

Like in Stow-on-Side, the gym is pretty much the same in Sword and Shield, minus the trainers and decorations.
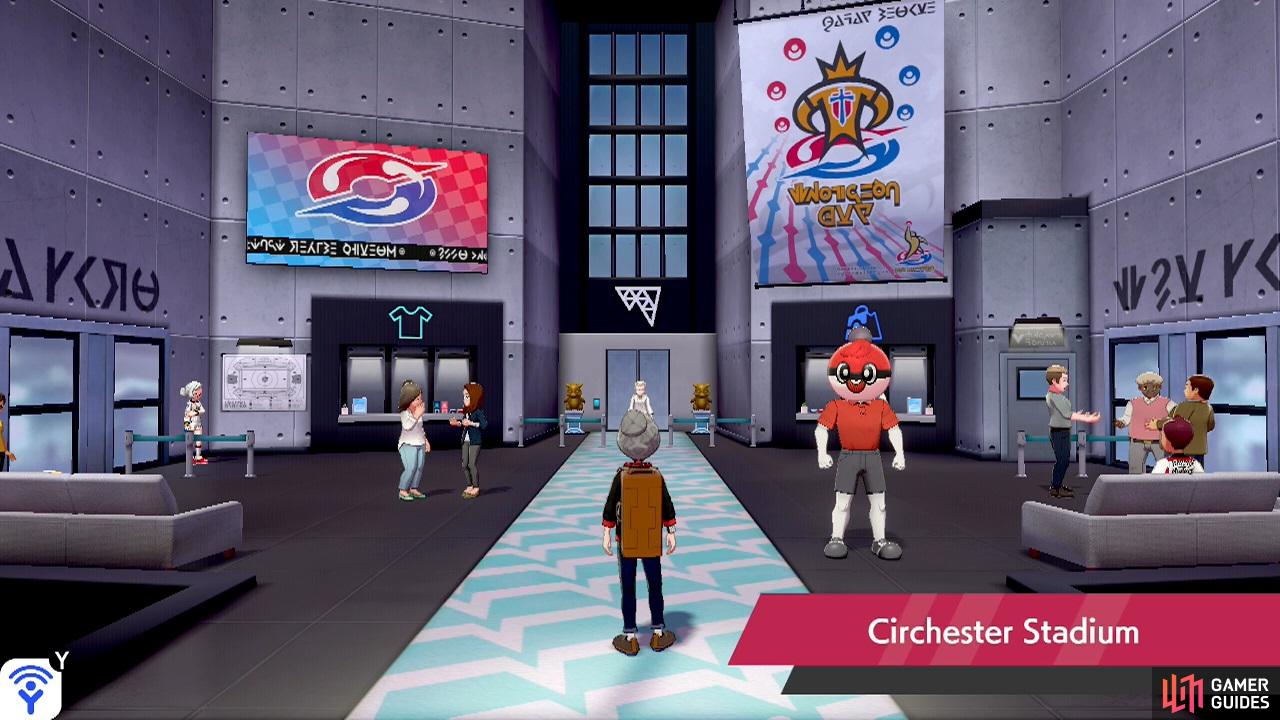
Regardless of what version you’re playing, as you enter the stadium, you’ll bump into Hop on his way out. You’ll receive Melony’s League Card from him. Once he’s gone, speak to the Ball Guy on the right. This time, you’ll be given a Moon Ball, a rare Poké Ball that’s good at catching Pokémon that evolve via Moon Stone. If you’re ready, speak to the staff member to begin the Gym mission.
This Gym mission makes use of the Nintendo Switch’s HD rumble feature. You’ll be given a trap detector, which reacts to hidden pitfalls in the gym. If there’s a nearby pitfall in the direction you’re facing, your Joy-con controllers will vibrate. The closer the pitfall, the bigger the vibration. Should you fall into a pitfall, you’ll return to the nearest solid platform.
Unfortunately, if you’re playing on a Nintendo Switch Lite (without rumble), you’ll have a much tougher time. Instead of vibrations, you’ll have to carefully watch the radio waves coming from the trap detector. If you see radio waves, it means a pitfall is nearby in the direction you’re facing. The faster the waves, the nearer the pitfall is.
Or you can follow our maps!
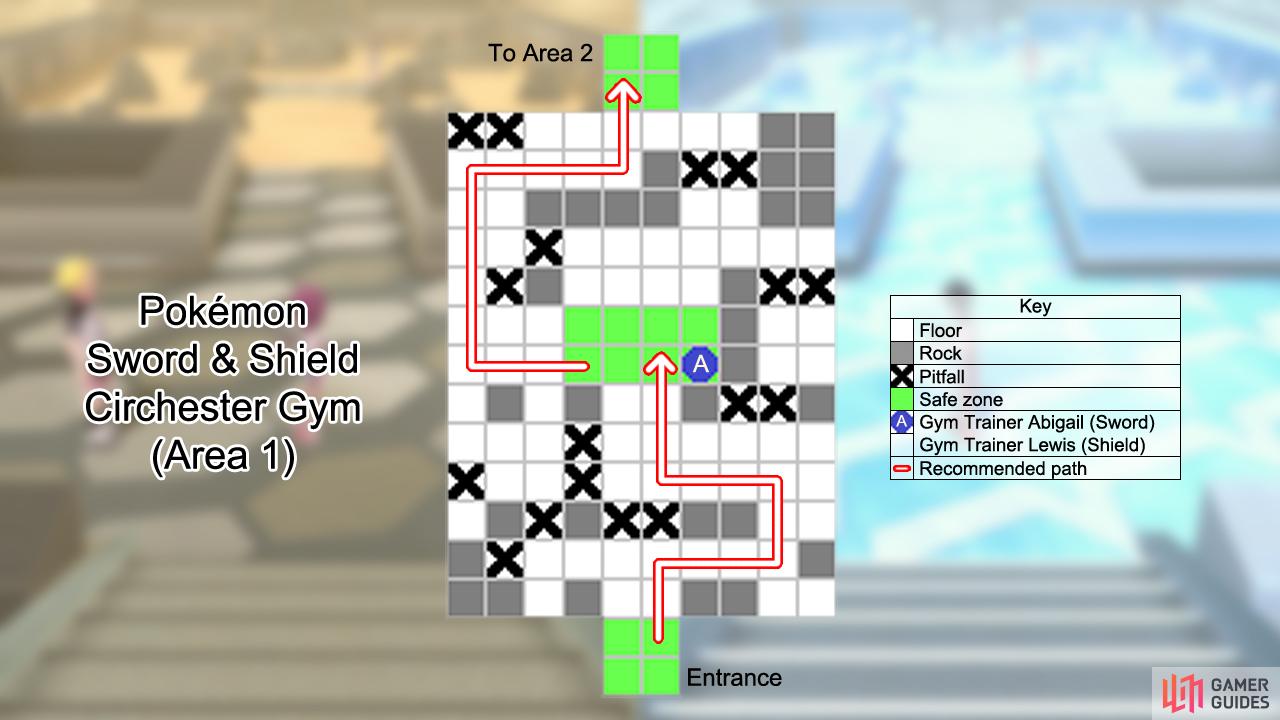
To start with, go forward a very short distance, then–as soon as you can–turn right towards the bottom-right corner. Next, go up a short distance and then turn left, so you’re opposite the entrance. From here, you can walk north onto the solid platform. Ahead, there’s a Gym trainer you’ll have to fight.
Gym Trainer Lewis
| Pokémon | Level | Type |
|---|---|---|
 Snom Snom |
38 | Ice/Bug |
Snom is a Bug Pokémon found in the cold part of Route 8. It takes 4x damage from Fire and Rock and 2x damage from Flying and Steel.
After defeating Lewis, go left from the platform, all the way to the wall. Then head north, while keeping close to the wall. As you approach the top-left corner, do not go all the way to the corner. Instead, turn right at the earliest opportunity. With luck, you’ll make it to the other side safely! After touching the exit, all of the pitfalls in the previous area will be revealed.
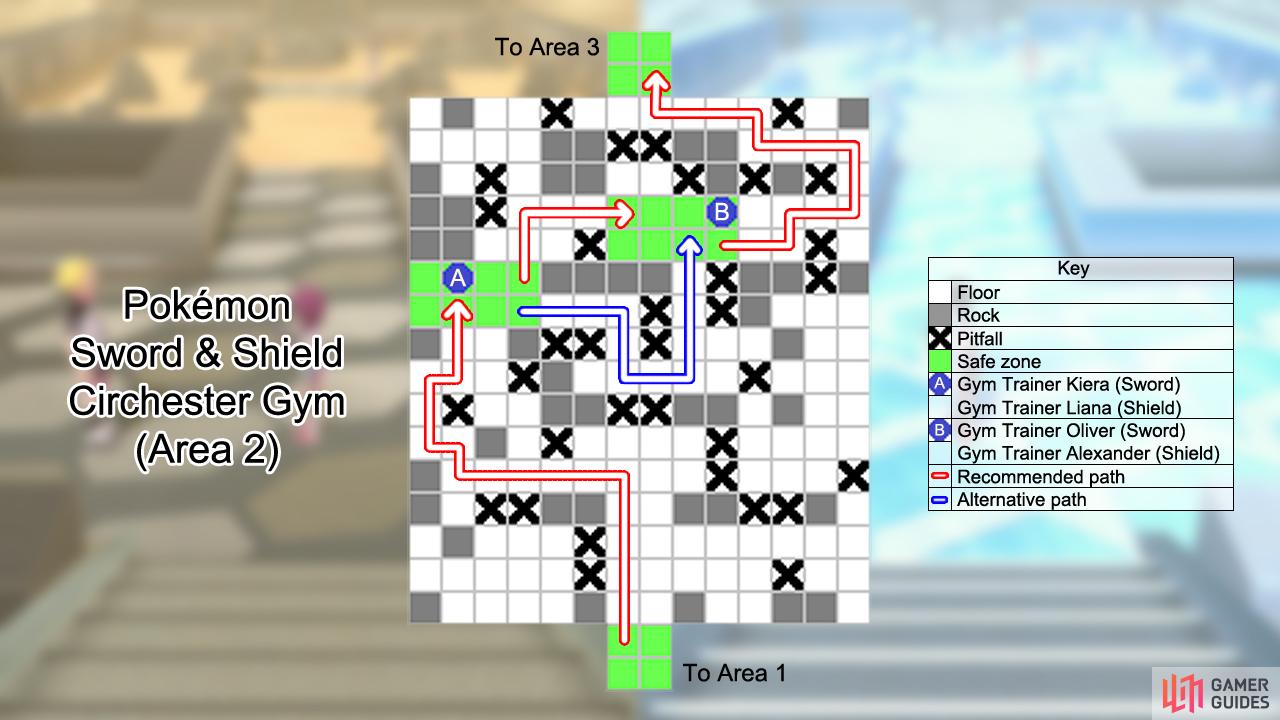
In the second area, things get a bit more tricky. Do you remember the old days when everything was confined to square tiles? Technically, these tiles still exist, but they’re harder to see because you can freely move between them. Anyway, try to imagine the floor as square tiles. Immediately to the left and the right are a pair of rocks.
Each of these rocks is a square tile. Meanwhile, the space in-between these two rocks are two square tiles. Does that make sense? If so, from the entrance, walk forward exactly 5 square tiles. You should have just gone past a second pair of rocks. Do not continue past the third pair of rocks. Instead, head directly west. Do not go up or down yet.
Keep going until you bump into the rock next to the wall. Hug this rock and go around to the top of the rock. You should be right next to the wall now. Follow the wall north to another rock. Then walk onto the solid platform just ahead. There will be a trainer here. It’s probably easier if you battle her. That said, you can avoid her by heading east.
Gym Trainer Liana
| Pokémon | Level | Type |
|---|---|---|
 Cloyster Cloyster |
38 | Water/Ice |
Cloyster is an evolved  Shellder. It’s weak to Grass, Electric, Rock and Fighting. Be careful as it can use Shell Smash to lower its defences, but boost its offensive stats and Speed. Use Electric-types if you can, especially special attackers as it has notoriously bad Special Defence.
If you fought Liana, you can head north from her position. But begin from the top-right corner of the solid platform. Walk 2 square tiles north, then 3 square tiles east to reach the next solid platform. Stop as soon as you reach the corner of this solid platform. That’s because there’s a trainer to the right.
Otherwise, if you plan to skip Liana, you’ll want to head east instead. From the bottom-right corner of her platform, go east exactly 3 square tiles. Then go south exactly 2 square tiles. After that, go east exactly 2 square tiles. Finally, head directly north towards the next solid platform. But do not walk onto the platform just yet, unless you want to fight the trainer.
To skip the trainer, if you came from the west (after defeating Liana), walk to the bottom-left corner of the platform. Wait for the trainer to look left, then quickly walk all the way east. If you came from the south (by skipping Liana), wait till the trainer is looking left, then step onto the platform and go east. Anyway, his details are below.
Gym Trainer Alexander
| Pokémon | Level | Type |
|---|---|---|
 Beartic Beartic |
39 | Ice |
Beartic is an evolved  Cubchoo. Since it’s a pure Ice-type, there isn’t much to say about it. It does know Swagger though, which has a uncanny tendency to make people scream in rage.
Either way, to proceed, you’ll need to head east from Alexander. After stepping off the solid platform, go east 1 square, then up 1 square. You should be just below a rock; in-between you and Alexander should be a space equal to 1 square. From here, head east towards the wall.
Next, head north towards the rock in the top-right corner. From the bottom of this rock, head directly west. Only go up when you bump into the next rock. Finally, continue west to reach the exit. If you thought that was bad, there’s still one more section to come!
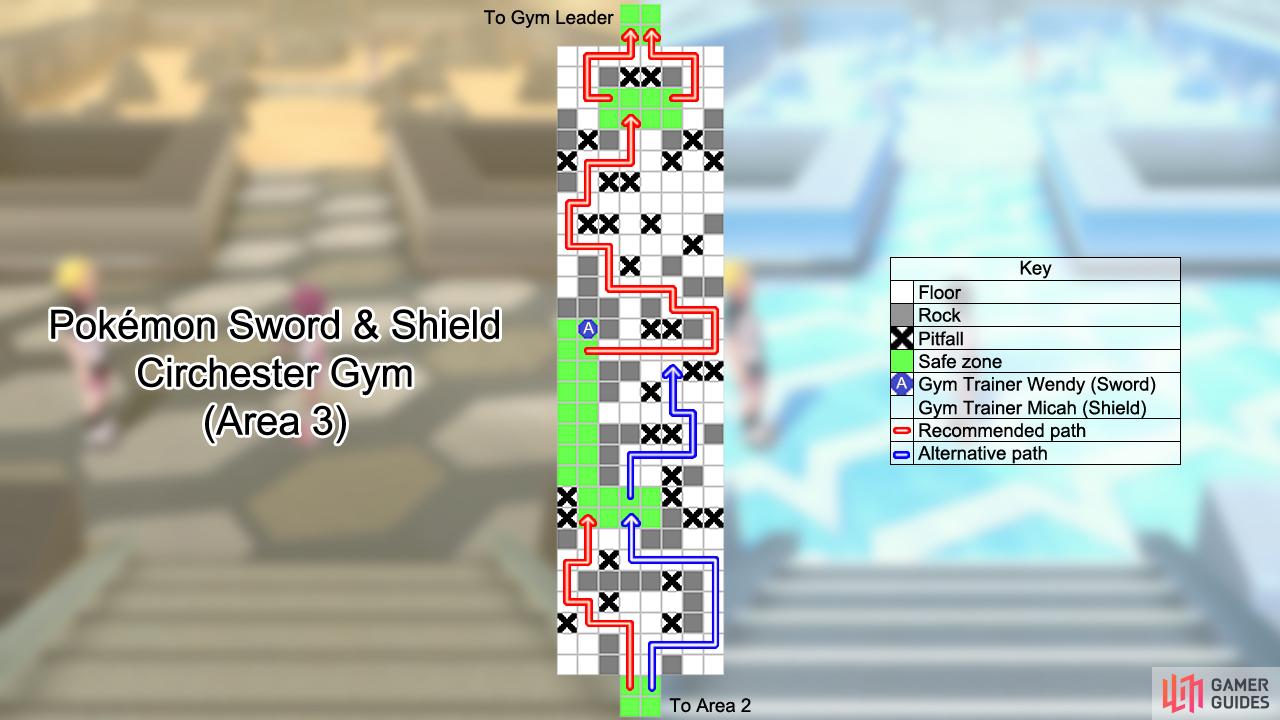
In the third and final section, there’s a twist. There’s a thick fog that makes it hard to see your surroundings. So you’ll have to rely on your trap detector more than ever. If you’re playing on a Switch Lite and made it OK so far, don’t worry as you can still see the radio waves through the fog. From the entrance, there are two directions you can go: left or right.
Left is shorter, but a little tricky. First, stand towards the left of the entrance. Go up a few paces while following the first rock on the left. After the rock ends, walk 2 squares left, 1 square up and 1 square left. You should be touching the wall. Now follow the wall north, until you bump into the rock. Then go right 1 square and up 2 squares to the next platform.
Right is slightly longer, but probably easier. Stand towards the right of the entrance. Go forward and turn right as early as you can. Keep going towards the wall. Next, follow the wall up, but stop the moment you go past the rocks on the left. Go left, then head up towards the next platform as soon as you can.
After arriving at the next platform, you can do this the easy way or the hard way. Easy way is just to follow the platform north, along the west side. But there’s a trainer at the far end of the platform, who’s difficult to avoid from this direction. That said, if you walk really slowly and look carefully through the fog, you can just about pull it off.
What you can do is stand 1 square above the line between the two vertical platforms. When the trainer is looking left, run up to him, then dash east. Or you could just meet him head on; he doesn’t take long to defeat. In any case, his details are below.
Gym Trainer Micah
| Pokémon | Level | Type |
|---|---|---|
 Avalugg Avalugg |
39 | Ice |
Avalugg is another pure Ice-type; this time, it’s evolved from an  Bergmite. There’s nothing here that should cause you any unwanted stress.
The hard way is to navigate north from the platform, but along the centre. You’ll easily avoid Micah, but the area is full of pitfalls and there are no platforms to act as safety nets. We strong recommend not going along this route, unless you really want to challenge yourself. In which case, godspeed! Oh, but we are writing a guide, so we should give you some tips at least.
From the horizontal platform, walk up 2 squares. Then go right, until there’s a rock below you. Next, go up 3 squares, left 1 square and up 3 squares. Are you managing so far? If you want a safety net, carefully head left. You’ll reach the platform where Micah is standing. When he’s looking left, step on the platform to “save” your position. From here, follow the easy way.
Back to the easy way, head all the right from Micah, towards the wall. Next, go forward until you reach the nearby rock, then head directly left to another rock. Go forward again to yet another rock. Then left to, you guessed it, a rock! Be careful now. Go up 2 squares, so you’re just past the rock on the left. Then walk left to the opposite wall. Head forward again, until you bump into a friendly rock.
Be extremely careful now. From the wall, walk right 1 square, up 2 squares, right 2 squares and up 2 squares to the next platform. That’s the hardest part done! From this platform, head left or right, then go around to the top. Ta-da, you made it to the end! From here, climb up the stairs to end the mission (although you’ll still be walking slowly). After that, it’s time to face the Gym Leader!
Gym Leader Melony

| Pokémon | Level | Type |
|---|---|---|
 Frosmoth Frosmoth |
40 | Ice/Bug |
 Darmanitan (Galarian) Darmanitan (Galarian) |
40 | Ice |
 Eiscue Eiscue |
41 | Ice |
 Lapras Lapras |
42 | Water/Ice |
Frosmoth is an evolved Snom; it takes 4x damage from Fire and Rock and 2x damage from Flying and Steel. If you have a Fire or Rock-type, it should go down in one hit.
Next, Melony may send out Galarian Darmanitan. It’s a pure Ice-type, but when it falls below 50% HP, it will change to Zen Mode and gain the Fire-type. Zen Mode takes 4x damage from Rock and 2x damage from Water, Ground and Fighting.
Her third Pokémon is Eiscue. In its initial form, Eiscue can take one physical hit without receiving damage, but then it will change form. If the weather changes to hail, Eiscue will return to its initial form. Use special moves if possible, or just slap it a couple of times.
Finally, she’s got a Lapras that will Gigantamax straight away. It’s weak to Grass, Electric, Rock and Fighting. Given the chance, it will use G-Max Resonance to deal damage and weaken its opponent’s damage for 5 turns. This can make Lapras even bulkier than usual, so super-effective moves will be key.
After shattering Melony’s Ice-types, you’ll receive the Ice Badge. When you’re back at the lobby, you’ll also be given TM27 Icy Wind and an Ice Uniform. Making sure you haven’t bruised yourself from falling down any pitfalls, exit the stadium to continue your journey.
No Comments