Making something with your own hands is a joy that never gets old.
So you can batter poor monsters to death and rob nature of its beautiful resources, what’s the next step for any self-professed entrepreneur? Why, it’s making things!
In Fantasy Life, there are a total of five craft-based Lives, whose sole job is to produce new items from materials you’ve gathered or bought.
Cooks deliver food, Tailors spin clothes, Blacksmiths forge metal objects, Carpenters craft wooden objects and Alchemists conjure up potions and trinklets.
Preparations
Besides their different skills, each Life works in a very similar manner. Equip your tool of choice, then approach your designated work bench. This can be found in your Master’s abode or in other towns.
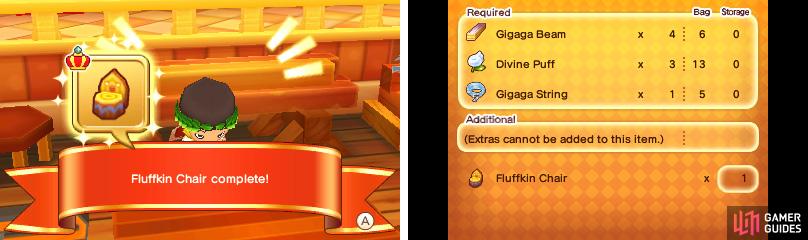
From here, you can pick a recipe to follow, from the ones you’ve learned. So long as you have all the ingredients and the minimum amount of them, you can get crafting!
Recipes can be obtained automatically by ranking up in each Life or from your Life colleagues. You can also check your Recipes by opening the Menu and navigating to the License section.
Your Work Bench
Once you’ve tried one craft Life, you’ve essentially tried them all.
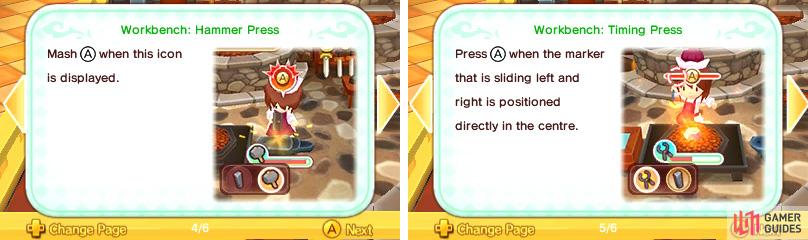
Crafting is essentially a rhythm game of sorts. There are three work spaces in each work bench and they can be one of three particular types.
- Mash the A button: Press the A button repeatedly. The faster, the better.
- Hold the A button: Yeah, just hold the A button. Couldn’t get any easier really.
- Time the A button: Press the A button when the moving cursor is over the “A” symbol.
The type and arrangement of work spaces depends on your crafting Life.
For instance, Blacksmiths have Hold A on the left, Time A in the centre and Mash A on the right. Tailors meanwhile have Mash A on the left, Time A in the centre and Time A on the right (but a faster moving cursor on the right).
Work Flow
Having identified your work spaces, you must follow the crafting process indicated in the bottom-left corner of the top screen, starting from the left-hand side.
The instructions are random each time and could be Mash A, Mash A, Time A. The game will also kindly provide prompts at each work space too.
At the start, the crafting process may only involve one step. For example, Mash A, Mash A, Time A like above. But as the items get more and more complicated, there will be multiple steps; you will of course have to complete all of them.
To check your current progress, refer to the Completion gauge in the top-left corner. Once it reaches 100%, your item will be completed and ready to go!
But be warned that you’re crafting against the clock, as indicated by the timer in the top-right corner.
Should you fail to reach 100% completion within the time limit, you will fail to create your item. Fortunately your materials will not be lost, but your time and effort will be!
Product Complete!

This ain’t just any Ghastly Stew, it’s Super Ghastly Stew. (So still ghastly…)
Depending on your Life, if you complete a project quickly and your relevant skill level is suitably high, you may produce high-quality items . These are rather coveted and sell for more in shops, as well as having better attributes.
For material objects, quality ranges from normal, Good (indicated by a standard crown), Great (a pronged crown) and Top (a magnificent crown). The better the quality, the better the item and the better its selling price.
For food and potions, you may produce “ Super “ versions, which are the best quality you can get.
Likewise, for ingots, beams, food and potions you can also produce more items than usual if you’re good. So while your project says it will produce 1 item, you might produce 1 extra, resulting in 2.
Human Factory
Finally, as you get more skilled with crafting the same item, you can begin to produce them in bulk , up to 10 at once. Of course you will need to provide the equivalent number of ingredients. Also producing in bulk results in less experience gained.
Then when you get even more familiar with the item, you can make it in your sleep! Or rather, automatically. Simply press the Y button during the crafting process to enter Auto Mode and your character will automatically do all the actions for you.
Of course, nothing comes without a price; items created in Auto Mode will be of lesser quality (until you craft enough for Auto Mode+) and experience gained will sharply drop.
No Comments