Read the letter in the mailbox

Well, well, you’re certainly rising up the popularity lists.
During the night, something occurs that will change the fate of Reveria forever…
Next morning, you’ll receive another letter, this time from the King.
Go to the castle
The King requests your presence at the Royal Court . For what reason, he doesn’t say but we could probably hazard a guess what it’s related to…
Go to the Royal Court
Upon setting foot inside the castle, you’ll be greeted by a long queue of townsfolk. There’s no need to be polite; just skip past them and go upstairs to immediately see the King.
Go to the Royal Court at the castle
Seeing the guards causing you bother, Professor Hughes swiftfully comes to the rescue. With the Professor by your side, nobody should have any complaints about letting you see the King, so go on through.
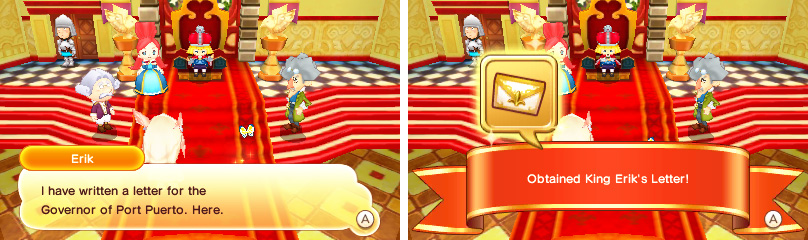
Once on the other side of the door, briskly step forward to meet the King, who’s sitting atop his throne as always.
The King explains that according to Hughes’s research, the Goddess’s Cogwheel is just one of the Goddess’s Treasures and there are two more in Reveria.
Your mission, whether you accept it or not, is to head to Port Puerto and inquire about their Goddess’s Treasure. To make matters more straightforward, you can show King Erik’s Letter when the time is right.
Leave the castle
You’ve got a big responsibility as the (makeshift) royal envoy.
With your task clear, you should leave the castle on your way to Port Puerto.
Go to Port Puerto
Outside, Flutter will suggest checking the map if you don’t know how to get to Port Puerto.
The road to Port Puerto is pretty simple, but quite long: from the East Grassy Plains, head north-west into the West Grassy Plains then head all the way to the far west.
We suggest going to South Castele to rent a horse from the stables, or go south a few paces to Falcon’s Garage and ride an airship straight to the West Grassy Plains, then run the rest of the journey.
After crossing the wooden bridge, Flutter will bring something to your attention: a nobleman just ahead is being set upon by a pack of Coyotes.
Save the young man from the monsters!
It’s just you against three Coyotes, so try not to be too reckless and use HP Potions if necessary.
Go to Port Puerto
Apparently the young man who you saved, Andy, can be found at the Port Puerto Palace. Which is lovely, but first you have to get to Port Puerto.
So stretch your legs and continue moving in a westerly direction, following the trodden path when you see it. Eventually you should catch sight of a magnificent white bridge leading north-west, towards the Port Puerto Beach District .
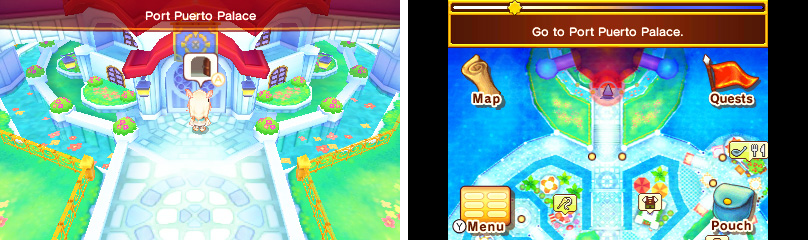
Go to Port Puerto Palace
Welcome to pretty Port Puerto, the place to be if you’re looking for some summer fun. But first, business to attend to….
Port Puerto is a big and bustling town that rivals Castele in size.
From the Beach District where you are, head north into the Marina and continue north towards the Palace Way . Guess where the palace itself is? Further north of course!
Inside, go forward, towards the staircase immediately ahead. Before going up though, turn right to find a previously-obscured black treasure chest, containing a cute pair of Ribbon-Laced Shoes . How sneaky!
Once that’s done, ascend the staircase and turn left or right at the end, to go upstairs to the Parlour. Next, follow the red carpet to find Andy ready and waiting for you at his office.
Also feel free to ransack the black treasure chest in the corner for a Silver Dagger ; nobody will tell you off.
Meet Olivia at the Pirate Port
Although Andy is welcome to see you and all too happy to help you (get fat, that is), he can’t make any decisions of his own. Instead, you’ll have to speak with his sister, Olivia, who’s the actual Governor.
She’s currently at the Pirate Port , situated along the west wing of the Marina, which you passed to get here. So take your leave and head back the way you came, turning left after passing the fruit and vegetable stall.
Step onto the wooden pier and follow the plank north-west, carefully avoiding the hazardous hole along the way. Just ahead, you should notice a curious little pirate gathering…
Take on the pirates!
It would seem Olivia ended up offending the pirates and a brawl between them breaks out. Naturally you’ll fight too, on Olivia’s side. It’s two versus three, so the odds are against you, but not by much.
Follow Olivia
After shooing away the pirates, Olivia coolly leaves the scene. Wait, didn’t you have something to show her?
Before that, head to your left and prise open the black treasure chest for a Seafarer’s Capris .
Now go up the stairs, onto the pirate ship deck and enter the Pirate Ship’s Cabin just ahead. Inside, Olivia stands pondering.
Go to the Port Puerto Beach District
After seeing King Erik’s Letter, Olivia’s pirate blood flares up and she agrees to help you search for Port Puerto’s Goddess’s Treasure.
Firstly though, you have to meet her at the Beach District . Why you couldn’t just head out together, we’ll never know. Leave the ship, then head south from the Marina to reach the beach.
Unfortunately you don’t know where exactly to meet Olivia, so just head west from the central Save crystal until you reach the shallow water.
No Comments