Go and meet the Mercenary master, Cervantes
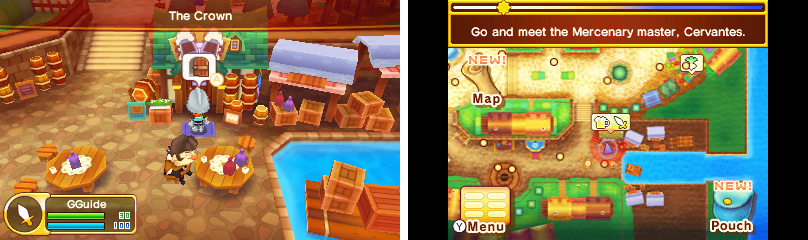
The Crown sits snugly in the corner of the Shopping District’s alleyway.
The Mercenary master, Cervantes, is waiting for you at The Crown , a rowdy tavern in the Castele Shopping District. From Castele Square, where you first set foot in town, head due west, over and past the Guild Office.
Once in the Shopping District, follow the street ahead until you go past a big tree in the middle of the road, then go down the stairs. To your right is the infamous The Crown; get your earplugs on and head on inside.
Cervantes is the steel-clad Mercenary standing in front of the stage just ahead. Speak to him and he’ll tell you all about the exciting adventures that come with the Mercenary Life. To get you on the road, he’ll present you with a Novice’s Claymore .
Speak to Bard at The Crown
No Mercenary is complete with a mission, so hop on over to the bar counter and strike up a conversation with Bard , the male proprietor.
There’s never a lack of work, it seems, and you’ll be given your first job: to sort out a problem at Giles’s Farm. Since you’re a Novice, you won’t be doing this alone–there’s already another Mercenary on the job.
Head out from The Crown
Exit The Crown the way you came and you’ll bump into the very Mercenary you’ve been partnered with: Jude. Er, wasn’t he supposed to be at the farm already?
Better grill him for details…
Go and speak to Jude, the Mercenary
Turns out the poor lad isn’t quite up to the task, but now that you’re here, there’s a chance we can turn the situation around. Firstly though, we need to learn how to use our Novice’s Claymore–and this includes Jude too.
Head to the field in West Castele

Greatswords are powerful weapons offering little defence.
From The Crown, head all the way west, past the big water fountain, taking the exit to West Castele . Once there, follow the path south, past the Airship Dock, then turn left towards the wooden bridge. Just across is the Proving Stone where you’ll train your sword.
Upon arrival, Jude will try his best to dent the Proving Stone, but to no avail. Just as he’s about to give up, a mysterious swordsman known as Miguel appears on the scene and properly teaches you the Greatsword Skill . Now you can equip and wield greatswords!
Equip your Novices Claymore
Naturally you can’t train your sword without first equipping it. So if you haven’t done so already, go to the Gear section in the Menu, then equip the Novice’s Claymore. After you’re properly kitted, speak to Miguel once more.
Break the Proving Stone!
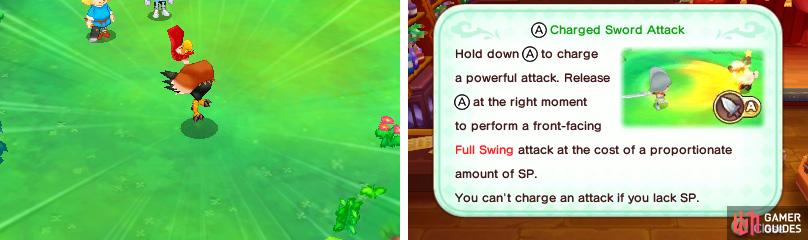
Now it’s time to break a little sweat. Press the A button to draw your greatsword and press A again to give it a good swing. Whoa, check out that range and power!
You can perform a three hit combo by standing still and pressing the A button consecutively or a dash attack by moving and then pressing A.
Either way, get close to the Proving Stone and smash it to bits with the A button.
Head to Giles farm in South Castele
Fantastic! If you can break a rock, you can break anything! So what was the task again? Some trouble at Giles’s Farm?
Return to the main path, before you crossed the wooden bridge, and follow it all the way south, into South Castele .
Giles’s Farm is located towards the east of South Castele. Simply run east until you reach the crossroads, where the Save crystal is, and you’ll find the farm a few paces away, north-east.
Once there, the root of the problem will become clear: a gang of carrot-like Carrotys are causing mayhem in the farm!
Defeat the Carrotys!

Jude’s useless here, so you’re on your own…
To no-one’s surprise, the solution to this problem is to defeat the Carrotys.
Draw your greatsword like you did earlier and give the Carrotys a good swinging and beating. There are three of them, so keep your distance if you can; your greatsword has decent range considering it’s a close-combat weapon.
Go back to The Crown in the Shopping District
With the Carrotys properly exterminated, it’s time to see if there’s anything else that needs our undue attention. Return to The Crown, heading north from the crossroads into Castele Square, then west into the Castele Shopping District.
Like before, chat to Bard behind the counter to see if anyone needs help. Lo and behold, there’s another problem waiting for us and a bigger problem at that: a fearsome Razorbeak !
This vicious creature is more dangerous than a Carroty, so Cervantes hastily teaches you the Full Swing skill, hoping it’ll be useful in your coming bout. We hope so too…
Head to the field in West Castele
The location of the Razorbeak is exactly the same as the Proving Stone, so head west through the Shopping District and exit towards West Castele. Then run south and across the wooden bridge leading west.
Defeat the Razorbeak!
There’s more than one way to skin… a Razorbeak.
After seeing your courage from earlier, Jude will now join in the fight. So it’s two rookie Mercenaries against one very angry Razorbeak!
You’ll also receive some encouragement and a HP Potion from Miguel. When the going gets tough, don’t hesitate to run to a corner and use the HP Potion (either via the Item menu or your Pouch) to restore health.
The Razorbeak has more health than the Carrotys, but it’s just one enemy so you can afford to take your time. If you want, use the Full Swing skill by holding down the A button (when your weapon is drawn) and releasing the button after hearing the chime.
Report back to Cervantes
When the Razorbeak is toast, give yourself a pat on the back. Oh and count the 500 dosh awarded to you by the grateful farmer.
With a job well done, run all the way back to The Crown and speak to Cervantes to receive a report. Ta-da! You’re now a full-fledged… or rather, Fledgling Mercenary ! (Yes, we know there’s a big difference between the two.)
No Comments