Tips
Only one task remains for a God Alchemist such as yourself. Speak to your master, Flamel, in the Royal Castele Library and he’ll ask you to craft a forbidden Djinn Talisman using materials found inside Drysand Desert’s Subterranean Lake.
Before setting out on your expedition, switch to your favourite (i.e. strongest) combat-based Life and drag along two dependable allies–including one who can cure status, such as Yuelia.
As soon as you enter the cave, you should notice some powerful Skullblobs lurking inside. Careful navigate your way around the cave, keeping your eyes peeled for any shiny objects on the floor–these are the Sorcery Powders you need.
If you thoroughly search the place, you should find exactly five powders–usually in the north-west corner, towards the south and some near the centre. But if not, come back again after visiting two areas in succession to respawn the shiny spots.
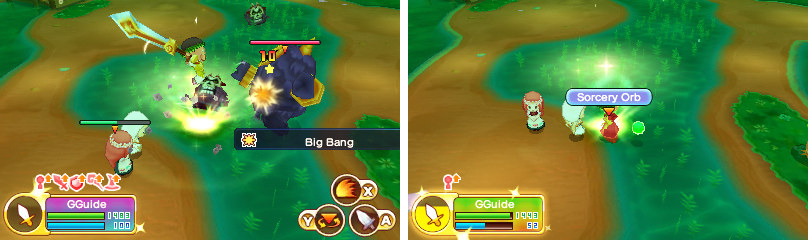
Towards the centre, you’ll really need to get your game on, as you must battle an Enchanted Golem to retrieve its highly-coveted Sorcery Orb . At the beginning of the fight, try to clear away the Skullblob subordinates so you don’t have to dance around as much.
It’s a battle and a half, but the final reward–the Djinn Talisman–is worth all the effort
The Enchanted Golem is essentially a souped up golem, but it’s far tougher than any golem you may have faced. For starters, most of its attacks inflict Poison–and deadly poison too, hence the need for an ally who can cure statue.
Its standard attack is a simple punch, which still whacks off a good amount of HP. Next, it may scoop up the ground in front of it and unleash a dangerous poison blast forward. Both attacks are quick, so do your best to keep moving to avoid them.
Sometimes, the golem may pause and look down, which means it’s about to leap into the air and liberally body slam any unfortunate sap standing in front of it. If you somehow survived the slam, stand back because the attack isn’t over just yet…
Afterwards, the golem will remain underground, before popping out mid-way, inflicting additional damage to anyone nearby. It will then remain half-burrowed and completely vulnerable for a few seconds, which is an excellent opportunity to have your sweet revenge.
Finally, the golem may charge up power and then launch a power punch forward. After using this attack, you should notice the golem just standing there, sweating sweat drops. Again, this is a great chance for you to attack while the golem is harmless.
When you’ve finally sent the golem packing, it’s time to head back home with all your new-found materials. Although, if you need to restock on Wonderful String , you can quickly visit Baste the parrot in Madam Purl’s house, near the centre of Port Puerto’s Palace Way.
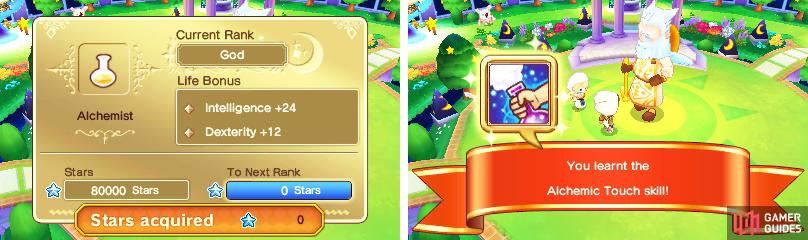
As for the crafting itself, it’s a piece of cake, especially once you realise how amazingly broken your God Skill is. To really make the most of your God Skill, you can try stacking Crafting Special Skill rate bonuses; with enough, you can make most items in 30 seconds or less!
We recommend a Big Bang Flask crafted with an Ancient Stone+ (dropped by Giant Mimics in the Trial of Time) and a God Material (eg. Love Orb) to get Crafting S. Skill rate +35% on top of the natural +25%.
Then to further boost the rate, see if you can pull Leilah’s Floral Circlet (rate +25%) from the Elderwood Village Goddess Statue and get yourself a Sun Ring (rate x2) from the Exchange Clerk in Pam’s House.
By the way, the Djinn Talisman is a great accessory for any Mercenary, Paladin or Hunter, so do yourself a favour and craft one for yourself when you have time. If you’re really lucky, you can even add Attack +20 using just God Materials for overkill attack.
No Comments