5th Floor
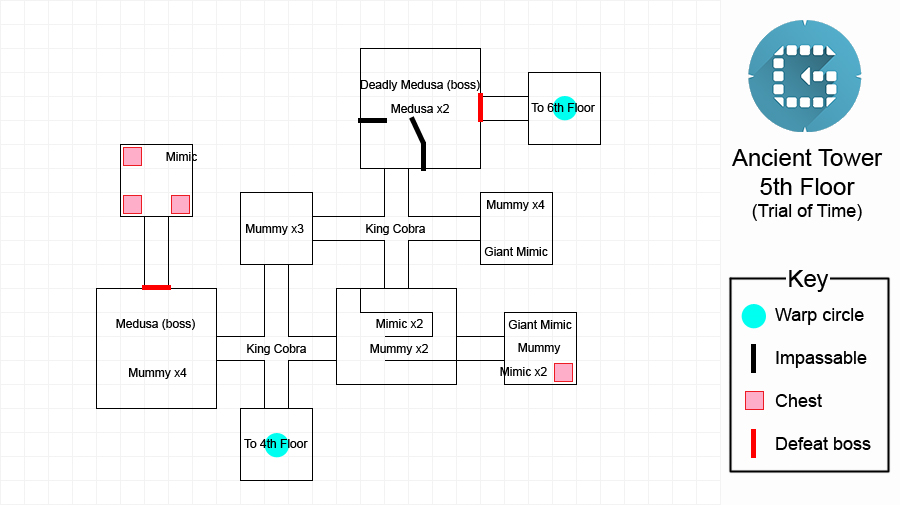
It’s a mini-maze again, this time filled with mummies, mimics and nasty snake bosses.
From the first crossroad, you can head west to challenge a Medusa and four mummies for the chance to unlock the passage to three nifty treasure chests (the fourth one is a Mimic!).
Despite its name, Medusa cannot petrify you, so rest easy; in fact, it’s a pretty simple mini-boss. For its basic attacks, it will quickly snap forward to bite you or pull backwards and then pounce, causing Poison upon contact.
To mix things up, it can breathe fire a medium distance or swipe its tail around itself, also inflicting Fire-based damage. Because of its short range, ranged attackers will have the easiest time, although its attacks are hardly a threat in the first place.
A tip for God-ranked craftsmen: the Giant Mimics rarely drop an Ancient Stone+ upon defeat (as an item bag, not from the bounty). If you really need an Ancient Stone+, feel free to re-enter this floor to respawn the Giant Mimics.
Towards the north-east of the floor is the main boss: a Deadly Medusa . As it happens, this giant Medusa shares its lair with two weaker but still formidable Medusas.
Not just that, but it shares most of the same moves too. Funnily enough, the Deadly Medusa’s shadow breath is much easier to avoid and can be fully avoided by sticking close to the Medusa’s body.
That said, getting close has its disadvantages too, as the Deadly Medusa’s tail swipe has a much wider range and inflicts Poison to boot.
Upon slaying the Deadly Medusa, you may receive a rare Spell Stone+ as an item drop (not from the bounty). Either way, the door to the next warp circle will open.
6th Floor
Try to separate the weaker golems so you can easily get rid of them first.
Welcome to the next easy outdoor floor… Hang on a moment, it’s a mini-boss arena! To progress, you must topple the Dark Giant , a fearsome golem who’s also brought along two Berserk Giant buddies.
We already discussed the Dark Giant’s attacks earlier on, on the 3rd floor, but if you skipped that battle, be sure to go back a few pages to read up on the details.
Naturally, we recommend getting rid of the weaker Berserk Giants first, although that’s no mean feat due to their similar, painful attacks–the mega punch and rotating arms.
That said, the golems are all slow-moving, so you should be able to lure them one by one or at least let your allies distract the other golems.
7th Floor
On this penultimate floor, you can finally Save your game at the Save crystal, cash in any bounties or restock on supplies from the Fluffkin clerk.
Of note, you can buy Ancient Stones and Divinus Appliqués from the Fluffkin, items that are useful, but difficult to find elsewhere.
It’s not immediately obvious, but before advancing to the next floor, shake the two apple trees on either side. This is the easiest way to collect rare Golden Apples , used for crafting stat-boosting candies.
8th Floor

Silly guy, getting his club stuck in the ground like that…
Good job on reaching the final floor, but you know what this means, right? It’s time to take on the tower boss–the Killertaur in this case.
From his name and appearance, you can probably tell he’s basically a Strongertaur (geddit? Stronger Strongtaur?). To start with, he may pound with his giant club, which also creates a line of fire ahead.
To turn up the heat, he may generate a fiery whirlwind around himself and ahead, before pounding forward, again unleashing a line of fire in the process.
When he tires of clubbing, he may leap into the air and create a fiery explosion when he lands. However, he will get his club stuck in the ground, giving you ample time to get some safe hits in.
Once Killertaur’s HP starts plummeting, he will roar loudly, briefly interrupting your movements, before rolling forward to cause damage.
Additionally, after creating a fiery whirlwind, he will transition into his leaping attack instead of pounding forward.
Because of his large size and wild attacks, you’re unlikely to escape this battle unscathed, so do your best to watch your HP and remember to sip any potions when necessary.
After hopefully defeating Killertaur, the way ahead will be unlocked.
For your information, the treasure chests at the top of the tower always yield the best items. If you have the Treasure Gloves (obtained from the Exchange Clerk in Pam’s house), be sure to equip them if you haven’t already done so.
Once you’ve grabbed your share of treasure, inspect the Goddess’s statue to warp back to the base of the tower, preferably with the Killertaur’s bounty behind you.
No Comments