9th Floor
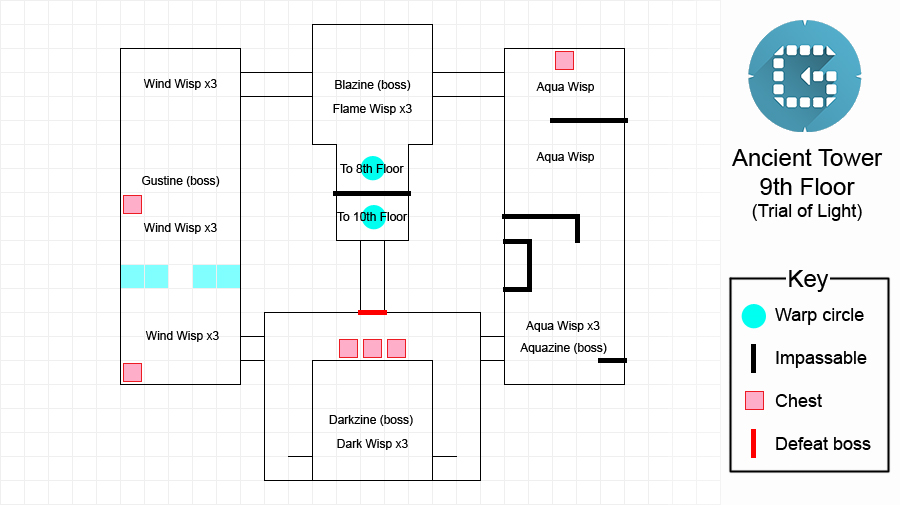
This is the final floor that needs a map, although you probably won’t have too much trouble finding your way around.
On this floor, you’ll face nothing but elemental wisps and the boss variants. However the only requirement to proceed is to to defeat the Darkzine to the far south.
The boss wisps can all be found on Origin Island, so they should be familiar to some. In any case, their regular attack involves casting a ball of elemental magic ahead like a regular wisp.
More annoyingly, they may surround themselves with damaging elemental magic, then stomp ahead, creating a minor splash effect.
Whether you’re a melee or ranged attacker, you’re unlikely to avoid all damage. So if you have any armour with high Magic Defence and/or elemental resistances, change into them now to reduce the damage you take.
10th Floor
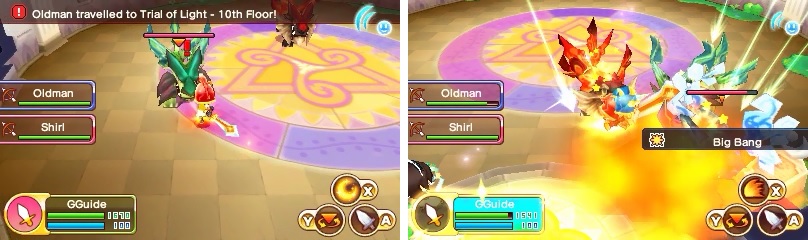
If you must take on all three at once, use your God and Special skills wisely.
Prepare yourself before you enter this penultimate boss floor, as you must contend with not one but three bosses: the mythical beast trio consisting of Blazilion, Aqualion and Gustilion.
Each boss has the same attack patterns, so study them carefully before or as you fight. To ease you in, the beast may quickly bite forward or jump back and then pounce a short distance ahead.
If the beast jumps back and roars instead of pouncing, this means it’s about to charge forward a great distance. Of course, if you see a beast jump back, get ready to move out of the way if you can.
Next, the beast may briefly stand up, before launching an elemental (fire, water or wind depending on which beast) attack forward. This attack has a long range and the fire breath in particular can cause consecutive damage.
To mitigate the damage you take, try to equip yourself with armour with high Magic Defence or elemental resistance. The biting and pouncing isn’t difficult to tank; it’s the elemental damage that really hurts most.
It’s difficult because of the confined space you’re fighting in, but if possible try to take on the beasts one at a time–at least for as long as you’re able to. One beast is hard to handle by itself; having to take on all three at once is an extremely challenging task.
Not to mention each of the beasts drops a valuable bounty and you ideally want to preserve as many as possible–an easier task if you don’t have any beasts nearby trying to attack your bounty.
11th Floor
Assuming you survived the previous onslaught, welcome to the calm before the storm.
Needless to say, make your preparations, shake any apple trees and then save your game before you step into the final warp circle.
12th Floor
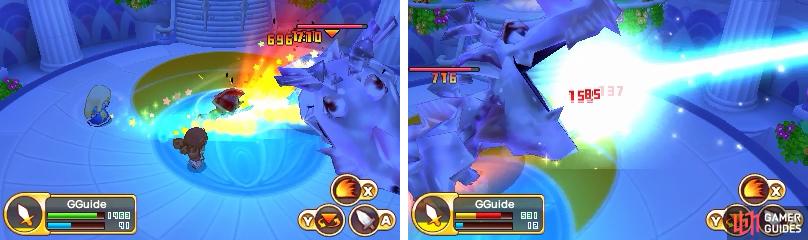
Avoid the front unless you want to risk a laser in your face…
The final boss of this trial is the Crystal Dragon , one of the strongest Napdragon variants in the game.
For its attacks, the dragon may use its signature jaw chomp attack, which now has a light-element effect to extend its range. It may also flap its wings, then hop on the spot, creating several damaging sparkles of light around it.
When you see the dragon pull its head back, like it does for a dragon breath attack, get out the way or use an attack with temporary invincibility as the dragon will unleash a massive and powerful beam of light that reaches the entre arena.
Around the half HP mark, the Crystal Dragon will occasionally roar into the sky, creating powerful shockwaves that interrupt your moves. Disarm your weapon to tell your allies to stop attacking, then run in a circle around the arena.
Why? Do you even need to ask? After roaring, the dragon will stampede forward, while shooting powerful beams of lasers in front of it. Although if you’re a Hunter or have Fern as an ally, you can attempt to inflict Stun to interrupt this attack.
Additionally, the dragon will start to uses its tail swipe attack (I bet some of you were wondering where it went) followed by its jaw chomp. If you get hit by the tail swipe, don’t bother going back in unless you want to get bitten.
This battle is mainly troublesome due to the relatively small size of the arena and the relatively big size of the dragon, making it hard to avoid attacks.
The easiest way to handle the dragon is to let your allies distract it, while you focus your attacks on its back or sides–that way you’ll avoid its annoying jaw chomp and beam of light attacks.
No Comments