5th Floor
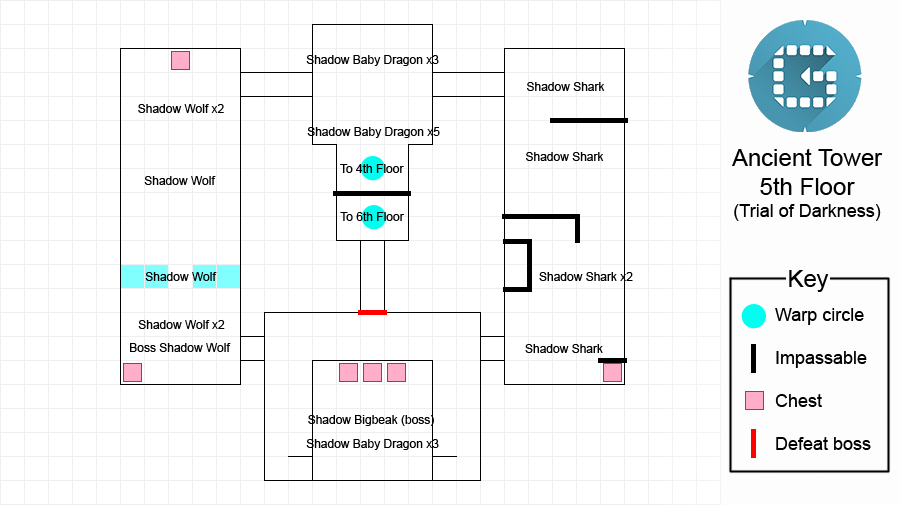
As soon as you materialise on this floor, get ready to run as you’ll be surrounded by five tricky Shadow Baby Dragons, with an additional three further north.
If you break free and pick off the dragons one by one, they’re not so bad. However if you foolishly delay or attempt to stand your guard, you’re liable to get interrupted until you’re on the floor.
After surviving the ambush, you can opt to take the east passage or west passage–both lead lead towards the exit and both are full of dangerous shadowy monsters.
Once you reach the south part of the floor, you must fell a Shadow Bigbeak before you can unlock the door to the next warp circle.
Hero Hunters will have faced this boss before; if you need tips or a refresher, refer to the Hunter’s Hero Rank page in the Life Walkthrough section of our guide.
6th Floor
In the middle of this floor you must slay a trio of Shadow Gargoyles to proceed. If you recall, you’ll have encountered one halfway along the 2nd Floor.
A Shadow Gargoyle by itself is fairly tricky, but definitely manageable; however when you’re faced with three at once, the battle becomes exponentially harder as you have to deal with multiple wide-ranged and highly-damaging attacks.
If possible, try to lure the gargoyles one at a time or have your allies distract two of the gargoyles while you focus on one of them. Much easier than going all rambo and getting yourself needlessly beat up.
7th Floor
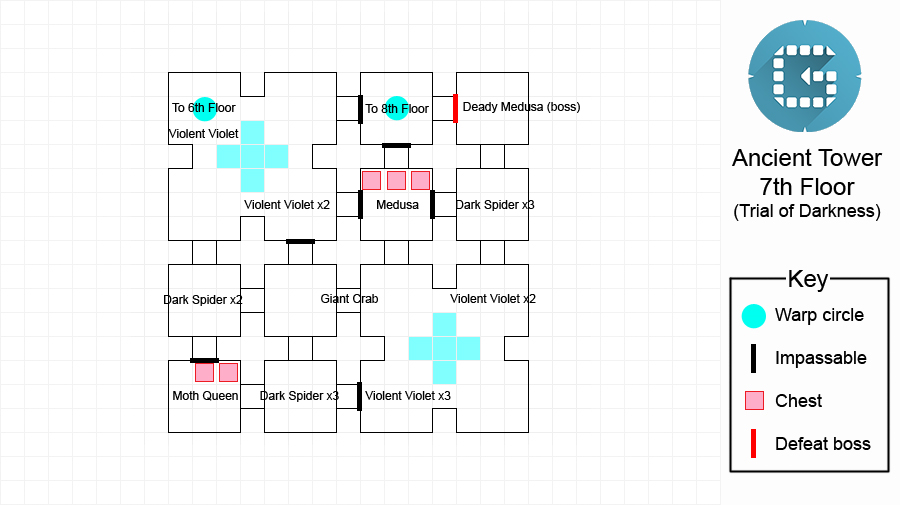
Sensing a bit of deja vu? It’s not just you… the layout for this floor is copied from the 3rd floor, but the monsters and path are different.
To begin with, head south until you reach a room with two Dark Spiders, then turn right to find a Giant (Enemy) Crab. If you visited Penguin Beach, you may have wrestled with the Giant Crab ; the strategy to defeat it is no different here.
That said, initially, the area you’re fighting in is rather narrow and cramped, so do yourself a favour and lure the Giant Crab out of the corridor before you fight it. Or you can run past it… either way works.
If you head south before the Giant Crab, you can find two treasure chests guarded by a Moth Queen. Meanwhile, heading north after the Giant Crab will take you towards three treasure chests watched over by a Medusa.
To progress, keep heading east-ward from the Giant Crab until you hit the wall, then travel north. In the north-east corner, you’ll need to defeat another Deadly Medusa to open the way ahead, but this one’s easy without any lackeys to annoy you.
8th Floor
This floor houses the trial’s penultimate boss: a Shadow Dragon with three Baby Shadow Dragons by its side.
Hero Paladins ought to recognise the Shadow Dragon, a tricky foe often encountered in the Dark Void. If you need detailed tips for this boss, please refer to the Paladin’s Hero Rank page in the Life Walkthrough.
9th Floor
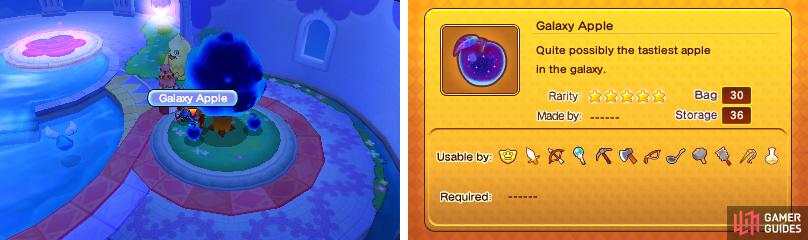
These apple trees look suspiciously like the ones in Divinus’s Garden… oh well, munch
The resting floor doesn’t really need a guide, but if you’re not aware, you can shake the two apple trees to obtain some rare Galaxy Apples .
As always on this floor, there’s a bounty clerk, although none of the bounties you’ll have picked up contain anything to shout home about. But if you have any bounties, do cash them in of course.
10th Floor
The final boss of the Trial of Darkness–the Demon Master –is both formidable and impressive. It is essentially a massive gargoyle, but it has many tricks up its sleeve besides its size.
To start with, the Demon Master often uses its claw to attack forward in a wide arc. This attack has impressive range, easily covering a third of the arena, but can be evaded if you find a good space; for example, behind or to the side of the boss.
When the Demon Master gathers energy, it will breathe a shadowy breath forward. This attack has similar range to the claws and can cause consecutive damage if you’re caught, but should be more easily avoidable because of the boss projecting the attack.
To really show off its power, the Demon Master occasionally pauses, becoming briefly invulnerable, before casting a ring of damaging magic circles a mid-distance away from itself.
You can stay close or run towards the Demon Master to completely evade this attack. If you can, keep your ear out for a weird “flickering” sound effect, which means this attack is going to be cast.
Once the Demon Master’s HP goes below half, it will surround itself with non-damaging shadowy flames, before summoning lightning bolts around itself and finish by casting giant magic circles under itself and around itself in a ring.
This attack has humongous range, but if you can keep your cool and don’t get knocked back by the lightning, you can step in the small areas between each magic circle to keep safe. Your allies won’t be as smart though.
You can also listen out for a “flaming” sound effect, which means the Demon Master is about to cast this attack. Then run away or activate your God skill or special skill to become briefly invulnerable and cause damage at the same time.
From this point, the Demon Master will swipe two times with each claw by default. It may also charge up power, while in the middle of a swiping motion, and swipe four times in a row. If you’re a Paladin, shield to block; otherwise, don’t attack so your weapon’s auto-guard kicks in.
This battle is definitely one of the more challenging ones and one where positioning is very important. Try your best to observe the Demon Master’s position before you attack and you’ll likely take much less damage that way.

 Sign up
No Comments