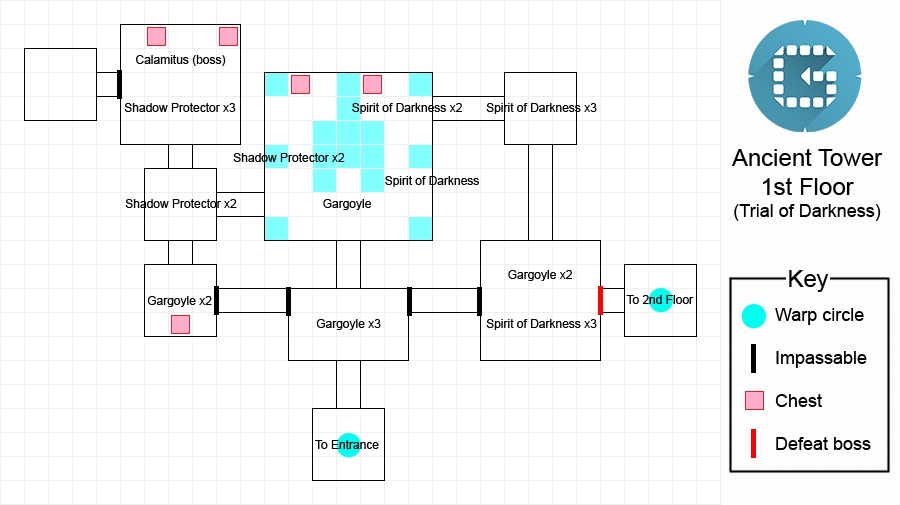
1st Floor
Unsurprisingly, the second trial ramps up the difficulty and we strongly recommend completing the previous trial first before attempting this one.
From the entrance, you’ll encounter three Gargoyles within close proximity of one another; these tricky fiends do not appear elsewhere and are mildly challenging, so keep your wits about you.
Past the Gargoyles, you can head directly north into the central fountain room, where you can once again gather shiny Goddess’s Beads from the edge of the fountain (north of a lone Gargoyle).
At this point, you can head west for some additional treasure chests, plus an optional battle with Calamitus towards the north-west corner. Hero Magicians will have faced Calamitus before, but if that’s not you then feel free to check the Magician’s Hero Rank page.
Meanwhile, the east passage ends with a surprisingly easy challenge against a pair of Gargoyles and three Spirits of Darkness. We say “easy”, but as always, exercise caution and try not to get ganged up or cornered.
2nd Floor
Upstairs, you’ll be fighting your way through a bunch of Gargoyles, before bumping into a stronger Shadow Gargoyle and two Dark Wisps near the centre.
Like the Desert Tyrant in the Trial of Time, you don’t need to defeat the boss to finish this floor, but it’s worth a punt if you’re reasonably strong.
The Shadow Gargoyle’s standard attack is a quick slash with its claws. If you’re standing afar, watch out for its long-ranged shadow breath attack, which will inflict Poison if it connects.
Lastly, the sinister Gargoyle may float up, becoming temporarily invulnerable, before dropping a shadowy shockwave around itself.
3rd Floor

The third floor is probably the maziest of the lot. From the initial warp circle, head north until you reach a barrier, then keep moving west-ward.
After fighting your way through multiple Dark Wisps, you must slay a Bloodmon to continue. This fiendish critter is fairly easy to exterminate, but can cause annoyance if you’re careless.
When you hear shrill laughter, the Bloodmon will breathe fire a short distance ahead of it. Meanwhile, a “bouncing” sound effect means the Bloodmon is about to stomp ahead.
…And that’s it. The only way you’d sustain any real damage is if you manage to get yourself cornered, then trapped by the Bloodmon’s fire breath. Otherwise, you can easily avoid all of its attacks.
Before continuing north from the Bloodmon, head south to loot three treasure chests. Once you’re satisfied, head through the newly-opened door and continue north, heading east-ward when you reach the top-left corner.
After cutting through a bunch of lesser Darkmons, you’ll encounter another Bloodmon , this time with two Darkmons as bodyguards. Again, you must defeat the Bloodmon to continue, but it’ll be slightly trickier with the Darkmons around.
Further east is the warp circle to the next floor, but if you desire additional treasures, head south for another set of treasure chests.
4th Floor
Almost halfway there now… Hopefully you’re still hanging in there.
Near the entrance is a helpful Bounty Clerk, ready to accept any bounties you may have picked up. No bounties? No problem; none of the ones so far are that valuable.
When you reach the middle of the floor, ready yourself for a tricky fight with a Hell Gigante . God-in-Training Mercenaries may have fought this hell beast before; either way, please refer to the Mercenary’s God-in-Training page for strategies.
The only difference in this battle is the smaller arena, which leaves little opportunities to evade attacks. Have those potions at the ready and cross your fingers that the Gigante chases after your allies rather than you.

 Sign up
No Comments