Read the letter in your mailbox
The King is really starting to rely on you now.
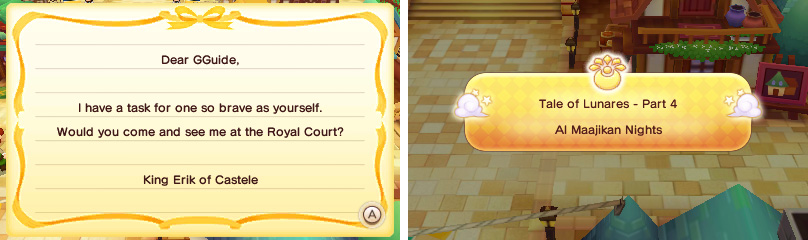
Well, what do you know? It’s another letter from the King. It should be pretty obvious what the letter is about by now, but let’s read it anyway!
Go to the Royal Court
Yup, it’s another royal summons. You know the drill: head on over to the Castele Castle Royal Court to see what the King’s got planned for you this time.
Leave the castle
To no-one’s surprise, your mission is to head to Al Maajik in search of the third and final Goddess’s Treasure. Common courtesy dictates you should give Al Maajik’s ruler, the Dark Sultan, King Erik’s Letter to let him know what’s going as well.
This trip sounds more dangerous than the last, but the fate of the world is at stake. In any case, before you can begin your next adventure you’ll have to leave the castle.
Go to Al Maajik
Outside, Flutter reminds you to check the map in case you don’t know where Al Maajik is. If you weren’t sure, you can reach Al Maajik by heading south from the West Grassy Plains.
More specifically, just before you go north-west into Port Puerto, go south across the wooden bridge instead and follow the path east, then south.
Right before the entrance, there’s a small camp site, where you can rest and restock on supplies. Past the camp site is the border between Port Puerto and Al Maajik and beyond the border the Desertward Ravine .
In the ravine, you’ll immediately come to a halt after crossing the first suspension bridge. Uh oh… It’s a monster ambush!
Fight off the monsters!
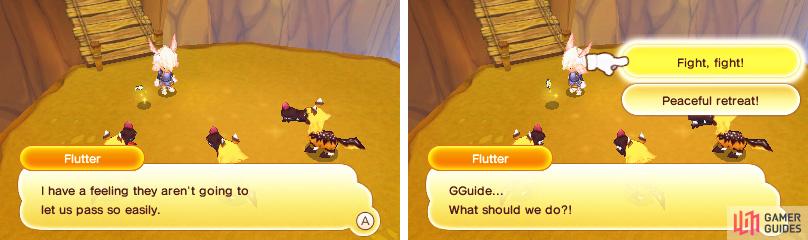
I think we’re on the menu…
You don’t have to tell us twice!
It’s just you versus three Jackals, which is hardly fair. But if you quickly circle around them, you can pick them off by one.
Go to Al Maajik
With the path ahead clear of monsters, you’re free to carry on south-west towards the Al Maajik Outskirts . There will be more Jackals along the way, but you can just run past these or lure them from a safe distance.
Go to the Dark Sultans Fortress
Upon arriving in Al Maajik you’ll stumble upon Magnificus, a “heroic” knight who’s determined to vanquish the Dark Sultan. Whatever his motives, you’re both going to see the Dark Sultan, so you might as well tag along.
From the town outskirts where you currently are, head in a north-easterly direction towards the Al Maajik Sandtown. After Magnificus’s little outburst, continue north into the Al Maajik Spelltown. Then further north to the Al Maajik Bridge .
The Dark Sultan’s Fortress will come into view, but there’s still a long road ahead. Don’t hesitate now (unlike Magnificus) and keep marching forward!
Just before the entrance, Eldred the Dark Mage will welcome you with Al Maajik’s special brand of “hospitality”. In other words… bring it on!
Take on the Maajiknights!
It’s time to test your mettle against three of Al Maajik’s renowned Maajiknights. You won’t be alone this time as you’ve got Magnificus to act as a decoy. The guy has got some guts at least.
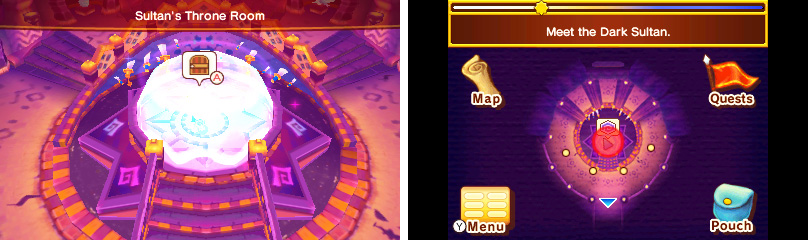
Meet the Dark Sultan
Magic sure is convenient; we wouldn’t want to walk up all those stairs.
After showing the Maajiknights who’s boss, the Dark Sultan grants you passage to his foreboding fortress… if you’re not too scared that is.
Wimpy Magnificus decides he’ll just worm his way out, so don’t expect any backup. You’re better than him though, so swing open that door and go through to the Hall .
Inside, walk into the magic sphere ahead and press the A button to transport yourself to the Sultan’s Throne Room . Then step forward to meet the fabled Dark Sultan himself…
Stay at the Al Maajik Inn
Now that wasn’t so bad, although it doesn’t look like you can do anything right now. For now, all you can do is rest in the inn.
Return south to the Spelltown, then further south, back into the Sandtown. The inn where you can stay is down the stairs to your left, on the right.

 Sign up
No Comments