
This page details how to complete the Spire quest in the Halo Infinite campaign. Includes how to defeat the Hunters beneath the Spire, and how to defeat the Adjutant Resolution boss. This quest begins immediately after Conservatory.
How to Complete Spire
The first thing you’ll need to do is reach the area beneath the Spire structure. The surrounding region is littered with Brutes, Jackals, and Grunts, some of which are using Ghost vehicles. These can be particularly annoying to deal with as they move at high speeds, but one of the most effective ways of defeating them is by using Grappleshot to latch onto the vehicle, then kick the pilot out of it and take control. You can then use the vehicle to defeat other enemies in the region relatively quickly. However, if you’d rather not waste time doing this you can run directly to the area beneath the Spire to face the two elite Hunters, but keep in mind that the fight will be more difficult since you’ll need to defeat some of the other Brutes, Jackals, and Grunts which will pursue you.
How to Defeat the Hunters Beneath the Spire
As you reach the platform area directly beneath the Spire structure, you’ll encounter two new enemies known as Hunters. These are extremely tough elite units who have excellent armor, a shield, and highly destructive energy weapons. They tend to move slowly most of the time, but they can easily catch you off guard as they sometimes speed up and chase you down, often when you least expect it. You therefore need to be highly vigilant of these swift attacks, since it only takes a few blasts of their powerful weapons to finish you off. Although you can kill Hunters with any weapon type, you’ll find the process a lot easier and a lot faster if you use highly damaging power weapons such as a Skewer, Ravager, Heatwave or Sentinel Beam. The two melee power weapons in the form of the Energy Sword and especially the powered Gravity Hammer are also highly damaging to Hunters, but they’re relatively rare to find and they will leave you more exposed to counter attacks if you rely on attacking within melee range.
The quickest way to deal with these two Hunters is by shooting them repeatedly with the Skewer that you can find in the weapon racks of the surrounding area. However, if you can find any of the other above weapons, they’ll be just as effective. The Gravity Hammer has the added bonus that it stuns the Hunters each time you strike (so long as it has some power in the battery), preventing them from attacking you so long as you maintain melee hits in an unbroken chain. For this reason the Gravity Hammer is arguably the single most effective weapon to use against Hunters, but without one you’ll need to rely on using the surrounding features beneath the Spire to take cover from Hunter attacks. You can also throw grenades to damage the Hunters as you take cover, and you can throw blast coils at the Hunters to inflict massive damage. If you weren’t able to bring a Skewer to the fight with the Hunters, you’ll find a Disrupter on the weapon racks directly beneath the Spire. This will suffice to damage the Hunters over time as you take cover, allowing you to kill them slowly without exposing yourself too much.
If you’re using the Disrupter it will take longer to kill the Hunters, but you have the advantage of damaging them over time as you move around the area to dodge incoming fire, or take cover. When you defeat both Hunters, you’ll unlock the Hunter. Killer. achievement.
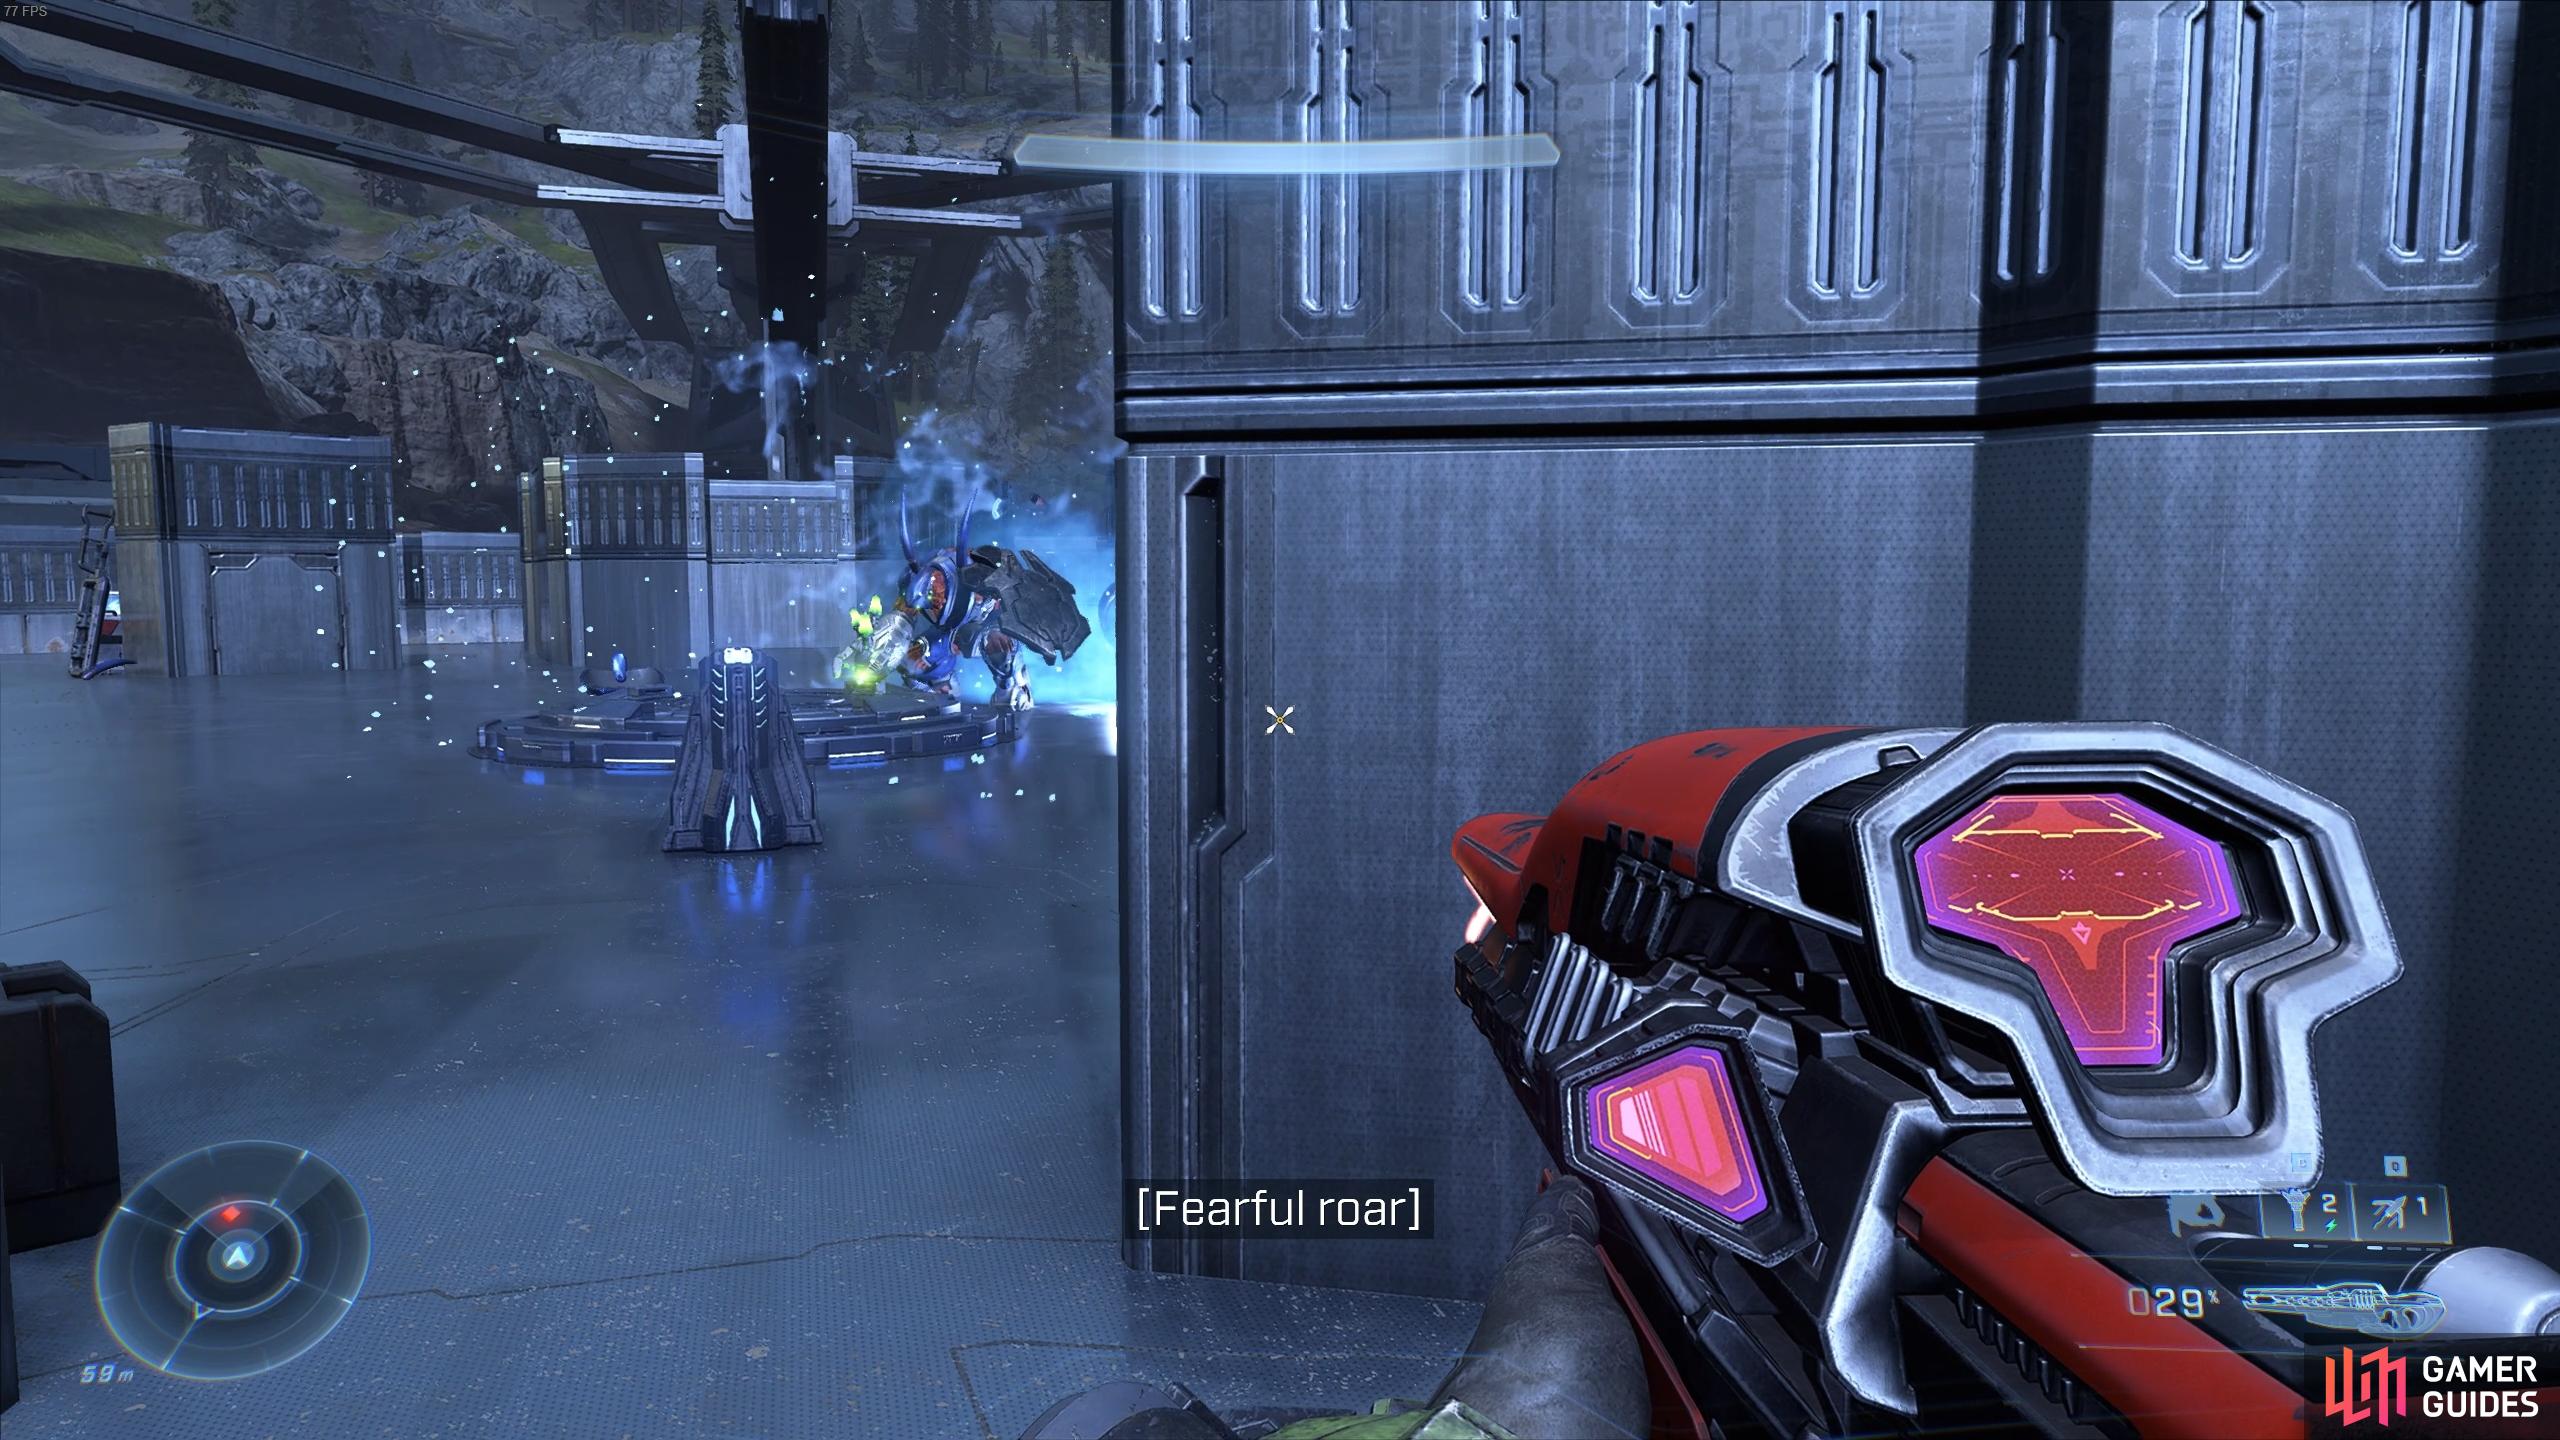
(1 of 3) You can hide from the Hunters in the nearby circular structures as you throw grenades, reload, or recover shield.
Boss Fight: How to Defeat Adjutant Resolution
Once you’ve defeated the two Hunters beneath the Spire, you can interact with the terminal to activate the gravity lift. All you need to do now is step on it to be taken up into the Spire, then follow the linear path until you reach another terminal. Interact with this to trigger a cutscene, then follow the Adjutant Resolution to the observation platform. You’ll need to wait for it to activate a bridge before you follow it at some point, so try not to fall into the unknown depths at this stage. You’ll soon reach the observation platform where you can deploy the weapon at the terminal to trigger another cutscene, at the end of which the boss fight with Adjutant Resolution begins.
The fight with this boss can seem difficult at first, but it’s actually one of the easier boss fights once you know exactly what to do. You won’t be able to damage Adjutant Resolution if you hit the main body of its armor. Instead, you’ll need to hit the glowing lights which act as weapons. The Adjutant Resolution begins the fight with four active weapons on each arm extension. It will take a few hits to destroy one of these, but each time you do the Adjutant Resolution will be stunned for a brief period. During this time you can shoot at its core eye to inflict additional damage, but it will soon be back firing with the remaining arm extensions. You’ll need to shoot each one to eliminate it, and repeat the process of shooting at the core eye once it’s stunned. You’ll take a good chunk of health away from the Adjutant Resolution each time you destroy one of its weapons, so the fight shouldn’t take too long.
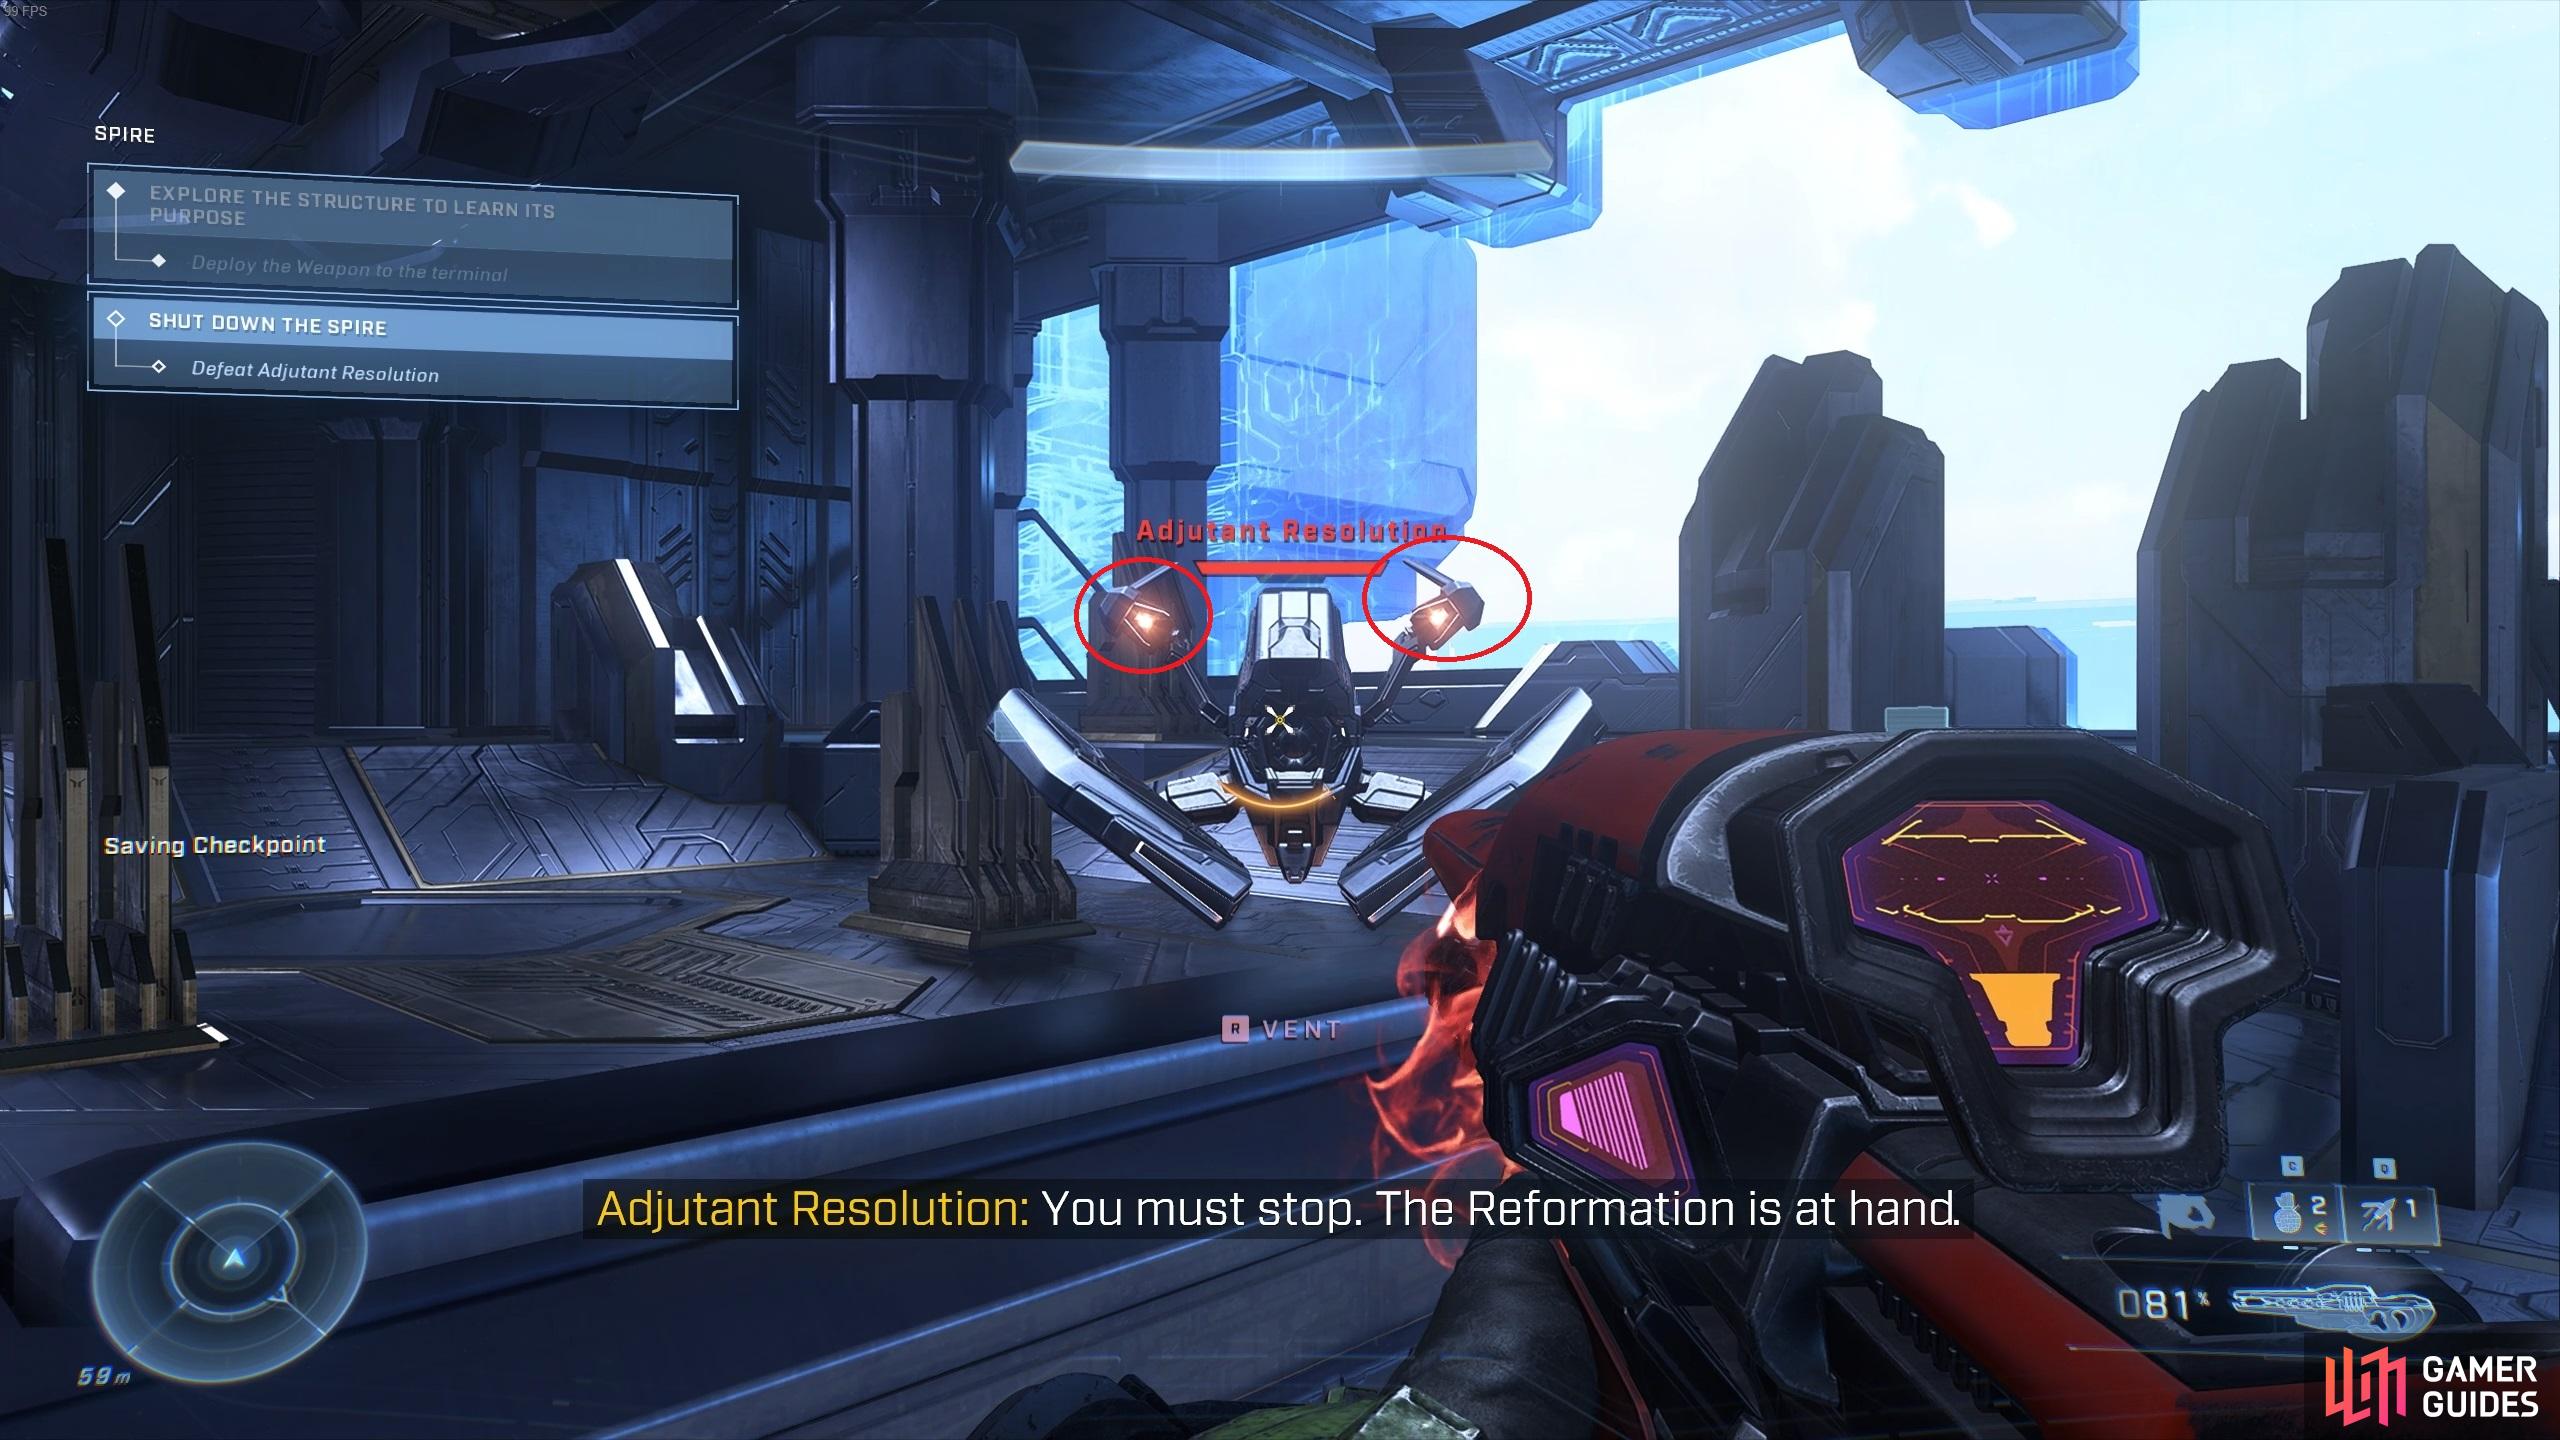
You’ll need to shoot the “eyes” highlighted here in red, to damage the Adjutant Resolution.
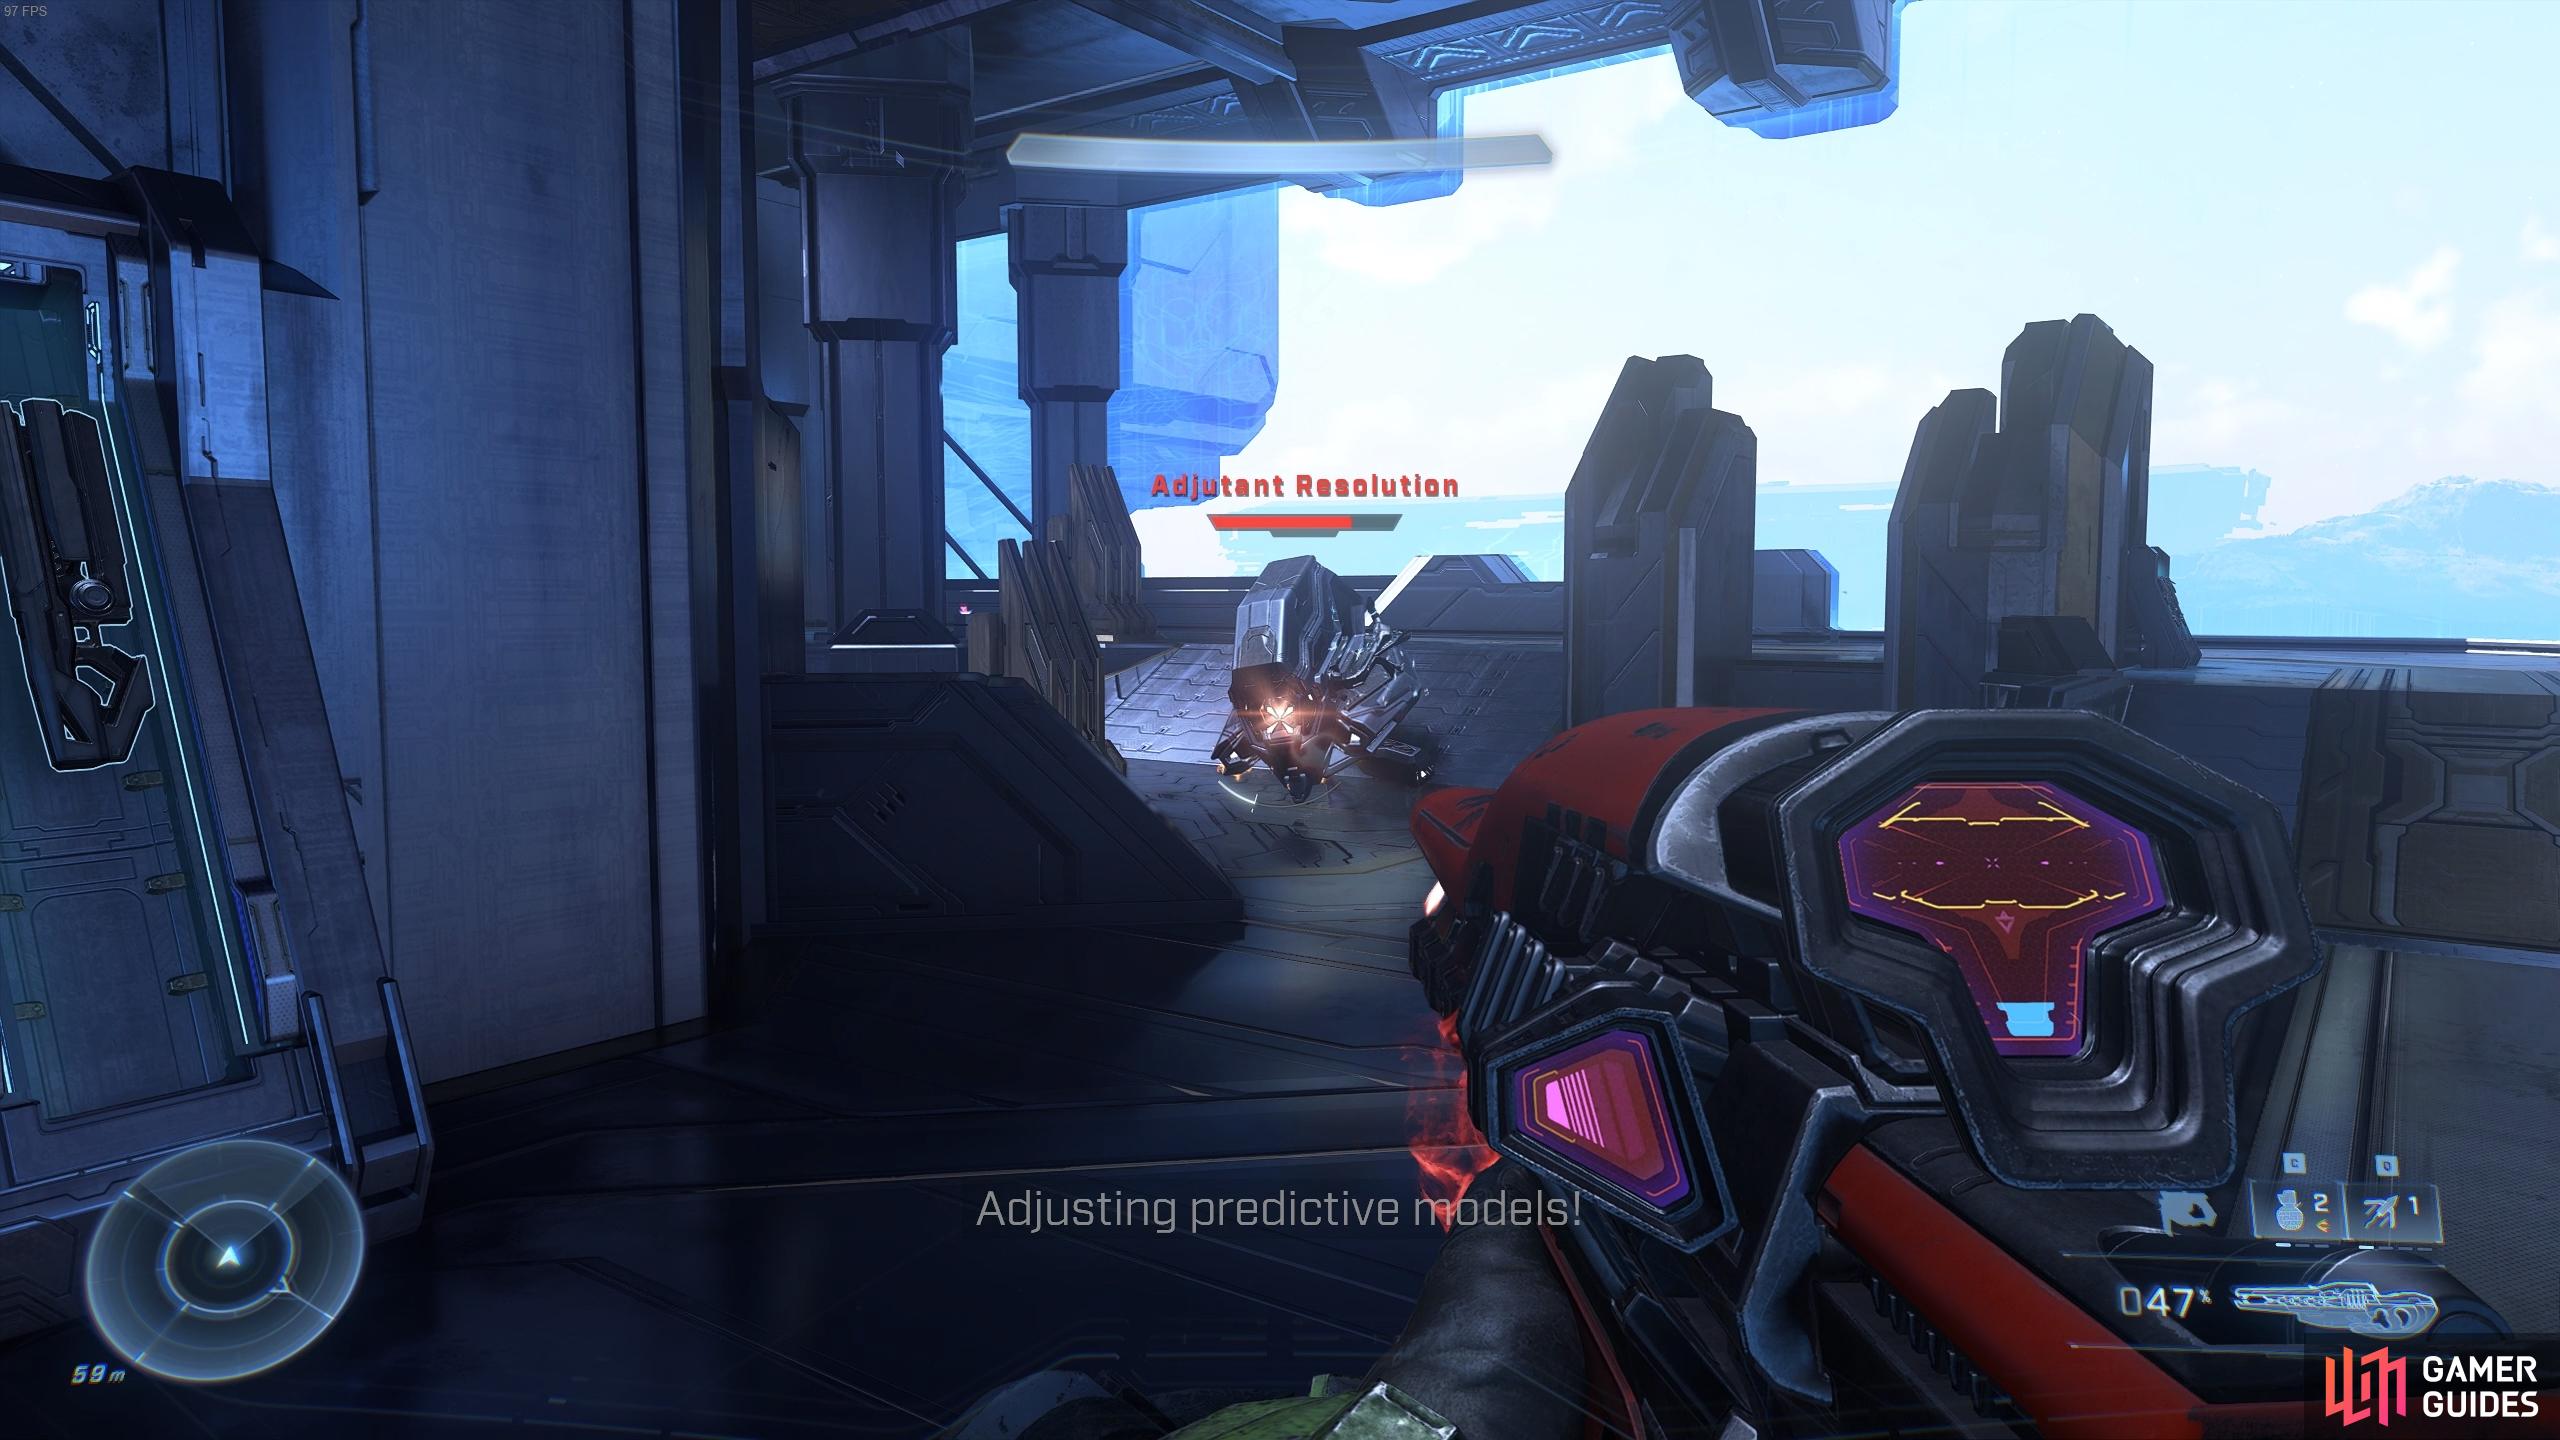
After shooting one of the eyes, the boss will be stunned briefly and you can shoot its core for additional damage.
The Adjutant Resolution is fairly clumsy and slow moving, so you can easily outmaneuver it by kiting it around one of the nearby pillar structures. This will give you the chance to reload or recover your energy shield if you do happen to be hit, but it’s possible to avoid being hit throughout the entire fight so long as you kite the Adjutant Resolution properly. Towards the end of the fight once you’ve destroyed most of the Adjutant Resolution’s arm extensions, it will begin firing a more powerful energy beam which can inflict a lot of damage in a short space of time. You’ll need to avoid this at all costs, and you can use the Grappleshot to quickly move from one part of the room to another if necessary. As you move around the pillars, be sure to throw grenades for some extra damage.
Keep kiting the Adjutant Resolution and stay behind the pillar if you get hit until your energy shield regenerates:
Shut Down the Spire
After defeating the Adjutant Resolution, all that remains is for you to interact with the terminal to shut down the Spire. What follows is a long cutscene which ends with the Pelican crashing. You’ll unlock the Pelican Down achievement upon completion of the quest.
Spire Collectibles - UNSC Audio Log
The “Easy To Break” UNSC audio log can be found just outside the main Spire structure, as you approach it from the northwest. You’ll find it on the ground next to a UNSC vehicle, as shown in the gif below.
No Comments