
The Berserker Gravestone for Bodvar the Fierce and Starolfr the Troublesome is located in the Jarnsmida Pitmines, in the west of Svartalfheim. This is a reasonably tough fight unless you’re level 8 or above, although it can be done at lower levels if you’re confident with your ability to avoid special attacks from two bosses at once.
Where to Find the Berserker Gravestone for Bodvar the Fierce and Starolfr the Troublesome
As mentioned above, you’ll find the Berserker Gravestone for Bodvar the Fierce and Starolfr the Troublesome in the Jarnsmida Pitmines. The easiest way to reach it is to travel to The Applecore via a Mystic Gateway, then head northwest as you make your way through it until you reach the southeast exit, which brings you to the Jarnsmida Pitmines. You’ll see the Berserker Gravestone just as you walk outside here, and you’ll need to have the Hilt of Skofnung, acquired during The Word of Fate main quest, to activate it when you interact with the stone.
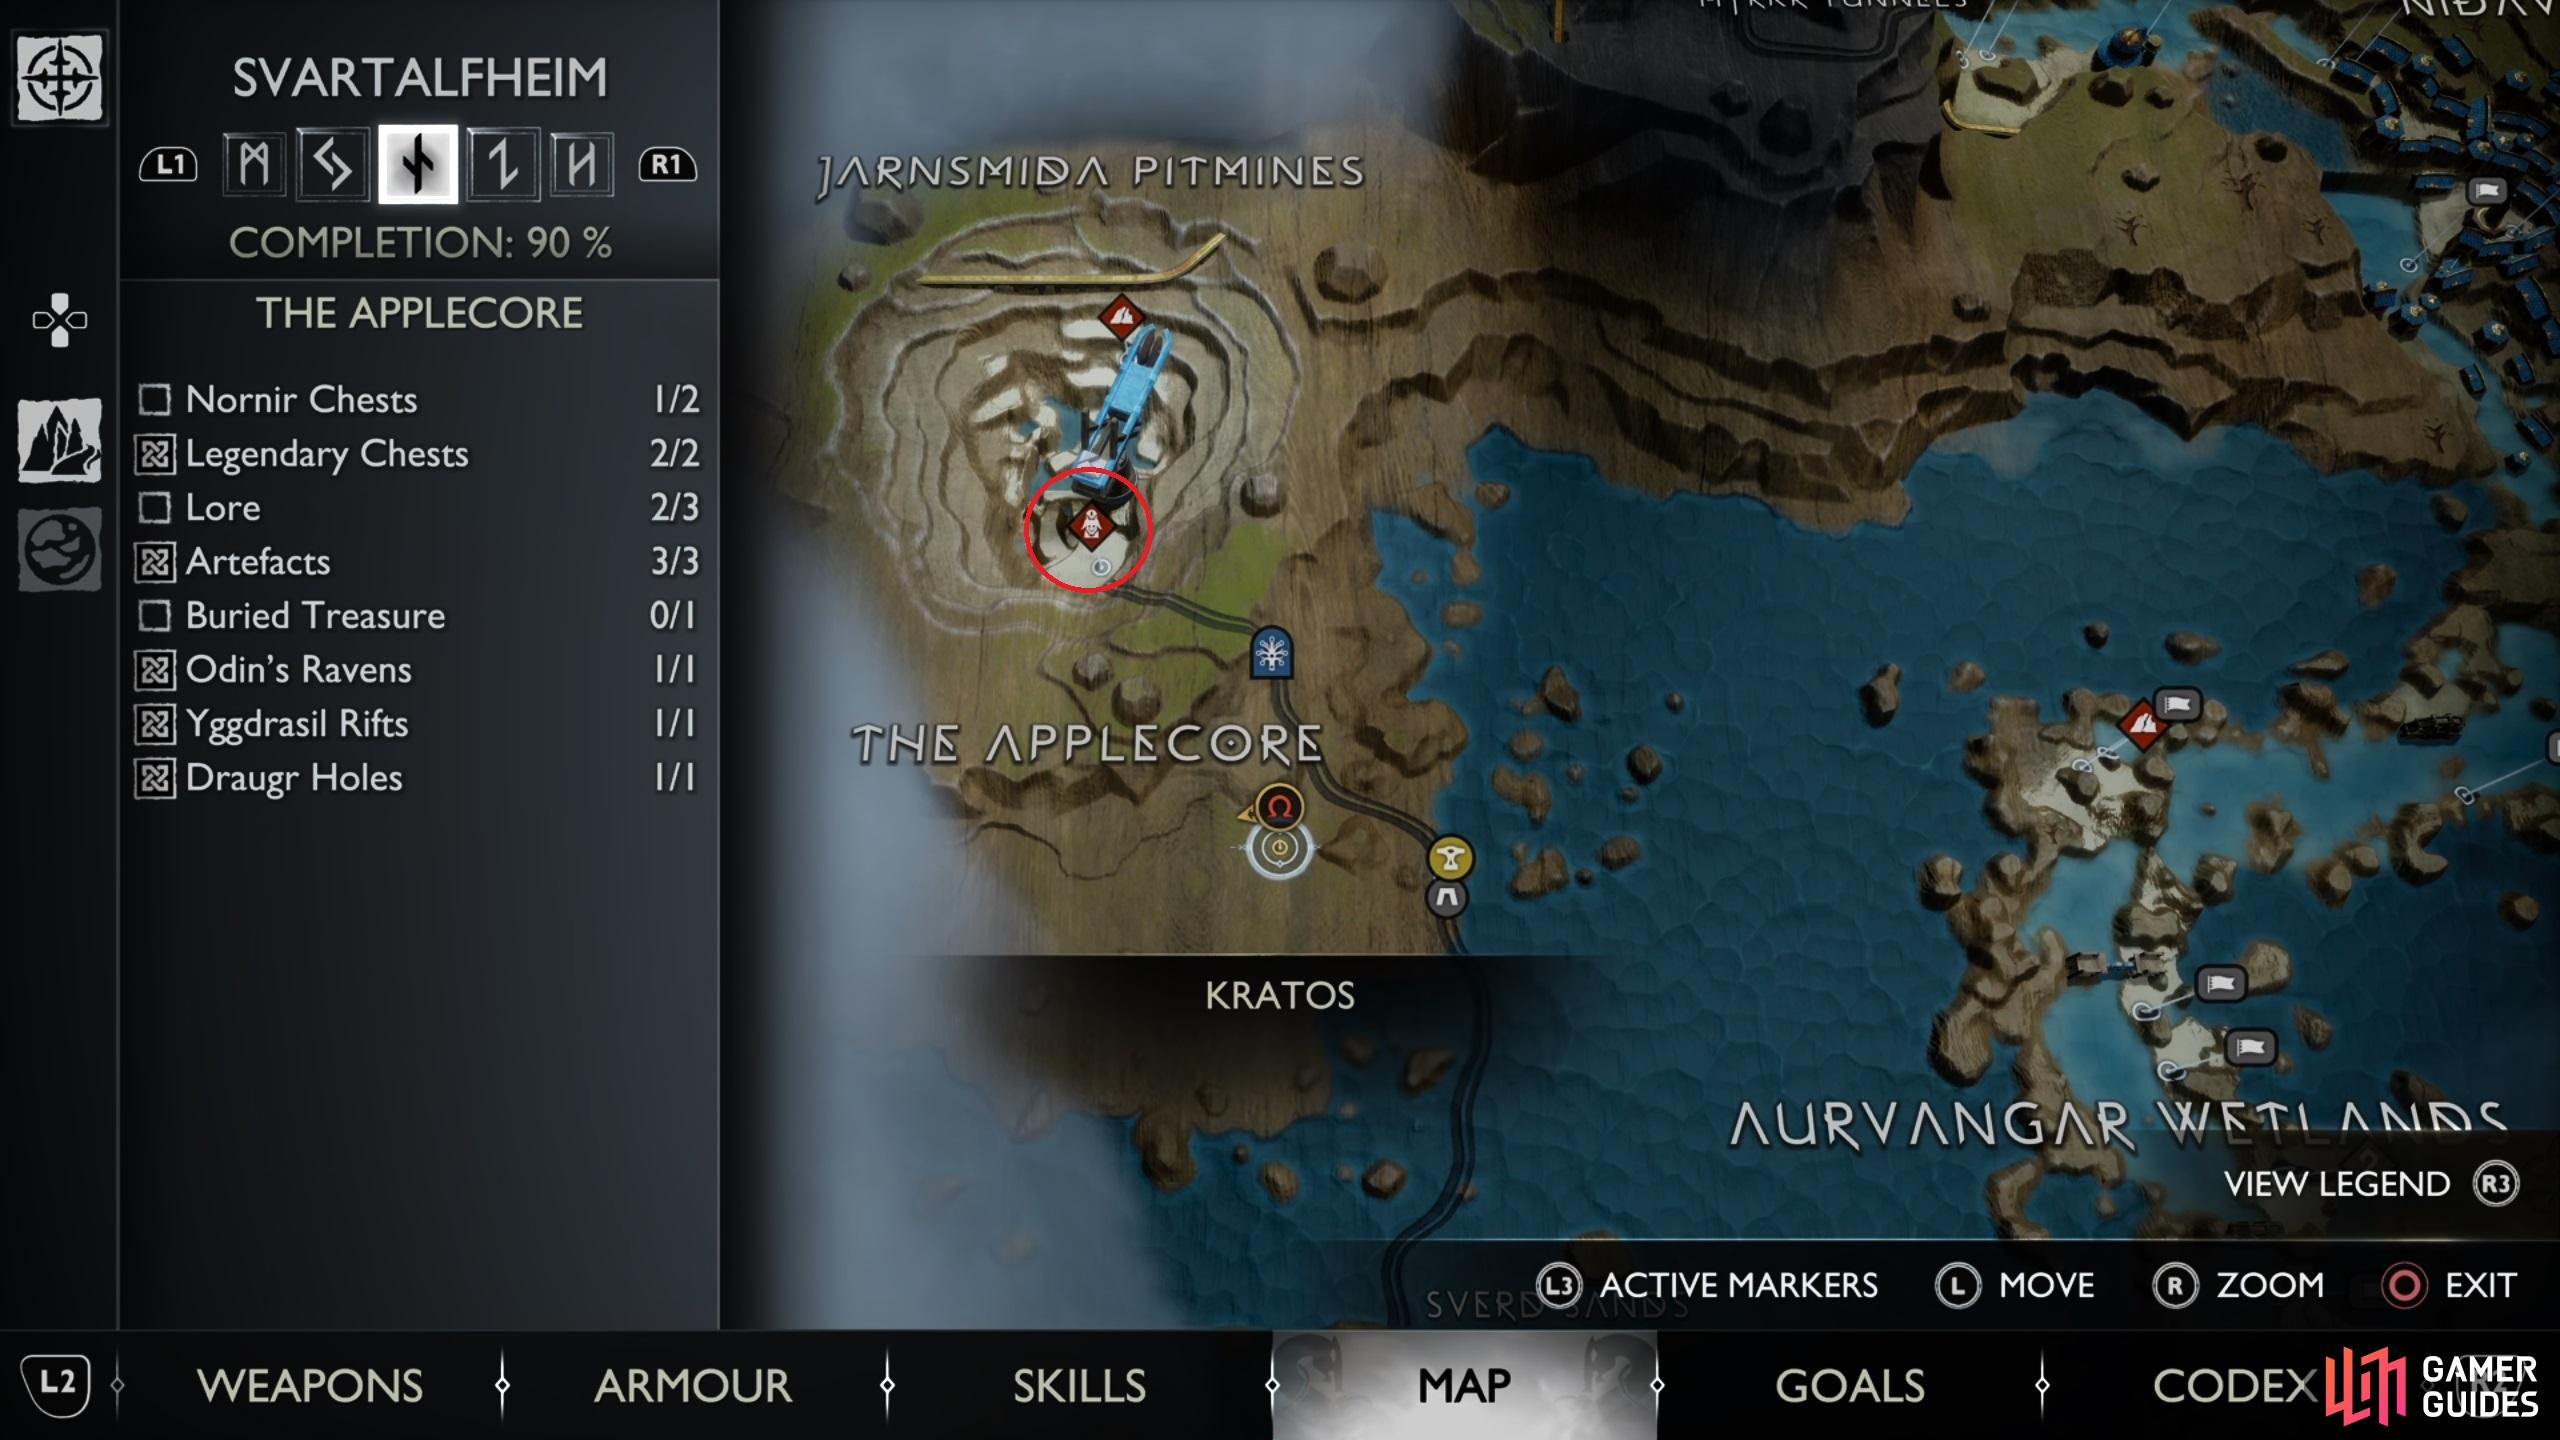
The location of the Berserker Gravestone for Bodvar and Starolfr in the Jarnsmida Pitmines.
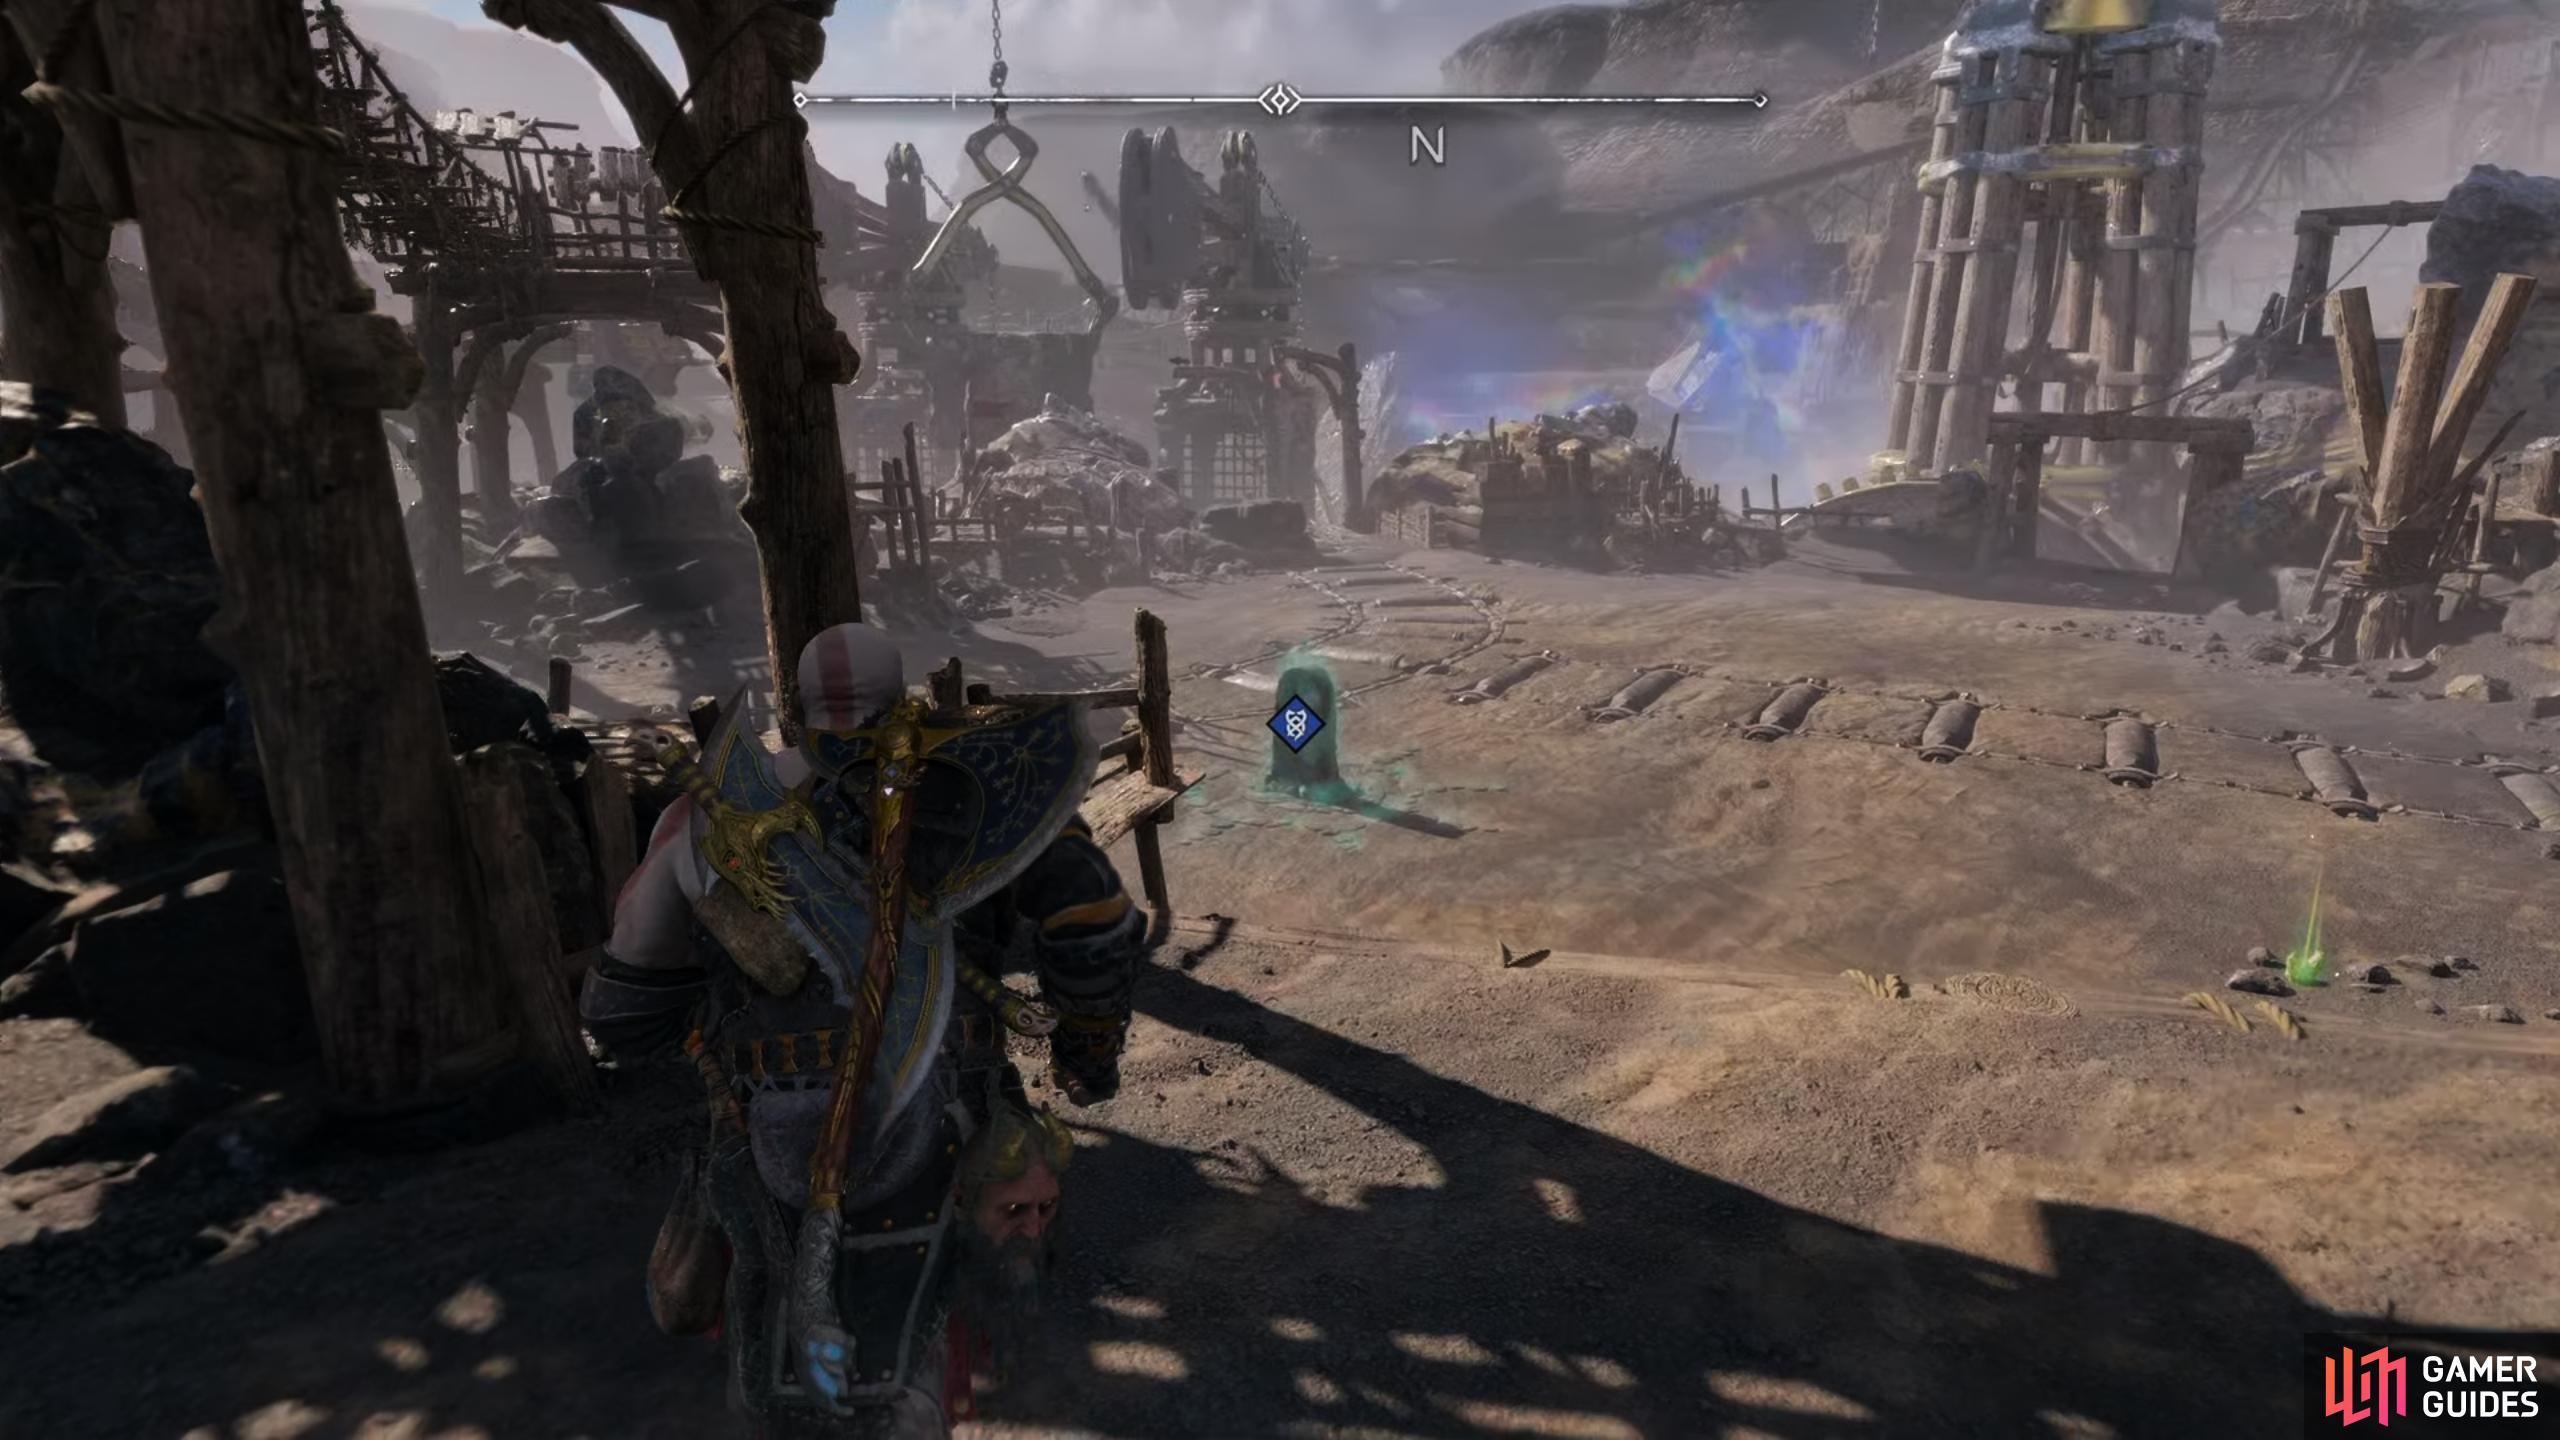
You need to interact with the Berserker Gravestone to begin the fight.
Boss Fight: How to Defeat Bodvar the Fierce and Starolfr the Troublesome
If you’ve fought some of the other Berserkers already, you’ll know that they share many of their attack patterns, with slight variations in style more than substance. This is good news for you because you’ll have some experience with avoiding at least some of their attacks, but we’ll take you through them so that you can become familiar with the main attacks from both bosses regardless.
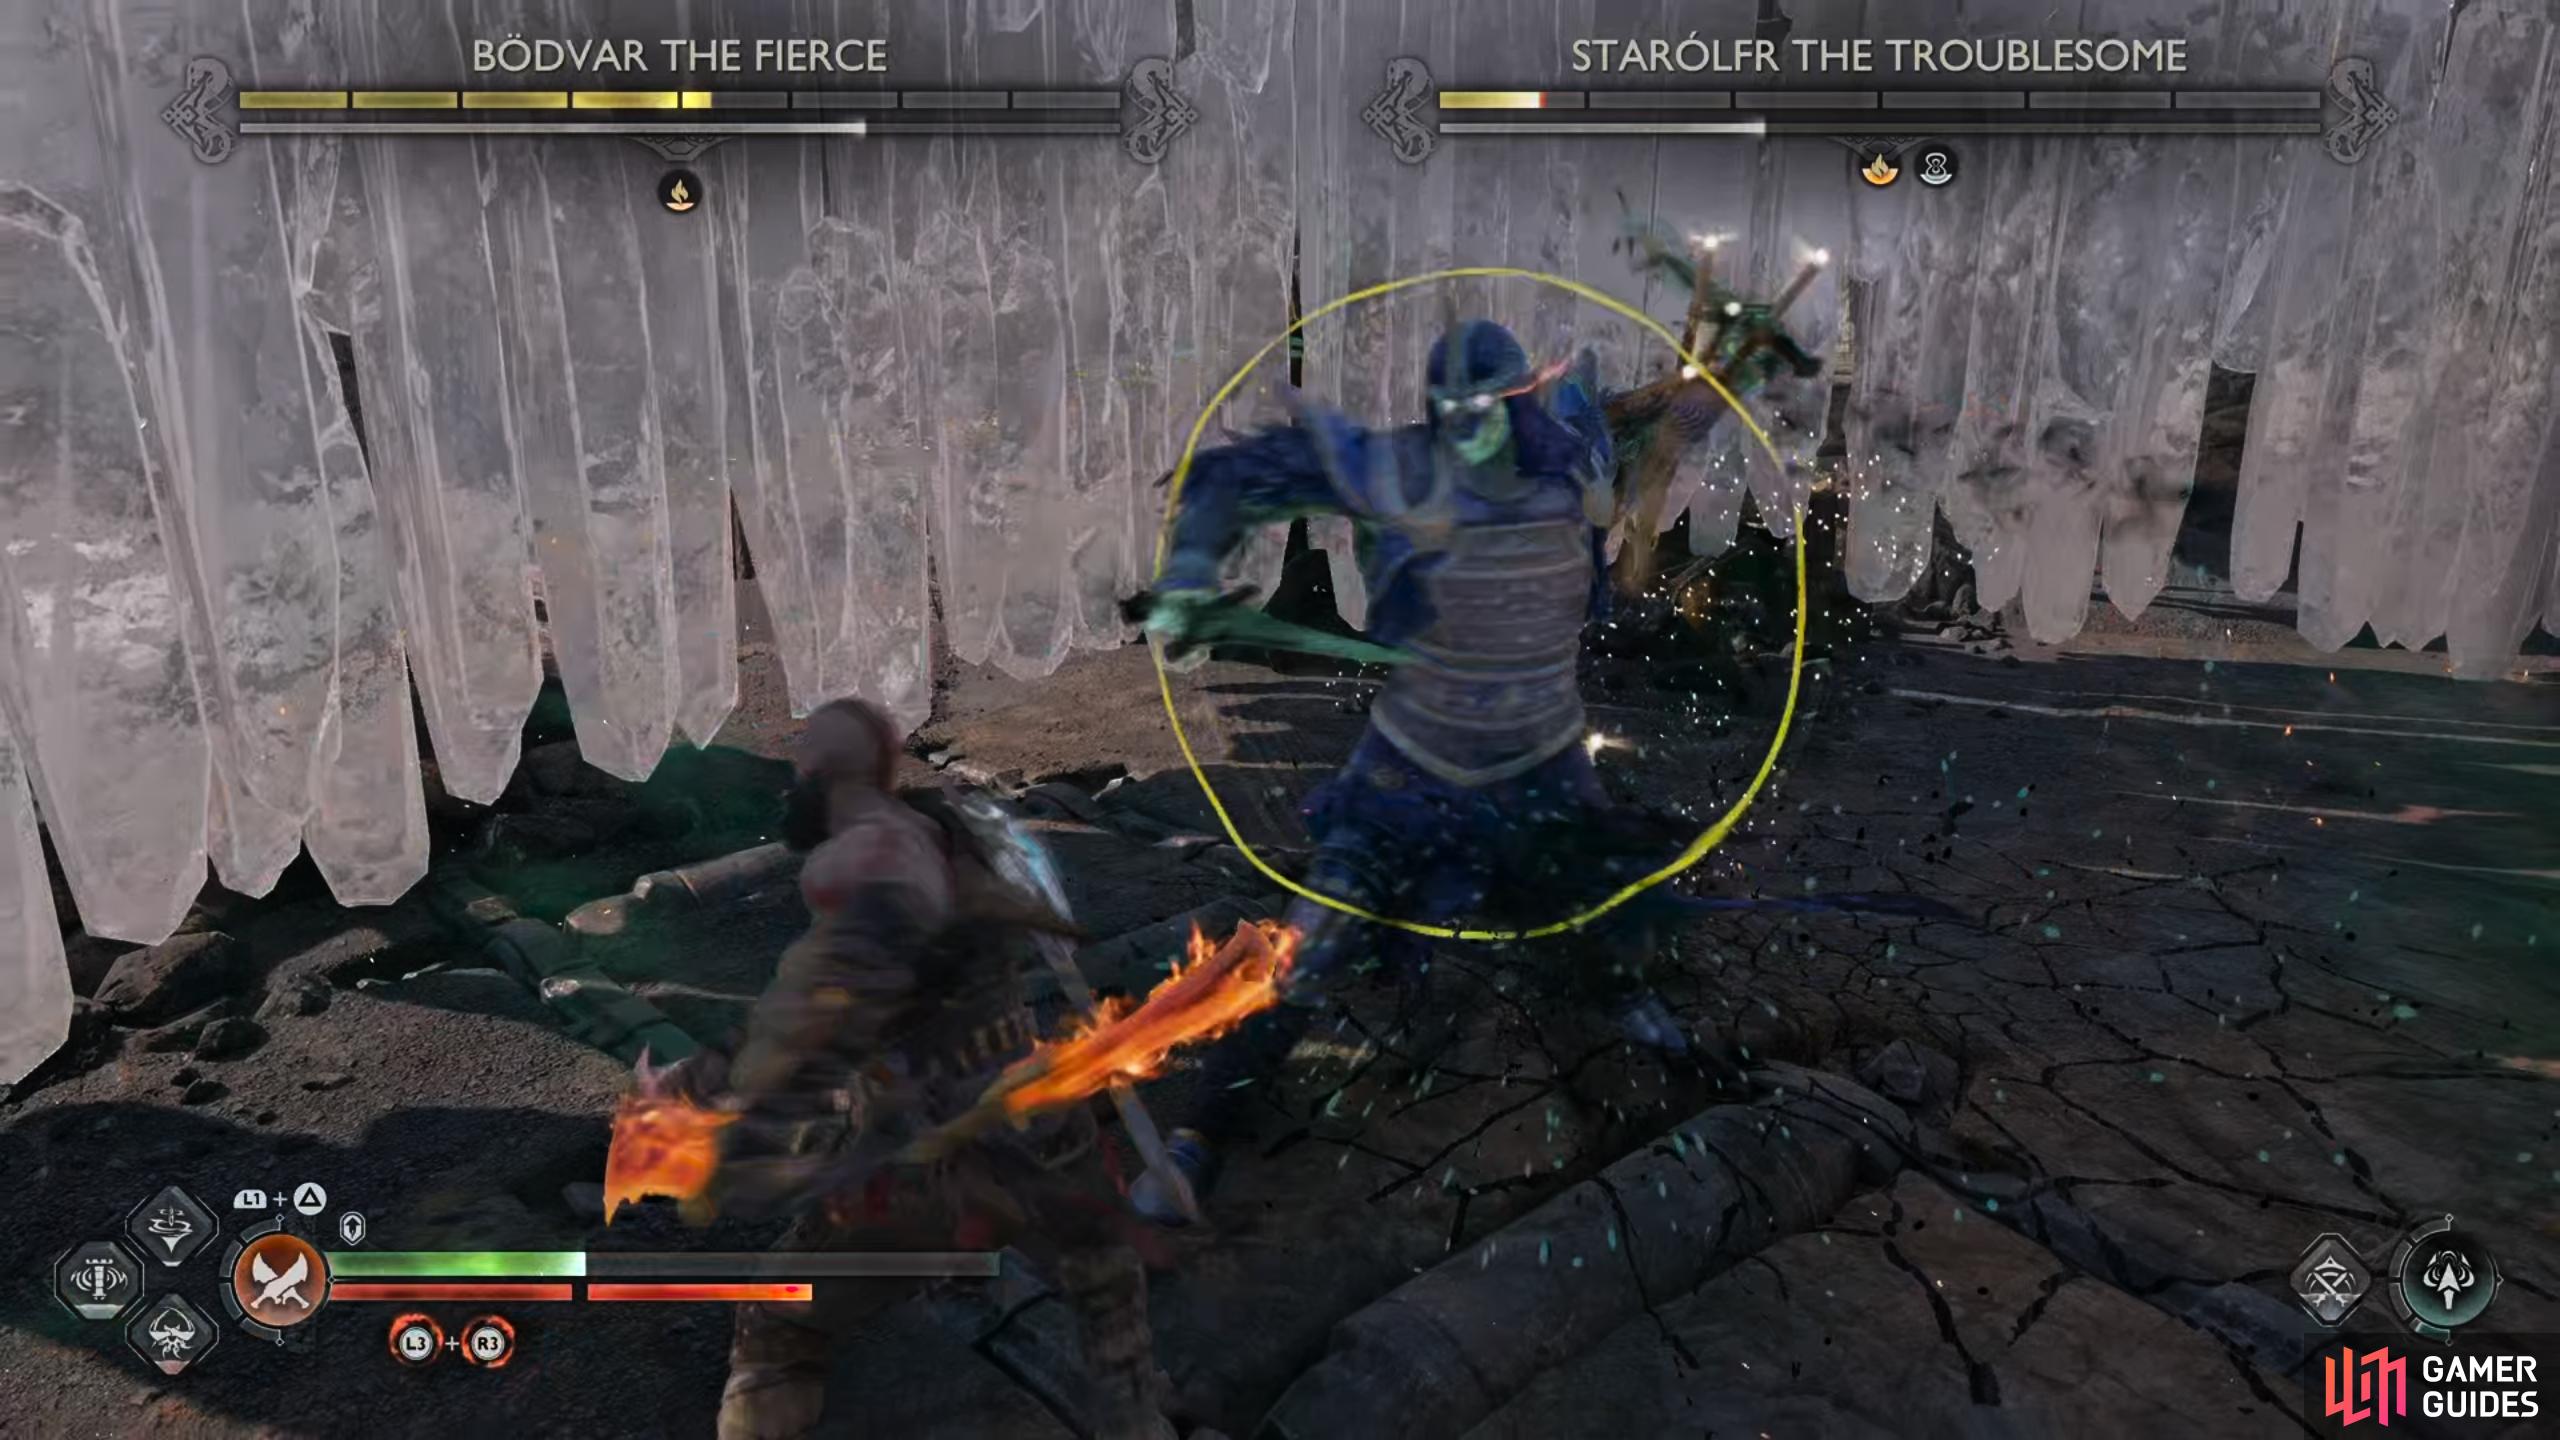
The first thing you should do at the beginning of the fight is choose one of the Berserkers to kill first, as you focus most of your attacks on them. They will both spawn at the same time and there will be a brief delay before they initiate any special attacks, which gives you a window of opportunity to get within melee range and execute as many high-damage Runic Attacks as quickly as you can. This will not only help to burst damage through one boss quickly so that they have limited time to retaliate, but it will also ensure that your Runic Attacks come off cooldown more quickly, ready to be used again.
During our fight we chose to focus on Starolfr the Troublesome, who spawned on the left for us. You may find that as soon as they get a breather from your relentless Runic Attacks, they will quickly sidestep away and out of melee range. You need to make sure that you close the gap as soon as possible and get back within melee range to execute melee combos alongside any Runic Attacks from your weapons.
Charge Attacks
Both of these Berserker bosses are capable of using the standard charge attack that most of them do. This can be preceded by either a red or yellow ring indicator, but it’s most often used in the red ring form. This means that you won’t be able to block or parry the charge, and you should instead be ready to dodge / roll out of the way. The bosses may charge you from a position on the ground, but they’re also capable of beginning a charge from the air as well. The best thing you can do is try to keep both bosses within your line of sight as much as possible, although this will sometimes be difficult as they maneuver around you.
Meteor Shower
Both of these bosses have the ability to teleport, but we saw Starolfr the Troublesome using it most. Starolfr will generally stay further away from you while Bodvar likes to get up close and personal to execute melee combos. This is a good reason to focus on Starolfr first since you don’t want to give them free reign to use ranged abilities while they’re out of reach from your own attacks. One of the most damaging ranged attacks that Starolfr can use is a kind of meteor shower. You’ll see them fly into the air before a red ring indicator appears around them, and the rocks will come crashing down at your location. You need to make sure that you get the timing right here and only dodge at the last moment to avoid being hit by them.
Focusing on Bodvar
Once you’ve got Starolfr out of the way, you can relax a bit more since you only need to worry about one set of attacks from one boss. However, Bodvar is generally more aggressive than Starolfr, so don’t let your guard down too much. You may have seen some of their attacks already at this point, but you’ll notice that they like to throw things at you, even at a close distance. This can make blocking or parrying projectiles difficult at times, since you don’t have as much warning before they hit you, and the animations can be obscured in the chaos of a melee fight. The key thing is to look out for the yellow and red ring indicators, and be ready to block, parry, or dodge accordingly.
Concentric Blue Ring Attacks
In addition to the yellow and red ring indicators, Bodvar is also capable of using unblockable attacks which are preceded by concentric blue rings. You can only stop these by interrupting them as you use one of your own Runic Attacks, or a special ability from your Relic / Sword Hilt. However, not all of these are executed quickly enough to do the job, so the most reliable method to stop the concentric blue ring attacks is to interrupt them with a shield attack by double tapping  . The only catch here is that you need to be within melee range for this to work, so you can’t allow Bodvar to remain at a distance from you for too long.
Be ready to block, parry, or dodge short range projectile attacks, as shown in the gif below.
The attacks from blue concentric rings are among the most damaging, so it’s important that you remain within melee range as often as possible. If you are caught out by one or more of these and you find your health slipping, don’t forget to make use of Spartan Rage to recover some health while you remain invulnerable for a few seconds.
Bodvar the Fierce and Starolfr the Troublesome Rewards
You get a decent amount of crafting materials as a reward from this fight, but you also get the unique Hind of the Nine Realms attachment for the Draupnir Spear. This provides the Momentous Shift ability, which triggers a Realm Shift whenever you activate Violent Maelstrom using and  while your Maelstrom is full.
| Reward | Quantity |
|---|---|
| Hind of the Nine Realms (Unique Spear attachment) | 1 |
| Tempered Remnants | 5 |
| Bonded Leather | 80 |
| Shattered Rune | 75 |
| Kratos XP | 2000 |
| Companion XP | 375 |
No Comments