

The way back to the Verdant Chambers from the Bandit Camp shouldn’t be much of a mystery, but the directions will still be provided, just in case:
- West
- Northwest
- Northwest to reach landmark: Ruined Watchtower
- Southwest
- Southwest
- West
When you arrive, be sure to rest before actually entering the area if you’re the least bit fatigued. The first fight in this area will be by far the most difficult, and if you can emerge victorious, you can always exit to rest up again.
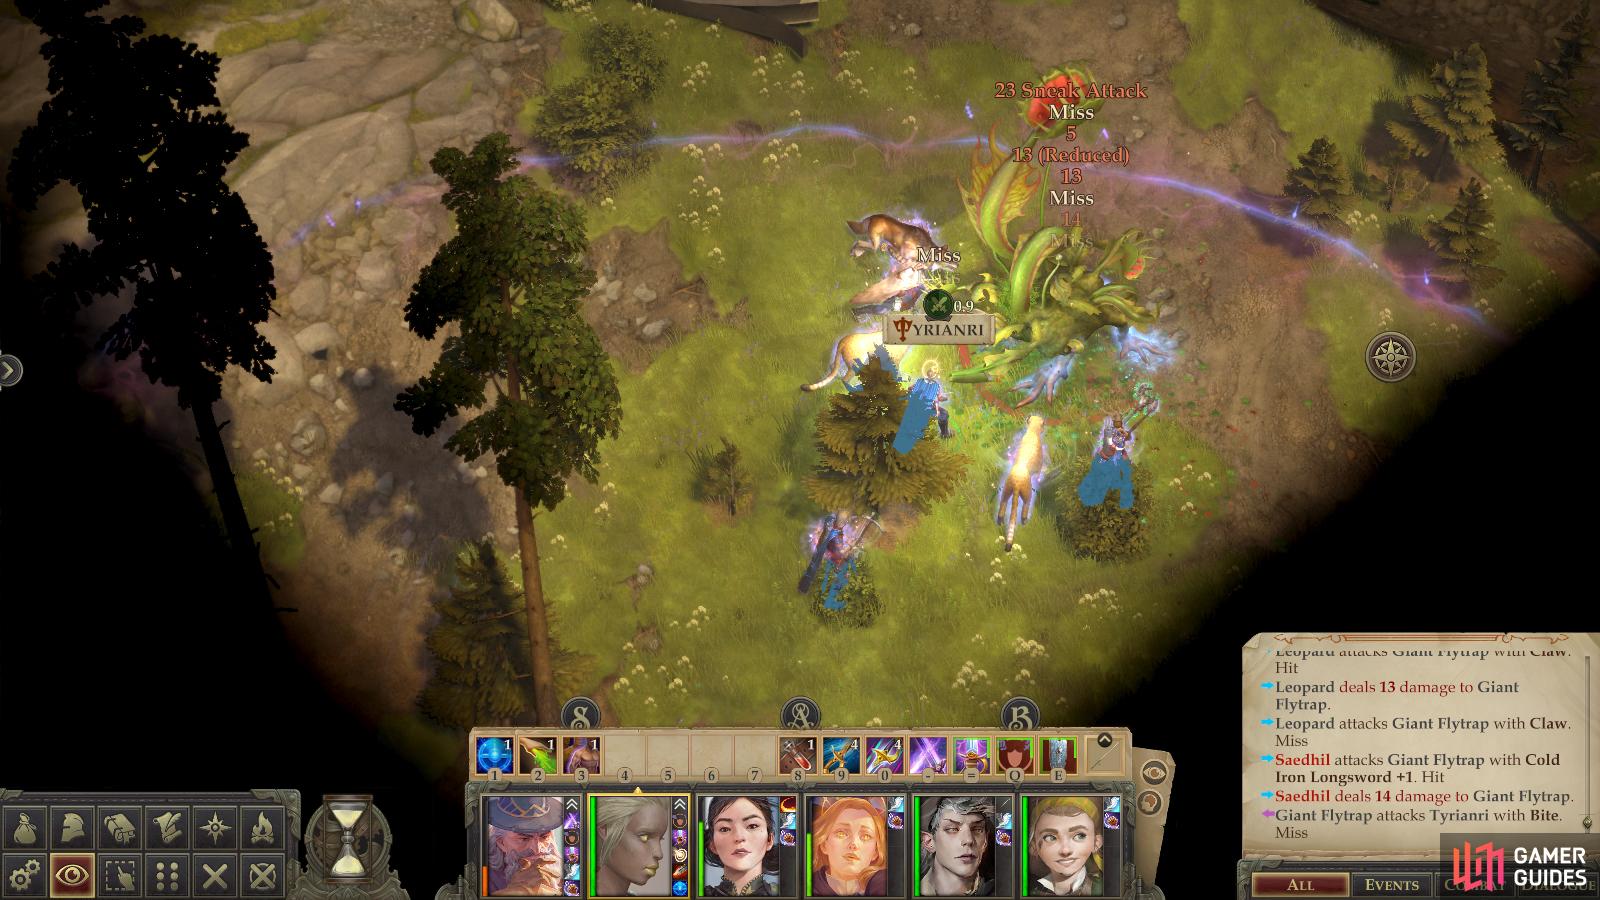
Battle: Giant Flytrap
As soon as you enter the area you’ll be forced into a fight with the Nymph’s Giant Flytrap. This aggressive plant was a death sentence against your lone protagonist, but facing it with your entire party… well, it’s not much better, honestly. It’s got a high enough Attack bonus to hit most of your warriors over half the time it attacks (assuming your best Armor Class is around the mid-twenties) and it attacks frequently and hits hard, dealing 15-20 damage per hit. On top of that, it has plenty of HP and a decent Armor Class, and to add insult to injury, your entire party will start out surrounding it. This might seem like a good thing, and flanking the beast won’t be difficult, but at the same time you’ll want to move your archers and casters out of the way quick-like, hopefully only enduring one attack of opportunity. Afterwards, immediately buff your party with Haste and Prayer and hope for the best - winning this battle could take a few tries and a bit of luck.
Alternatively, you can try running northwest to the keep’s gate immediately upon spawning, veering to the northeast at the gate and placing your hopes on the [Mobility 20] check to jump the gap. If you succeed, you can heal, (the Giant Flytrap will certainly manage a few Attacks of Opportunity given its absurd attack range) buff up, save your game, then cross back over the gap to engage the beast on your terms. The outcome of the fight when this strategy was applied was considerably more favorable than simply fighting it at the beginning of the area.
Battle: Owlbear, Young Hydra, Manticore
With your buffs still hopefully active, heal up and then make your way into the keep to confront the Owlbear, Young Hydra and Ferocious Manticore - or whichever of the three are still alive. There’s no reason why, with careful luring, you can’t end up fighting these critters one at a time. Just be wary of navigating your party through the gate, as the game likes to register movement assignments to the top of the wall above the gate, rather than on the ground under the gate. Of these foes, the Owlbear is likely the most dangerous, but nothing a fully buffed party can’t handle, and certainly nothing compared to the Giant Flytrap.
Battle: Redcaps on the Wall
After that, work your way up to the walls and kill the three Redcaps there, including the one on the northeastern walls that harassed you during your escape. Defeat the third Redcap and you’ll be done with this area. Unfortunately the Guardian of the Bloom doesn’t deign to show herself, so you’ll have to be satisfied with the petty revenge you gained by killing her creatures. It’s not all a waste, though, as these fights should have earned you just shy of 1,000 experience, hopefully putting you perilously close to hitting level six.
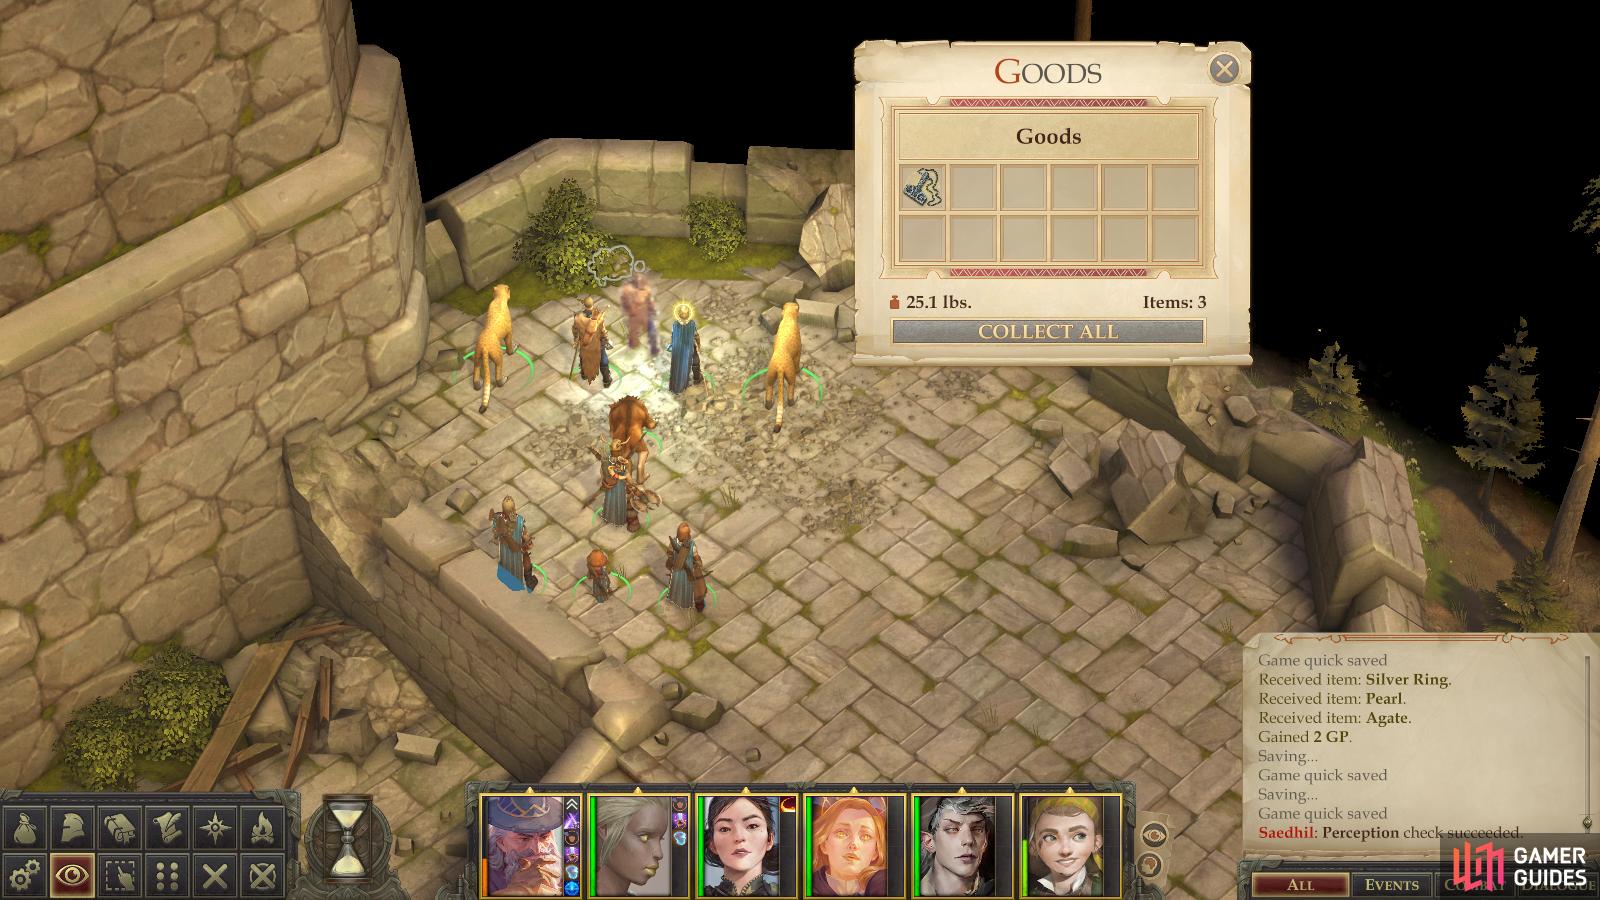
There are, however, some hidden treasures to be had, so you need not settled for returning home with only experience. On the northernmost section of the walls you can find a pile of rocks [Perception 23] hiding a Torag’s Pendant, while the eastern-most turret hides [Perception 9] another Torag’s Pendant. Next head down into the courtyard and search near the tree to find a third pile of rocks which hides a Token of the Dryad. Finally, near the steps to the west of the tree you can find [Perception 9] a final pile of rocks housing a Rune-covered Ancient Leather Scrap.
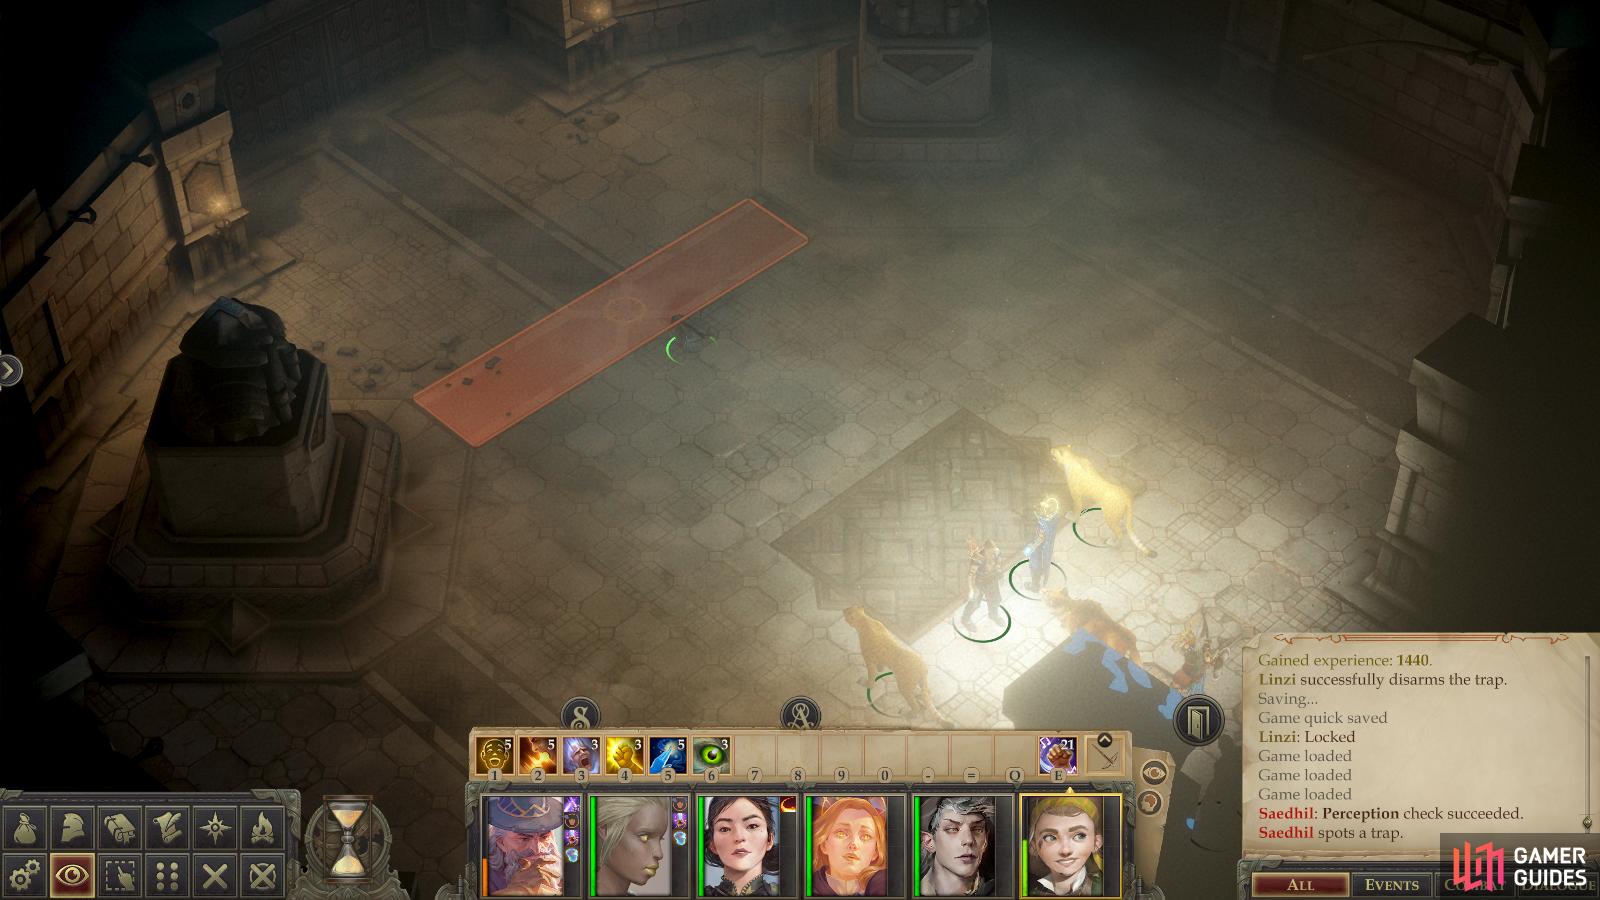
You can try to disarm a trap inside the keep,
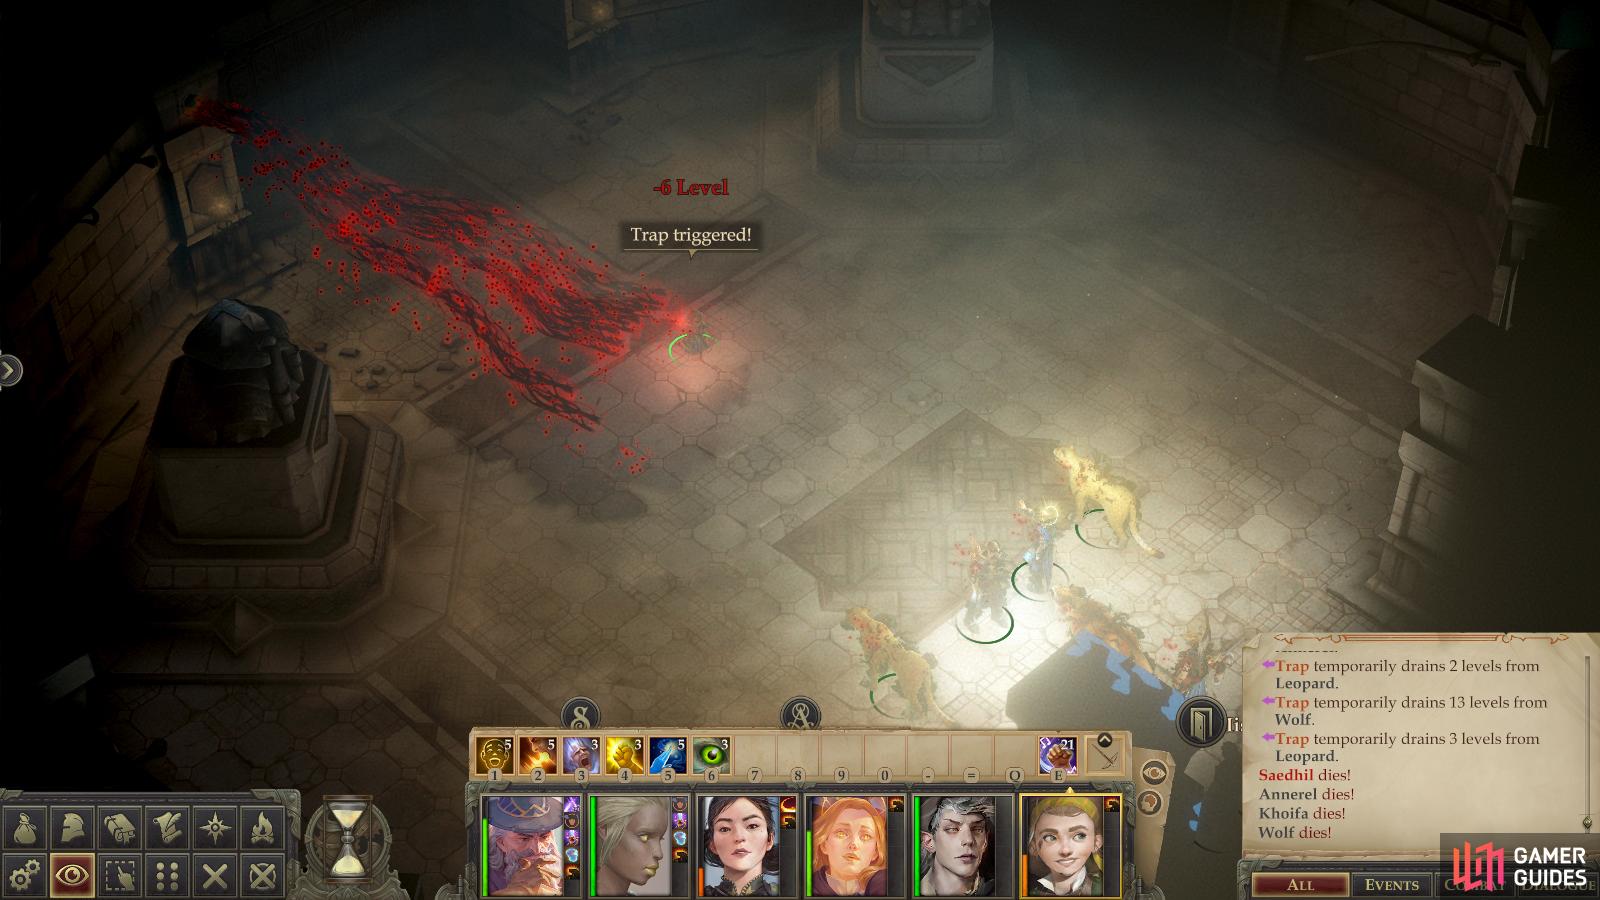
but it’s a very difficult trap, and failure will be punished.
There’s one more thing you can do while you’re here, if you wish. Go up the stairs from the courtyard and enter the keep. You won’t get far before your way is barred by a locked door which you can’t bypass just yet, but before that is a trap [Perception 36] [Trickery 36]. Those difficulties should warn you that this place is above your level, but if you want to save/load the trap until you find and disarm it, it’ll give you a hefty amount of XP for your current level (in our last playthrough we hauled in 1,440 XP - not bad for disarming a single trap!)
With that, it’s time to exit the Verdant Chambers and consider your next move:
After the Verdant Chambers Expedition
You should now be done with the Verdant Chambers, having performed the exploratory expedition there, dealt with Nyrissa’s betrayal during the main quest objective A Just Reward and the necessary retaliatory trip there just now.
That said, there’s still plenty to do in Chapter 2. Saying your current efforts are the tip of the iceberg is probably an understatement, as you’re not even truly done with many of the areas you may think you’re done with. There’s still a few more expeditions to go on, several large areas to explore, two main quest chains to complete (this chapter has two parts, revolving around two main superquests, with a total of fifteen sub-main quest segments) and a few fairly involved side quests, as well.
It’s a long chapter.
The first superquest, Troll Trouble, hasn’t even really begun yet, but that’s sure to change soon, and while there’s plenty of reasons to go out and explore, we suggest you head back to the barony and check for future developments. The details of your trip back to the barony and the developments that occur there will be covered in the Troll Trouble - Events Overview section of the guide.
you can actually manage to kite and kill all four of the monsters solo as long as you have a ranged weapon. None of them can make the mobility check gap in the southeast and you can just kite them to follow, stand there and attack them till they fall. I managed to kill all 4 this way during the solo encounter.
The Red Caps are another story however as the have regeneration and damage reduction.