
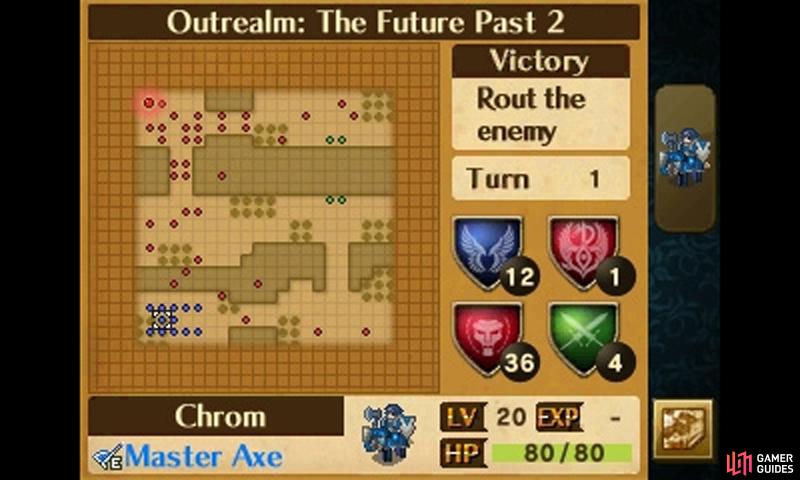
Boss
| Name | Class | Level | Items |
|---|---|---|---|
| ??? | Wyvern Lord | 20 | Hauteclere |
Strategies for all difficulties
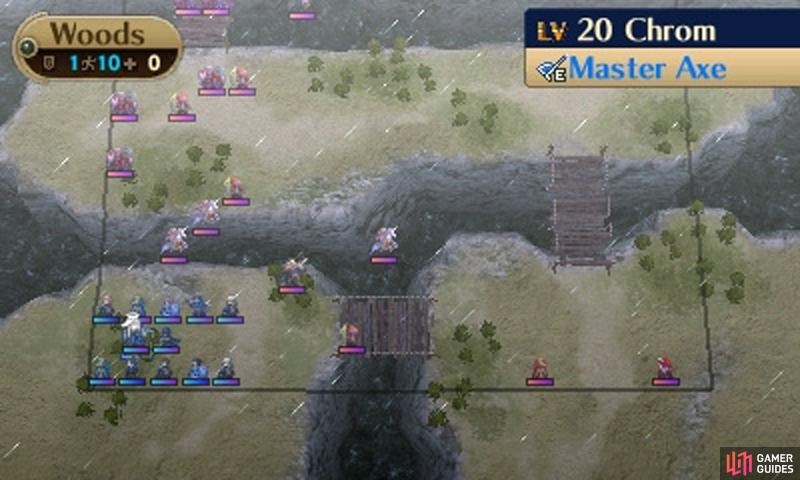
Following from the previous map, your mission again is to rout Grima’s minions, while simultaneously protecting four NPC children.
Compared to the previous mission, this one is potentially an easier fare. Provided you play well, Brady and Yarne shouldn’t ever get attacked by enemies, while Owain and Inigo can easily stand their ground, assuming you don’t take ages to reach them.
Furthermore, many of the enemies will plain ignore you–focusing on the NPC kids instead–making this akin to a tower defence game, with you slaughtering hordes of enemies as they attempt to pass you.
Ideally you should field a bunch of flying units, so you can traverse across the gaps, instead of wasting time snaking around the map.
As soon as the mission begins, have all your units march onwards, killing any enemies in their path. Like previously, you’d do well to have characters with Brave weapons (to increase the number of attacks), the Galeforce skill (lets you move twice per turn) and good support partners (either A or S Rank).
At this stage, you’ll probably want some Galeforce pairs (two units with Galeforce paired up) too; they can move up to 3 times per turn by switching the main unit after each kill, letting you cover a lot of ground quick.
The main bulk of the enemy will chase after Brady and Yarne only, while a few weaker ones will attack Owain and Inigo. Once Brady and Yarne leave the map or perish, all of the enemies will attack the remaining two kids, as well as your units.
Your main priority should be the enemy flying units, as they have massive movement and will reach Brady and Yarne before the ground units do. Use magic against the Wyvern Lords and Griffon Riders and physical weapons against the Falcon Knights and Dark Fliers.
It’s easiest if you leave some units on the west side of the map, directly north of the starting area, to stop the flying advance. Ideally, a Galeforce pair and a normal pair can handle the fliers, but prepare backup in case they fall short of a one-round K.O.
The ground-based enemies should be easier to deal with; you can block their advance by plugging in the south-eastern bridge. However watch out for the Tricksters who have Pass, as they can move through your units!
If you haven’t already, turn on the Danger zone (press X when on the map) and make sure Brady and Yarne don’t fall within the red zone by the time you end your turn.
For the rest of your turns, continue the advance, swatting any flying units as soon as you can and making sure no ground units slip by.
As mentioned earlier, many of the enemies (all but the initial flying units) will ignore your units and move straight past, unless you completely block their path. Expect a lot of flying units to turn up as the battle progresses.
- Turn 3: 2 Cavaliers, 2 Dark Fliers and 2 Griffon Riders
- Turn 4: 2 Wyvern Lords and 2 Falcon Knights
- Turn 5: 2 Cavaliers, 2 Dark Fliers and 2 Griffon Riders
- Turn 6: 2 Wyvern Lords and 2 Falcon Knights
- Turn 7: 2 Wyvern Lords, 2 Griffon Riders, 2 Dark Fliers and 2 Falcon Knights
- Turn 8: 2 Wyvern Lords, 2 Griffon Riders, 2 Dark Fliers and 2 Falcon Knights
All reinforcements spawn during the beginning of the enemy’s Turn, near the north-western corner; the flying ones target Brady and Yarne while the Cavaliers go for Owain and Inigo.
By the time it reaches Turn 7, Brady and Yarne should have escaped the map safely. At this stage, you should be ready to clear the map soon. Just be cautious that a lot of flying units will spawn when you end your turn and same for the next turn–and now that their primary target is gone, they’ll turn to your units instead.
In a similar manner to the previous map, you can avoid fighting the boss by having your Avatar wait next to them. This time, the boss will not attack your units, at least until the enemy’s Turn 8, at which point they will move out with the rest of the swarm.
No Comments