
Boss
| Name | Class | Level | Items |
|---|---|---|---|
| Alm | Dread Fighter | 21 | Alm’s Blade |
New Units
| Name | Class | Level | Recruit |
|---|---|---|---|
| Alm | Dread Fighter | 21 | End of mission |
Strategies for all difficulties
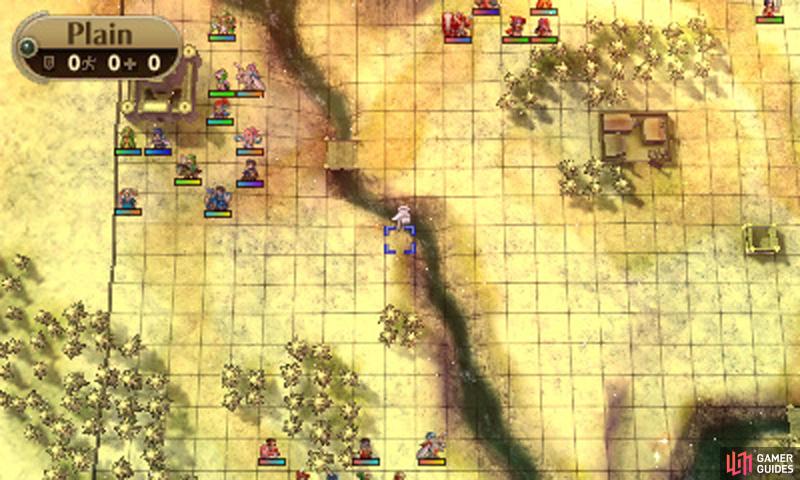
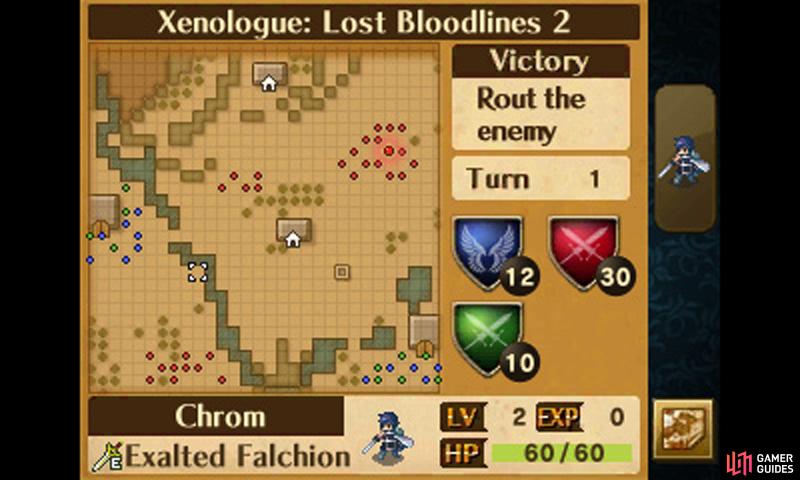
If you beat Lost Bloodlines 1, this mission shouldn’t pose a major threat. This time, you will be facing 30 enemies again, with another 10 green units to help you, but now you’ve swapped sides and this includes swapping your initial placement on the map too.
Your units will be begin besides the western and south-eastern castles, which is technically quite advantageous, due to the terrain benefit. However it means your units are spread out and you’ve got nowhere to run and hide.
Like before, if your army isn’t up to scratch, you can just deploy Chrom and your Avatar–pair them together and and have them sit on a castle, taking out the foes as they come. If you want to mix things up, you could try adding a second pair of characters to sit on the other castle; this will help spread the flow of enemies.
This defensive strategy is easier than on the previous map, since you start the mission right next to a castle, but watch out for Deen who has Counter–if you’re unlucky, you might not have space to attack him from range and will suffer a hit from his Counter.
At the end of the day, it’s probably easier and less risky if you have a strong and well-balanced army; the rest of the strategy assumes you have such an army.
This time you’re helping the Jugdrali battle the Archaneans and Valentians.
On your first turn, march your western regiment east to meet the small detachment of foes–it’s always a good idea to sort out the easiest foes first. Perhaps leave somebody in Ogma’s range to take him out during the enemy’s turn. Otherwise, leave the rest of the south-western foes to the green allies for now.
Your south-eastern regiment should march north-west to try and regroup with your western regiment; if feeling confident, however, you can stand your ground and use the bridges near the castle as choke points or have a strong unit run north to secure the fort, then face the enemies from there.
From the onset, all the enemies will move at once, so don’t expect many opportunities to relax.
On the second turn, your western troops should cross over the bridge and begin fighting the enemies on the other side.
Leave a strong unit behind the bridge, to protect your group from a rear attack and take caution of any flying units (although chances are they’ll attack the green allies). If you have any weak units, such as healers, they can hide behind the castle for now.
Meanwhile, your south-eastern forces should continue on their way to rendezvous with your other forces. If you spot a good opportunity, bait a few of the north-eastern foes who are marching your way. However, do keep an eye out for Deen, as his Counter skill can reflect damage at direct range.
The green allies nearby can distract the enemy while you make your leave (Jamke in particular can take out two enemies before he snuffs it).
During Turn 3, either pull back your western forces towards the castle (if you left any units there earlier) and brace for the oncoming enemies or keep to the other side of the bridge, using the bridge as a choke point (recommended).
Watch out for Gharnef (Sorcerer with Vengeance), Nabarl (speedy Swordmaster with a Killing Edge) and Tiki (tanky Manakete).
Like before, your south-eastern forces should continue marching west, baiting more enemies if necessary.
By Turn 4, your forces should have regrouped. Now you can safely fight the remaining enemies towards the west; once they’re dealt with, hop back to the castle side and use the bridge as a choke point while facing the advancing enemies from the east.
Alternatively you can lead the south-eastern enemies north and use the central woods and the village as cover.
Alm–the map’s boss–isn’t particularly dangerous, but do note he does 10 extra damage on his turn and has strong resistance against magic.
No Comments