
Information about the Nora Thunder Warrior in Horizon Forbidden West, including how to obtain it, how to upgrade it, and what the strengths and weaknesses of the Nora Thunder Warrior are.
The Nora Thunder Warrior outfit is probably the best armor in the game, as the skills on it benefit ranged combat greatly. Having access to more buffs to Concentration and Stamina Regen will make it a lot easier to slow down time and even use weapon skills. You should focus on getting this armor from the Arena first and foremost, then worry about the weapons after that.
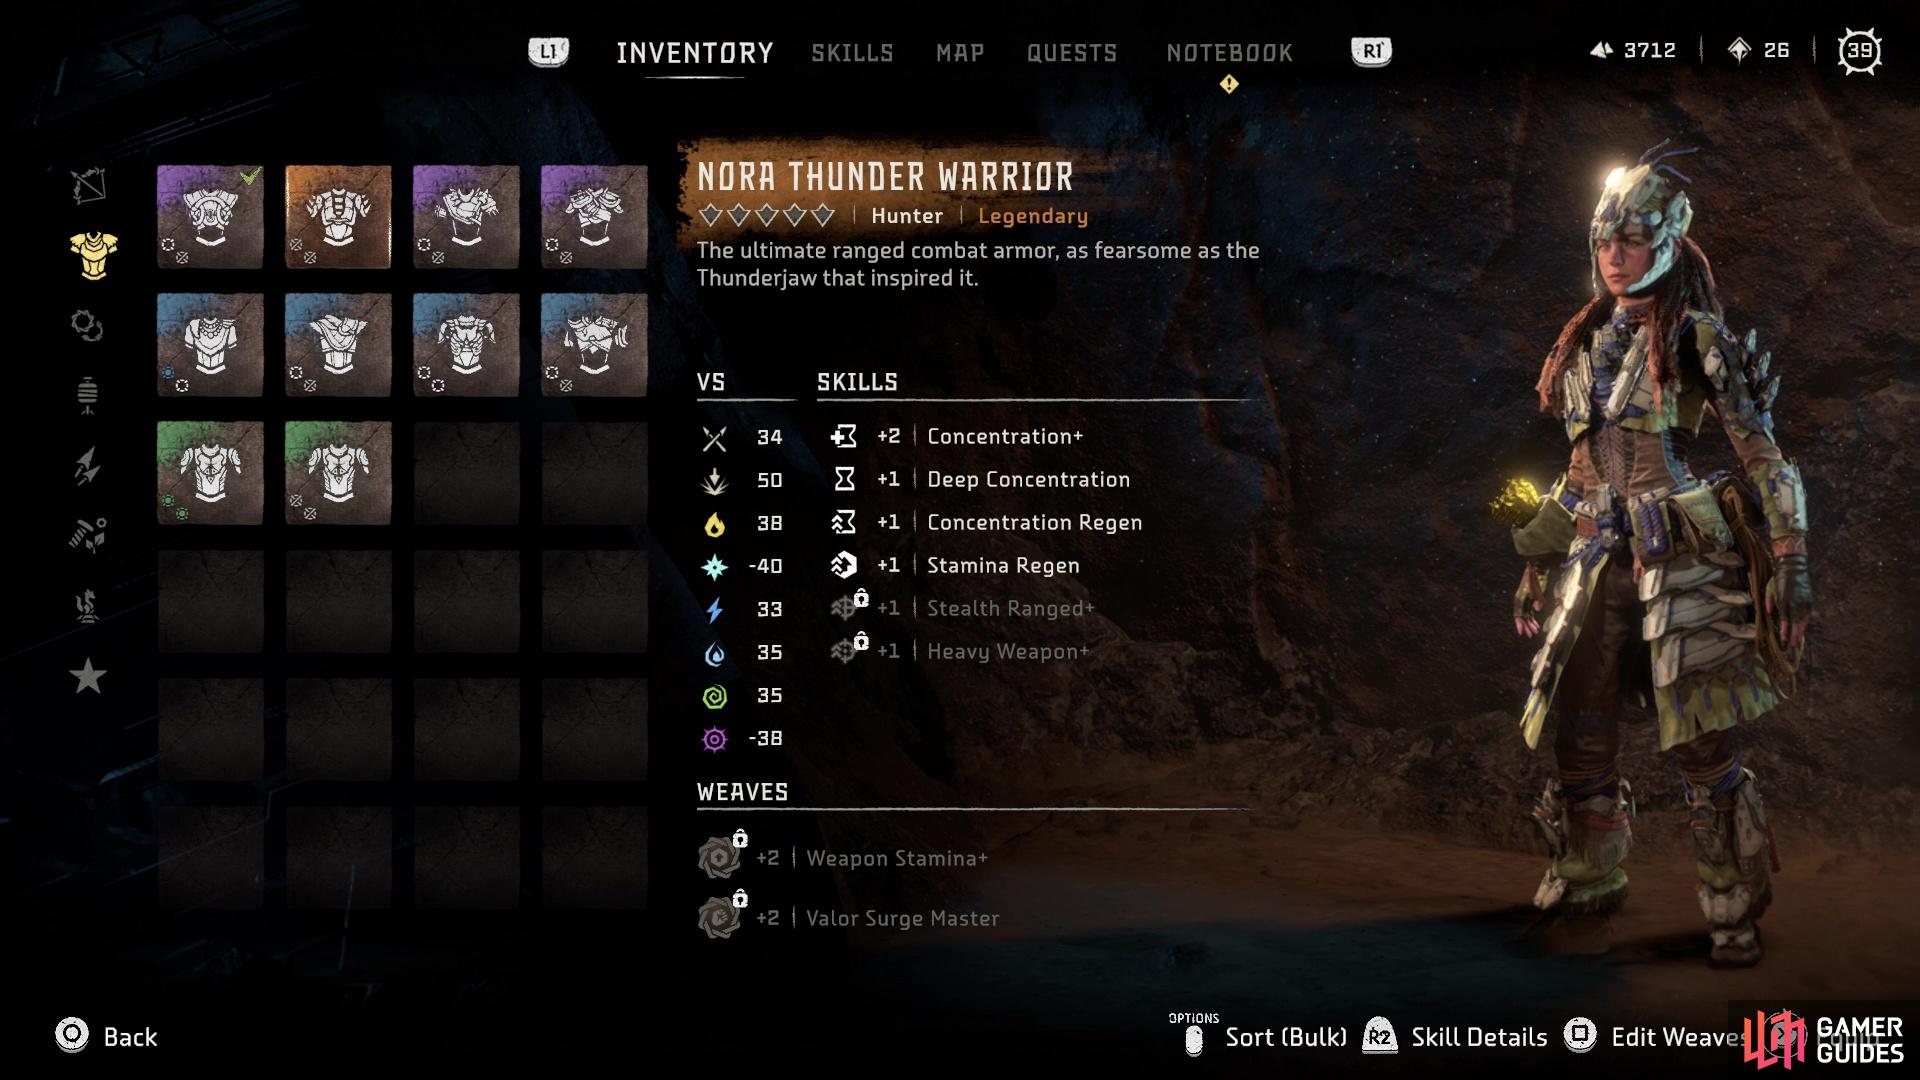
Nora Thunder Warrior Description
The ultimate ranged combat armor, as fearsome as the Thunderjaw that inspired it.
You can get this armor from the Arena
Where to Get the Nora Thunder Warrior
| Location | Cost |
|---|---|
| The Maw of the Arena | 54 Arena Medals |
The Nora Thunder Warrior outfit can be purchased from Dukkah, at The Maw of the Arena. In order to gain access to this NPC, you will need to have finished The Kulrut story mission. Once you have done this, you can find a pair of NPCs at The Maw of the Arena that give you an errand to reopen the Arena itself. You only need to speak with the NPCs, named Kalla and Dukkah, to gain access to Dukkah’s wares, so you don’t need to actually complete the errand to reopen the Arena. She will be marked on the map with a medal icon and is close to where you first encountered her. Speak to her, then select the option to Trade Medals to see the list of items she has, one of which will be the Nora Thunder Warrior outfit.
Nora Thunder Warrior Stats
| Resistances | Base | Rank I | Rank II | Rank III | Rank IV | Rank V |
|---|---|---|---|---|---|---|
| Melee | 34 | 38 | 42 | 43 | 49 | 55 |
| Impact | 50 | 55 | 55 | 60 | 65 | 65 |
| Fire | 38 | 38 | 43 | 48 | 53 | 55 |
| Frost | -40 | -35 | -30 | -20 | -10 | -5 |
| Shock | 33 | 39 | 47 | 47 | 51 | 55 |
| Purgewater | 35 | 35 | 41 | 47 | 51 | 55 |
| Acid | 35 | 39 | 43 | 43 | 49 | 55 |
| Plasma | -38 | -33 | -28 | -18 | -8 | -5 |
Nora Thunder Warrior Skills
| Skills | Base | Rank I | Rank II | Rank III | Rank IV | Rank V |
|---|---|---|---|---|---|---|
| Concentration+ | 2 | 2 | 2 | 2 | 2 | 2 |
| Deep Concentration | 1 | 1 | 2 | 2 | 2 | 2 |
| Concentration Regen | 1 | 1 | 1 | 2 | 2 | 2 |
| Stamina Regen | 1 | 1 | 1 | 1 | 2 | 2 |
| Stealth Ranged+ | – | – | 1 | 1 | 1 | 2 |
| Heavy Weapon+ | – | – | – | – | 1 | 2 |
| ::: |
- Concentration+: Part of the Hunter tree. Increase your Concentration limit, prolonging use. Aim with L2 and tap R3 to enter Concentration mode and slow down time.
- Deep Concentration: Part of the Hunter tree. Concentration depletes more slowly, prolonging use. Aim with L2 and tap R3 to enter Concentration mode and slow down time.
- Concentration Regen: Part of the Hunter tree. Recover Concentration faster. Aim with L2 and tap R3 to enter Concentration mode and slow down time.
- Stamina Regen: Recover Weapon Stamina faster. To use a Weapon Technique, aim with L2 and fire with R1.
- Stealth Ranged+: Part of the Infiltrator tree. Deal more ranged Impact damage while in stealth.
- Heavy Weapon+: Part of the Hunter tree. Deal more damage while using a heavy weapon. Heavy weapons can be shot off machines or picked up from fallen human enemies.
How to Upgrade the Nora Thunder Warrior
| Rank | Effect | Upgrade Cost |
|---|---|---|
| I | Increased Resistances | 600x Metal Shards, 1x Luminous Brainstem, 2x Slitherfang Primary Nerve, 5x Slitherfang Earthgrinder, 2x Frostclaw Circulator |
| II | Increased Resistances, Skill 5 Unlocked, Skill 2 Upgraded | 800x Metal Shards, 2x Luminous Brainstem, 2x Frostclaw Primary Nerve, 3x Frostclaw Sac Webbing, 2x Stormbird Primary Nerve |
| III | Increased Resistances, Skill 3 Upgraded, Weaves Unlocked | 1000x Metal Shards, 3x Luminous Brainstem, 1x Apex Stormbird Heart, 3x Apex Behemoth Heart, 10x Tremortusk Tusk |
| IV | Increased Resistances, Skill 6 Unlocked, Skill 4 Upgraded | 1200x Metal Shards, 4x Luminous Brainstem, 2x Tremortusk Circulator, 1x Apex Tremortusk Heart, 2x Tideripper Tail Fin |
| V | Increased Resistances, Skill 5 and 6 Upgraded | 1500x Metal Shards, 5x Luminous Brainstem, 2x Slaughterspine Circulator, 2x Apex Tideripper Heart, 1x Apex Slaughterspine Heart |
Nora Thunder Warrior Rank I Upgrades:
- Metal Shards: Common drop from all machines.
- Luminous Brainstem: Very Rare drop from all Heavyweight machines, as well as [Scorchers] and [Apex Frostclaws].
- Slitherfang Primary Nerve: Rare drop from Slitherfangs. Slitherfangs do not spawn in the wild until you have clear The Kulrut main story mission.
- Slitherfang Earthgrinder: Very Rare component from Slitherfangs. Must be detached before the machine is destroyed. These are the gears on the front, right underneath the mouth.
- Frostclaw Circulator: Uncommon drop from Frostclaws.
Nora Thunder Warrior Rank II Upgrades:
- Frostclaw Primary Nerve: Rare drop from Frostclaws.
- Frostclaw Sac Webbing: Rare drop from Frostclaws. Must avoid destroying the Chillwater Sac on its stomach in order to loot this.
- Stormbird Primary Nerve: Rare drop from Stormbirds. Stormbirds are very rare until you travel to an island to the far west during the main quest [Faro’s Tomb]. Alternatively, you may be able to find a Stormbird earlier in the mountains southeast of Cliffwatch, in the blacked-out, supposedly “inaccessible” part of the mountain range.
Nora Thunder Warrior Rank III Upgrades:
- Apex Stormbird Heart: Guaranteed drop from Apex Stormbirds.
- Apex Behemoth Heart: Very Rare drop from Apex Behemoths.
- Tremortusk Tusk: Legendary component from Tremortusks. Must be detached before killing the machine. Tremortusks do not spawn in the wild until you have completed The Broken Sky main story mission.
Nora Thunder Warrior Rank IV Upgrades:
- Tremortusk Circulator: Uncommon drop from Tremortusks.
- Apex Tremortusk Heart: Guaranteed drop from Apex Tremortusks.
- Tideripper Tail Fin: Very Rare component from Tiderippers. Must be detached before killing the machine. There is a Tideripper site found on the coast, to the southwest of Thornmarsh.
Nora Thunder Warrior Rank V Upgrades:
- Slaughterspine Circulator: Uncommon drop from Slaughterspines.
- Apex Tideripper Heart: Guaranteed drop from Tiderippers.
- Apex Slaughterspine Heart: Guaranteed drop from Slaughterspines.
No Comments