


| Bestiary |
|---|
| Rocktoise (Mark) |
| Items In This Area |
|---|
| Bangle • Firefly • Jade Collar • Survival Vest • Thief’s Cuffs x2 |
Ktjn the Lost Viera
After the aftermath of the events at the Tomb of Raithwall you’ll find yourself back in control of Vaan in the Muthru Bazaar in Rabanastre. There are a number of things you can do before you continue with the story, including a few hunts, but it’ll mostly be sidequests and possibly getting a few items that will help you in the long run.
Before you exit the bazaar, though, there is a NPC you can speak to here that will start a sidequest. Her name is Ktjn and she is a Viera that is trying to find a purpose in her life. You can find her sitting down in a little spot on the stairs in the northern part of the area, which is north of the Moogling Attendant. She will ask you questions and depending on your answers, she will give you an item. The first question she asks is “But the land, I cannot hear it… Should this not trouble me as a viera?”
-
Yes, you should be ashamed (+1)
-
No, don’t be silly (-1)
Each response you give to Ktjn has a hidden point counter attached to it, with the reward at the end of this little sidequest differing depending on the number of points you have accrued. You should have progressed far enough in the main story to be able to answer three questions, but it seems she can only ask one question at a time.
Bargains at the Bazaar V
Give the Viera whatever advice you wish, then it’s time to deal with all that loot you’ve acquired since the last Bargains at the Bazaar section and you’ve covered quite a bit of ground since then, indeed. Despite that, however, much of the loot you could have gained was too rare to bother farming, or simply old loot you could have harvested earlier. In particular, you may have obtained includes Aries Gems, Bomb Shells, Crooked Fangs, Earth Magicite, Sagittarius Gems, Solid Stones, Succulent Fruits, Taurus Gems, Yensa Fins and Yensa Scales.
For all the possible bundles these items are involved in you’ll need three Aries Gems, four Bomb Shells, four Crooked Fangs, four Earth Magicite stones, four Sagittarius Gems, two Solid Stones, four Succulent Fruit, three Taurus Gems, two Yensa Fins and one Yensa Scale. It’s probably not worth bothering with Aries Gems, Bomb Shells, or Sagittarius Gems yet, as you’ll get them from other sources easier later, and you can’t unlock any of their bundles yet. The Bazaar bundles that you can unlock right now are as follows:
| Loot Sold | Bazaar Bundle | Cost |
|---|---|---|
| Crooked Fang x2 Fire Stone x4 | Arrows Alight (Fiery Arrows, Longbow) | 2,800 gil |
| Succulent Fruit (x4) | Tinctures and Tonics (Potion x5) (Handkerchief x3) (Gold Needle x3) | 700 gil |
| Bomb Fragment (x5) Earth Stone (x4) Succulent Fruit (x3) | Wooden Pole (Cypress Pole) | 480 gil |
| Green Liquid (x3) Yensa Scale (x1) Water Stone (x4) | Rain of Tears (Aqua Shot, Vega) | 800 gil |
Hunt - Rocktoise
With the bazaar business out of the way, it’s time to finally crush the other Elite Mark you have access to - the Rocktoise. If you didn’t pick this hunt up, head to Montblanc at the Clan Hall to grab the hunt for the Rocktoise. Also, if you haven’t spoken to Montblanc since clearing Raithwall, he’ll now reward you for your exploits therein, as applicable:
| Reward (For destroying the optional Demon Wall) |
|---|
| 1,200 Gil |
| Electrum x1 |
| Reward (For destroying the mandatory Demon Wall) |
|---|
| 600G |
| Warp Mote x1 |
| Reward (For besting Belias) |
|---|
| Arcana x2 |
| Teleport Stones x2 |
| Rocktoise | . |
|---|---|
| Level | 16 |
| Weaknesses | Wind |
| Resistances | Earth (Absorbs) |
| Immunities | Confuse, Disable, Doom, Lure, Oil, Petrify, Poison, Reverse, Sap |
| Safety | Yes |
| Drop N/A | N/A |
| Steal | Potion (55%), Turtle Shell (10%), Aged Turtle Shell (3%) |
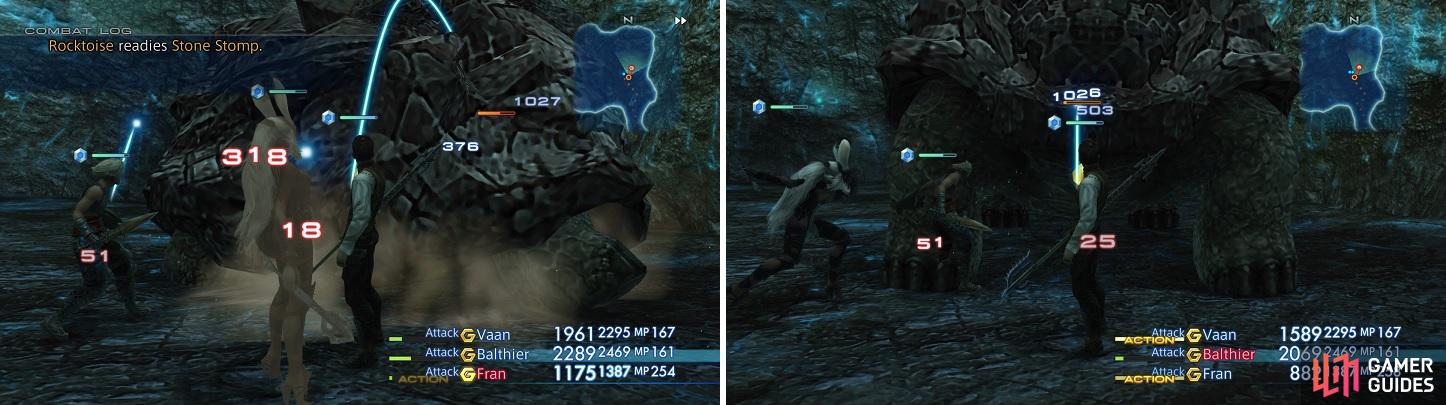
Rocktoise is a strong foe, which comes with the territory of Elite Marks (left). However, it should fall rather easily at this point (right).
Leave the Clan Hall and make your way down to the Gate Crystal in Southgate to teleport to Bhujerba. When you arrive, exit the aerodome and if you haven’t officially started the hunt, you need to speak to Pilika in Khus Skygrounds in Bhujerba (moogle standing on the wall at the southern end of the area). Once you do that, head on over to Lhusu Mines, with your destination being Site 2, where you ran into Ba’Gamnan and his pals earlier in the game. You should find Rocktoise stomping around in the open area, so it’s finally time to make some turtle soup out of it.
Despite being a giant turtle, the Rocktoise does have access to quite a few skills, but guess that’s a given considering it’s an Elite Mark. First and foremost, its normal attacks can inflict Slow, plus it can Blind your party with Flash. It can also cast Fire, Blizzard, Thunder, and Dark, although it only seems to use these when its target is out of reach of its physical attacks. Sonic Spin is an attack where it will spin its body and hit everyone in melee range, while Stone Stomp will do some decent damage against a character. Your characters will receive some minor damage from just attacking the turtle, around 5% of whatever the damage is you do. Also, when its HP gets to under 20%, its attacks will become unburdened by the restraints of the ATB bar needing to fill - faster, in other words.
Although you should be relatively well-equipped for this hunt by virtue of looting the Sandsea and Raithwall area, it doesn’t hurt to take precautions. Make sure you put Protect on everyone and have characters inflict the beast with both Blind and Slow, which will help immensely. Despite being blinded, the Rocktoise might still hit your characters quite often, so be prepared to heal. Rocktoise doesn’t drop anything, but you can steal a Potion, Turtle Shell or Aged Turtle Shell from it.
Once you finally vanquish the overgrown turtle, return to Pilika in Bhujerba to receive your reward.
| Reward (For terminating the giant terrapin) |
|---|
| 1,200 Gil |
| Hi-Potion |
| Survival Vest |
If you’ve completed all the hunts up to this point, your clan rank should improve to Vanguard. The next time you visit Montblanc he should acknowledge this, and reward you accordingly (Hi-Potion x3, Teleport Stones x2).
Pilikas Diary
There’s no need to rush back to Rabanastre just yet, however, as there’s still more to do in Bhujerba. Speak with Pilika after finishing up The Cry of Its Power (Rocktoise hunt) and she will ask one more favor of you: to retrieve her diary from Clio’s Technicks. She would go do it herself, but she’s been playing hooky quite often.
If you don’t remember where Clio’s Technicks is located, it’s in Miner’s End, a zone to the east of Khus Skygrounds. To help you with this errand, she will hand over a Merchant’s Armband, allowing you to access the second floor of the shop. Enter the establishment and go up the first set of stairs, where you should see a bookshelf straight ahead. This is where you will find Kilika’s Diary and you will have an option to read it or not. Reading it doesn’t matter in the end, because you can lie straight to Pilika’s face and still get that reward. Return the diary to Pilika and she will ask if you read it. Answer you “Read it” to receive a Bangle , while choosing “I’ve done nothing” will net you a Jade Collar , the better of the two rewards.
| Reward (For returning the moogle’s diary) |
|---|
| Bangle (By saying you read it) |
| Jade Collar (Choosing you didn’t read it) |
Bhujerban Madhu
There is one more sidequest in Bhujerba and it involves earning a hefty bit of Gil for very little work. Everybody’s favorite! In each zone, including the shops, there is a single bottle of Bhujerban Madhu that you can pick up. These bottles can be sold to specific people for 1,000 Gil each, with there being fourteen bottles in total. Each zone/place also has a specific NPC that will purchase the bottle, but you can pick up all 14 bottles and sell them to the same person, although you will need to exit and re-enter before they will purchase the bottle again. Their locations - and buyers are as follows:
–> Enter the Aerodome and make your way down the entry hallways past the flight clerks to the Gate Crystal, then search the corner of the room opposite the Gate Crystal. You’ll find the first bottle sitting on some luggage in the corner of this room. You can sell it to a nearby man sitting and talking with an Imperial Soldier (#1).
–> Next head outside to Travica Way and make your way to the southern end of the area, near the area transition to the Miner’s End zone. You’ll find the bottle of booze sitting on the ground next to a man who is kneeling whilst speaking to a kid. You can sell this bottle to the man leaning against the wall across from Mait’s Magicks shop (#2).
–> To lay your mitts on the third bottle, return to the armor shop (Rithil’s Protectives) along the northern end of Travica Way, and search the slightly ajar cabinet near the counter. You can sell it to the old lady in front of the counter (#3).
–> Inside of the weapons shop (Targe’s Arms), the bottle will be located on the upstairs, on some crates in the corner nearer the door. Head down the stairs near the counter and talk to a standing woman talking to a seated man - she’ll gladly buy the hooch off you (#4).
–> The magicks shop (Mait’s Magicks) is next, just head up the stairs near the door and search the table opposite the stairs. The Bhujerban Madhu is hiding in plain sight amongst a bunch of other containers. Sell it to the Bhujerban Guru, who is leaning against the wall nearby (#5).
–> Head west to Khus Skygrounds now and you’ll find the bottle on a crate north of a Bangaa merchant, on which a Moogle sits. The buyer is a woman leaning on a wall across from where you found the bottle (#6).
–> Make your way to the southern end of Cloudborne Row and head down a ramp south of The Staras Residence. You’ll find the Bhujerban Madhu on some crates. For the buyer, look across from the entrance to the Cloudborne; the Cloudborne Patron standing next to a prone Bangaa is your guy (#7).
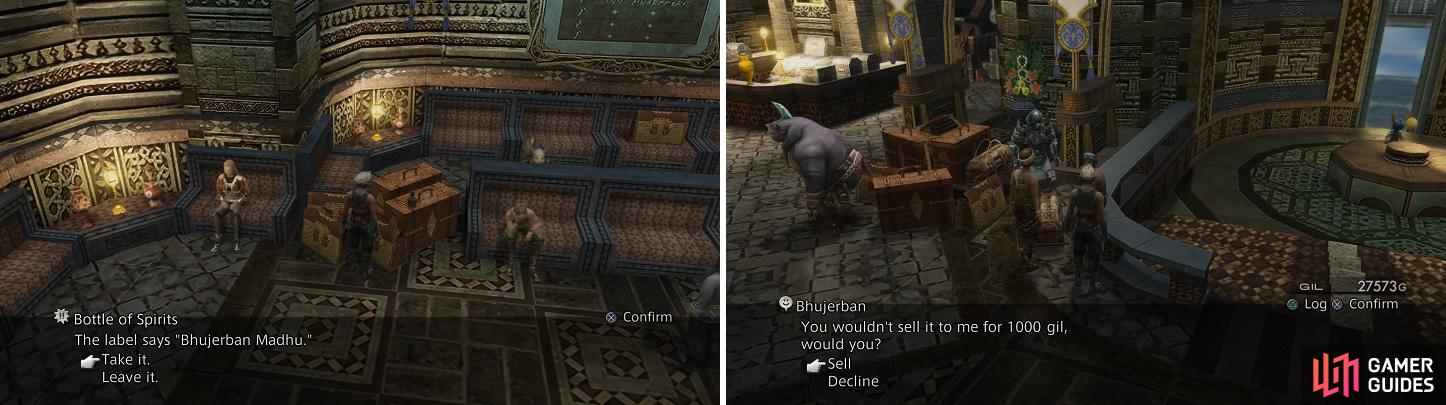
Each screen in Bhujerban has a bottle of the Madhu (left), as well as someone you can sell it to (right).
–> Turn east and enter The Cloudborne and search the area opposite the Notice Board. You’ll find the bottle on a round table nearest the bar, next to a passed-out woman. You can sell this to a Seeq sitting in an alcove opposite the bar (#8).
–> Return back to the southern end of the Cloudborne Row area and enter The Staras Residence. You’ll find another bottle inside, on a crate just to the right of the door as you enter. Unfortunately, you won’t be able to sell this one to the lady inside until after you finish the Antlion hunt later in the game, but you can sell it to another person (#9).
–> Make your way to the next area, Miner’s End, and search a crate just south of the entrance to Bashketi’s Gambits. To find the buyer, head south from the same shop until you spot a Bangaa speaking to a Moogle on a ledge; the Bangaa will be your man (#10).
–> Return north and enter the gambits shop (Bashketi’s Gambits), then head up the first flight of stairs near the door and search the bookshelf opposite them, whereupon you’ll find the bottle. You can sell it to the Seeq on the same level, near the stairs by the counter. (#11).
–> Next up is Clio’s Technicks shop, which is along the southwestern end of the district. The bottle is inside, on a crate to the left of the shop’s counter. You can sell this one to the Shop Clerk on the red carpet on the first floor (#12).
–> Twelve down, two to go. To get the first of these last two make your way to the southeasternmost zone - Kaff Terrace. Once there, descend a ramp and when you reach level ground between the ramp and some stairs, turn left to find a sitting Seeq. The bottle is on the railing next to him. Grab it, then head downstairs to the east and turn north - your buyer is a woman standing near the ledge to the east (#13).
–> The last bottle can be located in Lhusu Square, so head on over there and make your way down two flights of stairs north of the Save Crystal. Search the northern edge of the fountain to find the final bottle. You can sell this one to the man right next to the Seeq merchant in the zone (#14).
That’s all of the bottles, as well as who you can sell them to in each zone. There is no overarching reward for this sidequest, other than the 14,000 gil you received.
July the Streetear
The next sidequest you can do starts at Nalbina, but it should be noted that you won’t be able to actually finish it until later in the game. However, it will open up the way to a higher-leveled area, where you’ll be able to net yourself some Thief’s Cuffs - one of two pairs you can get right now, with a little bit of cowardice, and some directions.
Your destination is Nalbina, and to reach it you’ll have to either take two airship flights (one to Rabanastre and the other to Nalbina), use a Gate Crystal, or take an airship back to Rabanastre and just run there on foot. However you manage it, make your way to the area with the Gate Crystal - the West Barbican - and approach the two guards to the north for a scene (notice the woman kneeling down and hiding nearby). When that is over, head to the Chocobo stable and speak with Gurdy to rent one of the iconic yellow birds for 600 gil, then ride it over to the same two guards for another scene, with Gibbs running away in fear. July, the woman you saw before, comes over and thanks you for helping in her investigation on Gibbs and that she might see you in Archades.
Thiefs Cuffs in the Babbling Vale
While still on your Chocobo, head north and into the Mosphoran Highwaste, where you’ll find plenty of new enemies. They might not be impossible to kill right now, but they’re quite a bit stronger than what you’re supposed to be fighting, and really, you’re not here to fight them anyway. Fortunately, you don’t get attacked while riding a Chocobo, so you’re safe as long as you stay mounted. It’s important to know that your time on a Chocobo is limited, and your time remaining is shown in the bottom left corner of the screen. You are also able to sprint with the [X] button, but you only have three uses before you run out. You can choose to dismount prematurely by pressing the [Circle] button.
Let’s not dally, then. In the Southern Skirts area, take the exit to the northwest to get to Summit Path, where you will want to go to the northwestern exit, which will be marked as orange right now. This is because the Chocobo can’t enter this area, so dismount and enter Babbling Vale, a safe zone. There is a merchant here (sells nothing important) and a Gate Crystal, but you are here for the Thief’s Cuffs , which is located in an urn near the northwestern exit (one-time, always spawns). There, that wasn’t so bad, was it?
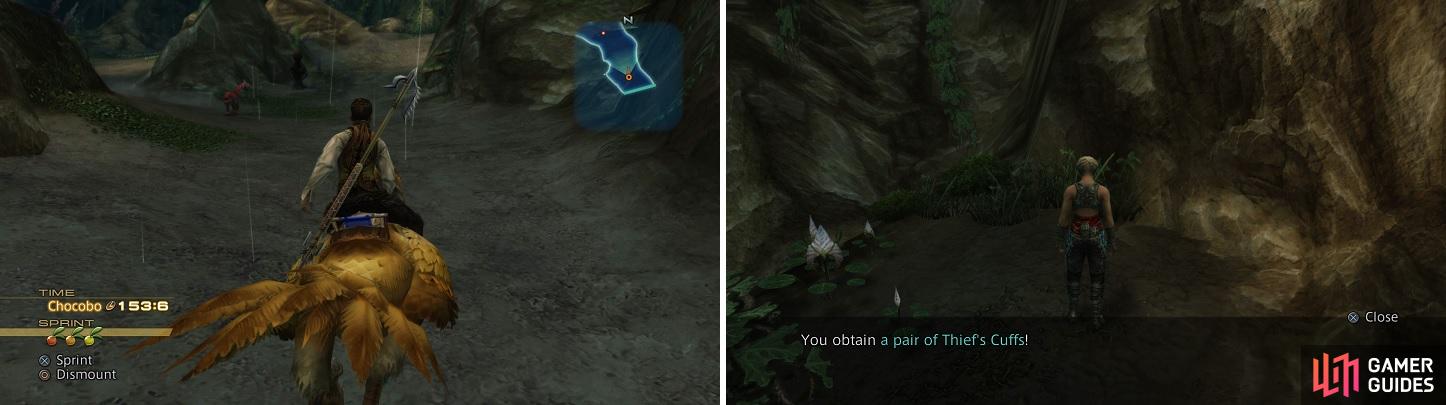
You can ride the Chocobo to Babbling Vale without having to fight anything (left). The Thief’s Cuffs will make it easier to steal items (right).
Thiefs Cuffs in the Zertinan Caverns
The second pair of Thief’s Cuffs can be found in the Zertinan Caverns, which will now be fully explorable. You remember them, they connected the Sandseas and the Westersand areas at numerous points? Despite the area’s newfound accessibility, however, the enemies in here will be tough, so you’ll just be going in and getting out as quick and painlessly as possible. This one is a little more dangerous as there will be a few enemies you have to run past, and there’s no Chocobo to help you. The entrance you will be using is in the Dalmasca Westersand, so teleport to that Gate Crystal, putting you at The Western Divide. From here, you want to go to Shimmering Horizons, which is two zones east and one south, with the entrance to Zertinan Caverns being towards the southwestern corner.
When you find yourself inside the Zertinan Caverns (the Invitation to Heresy zone) make your way southwest, until you find a path to the north. At this point turn north to reach a dead when, where you’ll find an urn containing a Firefly accessory. This container will not respawn once looted. Now make your way to the southwestern end of the area to find an area transition to the Sandfalls zone. So far enemies haven’t been terribly strong - weaker than the enemies in the Giza Plains you’re supposed to be fighting, but that changes in the next area. Seriously, get ready to hold down that [R2] button, because you probably don’t want to pick many fights in the next area.
When ready, exit to the Sandfalls zone where you will encounter some Buers who should be around level 39. Do your best not to provoke them and look for the path going south with the trap along it. Make your way there (feel free to limit yourself to one party member to avoid setting off the trap) and exit to Hourglass Basin zone. There will be a large rock in front of you, which you can push into the sand pit to create a path. Do so, then carry on past it to the east, then south, where you’ll find more Buers floating about.
You’re going to have to run past them, which will catch their attention. Consider only using one character, preferably one with Protect and high HP (Shielded Armor, perhaps), disable your Gambits to prevent any unnecessary distractions, and use Escape Mode [R2]. Run south past the Buers and whatever you do, don’t take the first exit to the west, which will bring you into Arthroza Quicksands, the home of one of the optional Espers, Adrammalech, who is a bit out of your league right now. Instead continue to the southern end of the level and hit an area transition to the southwest, which will lead you to The Undershore zone.
Make your way east until you find a Save Crystal - very nice - then note that there’s a secret path lurking about. Continue south from the Save Crystal and turn south past the, er, sandfalls? There’s an unmarked natural stone bridge running between the sandfalls, so cross it and turn south to find a small dead-end to the west, where you may find an urn containing a second set of Thief’s Cuffs . This urn doesn’t always spawn, so you may have to zone in a few times. The easiest way to do this is to continue east from the sandfalls and ascend a slope to reach the eastern edge of Hourglass Basin. Here you’ll find a couple of Grenades floating about, but they’re far enough away that they won’t come after you unless you go looking for a fight.
The Thief’s Cuffs don’t respawn, so once you get a set, exit the Zertinan Caverns the way you came and make your way back to whichever Gate Crystal you prefer - The Western Divide or Rabanastre’s Southgate. There’s more spectacular loot out there you can get your hands on before you’re supposed to, and if that interests you, continue with the next section “Elite Loot in the Estersand”, or, if you want to get on with the main story, skip down to “Rains in the Giza Plains”. While gathering some of this loot isn’t necessary to continue on with the story (it will, in fact, make the next leg of the story rather easy), it’s hard to over-estimate the quality of some of the loot you can pick up with a little effort.
No Comments