


| Bestiary |
|---|
| Jelly • Nightmare • Redmaw • Seeker • Tiamat (Boss) • Tyranorox |
| Items In This Area |
|---|
| Blood Sword (Drop from Seeker) • Brigandine • Flame Shield • Flametongue • Flametongue (Poach from Jelly) • Green Beret • Ice Shield (Drop from Redmaw) • Lente’s Tear • Mage’s Habit • Shielded Armor • Sledgehammer (Drop from Tyranorox) |
Entering the Henne Mines
To reach Mt. Bur-Omisace you’ll need to get through those barriers in the Golmore Jungle. To get through the barriers, you’ll need to find Mjrn, who is in the Henne Mines. Unfortunately the way to get to the Henne Mines is somewhat obscure, but the game has been giving subtle hints since you left Jahara. Remember when you left, you were promised a free Chocobo ride? Chocobos are the key to getting into the Henne Mines. As you explored the Ozmone Plain you may have noticed Chocobo tracks in the Field of Light Winds and Haulo Green areas, both of which lead to the southern half of The Shred, where you’ll find the entrance to the Henne Mines. In long-standing Final Fantasy tradition, Chocobos can traverse terrain that you, on foot alone, cannot.
You have two ways you can reach The Shred, the most obvious being to return to Jahara, rent a Chocobo from the Moogle, Gurdy, in the Banks of the Sogoht zone, then ride the bird to the Chocobo tracks in the southeastern part of the Haulo Green. From there, simply walk through the brush to find an area transition leading to The Shred. Alternatively, in the Sunlith Path zone you’ll now find two Imperial soldiers, one of whom is wounded and in need of a Potion. Hand one over and he’ll allow you to ride his Chocobo for free. Mount the bird, then head west to Field of Light Winds and search the southern boundary of the map, between the area transitions to the Sunlit Path in the east and The Greensnake in the center to find some Chocobo tracks.
However you manage it, once you’re in the southern section of The Shred, dismount the Chocobo and search the southern end of the level to find an area transition which leads to the Henne Mines. Before diving straight into Henne Mines, though, check out this southern area for some treasures. If you follow the northern edge to the west, you might run into a treasure that can contain a Float Mote. These are important, as they allow you to put Float on your characters, making it so they can safely walk over traps (you won’t get the spell version for a good while yet). Go southeast a tiny bit to the ledge in the middle of the area and you should spot another treasure with a Green Beret in it. There is one last treasure in the southwestern corner that might have a Flametongue .
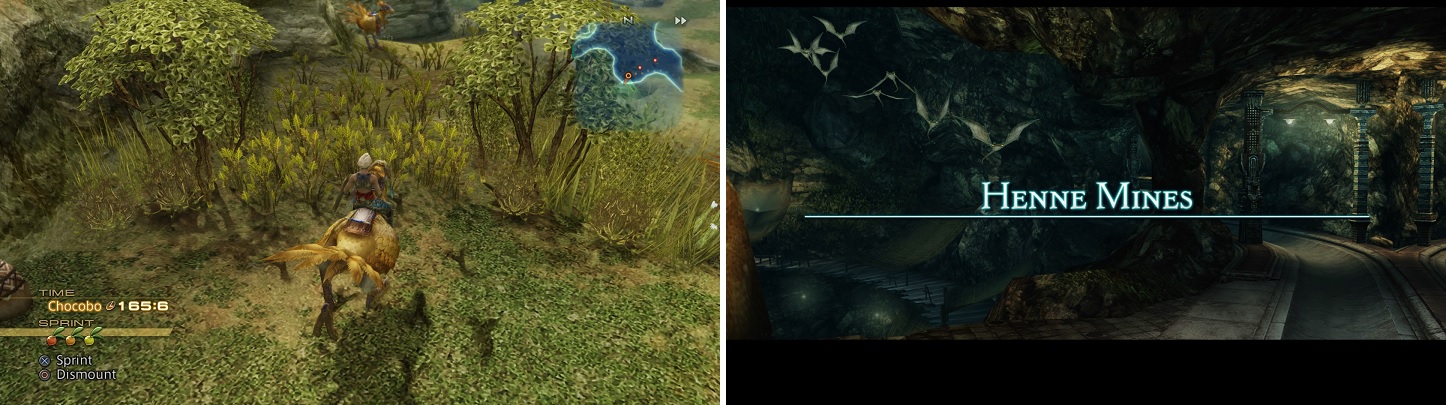
Look for the tracks while riding a Chocobo (left) to find the entrance to Henne Mines (right).
North Entrance
Enter Henne Mines now and you’ll find yourself in the first tunnel. The only enemy here is the Seeker, one you have fought prior in Barheim Passage and Raithwall. It hasn’t changed at all, other than it being stronger and a few of its drops/steals being different. Its very rare drop is now a Blood Sword, while its rare steal is a Nu Khai Sand - also, if you happen to have the Hunter Monograph, you might get a Bat Wing as a drop, which is used in a repeatable Bazaar recipe. There is a split on the map, but the eastern path is caved in, so try to go south to find a gate blocking your way. Double back to the north a bit and look for a blue light on a pillar near another locked gate. This is a switch and using it will unlock the gate to the south, allowing you to continue.
Pithead Junction A
This is just a pitstop, as it is a crossroads that leads deeper into the mines. If you look carefully, you entered from the north and there is a path leading out the western door. However, there are gates to the south and east, as well as a switch on the wall near the injured Imperial. Hitting the switch will open the latter two gates, but it will also drop some Jellies down on you.
Jelly :
Jellies are part of the Flan family of enemies, meaning they are a little resistant to physical attacks. Considering you’ll be faced with quite a few of them at once, they aren’t too bad, although they do have the ability to confuse party members with their Phantasmal Gaze ability. Outside of that, they can Divide when they get lower on health, and have access to both Aqua and Poison. You can receive a Water Magicite, Yellow Liquid, Teleport Stone or Float Mote as a drop, plus you can steal a Water Magicite, Yellow Liquid or 500 gil. Should you decide to poach them, you can net yourself either a Yellow Liquid or Flametongue . They are weak to fire.
The notable thing about the Jellies in Henne Mines is that they are a fairly good source for grinding. This is because it is easy to spawn them and you don’t have to worry about other enemies getting in the way. However, Pithead Junction A is not the ideal spot for this, as you would have to run through an area with a lot of Seekers and likely out of Henne Mines itself, plus it seems that the Jellies reduce in number the more times you do it. To continue, all you have to do is exit to the west before hitting the switch, but for now, take the eastern or southern transition.
Phase 1 Shaft
This portion (yes, portion) is one part of the Phase 1 Shaft zone that loops around and goes right back to Pithead Junction A (the other exit you didn’t take). The only enemies you will encounter here are Seekers and Redmaws, the latter of which are very similar to Seekers, so you might not even realize you’re fighting two different enemies. The whole point of this little loop, though, is located in the southeastern corner, where you’ll find the familiar green urn containing the map of Henne Mines.
Redmaw :
The Redmaw is not really much different than the Seeker, as they both have the same exact attacks (Gnaw, Leech, Joyous Soundwave and Self-Sacrifice). They might be marginally stronger than Seekers, though, and they definitely have different drops (Crooked Fang, Wind Magicite, Soleil Fang and Ice Shield) . You can also steal a Crooked Fang, 100 gil, or Taurus Gem, as well as poach either a Crooked Fang or Remedy. Note that killing Redmaws will contribute to the same chain as Seekers. They are weak to earth.
Once you’ve collected the map, return to Pithead Junction A, hit the switch again (no worrying about Jellies falling on your head this time) and take the western exit. This will lead you to the main portion of Phase 1 Shaft, which is just a north-to-south shaft with more Seekers and Redmaws. There are no treasures here, so just make the small trek to the southern end, where you will find a transition to the Phase 1 Dig zone.
Phase 1 Dig
There are finally treasures in this zone, although the majority of them contain nothing but motes, but it’s always good to have healthy supply of those in case of emergencies. Despite that, there are a few noteworthy additions to your increasingly large inventory here. Note that you may encounter a mimic starting with this area, which is called a Thunderbug. You can tell the difference if you look closely, though, as Thunderbugs have yellowish outlines on the “handles.” Follow the path, cutting down the Redmaws, until you get to the first fork, where you want to go south to a four-way intersection. East will bring you to a dead end with some treasures that have motes and west will eventually bring you around to where the southern path leads.
Thunderbug :
The Thunderbug is a mimic and disguises itself as a normal treasure, but it’s easy to spot the yellow coloring on it if you look close enough. Their normal attacks have the lightning element attached to them, which isn’t too far-fetched considering their name, and they know both Lunge and Leech. They are weak to ice and absorb lightning, and drop some Iron Scraps, Storm Magicite, Remedies or Soleil Fangs. You can also steal a Storm Magicite, Iron Scraps, or a Cancer Gem. If you decide to poach them, you might obtain some Iron Scraps or a Charged Gizzard. With the Knight Monograph, they can drop a Charged Gizzard and they are the only source for this loot, of which you will need three for the Bazaar recipe for the strongest hammer in the game.
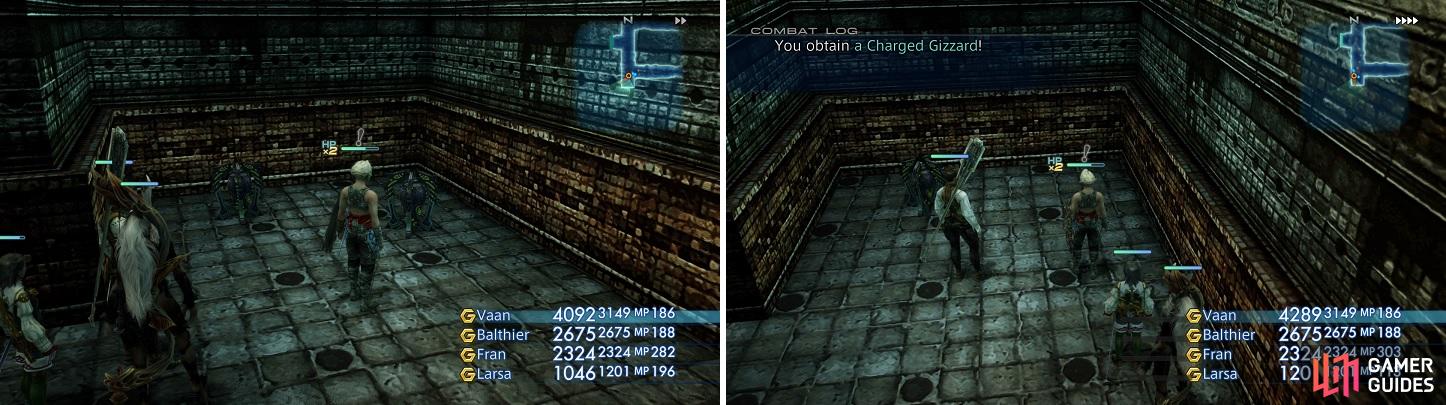
Hmm, those treasures look awfully suscipious (left). The Thunderbugs are your only source for Charged Gizzards in the entire game (right).
After going west, south and then west, you’ll come upon another new enemy, the Nightmare, as well as something important. There is a secret path to the north that isn’t marked on your map. This has a trap here, as well as two treasures, the southern of the two can contain either a Hastega Mote or Mage’s Habit , while the one at the end might have a Holy Mote or Brigandine . Return to the main path and follow the southern route, ignoring the dead end heading east, unless you want more motes, then go north and east. There’s another dead end north that leads to nothing terribly important, but the room further east with two Nightmares has one more treasure that could yield a Shielded Armor . All that is left is to continue north, stopping at the dead end to nab the treasure with the Bonecrusher technick, then step into the Crossover A zone.
Nightmare :
This seemingly undead-looking horse (it’s not undead) likes to teleport around, so any attacks in the middle of that will not land on it. It’s not too powerful, but it does know Blind, Slow and Poison, as well as Dark. In addition to its normal attack, it also has Kick, a slightly stronger physical attack. You can loot a Grimoire Togail, Dark Magicite, Nu Khai Sand or a Remedy from it, plus you can steal a Dark Magicite, Grimoire Togail or a Hi-Potion. Should you want to poach them, you will either get a Grimoire Togail or a Snowfly, the latter of which can also drop if you have the Mage Monograph (only need one for a Bazaar recipe). It is weak to holy.
Crossover A
As soon as you enter, you will want to go south, but you don’t want to use the stairs to the south, as there is a trap right there waiting for you. Instead, head north and double back south to the end, where you can nab a Flame Shield from the treasure there. Venture north, fighting more Redmaws, and there will be a split. One path goes north and the other goes northeast/east. Unfortunately, the transition to the east has a gate blocking your way, so you can only really go north for now. Note that there is a Tyranonox to the east, as well as another to the north. There’s nothing else to really do here, so just go to the north end of this area and take the exit to Crossover B.
Tyranonox :
This enemy might look familiar, as it is similar to the Wild Saurian from the Estersand and is probably the most powerful normal enemy in this part of Henne Mines. There is a chance that it might spawn confused, although the nearby Redmaws will likely snap it back into a normal state of mind. It doesn’t have much in the way of offensive capabilities, as its only skill is Sonic Fangs (very small chance of instantly KOing a character). It can drop an Earth Magicite, Prince’s Kiss, Tyrant Hide or a Sledgehammer , plus you can steal an Earth Magicite, 60 gil or a Leo Gem from it. If you Poach them, you can get a Tyrant Hide or a Tanned Tyrant Hide. Note that Leo Gems are needed for the Bazaar recipe one of the most powerful accessories in the game, should you want to stick around to try and steal them from this creature (need three), although there are easier ways to deal with this.
Crossover B
Upon entering, look to your south to spot two treasures in the little alcove, both of which are Thunderbugs. If you don’t have the three Charged Gizzards for the Bazaar recipe yet, then this is the most ideal place to farm them. As with previous areas, the gate along the southern path is locked, as well as the exit to the north, so you will need to go east along the northern path and to the north-to-south passage along the eastern side of this zone. There will just be more Redmaws here to bother you, so swat them away and exit to the south to Pithead Junction B.
Pithead Junction B
This might place look familiar and if you recall not much earlier in this same dungeon, pressing the switch here will make it rain Jellies. However, unlike the previous room, the game will always spawn a lot of them here, so you can use this to your advantage to grind a little bit. Since they are weak to fire and you should have purchased Fira recently from Jahara, set a gambit to attack fire-weak enemies with Fira to clear the whole lot before they have a chance to do any damage with their confusion. The easier way to respawn the Jellies is by hitting the switch against, zoning back through Crossover B to Crossover A, then back to this zone. A good level to stop is around 25-27 or so, if you feel like grinding all the way there.
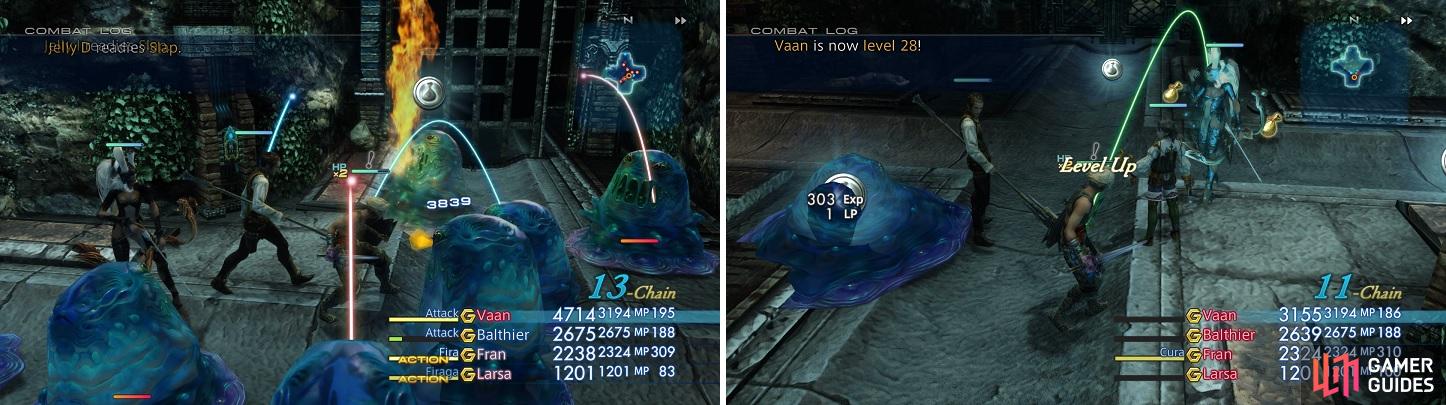
You can do some decent grinding on the Jellies to level up your characters here.
Once you have exhausted yourself of the grind, make sure the switch is blue in color and exit to the west, back to Crossover A. Go north to Crossover B once more, then in a circle from the south and to the northern exit, which will allow you to finally continue. Upon entering Staging Shaft, you will view a scene, where Mjrn will make her debut, obviously under the control of something, as she storms off into the next room. Touch the Gate Crystal to heal up, and don’t forget to save, then venture north after Mjrn to come face-to-face with the next boss, Tiamat.
Boss - Tiamat
Tiamat can be a little bit of a pain in the butt, but it’s not too bad, especially for the first half of the fight. It will typically use Aero and Reflect quite often in the beginning, so if you have Larsa tossing spells out with Shades of Black, it might be wise to nix that to avoid getting walloped by your own teammate (this also goes for anyone else using magicks). Its normal attack can inflict Petrify, which means that Rake can as well. You might also see Tiamat throw out Disablega, which can prove quite troublesome should it land, as you cannot perform any actions while afflicted.
Luckily, you should have purchased some Black Belts back in Eruyt Village, so go ahead and equip those to negate Disablega’s threat - unfortunately, you can’t do anything about Larsa, but a Remedy with Remedy Lore 1 will get rid of Disable, plus you also have Esuna. Once you get Tiamat to below 50% health, it will begin using Breath. This move does a fair bit of damage, plus it can also inflict Sap. Against, a Remedy Lore 1 corresponding item will get rid of this, but Regen will also. It also seems that Tiamat will forgo using Aero and Reflect at this point and stick with Rake and Disablega, in addition to Breath. Tiamat absorbs wind, so don’t forget to unequip the Gladius if you’re using it. It is weak to earth and takes reduced damage from all other elements.
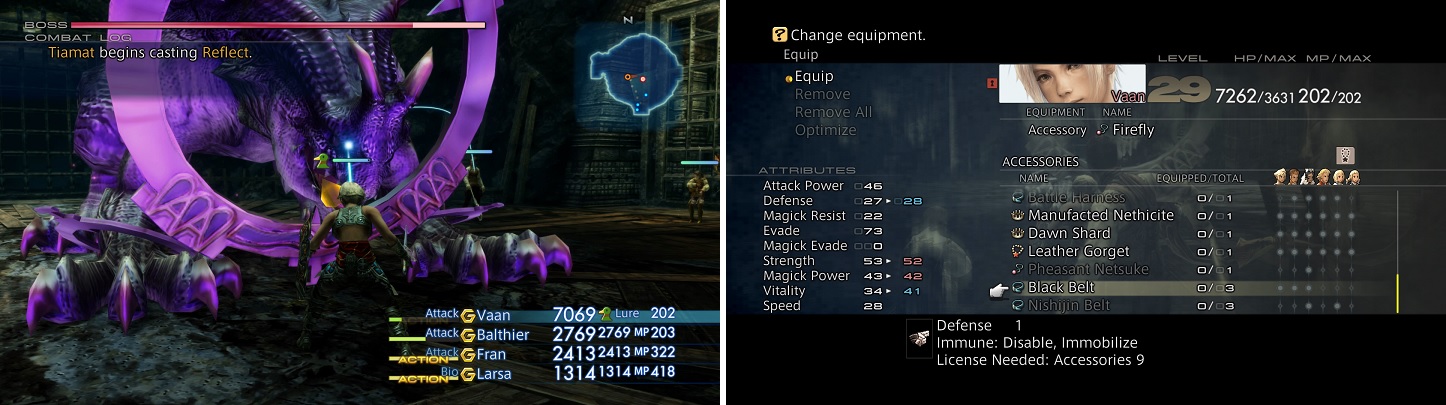
Be careful of Tiamat’s Reflect (left). Black Belts will help in diffusing Disable being cast on your characters (right).
After the fight is over, Mjrn will finally be free and will tell you the circumstances in which she ended up at Henne Mines. You will automatically return to Eruyt Village, where some more scenes will occur. Fran will say goodbye to her village and you will receive Lente’s Tear , a key item that will allow you to get past those barriers in Golmore Jungle.
No Comments