


| Bestiary |
|---|
| Giza Rabbit • Hyena • Slaven • Sleipnir • Urstrix |
| Items In This Area |
|---|
| Broadsword (Drop from Sleipnir) • Blind • Cotton Cap (Drop from Hyena) • Headgear (Drop from Urstrix) • Shortbow (Drop from Slaven) |
Enemies in the Giza Plains
You’ll enter the Giza Plains in the northern-most of its eight areas - the Throne Road. Your destination is due south, to the Nomad Camp, but it’s worth discussing some of the new critters here, as you’ll certainly encounter a few of them on your way south.
Giza Rabbit:
These cute little docile puffballs merrily and obliviously hop around the Giza Plains doing no harm, barely capable of mounting much of a defense if attacked. In fact, these critters will heal injured characters that stand near them for long enough. If you do attack them, however, they’ll flee with a good bit of speed and cast Protect on themselves. Aside from basic curatives (Potions and Phoenix Downs), they drop Water Stones and Drab Wool. You can also steal a Water Stone, Drab Wool or an Antidote from them. Giza Rabbits are weak to Fire.
Hyena:
The most common monster in the Giza Plains is the Hyena, which more or less, fights identically to the Wolf. You can regularly find them in groups of three, and they combo frequently, even if their combo total isn’t terribly impressive. They do slightly more damage and have slightly more HP than the weak Wolves you were fighting in the Estersand, but they’re a minor increase in difficulty, at best. As for their loot, you can steal a Fire Stone, a Wolf Pelt and a Potion from them, while they drop largely the same items, but in additon to the aforementioned items they also have a chance to drop a Cotton Cap (Mystic Armor 1). Hyenas are weak to Water damage.
Slaven:
These bipedal giants are basically giant mouths propped up on two pillar-like legs. Given their size, it should be no surprise that Slavens are the most powerful foes currently lurking in the Giza Plains… well, the most powerful foe you currently have any real chance of defeating. They have around three times as many HP as a Hyena and capable of dealing around 17~ damage with its basic melee attack and over 20~ damage with its Gnaw attack. While relatively strong (at least compared to the other weak monsters in this area), its truly dangerous attack is Stomp, which can deal over 60~ if it lands. You can steal an Earth Stone, Tanned Hide and 50 Gil from them, while they can drop an Earth Stone, Tanned Hide, a Shortbow (Bow 1) or Eye Drops. Slavens are weak to Wind damage.
Sleipnir:
This horse-like monster can currently be found only in the southern reaches of Starfall Field, and only a single one spawns at a time, at that. It rivals the Slaven in terms of HP, and its attacks, while relatively powerful, aren’t quite as painful as the Slaven’s Stomp. Its normal melee attack will deal around 26~ damage while its Kick attack will set you back somewhat further, dealing around 34~ damage. As for noteworthy loot, it drops (and you can steal) a Molting and a Storm Stone. In addition it also drops a Broadsword , but frankly, you’re better off just buying this, or stealing one from a Cactite. Other than this, you can steal 30 Gil or they can drop a Potion - neither of which are worth raising a fuss over. The Sleipnir is weak to Ice damage.
Urstrix:
This large owl-bear mutant is considerably stronger than the Hyena, having nearly twice as many HP and capable of doing more damage. Its normal attack will do around 14~ damage, while its Slap attack is slightly more powerful at around 19~ damage. It also has a fairly high combo rate, albeit with few hits per combo, and it can cast Protect to mitigate physical damage dealt to them. Still, this beast shouldn’t be too dangerous on its own, and they rarely travel in groups, although they may be found near other monsters. Items you can steal include an Earth Stone, a Large Feather and Echo Herbs, while they can drop a Large Feather, an Earth Stone, a Potion and Headgear (Light Armor 2). The Urstrix is weak to Wind damage.
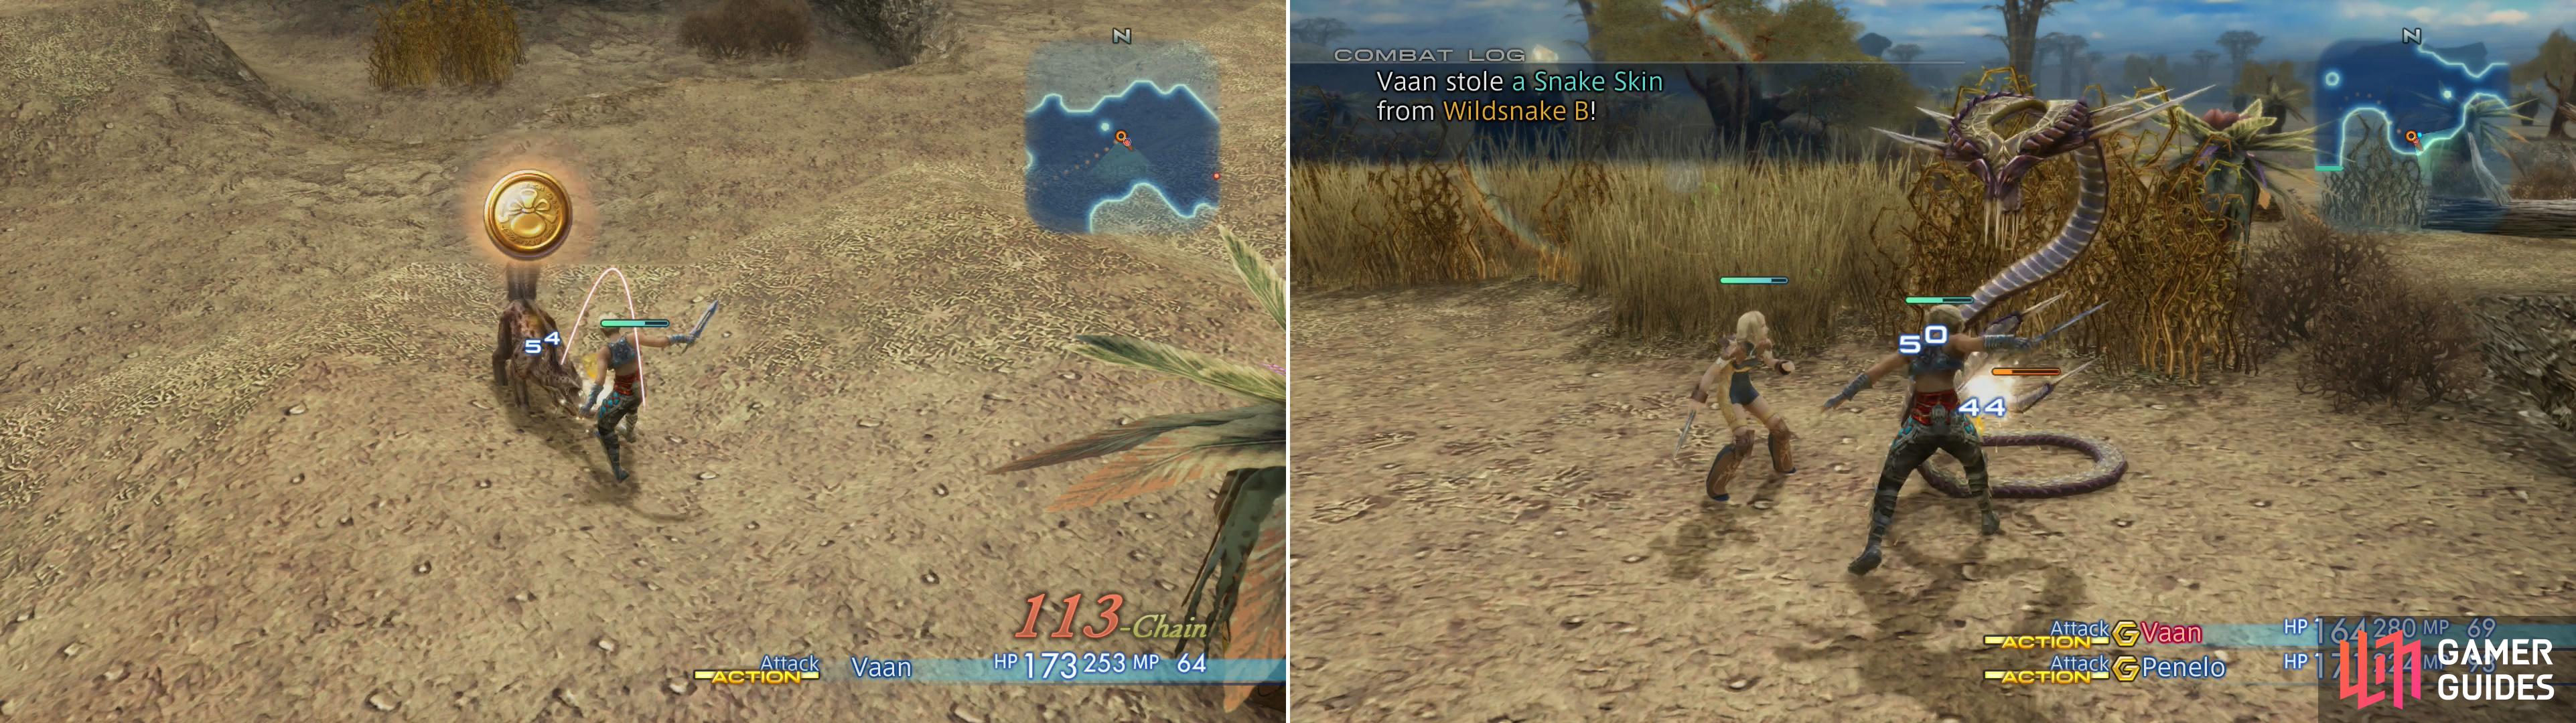
The more of the same monster you kill consecutively, the higher your battle chain number (left), improving loot drops. Some rare loot, like Snake Skin can only be stolen (right).
Wildsnake:
The most elusive critter in the Giza Plains, you’ll only find this monster in the Toam Hills, southeast of the bridge in the center of the area, just west of where a lone Slaven prowls a narrow trail, east of the area transition to the Starfall Field area. You won’t find the Wildsnake, it’ll find you, just stand west of where the narrow trail begins, west of the Slaven, and it should appear and ambush you.
Its strength does not befit its rarity, as it’s hardly any more of a threat than an Urstrix, but it can achieve a higher combo hit count than most foes you’ve faced so far. It has only two attacks, a regular attack and Gnaw, both of which deal about the same damage (17~). It is, however, an easy, early source of Snake Skin, which is required for several Bazaar items, including a powerful weapon currently far out of your means. Not only can you commonly steal a Snake Skin from the Wildsnake, but it has two chances to drop it, too. Other than that, you can steal a Wind Stone or a Leather Breastplate (Light Armor 2), or it can drop a Wind Stone or a Teleport Stone. Wildsnakes are weak to Ice damage.
Those, then, are all the creatures in the Giza Plains given the current weather conditions (more on this later). You may have noticed a pair of hairy hulking brutes in Starfall Field - Werewolves - but they’re safely outside of your means to kill, so they won’t be mentioned here. As for the loot you should consider harvesting - Large Feathers, Fire Stones, Moltings, Tanned Hides and Drab Wool all contribute to unlocking Bazaar items. You should only need around three of each of these (save Fire Stones - you’ll need six for one Bazaar bundle) to meet all their recipe requirements in the Bazaar.
As for the equipment that the monsters of the Giza Plains can drop, much of it isn’t worth the trouble. Cotton Caps are easy to acquire, given how numerous (and hence, chainable) Hyenas are, but the Slaven’s Shortbow and the Urstrix’s Headgear are both more trouble than they’re worth, and the Sleipnir’s Broadsword can be obtained more easily from other enemies. Of course, the Werewolf does drop a Slasher (Axes & Hammers 3) but the amount of grinding (both in levels and in gear) you’d need to do to best Werewolves reliably enough to get it to drop puts this weapon safely outside the realm of practical consideration.
All in all, this is, at worst, a very moderate amount of grinding and should prove no trouble for most players, but you may just want to save such an endeavor for after you visit the Nomad Camp.
Tutorial - Advanced Chaining
One more thing worth noting before you continue on your way in the Giza Plains is battle chains. This was briefly touched on earlier, but now that you’re in the Giza Plains you have numerous areas you can run between, allowing you to spawn a more or less inexhaustible supply of foes to chain, making it a fine time to discuss this aspect of the game in more detail.
As mentioned earlier, killing multiple enemies of the same type in succession will increase your battle chain. Entering a civilized - or at least safe - zone will end your chain (if you’re forced to control Vaan, it’s a safe area), as will killing a different sort of monster or touching a Gate Crystal or Save Crystal. The prime example in this area, due to their numbers, are Hyenas. Kill six Hyenas without doing anything to break the chain and you’ll be at a 6-Chain. Cool. So what’s the point? Well, as you increase your battle chain your chain level will increase. There are four chain levels, which can be noted by the different battle chain text that pops up every time you make a kill, or, more importantly, by the different loot icons enemies begin to drop.
At chain level one, enemies will drop the typical, drab brown loot bag, while they’ll drop silver loot coins with a glowing blue aura at chain level two. The loot icon for chain level three is a glowing gold coin while the chain level four icon is a large, elaborately detailed loot coin. The more magnificent icons fittingly denote the more lucrative loot found within, as not only will you get rare items more frequently, but you’ll often find multiple items per drop!
| Item Rarity | Level 1 | Level 2 | Level 3 | Level 4 |
|---|---|---|---|---|
| Common | 40% | 45% | 50% | 55% |
| Uncommon | 25% | 30% | 35% | 40% |
| Rare | 5% | 8% | 12% | 18% |
| Very Rare | 1% | 3% | 5% | 7% |
That’s the general idea, then. The more of a single type of enemy you progressively defeat, the higher your battle chain goes. The higher your battle chain, the higher your chain level. The higher your chain level, the more/better loot enemies drop. In addition, picking up high level chain loot items also has a chance to heal you or cast protective magicks on you, such as Protect or Shell.
Of course, it’s not quite that simple. You increase your chain level by increasing your battle chain (killing more of the same enemy sequentially), but there’s no set battle chain number that will increase your chain level at any given time. Numerous factors come into play, but one of the biggest factors is the loot drop itself. If you continuously pick up loot enemies drop, your chain level will increase slower. If you ignore low chain level loot drops, however, your chain level will increase much faster.
While it’s gut-wrenching to leave perfectly good loot on the ground (yes, loot will vanish over time, or if you leave the area without picking it up), the difference in chain level can be quite extreme; if you ignore all loot until you hit chain level four you might manage this at battle chain 25~, whereas if you pick up everything you might still be stuck on chain level three at battle chain 60~. These numbers are merely examples from recent experience, the range of disparity may be quite a bit higher. Considering the amount of loot this constitutes, it’s easy to recommend ignoring low-quality loot if you plan of chaining a great number of foes.
There is an exception to the whole “don’t pick up loot before chain level four” rule, however. When you kill an enemy, there’s a chance that the battle chain number on the bottom right of the screen will flash when it appears, rather than remain solid. When it flashes, this indicates that it’s safe to pick up loot, and it will remain safe until you make your next kill in the chain… provided the battle chain number doesn’t flash again. Consecutive flashes are possible, after all. This likely won’t occur often enough to allow you to grab everything, but if you kill several foes in the same area and the battle chain number flashes during the process, you can safely pick up any loot still remaining. Just be sure to stop being so plunderific the next time you get a solid battle chain number after a kill.
Nomad Village
Now that all that business is out of the way and you know what to kill, why, and how to most efficiently farm enemies… it’s time to proceed to the Nomad Village! From the area transition to Rabanastre continue south through the Throne Road area, killing any Hyenas that stand in your way. The area transition is along the southern edge of the area.
There are an awful lot of NPCs here you can talk to, but there are a few characters of specific interest you can talk to. Start by talking to the Moogle named Nutsy near the area transition, who will tell you about the Giza Plains’ dry season and rainy season. Right now, of course, it’s the dry season, but this will change eventually, and with the change in weather expect to see a change in fauna.
You can also find a merchant Nomad (named Arjie when you talk to her) just across from Nutsy, and she sells a great deal of goods, almost all of which can be purchased from the merchants in Rabanastre. The one exception is the Bangle accessory, which allows you to view detailed enemy stats as if you had used the Libra technick while equipped. Although Libra doesn’t cost anything to use, the fact that you don’t have to worry about using it when it wears out is better in the long run, at least for now.
Do whatever shopping you want and talk to the various NPCs around town. Some will mention a missing kid named Jinn, others will refer you to the Nomad Elder near the tent. You can also pester some tame Cockatrices, if that amuses you for whatever reason. When you’re done messing around, talk to the aforementioned Nomad Elder - Elder Brunoa - near the tent (just west of the Cockatrice pen) and she’ll tell you a bit about Sunstones before referring you to Masyua.
Leave Elder Brunoa and head north to the monolithic dark crystal, near which you’ll find Masyua. Chat with her and she’ll explain the economics of the Nomads, specifically concerning Sunstones. Simply put, they’re too valuable to let you have one, but fortunately she’ll propose an exchanges of services. Hear her out to learn about the problem she needs resolved, then agree to her terms. After the conversation, Vaan will walk off and have the misfortune to cross paths with Penelo. Or perhaps this meeting wasn’t an accident, after all? In any event, she clearly suspects Vaan of being up to no good, so she resolves to travel with Vaan to keep an eye on him.
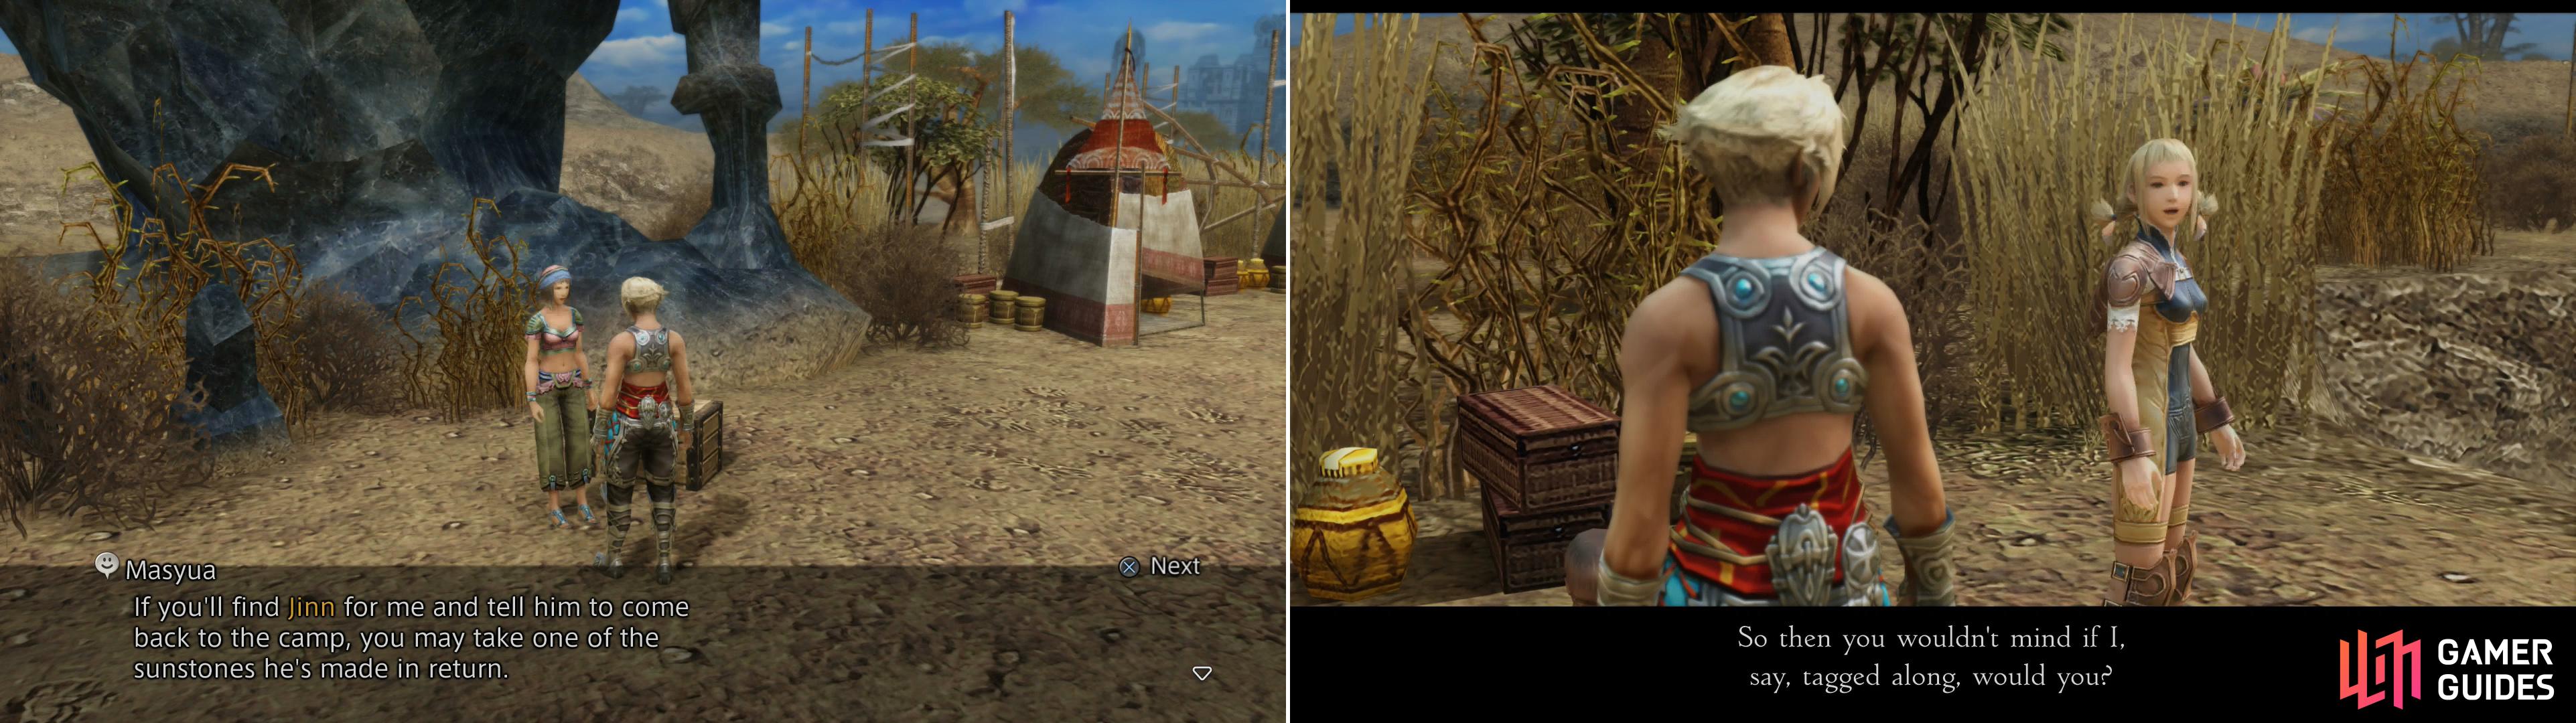
Talk to Masyua near the dark crystal and she’ll off you a job by which you can earn a Sunstone (left). Penelo will stop you as you leave the Nomad Village and insist on joining you (right).
The first thing you should do as soon as Penelo joins your party is assign one of the classes to her. It’s important to note that Penelo does end up having one of the highest Magick stats when she reaches level 99, so a class like Black Mage, Red Battlemage or White Mage could be a suitable fit for her. She does already come with Cure as one of her innate abilities, meaning taking her on the White Mage route right now won’t expand her casting options very much. Still, none of those three are bad choices, but if you want to wait and see what else comes along, that’s fine, too. She’s more than capable enough to help out without a job right now. Whatever you choose, fit her with some new equipment and it’s time to explore Giza Plains.
You will have two goals while visiting the Giza Plains right now, the first of which is to find this Jinn boy who is holding onto these precious stones you need. Looking at your map, you see the marker to the south of the Nomad Village, and you can approach it from either the west or east. However, there’s an important item to grab in Toam Hills to the west, so head in that direction. As you leave the village, Penelo will hand you 3 Potions and 2 Phoenix Downs, as well as very briefly introduce you to Gambits.
| Objective | Reward |
|---|---|
| For teaming up with Penelo | Potion (x3), Phoenix Down (x2) |
Tutorials - Party Controls and Gambits
Controlling two characters at once can be quite the burden, especially with the active combat system of this game. That’s where Gambits come into play, which are one of the biggest features of Final Fantasy XII. Although you don’t get the chance to delve too deeply into them right now, think of them as pretty much telling the AI what to do in battle without you having to control every single action of theirs. For now, your only Gambit seems to be that Penelo (or Vaan if you decide to control Penelo) will attack whatever enemy you are smacking.
Once you’ve regained control of Vaan, access your battle menu and be sure to turn your Gambits on. This will ensure that if you decided to take control of Penelo (open the battle menu and press left or right on the directional pad), that Vaan will attack on his own and not be utterly useless.
Speaking of changing characters, you can do this simply by pressing [Up] or [Down] on the D-Pad, selecting the preferred character, then pressing [X]. You’ll take direct control of your party leader (save in safe areas, where you’ll be obliged to control Vaan). Even though you can only directly control one character at a time, you can issues commands to all of the characters in your party freely. Just bring up the Battle Menu and press [Left] or [Right] on the D-Pad to switch between the Battle Menus of the different characters and pick what combat commands you wish. The characters will attempt to resolve these commands first, before resorting to whatever Gambits they might have active at the time.
Searching for Jinn and the Sunstones
Now that you have Penelo in your party, you can more easily accomplish a few tasks - like two new hunts. First, however, it’s time to go hunting for those Sunstones, and this gives you the perfect excuse to explore the various parts of the Giza Plains. The monsters and what they dropped were discussed earlier, so you’ll be left to your own initiative as far as that goes, but there’s still a bit to do aside from searching for Jinn and hunting monsters for their sweet, sweet loot. Fortunately, that “bit to do” happens to be in the Toam Hills. What luck! From the area transition to the Nomad Village follow the eastern boundary of the Toam Hills south past a bridge, then turn east, dispatching any foes that pester you on your way.
Continue down a narrow trail to the east to reach a dead-end clearing. There will be a Slaven along the way, while at the end, there will be a trio of Hyenas. Or rather, two Hyenas and an Alpha Hyena. Did you know that female hyenas - real hyenas, anyways - are larger and have a… well, nevermind. Kill the Alpha Hyena first and once the coast is clear, you should see at least one treasure in the southeast corner. Loot it to get the Blind magick (Black Magick 2), which is the only way to get the spell in this version of the game.
Leave this clearing behind and return back west, then turn south and head into Starfall Field. Your goal is to the east, just make sure to steer clear of the two Werewolves on the southern side of this area, as they will make quick work of Vaan and Penelo. If you spot a lootable urn next to the bridge as you enter, check it out, as it might contain a Dark Mote . Motes are items that mimic the effects of their corresponding magick, and Dark is one of the better spells in the early game, as it hits all of the enemies in an area around your target.
Exit the Starfall Field area via the area transition to the east to reach the small Crystal Glade area, where you’ll find Jinn sitting near a dark crystal. Talk to the kid and he’ll tell you his plight. Seems the kid hurt his leg (not too much to crouch, though) while running from some monsters, and he can’t finish the job of making Sunstones. Poor thing only had one left, too! You can see where this is going, right? Explain the situation to him and he’ll make the obvious deal with you; he gives you his last Shadestone, you run around the Giza Plains and absorb the energy from the glowing dark crystal and create a Sunstone, which you can keep for yourself.
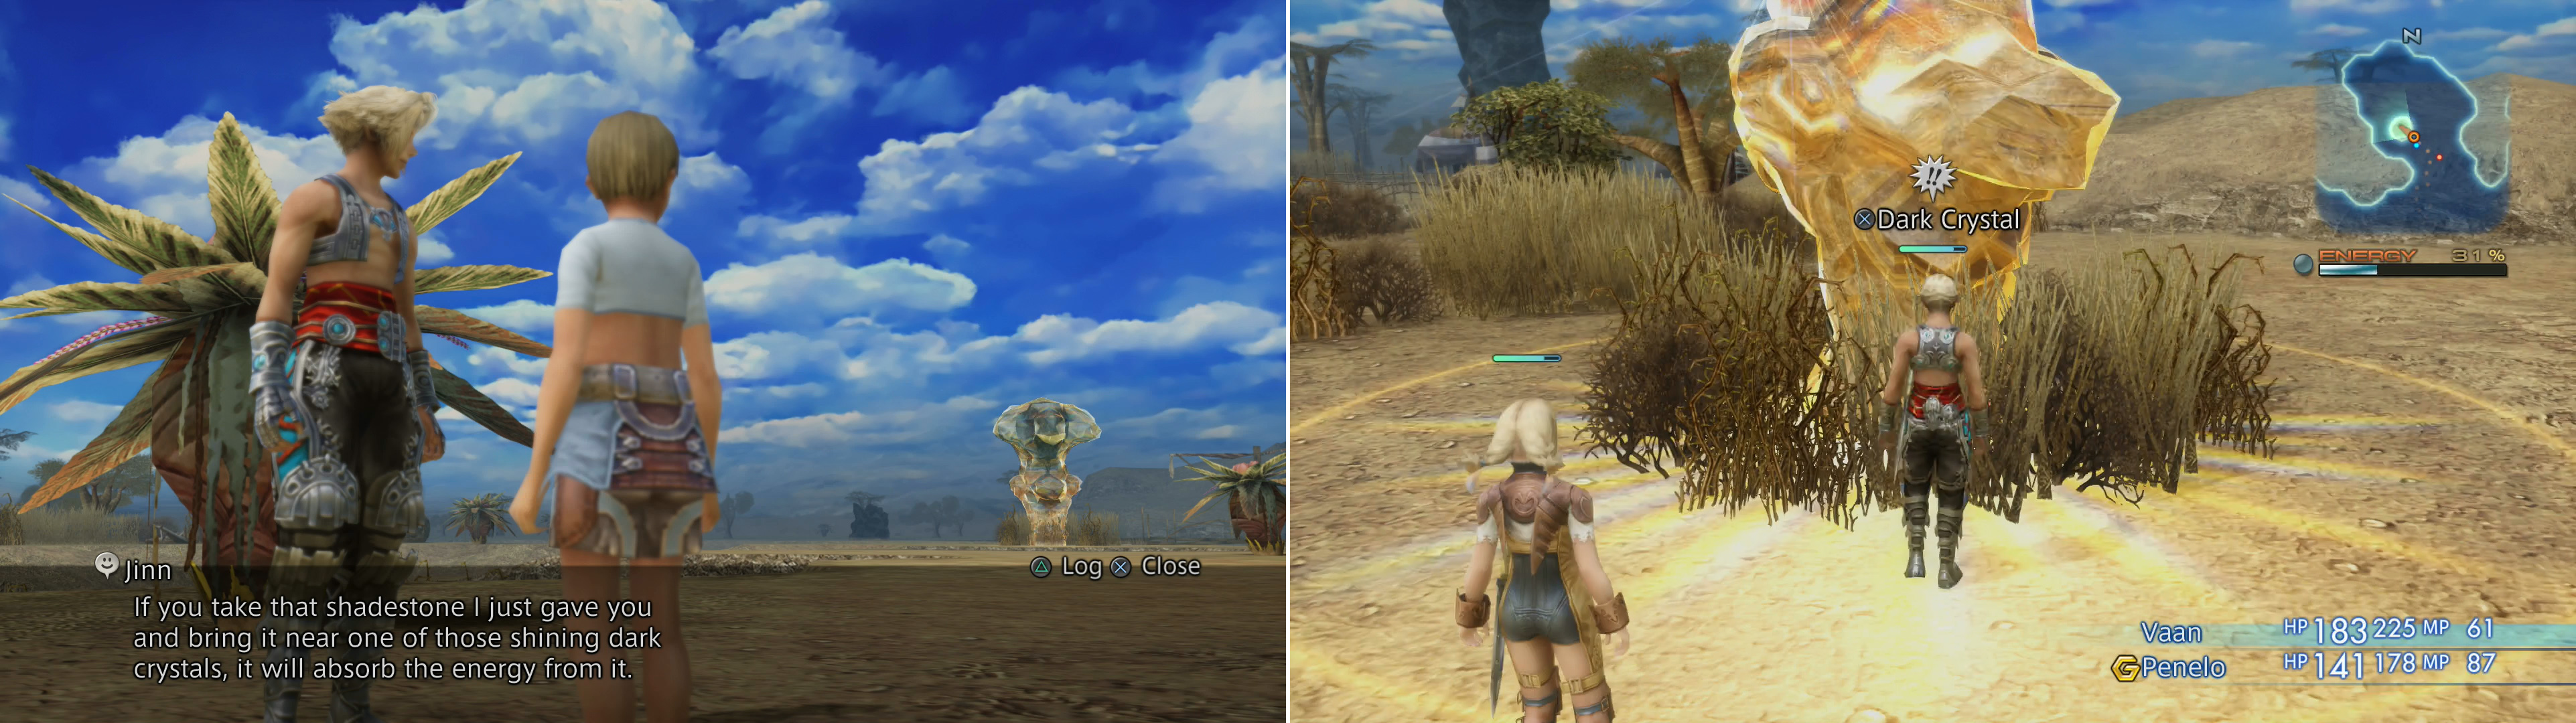
Find Jinn in the Crystal Glade area, where you’ll find Jinn (left). After he gives you a Shadestone and tells you want to do - find the dark crystals aound the Giza Plains and use them to create a Sunstone (right).
Simplicity itself. As Jinn said, there are four shining dark crystals in the Giza Plains right now, and finding them is as simple as scanning the horizon and heading towards the bright, glowing stone. He even marks their locations on the map for you! Or you can use this guide. Either way is fine, just hit enough of them to fill the Energy meter on the right side of the screen.
There are two in adjacent areas, one dark crystal in the Starfall Field area and one in the Gizas South Bank area. The Starfall Field dark crystal is just west of the area transition, beyond a pit. In Gizas South Bank, make your way north from the area transition and kill any Hyenas that bar your path. You’ll find this area’s dark crystal just south of the area transition to the area to the north - which leads to the Gizas North Bank area. Speaking of which, the Gizas North Bank also has its own dark crystal, which can be found on the western end of the area, in a clearing just north of the area transition leading back to the Nomad Village. The fourth and final dark crystal can be found in the northwestern-most area of the Giza Plains, the Warrior’s Wash area. Any three dark crystals should be sufficient to charge your Sunstone, but if you must venture to this area, you’ll find its dark crystal in the center of the map, near where a Slaven prowls.
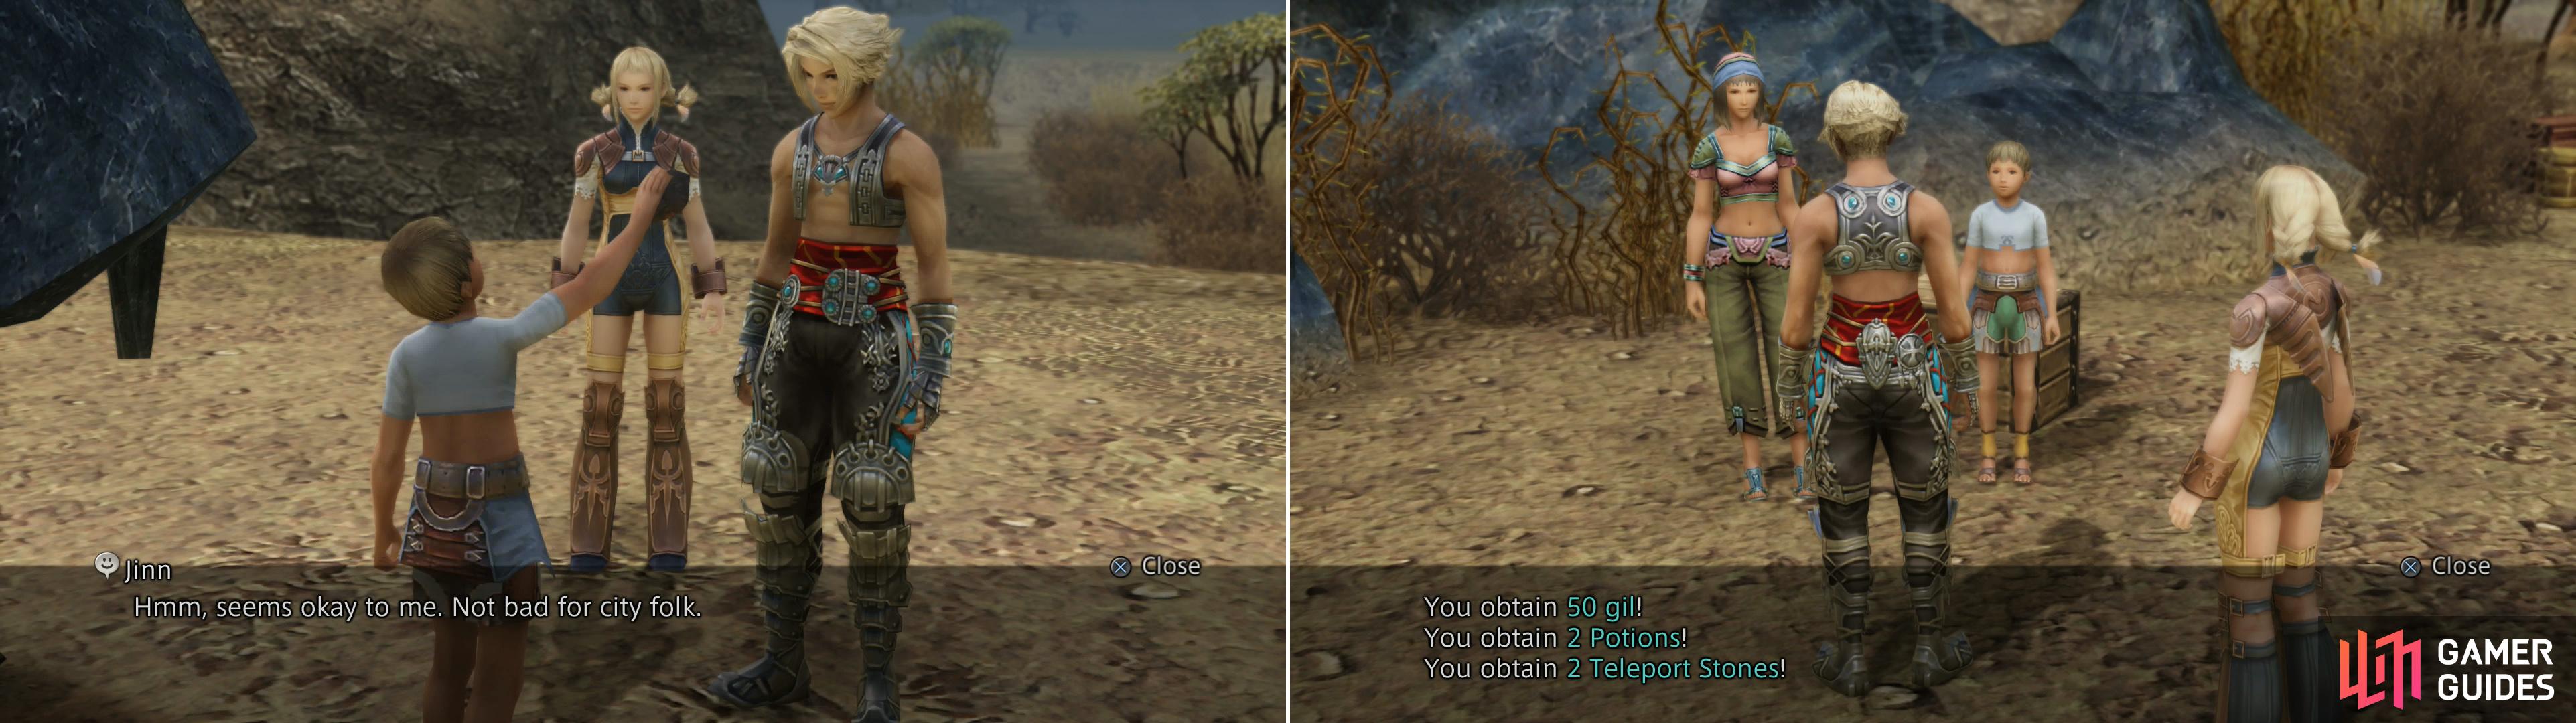
After charging the Sunstone, you’ll return to Jinn (left) then take him back to the Nomad Village where you’ll get a reward (right).
Once the energy meter hits 100%, you’ll gain your Sunstone automatically return to Jinn in the Crystal Glade area to behold a miracle - now that the work is all done, his leg is better! Good timing, that. Now that his business with you has concluded he’ll elaborate on how he hurt his leg, which will end with you returning to Masyua in the Nomad Village. She’ll thank you for rescuing Jinn and give you some bonus goodies to go with that Sunstone you made, which, of course, is yours to keep.
| Objective | Reward |
|---|---|
| For rescuing Jinn | 50 gil, Potion (x2), Teleport Stone (x2) |
No Comments