


| Bestiary |
|---|
| Battery Mimic • Bomb • Seeker • Skeleton • Skull Defender • Specter • Tiny Mimic • Zombie |
| Items In This Area |
|---|
| Battle Harness • Bronze Armor • Buckler x2 • Buckler (Drop from Zombie) • Headguard • Horned Hat (Drop from Suriander) • Iron Helm (Drop from Skeleton) • Iron Sword (Steal from Seeker) • Leather Gorget (Drop from Bomb) • Leather Headgear (Drop from Tiny Mimic) • Mage Masher • Oaken Pole (Steal from Specter) • Oak Staff • Pointy Hat x2 • Rod • Topkapi Hat (Drop from Flan • Tube Fuse |
The Lightworks
After the scenes that follow you’ll find yourself in the Barheim Passage, now joined by the reviled Captain Basch. He’s a guest, just like Amalia was earlier, but he’s far less versatile. He’s got no magicks, no technicks, hell, he doesn’t even have a weapon or many clothes! Still, he’ll contribute fairly well.
From where you start out in these ruins head downstairs to find a handy-dandy Save Crystal. Recuperate, save, then return back up a flight of stairs to the east to find a small chamber with three chests in it. Of the two chests to the north, the left chest is a very, very generous chest, containing 2,510G, while the other offers up… well, mostly junk. The lone chest on the southern side of the room can contain a Balance Mote . Note that none of these chests respawn.
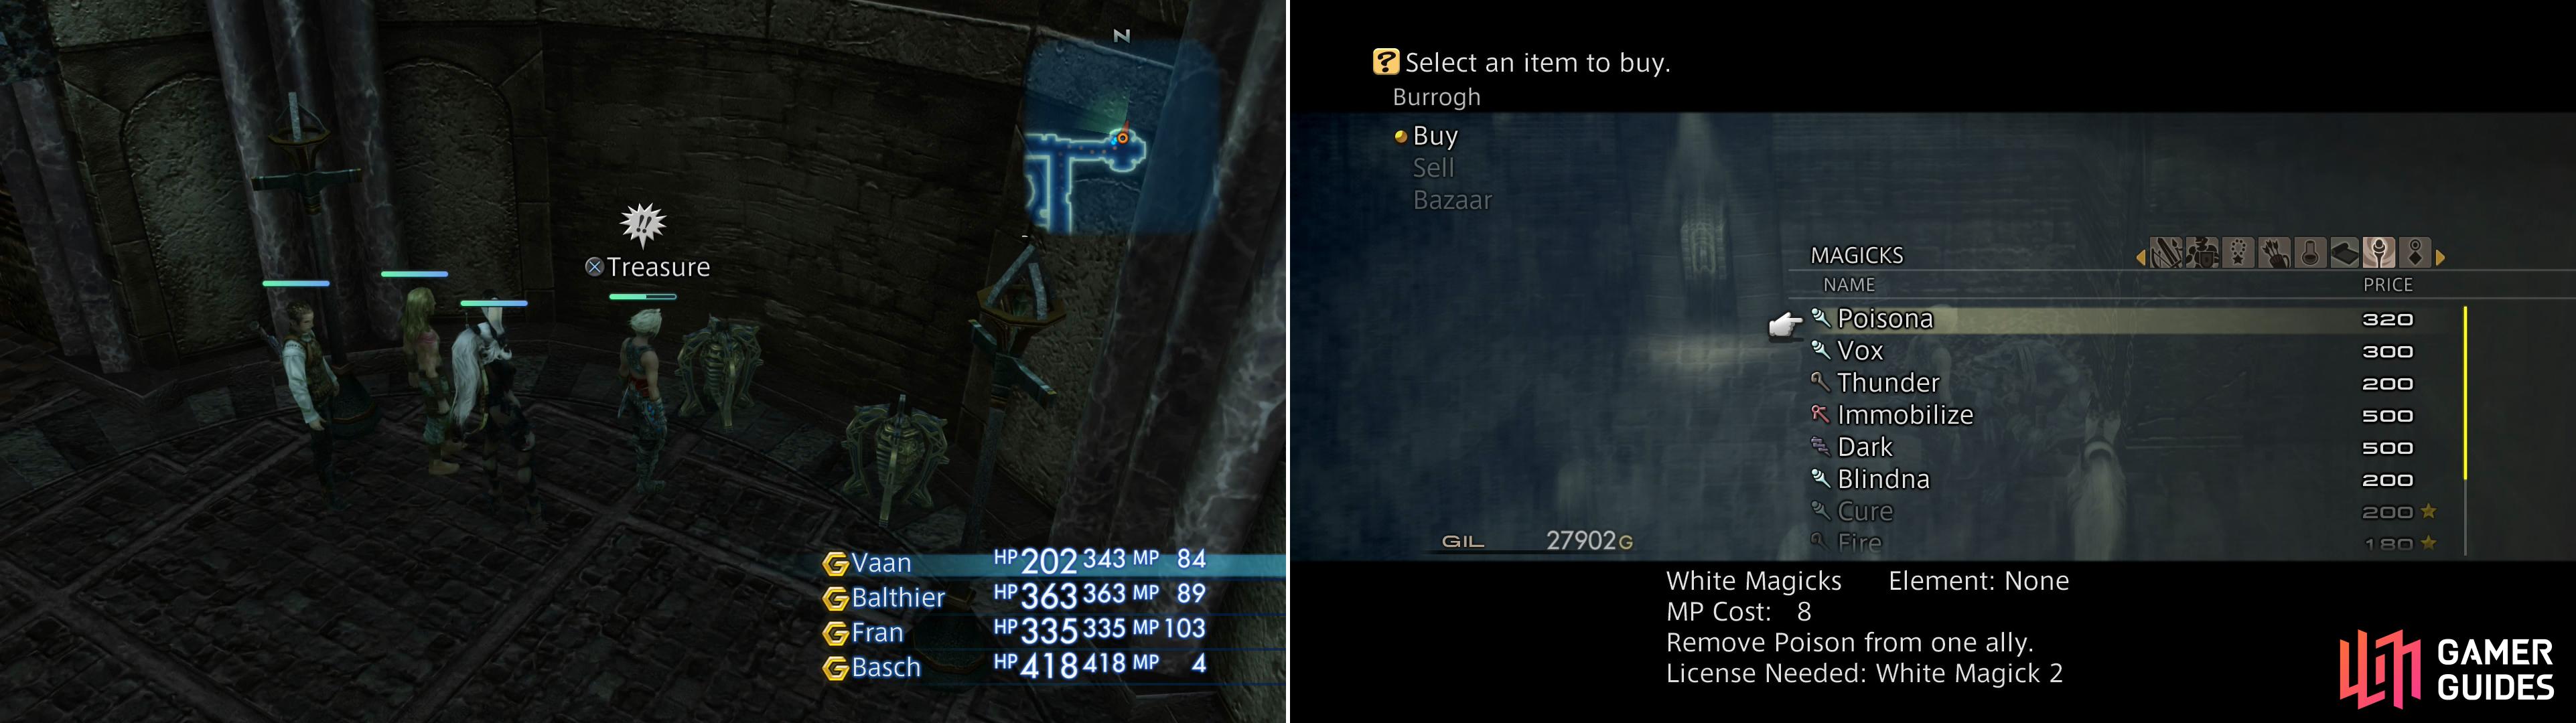
Loot the treasure chests in a dead-end passage, one of which possesses a great deal or Gil (left). Visit the Bangaa merchant Burrogh to sell off loot and buy a few new spells (right).
Leave the chamber and continue downstairs to find a Banga merchant named Burrogh, who will offer to sell you whatever salvage he scavenged from Barheim. He sells a wide variety of goods, including various new tier 2 weapons (Cypress Pole, Silver Bow, Capella, Iron Hammer, Mage Masher), some of which can be found in Barheim. As for new accessories, you can pick up a Bangle and an Argyle Armlet (prevents Blind, halves damage from Dark attacks). Blind will be a very common hazard you face ahead, so if you have the Gil, some Argyle Armlets will help, or some Eye Drops, whichever you prefer. New magicks include Poisona (White Magick 2, cures Poison), Vox (White Magick 2, cures Silence), Immobilize (Time Magick 1, inflicts Immobilize), Dark (Arcane Magick 1, deals Dark damage).
Finally, the Gambits. He sells well over thirty new Gambits, which will set you back 1,500G (they cost 50G each), but the versatility these give you may help out enough to warrant the cost. In particular, the “Foe: HP = 100%” Gambit will allow you to target undamaged foes with Steal, then, after you’ve stolen, attack with a character to hurt them and get the rest of your party to stop trying to steal from that particular monster. He also sells the terribly useful “Self” target Gambits. If you don’t have the cash right now, don’t worry. Other merchants will sell them in the future.
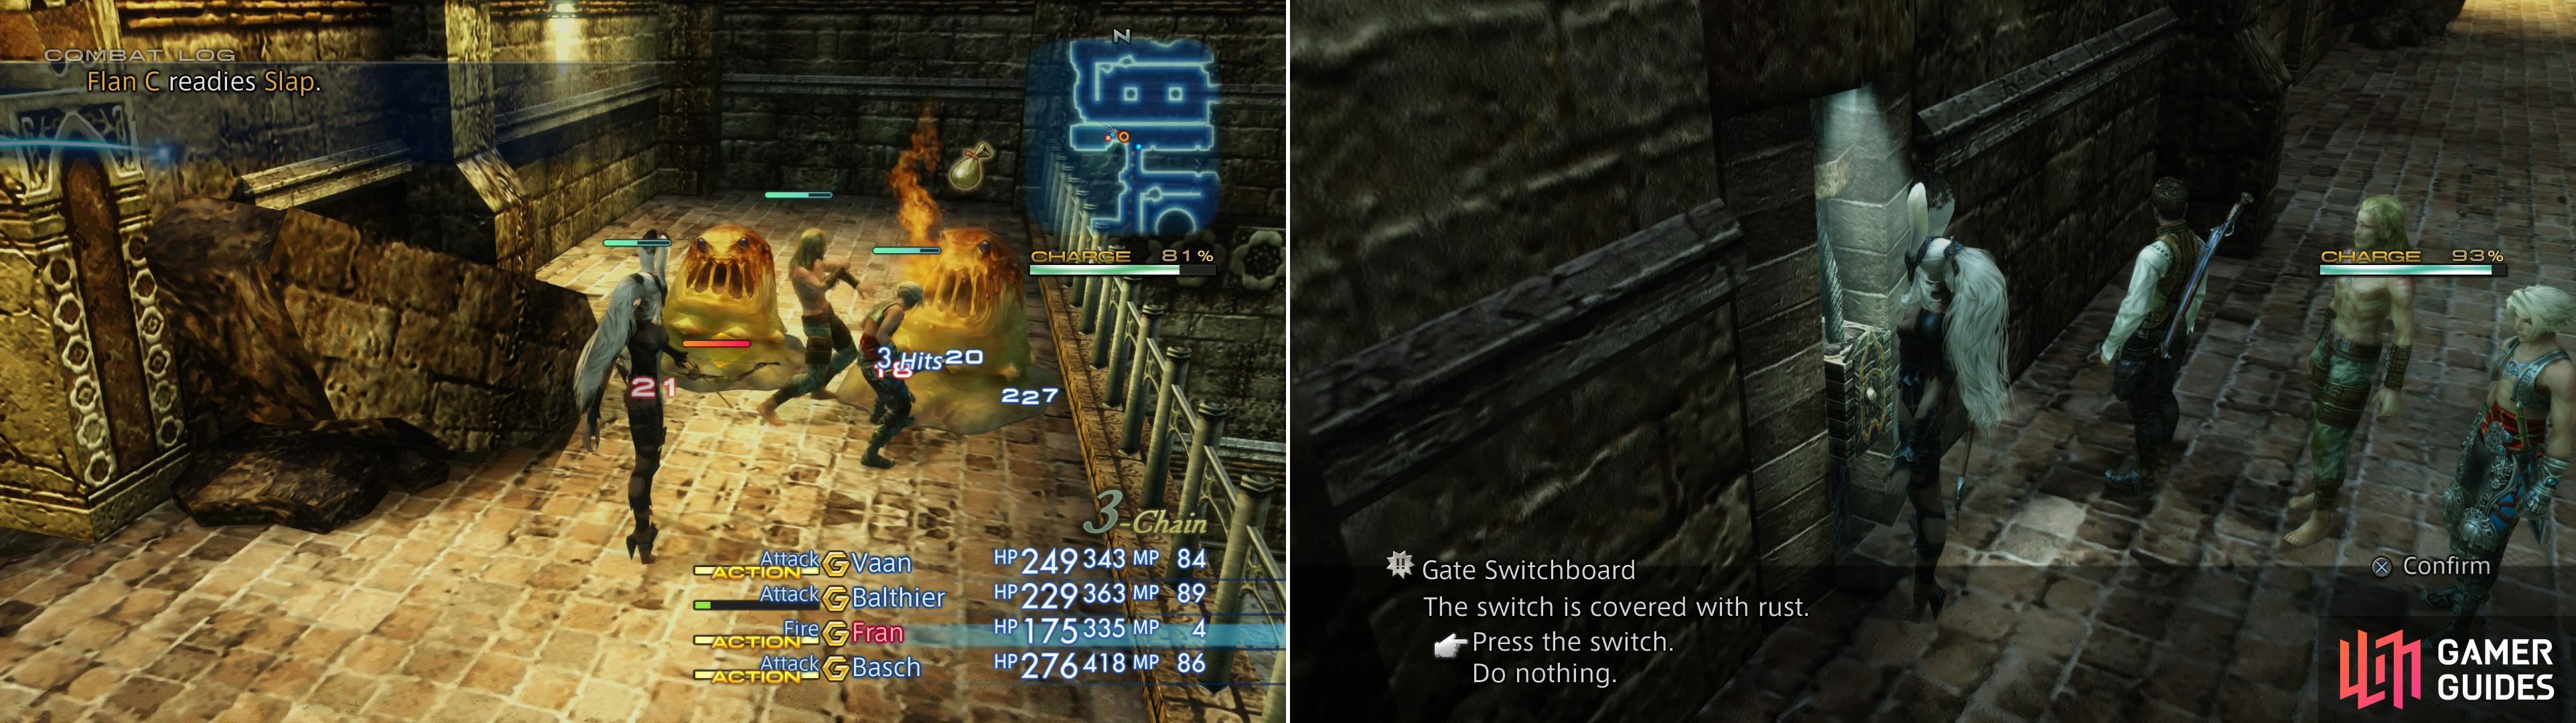
Do whatever business you wish with the Bangaa, then examine the switch on the wall east of the merchant and press it. Sadly, nothing happens. Looks like you’ll need to get the power flowing again. Head back upstairs to the Save Crystal and make your way back east until you find a wooden bridge leading south to a pylon, upon which you’ll find another switch - or rather a “Timeworn Device”. Attempt to interact with this, then Balthier will comment on the stubborn machinery. Head back downstairs and talk to the merchant again, who freely offers to give you the Tube Fuse you need. And why not? He’ll have to get out the same way you do, so he might as well let you do all the work.
Return back upstairs to the power relay and install the Tube Fuse to get everything running again. Note the charge meter on the right side of the screen, currently sitting at a merry 100%. Backtrack downstairs and activate the Gate Switchboard near the merchant to open the gate, but at a cost of 30% energy. Burrogh will take the opportunity to explain the system at work here - you use energy to open doors, and while this might seem like a puzzle of sorts, it’s really not. Instead, if the energy depletes too much (thresholds are at 50% and 30%), you’ll face stronger monsters. Good thing there aren’t beasties waiting to suck up energy, right?
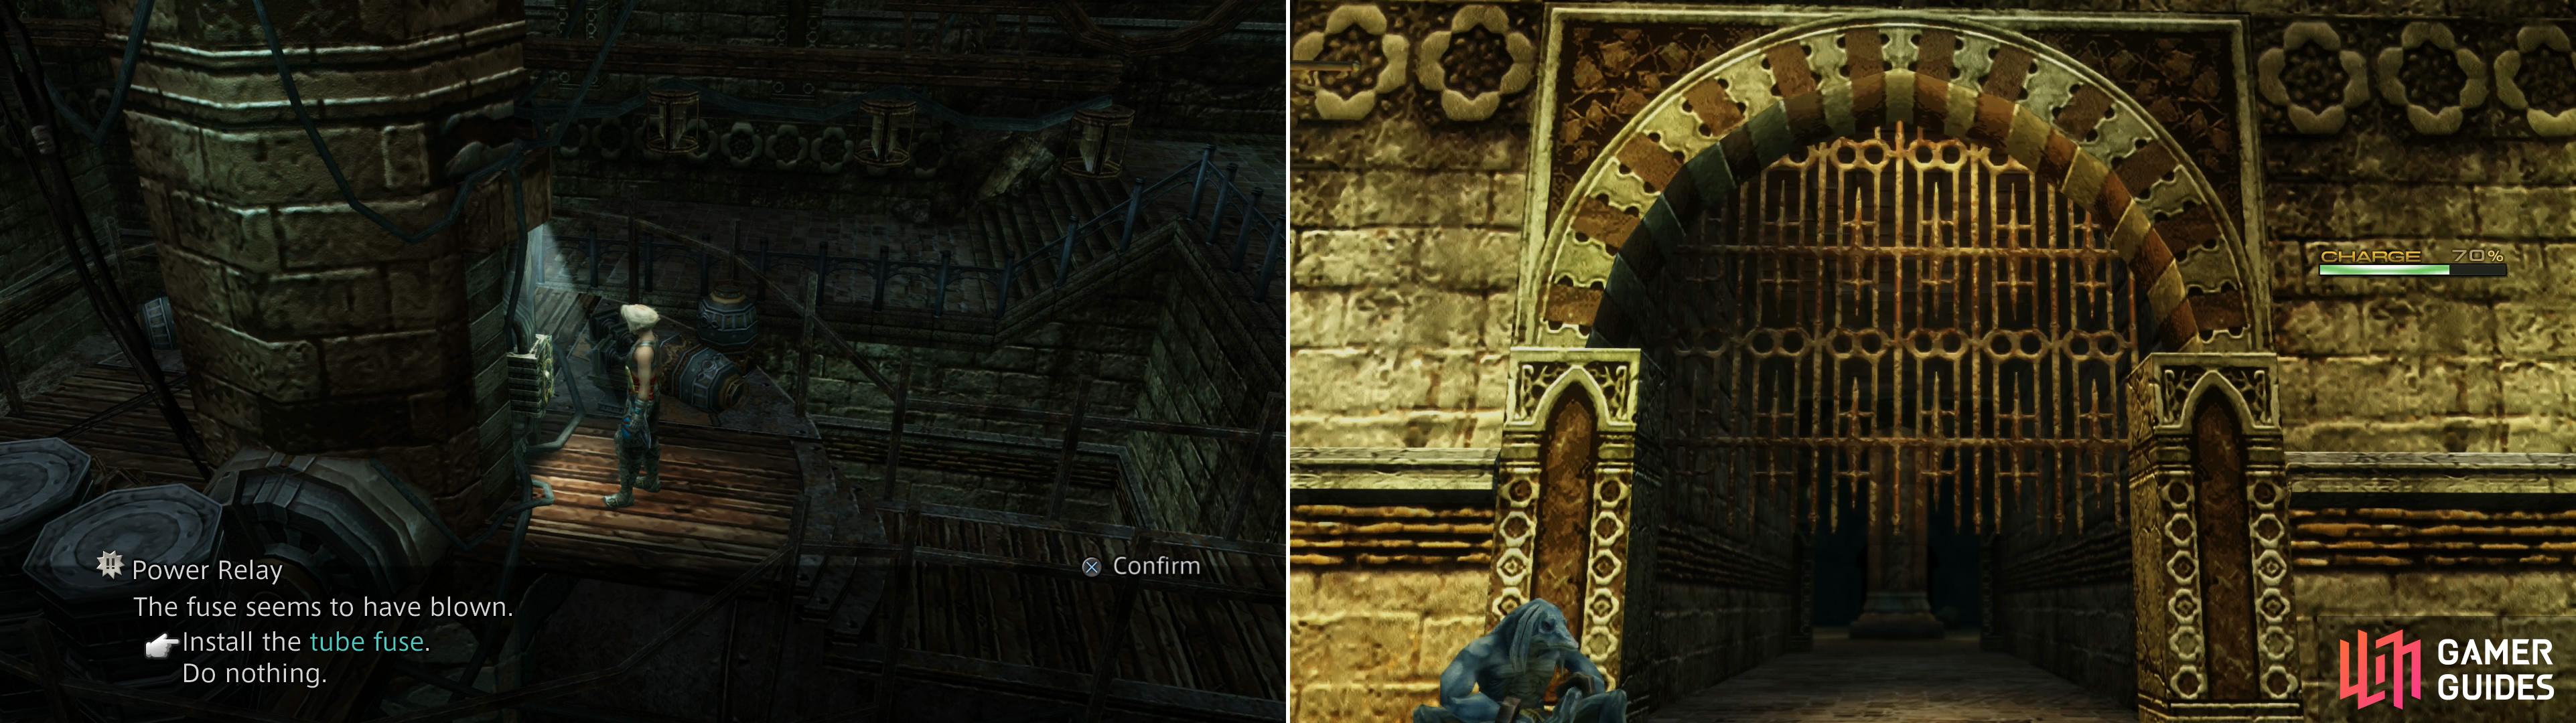
Install the Tube Fuse Burrogh gave you (left), then flip a switch to open the gate (right).
Bargains at the Bazaar III
Now you’ve got the gate open and have a vague idea of what to do, it’s time to move on - after a bit more business with Burrogh. You’ve been collecting loot since Garamsythe without a merchant, and have probably picked up more than a few things to sell. The Bazaar is a powerful force, indeed, and even selling to a remote merchant like Burrogh will lure more bundles, if you provide the right loot. Dump off your Rat Pelts, Bat Fangs, Fish Scales, Horns, Demon Eyeballs, Glass Jewels and Dark Stones, which should unlock the following items (and contribute to many more!):
| Loot Sold | Bazaar Bundle | Cost |
|---|---|---|
| Bat Fang (x1) Rat Pelt(x2) Dark Stone (x2) | Bow and Bodkin (Shortbow) (Parallel Arrows) | 400 gil |
| Demon Eyeball (x2) Molting (x3) | Eye Drop Set (Eye Drops x3) | 100 gil |
| Wolf Pelt (x2) Tanned Hide (x1) Dark Stone (x2) | Assorted Leathers (Leather Breastplate) (Leather Headgear) | 300 gil |
Op Sector 29
When you’re ready, leave the Lightworks area by passing through the gate you labored to open, whereupon you’ll find a nasty critter feasting away at your precious energy! Balthier, as usual, will identify the beast, then state the obvious. Simply put, in each area you’ll find Battery Mimics, which will drain the power as long as they’re alive and at their feeding spots. If the charge gauge drops below 50% you’ll start encountering lesser undead, like Skeletons and Zombies. This isn’t too bad, and in fact, it’s a way to nab some loot you’d otherwise have to wait a bit to obtain. If you let the power drop below 30% you’ll also face Skull Defenders and Specters. Naturally, all these critters deserve some description.
Battery Mimic :
These are the beasts that’ll drain your charge meter as long as they’re alive, and most will be found either at - or enroute to - an energy conduit to feed off. They’ve got a fair amount of HP (hence keeping them around and eating your energy!) but aren’t otherwise noteworthy combatants. Their attacks include a physical attack, and a Discharge attack which deals Lightning damage to all nearby enemies. They drop Eye Drops, some Iron Scraps and a Storm Stone, and you can rob them for some Iron Scraps, a Storm Stone and a Prince’s Kiss (removes Sleep from target). You really only need three Iron Scraps for a Bazaar weapon that’ll honestly be obsolete shortly after you can get it. Fittingly, they absorb Lightning damage.
Tiny Mimic:
If your charge gauge is below 50% you probably won’t see many of these critters, as they’ll be replaced by undead, but with the lights on, these are the most common stock monster in Barheim. They have a paltry amount of HP and weak attack, no magicks or technicks, and are weak to Wind. Basically, they just serve to get underfoot and little else. They drop Eye Drops, some Iron Scraps, Leather Headgear and a Potion, while you can steal an Earth Stone, 1G, or an Antidote from them.
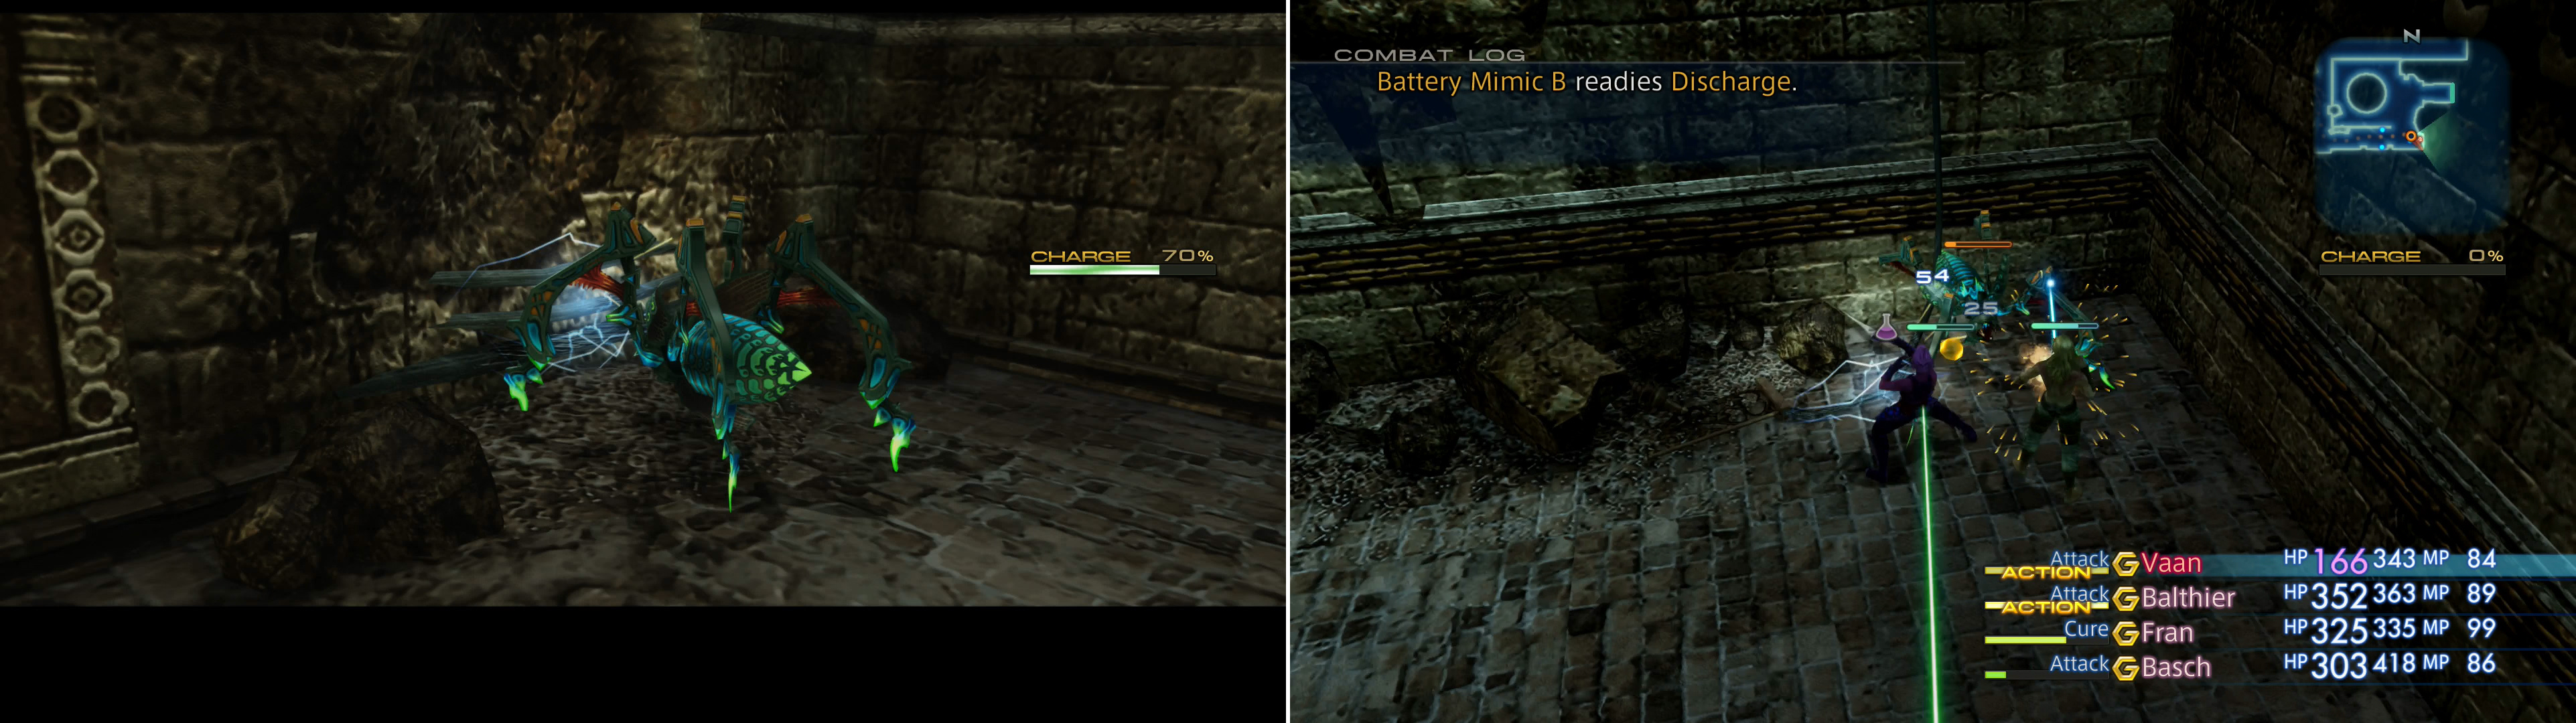
As soon as you exit the safety of The Lightworks you’ll find an electrical parasite (left). Teach the mechanical bug critter a lesson and in the process you’ll reclaim some of your stolen charge (right).
Specter :
Already replacing the Ghost is the Specter, a shameless palette-swap, and quite similar in many respects. They have a mediocre physical attack, cast basic elemental Black Magicks as well as Blind and Dark, and have a chance to inflict Slow with their melee attacks. They can also use Poison Touch, making them somewhat more annoying than Ghosts. They’ve got around 400 HP, giving them some staying power, and if that’s not enough they can use the Divide ability to create another Specter, which they’ll attempt to do when they’re low on HP. Specters are weak to Holy, absorb Dark and can be damaged by curatives. They can drop a Glass Jewel, a Dark Stone, an Oaken Pole and a Prince’s Kiss, while you can steal a Dark Stone, a Glass Jewel and a Dark Mote.
Zombie :
One of the most basic undead foes in the game, Zombies are neither impressive for their HP or their offensive output. They can cast Protect to reduce incoming physical damage a bit, Blind to reduce your offensive capabiltiies, and their physical attacks can inflict Poison via their physical attacks or by their Poison Touch technick, somewhat enhancing their otherwise unremarkable offense. They are weak to Holy, absorb Dark, and will be harmed by curatives. They can drop a Dark Stone, some Foul Flesh, an Antidote and a Buckler (Shields 1), and you can steal Foul Flesh, a Dark Stone, 2G or 50G from them. Two Bazaar bundles require Foul Flesh, but you only need two slabs of such putrid flesh, overall.
Now that the critters are covered, onto the task at hand. Battery Mimics drain your charge gauge, which makes the lights go out. Undead fancy the darkness, and hence come out to play. Unfortunately the only way they know how to interact with the living is by nibbling on them. Honest mistake, but it’s still not good for your health. While the undead do make the place more difficult (otherwise Tiny Mimics will be scurrying about underfoot if the lights are on), it is a good opportunity to stock up on Dark Stones (should you need or desire more), Foul Flesh, Bone Fragments and other goodies. Then again, you’ll encounter all these monsters later, so there’s no need to force the issue if they’re putting up too much of a fight, nor is this the best place to farm them.
There’s no real long-term downside to the power draining, however, as when you kill a Battery Mimic they’ll restore 30% - 50% of the charge meter, regardless of how much they’ve drained, and there’s enough of them about to ensure you’ll have enough juice to power on the few switches that lie ahead; if not keep the lights on while doing so. In fact, in order to encounter undead regularly you’ll probably have to go out of your way to avoid Battery Mimics so they can drain your charge gauge.
Speaking of which, one of the cheeky monsters is greedily slurping away your charge right in front of you, in the southeastern corner of this room, no less! It may also be joined by a fellow who, if it doesn’t stay to fight will proceed deeper into the level to suck on more conduits. Kill the Battery Mimic to regain some of the lost power then search around the southern-most pillar nearby to find a chest, which can contain a Pointy Hat . Hard to get excited about a garment a Wolf could drop at the beginning of the game, but there it is.
Continue through an arch to the south, turn west, then head down a series of stairs to find the second Battery Mimic munching away at your power, if you didn’t kill it earlier. If not, do so now to gain back more energy (perhaps more than you had before you entered!), then scour the area for chests containing low-quality loot and hit the area transition to the east.
Bomb :
Leave the area, but immediately return. It’s not quite time to go exploring yet, as there’s likely a new monster floating about here now - another Final Fantasy staple, the Bomb. In the olden days, these floating balls of elemental death would cast Fire, ram you for some melee damage, and most importantly, use Self Destruct after three hits. Didn’t kill them in three hits? Too bad - the penalty is pain.
With Final Fantasy XII the series was moving more action-based instead of turn-based (ATB was a formality at this point) so Bombs are accordingly more picky about using Self Destruct. As the Bomb is harried in combat they’ll grow larger, and the larger they grow, the closer they are to self destrucing. If they manage to Self Destruct, you’ll regret it, especially since it’ll cause other, nearby Bombs to Self Destruct as well. Other than that, they’ll cast Fire, ram into you, and buff themselves with Protect. The more things change, the more they stay the same.
They can drop Bomb Ashes, a Fire Stone, Echo Herbs or a Leather Gorget , while you can steal a Fire Stone, Bomb Ashes and a Gold Needle. Bomb Ashes are used in one Bazaar bundle, and you need three of them to unlock it. They’re fond of spawning in areas you’ve already passed through, for whatever reason, so keep an eye out for them if you backtrack. It’s worth noting that they’re not always hostile, but casting magick near them may provoke them. They absorb Fire damage and are weak to Water damage.

If the lights are on, you’ll encounter mostly Battery Mimics (left), while in the darkness the undead will prowl (right).
Great Eastern Passage
After you’re done messing around in the “Op Sector 29” area make you way east to the next zone. This long area - rightfully called the “Great Eastern Passage” is home to three Battery Mimics who prefer to absorb energy at various spots. If you’re quick you may catch the first one as it heads south to its feeding area. If not, make your way south through some arches, keep following the tracks south, and when the path splits, go down the tunnel to the southwest to find the conduit upon which the Battery Mimic feasts.
This simple task should emphasize the difference between Barheim in the dark and in the light. If the lights are up (50% charge gauge or above) you’ll likely fight the odd Tiny Mimic and a Steeling (somewhat stronger than the ones in Garamsythe). If the lights are below 50% you’ll encounter several Zombies on this same stretch of tunnel, and if it’s below 30% you’ll also have to fend off a few Specters and the Steeling, which is there regardless. That’s a lot more foes, throwing a lot more status effects at you over the same stretch of ground.
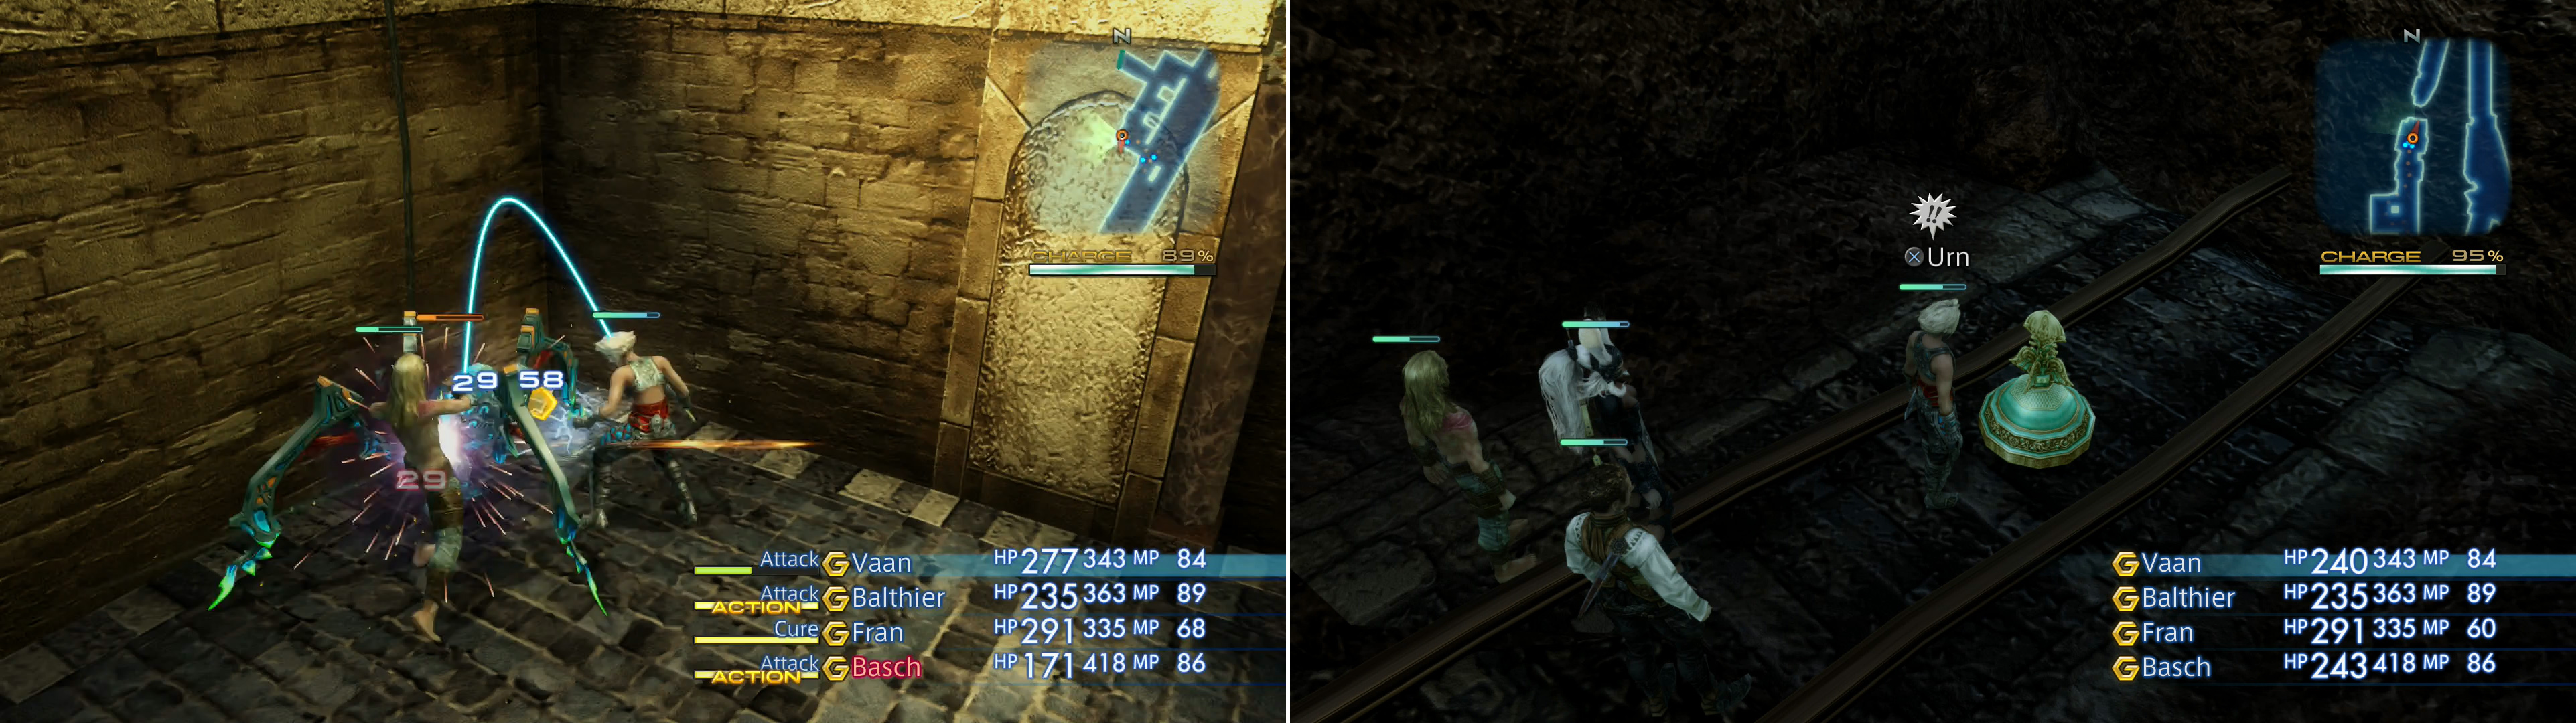
Whatever your situation, kill the Battery Mimic feasting, then continue down the tunnel to the southwest until it terminates. Clearly your characters aren’t capable of dropping down this modest ledge, but at least you can note the decorative urn below. Something to keep in mind as you explore.
Backtrack northeast to where the main passage forked, then follow the other railroad track to the south, killing undead or Tiny Mimics and the odd Steeling as you go. When you reach another fork follow the eastern-most rails until you reach a dead-end, where a Battery Mimic’s feeding spot is located. Whether the Battery Mimic is here or not is another matter, but hey, at least you’ve cut it off from its food source - it’ll have to go past you to get to it now. Return back northeast and search a small side area east of the tracks, where you might find a chest that can contain a suit of Bronze Armor , this area’s sole bit of noteworthy loot.
More Battery Mimics lurk in nearly every area, greedily dining on your charge (left). You can also find a map of the Barheim Passage in the Great Eastern Passage (right).
Continue backtracking up the tunnel and when you return to the fork, head down the western-most tunnel this time, killing the Battery Mimic if you didn’t find it at, or going to, its food source. Follow the western tunnel to the southwest, killing whatever foes your light level lures until you reach another fork. At this fork turn north and follow the tracks until they terminate below where the first Battery Mimic’s feeding spot was. Here you’ll find the ornate urn you couldn’t reach earlier, and it so happens to contain a map of the Barheim Passage. Seems like you’ve got a lot of work ahead of you.
Return south to the fork and from there follow the two tracks running southwest, slaying as you go. Eventually you’ll find a landing on the western side of the tracks, where the third Battery Mimic’s delicious conduit is located. Kill the Mimic if it’s there, otherwise continue southwest a bit further where you’ll undoubtedly find it or, alternatively, if you want to spawn Skeletons and Skull Defenders in the next area, let it chomp your power down. You can always return and kill it later
Either way, you’ve got two areas open to you now - a smallish area up the landing to the west, or more rail tunnels to the southwest. You might as well clear the area to the west before venturing further south.
Op Sector 36
This area may be somewhat small, but it boasts no fewer than two Battery Mimics. You may come into conflict with one shortly after entering, as a feeding spot is just north of the area transition. Kill it, then head downstairs until you reach the ground floor of a small chamber not unlike the room in which Burrogh has set up shop. Here you’ll find the second Battery Mimic’s feeding spot along the southwestern wall. Kill it, if you wish, but note that this is the first chamber in which you can encounter Skeletons, so if you want to kill them, make sure your charge gauge stays below 50%.
Skeleton:
Skeletons are, statistically, stronger than Zombies in just about every way. They have more HP (around 300~), do more damage with their physical attacks, and can cast a variety of basic elemental Black Magicks, Dark, Poison and Protect. Still, since they’re less likely to inflict status effects on you they’re somewhat less annoying than Zombies. They drop Bone Fragments, Dark Stones, Antidotes and Iron Helms, while you can steal Bone Fragments, 20G and Dark Motes. Bone Fragments will become quite useful later on, but farming them reliably here is more bother than its worth. For now, you only need five of them to unlock the Bazaar bundle they’re part of. They’re weak to Holy, absorb Dark and are harmed by curatives.
Now that that’s out of the way, it’s time to get to looting! Search the northeastern corner of this room to find a chest that might contain a Buckler , then head upstairs to find a hallway running to the east. Search the eastern end of this hallway for another chest, this one possibly holding Rod . Finally head through an arch to the south to find a collapsed stone walkway at the end of which is a chest that will always contain a Battle Harness , an accessory that causes the wearer to counter-attack when struck. The chest with the Battle Harness in it will not respawn.
Special Op Sector 3
Leave the “Op Sector 36” area and return back east to the “Great Eastern Passage”, then head southwest to the next area - “Special Op Sector 3”. When you arrive continue south through some arches, where you may see a Battery Mimic on its way to siphon your power. There are two such monsters in this area, and as in the previous zone there’s a smaller (well, in this case more compact might be more appropriate) side area to the west.
Sadly, this western area isn’t optional, as a gate blocks the way to the area to the south, so you’ll have to find whatever controls the door to the west. Still, to keep the lights on, continue south to find one of the Battery Mimic’s feeding spots, and with any luck the Mimic itself. Kill it, then return north to the fork and head through a doorway to the west, where you’ll be ambushed by some Flans. Yep, they’ve been downgraded to normal enemies already, which means they’re worth a proper paragraph discussing them.
Flan :
It should be no surprise that there are more similarities than differences between the boss Flan in the Garamsythe Waterway and the more mundane foes in Barheim Passage. These ones have fewer HP, but can deal more damage, and possess the same Cure and Blind magicks. Most importantly, now that they’re normal foes they actually have item drops. They can drop Green Liquid, a Water Stone, a Topkapi Hat (Mystic Armor 2) and a Water Mote, while you can steal Green Liquid, a Water Stone and a Gold Needle. Green Liquid is part of two Bazaar bundles, so make sure to grab three of them. As before, Fran and any Black Mage you may have will prove useful here, as Flan are weak to Fire. It’s likely the most effective means of dealing with them you have at your disposal right now.
Kill the Flans and whatever other foes might show up to help them (Flans, like Steelings are here no matter what the light level is) then enter the room they occupied. Press on through a doorway to the west, killing another Flan and whatever other monsters are nearby and beyond the doorway you’ll find another chamber similar to the one Burrogh is in. In the southeastern corner of this room you’ll find another exposed conduit, where a Battery Mimic is likely merrily munching away. Dispose of it, then search the northeast corner of the room to find a chest that can contain a Headguard .
Now turn your attention to the stairs. Head up two flights of stairs and make your way north on the landing between the second and third flights. Midway through you should spot a door to the west, which leads to the next area. Don’t waste your time peeking at the dead end atop the stairs, head to the next area, instead.
Op Sector 37
Another area, another batch of Battery Mimics trying to suck the place dry. Make your way east out of the entry hallway and into the staircase-laden chamber beyond (another chamber like the one Burrogh is in - and the last such recycled room in this dungeon) and immediately turn north to find the first Battery Mimic. Smack it around for eating your power, then head downstairs to the east to reach the bottom of this chamber. It’s worth noting that you may face Skull Defenders in this area if your charge gauge depletes enough.
Skull Defender:
Speaking of which, Skull Defenders are, at a glance, so similar to Skeletons that you may not know you’re facing a different foe! Their HP is about the same, and they do about the same damage. Both are weak to Holy and absorb Dark, and share the same allergy to curatives that all proper undead do. When vanquished they may forfeit a Bone Fragment, a Dark Stone, a Potion or Echo Herbs, while you can steal a Bone Fragment, an Aquara Mote or a Bronze Chestplate .
To stop the second Battery Mimic you’ll need to continue east down a short hallway, then turn north around a corner and continue along a much longer hallway. As you pass through a circular chamber midway down this hallway, search the wall to the west to find a chest, which can contain a Pointy Hat , then carry on. At the end of this hallway you’ll find the second Battery Mimic.
More Flans - now normal enemies - lurk in Barheim Passage, but Fran’s Fire magick works just as well here as in Garamsythe (left). Flip a switch to open another gate (right).
With both of the Battery Mimics in this area vanquished, turn west to reach a chamber where you’ll likely encounter more Flans and whatever allies the light (or lack thereof) permits. When you stand victorious, searching a chest in the southeastern corner of this room might make you richer by one Buckler . Continue west through the chamber and head up some stairs, smiting more Flan and other foes as you go. Atop these stairs you’ll find a switch, which will open the southern gate in the “Special Op Sector 3” area, but deduct 30% from your charge gauge. Flip the switch, then turn east to find a chest on this elevated walkway. This chest’s weapon - a Mage Masher (Daggers 2) is worth going through some trouble to get, as it’ll make an upcoming hunt much easier, but you can also just buy one if you don’t feel like running about.
Return to the beginning of this area, but before you leave there’s a little bit more loot to gain. From the arch leading to the tunnel that houses the area transition, turn north to find another arch you can pass to reach a walkway overlooking the room with the switch. Not only will you find some Flan guarding this walkway, but if you turn east you’ll find a chest that always contains either an Ether or Gil, which may prove useful if this dungeon is taxing Fran’s MP reserves. Return to the archway leading to the area transition again and this time head south up some stairs until you hit a dead-end, at which you may find a chest housing an Oak Staff (Staves 1).
No Comments