


| Bestiary |
|---|
| Diresaur • Elder Wyrm (Boss) • Phyllo (Rare Game) |
| Items In This Area |
|---|
| Amber Armlet • Argyle Armlet • Black Belt • Brigandine • Ras Algethi |
Lente’s Tear will allow you to get past those barriers you previously saw in Golmore Jungle, so exit Eruyt Village to return to The Needlebrake section of Golmore Jungle. The barrier you need to bypass to continue on is along the eastern edge of the The Needlebreak, but other barriers can be found to the south of this zone and in the southern end of the Paths of Chained Light. The former leads to The Rustling Chapel zone, while the latter leads to the southern part of the Paths of Chained Light zone, both of which are populated by higher level enemies, which you need not tangle with right now. Not that they’re too strong for you, just that there’s no profit in it, and you’ll get an excuse to return later.
So, when you exit Eruyt, head southeast a bit and pass through the barrier there to enter Whisperleaf Way. This area is just a straight path to the east, with Gargoyles, Malboros and Great Malboros along the way. This leads to The Parting Glade, which has a conveniently placed Gate Crystal, a Viera you can speak with and a treasure in the southwest corner that contains an Amber Armlet . Touch the Gate Crystal to heal up, save and then go north to come to another boss.
Boss - Elder Wyrm
This boss is definitely more of a challenge than Tiamat, all because it loves to use status ailments against you. It comes with two Treants, who are aggressive this time, but they aren’t any different than their docile counterparts, so you will want to cut them down to size as soon as the battle begins. This will make it much easier to concentrate on Elder Wyrm, who will still be attacking you during this short process. As already mentioned, the Elder Wyrm will use a lot of ailments in this battle, as it has access to Slow, Break, Blind, Silence, Sleep and Confuse. Of the ones listed, Confuse, Silence (depending on who it is) and Break are the most important ones to remove.
However, things get a bit more complicated, as the Elder Wyrm’s ultimate attack can add more fuel to the fire. When you see it ready Sporefall, get ready for another round of status ailments, which includes Confuse, Slow, Silence, Blind, Poison, Oil and Sap. Oil is the big one here, as Elder Wyrm also knows Fireball, so that combo will do some insane damage to a character, should they remain oiled. The catch about this move is that it hits in a cone-shaped range in front of Elder Wyrm, so you could use Decoy on your tank character (preferably with a Main Gauche and shield combo), then turn Elder Wyrm from your other party members.
Having a White Mage with Esuna is very helpful in this battle, but Remedies with Remedy Lore 3 will also help. There is one thing you want to look at when fighting the Elder Wyrm, and this part is completely optional. The rare steal for this wood-woven wyrm is something called an Emperor Scale, an item needed for the Bazaar recipe for the strongest gun in the game. The reasoning behind mentioning this is that this piece of loot is limited to a steal from this boss, a later Mark, and a Monograph drop/Poach from one of the most challenging normal enemies in the game. You only need two of them, so stealing one from this boss and one from the Mark later on will limit the need to have to struggle with the strong enemies. If you feel you are up for it, you can equip the Thief’s Cuffs on someone and keep attempting to snatch the Emperor Scales from the Elder Wyrm - you should have a save right outside the boss room!

The Elder Wyrm will use a lot of status ailments on you, like Petrify (left) and with Sporefall, its ultimate attack (right).
After the battle is over, you might notice a treasure located in the boss’ room during the Congratulations screen, which contains 9,872 gil. Feel free to return to the previous room to save and heal up at the Gate Crystal, then return to the small area where you encountered the boss and exit via an area transition to the east to continue on.
The Branchway
At the start of this level you’ll find yourself traversing a grassy path east, then south… almost like being in a jungle! Sadly, the experience isn’t long-lasting, as you’ll soon find yourself back on the walkways that run through the Golmore “Jungle”. From here you can turn west or east, but since the western path leads to a dead-end (which may be of interest later) continue east, instead. A short distance to the east the path will split into two, a northern one and a southern path. You’ll encounter Malboros and Great Malboros on both paths and if you want to spawn the Rare Game here, Phyllo, you’ll need to slaughter those Malboro.
Before that, though, there is one single treasure to grab here, if you want it. Take the southern path, head down some stairs and when you reach a fork turn west to reach a dead-end, at which is a chest which may contain a Black Belt accessory. Grab it, then get back to the business of killing Malboros by returning to the previous fork and clearing the northern route. Once you’ve done that there is a chance that Phyllo will spawn when you go to either of the dead ends on the map - either the dead-end at the western-most point of the zone just off the path leading to the area where you fought the Elder Wyrm, or to the dead-end where you found the Black Belt. If it doesn’t spawn, you’ll have to move two zones away (The Parting Glade - where the Gate Crystal is - should suffice) then return and try again by clearing out all the Malboros. Keep in mind that you won’t know Phyllo is there until you are on top of its spawning spot, as it remains hidden until there’s prey close enough for it to attack.
Phyllo :
Phyllo is pretty much nothing more than a stronger version of the Redmaws you encountered in Henne Mines. Its regular attack can inflict poison and it won’t self-destruct with Self-Sacrifice, so you don’t have to worry about that. It does have Gnaw and Leech, the latter of which can’t be reduced with defense. The only new skill it has over the others is Eerie Soundwave, which can hit multiple characters if they are grouped together. It can drop a Bat Fang or Spiral Incisor, plus you can steal a Taurus Gem from it and if you want to poach it, you can acquire either a Pebble or Ras Algethi (Guns 4).
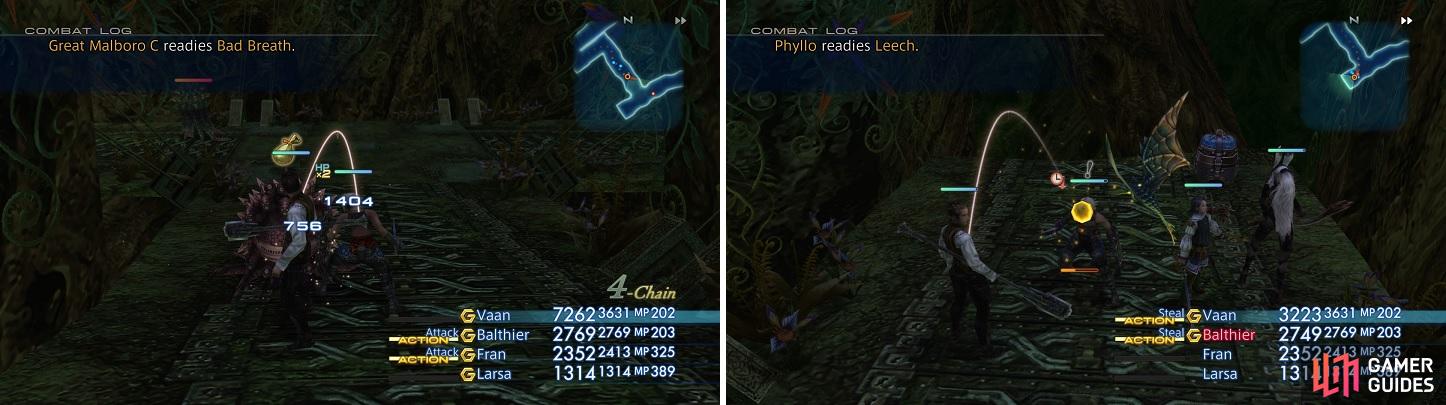
Clear the area of Malboros (left) and at one of the dead ends, Phyllo will appear (right).
The Greenswathe
Although you can take either the northern-most or southern-most paths in the previous zone to get here, to easily grab an item use the southern of the two paths. There might be a Treant here, as well as more Malboros (both kinds) and Gargoyles. Where the map bends upward on the lower path is where your desired treasure lies, which could just be an Argyle Armlet . Now, it didn’t really matter which path you took in the previous zone, as they both converge at the eastern side of this one. One other pit stop you want to take is the platform at the center of the northern path, where you will find a Diresaur. When you’re finished, head through the transition to your east to arrive in Paramina Rift.
Diresaur :
The Diresaur might look familiar, as it is really nothing more than the Wild Saurian from the Estersand. It is definitely the beefiest normal enemy in Golmore Jungle, and likely the strongest, physically - Malboros and Panthers can be more annoying with their ailments. It doesn’t really have a lot of attacks, as it uses a normal attack, Ram and Sonic Fangs, the last of which is the most dangerous because of the small chance for an instant KO. It can drop a Tyrant Hide, Earth Magicite, Hi-Potion or a Float Mote, plus you can steal a Tyrant Hide, Earth Magicite or Leo Gem. That last item can be important, as it’s used in the Bazaar recipe for the Nihipalaoa, an accessory that is one of the more powerful items in the game (need three of them). If you decide to poach the Diresaur, you may get a Tyrant Hide or a Brigandine .
No Comments