


| Bestiary |
|---|
| Aeronite • Brainpan • Chimera Brain • Deidar • Hydro (Boss) • Mistmare • Pandaemonium (Boss) • Vishno (Rare Game) |
| Items In This Area |
|---|
| Antares (drop from Deidar) • Argyle Armlet • Bangle • Berserker Bracers • Black Mask • Black Robes (poach Mistmare) • Celebrant’s Miter (steal from Chimera Brain) • Chaperon • Demon Shield • Dragon Helm • Gungir • Hermes Sandals • Holy • Leather Gorget • Magepower Shishak (poach Brainpan) • Magick Gloves • Perseus Bow • Power Armlet • Ribbon (drop from Vishno) • Ruby Ring |
The Pharos at Ridorana, or Pharos for short, is what many consider the true final dungeon in the game and if you thought anything before this was a slog, then you’re in for a real treat. Of course, what a better way to welcome you to Pharos than a boss!
Boss - Hydro
This skeletal undead dragon is the gatekeeper to Pharos proper and he can be a bother due to some of his skills. First off, he can drain your entire party’s MP pool with Fearga, so equipping your White Mage with the Turtleshell Choker will negate the low MP problem (don’t forget to disable any Charge gambits you have active). Other magicks it has include Immobilizega, Bio (inflicts Sap), Darkra and Curse (inflicts Disease). You will definitely want to cure Disease as soon as possible, which requires either a Serum or Remedy Lore 3 license. Technicks it has access to include Bile (inflicts Sap), Countdown (inflicts Doom), Crushing and Sonic Fangs, Lunge and Fireball.
Hydro is weak to holy, absorbs dark and takes half damage from all other elements, so you might as well bench your Black Mage… unless they have access to Curaja, anyways, but more on that in a bit. He is susceptible to few ailments, although you may inflict Confuse, Oil, and Slow on him. If you happen to have a competent Uhlan, equipping that character with the Holy Spear will do wonders against this boss. Also, casting Reflect on your party and then bouncing Cura/Curaja off of them will make this boss a joke. You can steal a few items from the boss, like a Maggoty Flesh, Corpse Fly or Wyrm Bone, but staying alive is more important.
| Hydro | . |
|---|---|
| Level | 47 |
| Weaknesses | Holy |
| Resistances | Dark (Absorbs), Earth, Fire, Ice, Lightning, Water, Wind (Halves) |
| Immunities | Blind, Disable, Disease, Doom, Immobilize, Petrify, Poison, Reverse, Sap, Silence, Sleep, Stop |
| Safety | Yes |
| Drop | N/A |
| Steal | Maggoty Flesh (55%), Corpse Fly (10%), Wyrm Bone (3%) |
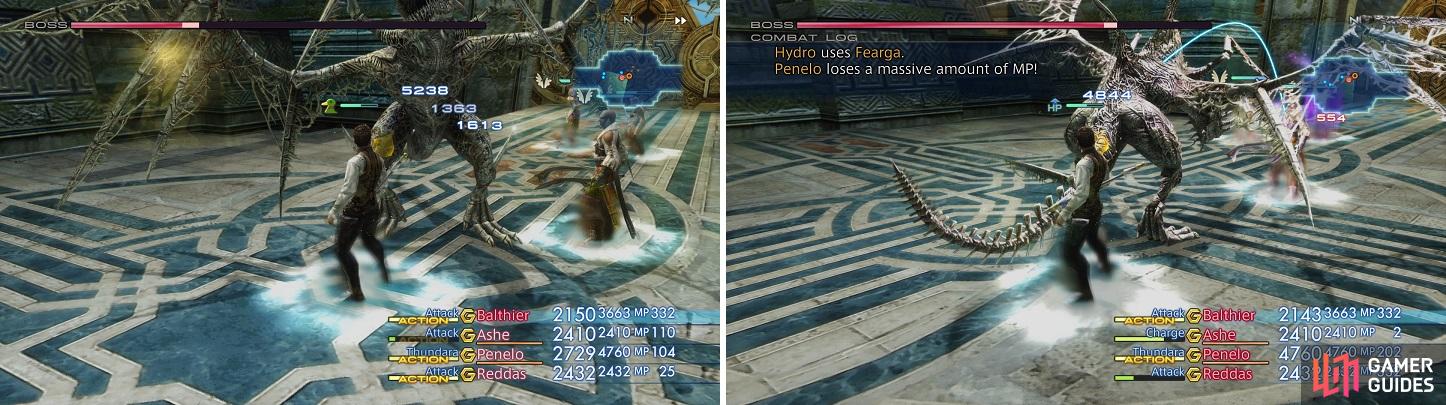
Hydro being weak to holy means your Uhlan can deal some major damage with a Holy Lance (left). Fearga is annoying, as it can deplete your party’s MP pools (right).
After the battle is over, look around the arena to spot some chests. Only one is guaranteed to spawn, which contains a Ruby Ring , but the others all have a lesser chance to appear ( Berserker Bracers , Cura Mote and Bubble Mote). All of these chests do not respawn once you open them and considering their contents, they’re probably not worth too much to keep rezoning to try and snatch them. When you have finished mulling about, climb the stairs to your east and approach the giant door for a scene. After some dialog between the party members, the door will finally open and you will be able to enter the Pharos proper.
The Wellspring
One of the first things you will notice upon entering - courtesy of the intro cinematic - is the huge mist-enshrouded shaft in the center of the area, east of where you start. Straight ahead will be a Way Stone, but it’s currently dormant, likely suggesting it’s a means of egress, not ingress. More conventional area transitions lie to the north and south, both leading to the Wellspring Labyrinth, but don’t go in either one just yet. Instead, run northeast past the Way Stone to spot a Gate Crystal, which will be very handy if you need to restock on items. From the Gate Crystal turn south and head back past the Way Stone, following the walkway counter-clockwise until you reach around 6:00, at which turn north to spot an Altar of Night, which will prove useful in just a little bit. There are also two Carven Pillars by the central shaft, east the Way Stone, upon which some cryptic mumbo-jumbo is scrawled. Anyways, now that you’re done familiarizing yourself with some of the features of this area, it’s time to leave. Return to the Way Stone and pass through the southern exit to arrive in Wellspring Labyrinth.
Wellspring Labyrinth
As the name suggests, this area is a bit of a labyrinth, but it won’t be too bad for long. Head east and then southeast a bit, taking the stairs to a set of rooms that turn out to be dead ends. Here is where you’ll encounter the first enemy in Pharos, Chimera Brains. Upon defeating them, you will notice they leave behind little floating orbs. Approach them swiftly enough and you will be able to interact with them. These Black Orbs are necessary to progress further into Pharos, but you only need three of them. Remember that Altar of Night in the Wellspring? Well, you can place one of the Black Orbs on it to “break a seal”, which will allow you to progress deeper into the Wellspring Labyrinth. There’s a total of three Altars of Night, so you’ll need to pick up three Black Orbs.
Chimera Brain:
An evolution of the simple Cockatrice, Chimera Brains are going to be the main enemy in Pharos for a good while. Their evasion gets higher when they get low on health, so you might miss a bit with physical attacks. Their technicks include Poke, Flurry Kick, Purify, Stone Gaze (inflicts Petrify), Hawk Glare (inflicts Disable) and Ember Breath. You can receive a Dark Crystal, Hi-Potion, Windslicer Pinion, or a Taurus Gem as drops, plus you can steal 60 gil, a Taurus Gem or a Celebrant’s Miter from them. Poachables include a Windslicer Pinion or a Chimera Head, the latter of which is also a Monograph (Mage’s) drop. It is weak to holy, but absorbs dark.
The notable item from the Chimera Brain is the Chimera Head, which is a part of two high-end equipment Bazaar bundles (two each, for a total of four needed). While you might chance the 5% poach, it’s much easier to just try your hand at the Mage’s Monograph drop instead.
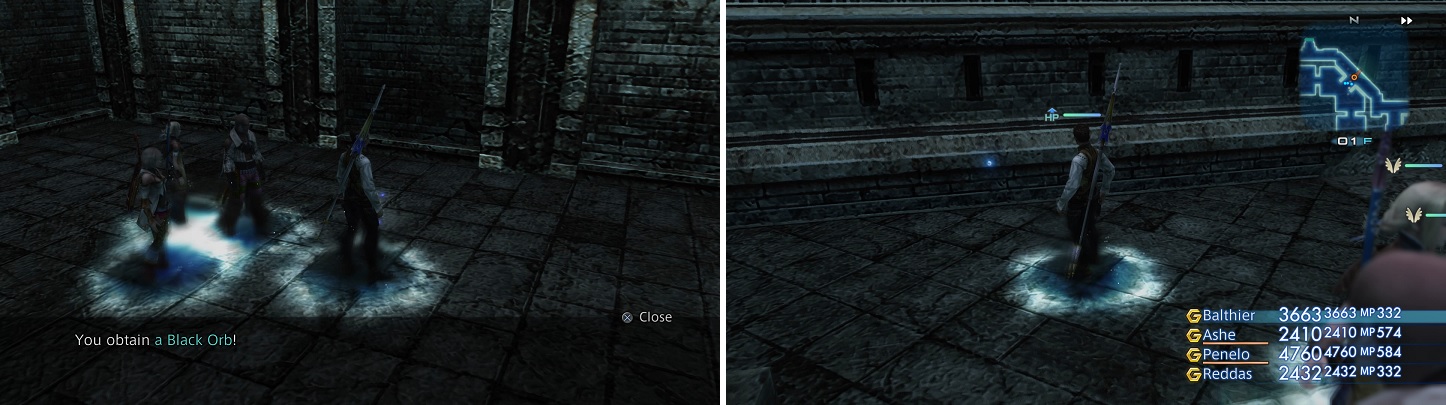
The Black Orbs are dropped by enemies and can be picked up (left). However, they disappear quickly, so you’ll need to grab them fast (right).
Once you grab a Black Orb, go back out to The Wellspring and place it in the Altar of Night on the southern end of the area. Once done, return to Wellspring Labyrinth area and make your way back southeast to where you fought the Chimera Brains. From here, turn southwest and go up a short flight of stairs to spot two sets of chambers to the west and south. In the center of some of these rooms are chests (although some may, in fact, be Mimeo’s in disguise!). In the southern-most room of the southern set you may find a chest containing an Argyle Armlet , although this chest is found near some rubble to the east, not in the center of the chamber.
Mimeo:
This slightly dangerous mimic is not too abundant in Pharos, but it can be a hassle to deal with, due to Leech’s high damage output. Other than Leech, it only uses Lunge as another physical attack. Drops include Iron Ore, Dark Crystals, a Zeus Mace or a Cancer Gem. Stealing with get you an Iron Ore, 500 gil or a Cancer, while poaching will yield either an Iron Ore or a Hastega Mote. They are weak to holy.
Leave these treasure-bearing rooms and continue southeast from the stairs to find a larger chamber with stairs leading to a depressed area to th south, wherein you’ll encounter another new enemy, the Mistmare. Tame the horses and continue east, then northeast, until you reach some stairs to the southeast that lead to another, more complex series of chambers. Ignore them for now and instead turn northwest to find an area transition, which leads back out to the otherwise inaccessible eastern end of The Wellspring area, where you’ll find another Altar of Night. Place a Black Orb into it and return to Wellspring Labyrinth.
Mistmare:
The teleporting horse has returned, with a bit of magicks to back up its usual assortment of technicks (Rush, Snake Lash and Toxify). You will find it has the ability to cast Aquaga, Slow, Stop and Blindga. The worst of those is definitely Stop, so have a gambit ready to toss a Chronos Tear if it manages to stick you with it. Note that its magicks will always hit, as it has the Ignore Reflect augment. Mistmares can drop a Water Crystal, Chronos Tear, Grimoire Aidhed or a Scorpio Gem, while you can steal a Grimoire Aidhed, Water Crystal or Reflectga Mote. Poachables include either a Grimoire Aidhed or Black Robes . It is weak to fire.
Now that you’re back in the Wellspring Labyrinth, continue southeast up the stairs then turn east into the first of a number of rooms, most of which are occupied by Chimera Brains and the odd Mistmare. Continue south into a larger room, then west, then south again to reach a small chamber with two new exits. Go west first to reach a long hallway, at the western end of which is an ornate urn containing the map for the First Ascent of Pharos. Groovy. Double back to previous chamber and venture east this time and follow the linear series of chambers east, then north until you reach a room with stairs leading up.
Ascend two flights of stairs (north, then west) then continue north down a hallway to find a locked door to your east, bound by some powerful magicks. This is the door that will unlock once you’ve placed all of the Black Orbs in their respective altars. Across from the door is a chest that contains a pair of Hermes Sandals , an accessory that will grant a character permanent Haste. Grab that nifty accessory, then continue north and turn east, then north down two more flights of stairs until you find yourself in another series of chambers.
Fight your way through them north, then west until you reach a chamber with two new exits, at which turn south into a large chamber, then west, then south again to find a short flight of stairs descending down to the southwest, beyond which is another area transition leading to the northern part of The Wellspring area. Here you’ll find the third, and last, Altar of Night, and upon offering up a third Black Orb you’ll receive a messag informing you that “the Seal of Night has lost its power”.. or in other words, the previously-sealed door is now open. Return to the Wellspring Labyrinth area and fight your way back to the door - the Threshold of the Night - and go through it, upon which you’ll be transported to an odd dreamscape environment somewhat resembling the Ogir-Yensa Sandsea. Head uphill and stick to the right to find a large clearing, oddly suitable for some large beastie to inhabit…
Boss - Pandaemonium
This overgrown turtle will be annoying, as only Wind magicks will be able to damage it, as far as elements go. It absorbs earth and is immune to everything else, so if you brought your Black Mage, make sure they are constantly casting Aero/Aeroga and not anything else. It will begin the battle with Protect, and possibly Shell, so use Dispel at the beginning to get rid of those. It can use Flash to blind your party, Stone Gaze to inflict Petrify and Flatten/Power Spin to hit multiple characters for physical damage (Power Spin has a chance to inflict Slow).
Once its HP gets to around 50% or so, the boss will throw up Perfect Defense, making it immune to both magicks and physical attacks. That means you won’t be able to do anything against it, so use this downtime to reapply buffs, heal and just wait for them to drop. It is vulnerable to Oil, which is… well, somewhat mitigated by the fact that it’s also immune to Fire. The only other ailment it is susceptible to is Silence, which doesn’t do a whole lot either. It has quite a bit of health, so this battle could go on for a while. You can steal an Ancient Turtle Shell, Aries Gem or Scarletite from it. The last item on that list is needed to make Gemsteel, which is an ingredient in two high-end weapons (one is needed to make a Gemsteel, but multiple Gemsteels needed), but if you don’t get it, there are other methods.
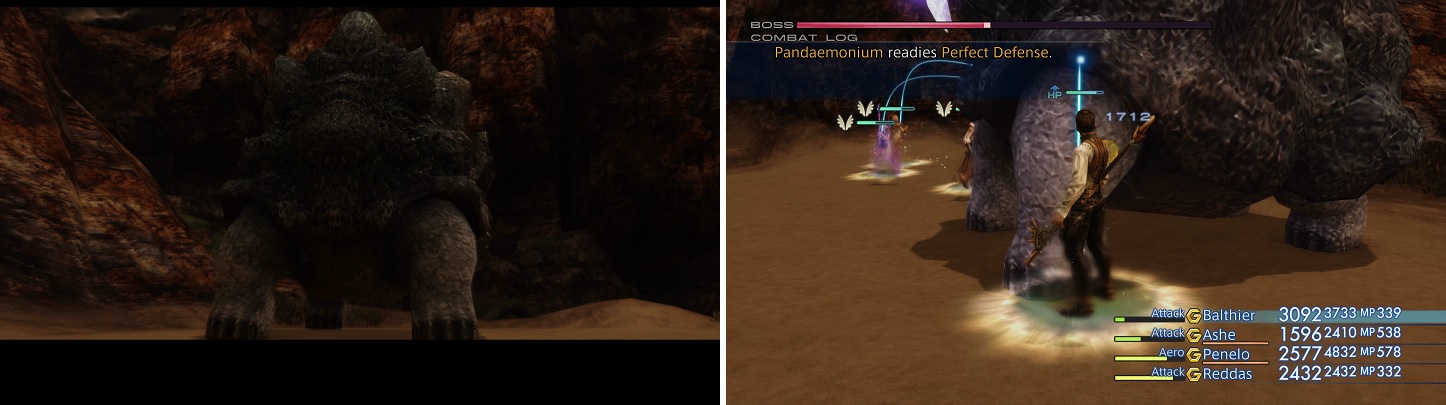
Yep, that’s a giant turtle alright (left). When it gets to a certain HP threshold, it will use Perfect Defense to become immune to all damage (right).
| Pandaemonium | . |
|---|---|
| Level | 45 |
| Weaknesses | Wind |
| Resistances | Earth (Absorbs), Darky, Fire, Holy, Ice, Lightning, Water (Immune) |
| Immunities | Blind, Confuse, Disable, Disease, Doom, Immobilize, Petrify, Poison, Reverse, Sap, Sleep, Stop |
| Safety | Yes |
| Drop | N/A |
| Steal | Ancient Turtle Shell (55%), Aries Gem (10%), Scarletite (3%) |
After the turtle is smote you’ll find yourself back in the room beyond the Threshold of the Night, the tiny Blackrock Vault area. Return back west to Wellspring Labyrinth zone - the Way Stone back in The Wellspring zone is now active, but there’s one more treasure worth fishing for while you’re here. From outside the chamber return downstairs to the north and continue through three chambers to reach the northeastern-most room of the area. From here turn west to return to the room with three exits, after which continue west down a hallway and into the chamber to the west. From here head south through two rooms and at some stairs leading southeast to a hallway, turn west to find more rooms. In the western-most room on the side of the area you may find a chest, inside of which you may find some Magick Gloves .
Grab them if you wish, then return to The Wellspring area, where you’ll find that the Way Stone is now lit up and active. Interact with the Way Stone and you’ll be teleported to the Wellspring Ravel - 1st Flight area.
Wellspring Ravel - 1st Flight
When you arrive, note that there are two doors, one to the east, and one to the north. Both of them lead to the same place, however, so pick your poison and work your way to a larger chamber northeast of where you started, then continue donw a passage to the northeast to find more Chimera Brains waiting for you. Kill them and note that you can explore to the north, or turn east up some stairs.
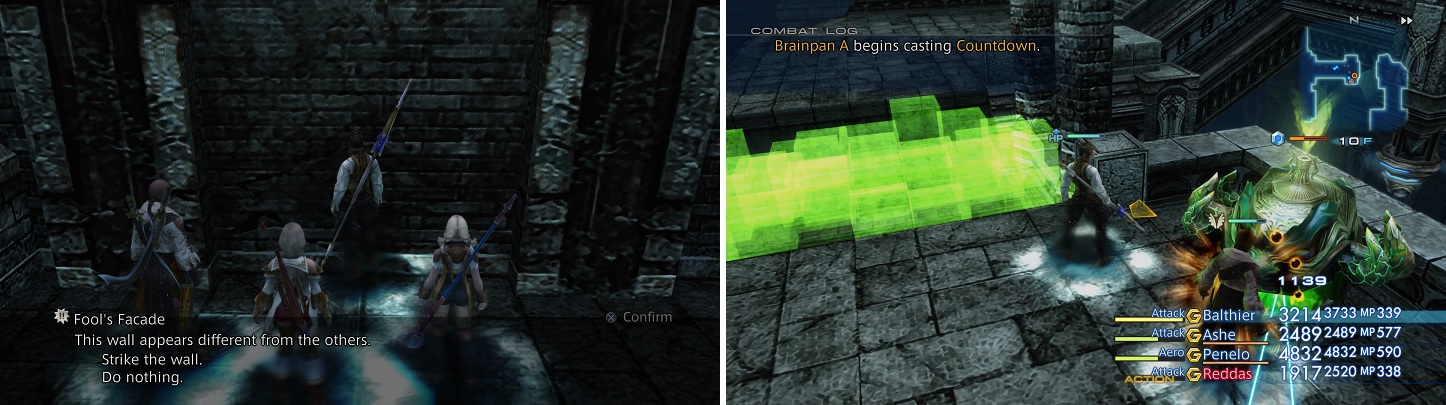
Head north for now and at the seemingly dead end, you will have a prompt to interact with the wall there. Pick the option to strike the “Fool’s Facade” to reveal a hidden area, which houses a chest that contains a Demon’s Shield . You’ll find these fake walls throughout Pharos, usually housing some unique treaures or more enemies. They’ll be pointed out as you explore.
After grabbing the treasure, return back south, then head up the stairs to the east, where you’ll where you’ll encounter another new foe (and a new puzzle gimmick!), the Brainpan. You might also see a wyvern-type enemy flying around nearby, which is an Aeronite. Back to the Brainpan, these enemies, when killed, will create a bridge over certain gaps. Some bridges will require a specific number of Brainpans to be killed and upon killing them, you will usually hear a ding noise in the background. The very first bridge only requires you to kill two of them, which are both by the gap itself. Step foot on the bridge after you’ve felled them and it will now become permanent, so you won’t need to do this more than once.
Brainpan:
Apart from being the gimmick in the area, these Facer enemies have a lot of attacks at their disposal. Their magicks include Aeroga, Darkra, and Aquaga, while their technicks include Countdown (Doom), Eerie Soundwave, Flash (Blind), Screech (Confuse), Stone Gaze (Petrify) and Self-Destruct, similar to Bombs. Note their magicks will always hit you, as they have the Ignore Reflect augment. They can drop a Quality Stone, Dark Crystal, Nu Khai Sand or Aquarius Gem, while stealing can net you a Dark Crystal, Chronos Tear or X-Potion. Poachables include either a Quality Stone or Magepower Shishak . They are weak to holy.
Aeronite:
This flying menace is usually found just out of range, flying over bottomless pits… probably in an attempt to ensure that anything they drop will be unobtainable. If you want any treasure, lure them over solid ground. They have access to both Aeroga and Blizzaga, plus their technicks include Ram, Crushing Fangs and Poison Breath (can inflict Poison on multiple characters). They can drop a Wyvern Fang, Ice Crystal, Dragon Helm and Leo Gem, while stealing will net you a Wyvern Fang, Hi-Potion or Leo Gem. Poaching will yield either a Wyvern Fang or Wyvern Wing, the latter of which is also a Monograph (Dragoon) drop.
Kill two Brainpans, then head across the bridge formed in the wake of their passing, after which turn south and head upstairs. Continue up another flight of stairs to the east, then north, killing another Brainpan as you go. After ascending the northern flight of stairs search the collapsed northwestern end of the landing where you may find a chest yielding a Leather Gorget . Turn east and climb another flight of stairs to reach a landing with a bridge spanning to the east, near which is another Brainpan. Kill it and note that the bridge is yet unfinished - looks like you’ll need to kill more than just the two Brainpans you’ve found on the way to it, so head up some stairs to the south from the soon-to-be bridge.
You will encounter a few false walls throughout Pharos (left). Killing the Brainpans will cause a green bridge to appear (right).
At the top of these stairs you can turn east to find… more stairs! A much smaller flight, these lead to a series of rooms, but before you climb them, continue south, then east to find a Brainpan hiding in a little alcove. Smite it, head up the stairs, then turn north to find a chamber where the last Brainpan dwells, who is also guarding another chest, this one housing a Dragon Helm . Kill and loot, after which the bridge will now be complete. Cross it and fight your way up several more flights of stairs to reach the area transition to the Wellspring Ravel - 2nd Flight zone.
Wellspring Ravel - 2nd Flight
Ascend the stairs to reach the first landing, then turn east, then go south up another three flights of stairs. After ascending the northern-leading stairs you’ll find a shorter set of stairs running up to some more chambers. Kill a Brainpan outside, then head into the rooms and turn west to find a second Brainpan. Smite it and search the wall to the north to find another Fool’s Facade, beyond which is a large chamber that contains… well, nothing of interest, really. Return outside, then head upstairs to the west and kill another Brainpan on the landing.
Ascend more stairs to the north, then west until you reach a landing with some Chimera Brains rolling about. Pluck them, then examine the wall to the south to find another Fool’s Facade, beyond which is an open area that’s a little bigger than the previous two secret chambers. Enter the area beyond the secret door, ascend the stairs to the west and tucked away in a corner at the top will be a chest with a Chaperon inside.
Snatch it, examine the wall to the north to find another Fool’s Facade, then smash it to get back on the main path. Head up some stairs to the west to find a landing with a trio of Brainpans, the deaths of which will form a bridge to the south. Cross it, kill another batch of Chimera Brains, then note another gap to the west. Unfortunately, you can’t get across right now, so continue upstairs to reach an area transition leading to the Wellspring Ravel - 3rd Flight zone.
Wellspring Ravel - 3rd Flight
This area initially seems like it’s more of the same, so start off by heading upstairs to the south to find a pair of Brainpans. Kill them, then head upstairs to the east to reach a four-way intersection. Head north first, ascend some stair and search the wall at the top to find another Fool’s Facade, behind it which can be a chest that might contain a Power Armlet .
Grab it and return south to the intersection, at which continue south until you find an Ancient Door to the west, beyond which you’ll find another Brainpan, as well as a Carven Pillar making mention of a “stone-face lit by red flame” and how they affect the “stone born of green flame.” Hmmm… interesting. Return back east and ascend some stairs to the south to find another Brainpan waiting for you near a deadend. Once both of them are dead, return to the intersection again.
There’s only one path left to go now, so head upstairs to the east, taking down the Aeronite that might be lurking about, then continue climbing stairs until you find a Brainpan outside of a doorway. Kill the Brainpans and… wait, one’s not a Brainpan, but really a similar monster called a Deidar. These must be the “red flame” enemies previously mentioned on the Carven Pillar, and when you kill them while trying to create a Brainpan bridge, they will actually remove one of the blocks. Unfortunately, there’s likely naught you can do right here, as the Deidar is in close proximity to the two Brainpans. If you find yourself still requiring a Brainpan to finish the bridge nearby, you may have to zone-out and respawn the enemies to get the final Brainpan(s) you need.
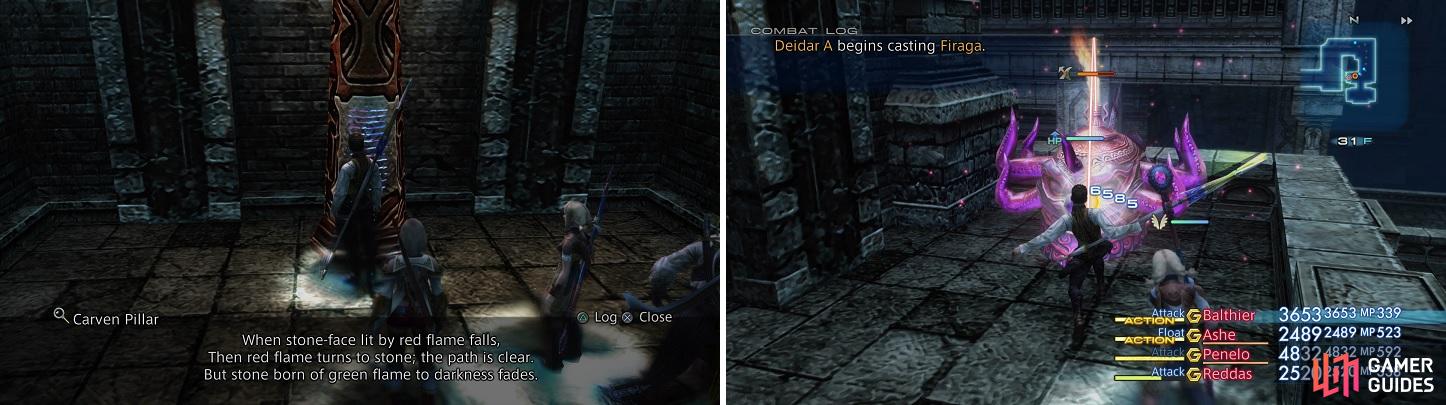
The Carven Pillar (left) is talking about Deidars (right), which when killed while constructing green bridges will take a notch out of them, making you have to kill more Brainpans.
Deidar:
Similar to the Brainpans, Deidars have red flames on top of their heads, which makes it easier to tell them apart from the others. They have quite a few magicks in their repertoire, including Firaga, Blizzaga, and Thundaga, as well as Lv. 3 Disable and Lv. 4 Break. Those last two only work if your characters’ levels are divisible by three or four, respectively. Their technicks include Flash (Blind), Screech (Confuse), Stone Gaze (Petrify), Eerie Soundwave, Lunge and Self-Destruct. They can drop a Quality Stone, Dark Crystal, Antares or Aquarius Gem, while stealing can net you a Dark Crystal, Quality Stone or Aquarius Gem. Poachables include either a Quality Stone or Orichalcum, which is also a Monograph (Scholar) drop. They are weak to holy.
Apart from a Rare Game, the Deidar is your only source for Orichalcum, which is used in two high-end weapon Bazaar recipes. While you could try poaching the Deidars for them, it’s much easier to just hope for the 13% Scholar’s Monograph drop.
It’s time to talk about the other function of the Deidars, which is to construct red bridges. That one gap in 2nd Flight that had a treasure on the other side requires you to create one said red bridge. Note that if you’re currently making a green bridge, then the Deidars will destroy the blocks, but after constructing the green bridges to completion, then they count towards the red bridges. These are completely optional, but if you wish to get all of the magicks in the game, then you’re going to need to do this. For now, just make a note of this, you’ll get around to actually forming these bridges later.
Cross the green bridge south of where you encountered your first Deidar and ascend two flights of stairs beyond the bridge to the east and north. Atop the northern flight of stairs you might find a chest that can contain a Bangle . Loot it if you wish, then head up another flight of stairs to the south, atop which turn east and kill some more Brainpans. From here you have two ways you can go, although the area forms a large square circuit, so just circle the area and slay Brainpans and avoid the Deidar to complete yet another bridge along the northwestern edge of this square. Once you don’t hear any more “pings” after one of their deaths, you can walk on the bridge to finally set it in stone. Cross the bridge you just formed, and follow the linear path beyond to reach the area transition to Wellspring Ravel - 4th Flight.
Wellspring Ravel - 4th Flight
You’ll be met with some Brainpans up the first set of stairs, then a mix of both Deidars and Brainpans as you continue to climb the tower. Avoid the Deidars and kill the Brainpans whenever possible as you progress through the area. Ascend multiple flights of stairs until you reach the northeastern corner of the zone, then turn west down a hallway until you find yourself sandwiched between two flights of stairs. Turn east up the smaller flight, first, and enter the rooms they lead to, wherein you’ll find two more Brainpans and another Deidar - there will also be a chest in the norhtwestern corner of the largest of these rooms, which contains a Scathe Mote.
Leave the chambers and head up the previously-neglected, larger flight of stairs to the west, which leads to a series of platforms connected by stairs, occupied by various foes. Ascend the stairs until you reach a more substantial stretch of flat ground where you again have options as to how to proceed, namely in the form of a hallway continuing west, and just south of that, a small flight of stairs leads into a series of three rooms. Enter the rooms here and in the small southern one you will find another Fool’s Facade along the western wall, beyond which you’ll find a chamber housing a chest with an Elixir inside. Leave the rooms, then take the adjacent hallway to the west and follow it upstairs until it finally terminates at a final green bridge.
Now that the final green bridge is completed, most Brainpans will no longer spawn… or rather, they’ll remain dormant, which somehow prevents them from coming to harm. Now that they’re out of the way, you may want to consider going back to the previous areas and clearing out Deidars, which will form red bridges. For whatever reason, some Deidar will not count towards this, but when they do count you should hear those familiar “pings” in the background upon killing them, so just keep track of them as you go.
There are two bridges on 3rd Flight and one on 2nd Flight. Three Deidars will get you across the first bridge on 3rd Flight, which is just north of the stairs leading to the 4th Flight. Complete it, cross it, search the wall beyond to find a Fool’s Facade, beyond which you’ll find a chest containing a Gungnir . To complete the second bridge on the 3rd Flight, which is just west of where the chest with the Gungir lies, you’ll need to kill four Deidar. Once done, cross the bridge to find a chest containing the Holy magick (White Magick 11), a rare offensive spell for the White Mage. The final bridge on 2nd Flight (from the area transition to the 3rd Flight, head down some stairs to the east, then north, then turn west) needs four more Deidars. Beyond this bridge you’ll find a chest which yields a Perseus Bow .
Creating all three red bridges in one go will fulfill the requirement needed to spawn a Rare Game on floor 47 (you need to kill 10 Deidars in total for this), which is just past the final green bridge in the 4th Flight area. Just cross the aforementioned bridge and head upstairs to the south where you’ll find this Rare Game, Vishno. Vishno will spawn near an Aeronite, so you’ll want to be careful which one you defeat first, especially if you’ve been keeping up a battle chain with Brainpans/Deidars. You definitely don’t want all of that hard work to disappear just because of a stupid Aeronite, do you? When you’re finished, continue up some stairs to the west, then eat, to reach Horizon’s Break.
Killing Deidars after doing the green bridges has two benefits, as you can make red bridges that lead to good treasures (left) and defeating enough will spawn the Rare Game, Vishno (right).
Vishno:
Vishno is pretty much just a stronger version of the Deidar that has access to almost everything they do - well, at least their magicks. They can cast Aeroga, Blizzaga, Darkra, Firaga, Thundaga and Aquaga. Its technicks are just limited to Lunge, Stone Gaze and Flash, so you don’t have to worry about the other stuff. Vishno has quite a lot of HP, around 80,000 or so, which means the fight will be a little long. It can drop a Solid Stone (common) or Ribbon (rare), plus you can steal a piece of Orichalcum from it. It is weak to Holy, but absorbs Dark.
While the Ribbon is certainly a great item, as it blocks the majority of status ailments in the game, getting the rare drop from Vishno can prove to be troublesome. You can increase the chance for it via chaining Deidars and Brainpans, but it’s still only a 12% base chance and that can be a pain. It is certainly not easy to respawn Vishno, since you’d need to go back to the First Ascent area, then kill ten more Deidars (possibly attempting to chain them to improve your odds of getting a Ribbon) to have another opportunity at it.
Horizons Break/Horizons Cusp
From where you arrive, make your way east, then southeast down two small flights of stairs to reach a circular walkway overlooking the misty central shaft of Pharos. From here turn southwest (counter-clockwise) to find a Save Crystal, the sole point of interest in the immediate area. You’re free to run around the ring if you want, but you won’t find anything at all. Heal/save at the crystal, then look for the exit in the southwest corner, bringing you to the Horizon’s Cusp area. Once you arrive here follow the linear path ahead and when you reach a door, search two chests, one on either side of the door. They will contain a Reflectga Mote (north) and a Black Mask (south). When you’re ready to move on, head through the door to face another boss in its illusory realm.
Boss - Slyt
Slyt is a strong enemy, sporting a pretty high attack power, and it is a very simple fight in terms of attacks. The boss will pretty much use Enrage at the beginning of the battle, granting it the “Attack CT 0” augment, meaning its attacks won’t need to wait until the ATB gauge fills up. It will resort to using only normal attacks throughout the entire battle. However, Slyt has one big, glaring weakness: it is susceptible to Oil and is weak to Fire. If you afflict it with Oil and pelt it with Firaga, the boss will go down stunningly fast when faced with that lethal combination. Note that it absorbs Water and nulls all other elemental damage, so Fire is the only one you can use. You can steal a Yensa Scale, Pisces Gem or Yensa Fin from it.
| Slyt | . |
|---|---|
| Level | 47 |
| Weaknesses | Fire |
| Resistances | Water (Absorbs), Dark, Earth, Holy, Ice, Lightning, Wind (Immune) |
| Immunities | Blind, Disable, Doom, Immobilize, Petrify, Poison, Sap, Silence, Sleep, Stop |
| Safety | Yes |
| Drop | N/A |
| Steal | Yensa Scale (55%), Pisces Gem (10%), Yensa Fin (3%) |
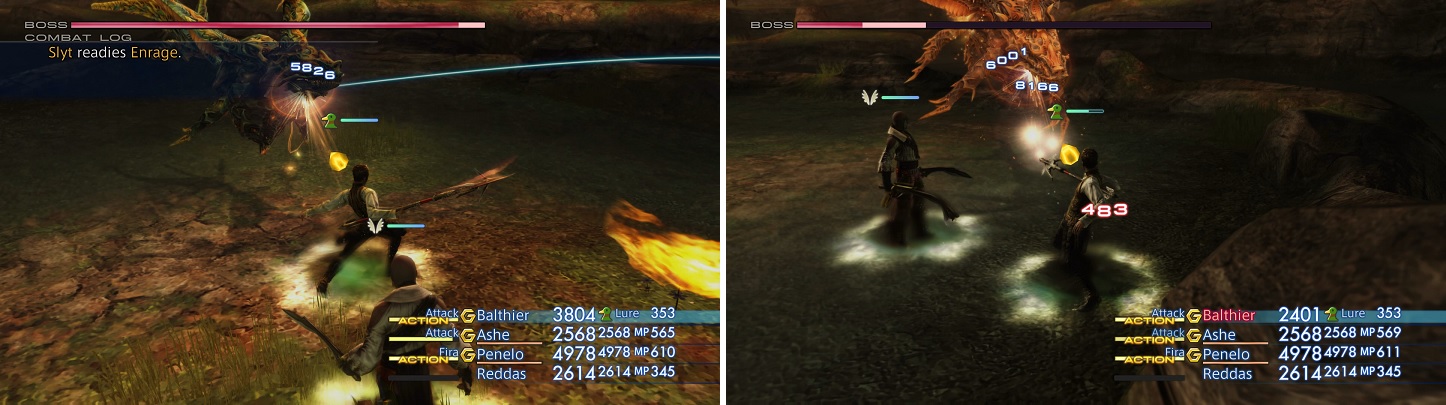
Slyt will open the fight with Enrage, making its physical attacks stronger (left). Its weakness to fire will make the fight go very quickly (right).
With the boss flopping on the ground, gasping for air, the room will return to normal, revealing a door to the east. Head through it and follow the linear path beyond to find a Way Stone. Note that there is a small chance that an Undin Entite might spawn here and unlike the normal rules they usually follow, if it does spawn in Horizon’s Cusp, it will already be hostile. Either equip Water-absorbing gear and cut it down, or make a break for the Way Stone and teleport to the Second Ascent.
No Comments