


| Bestiary |
|---|
| Wraith (Mark) |
| Items In This Area |
|---|
| Sword of the Old Order |
Back to Rabanastre
Return to Rabanastre by whatever means you find most suitable - Speed Mode and Escape Mode and simply running through the Estersand works fine - and when you arrive the party will disband. This leaves Vaan on his lonesome, with him deciding to show Penelo the shiny treasure he obtained from within the palace. She’s likely mucking about Migelo’s, but before you go meet her, you might as well deal with a bit of business.
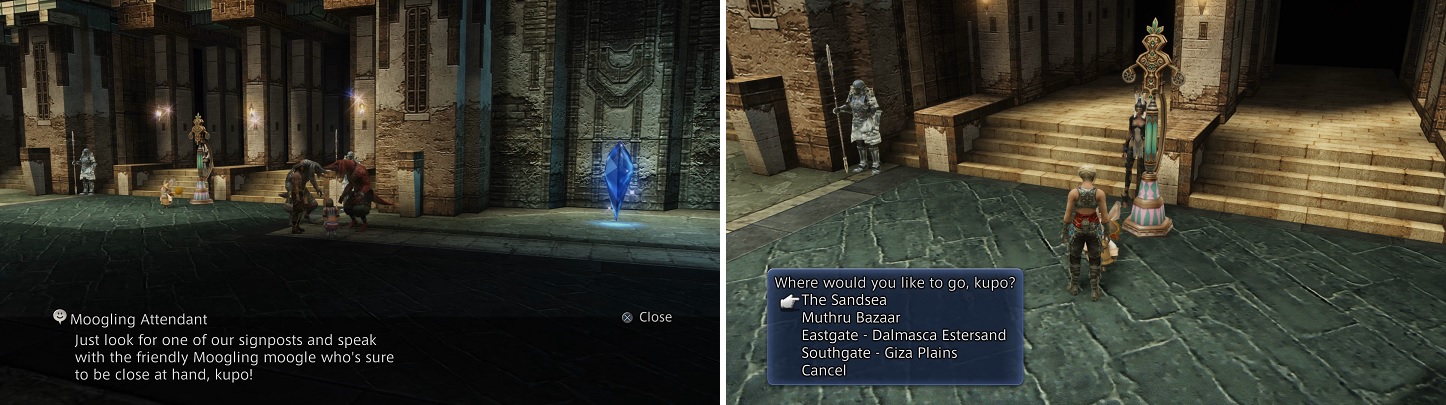
The Moogling Attendants will make it easier to get around the big city of Rabanastre.
First up, talk to a Moogle near the gate - the “Moogling Attendant” - and it’ll tell you that the Moogling is now open for business. Basically, free fast-travel around Rabanastre. To make use of it, head northeast from the Save Crystal and talk to the Moogle named Hurdy and it’ll take you where you want to go. Your first stop should be The Sandsea, so use the Moogling to travel there to find yourself at the northern end of the East End area. Enter the Sandsea and check out the notice board to pick up the new hunt “ Waterway Haunting “. Of course, since Vaan is on his own it would be suicidal to try and go after this hunt right now, so it can wait a little bit until you have a full party again.
Leave the Sandsea and head to the North End area to the north, which houses the Clan Hall. Return to this illustrious guild and talk to Montblanc, who will reward you for every boss you’ve defeated since you last spoke to him, including the pack of Flans, the Firemane and the Mimic Queen. He’ll also offer hunts for the Elite Marks Cluckatrice and Rocktoise, but you’re best off leaving them for later, given your current strength.
| Reward (For defeating the pack of Flans) |
|---|
| 150 Gil |
| Reward (For defeating the Firemane) |
|---|
| 200 Gil |
| Reward (For defeating the Mimic Queen) |
|---|
| 300 Gil |
Bargains at the Bazaar IV
When you’re done getting easy money from Montblanc, leave the Clan Hall and return to the East End area. The rest of the shops here don’t have anything of particular interest, but now is a fine time to sell off all that loot you picked up in Barheim Passage and the Estersand and see what Bazaar bundles unlock. In particular you’ll want to sell off Bomb Ashes x3, Bone Fragments x5, Foul Flesh x2, Green Liquid x3, Iron Scraps x3, a Rainbow Egg and Small Feathers x3 to unlock numerous Bazaar Bundles. You’ll need to sell three Screamroots to unlock the Potion Crate bundle, but there’s a Samurai’s Katana that requires seven Screamroots, so you might want to delay purchasing the Potion Crate bundle, or just hold onto your Screamroots for now.
| Loot Sold | Bazaar Bundle | Cost |
|---|---|---|
| Rainbow Egg | Hi-Potion Pack (Hi-Potion x10) | 400 gil |
| Small Feather (x3) | Tail of the Phoenix (Phoenix Down x2) | 1,111 gil |
| Earth Stone (x3) Foul Flesh (x2) Iron Scraps (x3) | Iron-Forged Blade (Iron Sword) | 650 gil |
| Foul Flesh (x2) Horn (x2) Wind Stone (x3) | Light Spear (Javelin) | 320 gil |
| Dark Stone (x3) Fish Scale (x2) Green Liquid (x2) | Marksman’s Delight (Capella) (Silent Shot) | 550 gil |
Vaan for Squire
Now that you’re done shopping and claiming rewards for bosses slain, head to Migelo’s shop. Inside you’ll be pestered by Kytes, who is overly impressed by Vaan’s prison break. Vaan omits to mention all the help he had, of course. More importantly, the kid will tell you that neither Penelo or Migelo are about, and complains about his suspended errand for Old Dalan. This prompts Vaan to offer up his services again to help out his little buddy and go meet Old Dalan in his stead.
The easiest way to get to Old Dalan’s from here is to go through the entrance to Lowtown in Southgate, as Dalan’s house is just a few steps north of there. Once you arrive Vaan will show off his stolen treasure, after which Dalan will decide to give you the task that was meant for Kytes - to personally deliver a sword to someone named Azelas. Thankfully, he marks your map with the location, which is on the western side of North Sprawl.
Instead of going straight there, however, let’s head on over to this Milha person - the petitioner for the last hunt you picked up - to officially begin the Waterway Haunting hunt. Looking at your map of Lowtown, there will be a person icon to the east of the Traveling Merchant in North Sprawl, and that is where you’ll find Milha. Speak with her to find out some child has locked himself in the house because of some spooky ghost. Seems like less of a “ghost needs exorcised” problem and more of a “child needs disciplined” issue. Oh well. Accept the hunt.
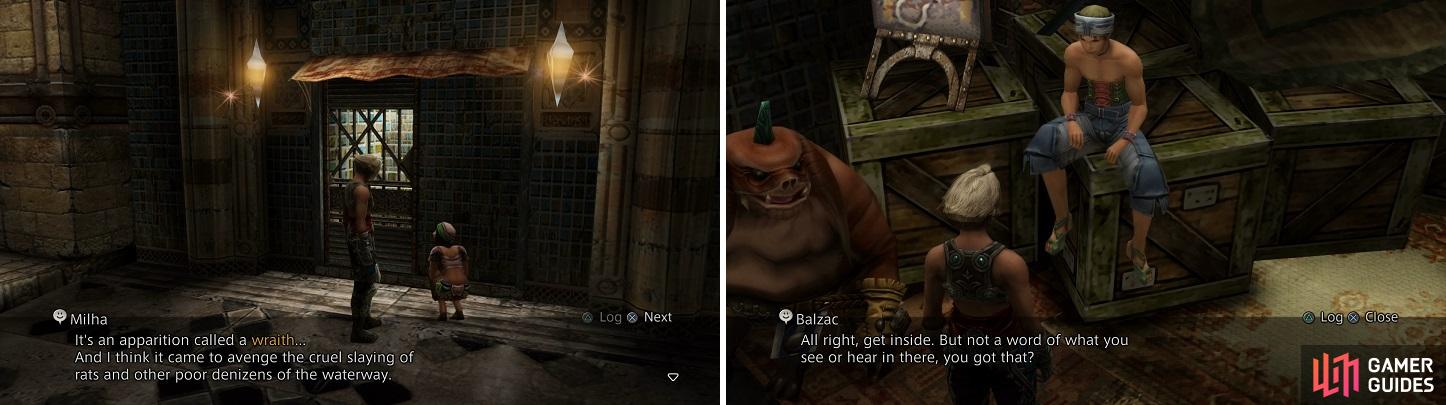
Talk to Milha to officially start the Wraith hunt (left) and Balzac to continue with the main storyline (right).
You still have no party to back you up, but at least you’ve moved the chains. Continue on with this sword delivery business and head to the location marked on your map, which is in the southwestern corner of the North Sprawl area. When you arrive, speak with a man named Balzac, who is currently employed with the task of sitting on the boxes. After you drop Dalan’s name, he will let you inside, where you’ll see a scene with a freshly-cleaned and groomed Basch who for some reason is still wearing the clothes and piecemeal armor he picked out of Barheim Passage. The Resistance will debate Basch’s trustworthiness, Basch mentions rescuing Amalia, Vaan over-reacts and injects himself in matters that are, frankly, above him, and the Resistance decides to keep an eye on Basch.
After Vaan and Basch leave they’ll chat a bit more, with Basch asking Vaan for one last favor, after which Basch will join the party for good. Now that he’s officially a party member and no longer a guest, make sure you set a job for him (he’s an obvious front-runner for Knight and Bushi, for lore and stat reasons) and spend what available LP he’s earned to boost him up a bit. It also doesn’t hurt to outfit him with some updated equipment, assuming you have extra or wish to buy some more.


Basch wants you to take him to meet up with Balthier, and where else would a sky pirate be besides the local watering hole? Exit Lowtown via the northeastern entrance and - if you didn’t purchase them at Nalbina - head into Yamoora’s Gambit shop across the street, where you should purchase the Gambits “Foe: [element]-vulnerable” and the Gambits “Foe: Undead” and “Foe: Flying”. These will make the upcoming hunt easier.
When you’re finished, head south into the East End area and Basch and Vaan will have a bit of a chat. A bit random, but… hooray! Reconciliation! After the bromance, enter the Sandsea, where you’ll want to go upstairs for another scene. Seems that the bounty hunters led by Ba’Gamnan have captured Penelo, and are using her as bait to lure Balthier to Bhujerba. Why that Bangaa thought that a mercenary like Balthier would be lured by the plight of some girl is open to debate, but both Vaan and Basch are willing to go (albeit for different reasons). After a spot of bribery Balthier relents and he and Fran join the party. The gang is back together! Of course, you can only have three characters (not including guests) active at a time, so you’ll have to bench one of the four cough Vaan cough. To do this, enter the Party Menu, select the Party option and use [X] to toggle people in and out of the party. Active characters have their portraits further to the left, while inactive character’s portraits are further right and grayed out. Take who you wish, and Balthier will tell you to meet him at the Aerodome. Before heading off to Bhujerba, however let’s go ahead and finish that hunt you’ve been working at.
Hunt - Wraith
| Wraith | . |
|---|---|
| Level | 9 |
| Weaknesses | Lightning |
| Resistances | Ice (Absorbs) |
| Immunities | Disease, Doom, Libra, Lure, Petrify, Poison, Sleep |
| Safety | Yes |
| Drop | N/A |
| Steal | Glass Jewel (55%), Dark Magicite (10%), Hi-Potion (3%) |
It is now time to tackle the hunt you just started not too long ago. The ghost Milha talked about earlier is haunting the Garamsythe Waterway, particularly the spot accessible by Storehouse 5, a place that should be familiar to Vaan Ratsbane. Note that this hunt can be a little challenging, but it is made significantly easier with the use of Silence. You should have already found this Black Magick in the Yardang Labyrinth of the Estersand, but in order to use it, you will need either a Black Mage or a Red Battlemage.
If you don’t have such a caster ready, however, there are other ways to inflict Silence; the Mage Masher, a dagger that you could have found in Barheim Passage or purchased there or afterwards (it’s for sale in both Rabanastre and Nablina) which can inflict silence on hit. You’ll need a Shikari to equip it, however. Failing that, however, if you purchased the Marksman’s Delight Bazaar bundle you’ll get your hands on some Silent Shot, which also inflicts Silence. Best of all, it can be equipped by Balthier no matter what his job is. This will set you back 550G. If you can’t get your hands on any means of inflicting Silence, you may want to postpone this hunt until later.
When you feel you are ready, head back into Lowtown and find the entrance to Storehouse 5, where you can return to Vaan’s humble beginnings - at least, where you saw him at the beginning of the game. Upon entering the Overflow Cloaca of Garamsythe Waterway, you will see nothing, but as you approach the middle portion of the room, the Wraith will magically appear out of thin air, like all others of its kind. The first thing you will want to do is try and get Silence on the Wraith, assuming you have access to it. You won’t see why this helps until later on in the fight - well, you won’t see why it helps anyway if you can inflict it.
Right off the bat, the Wraith will randomly cast Doom until it sticks on all of your characters. The more it misses, the better it is, as you will have more time to inflict damage to the apparition. It will cast Doom until all characters are afflicted, and if a character that had Doom is revived, it’ll immediately attempt to cast it on them again. Outside of Doom, it has access to Sleep Touch and Poison Touch, so be ready with Antidotes for the latter, should you wish to remove it.
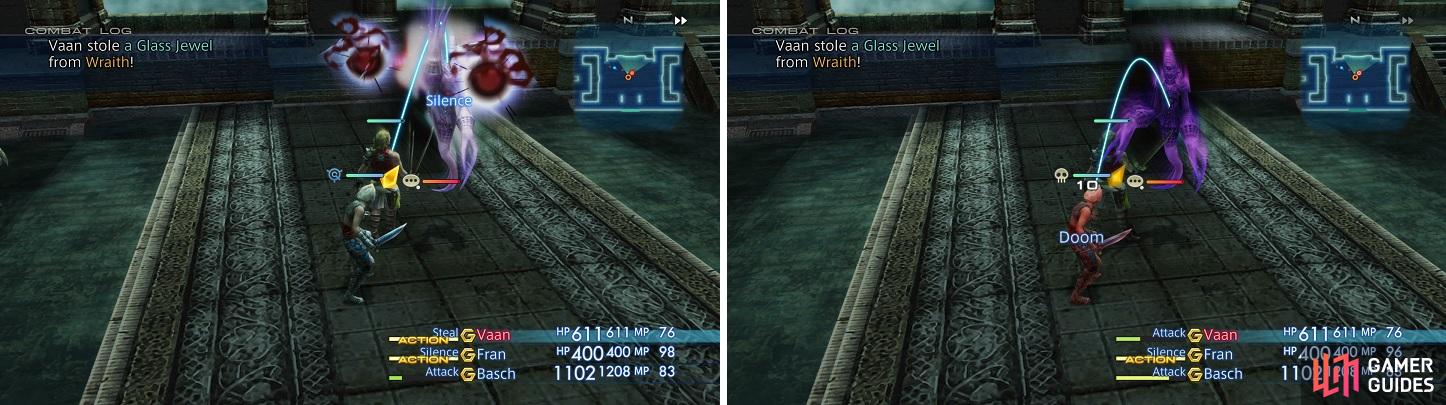
Silencing the Wraith (left) will make the battle very easy by blocking its magicks. The Wraith will start the fight with Doom on all party members (right), which will kill a character when the timer runs to zero.
Once you get the Wraith to under 20% of its max health, it will begin using magicks, specifically Blizzard (although it may also start casting this a bit earlier), Blind and Dark. The first isn’t too bad and the second is a nuisance, as it will make the Wraith harder to hit, but Dark is the most troublesome of the three. This is because Dark is an area-of-effect spell, so if your characters are jumbled up, then it will hit all of them and it will be very difficult to heal all three of your characters at the same time with something like Potions and Cure.
If you manage to inflict Silence, though, you don’t have to worry about any of those magicks (except for Doom, of course, which somehow bypasses it). This makes it so the Wraith can only attack physically once it’s finished with Doom. The Wraith doesn’t drop anything, but you can steal a Glass Jewel, Dark Magicite or Hi-Potion from it. Once the Wraith is no more, return to Lowtown and seek out Milha again to have the little Seeq boy finally come out of the house. The boy’s parent will come and thank you for vanquishing the ghost, as well as hand over your reward.
| Reward (For exterminating the Wraith) |
|---|
| 500 Gil |
| Ether |
| Gauntlets |
Now that you’re done with that hunt there’s one more thing you can do, which can get you great loot far earlier than you should have it, but it’ll take some time and bother to do. If you want to go after this loot and get your toes wet with Trial Mode, check out the “Trial Mode Treasures I” page, while if you want to continue with the story skip to the “Skycity of Bhujerba” page.
@ Flowering Cactoid Hunt. Just use an Aero Mote. Dead in 2 seconds.
@ Flowering Cactoid Hunt. Just use an Aero Mote. Dead in 2 seconds.