

| Quest Giver | Reward | Lvl |
|---|---|---|
| Rhys - Atlas HQ | Cash, Epic Weapon Trinket, 4th Weapon slot Unlock, Unique Legendary SMG (Optional) | 24 |
Go to Sanctuary bridge, Eliminate Maliwan squad
Upon completing the previous mission, Tannis will contact you while at Atlas HQ to return the fragment to her. Fast Travel back to Sanctuary, hand the fragment over to Tannis and then make your way to the bridge. You’ll learn the location of the Vault on Promethea so once you’re geared up and ready, Fast Travel to Meridian Metroplex and make your way to the northeast to find a group of Maliwan. They shouldn’t pose too much of a threat, especially with the assistance from the Atlas forces. Once the last of the Maliwan Troopers fall, head over to Zer0 to have him open the way and press on.
Drive Project DD, Drive to Apollyon Station
Neon Arterial is primarily used for story purchases and it’s rather linear but there is still the usual Crew Challenges and Zone Completion to look into. For now, go ahead and meet Maya, getting into the Technical that she provides. Before you head off however, there’s a Typhon Log along the southern wall, grab it and then jump into Project DD.
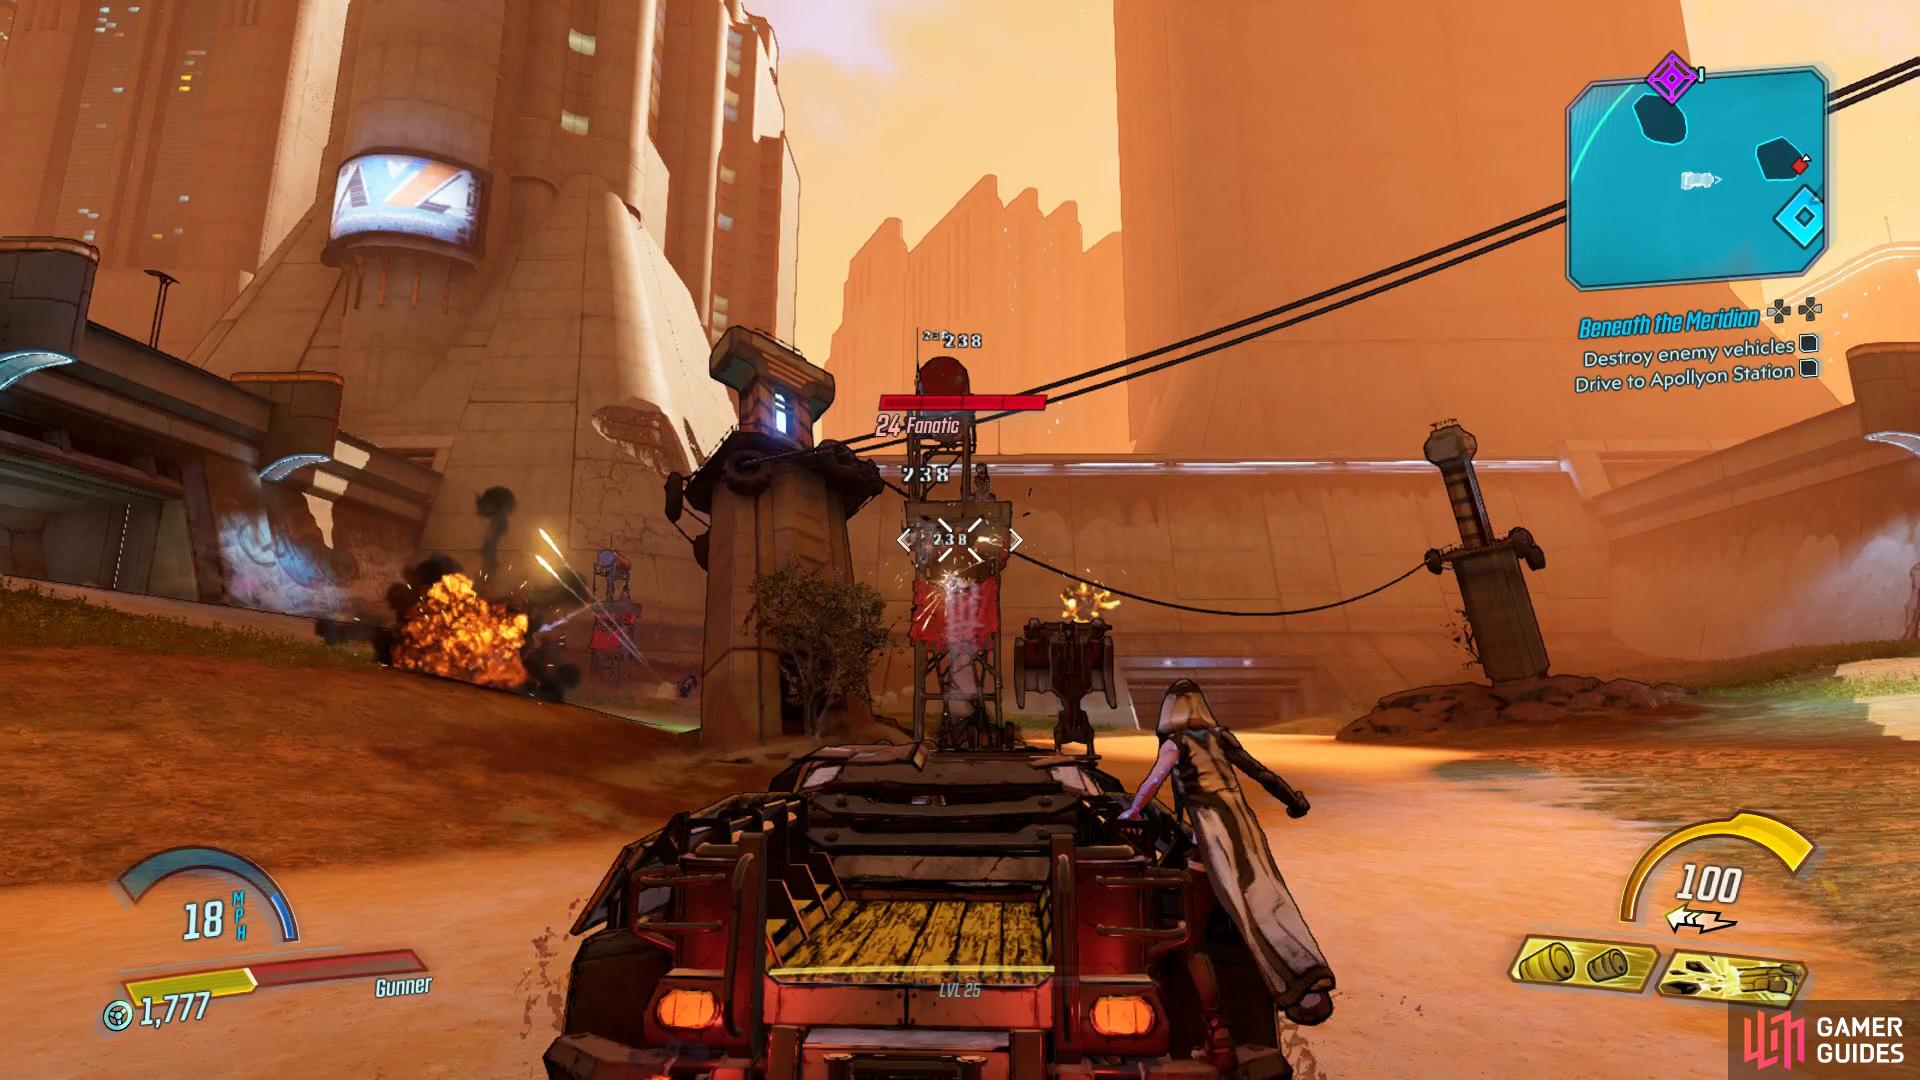
Don’t forget to take out the Towers first to avoid rockets coming your way
Maya will assist by Phaselocking mines towards your enemies.
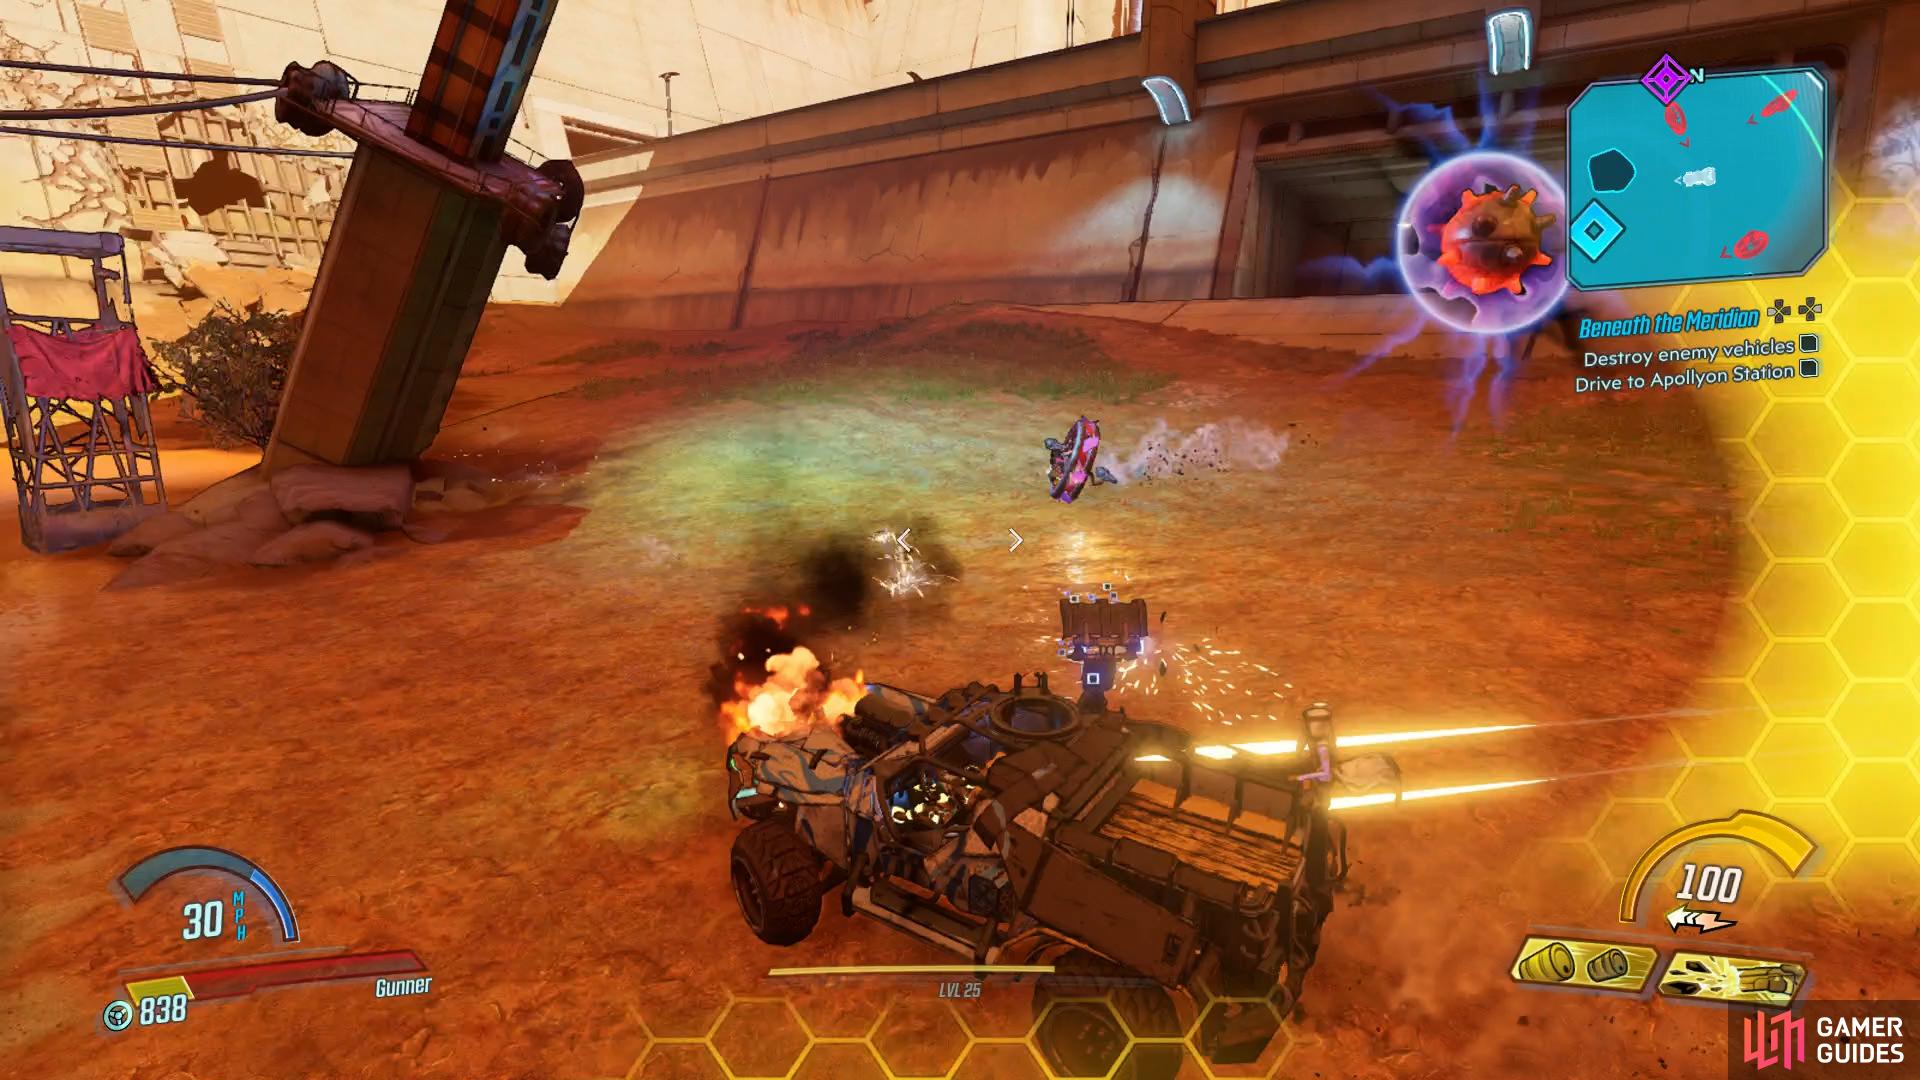
Your task is to now head to Apollyon Station and you’ll soon be assaulted by the COV. There’s nothing to grab along the way so focus on making it through the straights and ignore any of the enemies if you can until you get to the roadblocks. Before Maya can open the way, you’ll need to dispatch any of the other enemies in the area, keep on the move while you’re shooting and you should be fine. Should you lose your vehicle in the shootout, use the nearby Catch-A-Ride to spawn another and continue on. You’ll have to repeat this step one more time before you reach Apollyon Station up ahead.
Enter Apollyon Station
Make use of the nearby Vending Machines if you need and then press on until you’re just outside the station. The COV have set up an ambush here and you’ll be in the open, immediately take cover and thin the horde, focusing on the Badass and Bruiser enemies first. If you see Maya Phaselock any enemies, shoot them while they’re suspended to deal increased damage. Once the area is clear, search along the northern wall to find the next Typhon Log before entering the station itself.
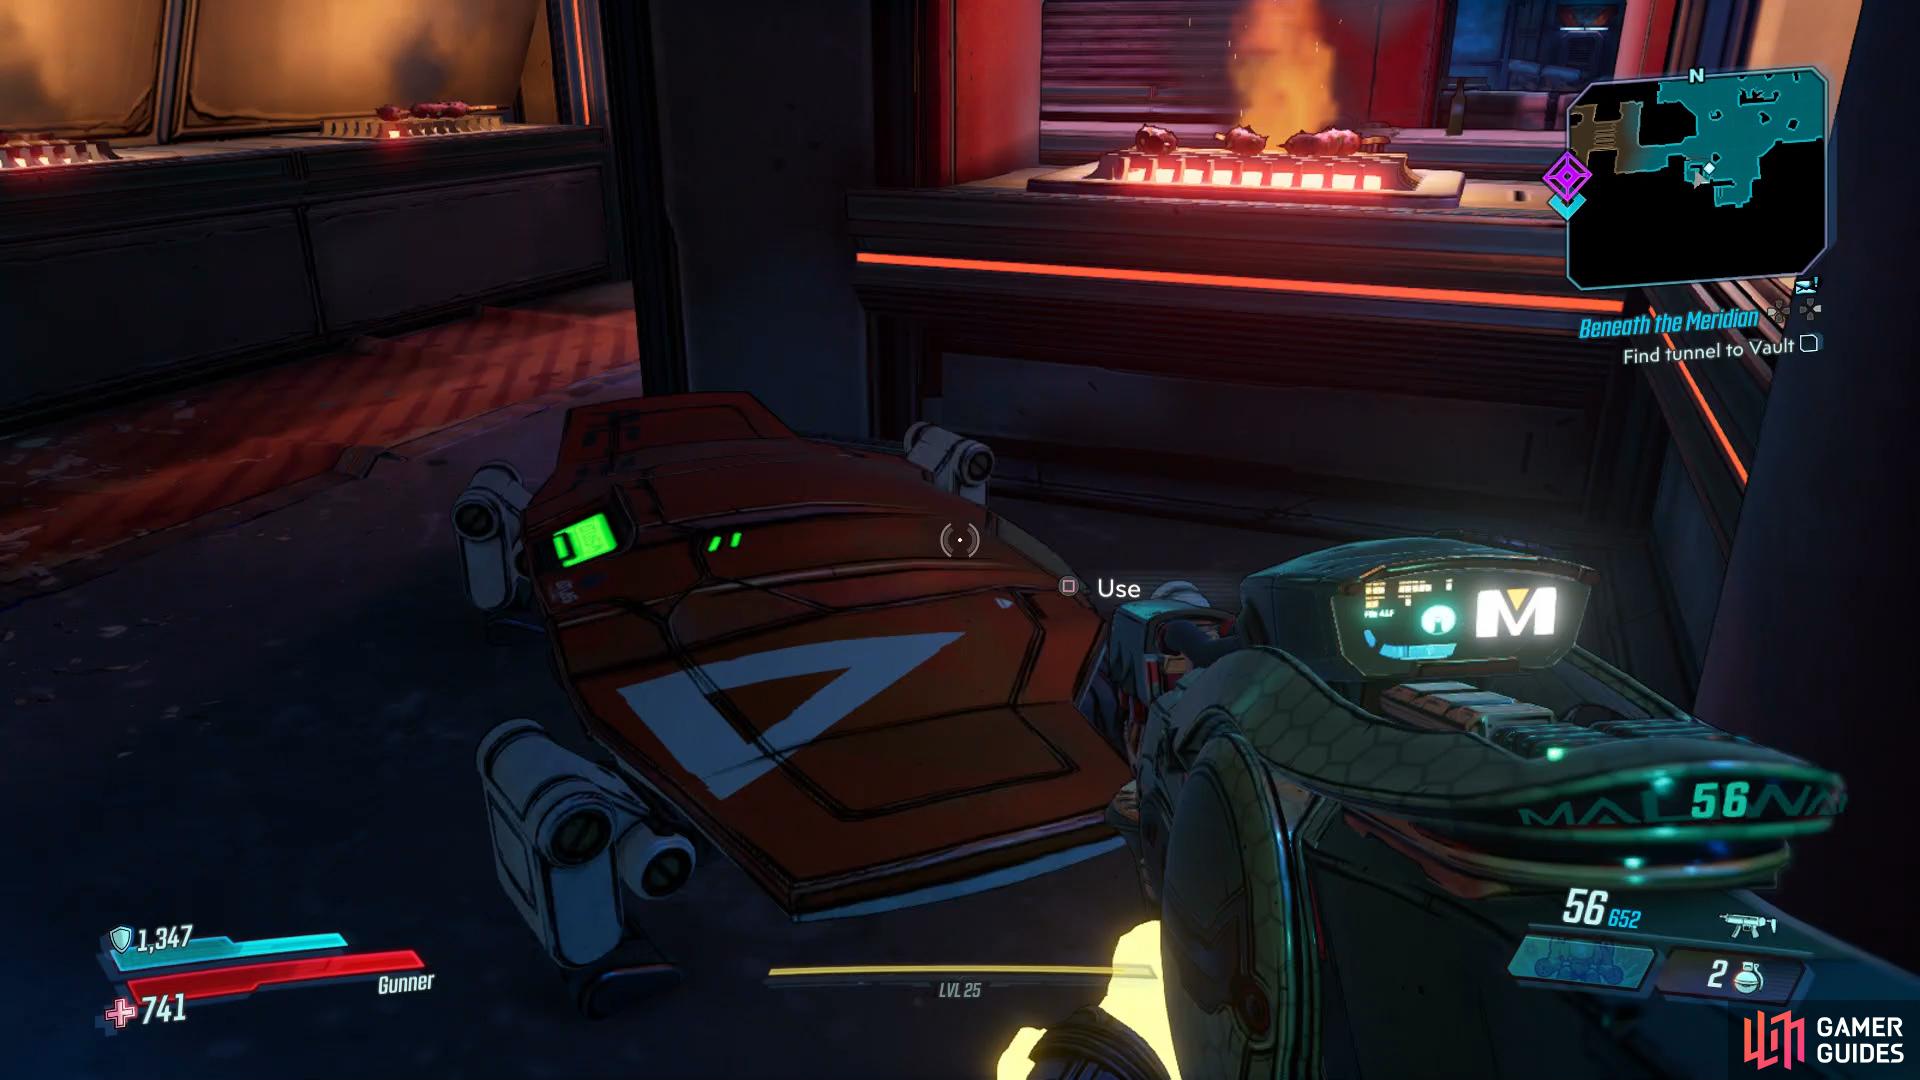
Find tunnel to Vault
Once you enter the station, you’ll have to deal with another large group of COV. Use the same tactics employed in the previous battle and focus on any Badass Tinks that may spawn, their multiple grenades can cause problems if you’re not careful. Once you clear the initial area, search in the kitchen to the south to find a Red Chest and then continue on to find some Vending Machines just before you enter Green Diamond Platform.
This Red Chest is hidden in the kitchen just before you reach Green Diamond Platform.
There’s another large scale COV battle here however the area is more even with it’s cover for you to use. Be sure to keep an eye on the upper walkway, COVs will take position up there and can really pile up the damage if you ignore them. Once the enemies are defeated, look on the tracks to find a Dead Claptrap and then make your way into the tunnel beyond.
Find Vault
As soon as you drop down into the caverns, you’ll come across your first Eridian, the Wraiths. These enemies will attack you with their staves from afar but go down easily provided you have a Shock weapon to shred their shields. Follow the linear path down to the next group where you’ll encounter Spectres, these Eridians will rush you and go for melee attacks so back up while you’re shooting them and make them your priority. Once you enter the water as you press forward, look to the left wall to spot some Eridian Writing and then take out the next group of Eridians just beyond.
Once you can, head down the side path to the east to locate the third and final Typhon Log and then after taking out yet another group of Eridians south of here, the Dead Drop can be found in a side path to the west. The final battle at the end of the Zone contains a Summoner, these nasty Eridians will summon more Wraiths and Spectres into battle so focus all your firepower on it to make life easier for yourself. Once the area is clear, proceed forward to enter The Forgotten Basilica.
There are Vending Machines just ahead so be sure you’re fully stocked before you head forward and when you’re ready to face what lies beyond, insert the Vault Key.
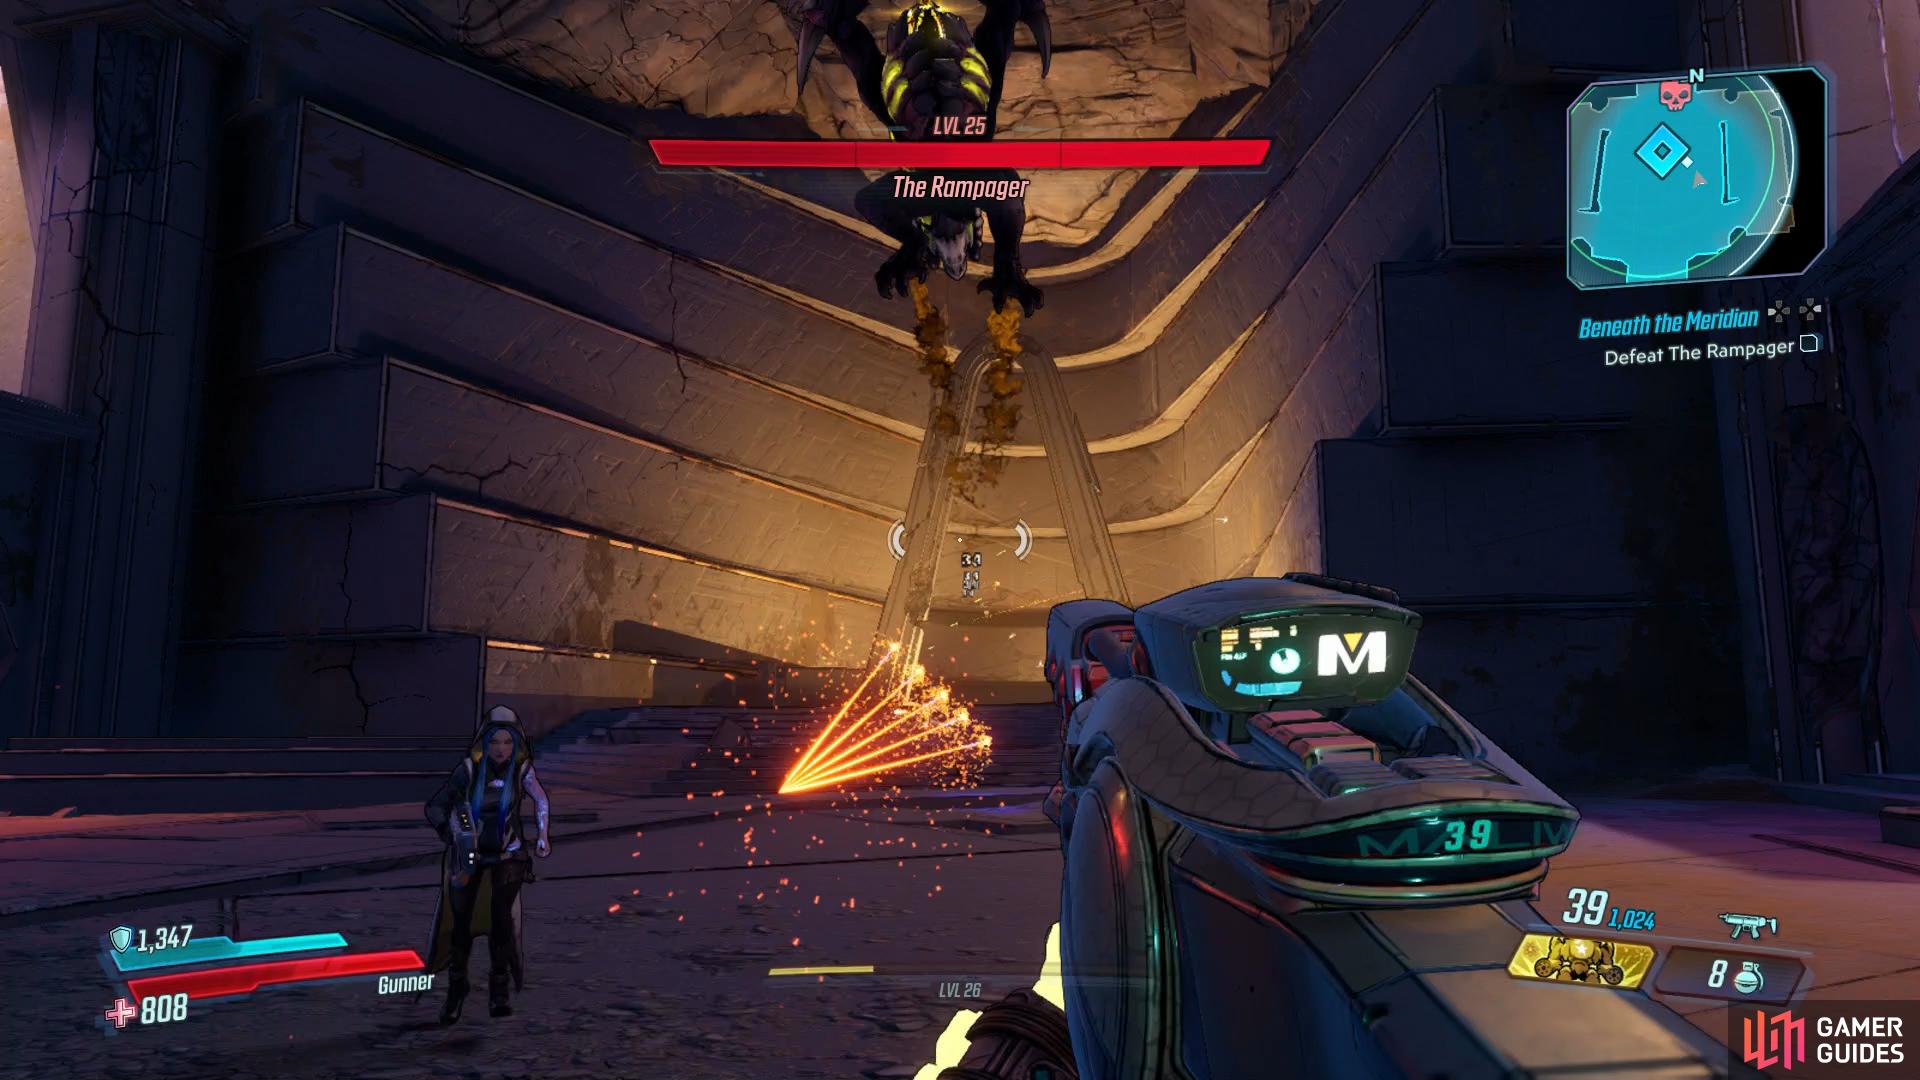
Boss: The Rampager

The first thing you should notice is that the arena is fairly large, this should tell you all you need to know as you’ll need to move around the arena at all times to avoid The Rampager. You’ll also spot pillars on the sides of the arena that can be used for cover, even though it’s much better to be direct against it.
The Rampager is fast and close the distance quickly by leaping at you, dealing massive damage if you’re caught in it’s shockwave when it lands. Additionally, it will fire off different elemental blasts at you at a rapid pace, this can generally be avoided by moving while shooting so be on the move at all times, there’s not one point in this battle where you want to be stationary. As you may not expect with a creature this large, it’s head is not it’s weak point but in fact it’s ribcage and once you deal enough damage, it’ll fall to the ground giving you more time to unload into it’s head.
At this point, you’ll have to deal with adds for the rest of the battle in the form of Wraiths, they’re easy enough to take down however and you should only really use them as a resource for gaining health, ammo or for a Second Wind. The Rampager will also leap to the corners from the room and fire off more blasts from you before leaping back down at your position.
Once you deal just under half damage to The Rampager, it will go immune for a short while as it begins to absorbs the Spirit Orbs, shoot as many of these as you can to prevent it from gaining too much of a buff and it will transform into it’s next phase. At this point, it will begin shooting a wave of blasts at you, as they approach, be sure to leap over them or you’ll suffer massive damage. It will also strafe while firing off it’s regular blasts so move to the opposite side while jumping to avoid them.
Once The Rampager is left with around a quarter of it’s health, it’ll begin sucking in Spirit Orbs once more, repeat the process of shooting as many as you can and then get ready for the final transformation. This final form will give it wings and increase it’s speed even more as it jumps around from corner to corner. This time around, Fireballs will rain down from the sky as he leaps about so continue to be on the move or you can go down very quickly here.
Legendary Shotgun Will-o’-the-Wisp and Legendary RPG Quadomizer
On top of regular World Legendary drops, The Rampager also has two unique ones for you to farm. The [Will-o’-the-Wisp] will allow you to charge up the Shotgun to fire off a large Shock orb at the cost of four ammo while the [Quadomizer] will shoot off four rockets that change between all the elements, a very handy weapon indeed.
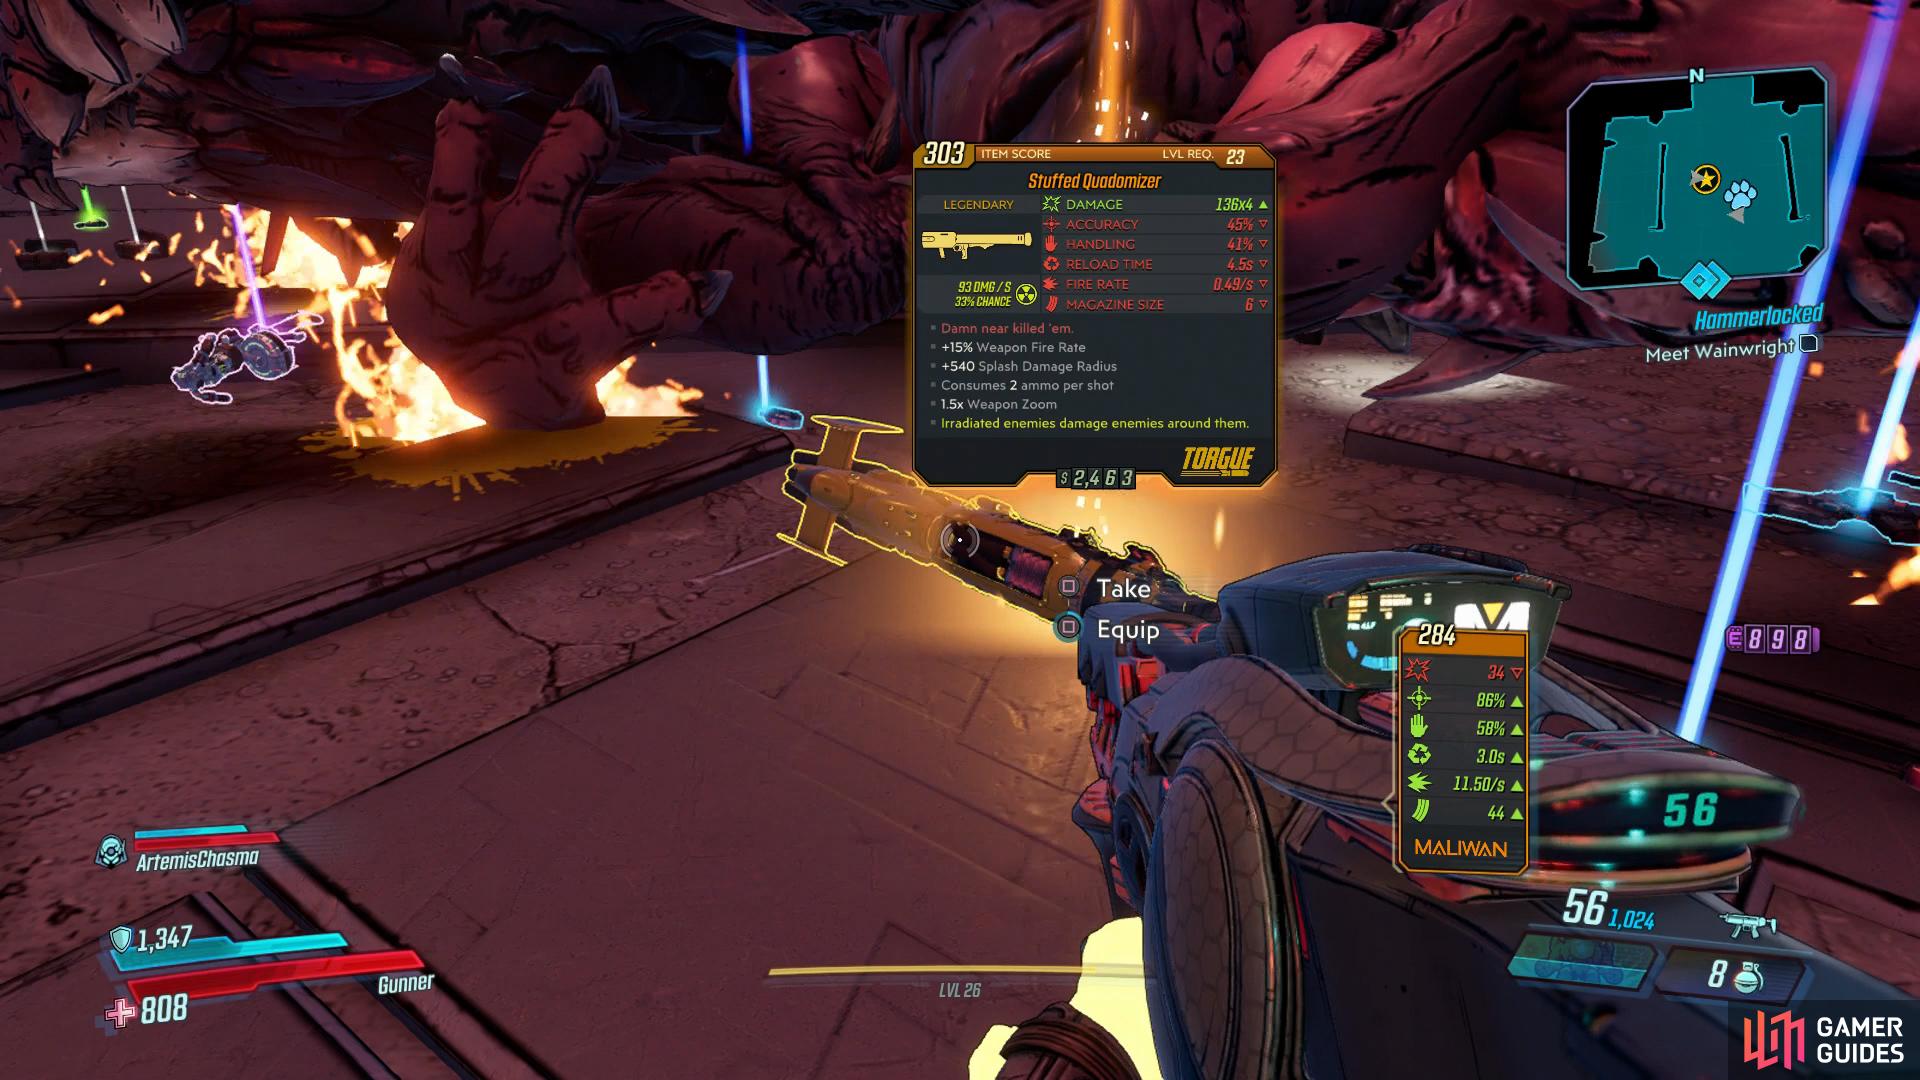
The Quadomizer is one of two possible Unique Legendaries that drops here.
Loot Vault, Return to Maya
Once you’ve looted The Rampager, head through the Vault ahead to find two Vault Chests and then examine the pedestal in the middle to obtain the Eridian Resonator, this will upgrade your melee to allow you to break the Eridium deposits you’ve seen a lot of. Go around the room breaking all the Eridium deposits and you’ll uncover two Eridian Chests to the north of the room, you’ll begin to encounter these more from this point onwards and they have the chance to contain Legendary gear (albeit at a less chance than Red Chests). Finally, break the Eridium deposit due north to find the lodestar which will give you your next destination.
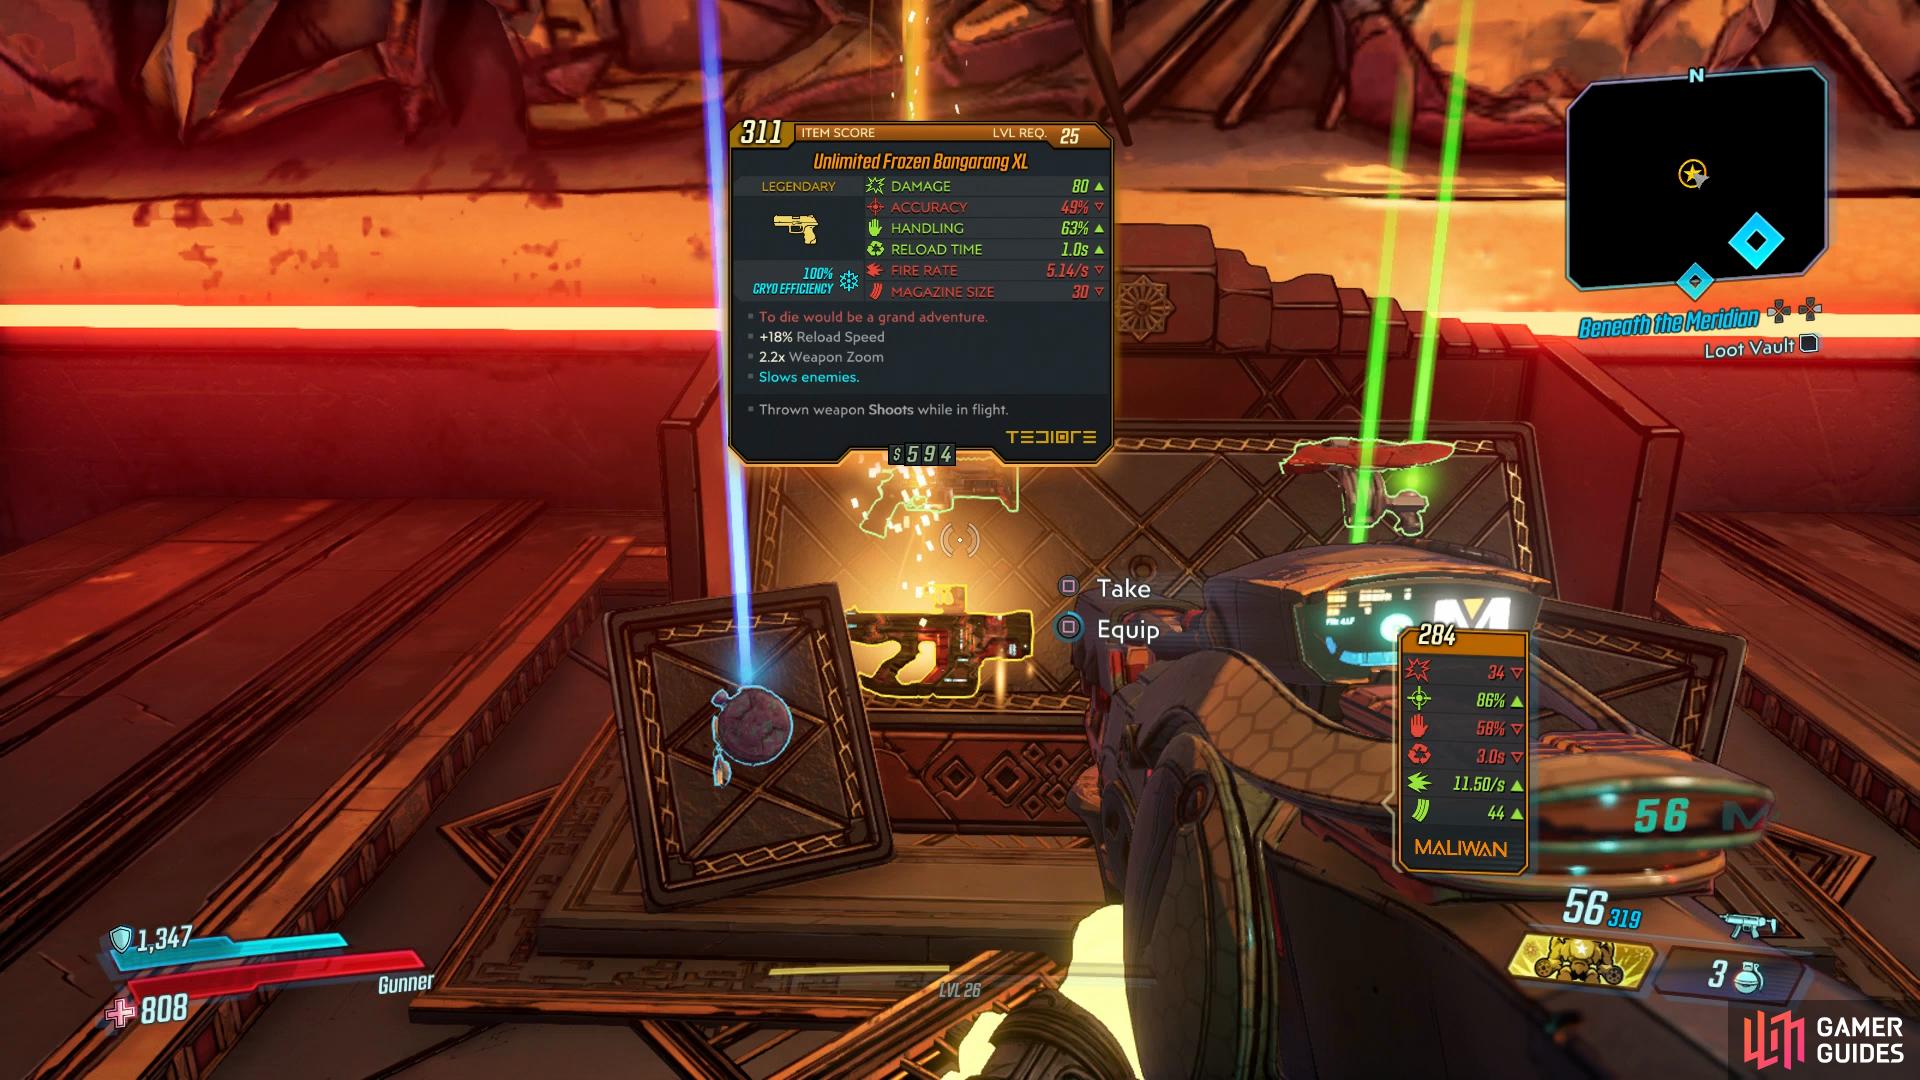
When farming, the chests in the Vault will also respawn.
Head back out of the Vault to trigger a cutscene and then talk to Ava once you regain control. Fast Travel back to Sanctuary and speak to Lilith where you’ll gain an optional objective, be sure to speak to Ava as you’ll obtain the Unique Legendary SMG Cloud Kill for your troubles. Return to Lilith and speak to her after this to complete the mission, unlock Gone From My Sight and unlock your fourth and final Weapon Slot.


No Comments