Published
Title
Score
Editor's Choice
Publisher
Published
Title
Publisher
Frontier Village
Alcamoth
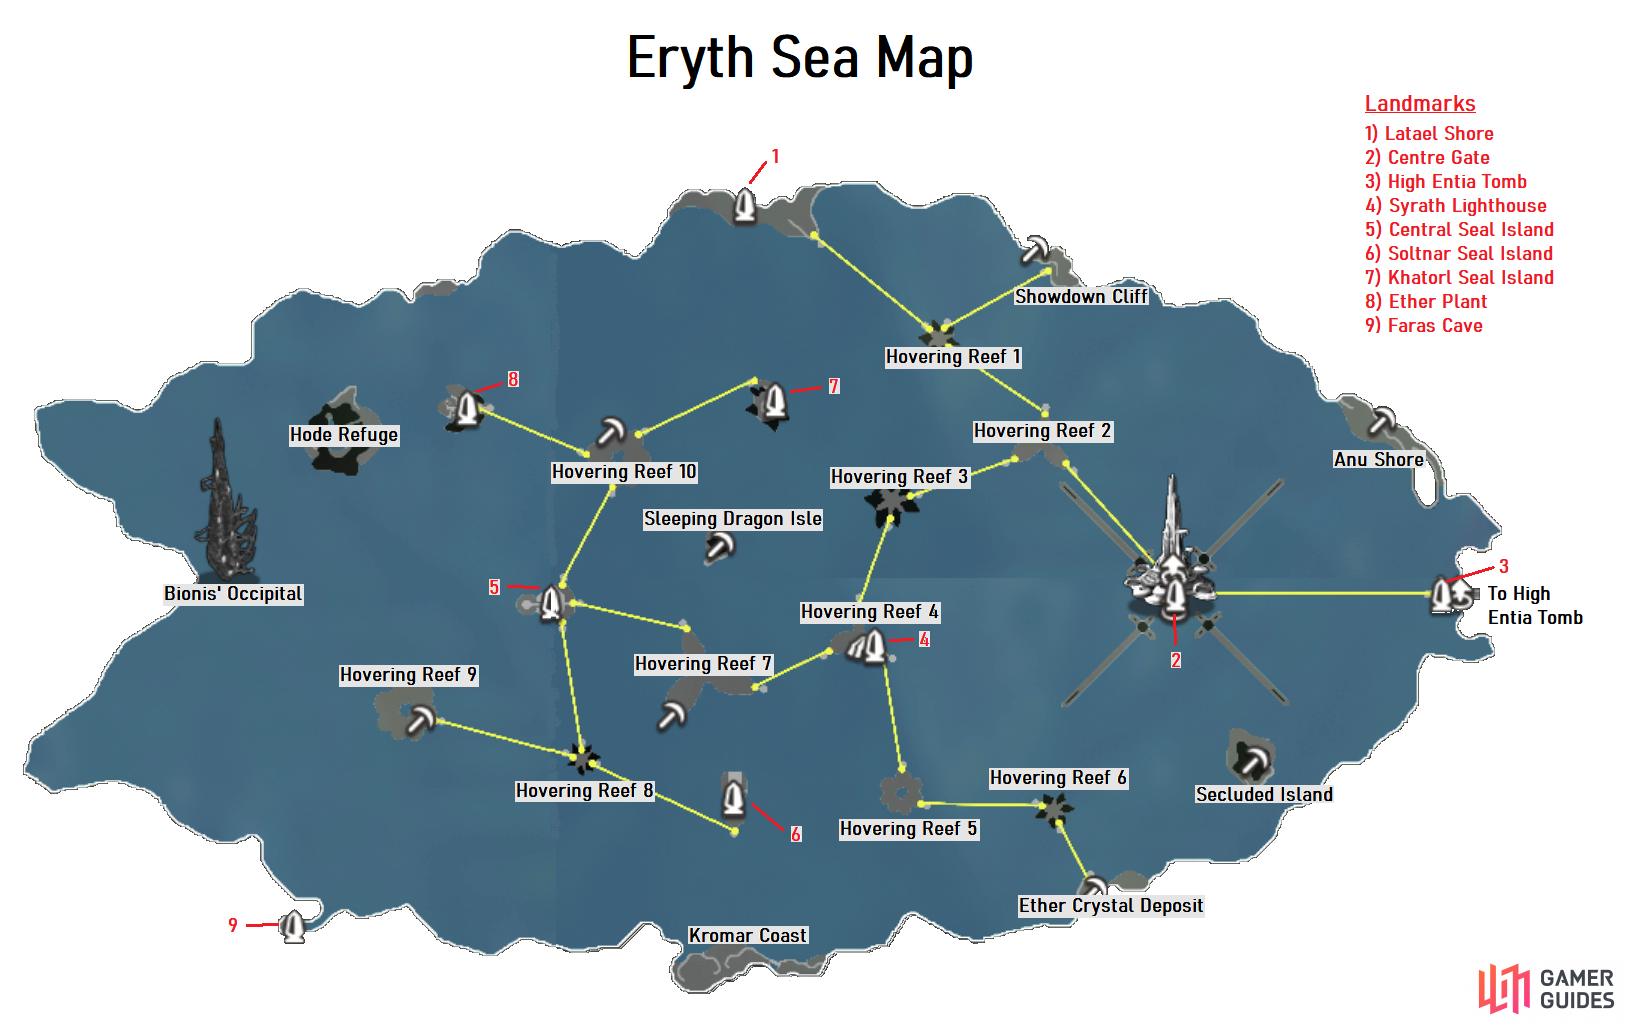
Eryth Sea is a large sea that is situated on the Bionis’ neck, where there are a large number of floating islands that are connected by transporters. On your first visit to this zone, you will be restricted to the eastern side of the map. It isn’t until a story quest that requires you to help fix the transporters that the western half of the map is opened, allowing you to find all landmarks and locations. Eryth Sea connects to both Alcamoth and the High Entia Tomb . There is a special “weather” condition in Eryth Sea called Shooting Stars, where you have shooting stars falling to the ground.
Collectopaedia
Category
Items
Reward
Vegetable
Pink Asparagus, Tropical Radish, Dolphin Carrot, Gold Burdock
Critical Up II
Flower
Sea Berry, Despair Clover, Doomsday Poppy, Night Lily, Razor Teasel
Mithril Armour
Animal
Sea Frog, Mane Cat
Aerial Cloak II
Nature
White Tail, Marine Marble, Oil Branch, Dilemma Rock
Mithril Leggings
Strange
High Violet, Steel Hauyne
Ether Up III
The reward for finishing the Collectopaedia for this area is a Heavy Armour (Chest Armour)
Landmarks
Landmark
When Available
Latael Shore
First Visit
Centre Gate
First Visit
High Entia Tomb
First Visit
Syrath Lighthouse
First Visit
Central Seal Island
After story quest
Soltnar Seal Island
After story quest
Khatorl Seal Island
After story quest
Ether Plant
After story quest
Faras Cave (Secret)
First Visit
Locations
Location
When Available
Anu Shore
First Visit
Bionis’ Occipital
First Visit
Ether Crystal Deposit
First Visit
Hode Refuge
First Visit
Hovering Reef 1
First Visit
Hovering Reef 2
First Visit
Hovering Reef 3
First Visit
Hovering Reef 4
First Visit
Hovering Reef 5
First Visit
Hovering Reef 6
First Visit
Hovering Reef 7
After story quest
Hovering Reef 8
After story quest
Hovering Reef 9
After story quest
Hovering Reef 10
After story quest
Kromar Coast
First Visit
Secluded Island
First Visit
Showdown Cliff
First Visit
Sleeping Dragon Isle
First Visit
Normal Enemies
Enemy
Level
Location
Aora Telethia
88
After Mechonis Core
Archer Hode
34
Showdown Cliff, Hovering Reef 2
Arel Telethia
86-87
After Mechonis Core
Asara Telethia
89
After Mechonis Core
Bono Nebula
35
Hovering Reefs 1/4 (Clear weather)
Buono Nebula
33
Latael Shore, Anu Shore, Hovering Reef 5 (Day, no Rain; Shooting Stars)
Bulganon Nebula
85
During thunderstorms
Carbon Tude
88-89
Sleeping Dragon Isle, Under Hovering Reef 9
Chloro Laia
34
Hovering Reefs 2/4/5/9 (Night)
Ciconia Ekidno
38-40
Hovering Reefs 7/10
Cruz Pagul
33
Latael Shore, Island below Hovering Reef 5, Secluded Island, Anu Shore
Eryth Ansel
36
Hovering Reefs 2/3/4/5/7/9 (Day)
Eryth Hiln
33
Latael Shore, Secluded Island, Anu Shore, Sleeping Dragon Isle
Eryth Rhana
87
Anu Shore, Shore north of Ether Plant
Flavel Andos
34
Hovering Reefs 1/3/6/8
Flutes Kromar
37
Hovering Reefs 6/7
Goldi Kromar
86
Kromar Coast, Secluded Island
Kurian Hode
35
Hovering Reef 10, Khatorl Seal Island
Lograt Kromar
86
Kromar Coast, Secluded Island, Anu Shore
Lunar Grady
32
Latael Shore, Sleeping Dragon Isle
Maleza Kromar
36
Hovering Reefs 6/7/8
Otol Kromar
39
Soltnar Seal Island
Palti Kromar
35
Hovering Reefs 6/7/8, Soltnar Seal Island
Pelargos Ekidno
40
Khatorl Seal Island, Hode Refuge
Perna Eluca
32-33
Latael Shore, Hovering Reef 3
Possessio Hode
36
Hode Refuge
Pulse Orluga
36
Showdown Cliff, Hode Refuge
Racti Lexos
39
Hovering Reef 9, Below Hovering Reef 5, Soltnar Seal Island
Sol Grady
85
In water surrounding Hode Refuge/Sleeping Dragon Isle/Secluded Island
Somati Kromar
38
Soltnar Seal Island
Stella Eks
38
Anu Shore, Hovering Reef 7, Below Hovering Reef 5, Hovering Reef 10, Khatorl Seal Island
Tarifa Hode
35
Hode Refuge, Hovering Reef 10
Tocos Orluga
39
Khatorl Seal Island, Hode Refuge
Trava Kromar
86
Kromar Coast, Secluded Island, Anu Shore
Tussock Kromar
39
Soltnar Seal Island
Unine Hode
33
Showdown Cliff, Hovering Reefs 2/3
Watcher Hode
34
Hode Refuge, Hovering Reef 10
Zeldi Kromar
84-87
Kromar Coast, Anu Shore, Secluded Island
Unique Monsters
Unique Monster
Level
Location
Bizarre Ragoel
88
Anu Shore
Clamorous Dablon
92
Northwest coast of Sleeping Dragon Isle (Thunderstorm)
Cumulus Danaemos
41
Khatorl Seal Island
Deadly Medorlo
93
Central Seal Island (After Mechonis Core)
Flabbergasted Jerome
38
Beneath Hovering Reef 5
Funeral Gozra
42
Hode Refuge
Lightspeed Sonid
44
Anu Shore (Top portion)
Peeling Kircheis
38
Hovering Reef 7
Proper Bandaz
39
Secluded Island (Night, Shooting Stars)
Sacred Zagamei
89
Underneath Hovering Reef 9
Stormy Belagon
87
Kromar Coast
Subterranean Zomar
40
Soltnar Seal Island
Tempestuous Edegia
39
Hovering Reef 10
Turbulent Belmo
36
Hovering Reef 1
Scroll down
Guide Information
Publisher
Platforms,
Genre
Guide Release Last Updated Version History Guide Author
Get access to this feature and a lot more by upgrading to a premium account.
Find out more
Already subscribed? Log in instead


No Comments