


The Belly of the Beast
With most of the Quests taken care of in the major settlements, it’s time to continue with the story to gain access to another area with Collectables to continue reconstruction of Colony 6. Ensure your preparations are complete and then head to Junks at Colony 6 to speak with Miqol and begin the trip to the Bionis Interior.
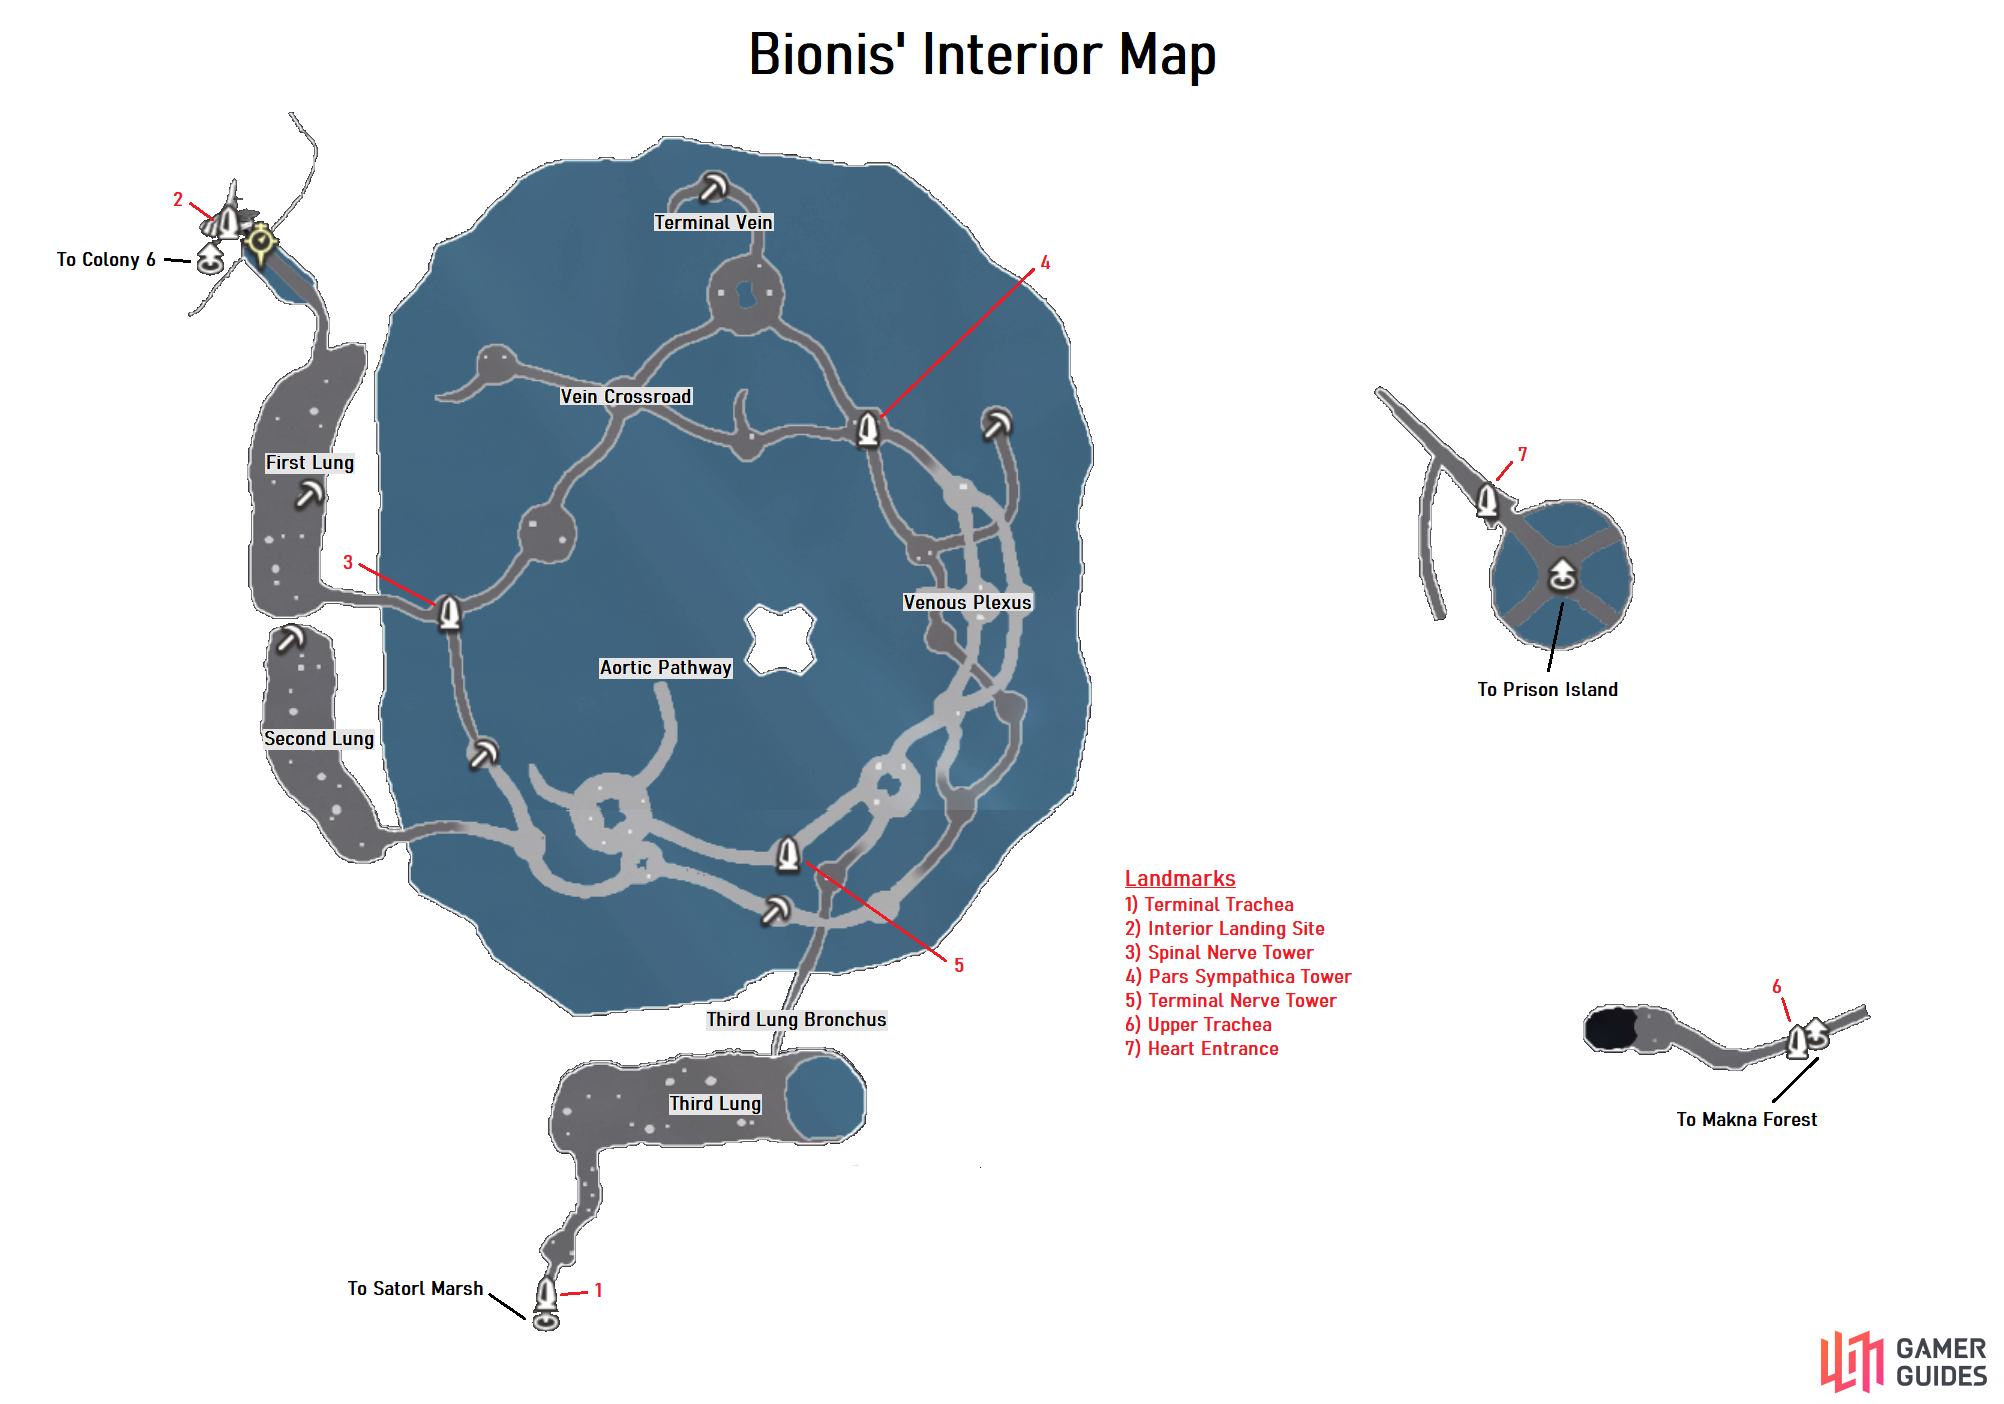
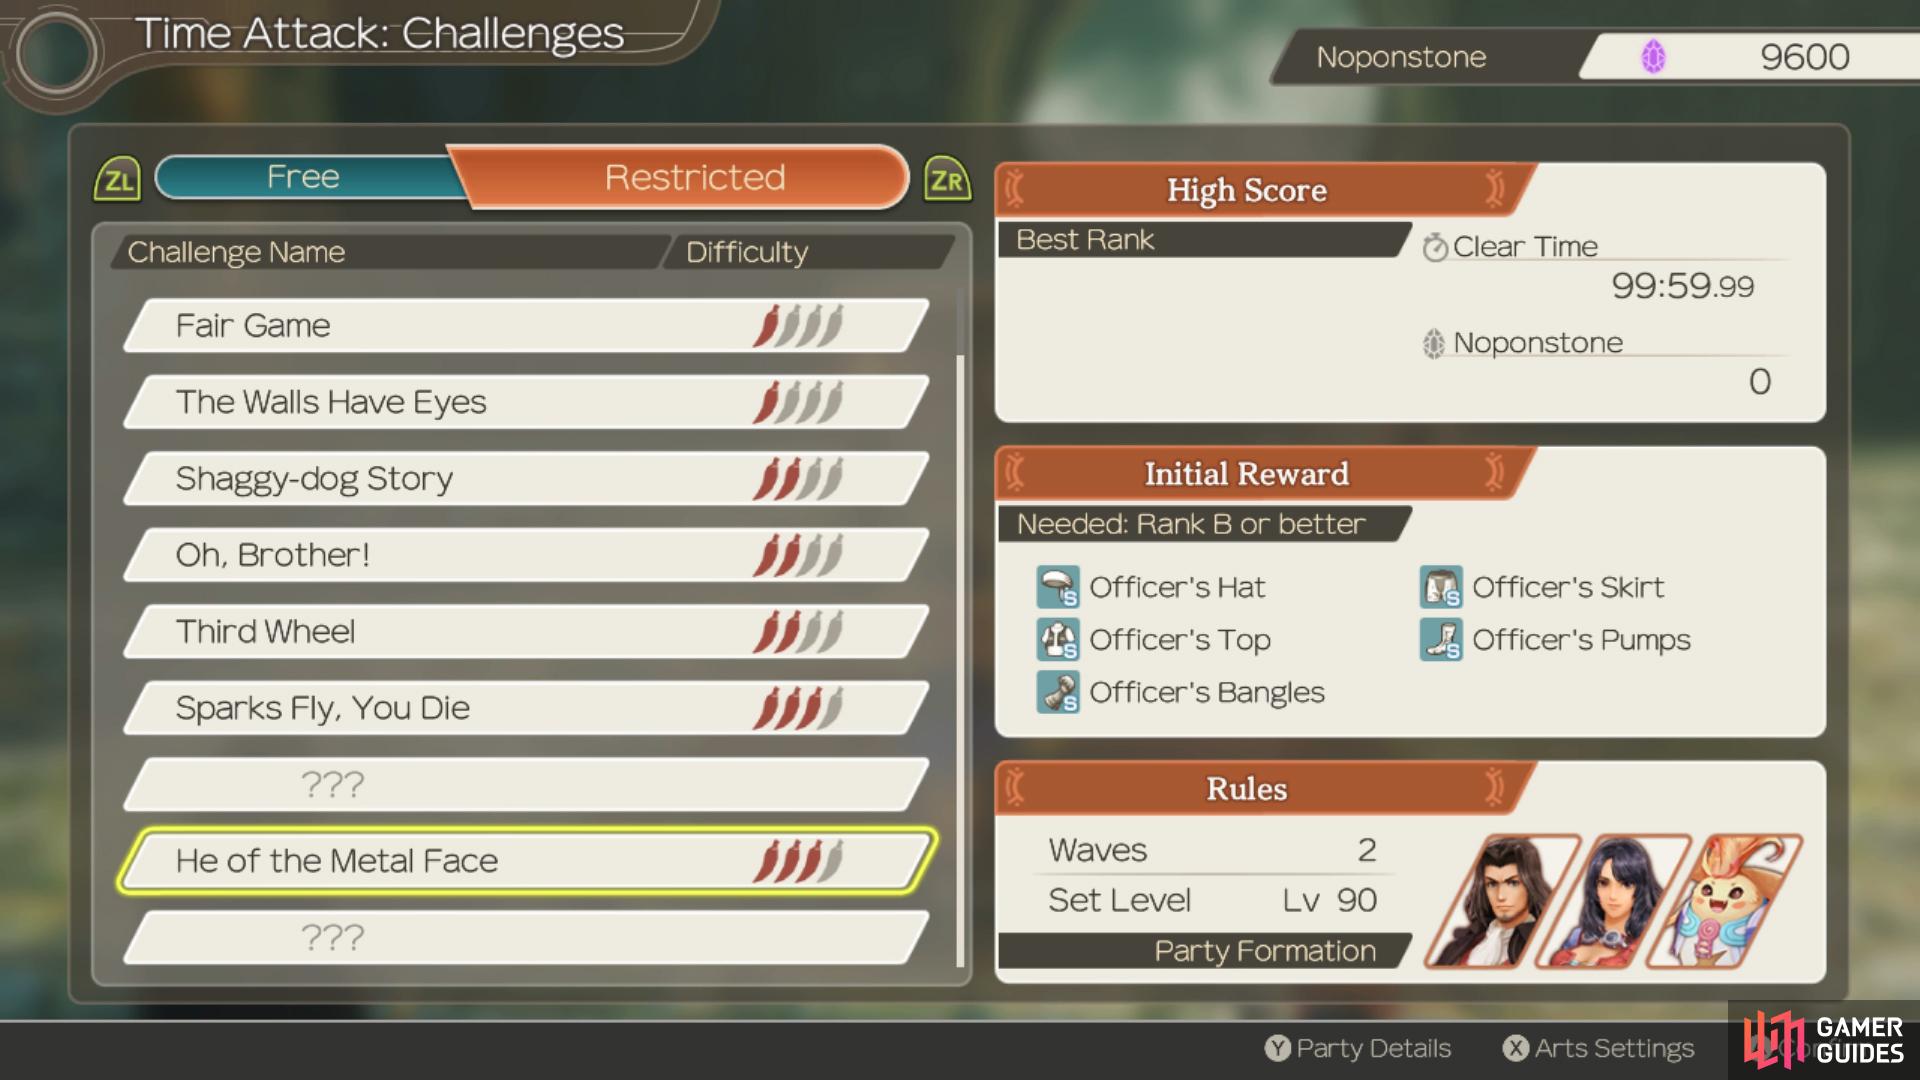
As you regain control in the Bionis Interior, you’ll unlock the Interior Landing Site Landmark and find a Time Attack Portal directly in front of you. Head in and you’ll discover that the Archsage is now offering Tier V Gems for trade and that another new trial is ready for you to undertake.
| Challenge Name | Difficulty | Rewards |
|---|---|---|
| He of the Metal Face | 3/4 | Officer Set |
-
Wave 1 - You’re in control of Dunban for this battle and you’re up against a difficult Lv 90 Metal Face. He’s not too different from his final Story encounter but the main threat is the Custom Grand Shot Art that will Daze the entire party, something that will greatly delay the battle. He will usually attempt to use this once his HP falls below 50% HP so try to have a Chain Attack ready and then trigger it to inflict Daze on him and cancel the Art. Other than that, Opt for the Peerless Aura for Dunban so that you increase your damage output.
-
Wave 2 - This second battle is even tougher, you’re up against a Lv 99 Mumkhar that’s out of his Mechon. This means you’ll have to deal with his quick attacks and the fact that most of his Arts will inflict Debuffs on your entire party. The largest threat this time is Mumkhar’s ability to use an Instant Death Art once his HP drops below 50%, once again you’ll want to make use of Chain Attacks to control the flow of the battle and deal large amounts of damage at once. Peerless should once again be your Aura of choice and focus on trying to keep him Toppled where possible to limit the damage you receive from Mumkhar.
With that cleared, return into Junks to find a new set of Quests have just opened up, the Replica Monado Quests, all of which will alter Shulk’s Monado in various ways. Some of the Quests are far tougher than the others (including one which requires defeating a Lv 99 Dragon!) but be sure to pick them all up and hold on to them until you’re done with this area.
You can now press on with your exploration of the Bionis Interior by heading to the south where you’ll reach the First Lung. Be on the lookout for the Largo Selua and the Wool Selua while in this area, you’ll need 3 Flexible and Steel Selua Cells from them for Colony 6 and getting them now will save you a trip back later. Continue heading south and then go east when the path veers that way to trigger a scene.
Once you regain control, you’ll unlock the Spinal Nerve Tower and learn your next objective, to reach the top. Head east from this location and you’ll reach the Vein Crossroad which is exactly as it says. Make your way up to the northeast here and then go north at the next intersection to unlock Terminal Vein where you’ll find an Ether Deposit. Make your way back to the previous intersection now and follow it east to reach the Pars Sympathica Tower Landmark.
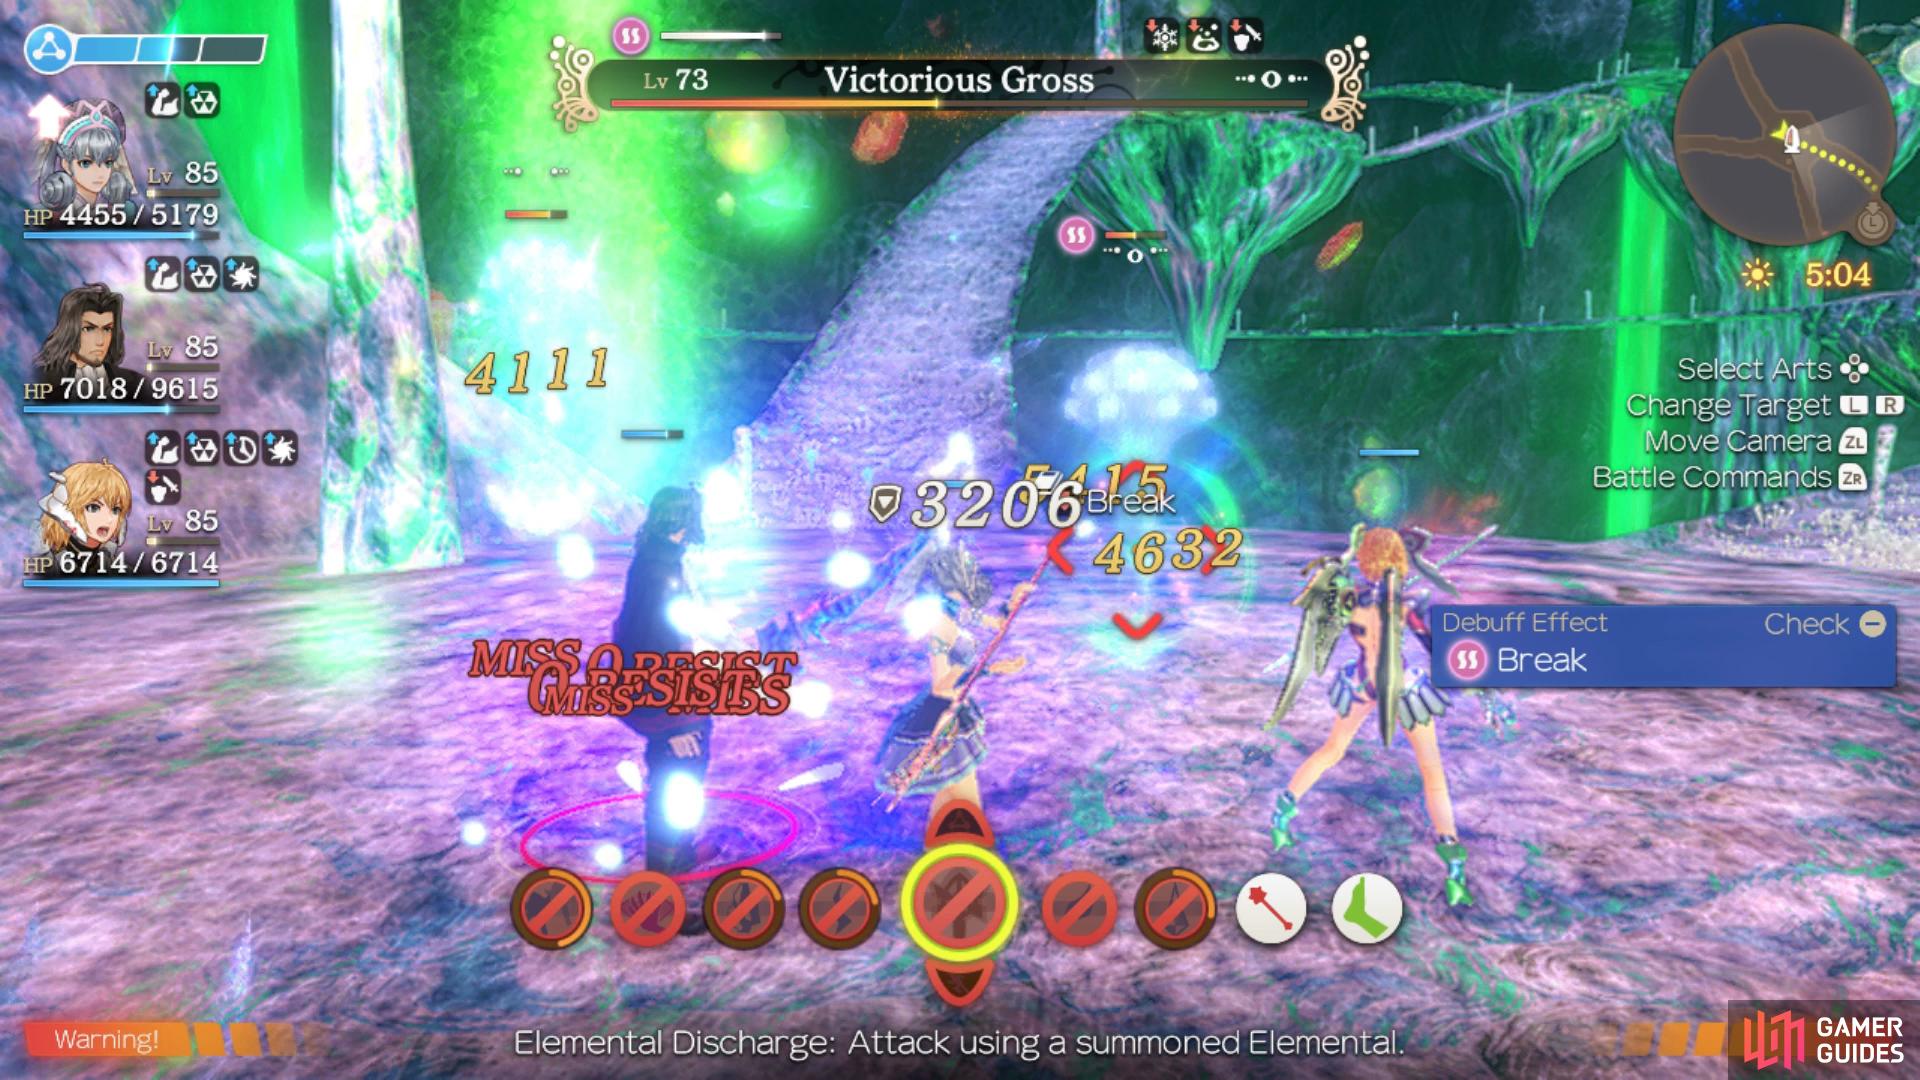
You’ll find a Lv 73 Unique Monster, Victorious Gross here so be sure to take it out and then head south to unlock Venous Plexus, following the path until you reach the next intersection. Heading east here will lead to another Ether Deposit, pocket the crystals and then continue heading south until you discover and defeat the Lv 75 Unique Monster, Officer Robusto. Continue along the southern path until you reach the next intersection where you’ll want to keep heading to the southwest.
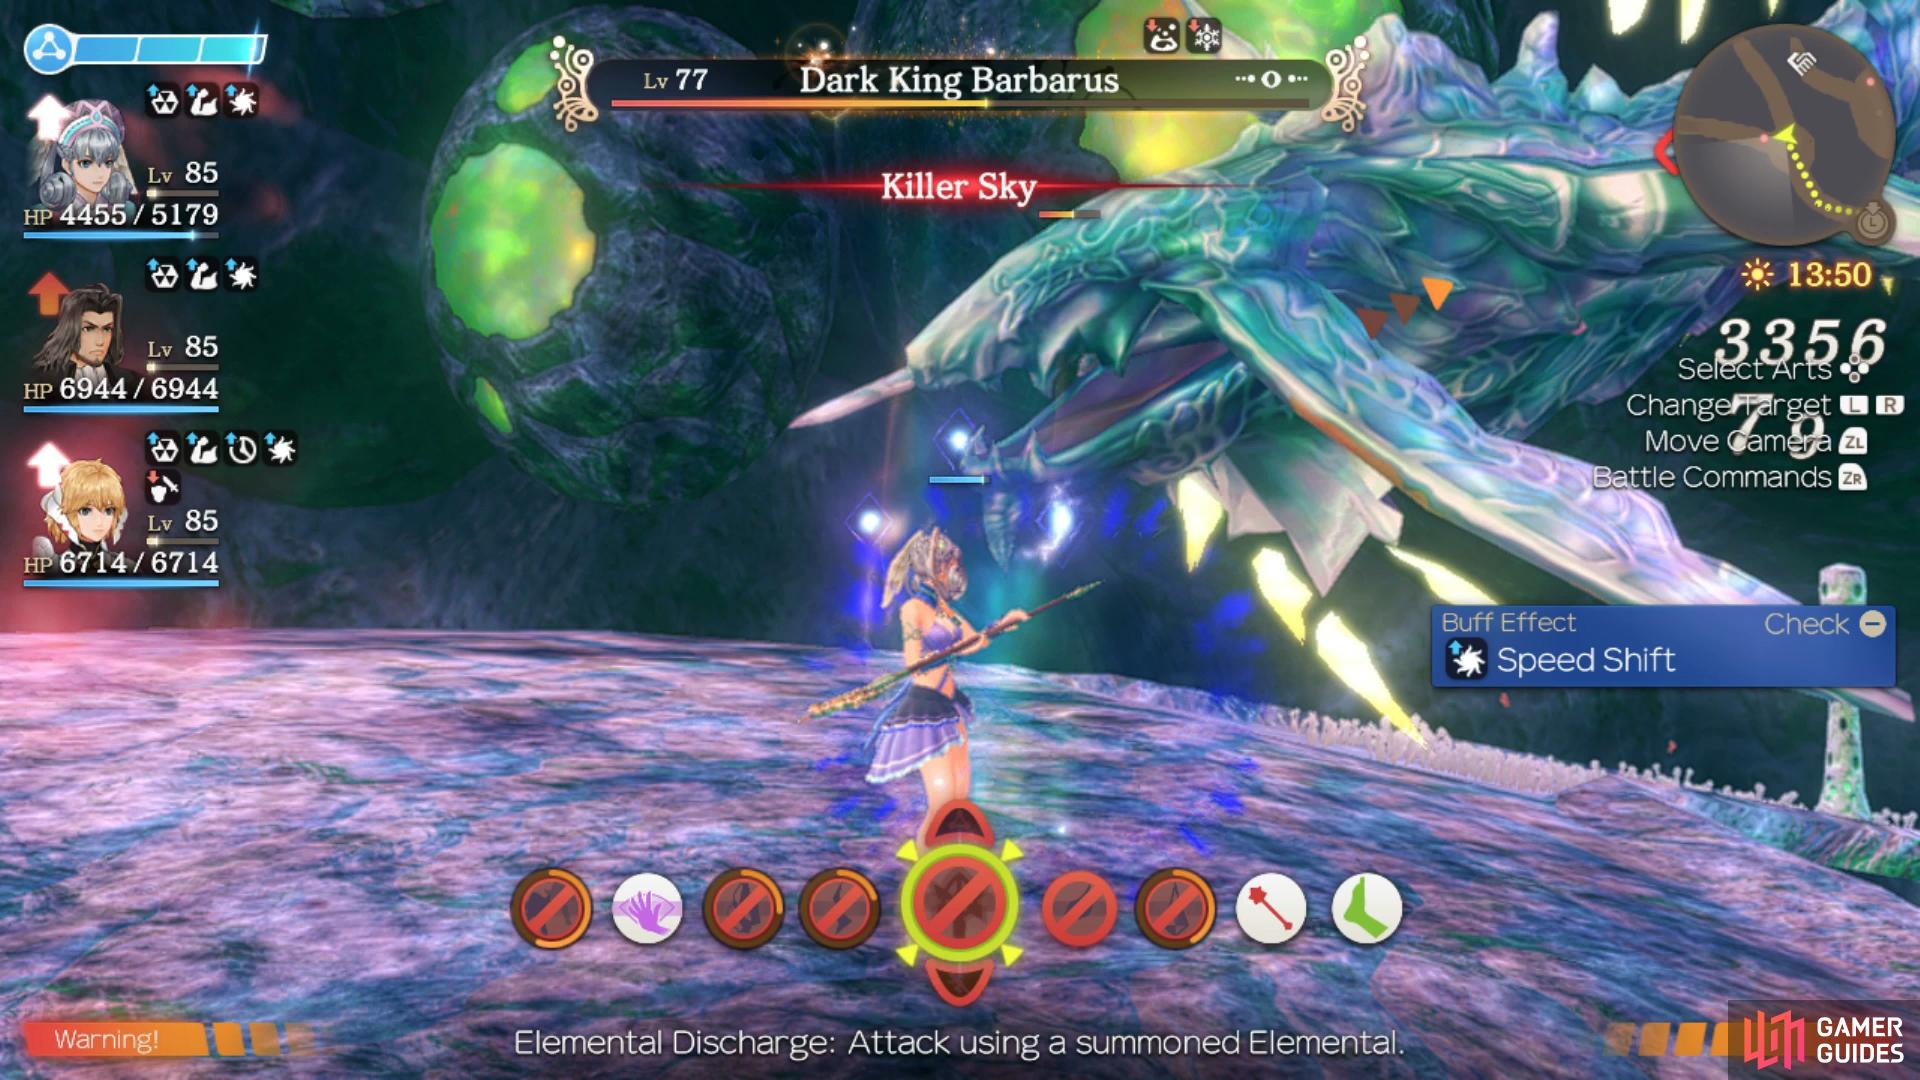
You’ll come across another Ether Deposit as you follow this path and eventually you’ll come to the next intersection where a Lv 77 Unique Monster, Dark King Barbarus is lurking. After defeating it, west at this intersection to reach the Second Lung, an area that has a high chance to contain Black Liver Beans of which you’ll need a total of three. You’ll also find a Lv 72 Unique Monster, Active Impulso and a Lv 74 Unique Monster, Clandestine Apety to defeat here along with an Ether Deposit.
There are many Unique Monsters to find here
you should be able to defeat all of them on yoru first visit.
Warp back to the Pars Sympathica Tower Landmark now and this time take the upper eastern path and then take either path as you continue south until you reach the next intersection. Continue heading southwest here and you’ll come to yet another intersection, this time take the southern path and follow it to reach the Third Lung Bronchus. Don’t drop down here however, it only leads back to the part of Bionis Interior you first accessed on your way to Makna Forest a long time ago.
Instead, return to the previous intersection and take the northwest path to unlock the Terminal Nerve Tower Landmark and then continue on to find and defeat the Lv 76 Unique Monster, Ghostly Mahatos. Head to the northwest to find a Heart-to-Heart and then go to the east to reach the Aortic Pathway. Once you reach the top here, head slightly to the southeast to unlock the Heart Entrance Landmark and then stop, this will complete the map but before you head through the door, there are two more Unique Monsters to take care of. Travel to the Terminal Trachea Landmark in the Third Lung and head up to the Lung to discover two more Unique Monsters to defeat, Lv 75 Vivid Anstan and Lv 72 Mystical Klesida that has a nasty Spike Aura you’ll want to remove as quickly as possible. Once you have everything that you’re after here, return to the Heart Entrance Landmark and head through to catch up to Lorithia.
Boss: Disciple Lorithia
| Enemy | Level | Detection |
|---|---|---|
| Disciple Lorithia | 75 | Sight |
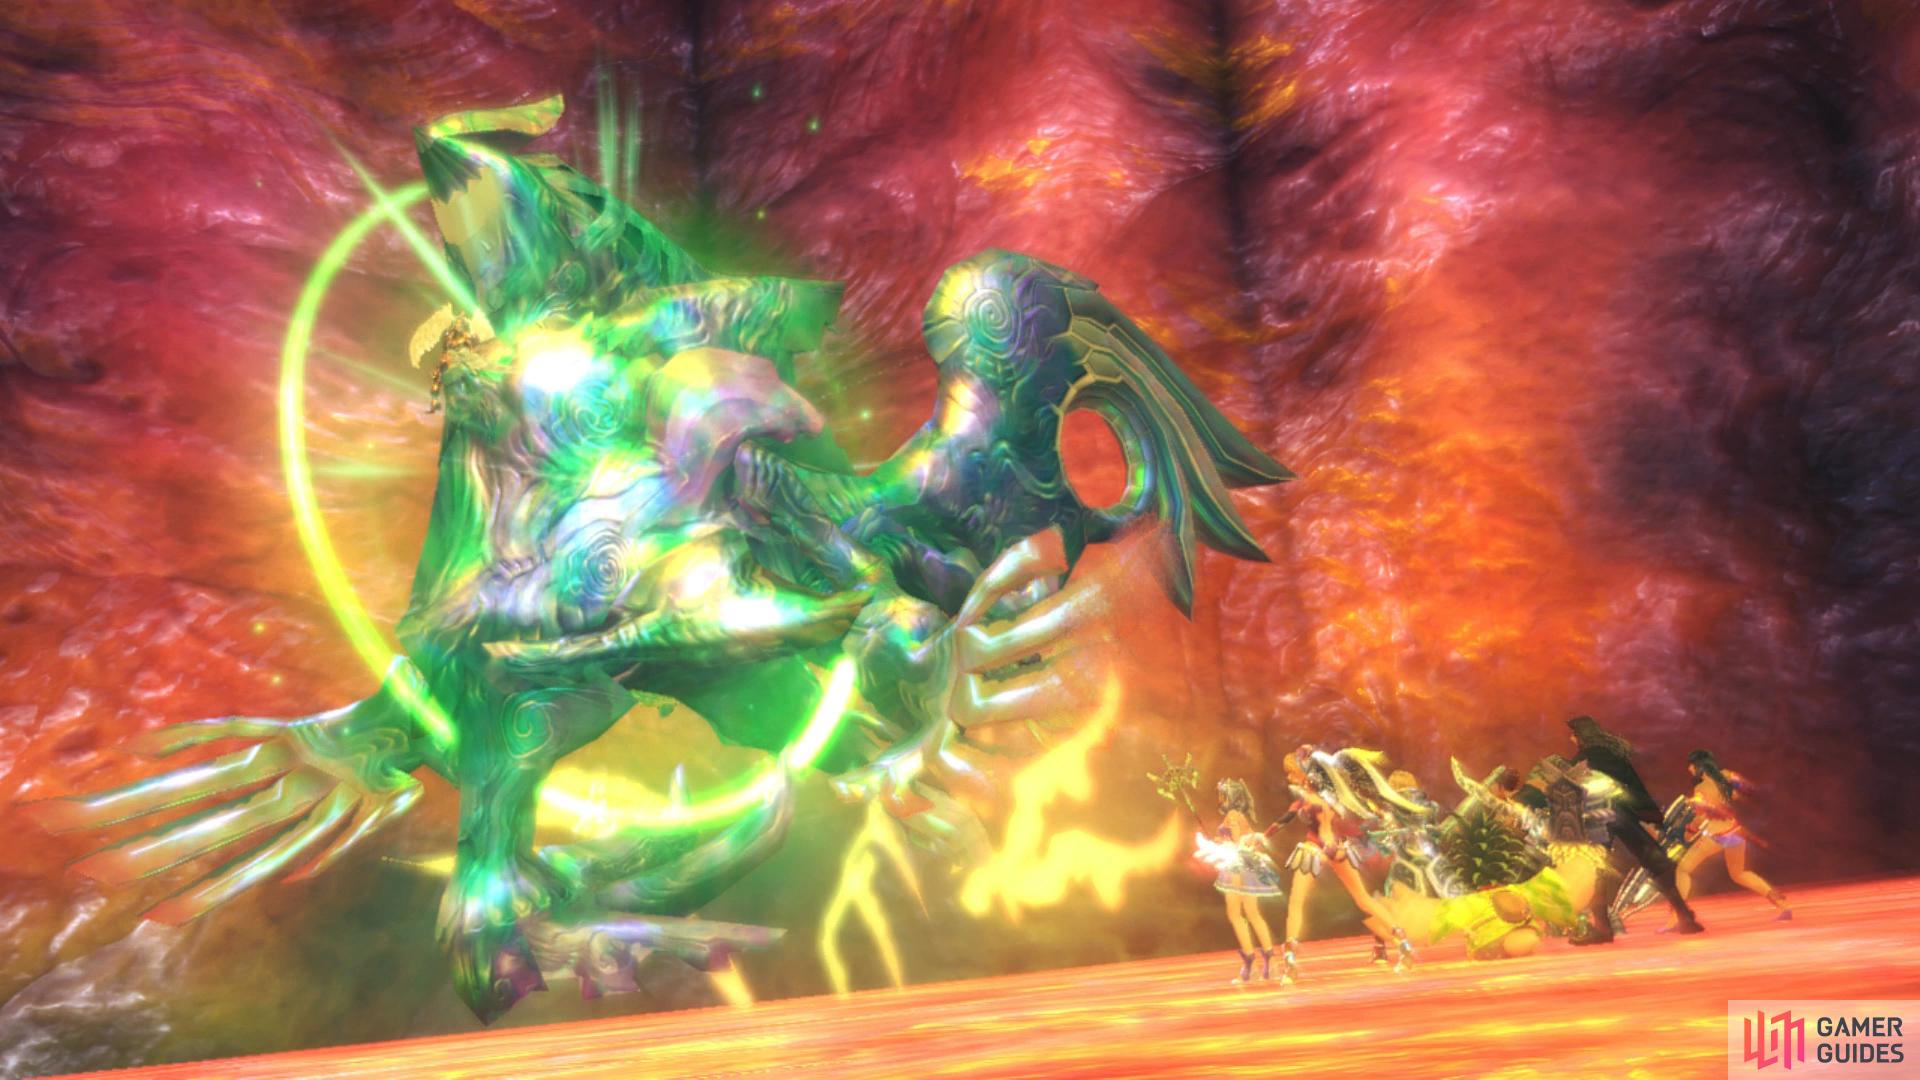
You’ll finally get your chance to make Lorithia pay for everything she’s done however the difficulty of this battle lies entirely on your Level at this stage of the game. If you’ve spent time completing the Post Mechonis Quests, it’s possible your levels will be far beyond Lorithia’s, eliminating all challenge however challenge her around Lv 75-77 and this is a very difficult battle. To begin with, note the acidic pools around the battlefield, heading into them will cause constant damage so avoid them at all costs. What’s more, she’ll be accompanied by four Nova enemies that will increase her Physical Defence while active however take them out and you can reduce her Defence massively.
The problem here however is that these Novas can quickly overwhelm you and they come with Spike Auras too so you’ll want to use either Monado Purge or Mind Blast as soon as possible to make them more manageable. They can and will Sacrifice themselves too, dealing Instant Death to the character they hit so your first objective in this battle should be to focus them down before focusing on Lorithia once some of them are down.
-
Big Bang VI - Lorithia’s Ether based Talent Art that deals moderate damage to targets in a line while also inflicting Confuse, Blowback and Daze.
-
Elemental Activate - Casts the Awakening Aura on Lorithia that increases her Level and thus, all stats.
-
Elemental Barrier - Summons Novas to Lorithia’s side.
-
Ether Laser - An Ether based Art that deals major damage to targets in a line while also inflicting Arts Seal, Ether Defence Down, Blowback and Daze.
-
Obliterate - A Physical based Art that deals major damage to targets in a circle around Lorithia while also inflicting Topple and Knockback.
-
Shield Recovery - A Buff that both removes any Debuffs on Lorithia along with granting her immunity to them.
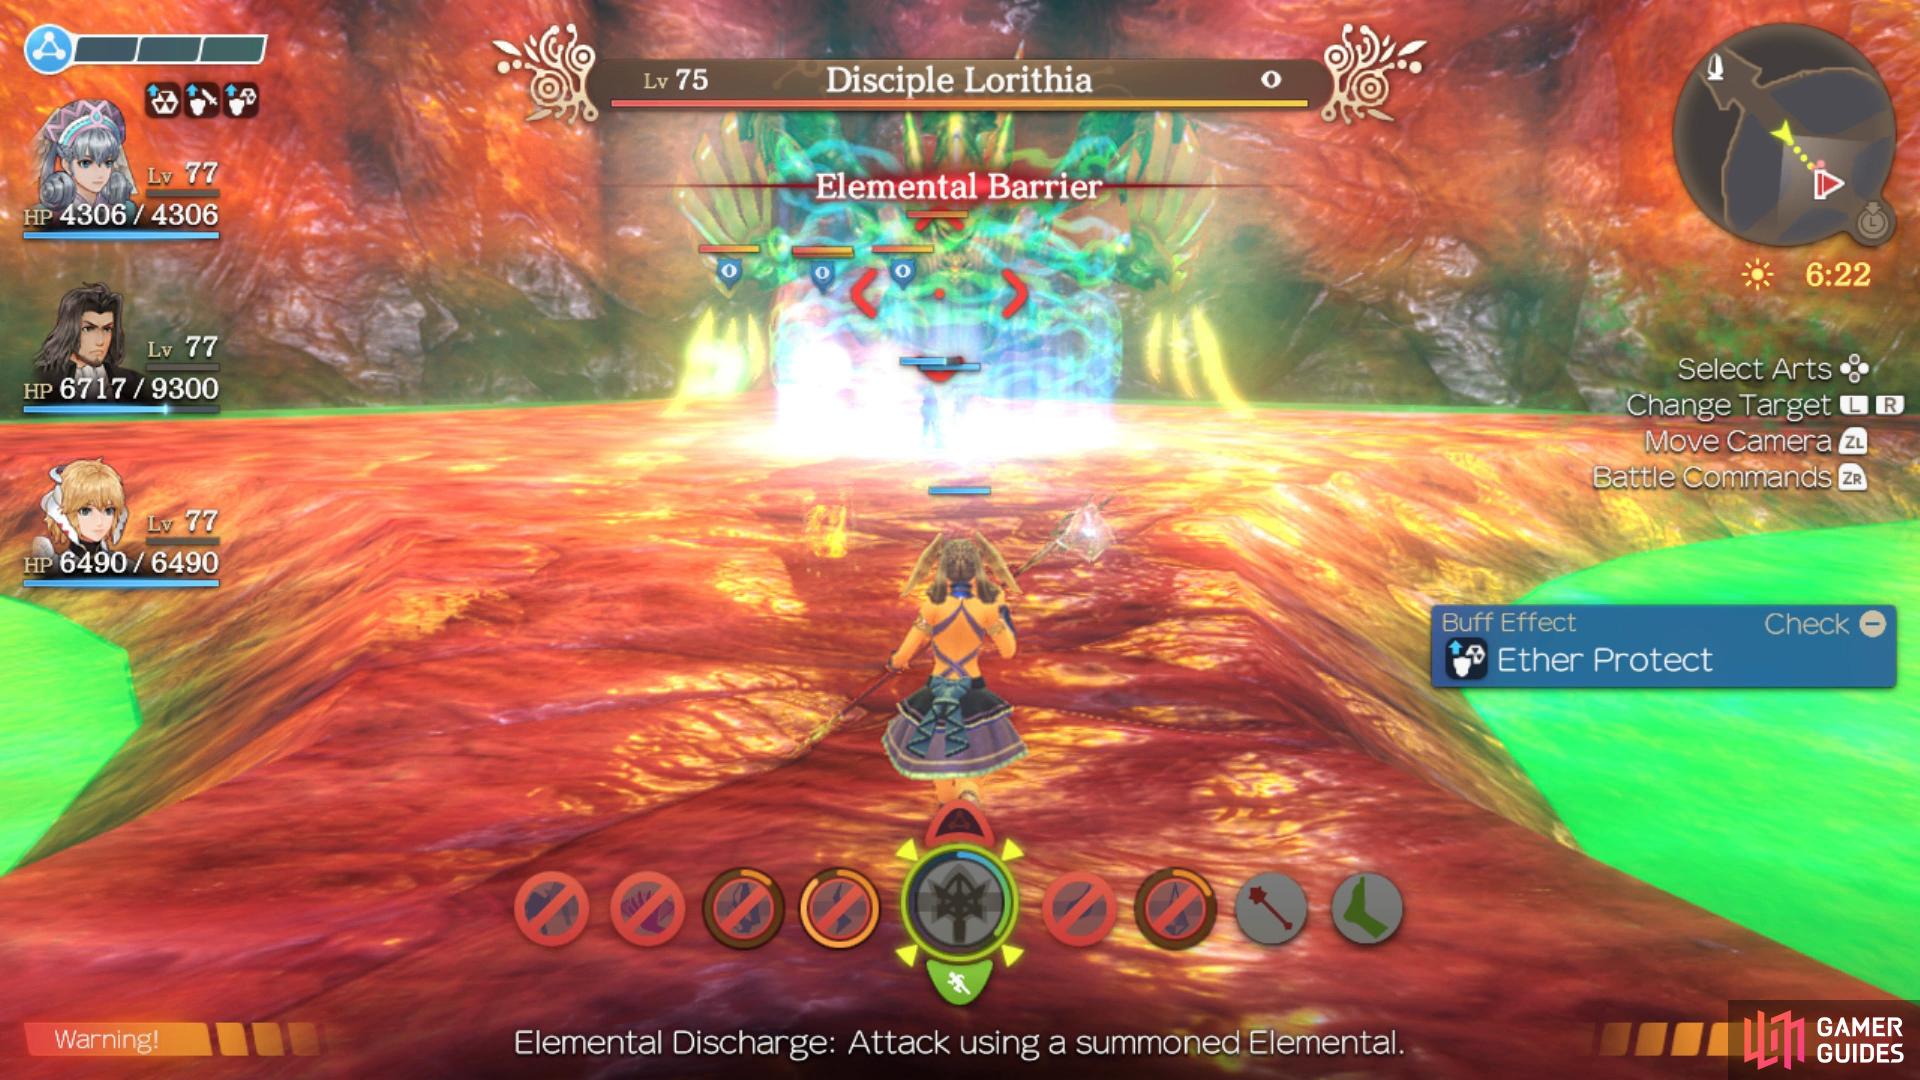
(1 of 4) Lorithia will summon Novas that Buff her Defence based on how many are active
All of Lorithia’s attack Arts dish out nasty status effects and that’s where the difficulty of the battle lies. Melia is useful as a party leader for this battle, she can throw Poison, Chill and Blaze on Lorithia to tick away even with all of her Novas active and it’ll last until she removes them with Shield Recovery. Likewise, Shulk will be useful for his various Monado abilities such as keeping Purge on the Novas and using Monado Armour to cut down on incoming damage. This is a difficult battle when fought around her level and it may take several attempts until you manage to control the battle effectively.
Once you regain control following the scenes after Lorithia’s demise, you’ll gain access to Prison Island, the last true area in the game. With the new items you’ve gained from the Bionis Interior however, now’s a good time to take a short break and continue the next set of Post Mechonis Quests. If you’re not interested in that, head on to the [Prison Island Revisited] page to continue with the story, otherwise make your way back to Colony 6.
Colony 6 Reconstruction
With access to Bionis Interior, it’s now possible to construct the final Nature upgrade while also upgrading Special to Lv 4 (you’ll need to visit Prison Island for Lv 5 but that will come in due time).
- Nature Lv 5 - Arduen Elder Beards are dropped by Magnis Ardun found near Kamos Guidepost on the Bionis’ Leg. Leg Tokilos are also found on the Bionis’ Leg, and they can drop Tokilos King Eggs. They are found in common numbers near the Zax Guidepost landmark on the Upper level of the Bionis’ Leg. Lewisia Silver is a collectable found in Agniratha, it will also spawn in Colony 6 after reaching Special level 4. Alternatively, you can trade with Berryjammy in Colony 6 if you have a 5✰ affinity with its residents. Black Liver Beans are a notoriously rare collectable found in the Bionis’ Interior. They are known for their rarity throughout the Xenoblade community, so if you’re having issues finding 2 of them, consider waiting until you can buy them from the Noponsage for 23,400 Noponstones. And finally, Black Beetles are a collectable found in the Ether Mine. If you would prefer though, you can trade for them with Norara at 1✰ affinity in Colony 6.
When you reach Level 5 in Nature you will be gifted an EXP UP IV gem.
- Special Lv 4 - Rainbow Slugs and Azure Hollycocks are both collectables. Rainbow Slugs can be found on the Fallen Arm, whilst Azure Hollycock are found in Mechonis Field. Flexible Selua and Steel Selua are materials obtained from Selua enemies only found in the Bionis’ Interior. You may only access the specific area of the Bionis’ Interior where these enemies are located after you have travelled there in the main story quest. This is a late game area and is accessible a little after the events at the Mechonis Core. The Steel Selua is dropped only by Wool Selua and the Unique enemy, Victorious Gross. They are exclusively found at the Pars Sympathica Tower landmark. It is a bit of a rarer drop, so you may have to fast travel to the landmark using the map repeatedly, so the enemies respawn. Flexible Selua are dropped by Largo Selua, which are found across the Bionis’ Interior. They are most common south of the Interior Landing Site landmark, and west of the Spinal Nerve Tower landmark.
You can complete some more reconstruction of Colony 6, allowing you to recruit the final citizens.
With Special finally at Level 4, you can now return to Colony 9 and invite Oleksiy to Colony 6. This will also allow you to pick up the Family Secrets Quest if you sent Zel Argentis to Colony 6.
Family Secrets
This quest is available from either Zel Argentis or En Argentis, depending on whom you invite to Colony 6. The prerequisites to invite either sister are the same; their father, Don Argentis must have moved to Colony 6 already. This requires Housing and Nature to be at Level 4 in the reconstruction process. To invite Zel and En, however, you must have Housing at Level 5. It is worth mentioning that whilst the rewards and quest objectives for Family Secrets are identical depending on who you choose, there are mutually exclusive quests that follow that are different. There are also different prerequisites for accepting this particular quest, depending on who you invite:
-
En Argentis - It will likely be easier for you to fulfill the prerequisites for En’s version of the quest if you are still only as far as Central Factory in the game (which is when you can technically pick up this quest). Peppino must have been invited to Colony 6, which also requires Level 5 in Housing. En Argentis and Peppino will date if she moves to Colony 6.
-
Zel Argentis - If Zel has moved to Colony 6, then the prerequisites will be slightly higher level than En’s version of this quest. Firstly, you must have cleared the Mechonis Core. You must also have invited Oleksiy to Colony 6, which requires Level 4 in Housing and Special.
Whichever sister you choose, they will ask you to talk to their father, Don Argentis to keep him company. You will have to talk to him a total of four separate occasions. After speaking to him, head back to whichever sister you chose to complete the quest.
Betrothal Test (En Argentis)
Once you have reached 4 affinity with Colony 6 residents and have also completed En Argentis’ quest, Family Secrets, you will be able to pick this quest up from Peppino. He asks you to help him collect items to prove his love to Don Argentis. He wants you to collect 2 Wisp Bliss Rings and 2 Slobos Ice Rocks. The Slobos Ice Rocks can be obtained from various Slobos-type enemies found around the Nopol Tower landmark on Valak Mountain. It is a bit of a rare drop, but luckily there is an abundance of Sloboses on the lower level of Valak Mountain, so farming should be straightforward enough. The Wisp Bliss Rings can be dropped by Tramont Wisps near the Digit 2 Plain landmark. There are plenty of them around that area, so once again, obtaining 2 Wisp Bliss Rings shouldn’t take too long at all. Once you have the items, head back to Peppino in Colony 6 to complete the quest.
Betrothal Test (Zel Argentis)
Once you have reached 4 affinity with Colony 6 residents and have also completed Zel Argentis’ quest, Family Secrets, you will be able to pick this quest up from Oleksiy. He asks you to help him collect items to meet the demands of Don Argentis. He wants you to collect 5 Scratched Jewels and 2 Lucky Chilkin Rings. You’ll find the Scratched Jewels from Perna Eluca in Eryth Sea and you’ll find plenty of them at the Latael Shore Landmark. Lucky Chilkin Rings can be found on Chilkins on Valak Mountain, all Chilkins can drop this. Once you have the items, head back to Oleksiy in Colony 6 to complete the quest.
Stopping the Elopement (En Argentis)
To have access to this quest, you must have already completed Betrothal Test (En Argentis). Don Argentis will ask you to find his daughter, who has run off with Peppino to Tephra Cave. You won’t actually find them in Tephra Cave itself, instead they will be on Kneecap Hill, near the cave entrance onto Leg Pass. You’ll find them standing near the edge of the cliff. To talk them away from the cliff, you’ll need to have Sharla as the party leader. She will tell them to return to Colony 6. When you have done this, return to Don Argentis to complete the quest.
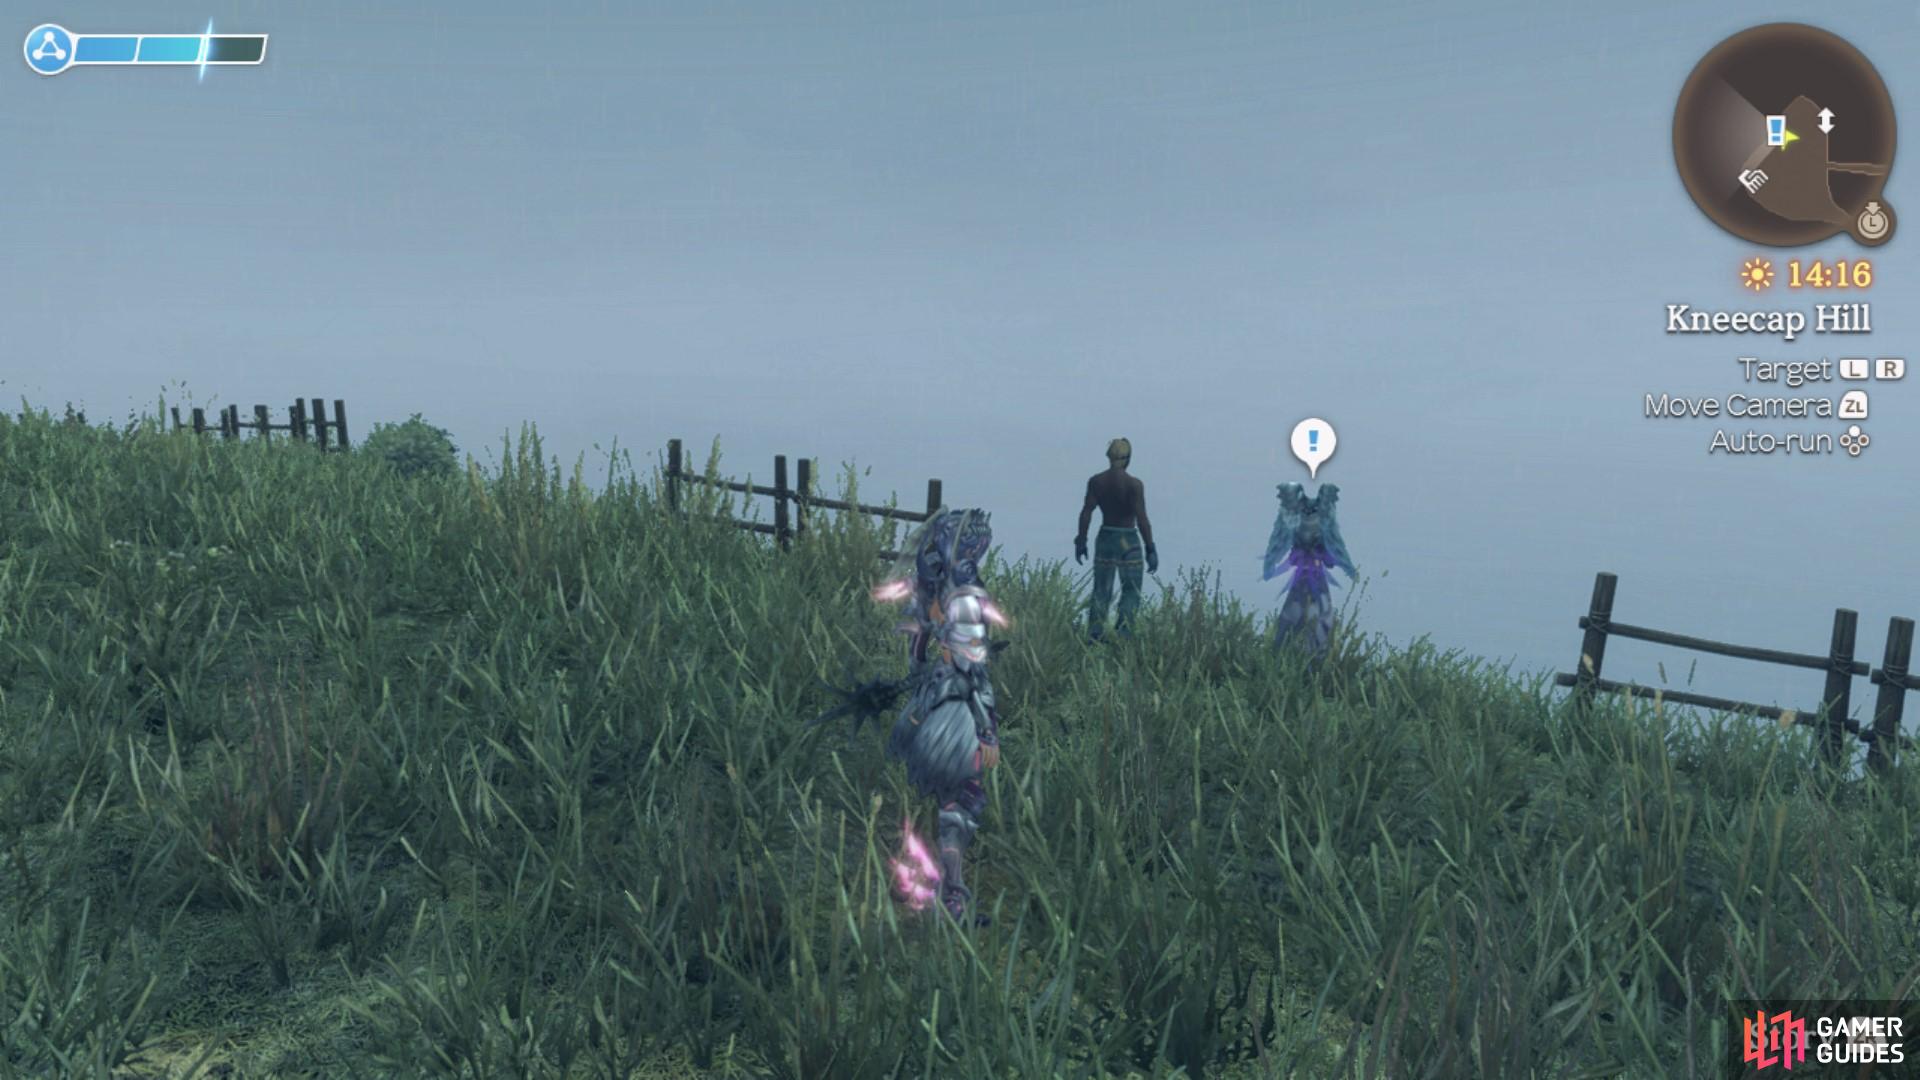
En Argentis doesn’t quite know the meaning of “elopement”
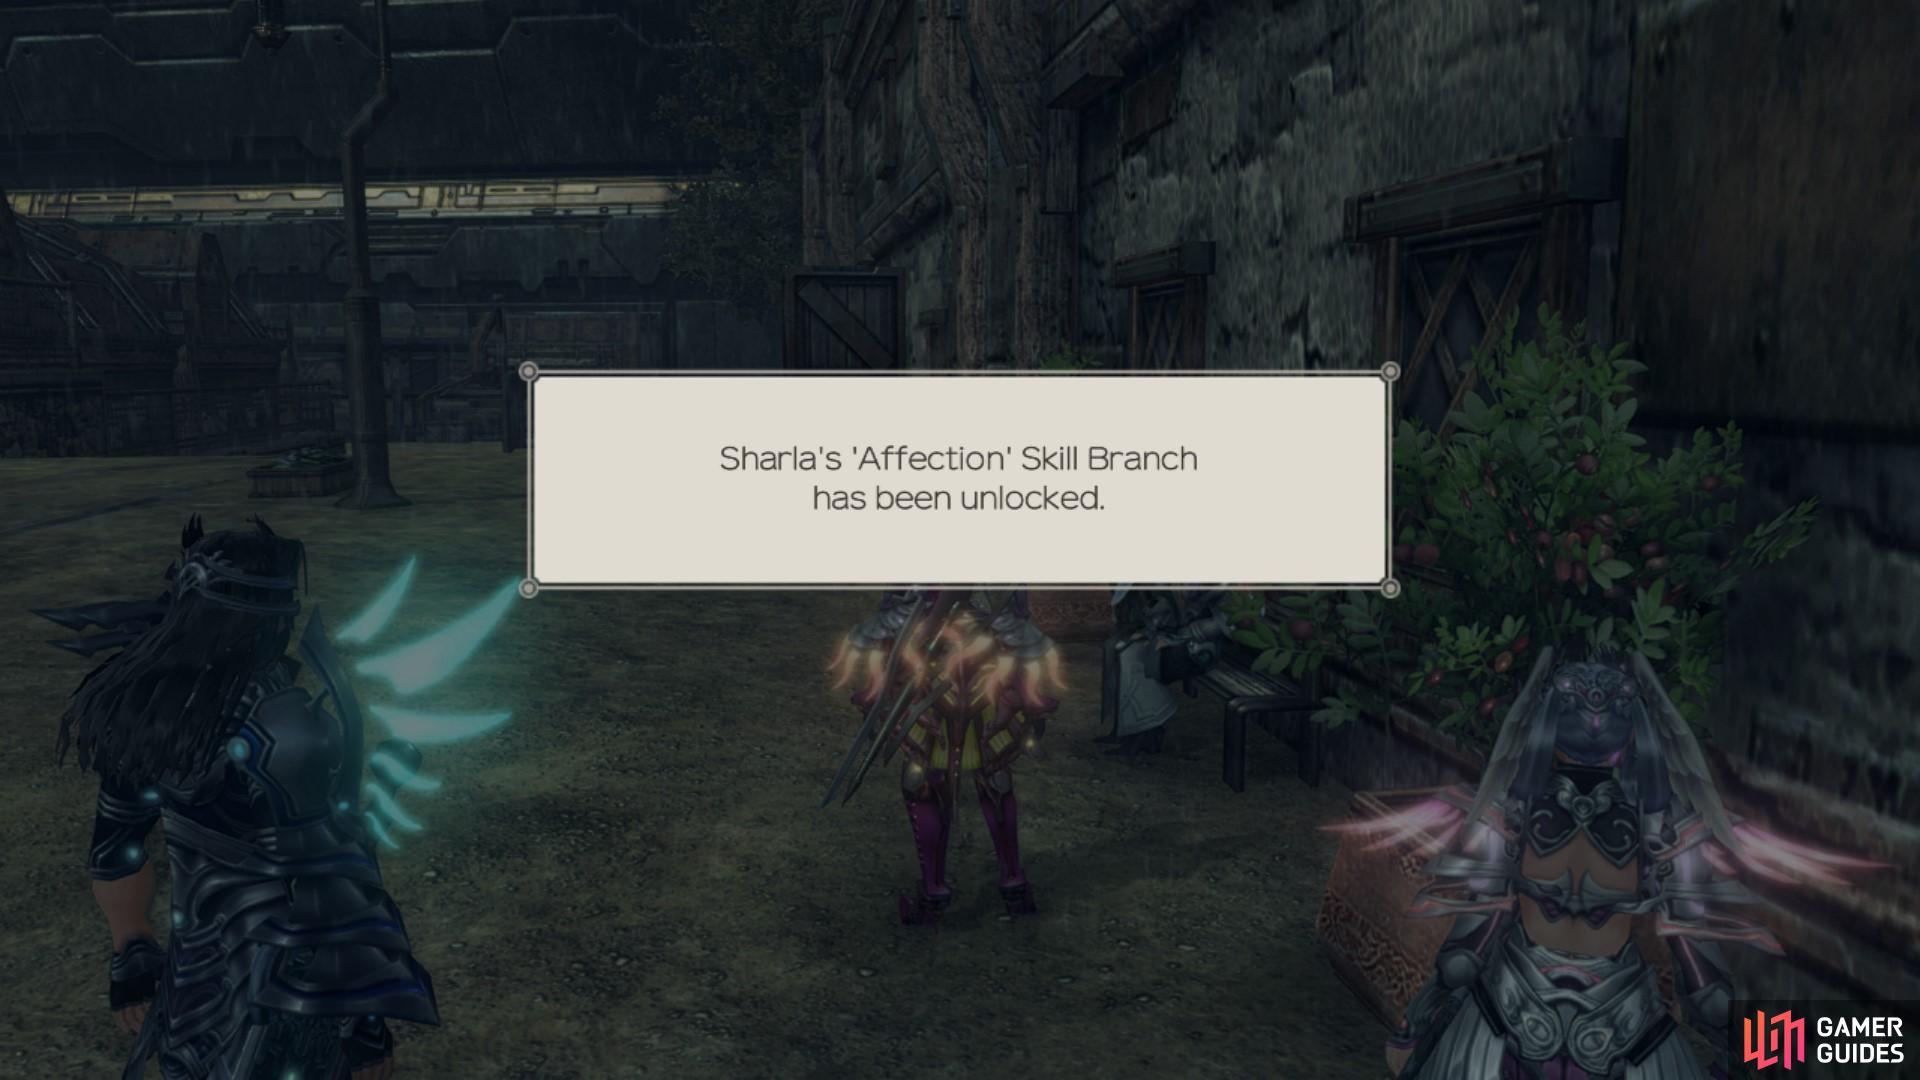
completing this quest will unlock Sharla’s fifth skill branch, Affection.
Stopping the Elopement (Zel Argentis)
To have access to this quest, you must have already completed Betrothal Test (Zel Argentis). Don Argentis will ask you to find his daughter, who has run off with Oleksiy to Satorl Marsh. You’ll find the pair at the Nopon Refuge and need to have Sharla as the party leader and she will tell them to return to Colony 6. When you have done this, return to Don Argentis to complete the quest.
The last few Quests in Colony 6 either require items from Prison Island (which you’ll be visiting shortly) or entry into the highest level area in the game. For now, make your way back to Fallen Arm to pick up the final Quests there.
Stunted Growth
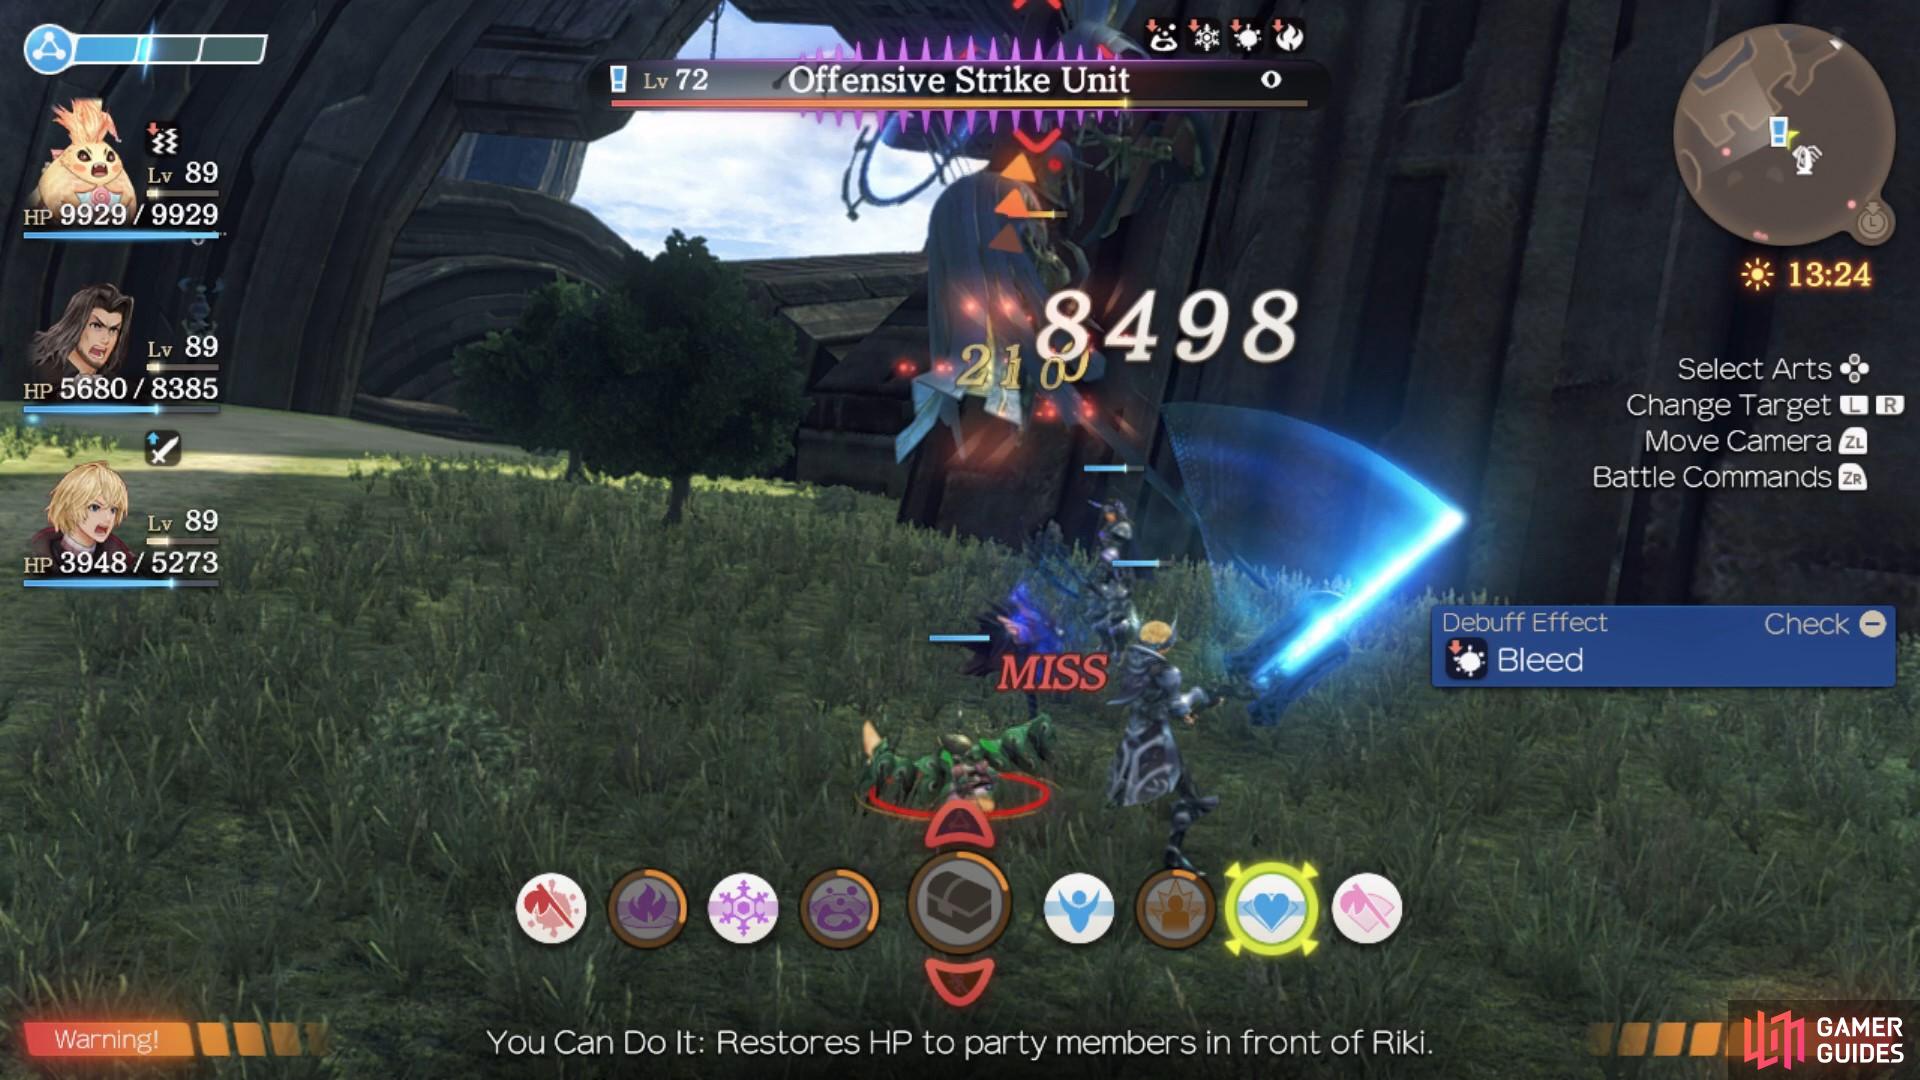
This quest is available to you once you defended Colony 6 from an attack, after the events at Mechonis Core. Dunban must be in the lead when you accept this quest. Orkatrix will ask you to find things that will help Orkatrix grow. He needs a Transmission Bypass, an Exhaust Pump and a Mini Reactor. Activating this quest will trigger the side quests Transmission Bypass, The Exhaust Pump and The Mini Reactor. They must be completed in order to continue with and finish Stunted Growth.
-
Transmission Bypass - You can obtain the Transmission Bypass from the Offensive Strike Unit found near the Black Wreckage landmark on Fallen Arm. Defeating the mechon enemy will automatically complete the quest, Transmission Bypass.
-
The Exhaust Pump - You can retrieve the Exhaust Pump from the Offensive Hover Unit found on Digit 4, northwest of the Black Wreckage landmark. Collecting the Exhaust Pump will automatically complete The Exhaust Pump.
-
The Mini Reactor - The Mini Reactor can be obtained from the Experimental M86 unit found near Digit 1 Crevasse and the Digit 2 Plain landmark. Defeating the enemy and obtaining the Mini Reactor will complete The Mini Reactor.
When you have all three items, return to Orkatrix in Junks. You’ll need to speak with him with Shulk as the party lead to complete the quest.
That’s all of the Quests available at Fallen Arm finished, next on your list should be to head to Satorl Marsh and pick up the Quests you can find there at both the Sororal Statues and Oath Sanctuary.
Challenge
A High Entia Refugee found during the day near Sororal Statues will ask you to defeat Veteran Yozel at the Silent Obelisk landmark in Satorl Marsh. The Unique monster is found at night during dense fog and is surrounded by a few Green Feris enemies. You’ll likely have to fight multiple enemies whilst battling Veteran Yozel. To complete this quest, you’ll have to return to the same High Entia Refugee after you defeat the unique enemy.
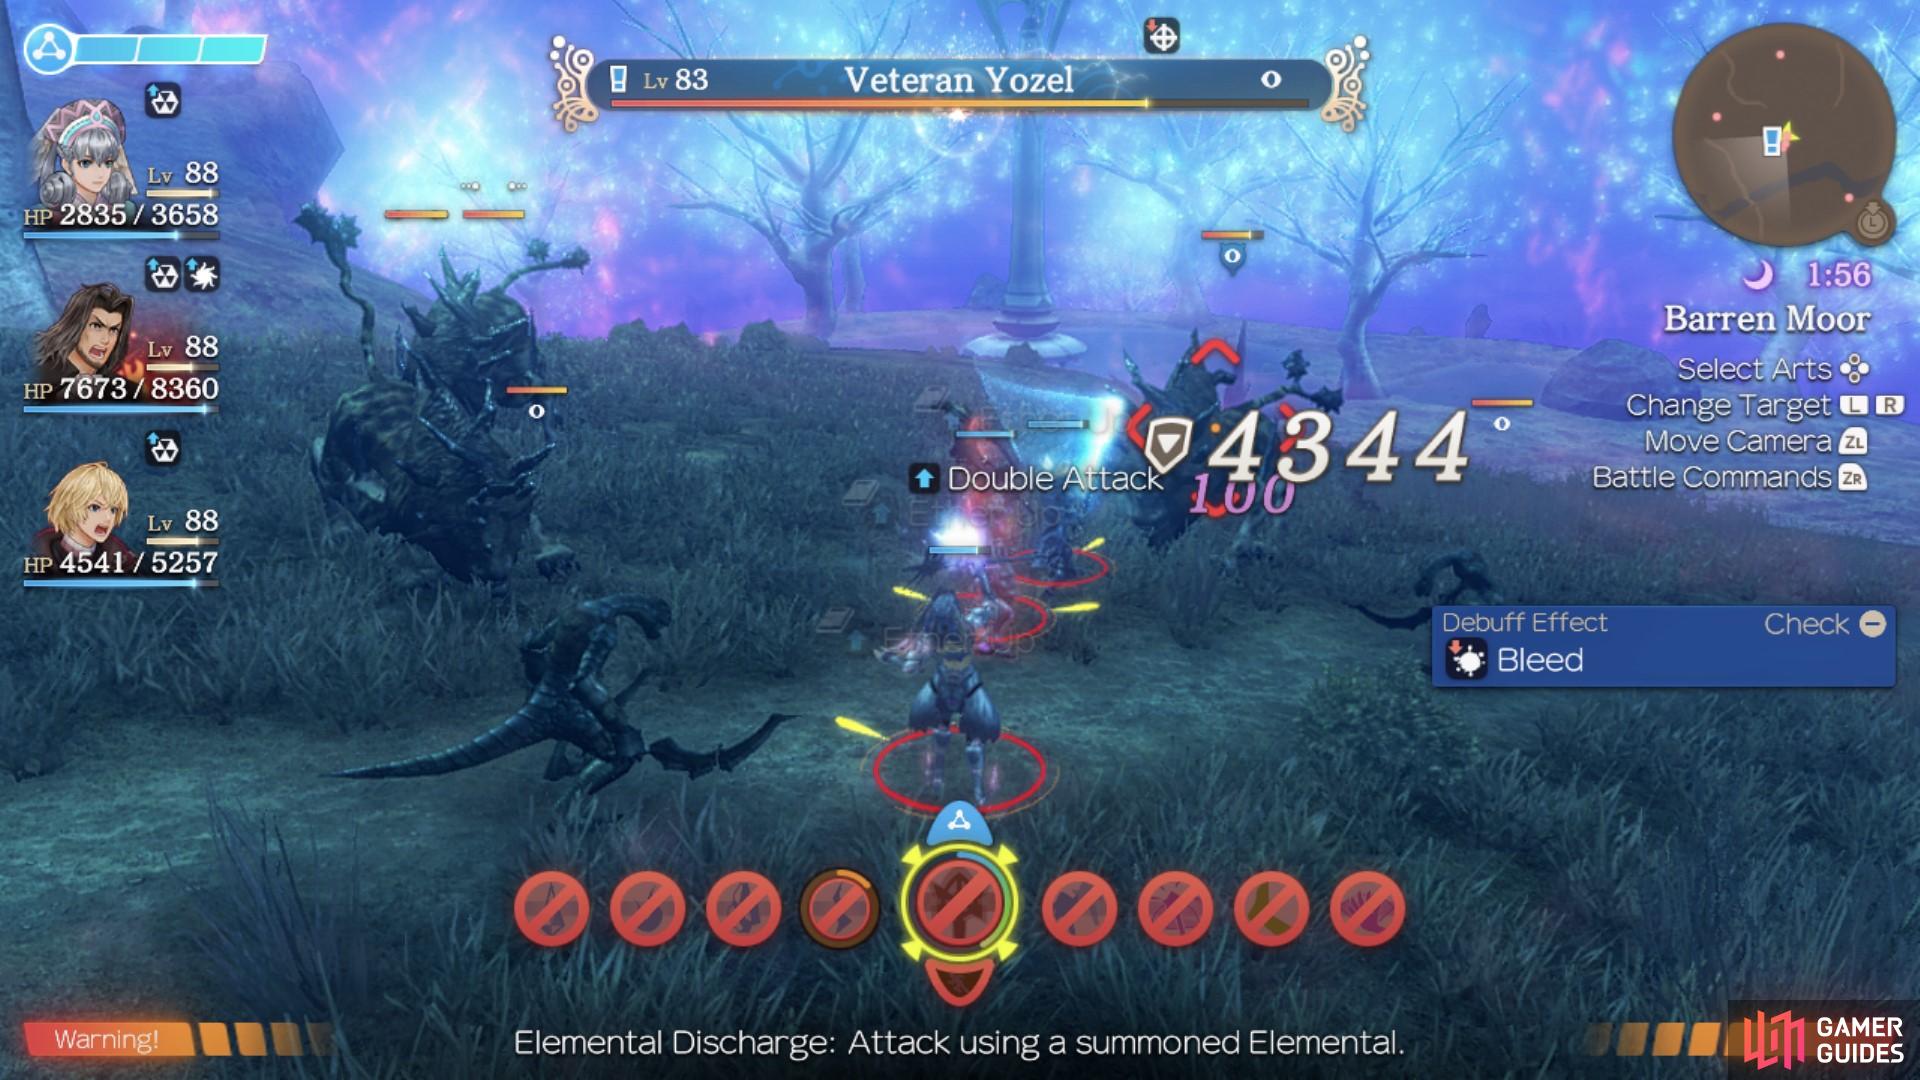
The Veteran Yozel is an Alpha Feris.
For a Friend
Rozeal can be found near the Sororal Statues in Satorl Marsh after the events at Mechonis Core. She will ask you to find out what happened to Galvin after he turned into a Telethia. You’ll need to speak to Scarlen, found near the Statues in Satorl Marsh, at night. Then, talk to Kaleka and Atael found near the Nopon Tower in Frontier Village. Return to Rozeal to complete the quest, after speaking to all three.
A Merciful End
After completing For a Friend, Rozeal will ask you to find Telethia Galvin and put him out of his misery. He can be found in the Revelation Hall in the Imperial Palace. Once you have defeated him, you will obtain a shard of his armour. When you return to Rozeal to complete the quest, you will give her this shard as a keepsake.
A Release from Duty
After helping Rozeal in A Merciful End, she will ask you to put other Telethia out of their misery.
-
Telethia Lecrough - Telethia Lecrough can be found in the Great Hall, which is the first area you will enter in the Imperial Palace.
-
Telethia Galdo - Telethia Galdo is found in the Imperial Villa. To reach the Imperial Villa, use the teleporter in the northern wing of the Great Hall.
-
Telethia Donnis - Telethia Donnis is found in the Audience Chamber on the Second Floor of the Imperial City. The room is full of Arel Telethia so be careful not to aggro too many of them during this battle, or you may be overwhelmed.
-
Telethia Kaelin - Telethia Kaelin can be found on the Sky Terrace, which is just behind the teleporter that takes you from the Great Hall to the Audience Chamber.
Return to Rozeal once you have defeated all the Telethia to complete the quest.
The Imperial Ceremony and Imperial Ceremony Offerings
Scarlen will be located just south of Sororal Statues, nearby Oath Sanctuary. During The Imperial Ceremony, he will ask you to collect Radiants from all around the world in order to perform the ceremony. Activating this quest will trigger Imperial Ceremony Offerings.
-
Mist Radiant - This Radiant is found near the Basin Cave in Satorl Marsh.
-
Ocean Radiant - This Radiant is obtained from the raised platform above Central Seal Island at Eryth Sea. To reach the platform, walk up the ramp to the left or the right of the landmark.
-
Imperial Radiant - This Radiant is located in the Ceremony Hall in the High Entia Tomb.
-
Snow Radiant - This Radiant is found within the Sealed Tower near the Harict Chapellandmark on Valak Mountain.
After collecting all of the Radiants, you will automatically complete Imperial Ceremony Offerings and you may now proceed with and complete The Imperial Ceremony. You will need to return to Sororal Statues and place the Radiants near the engravings on the ground. When you do this, the Radiant Pterix will spawn; you will need to defeat it to complete this quest. After defeating it you will obtain the High Entia Emblem, which opens a variety of sealed Imperial doors across the Bionis.
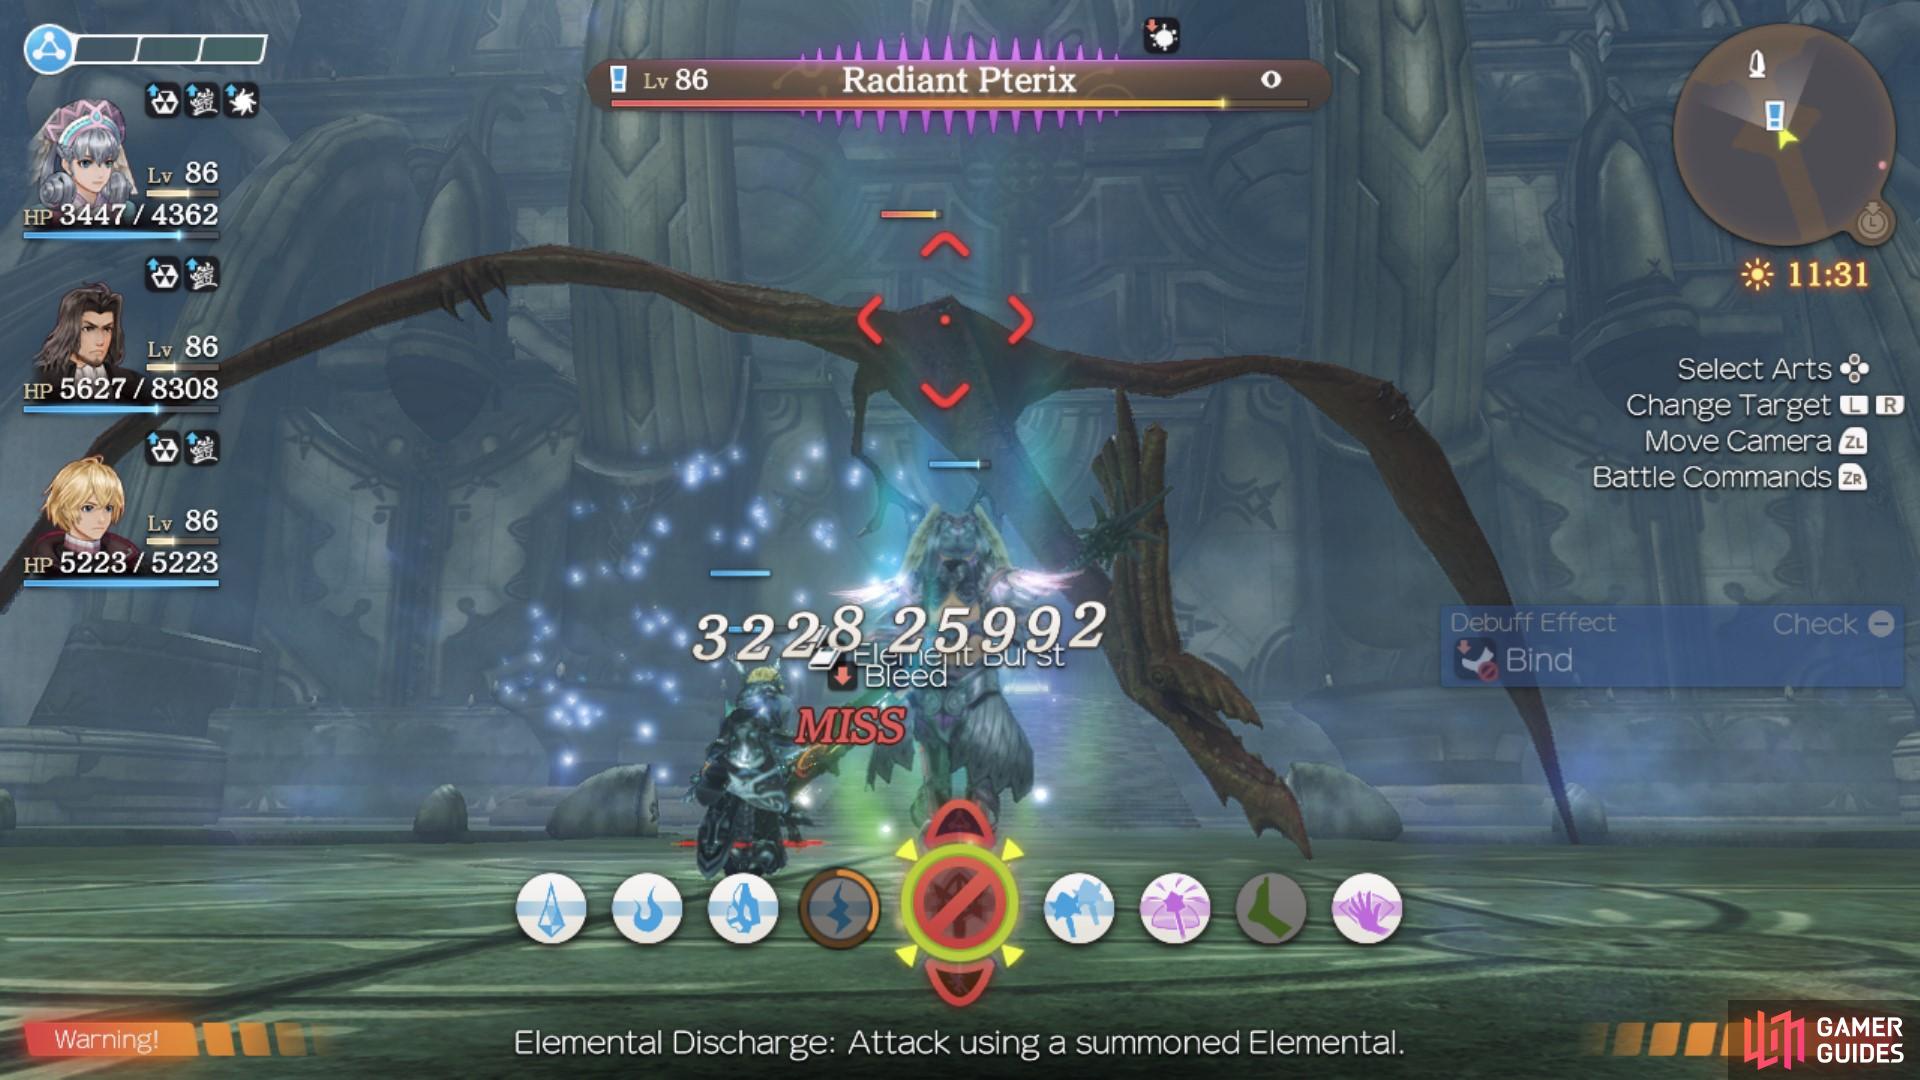
The Radiant Pterix will spawn when you place the Radiants on the engravings.
Not only does this complete the last of the Quests available in Satorl Marsh but with your Emblem you should head to these doors straight away, below is a list of where you can find them and what you can obtain:
| Location | Comments | Rewards |
|---|---|---|
| Satorl Marsh - Sororal Statues | Jump off the High Entia Lift once you see the under the Statue Summit Landmark | Grace Cap, Daze Plus V |
| Eryth Sea - Kromar Coast | Head across the bridge and behind the Lv 85 enemies here | Argos Gear, Combatant Boots, Back Attack Plus V |
| Eryth Sea - Hode Refuge | Hidden behind the Orluga in the southwest | Shade Glasses, Argos Gauntlets, Topple Plus V |
| High Entia Tomb - Imperial Treasury | Climb down the wall in Tower of Trials | Grace Gloves, Grace Shoes, Debuff Resist VI |
| Valak Mountain - La Luz Church | – | Heart-to-Heart |
While you’re in the High Entia Tomb, head to the Ceremony Hall and head east to reach the Telethia Laboratory to fully complete the map here and a Lv 96 Unique Monster that you’ll most likely have to return for later. Finally on your list of Areas to wrap up Quests in for now, make your way to Eryth Sea and head to the Ether Plant Landmark.
Investigating Satorl
This quest can be picked up from Miriall at the Ether Plant so long as you have not already completed Talia’s Research. The quests themselves are identical, however, the EXP and rewards received for this quest are higher. You are tasked with defeating the Dogmatic Gogol near the Place of Judgement in Satorl Marsh. The Dogmatic Gogol is only Level 32, since it appears that the quest exclusive monster is identical to the one you fight in Talia’s Research. They have not scaled the enemy to suit your much higher level, therefore, defeating him will be far easier in this version of the quest. Once you have slain the enemy, talk to Talia who is nearby the Place of Judgement. Then, after that, you will need to talk to her again when she has returned to the Ether Plant at Eryth Sea, in order to complete the quest.
Ancient High Entia Mystery
You can pick this quest up after the events at Mechonis Core if you have completed Talia’s Research or Investigating Satorl. To continue with this quest, you’ll need to complete The Imperial Ceremony quest in Satorl Marsh, as you will need the High Entia Emblem during this quest. You will need it to unlock the seal at La Luz Church on Valak Mountain. When you open the seal, you’ll have to walk down a long tunnel until you reach a small cliff space. There, you will find the War God Statue that you need to examine. After doing so, head back to Talia at the Ether Plant to complete the quest.
This War God statue is the original depiction of the High Entia faith,
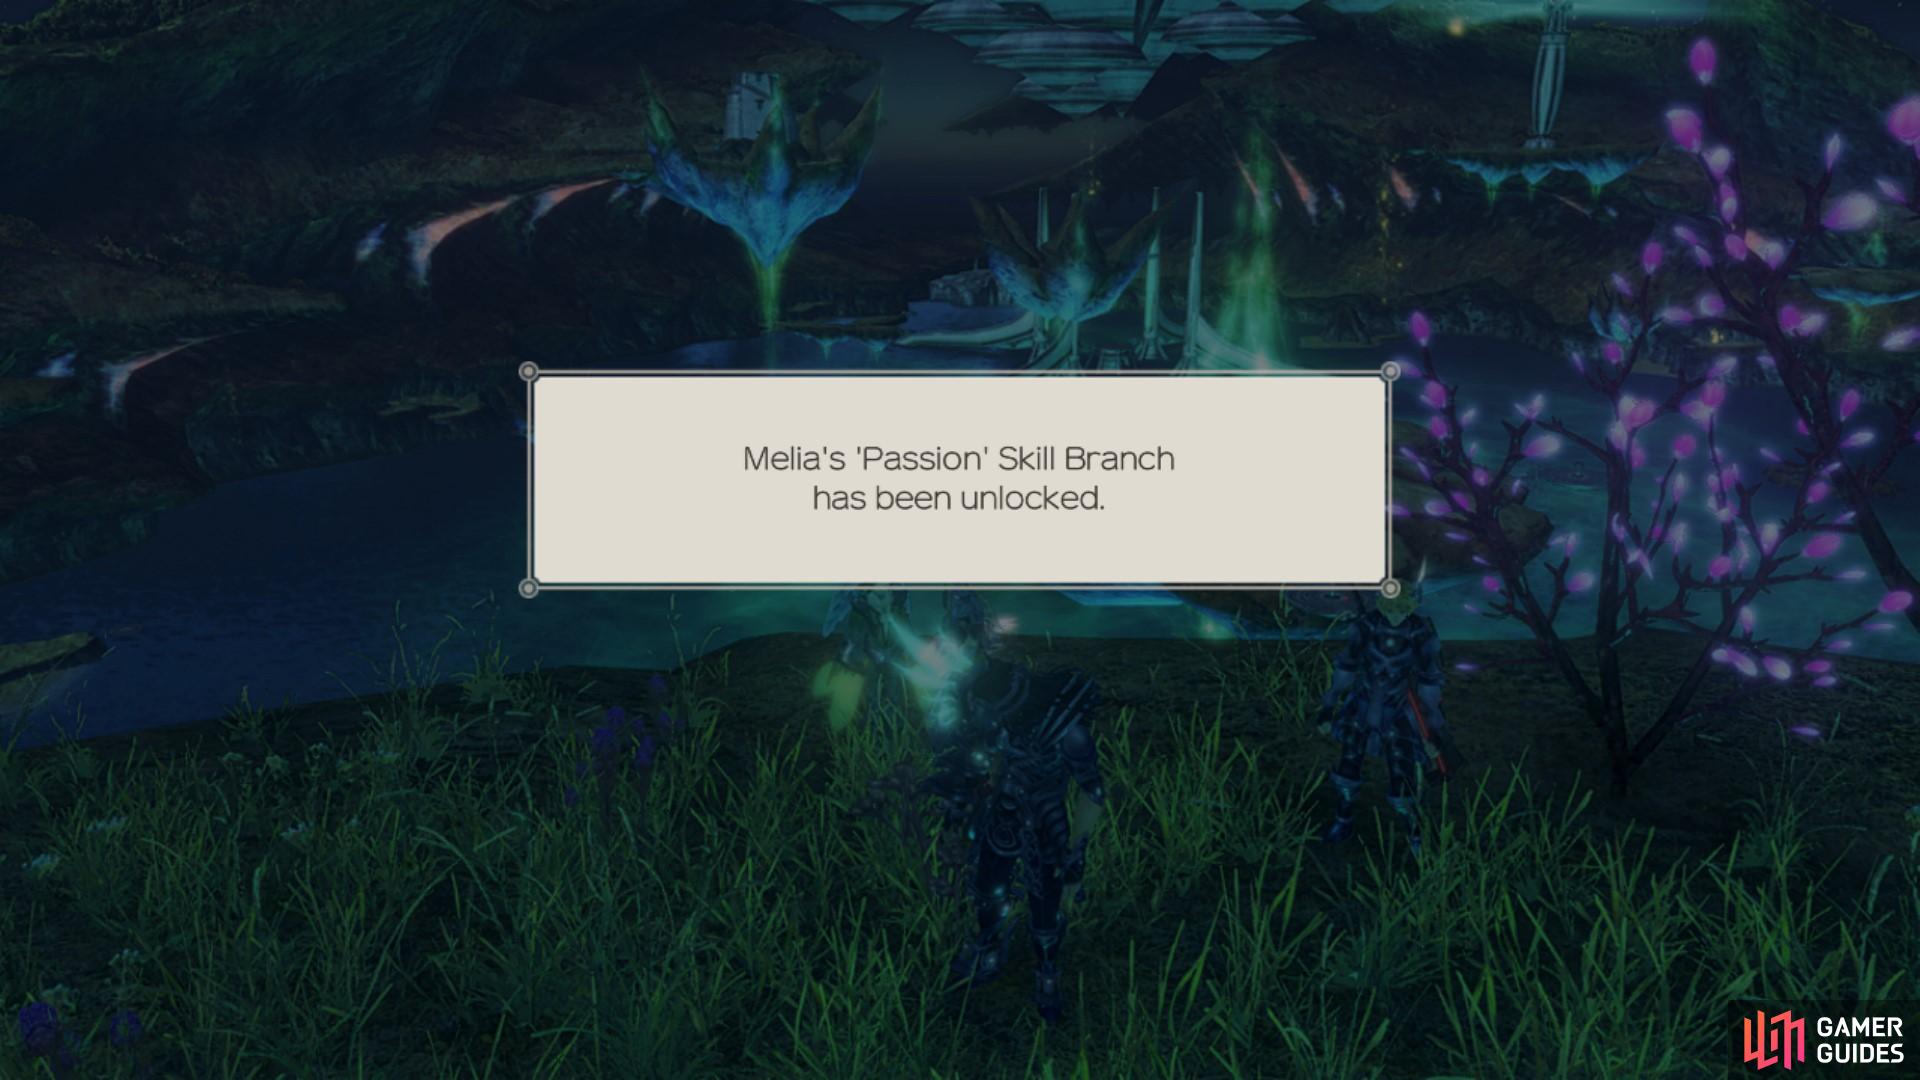
completing this quest unlocks Melia’s fifth skill branch, Passion.
The Missing Boy
This quest can be picked up from Miriall who is now found at the Ether Plant. She will ask you to find Teelan. He can be found in Alcamoth on the First Floor, in the small alcove to the south. Once you have found Teelan, return to Miriall to complete the quest.
I Will Never Forget You
Vidian will ask you to help put her friends out of their misery. Firstly, you will need to return to Alcamoth and defeat 10 Arel Telethia. Once you have done this, you’ll need to battle Telethia Arielle, who can be found near the Fountain of Eternity. Then, you’ll be asked to defeat Telethia Lesunia, who is located near Melfica Road on the First Floor of the Imperial City. After you have defeated all of these enemies, you’ll be able to return to Vidian at the Ether Plant to complete the quest.
Secret Research
This quest can be picked up once you have completed The Missing Boy. Teelan will tell you to collect the Telethia Research found in the Telethia Laboratory in the High Entia Tomb. To gain access into the Laboratory, you’ll need the High Entia Emblem, which is obtained by completing The Imperial Ceremony quest in Satorl Marsh. The Laboratory is east of the Ceremony Hall on the Ground Floor. Once inside the Laboratory, you’ll be faced with the formidable unique enemy, Furious Jozan, who will attack you if he hears you. This means you can sneak around him (unless you’re high enough to defeat it right now) to reach the Telethia Research, but you’ll have to be extra stealthy. However, you choose to approach the Research, once you have picked it up, return to Teelan to complete the quest.
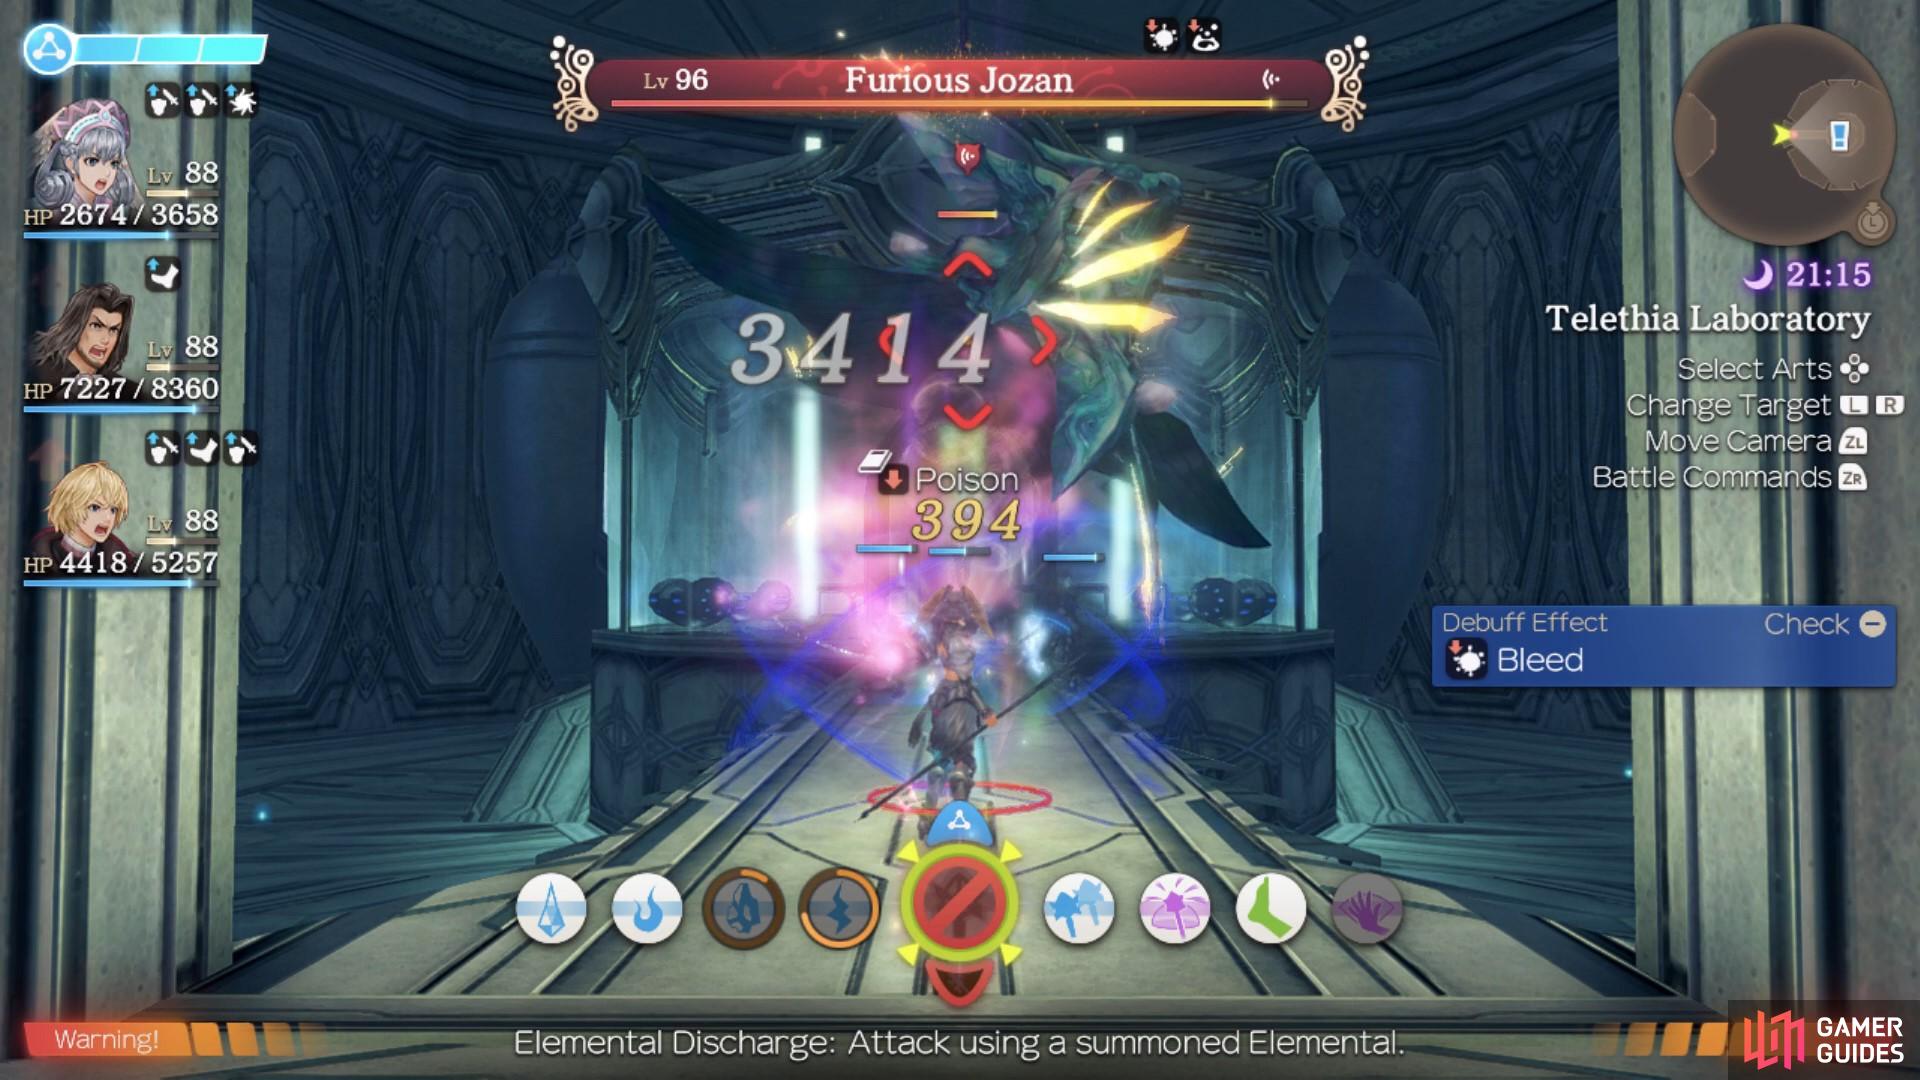
You can choose to fight or avoid Furious Jozan.
That should complete all of the Eryth Sea Quests, the final set of Quests in the game involve either High Level 95+ enemies or venturing into the new reaches of Tephra Cave, also filled with the highest Level enemies in the game so for now, it’s a good idea to press forward with the story before you return to the final set of Quests.
No Comments