


Kneecap Hill
You’ve reached the Bionis’ kneecap and with it, Colony 6 is drawing closer all the time. Take a look at the cave entrance once more and you’ll spot an area you can dig if you picked up A Thank You back in the caves. Do so and you’ll obtain a Topple Resist III Gem along with completing the final Tephra Cave Quest. Before climbing the vines, be sure to interact with the Heart-to-Heart to register it in your menu for later.
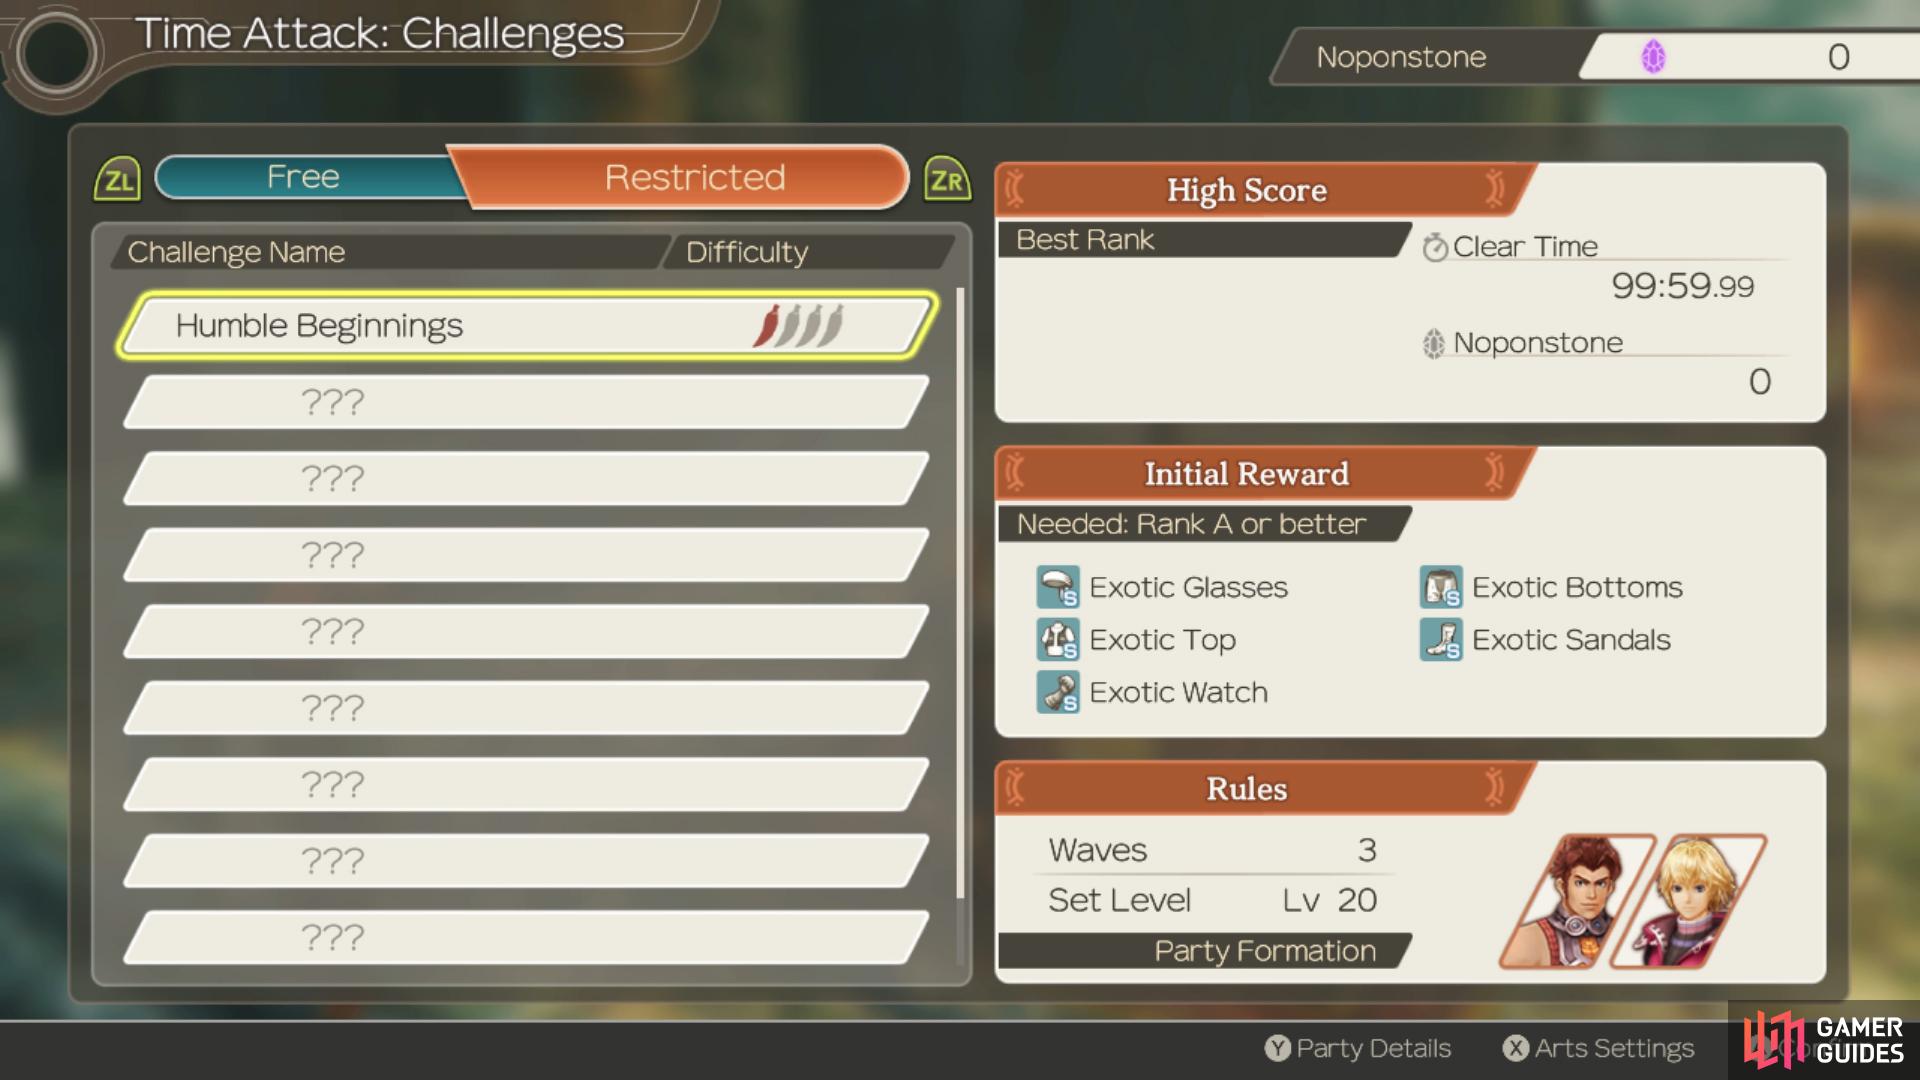
Ignore the enemies here and continue onwards to the east where you’ll spot a glowing red portal and upon touching it, will whisk you off to some unknown temple. Proceed forward and speak to the Nopon Archsage and you’ll be given a choice that you should gladly accept. At this point, you’ll be given the tutorial on Time Attack Mode, a new feature to Definitive Edition, by completing challenges you’ll be awarded Noponstone, this in turn can be traded for exclusive and difficult to obtain items. For now, the equipment are more for cosmetic purposes while the Gems are only Rank 1 however you’ll soon find rare items will populate the list.
Take a look at the Challenges and you’ll be given another tutorial on the differences between Free and Restricted Battles. Both feature the same enemies with the difference being in Free Battles you can select your party whereas in Restricted, you’re given a set team at a set level. Suffice to say, you’ll get better rewards for beating the Restricted Battles. Seeing as the Free Battle has a Rec. Level of 20, you’ll be unable to complete it right now but Restricted Battle will set Reyn and Shulk to Level 20 so let’s attempt this now.
| Challenge Name | Difficulty | Rewards |
|---|---|---|
| Humble Beginnings | 1/4 | Exotic Armor Set |
-
Wave 1: You’ll be up against two Lv 21 Colony Krabbles and two Lv 22 Marble Krabbles. Seeing as you’re controlling Reyn for these battles, be sure to make use of his aggro generating abilities to keep Shulk out of danger and make the Marble Krabbles your main priority, choose the party to focus on one at a time.
-
Wave 2: This time it’s a Lv 23 Baby Armu with three Lv 22 Baby Armus. Wild Swing is useful to gain aggro on all of the enemies and make use of Guard Shift if you find yourself taking too much damage to give Shulk a chance to heal you.
-
Wave 3: The final wave is a little tougher, you’re up against a Lv 23 Knuckle Bunnit, a Lv 24 Wood Bunnit and a Lv 25 Junk Bunnit who should be your first target. You’ll have to dip into Guard Shift here to be able to withstand some of the damage and if you have a Chain Attack available, consider using it on the Junk Bunnit. Once that one is down, you should have little issue taking out the rest and finishing the Challenge.
You’ll gain a tutorial upon completion detailing all of the Bonus conditions for your ranking and then you’ll be graded, should you get an S Rank, you’ll gain 3600 Noponstone in addition to the other rewards. Once you’ve had your fill, return through the portal and continue on to the east to unlock the Leg Pass and Ragrinar Canyon Path Landmarks as you enter Bionis’ Leg.
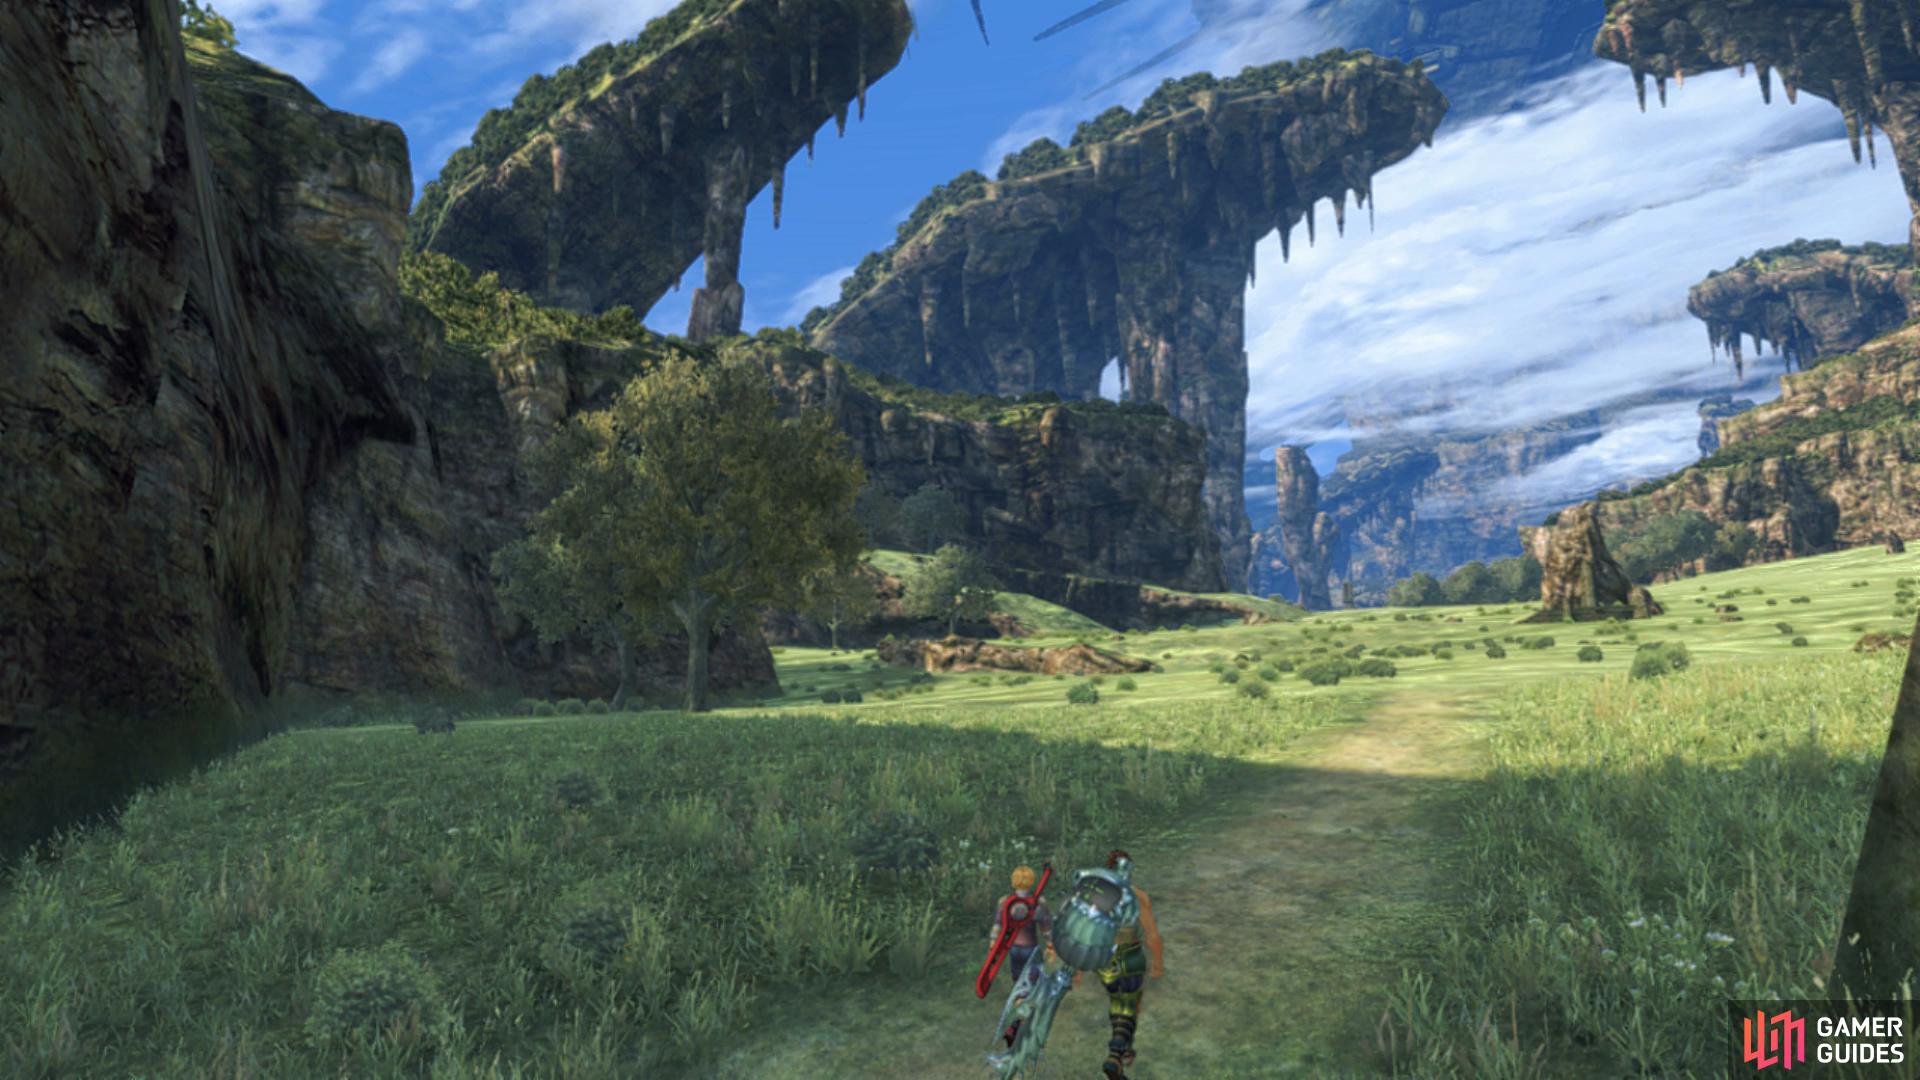
Gaur Plains
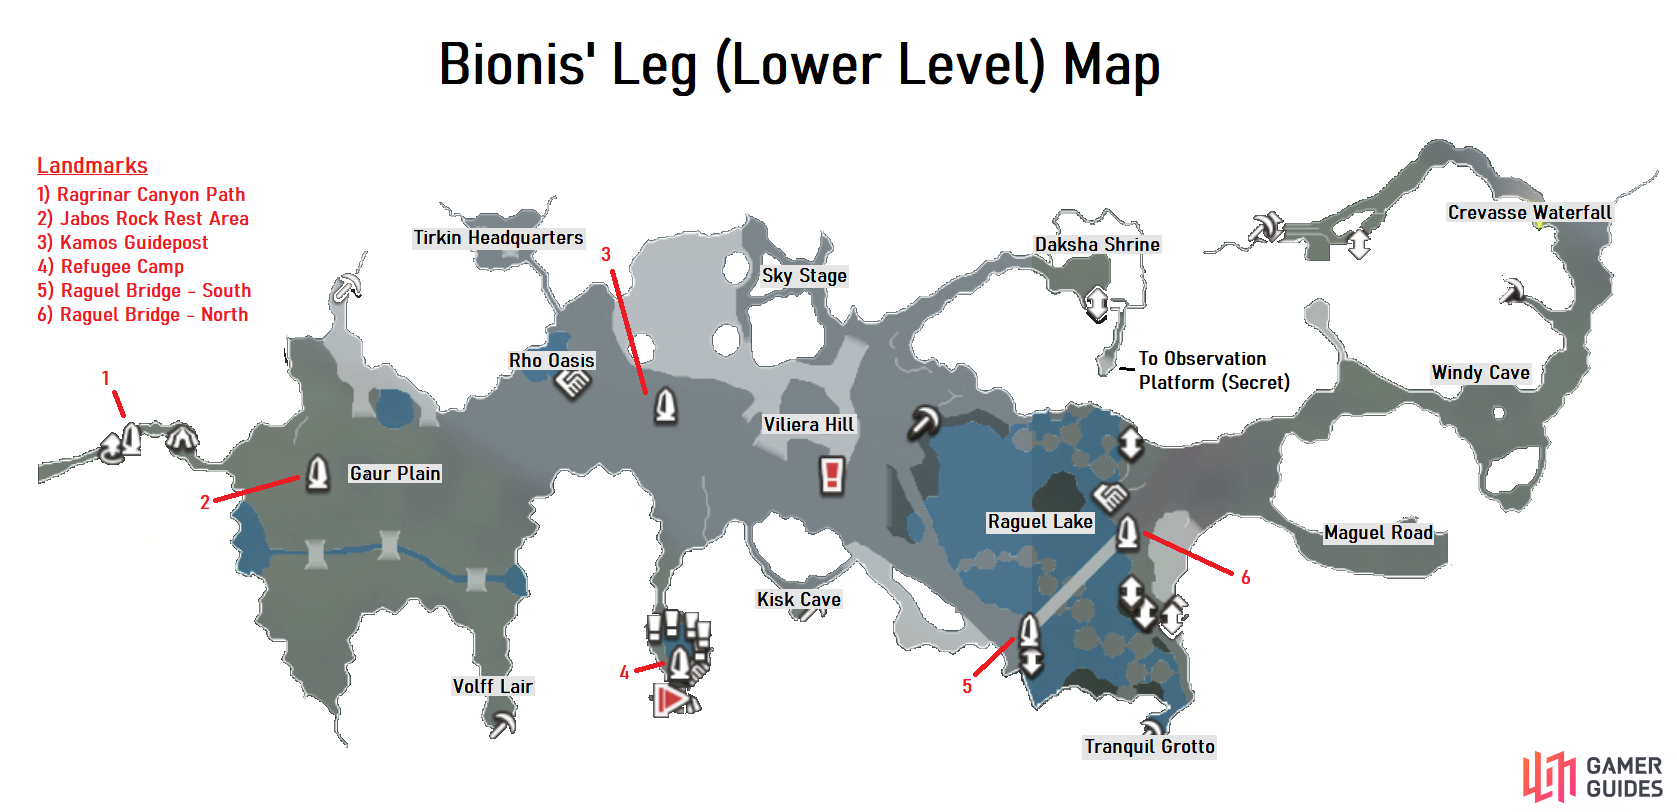
Lower Level Map for Bionis’ Leg
Upper Level Map for Bionis’ Leg
As you make your way east, you’ll come to a group of Homs, one who is selling goods and another who will offer you Monster Quest 1 - Parts 1-4 so be sure to pick them all up. Continue on to the east and you’ll finally reach the vast Gaur Plains, an area that is far larger than anything you’ve encountered yet. Weather will begin playing a part here on the types of monsters you’ll encounter and with it, you’ll be informed of how Ether types Aggro, that is to say using Ether around them will cause them to become attracted to you.
It’s easy to get overwhelmed here so it’s a good idea to set yourself mini goals and get to work on them. For now, you’ll spot some Armus ahead that you can kill toward one of the Monster Quests you just picked up. Make your way to the north here and you should locate the Maker Bunnits needed for one of the other Monster Quests.
The final two groups of enemies can be found further to the east of the plains and from the Story Flag so be sure to head there first and dispatch of the Ponios and the Leg Volf. Once all four quests have been completed, return west and head towards the Story Flag to trigger a cutscene. Once you regain control, you need to track down some water sources and if you’ve already ventured east a little, you’ll have a place in mind. Make your way to the northeast and you’ll run into the boy and the two monsters in question, forcing you into battle.
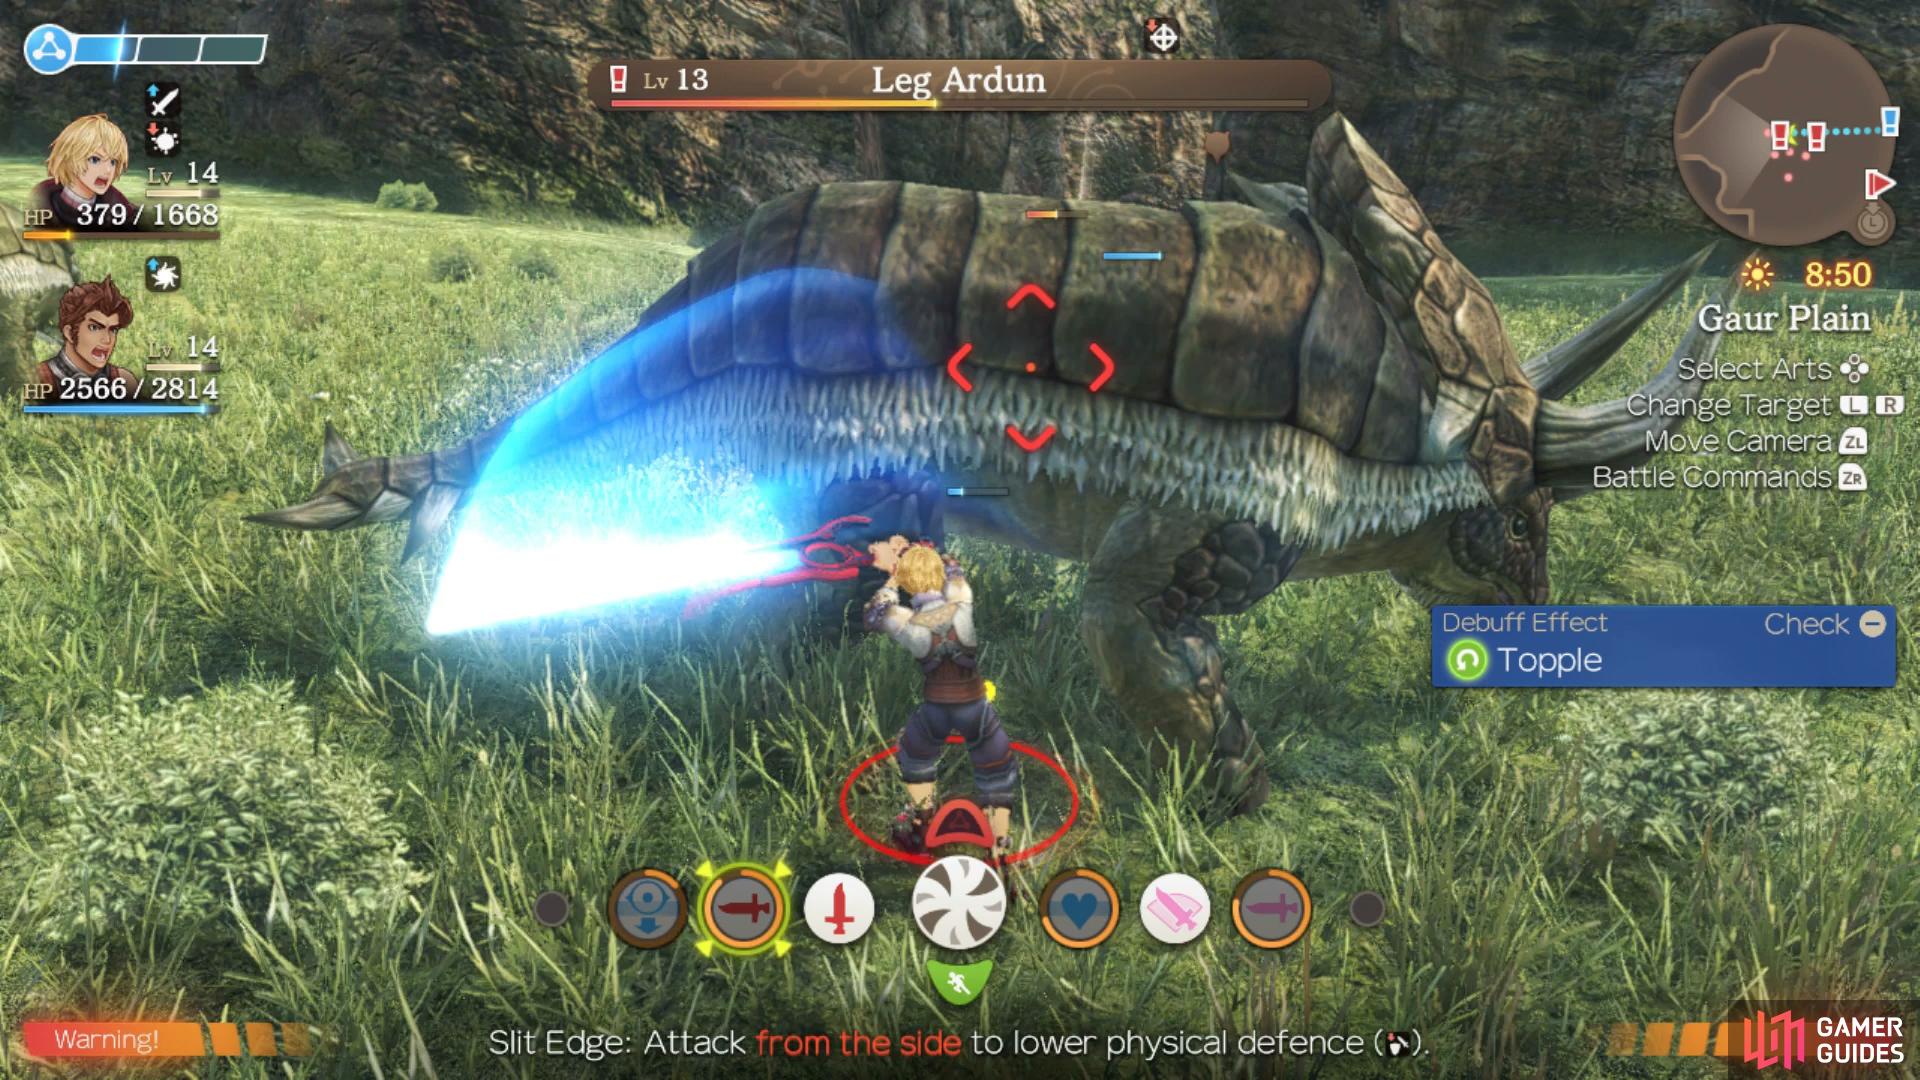
The Berserk Arduns are Level 14 and despite their size, not as difficult as the boss theme likes to imply so long as you at least match their level. Be sure to have your party focus on the same target and then get to work inflicting Defense Down, Slow and then eventually Topple. By the time you’ve pulled off a Back Slash and a Monado Buster it’ll be near death so finish it off and repeat the same on the other to take them out.
You’ll automatically return to the buggy following the battle and you’ll learn the boy’s name, Juju. With your next destination in mind, head back to the Rho Oasis from a moment ago (unlocking it if you didn’t in the previous battle) and you’ll also find another Heart-to-Heart to register for later use. Make your way east from here to reach the Kamos Guidepost Landmark that Juju mentioned and then head south through the trees. Along the way you’ll find a Refugee who will give you the Challenge 1 - Parts 1 and 2 Quests.
Ignore these Quests for now however and push on to the south where you’ll finally reach the camp that Juju mentioned and trigger a cutscene.
Refugee Camp
| Key Information | Details |
|---|---|
| New Quests | 34 (including the rest of Bionis’ Leg) |
| New NPCs | 11 |
| Heart-to-Hearts | 2 |
You’ll regain control in the Refugee Camp as Sharla beckons you to the cavern ahead. Before you progress the story however, take the time to meet all of the people gathered here. Nearby the lake, you should find Earnest who will offer the Earnest’s Fibs Quest. To the northeast of the cave entrance you’ll find a small Nopon by the name of Nikita while another, Satata will be nearby a Heart-to-Heart, speak to the Nopon to begin the Being a Good Grandfather Quest. Follow the edge of the water to the northeast and you’ll find a Refugee who will offer Collection Quest 2. Finally for this side of the water, you’ll find another Refugee who will offer Monster Quest 2.
Make your way up the northwest bank now and you’ll find a Refugee who will offer Search Quest 1 while there’s another Nopon Refugee who will offer Challenge 2 - Parts 1 and 2. While still up here, change the time to 18:00 and you’ll find another Refugee off to the east who will offer Material Quests 1 and 3 while down along the western edge another will offer Monster Quest 3 - Parts 1 and 2. You’ll find another Nopon by the name of Pama down by the edge of the water here while Ewan will venture out of the cave entrance. Finally, head up the eastern edge once more to find one final Refugee who will offer Search Quest 2.
Take the time to register all of the people to your Affinity Chart
and pick up all of the Quests on offer.
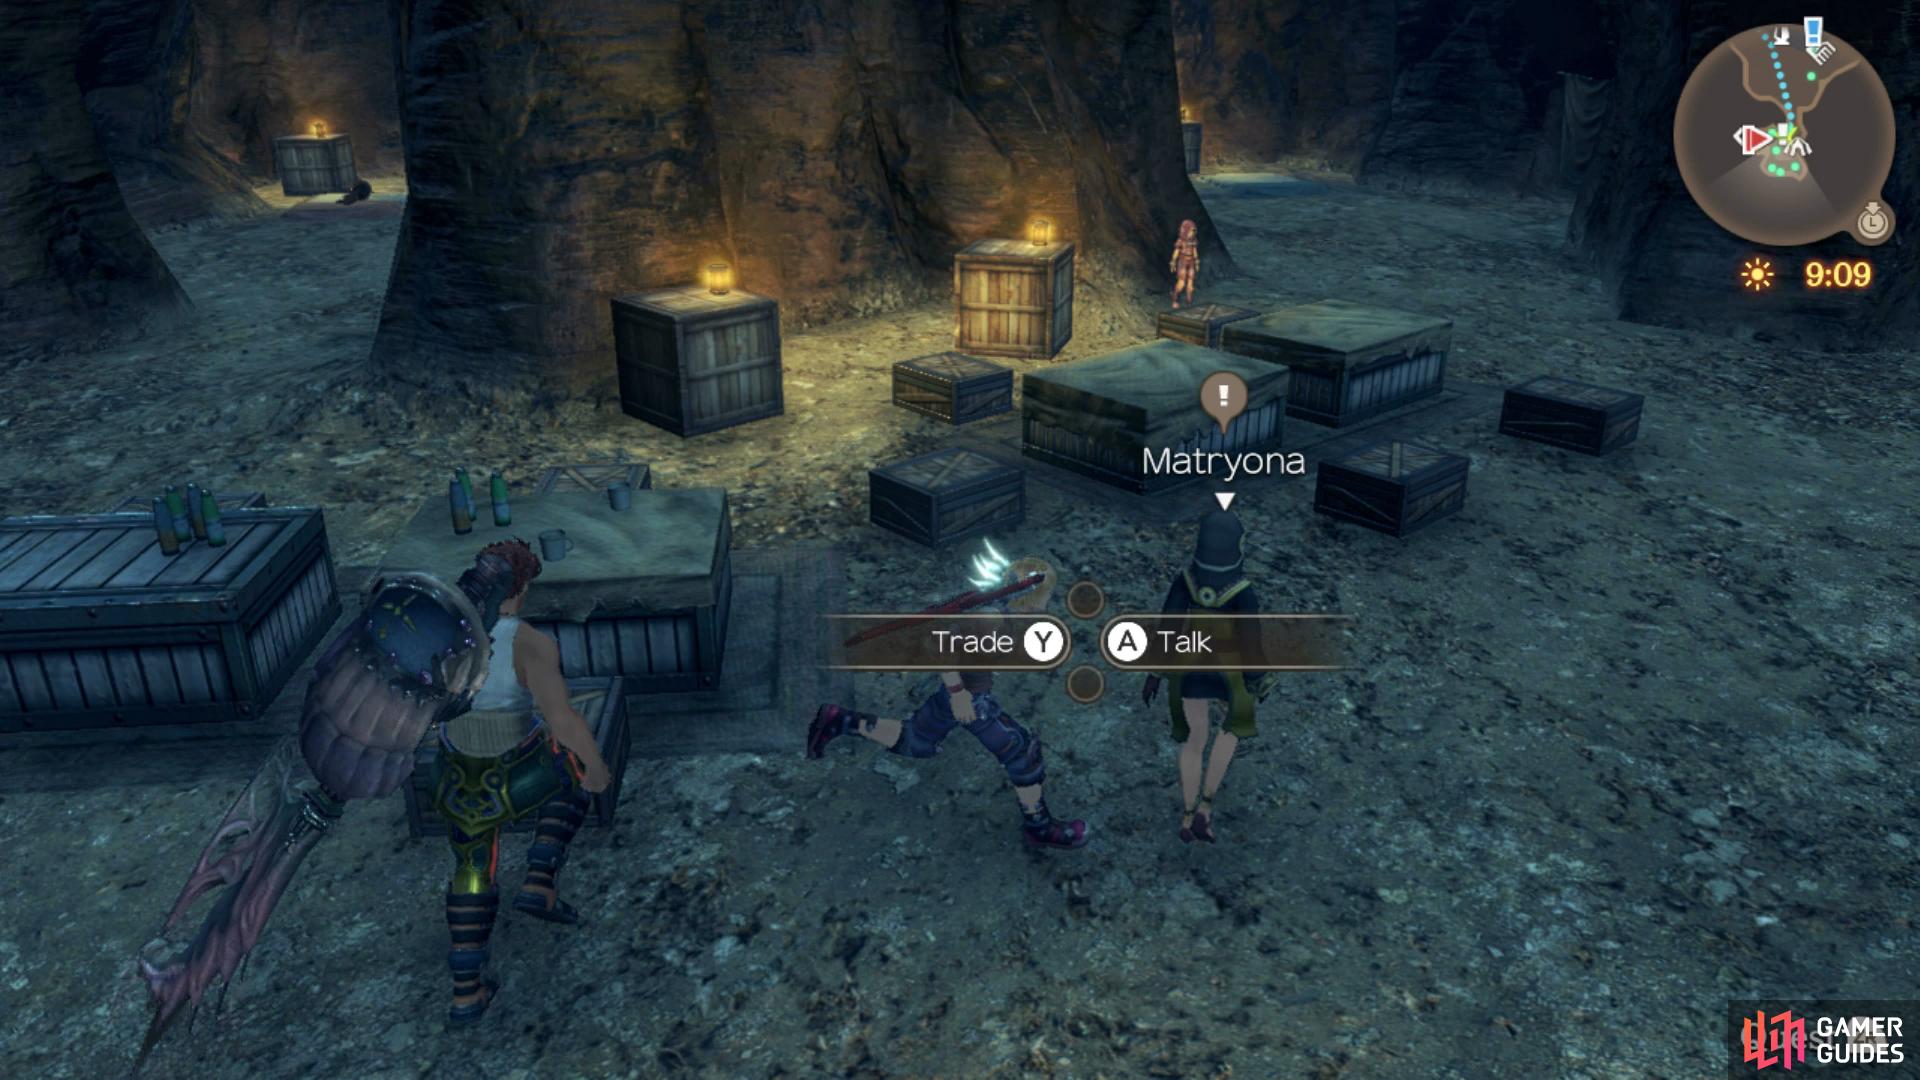
Make your way into the cave now to find a Shop, sell any excess equipment you may have and if you have the funds on you, be sure to pick up a copy of each Arts Manual there. Should it still be night time, you’ll find Arda in the room to the south resting while another Refugee will offer Collection Quest 1. Before switching back to Daytime, you’ll find one final Refugee here who will offer Material Quest 2 and 4. Back at 09:00, you’ll find Olga in here while you’ll also find Matryona who will offer A Thoughtful Idea. Standing against the wall, you’ll find Anna while another Nopon, Kiroki, can be found near some boxes. There’s one final NPC to register and you can find him by switching the time to 21:00 and speaking to the only other person with a Quest, Gorman who will offer Thieving Monsters. With this tour over with, finally make your way to the Story Flag to speak with Juju and Sharla to progress the story.
Following the scenes, you’ll learn your next destination, towards Colony 6 however you’ll have gained a new party member in the form of Sharla and with it, the best time to complete a whole batch of Quests. Having Sharla in the party will make battles a lot smoother, not only can she buff your party but her primary role is that of a healer. Until now you’ve only had Shulk’s heal which isn’t much of one but now you can take on more dangerous foes.
Make your way out of the Refugee Camp and head towards the Story Flag to trigger another cutscene at which point you’ll be free to travel around again.
Questing around Bionis’ Leg
Juju’s plight can wait for now, you’ve just accepted a whole bunch of Quests, some of which are timed and can be missed if you progress the story too much. Before you even get started however, skip travel back to Refugee Camp and head through the Portal once more to find a new Restricted Challenge you can undertake.
| Challenge Name | Difficulty | Rewards |
|---|---|---|
| Fair Game | 1/4 | Captain’s Hat, Top and Bangles |
-
Wave 1: You’ll be up against two Lv 27 Black Flamii and two Lv 28 Oasis Flamii and you’ll be in control of Sharla. Remember that as Sharla, you’ll need to use her Talent Art to cooldown the rifle once it overheats, allowing you to use Arts again. Also, as Sharla is the healer of the group, keep an eye on Shulk and Reyns HP and heal when necessary. Heal Blast should be saved for when a party member is in immediate danger as it has a longer cooldown while Heal Bullet can be used more freely. Finally, you can start the Break-Topple-Daze combo with her Metal Blast Art.
-
Wave 2: The next wave sees you taking on two Lv 28 Leg Skeeters and a Lv 29 Crowd Flier. You can make this easier on yourself by focusing on the Leg Skeeters first and even putting the Crowd Flier to sleep if need be. Additionally, Sharla’s Thunder Bullet will deal increased damage to flying enemies allowing you to dish out some of the damage yourself.
-
Wave 3: The final wave is against two Lv 27 Archer Tirkins, two Lv 28 Gust Vangs and a Lv 30 Archer Tirkin. If you have a Chain Attack available, begin the battle by using it against the Archer Tirkin then focus on the flyers with Sharla’s Arts. Keep an eye on HP and heal if need be and you should have no issues with finishing off the rest of the enemies.
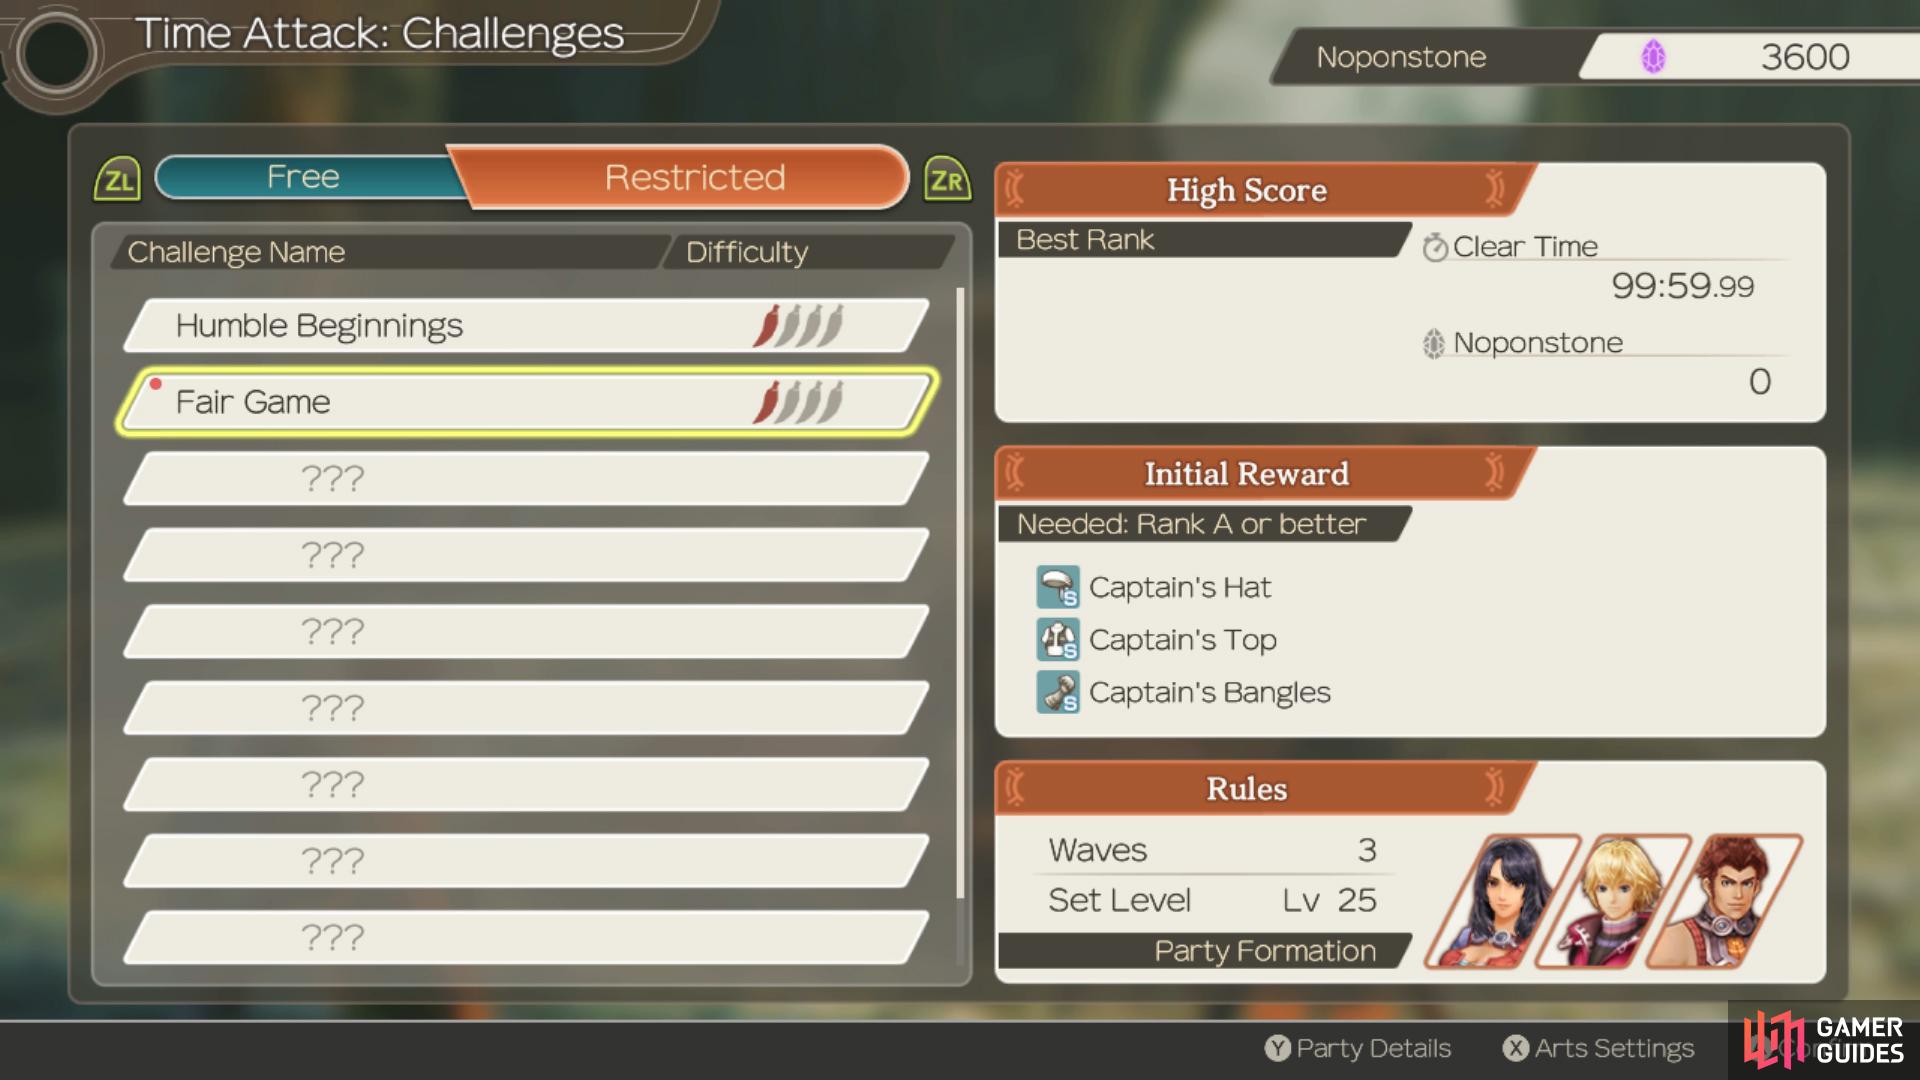
If you managed to finish the battle with an S Rank, you’ll obtain 4000 Noponstone in addition to the other rewards. If you take a look at the Prizes, you’ll see there’s now Rank 2 Gems for sale, again hold off on this for now as it’s not worth spending your Noponstone on Gems under Rank 3. With that little excursion out of the way, it’s time to turn your attention back to Questing but before you leave the Refugee Camp, you’ll notice there’s another new Quest from Olga to accept, Emergency Treatment.
Emergency Treatment
Gorman took only a limited supply of his medicine in the escape from Colony 6, so he’s going to need some more. Olga says that she will need some Glowing Wisp Fluid in order to make more. There are two ways to procure these Glowing Wisp Fluids, one of which is by trading with Ewan. The other method of obtaining these is from specific Wisps at night. There are Night Wisps at Kneecap Hill just outside of Tephra Cave that can drop them, as well as Flash Wisps and Light Wisps in Bionis’ Leg (check out the bodies of water for a more prominent spawn). You will need five lots of Glowing Wisp Fluid and once you have them, return to Olga to complete the quest.
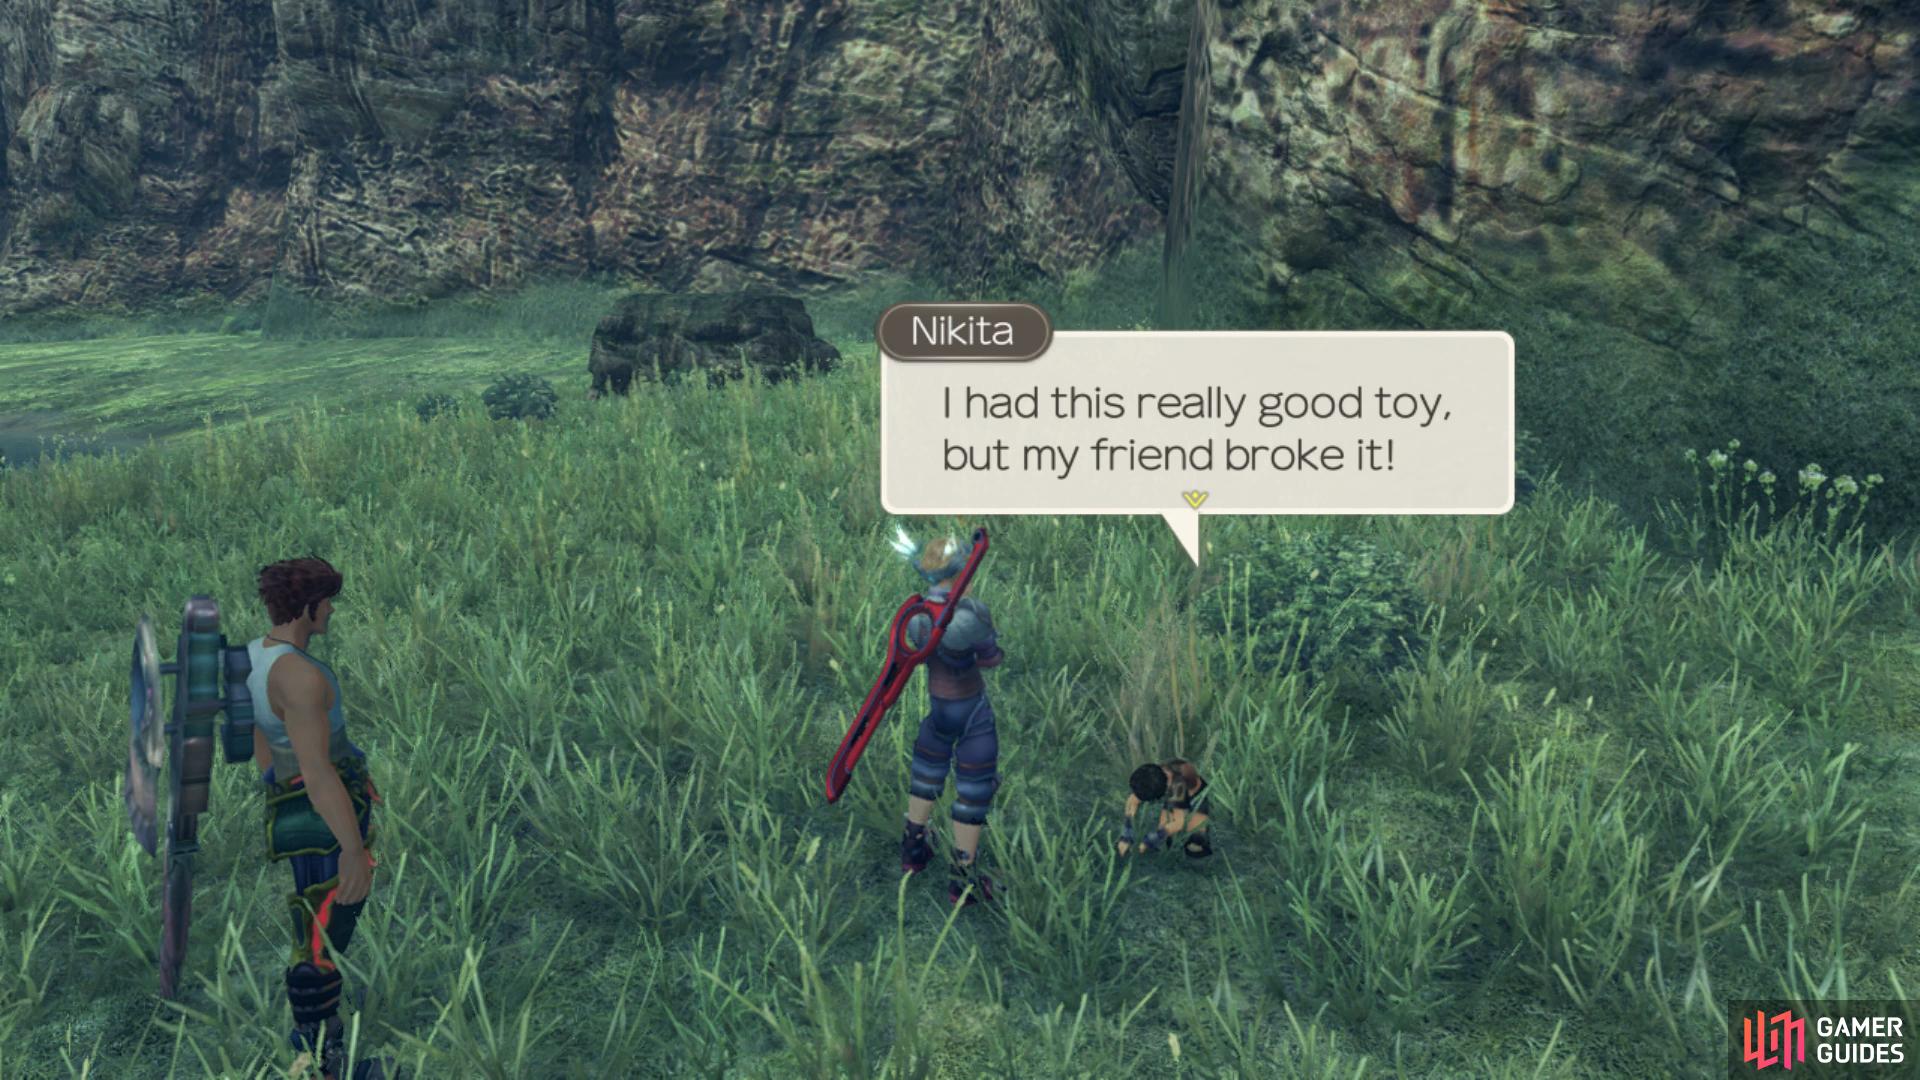
Being a Good Grandfather
Satata’s grandson has broken a toy belonging to his friend, so Satata asks you to go retrieve 3 Sticky Web Fibre from Arachnos to help fix it. As with a lot of items for quests, you can trade for Sticky Web Fibre with Emmy Leater in Colony 9, but this requires an Affinity of two stars with that settlement. To find the enemies that drop it, look no further than the Kisk Cave right by the Refugee Camp. There are a good number of Leg Arachnos in there and they can drop the Sticky Web Fibres. Return to Satata with the items to have him fix the toy and hand it over. Bring the toy to Kiroki, then report back to Satata to finish. Once you complete this Quest, be sure to pick up the follow up The Greedy Monster.
A Thoughtful Idea
Pama is feeling the pain of losing his parents, so Matryona has an idea to try and bring a smile back to his face. Pay Ewan, the author, a visit, who is available throughout the entire day. Ewan says he doesn’t want anything to do with it, but after pestering him a bit more, he decides he will do it for some Ponio Neck Meat, three pieces to be exact. This item is the rarer of the two drops for the Field Ponios, which only spawn during the day. Once you have the necessary items, bring them back to Ewan, then report to Matryona to finish. Upon completing this Quest, speak to Ewan once more to accept A Dash of Colour.
A Dash of Colour
Ewan got some inspiration from Matryona, so he needs some Sour Gooseberries in order to make the paints for the book. Sour Gooseberries are one of the items for the Collectopaedia, meaning you will need to hunt them down from the blue orbs all over the Bionis’ Leg area. However, if you find Kiroki (06:00 - 18:00), then you can trade for them. You need four Gooseberries, so get them all and return to Ewan. He wants you to bring the items to Matryona, so do that and go back to Ewan to finish the quest. Upon completing this Quest, you’ll be able to accept the next one from Matryona Imaginations Tempered and one from Arda, Spirits Raised.
Spirit’s Raised
Upon accepting Imaginations Tempered, you can speak to Arda to begin this quest. Arda is happy that Matryona is making a picture book for Pama, but regrets her sickness keeping her from watching over him all the time. She would like you to get a Medicinal Herb to help her get better, which is located near Raguel Lake. Fast travel to the Raguel Bridge - North waypoint, then follow the cliffside to the south. This isn’t by the water’s edge, but on the cliffside above. Keep going all the way south and at the very end, you will find the red orb. Loot the Medicinal Herb and bring it back to Arda. She says to tell Matryona, who will hand over the picture book for you to give to Pama. Give it to him to finish the quest.
Leap into the water at Raguel Bridge
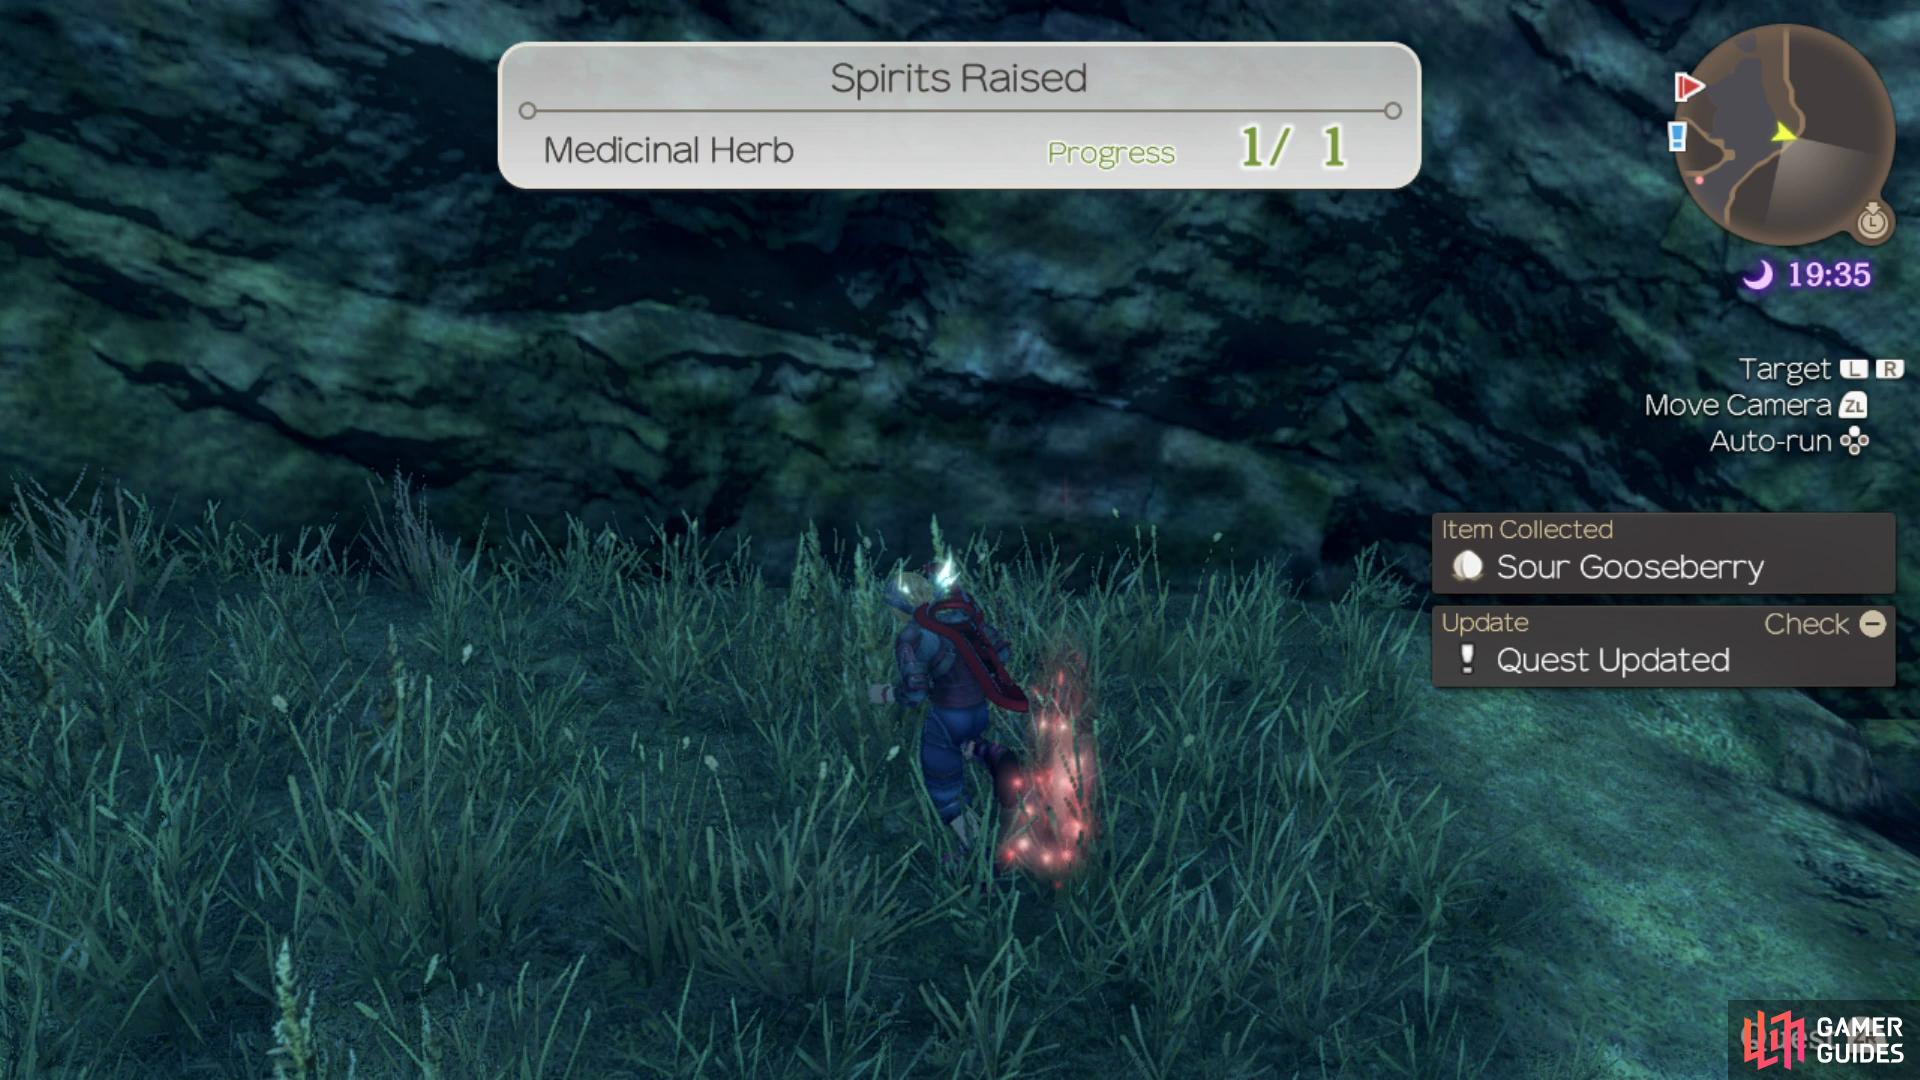
and climb up the the vines to the northeast to reach the Medicinal Herb.
Thieving Monsters
Tirkins took the Refugees’ clothes while they were hanging out to dry. They took their clothes back to the Tirkin Headquarters, which is located to the northwest of the Refugee Camp. If you’ve been exploring and discovered Rho Oasis, then the Tirkin HQ will be just north of it, through a little cave entrance. This place can be really dangerous, as there is a Tirkin Guard in the tunnels that will run away and alert a good number of other Tirkins, who will all come after you. So, you can either wait until you get a third party member or wait a bit until you’re leveled enough where the enemies don’t aggro anymore. Either way, you only need to run in real quick, grab the red shiny on the ground, then quickly leave the same way you entered. Return the clothes to Gorman to complete the quest.
The Greedy Monster
This quest becomes available from Satata whenever you finish Being a Good Grandfather. The residents are finding it difficult to catch fish, as there is a monster that has settled by Raguel Lake. The Abnormal Brog can be found on the large island in the middle of Raguel Lake. It is level 16 and shouldn’t prove to be too much trouble. Defeat the creature, then return back to the camp to report it to Satata.
Earnest’s Fibs
Earnest tells you that there is an everlasting ether deposit very close by. Exit the Refugee Camp and follow the southern edge of the map to the east, only deviating to get on top of the hill right there. There will be a cave entrance, leading to a small cave with some Arachnos and Vangs. Ignore them, if you can, and inspect the Electric Ether Deposit to see that it is normal. Note that doing this will spawn five Fierce Vangs, who aggro on sight (they are level 14). You don’t have to fight them, so do whatever you want and report back to Earnest to complete the quest. Upon completing this, you’ll be able to accept the next one.
Earnest’s Mischief
Speak with Earnest again, after completing Earnest’s Fibs, to see that he has another ether deposit to look for, which is located in a cave on the edge of Raguel Lake. This cave is actually Tranquil Grotto, which is southeast of the bridge, in the water. Once you arrive in the cave, inspect the ether deposit like before and a level 17 Assault Flamii will spawn, instantly aggroing to you. As before, you don’t need to actually fight it, so do whatever you want and return to Earnest to complete the quest.
The second item for Memories of a Lost Son is in the cave towards the Secret Area
these grant a lot more EXP than regular locations.
To complete the next set of Quests, you’ll need to progress the story by heading across the bridge so make your way to Raguel Bridge, past the Mechon (remember Monado Enchant!) to reach the Story Flag and trigger a cutscene and unlock the Raguel Bridge - South Landmark. Once you regain control, head across the bridge to unlock Raguel Bridge - North Landmark before heading north to register another Heart-to-Heart to your list. Continue further east and you’ll trigger yet another cutscene, leading to a whole new part of Bionis’ Leg and with it, your chance to wrap up the last of Earnest’s Quests.
Earnest’s Solitude
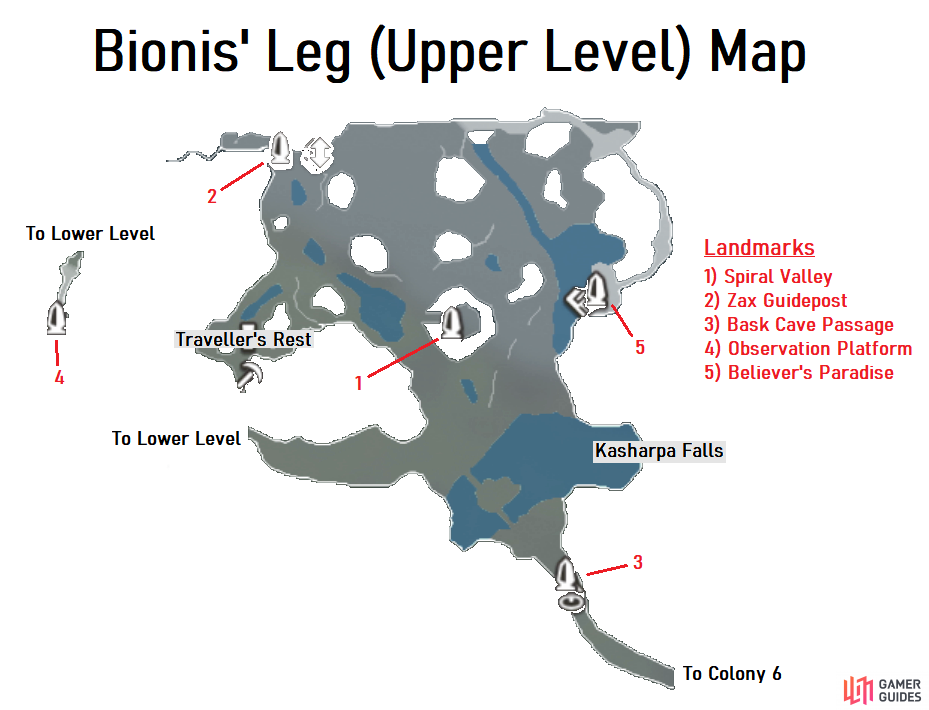
Earnest, who once again was wrong about the everlasting ether deposit, has one more quest for you after finishing up Earnest’s Mischief. He wants you to place flowers on the grave of his friend at the edge of the cliff north of Kasharpa Waterfall. Kasharpa Waterfall is a location in the upper level of Bionis’ Leg, north and a little east of the exit leading to Colony 6. You are going to the northeastern corner of the map, on the base level and not to the ledge up above. There will be a cairn there, so place the offering to have a level 19 Arrogant Tirkin appear. Kill it, then return to Earnest to finish.
This should be the last Unique Quest you have for now and although there’s a few more to pick up, the Story Flag will prevent you from reaching it so go ahead and make your way to the center to trigger a cutscene.
Boss: Mechon M71
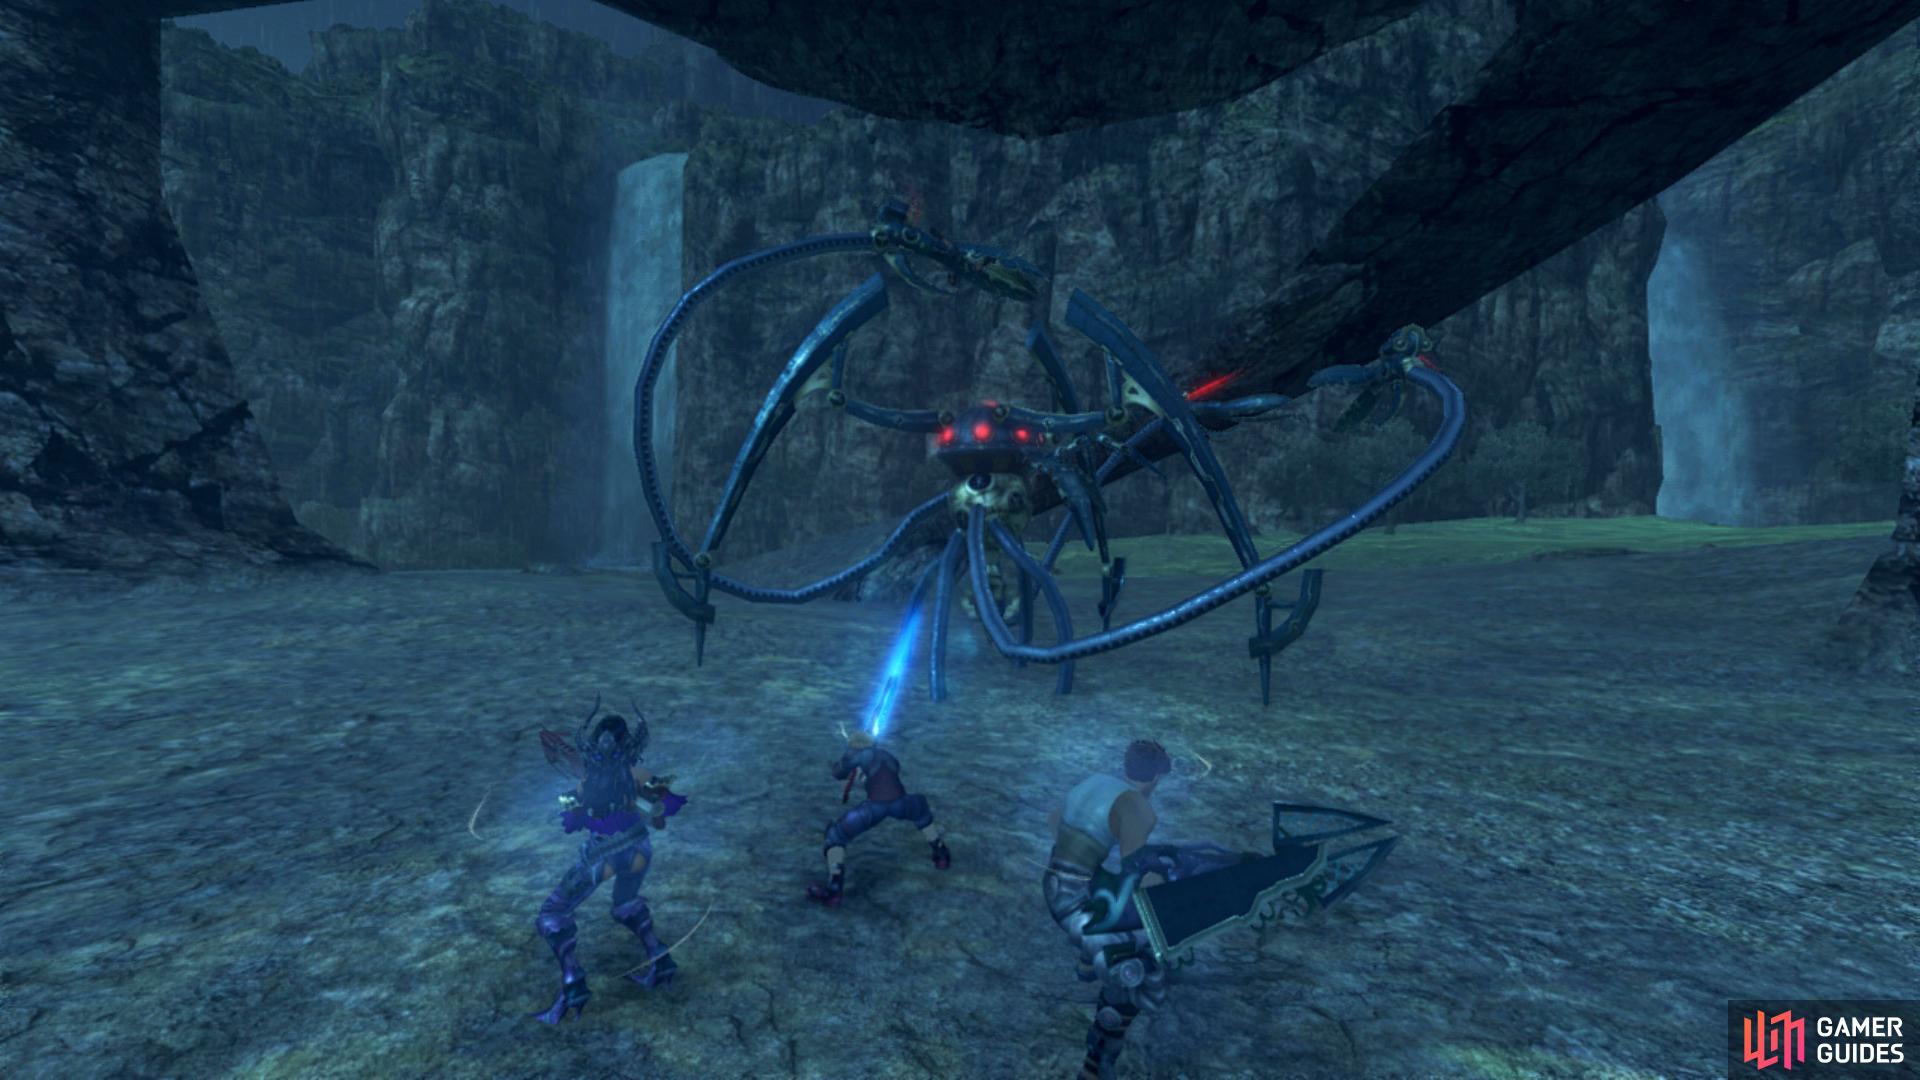
| Enemy | Level | Detection |
|---|---|---|
| Mechon M71 | 18 | Sight |
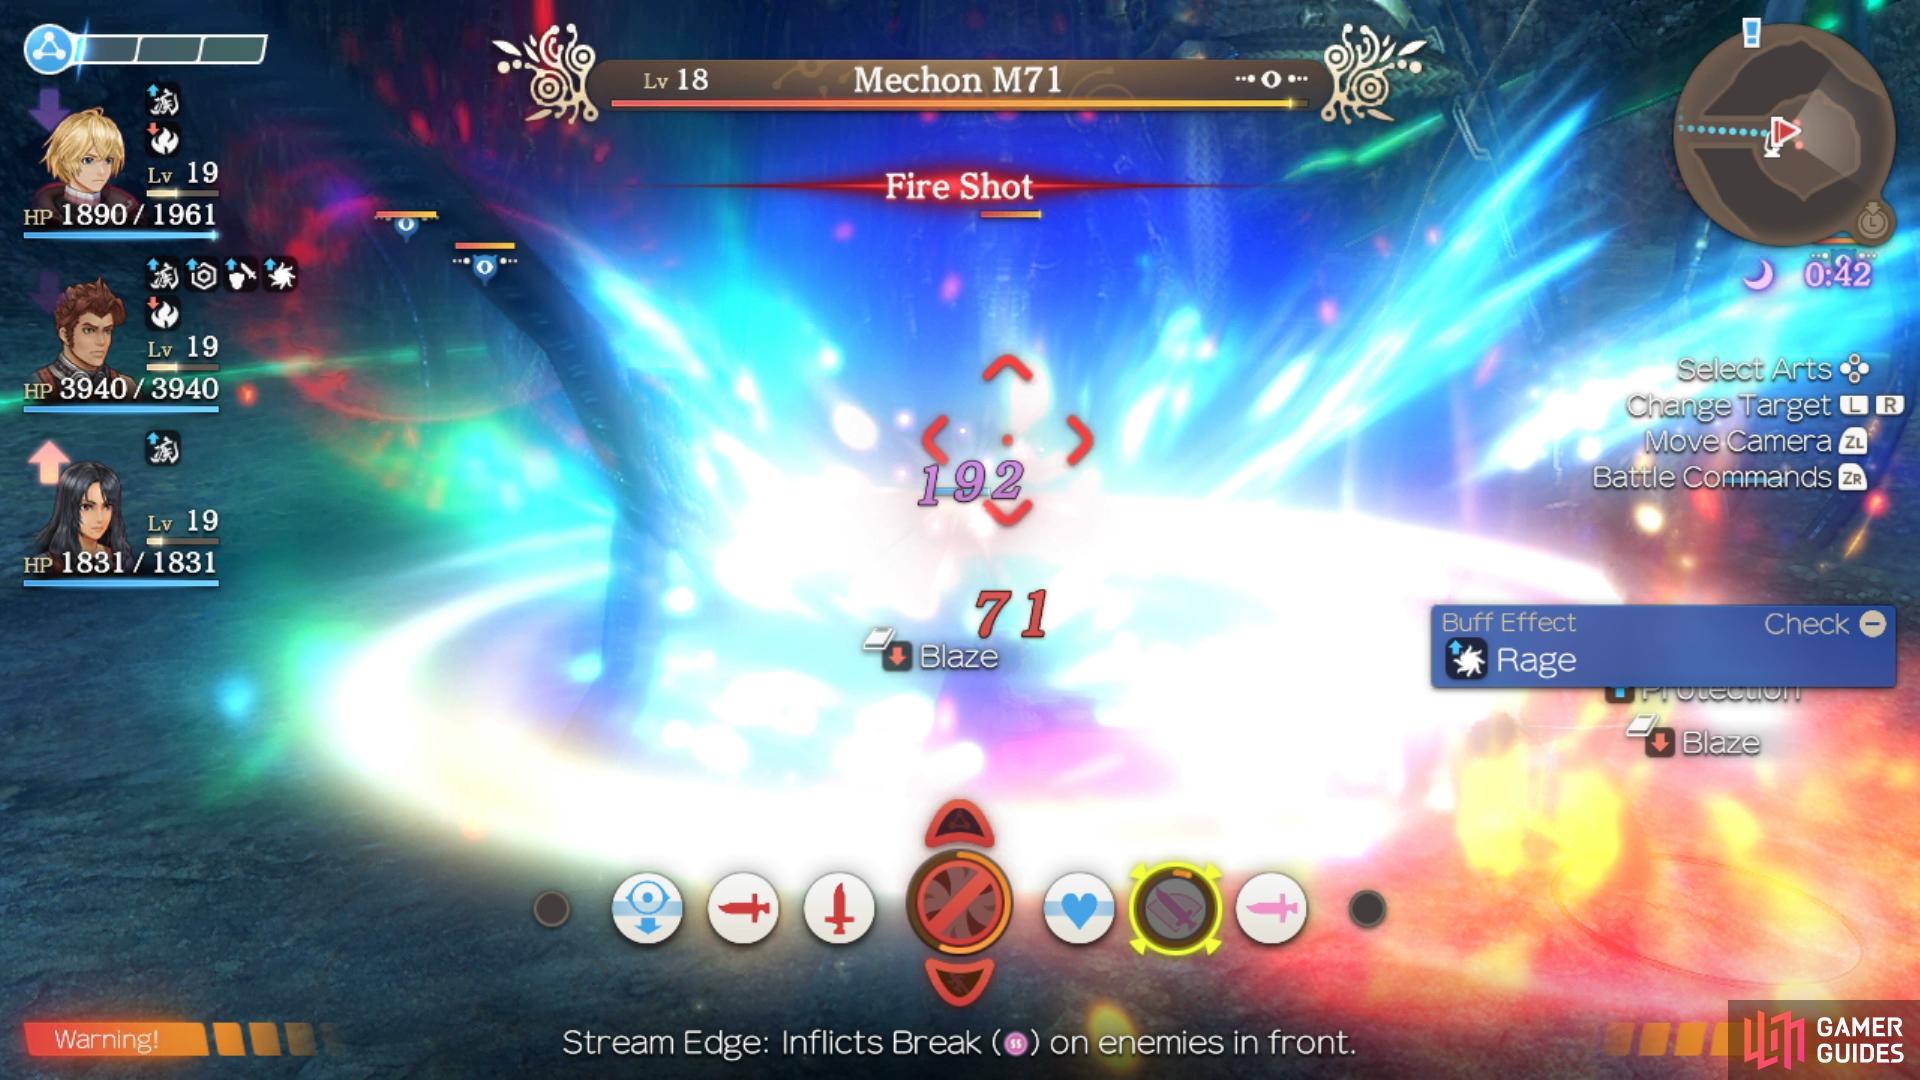
Right at the start of the battle, Shulk will learn the next Monado Art, Monado Speed, which will allow him to increase both Evasion and Speed, a handy Art to be sure. However, your first use of the Monado should be to use Monado Enchant so that your allies can deal damage to the Mechon in front of you. M71 will come with Tentacles that you can aim at but they’re rather insignificant so instead, have the party focus target the M71 itself.
For the first half of the battle, your aim will be to take it under 50% HP so make use of Chain Attacks while using Reyn to manage Aggro and inflict major damage with Shulk’s Back Slash, Air Slash and when available, Monado Buster. M71 has a variety of attacks itself as detailed below:
-
Rapid Tentacle - A Physical Art that is focused on one target that will blow you away if struck by it, not much you can do to avoid except heal through it.
-
Tentacles - Despite the generic name, this Physical Art is deadly as it will deal major damage and Daze to a single target.
-
Fire Shot - An Ether Art that inflicts the target with Blaze, have Sharla cure the Debuff to avoid extra damage from the status effect.
Once you reach the HP threshold, the Mechon M71 will move to the platform above it giving you the chance to access your menu, level up any Arts or change any equipment before resuming the battle. The Mechon M71 gains two new Arts in this phase of the battle as follows:
-
Ripple Laser I - This nasty attack is the Mechon M71’s Talent Art and will deal damage in an area in front of it, be sure to make use of Monado Shield to limit the damage it deals.
-
Generator Power - Mechon M71 won’t use this until you get it well under 30% HP but when it does, this Art will grant it the Awakening buff which will grant an aura that raises its Level making it nastier all around. You can disable this Aura by inflicting Daze upon it however you don’t have the means to do that right now.
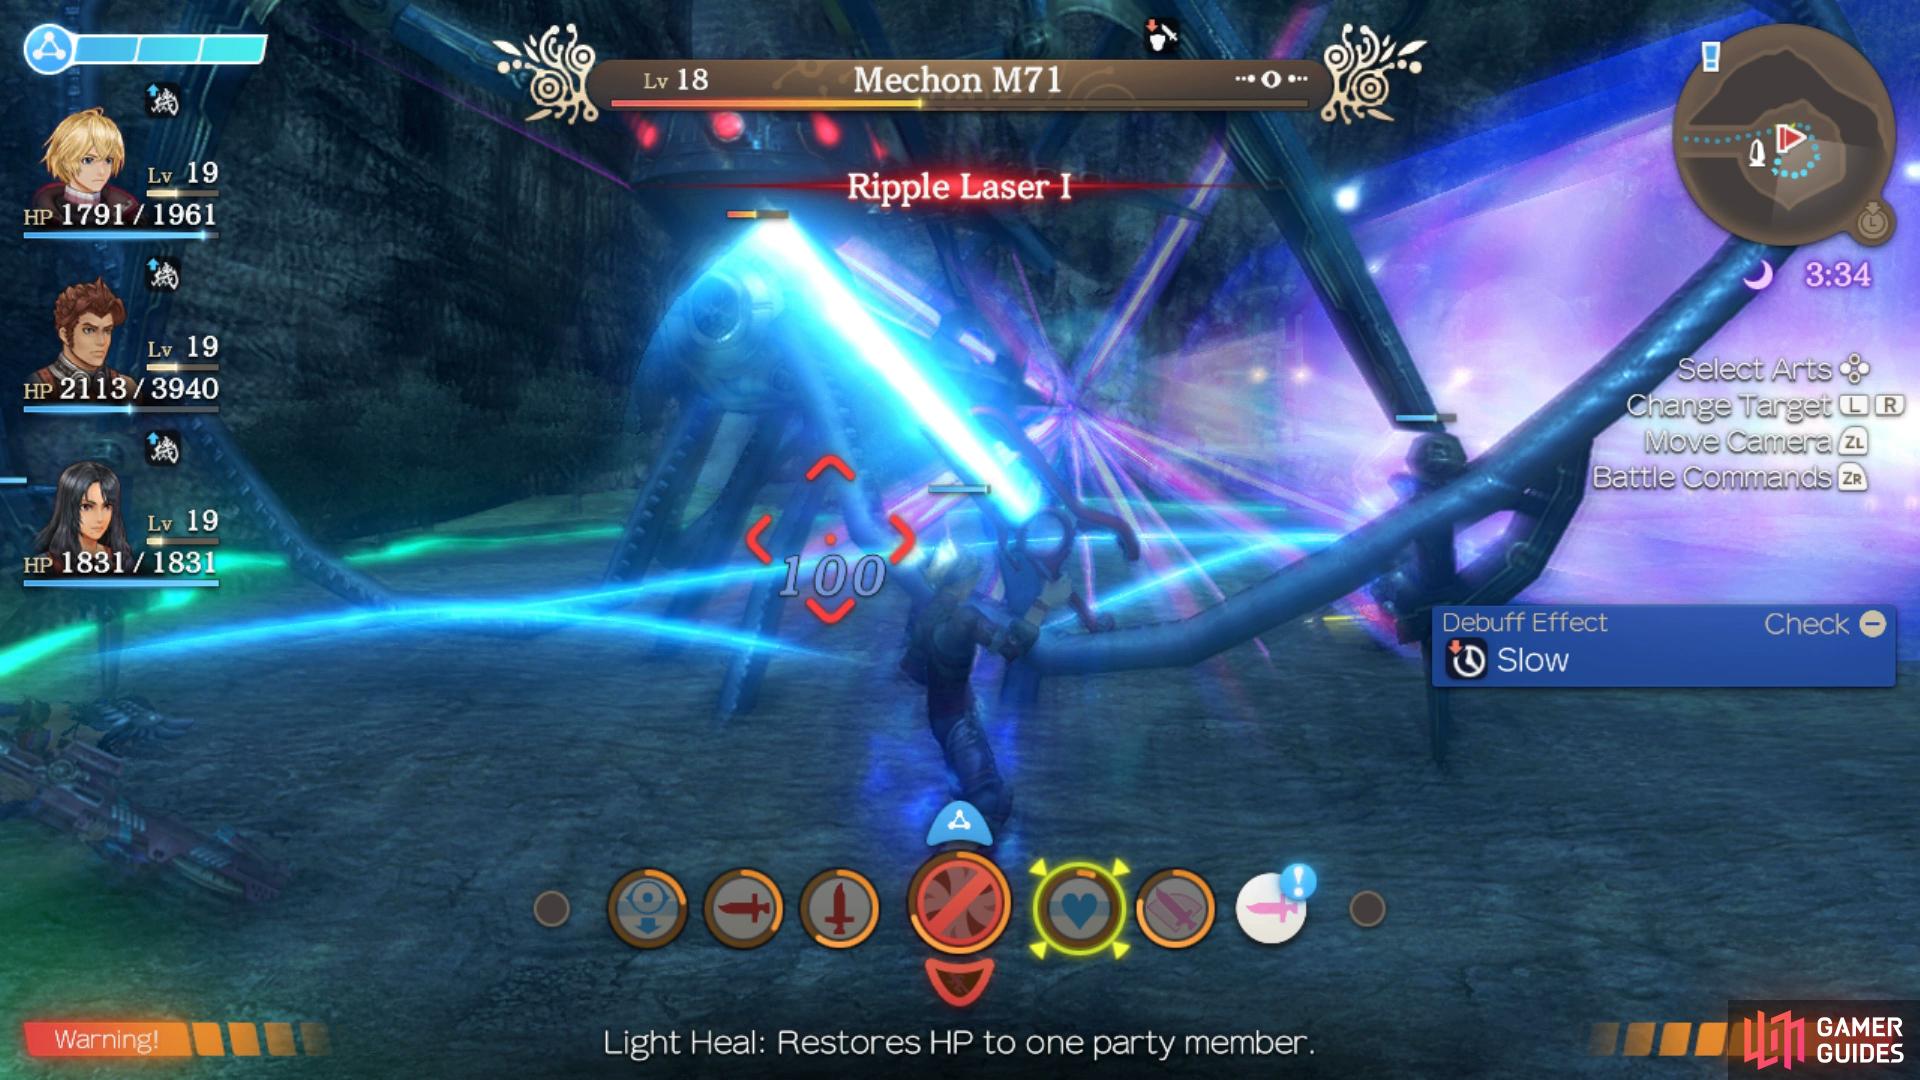
As you can see, Generator Power is the real one to watch out for, try to save your Party Gauge so that you can make use of a Chain Attack around 30% HP to try and limit the amount of time you need to deal with Awakening.
Watch the scenes that unfold following your victory and you’ll be forced into another battle against Mysterious Face. Despite what you may think, this battle is unwinnable so instead focus on survival, keeping your HP up before the battle and Chapter comes to an end.
No Comments