
The Find the Githyanki Creche quest is one of the first that you’ll encounter in Baldur’s Gate 3. It’s a subquest of the ![]() Find a Cure main quest, and it also overlaps with
Find a Cure main quest, and it also overlaps with ![]() The Githyanki Warrior companion quest, which is associated with
The Githyanki Warrior companion quest, which is associated with ![]() Lae’zel. There’s a lot to cover when you find the creche, also known as
Lae’zel. There’s a lot to cover when you find the creche, also known as ![]() Creche Y’llek, and you’ll have the opportunity to explore the Infirmary, Classroom, Hatchery, Captain’s Quarters, and more. You will also need to make a decision related to the mysterious artefact which
Creche Y’llek, and you’ll have the opportunity to explore the Infirmary, Classroom, Hatchery, Captain’s Quarters, and more. You will also need to make a decision related to the mysterious artefact which ![]() Shadowheart carries, related to the Discover the Artefact’s Secrets quest. On this page we’ll take you through where to find the Githyanki Creche, and all that you can do inside, including optimal outcomes.
Shadowheart carries, related to the Discover the Artefact’s Secrets quest. On this page we’ll take you through where to find the Githyanki Creche, and all that you can do inside, including optimal outcomes.
Ghustil Stornugoss in the Githyanki Creche, Baldur’s Gate 3.
Where Is the Githyanki Creche in the Mountain Pass?
The first objective that you’ll receive related to the Find the Githyanki Creche quest is to find an NPC named Zorru. This is a Tiefling who may be able to help with identifying the location, and you can find them in the northwestern part of the ![]() Wilderness map. The exact location will be marked on your map, but note that Zorru will move on after a while if you choose to proceed with other objectives in the region first (namely killing the three leaders at the Goblin Camp and saving the refugees). There’s no need to worry if this happens, though, since all Zorru does is point you in the direction of an old bridge in the far northwest of the Wilderness, just west of
Wilderness map. The exact location will be marked on your map, but note that Zorru will move on after a while if you choose to proceed with other objectives in the region first (namely killing the three leaders at the Goblin Camp and saving the refugees). There’s no need to worry if this happens, though, since all Zorru does is point you in the direction of an old bridge in the far northwest of the Wilderness, just west of ![]() Waukeen’s Rest.
Waukeen’s Rest.
Should You Give the Artefact to the Githyanki?
Once you reach this bridge, a cutscene will begin during which a group of Githyanki (who are looking for the mysterious artefact that Shadowheart carries) are introduced. If Shadowheart isn’t in your party, you will be carrying it by default and you’ll need to decide whether you want to reveal this fact or not. In truth, it doesn’t matter much whether you reveal the artefact at this point or not, other than the impact it will have on Shadowheart’s approval of you. If Lae’zel is in your party, she will approve if you allow her to speak with the Githyanki, but she won’t mind if you choose to hide it from them.
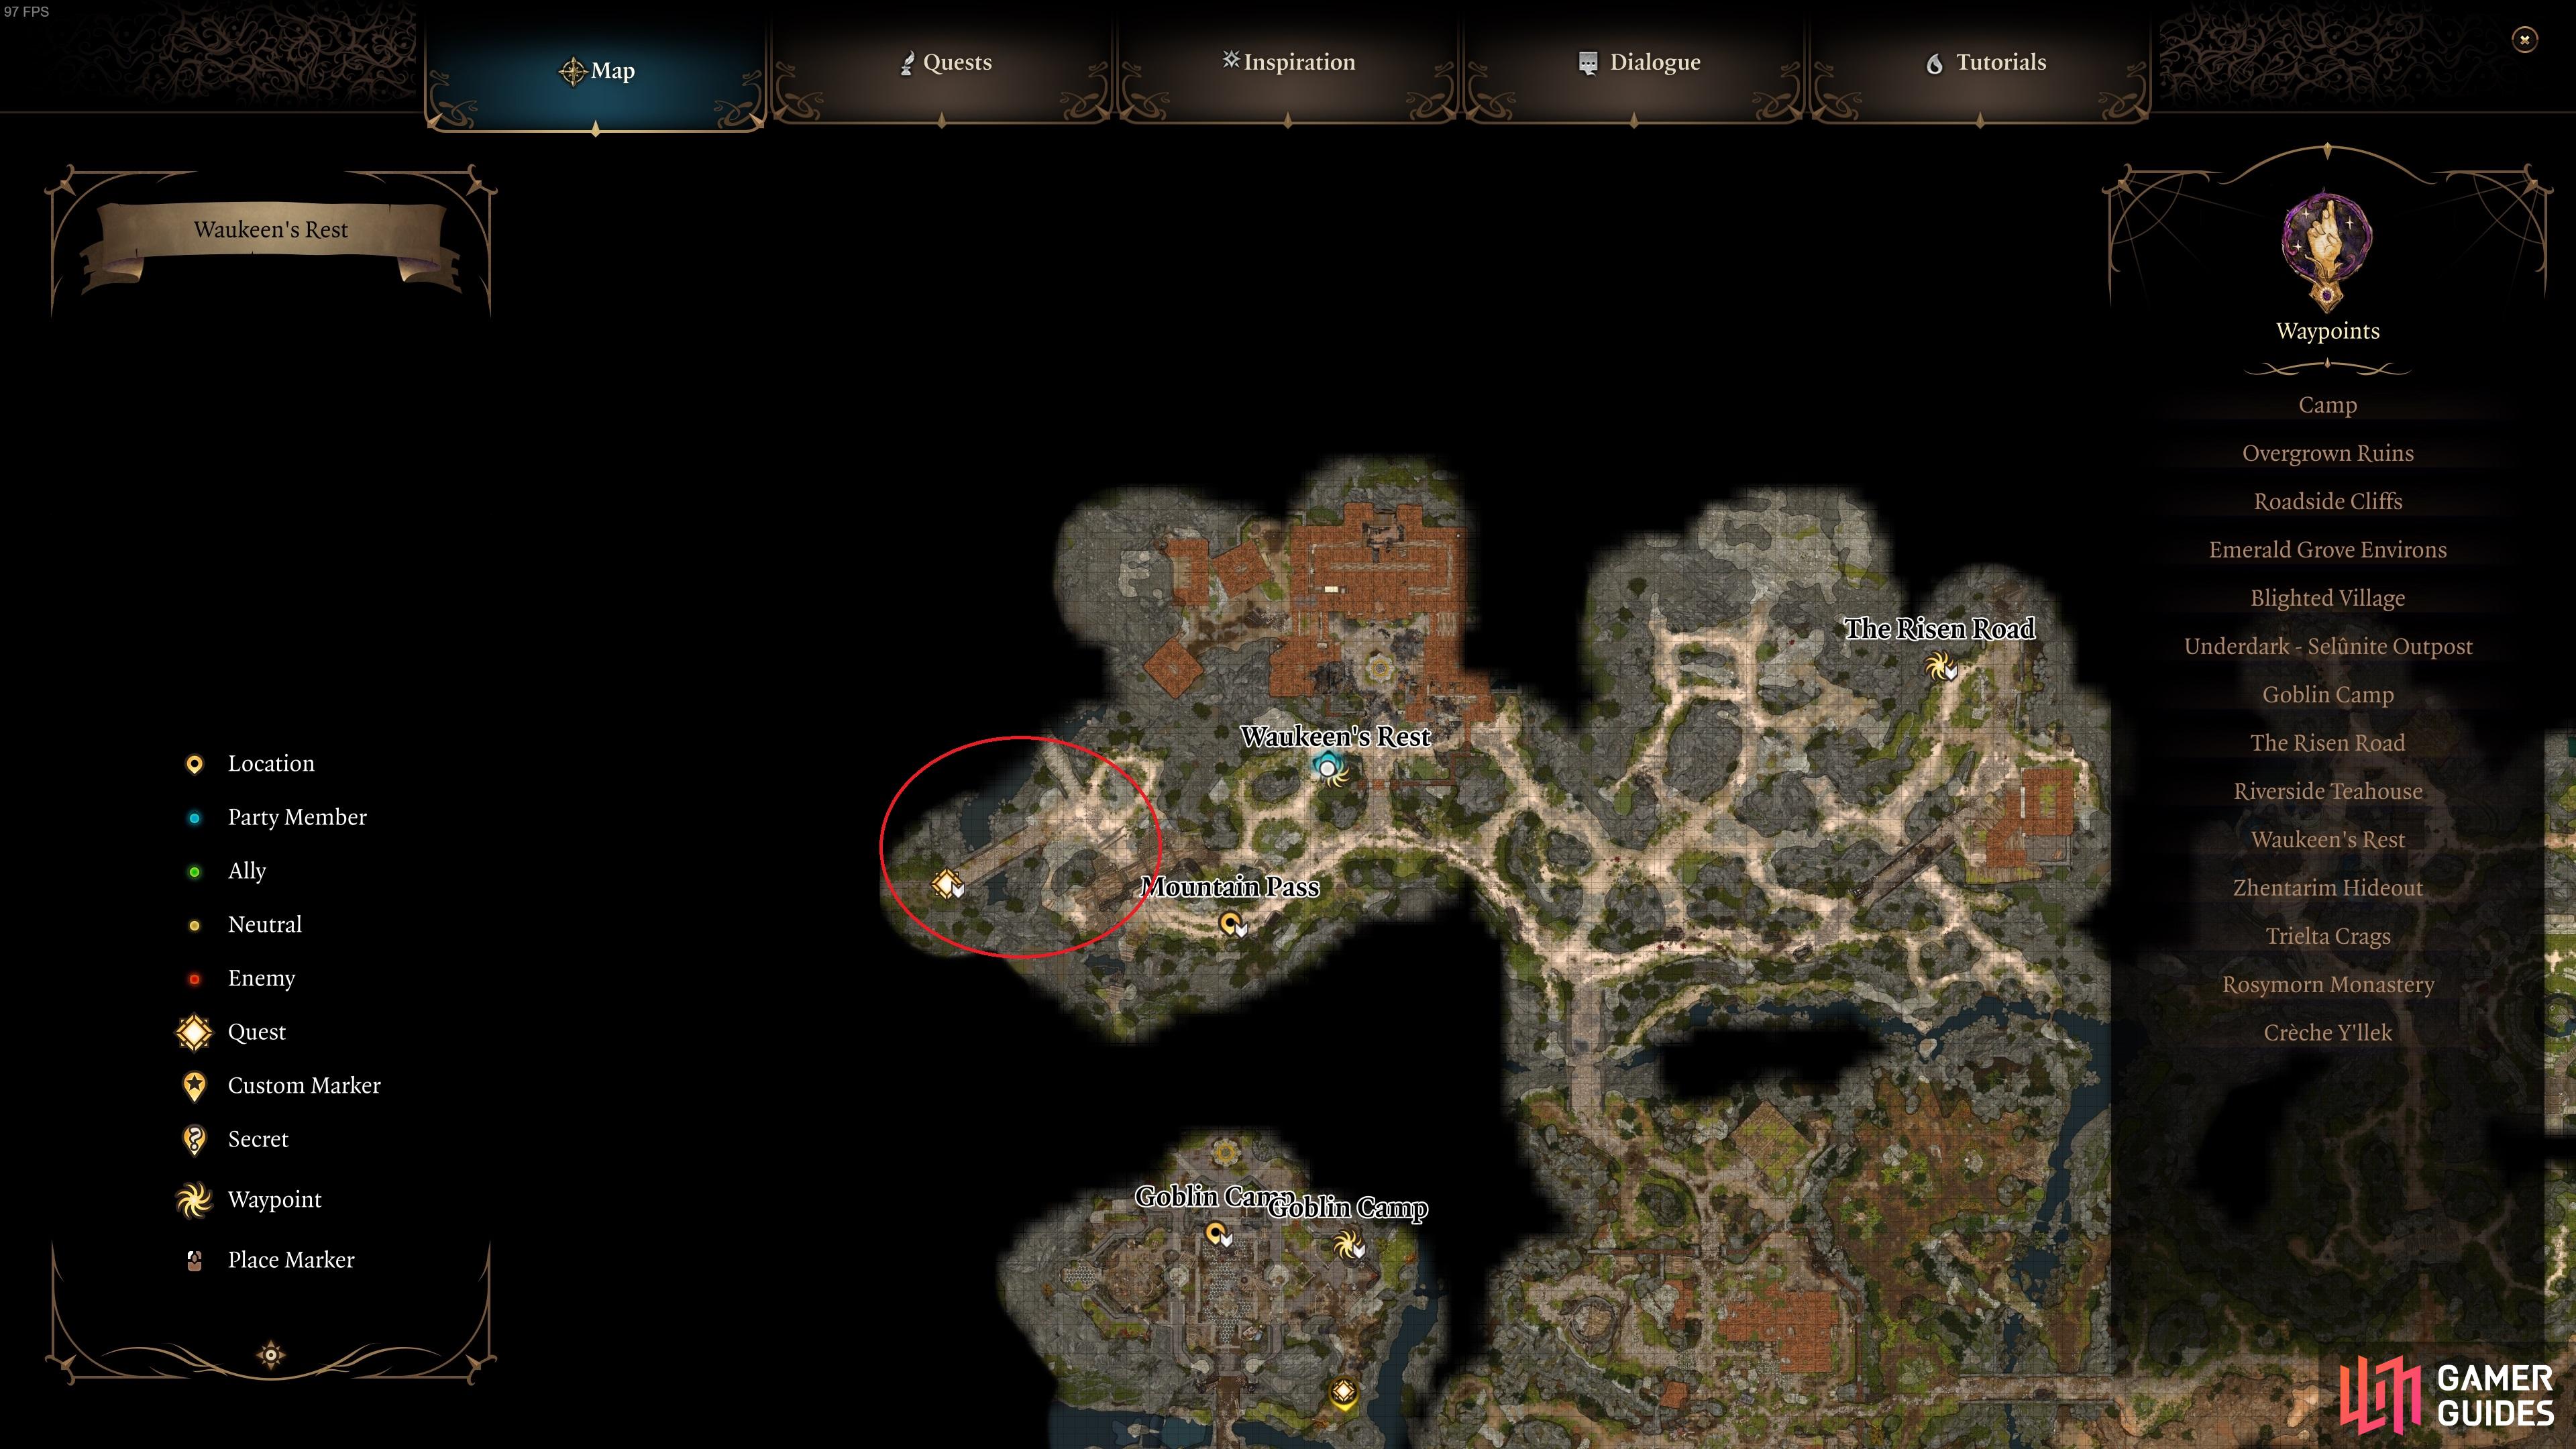
The Githyanki group and the path to the Mountain Pass over the bridge can be found in the circled area here.
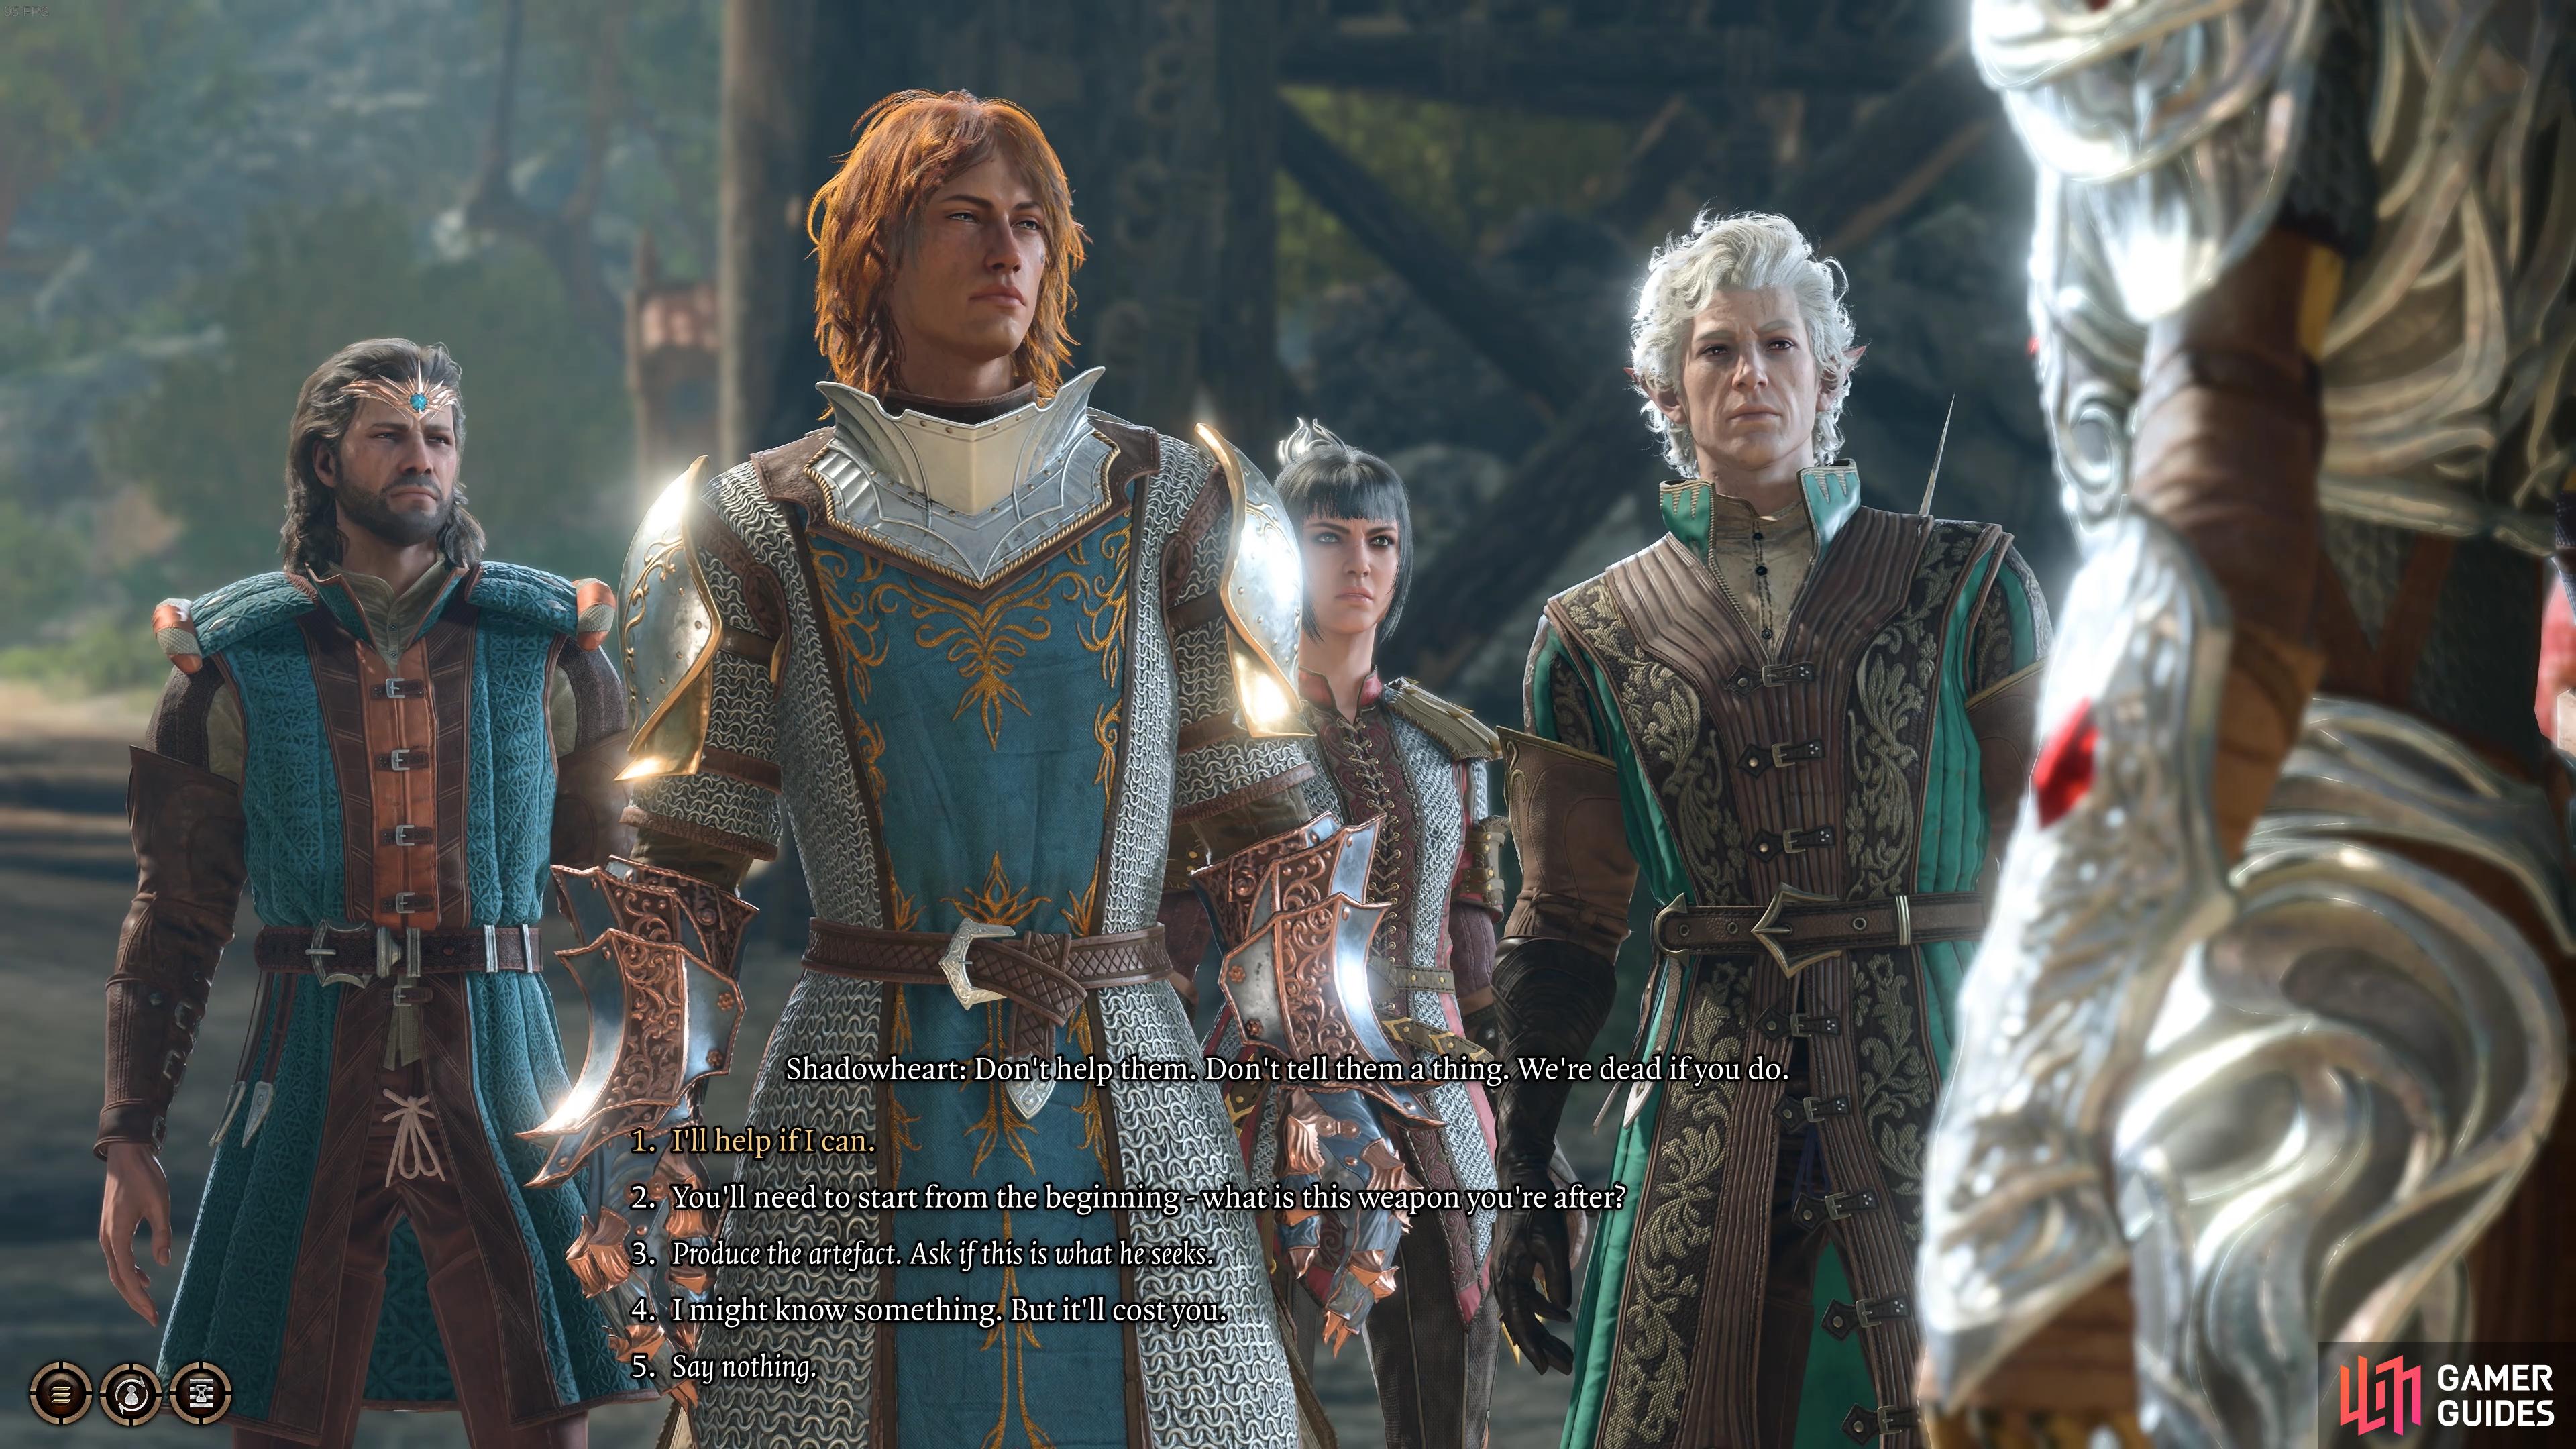
You’ll need to pass dialogue roll checks to pass without bloodshed, or fight the Githyanki to the death.
Where to Find the Githyanki Creche Beneath Rosymorn Monastery
However you choose to death with the Githyanki on the bridge, the next thing you’ll need to do is continue to the ![]() Mountain Pass, which can be accessed just over the bridge to the west. Once you’re on the other side you’ll be in the first part of the Mountain Pass region, with the Trielta Crags waypoint just ahead. From here, make your way northeast until you reach the
Mountain Pass, which can be accessed just over the bridge to the west. Once you’re on the other side you’ll be in the first part of the Mountain Pass region, with the Trielta Crags waypoint just ahead. From here, make your way northeast until you reach the ![]() Rosymorn Monastery, using the nearby rope lift to reach it if necessary. As you approach the entrance to the monastery another cutscene will begin, revealing the cruelty of the Githyanki towards those who they suspect as thieves. You can expect the same treatment if you reveal that you have the artefact.
Rosymorn Monastery, using the nearby rope lift to reach it if necessary. As you approach the entrance to the monastery another cutscene will begin, revealing the cruelty of the Githyanki towards those who they suspect as thieves. You can expect the same treatment if you reveal that you have the artefact.
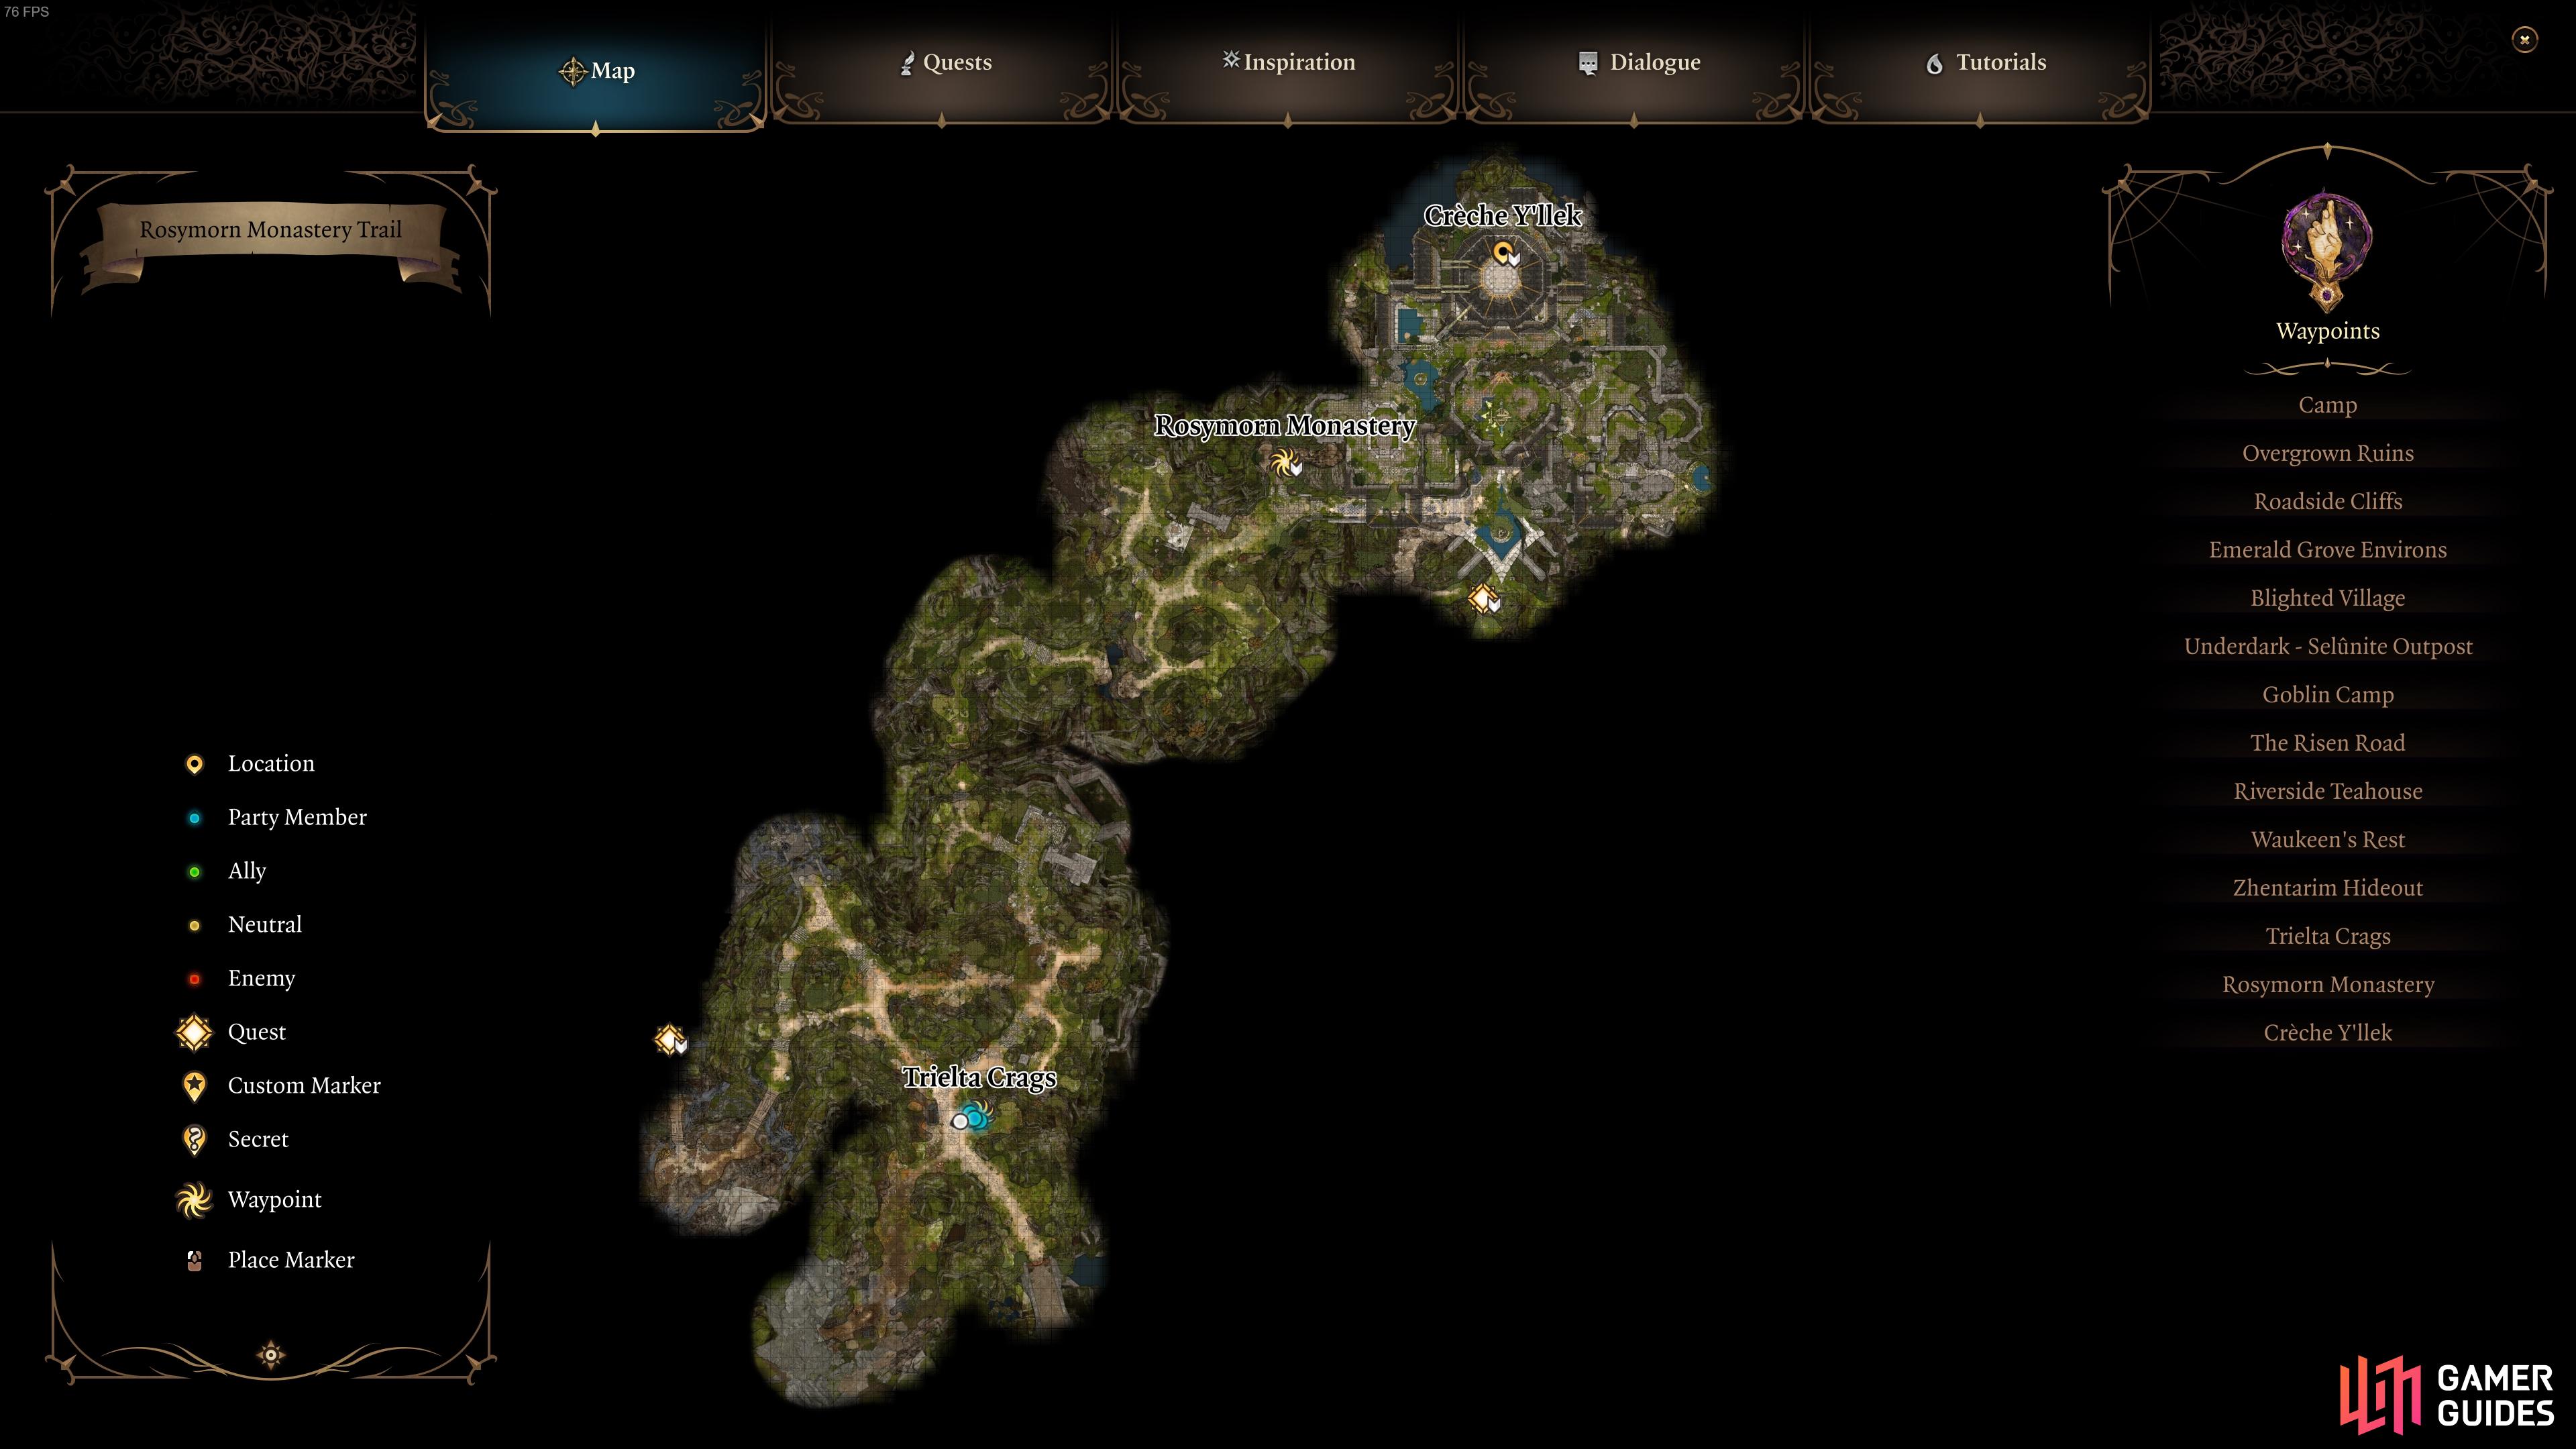
A map of the Mountain Pass, showing the Trielta Crags in the south, with the Rosymorn Monastery and Githyanki Creche in the north.
Now that you’re at the entrance to the Rosymorn Monastery, there are multiple ways inside. Some of these involve climbing vines on the western side, but we recommend avoiding this for now since you’ll start a fight with some tricky creatures who only get more powerful if you use any spells around them. Instead, look for the knotted roots above the boxes, just to the west of the main entrance to the monastery, as shown in the screenshot below. Climbing up here will give you a safer path inside, and you’ll notice many rooms that you can enter to explore the monastery further. You can do this now if you wish, but if you just want to find the Creche you should proceed using the following instructions:
- Head north from the balcony that you just climbed to, and turn right (east) when you reach the barricade
- Continue east by jumping over the gap in the floor, which is damaged by tree branches
- Turn right (south) until you reach the large door to your left (not the enchanted one), go through it and continue down the steps
- After passing the talking bust, continue down the steps to the north and turn left through the gap in the wall
- Now turn right (north) and go through the Oak Door. You’re now on the other side of the main entrance to the monastery
- Continue west until you see some stairs heading down to the north. Follow these to the bottom to find the entrance to the Githyanki Creche
It’s a good idea to open the main entrance doors to the monastery before you head down to the Githyanki Creche, since you can only open them from the inside and it’ll be easier for you to return in the future.
You will need to smash through a barricade at the bottom of the stairs near to where the talking bust is, but don’t worry; you won’t alert any enemies in the process. You can use regular melee attacks, or any spell that will destroy it quickly, such as ![]() Fireball. If you’re still struggling to find the entrance using the instructions above, see the images below for a visual aid.
Fireball. If you’re still struggling to find the entrance using the instructions above, see the images below for a visual aid.
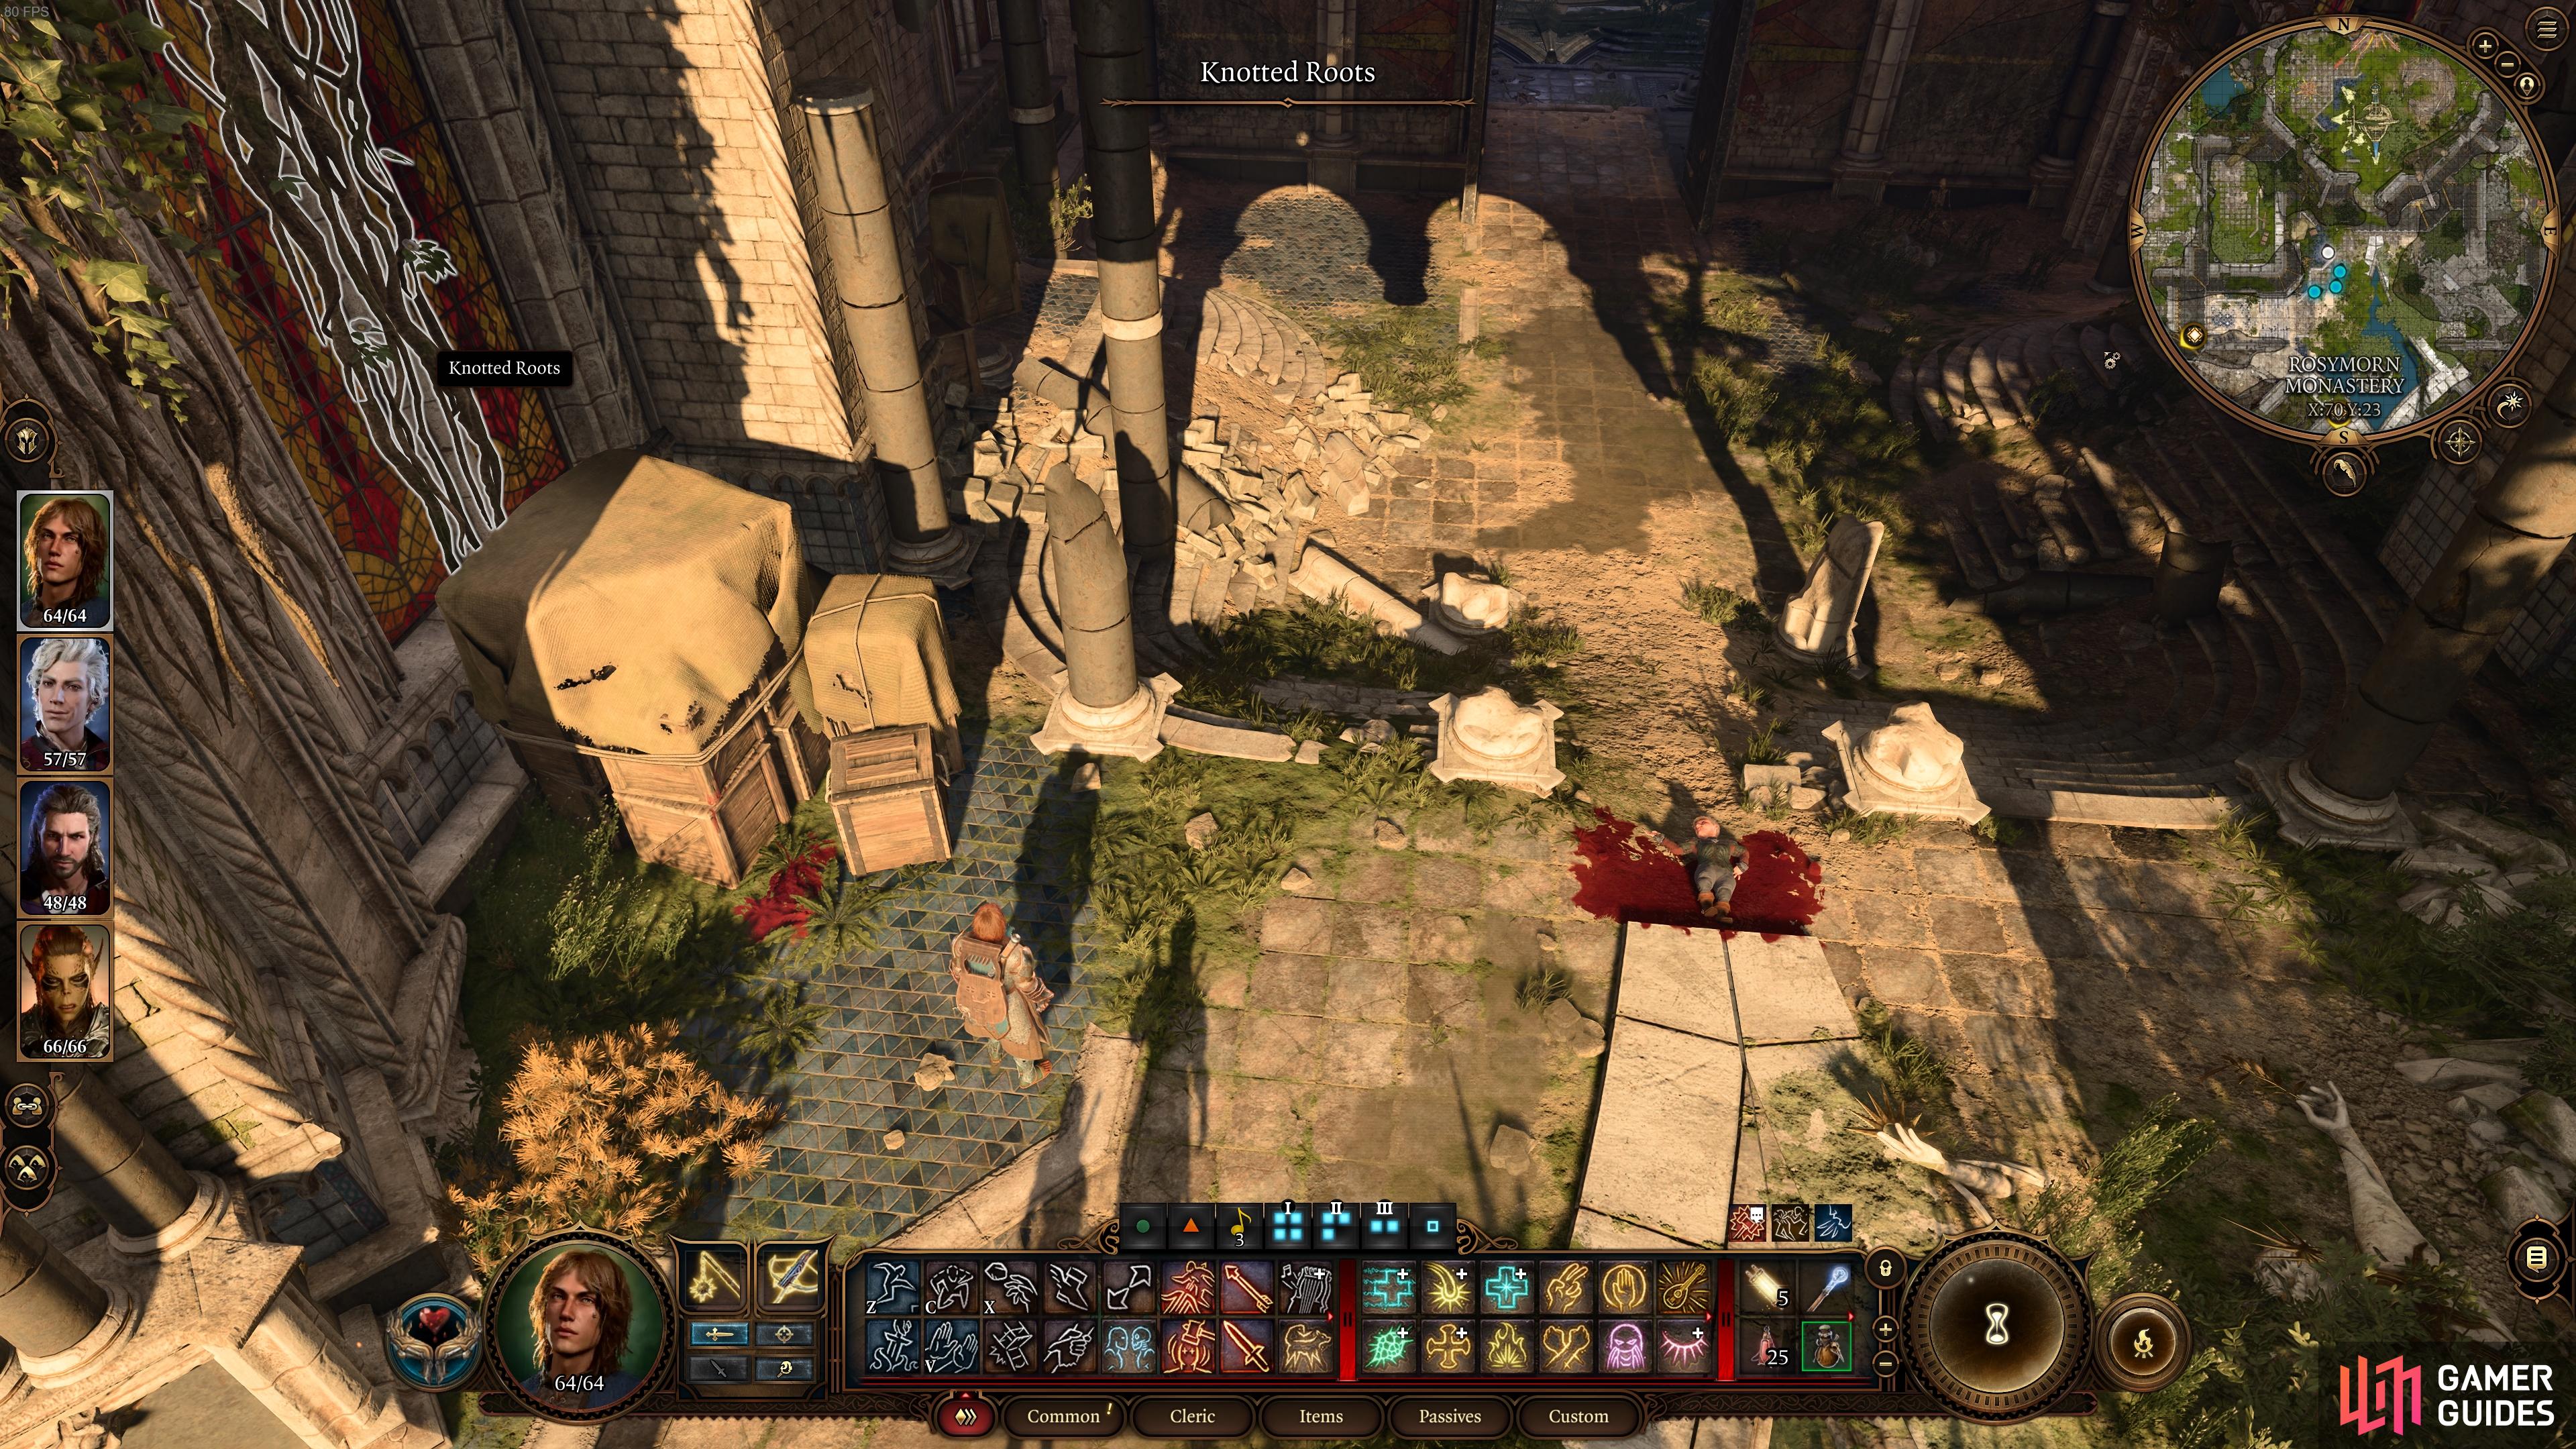
(1 of 6) Look for these Knotted Roots to the left of the main entrance of the monastery.
Find the Githyanki Cure in the Infirmary of the Creche
Now that you’re inside the Githyanki Creche, you’ll need to speak with the nearby sentries and make your purpose known. You’ll have a number of options here, but unless you’re of an appropriate level and confident in your combat abilities (and if you don’t care about upsetting Lae’zel), fighting the Githyanki at this point should be low on your list. Instead, you can convince them to let you pass using a number of roll checks based on your character’s strengths, or you can simply state that you’re here with orders from Captain Voss.
Explore the Creche Y’llek - Trade and Steal
Once you’ve gained entry to the main part of the Creche Y’llek using your preferred dialogue choices, you can freely explore it. There’s a lot to see here outside of the main objective for this quest. You’ll find a trader known as A ‘jak’ nir Jeera (aka the Quartermistress) in the southeastern part of the Creche. She sells a decent number of supplies and some good equipment (which you may need for the fight ahead). This is a good opportunity to sell off any unwanted items that may be weighing you down.
You’ll notice a lot of different types of chests strewn about the Creche, most of which can be looted or lockpicked. You’ll need to make sure that none of the nearby Githyanki can see you while you attempt this, though, so it’s best to use a rogue-like character such as ![]() Astarion. If you encountered Lady Esther on the road as you entered the Mountain Pass, you probably learned of her request to acquire a Githyanki egg. You’ll find this in the Hatchery, which is in the northwestern part of the Creche, and you can get the egg using numerous methods, not just stealing or fighting! For a full guide to this, see our Give Lady Esther the Githyanki or Owlbear Egg in BG3? page.
Astarion. If you encountered Lady Esther on the road as you entered the Mountain Pass, you probably learned of her request to acquire a Githyanki egg. You’ll find this in the Hatchery, which is in the northwestern part of the Creche, and you can get the egg using numerous methods, not just stealing or fighting! For a full guide to this, see our Give Lady Esther the Githyanki or Owlbear Egg in BG3? page.
In addition to the above, you’ll also find a Classroom with the extremely grumpy Sa’varsh Kethk instructing students. You can engage in a bit of a dialogue exchange with him here, but we don’t recommend picking a fight.
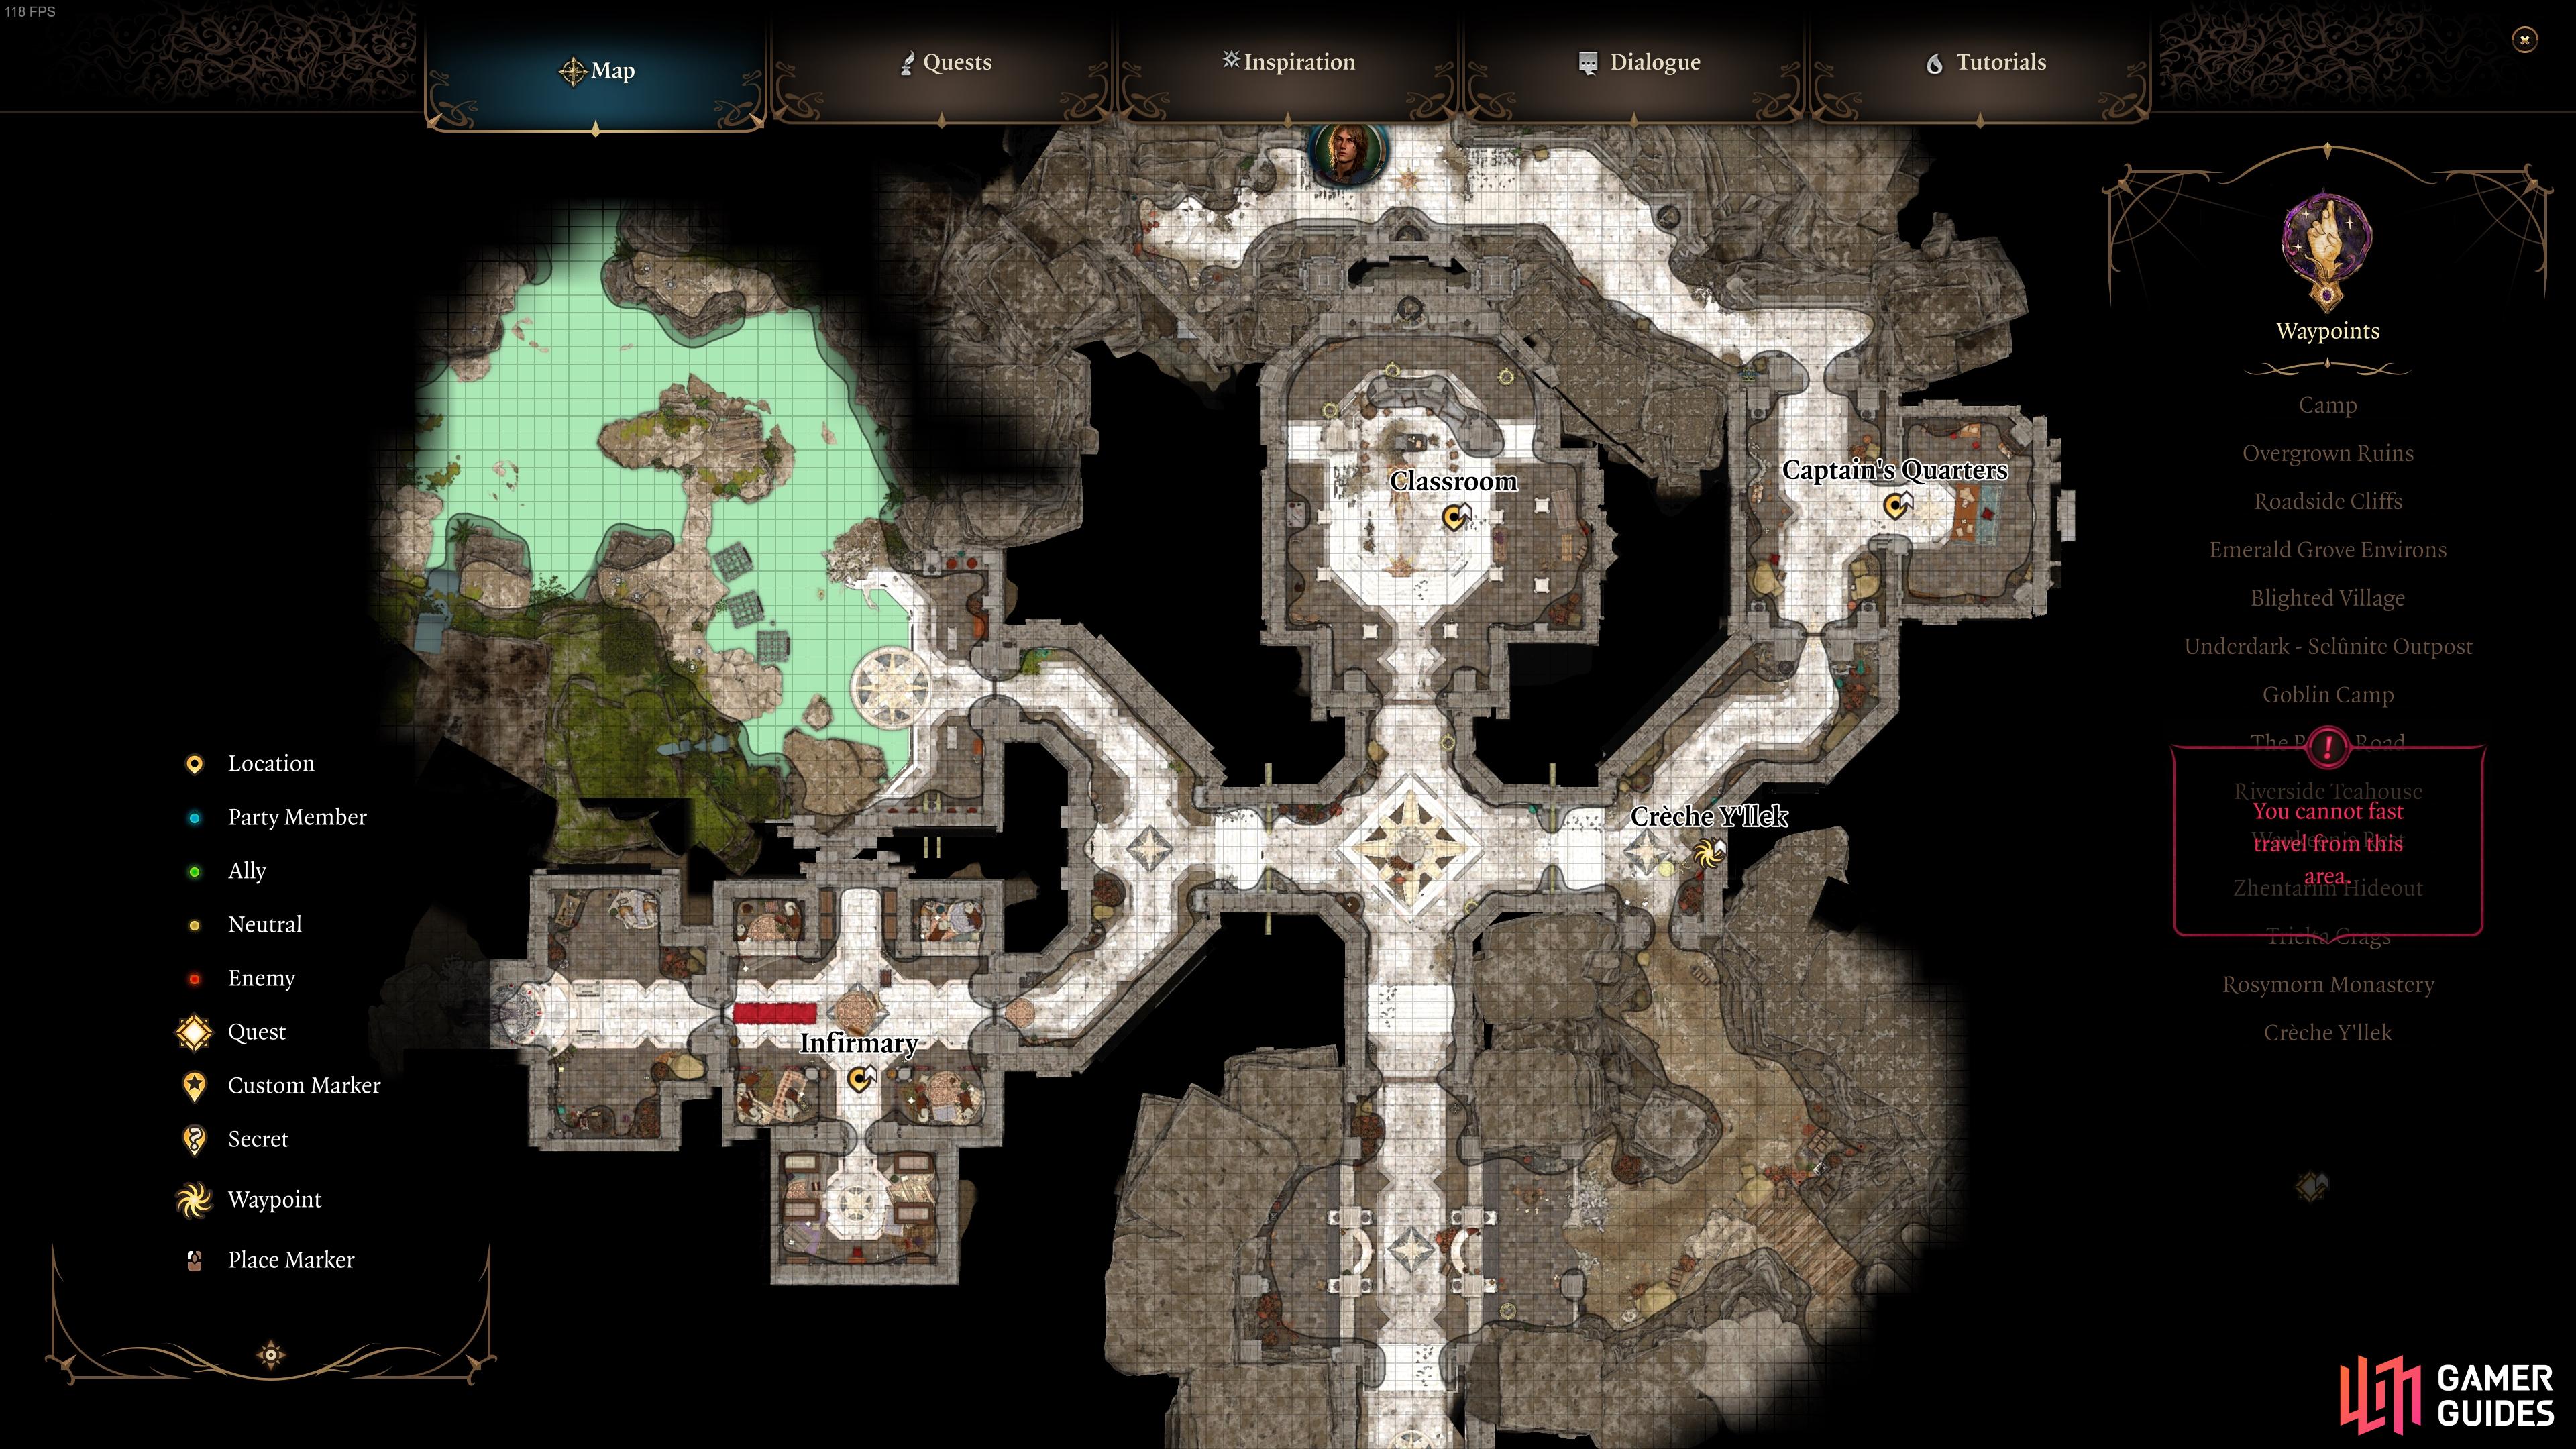
A map of the Creche Y’llek, showing the Infirmary, Captain’s Quarters, Classroom, and the unlabelled Hatchery in the northwest.
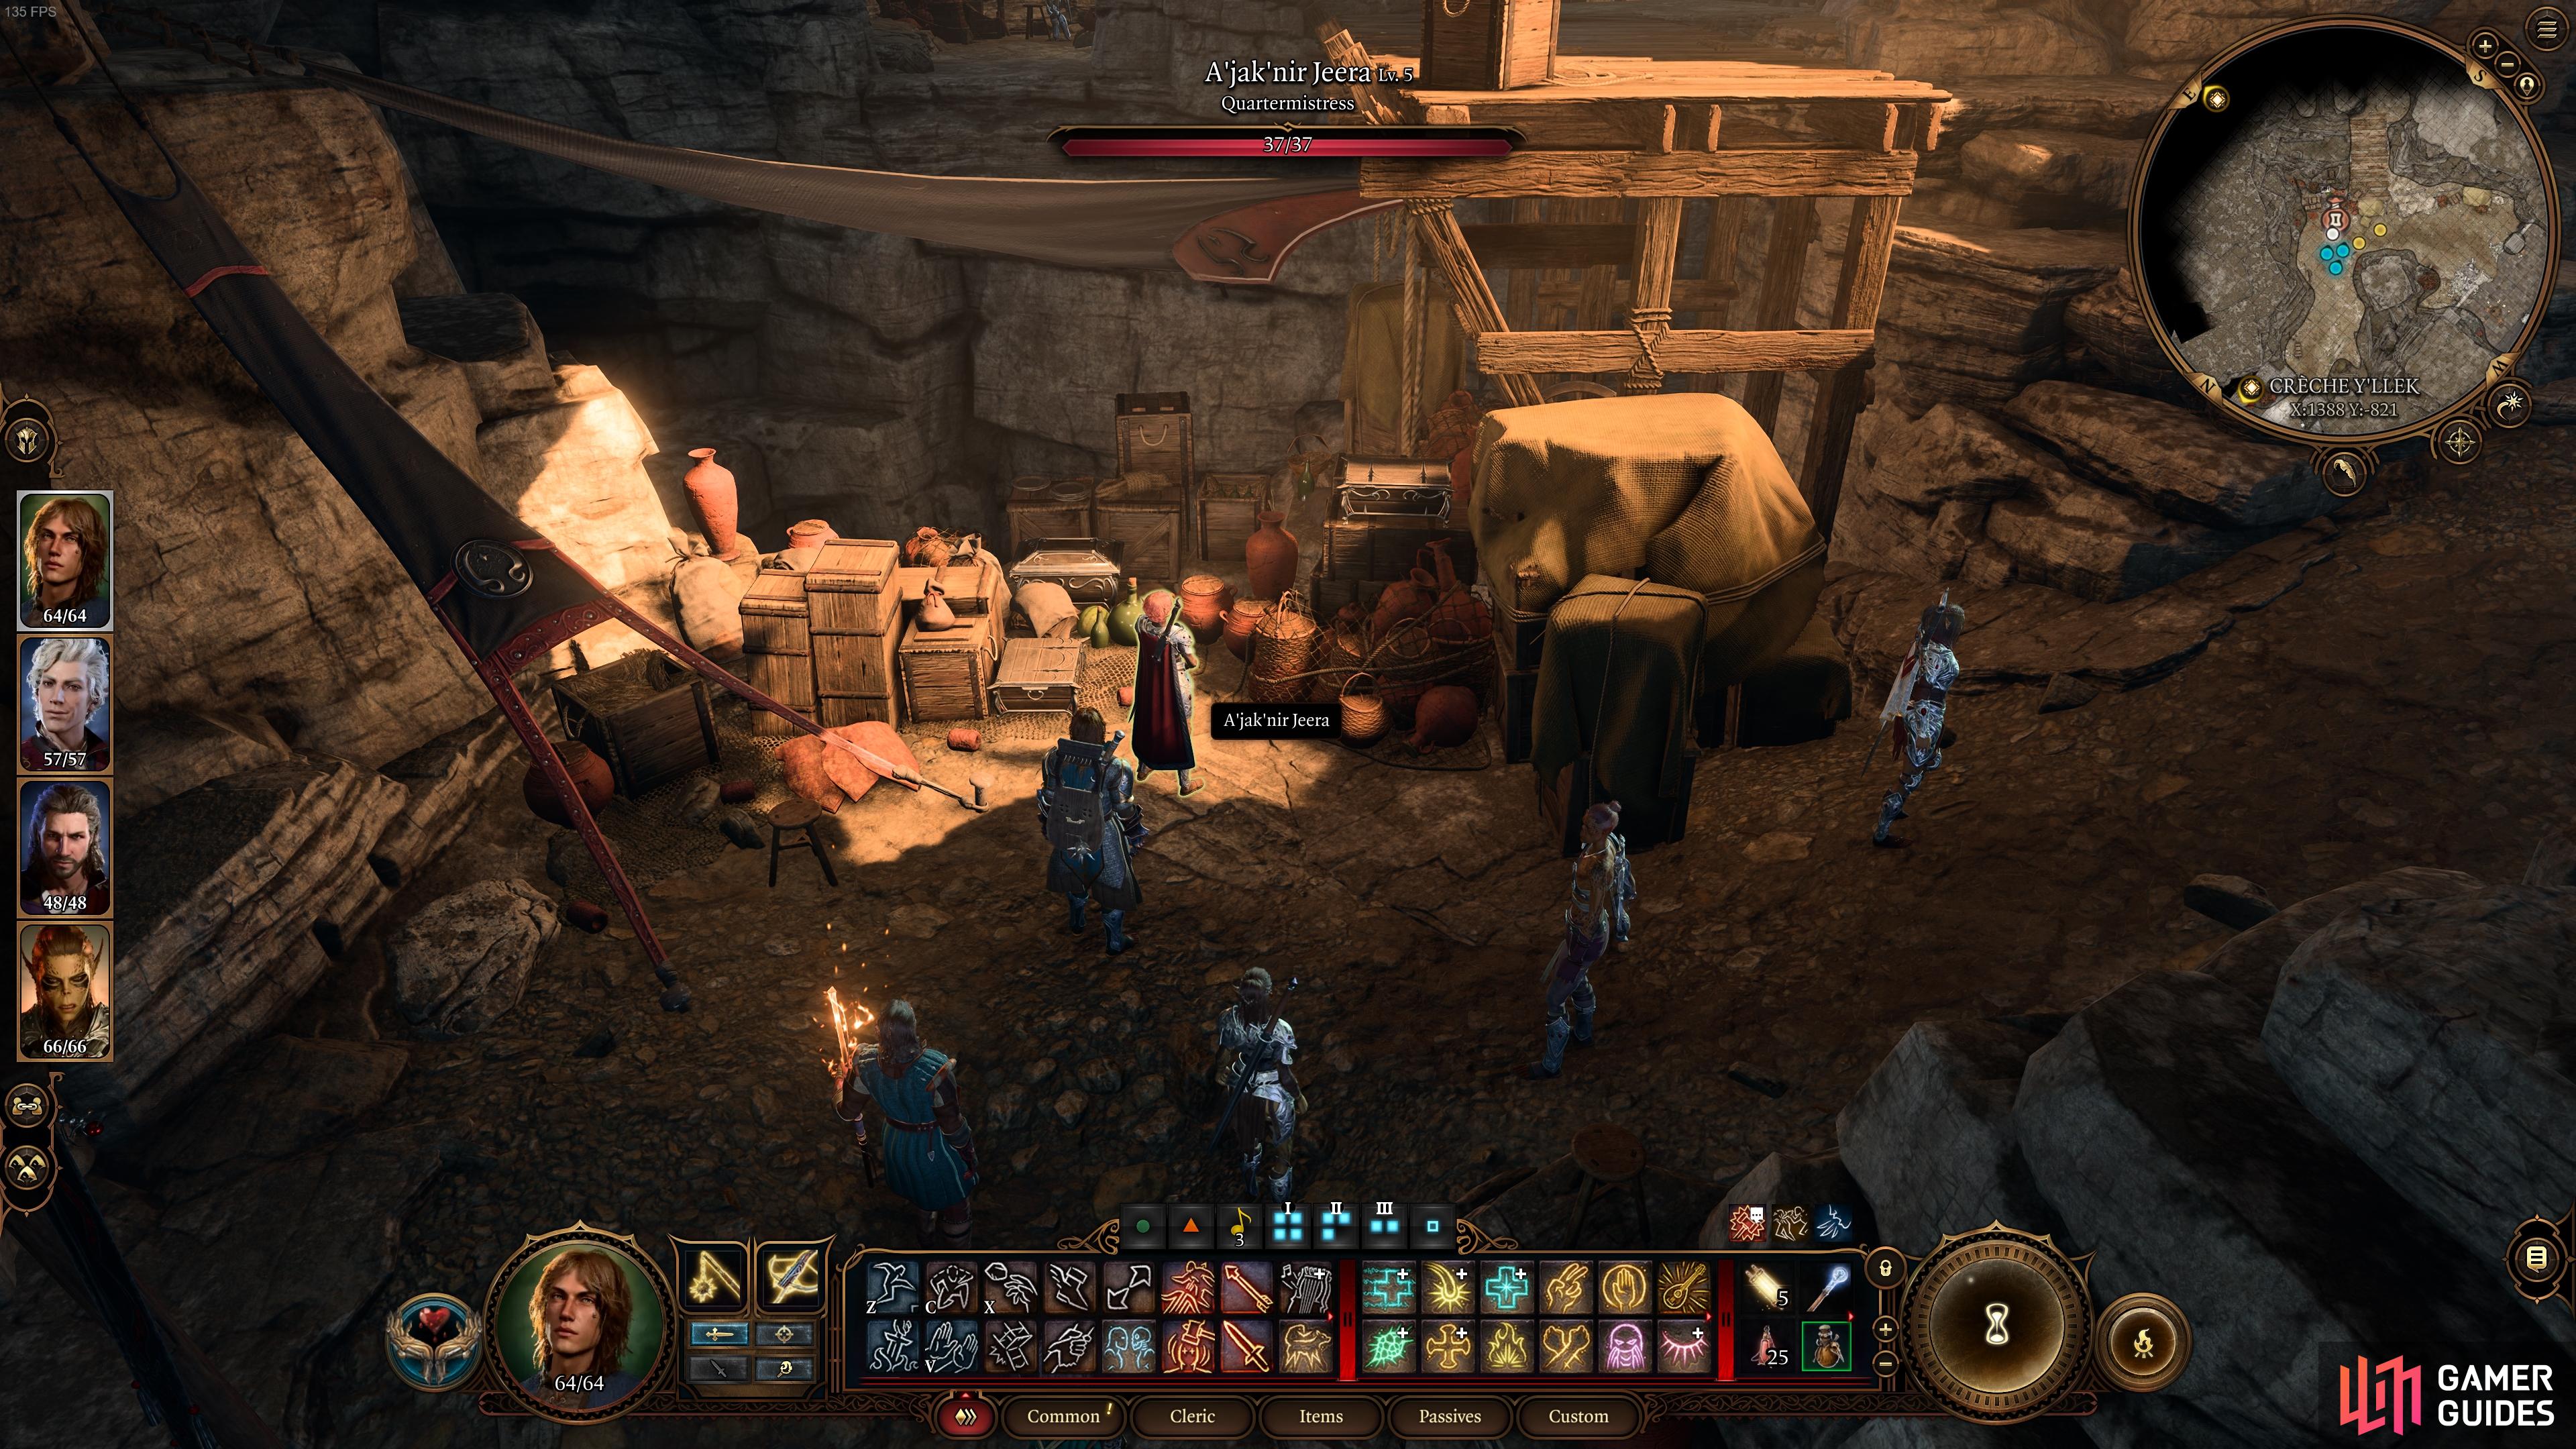
Be sure to speak with the trader in the Creche Y’llek to see if you can benefit from their items.
Where to Find Ghustil Stornugoss in the Creche Infirmary
After exploring the Creche as much as you like, you’ll want to find Ghustil Stornugoss in the Infirmary. This is the principle healer of the Creche Y’llek, and she’s the one that Lae’zel wants you to find so that she can cure you of the Illithid parasite. Ghustil is located in a laboratory found through a door on the western side of the Infirmary, and when you speak with her a cutscene will begin. We recommend having Lae’zel in your party for this part, and let her speak on your behalf. She will also demand that she gets to use the Zaith’isk - the device which she claims can cure the parasitic infection - first. This turns out fine for you, since the device nearly kills Lae’zel and you have to decide whether to save her, or let her die.
Should You Allow the Zaith’isk to Kill Lae’zel?
You may be wondering about what happens if you encourage Lae’zel to endure the pain from the Zaith’isk, to the point where it could kill her. The truth is that there’s no real change in the outcome either way, since the device is powerless to kill her due to the special significance of the parasite that she carries. Whatever you choose at this point, the Zaith’isk device will end up exploding and Ghustil will be extremely upset. You will have three dialogue options when you come to speak with Ghustil after the scene:
- The parasite lives, yes. And thank goodness - it saved her.
- Your zaith’isk tried to kill Lae’zel. And failed.
- [Deception] You’re wrong. Can’t you see it in her eyes? the parasite’s dead.
As mentioned in the tip above, the best outcome to ensure that you don’t need to fight any Githyanki at this point is to try for the Deception roll check. This is the only way that you will convince Ghustil that the parasite is dead, and she’ll let you go free. If you choose one of the other options, Ghustil will lock the door to her laboratory and if you try to get out, you will be attacked by all the Githyanki outside.
The Githyanki Warrior Objectives - Take Lae’zel to the Inquisitor
At this point, after the interaction with Ghustil Stornugoss, the objectives for the Find the Githyanki Creche quest will be complete, but there’s more to do here related to Lae’zel’s companion quest - The Githyanki Warrior. We’ll take you through how to complete the rest of the Creche objectives below.
Where to Find the Inquisitor in the Creche Y’llek
After the encounter with the zaith’isk device, Lae’zel believes that it has been tampered with, and she wants to inform the Inquisitor (Ch’r’ai Wargaz) who can be found in his chamber located in the far northern part of the Creche Y’llek.
What Do You Insert Into the Githyanki Barrier Disruptor?
To reach the chamber, you will need to pass through the Captain’s Quarters, located on the eastern side of the creche, and take the Gith Shard from the captain (Kith’rak Therezzyn). You’ll need to insert this shard into the Githyanki Barrier Disruptor to dispel the energy field on the door next to it, and only then can you make your way north to the Inquisitor’s Chamber. Alternatively, if you want to produce the artefact for her, she will let you pass without having to take the shard from her. You will still be able to keep the artefact if you make this choice.
There are two ways to obtain the Gith Shard from the captain if you don’t want to produce the artefact: kill her or pickpocket her. She won’t give it up willingly, but the easiest method is to pickpocket. There’s a good chance that she will approach you after doing this, knowing what you’ve stolen from her, and you will need to talk your way out of it or bribe her with 160 gold or so. Whichever method you choose, once she’s placated you can use the shard with the disruptor and pass freely on to the chamber.
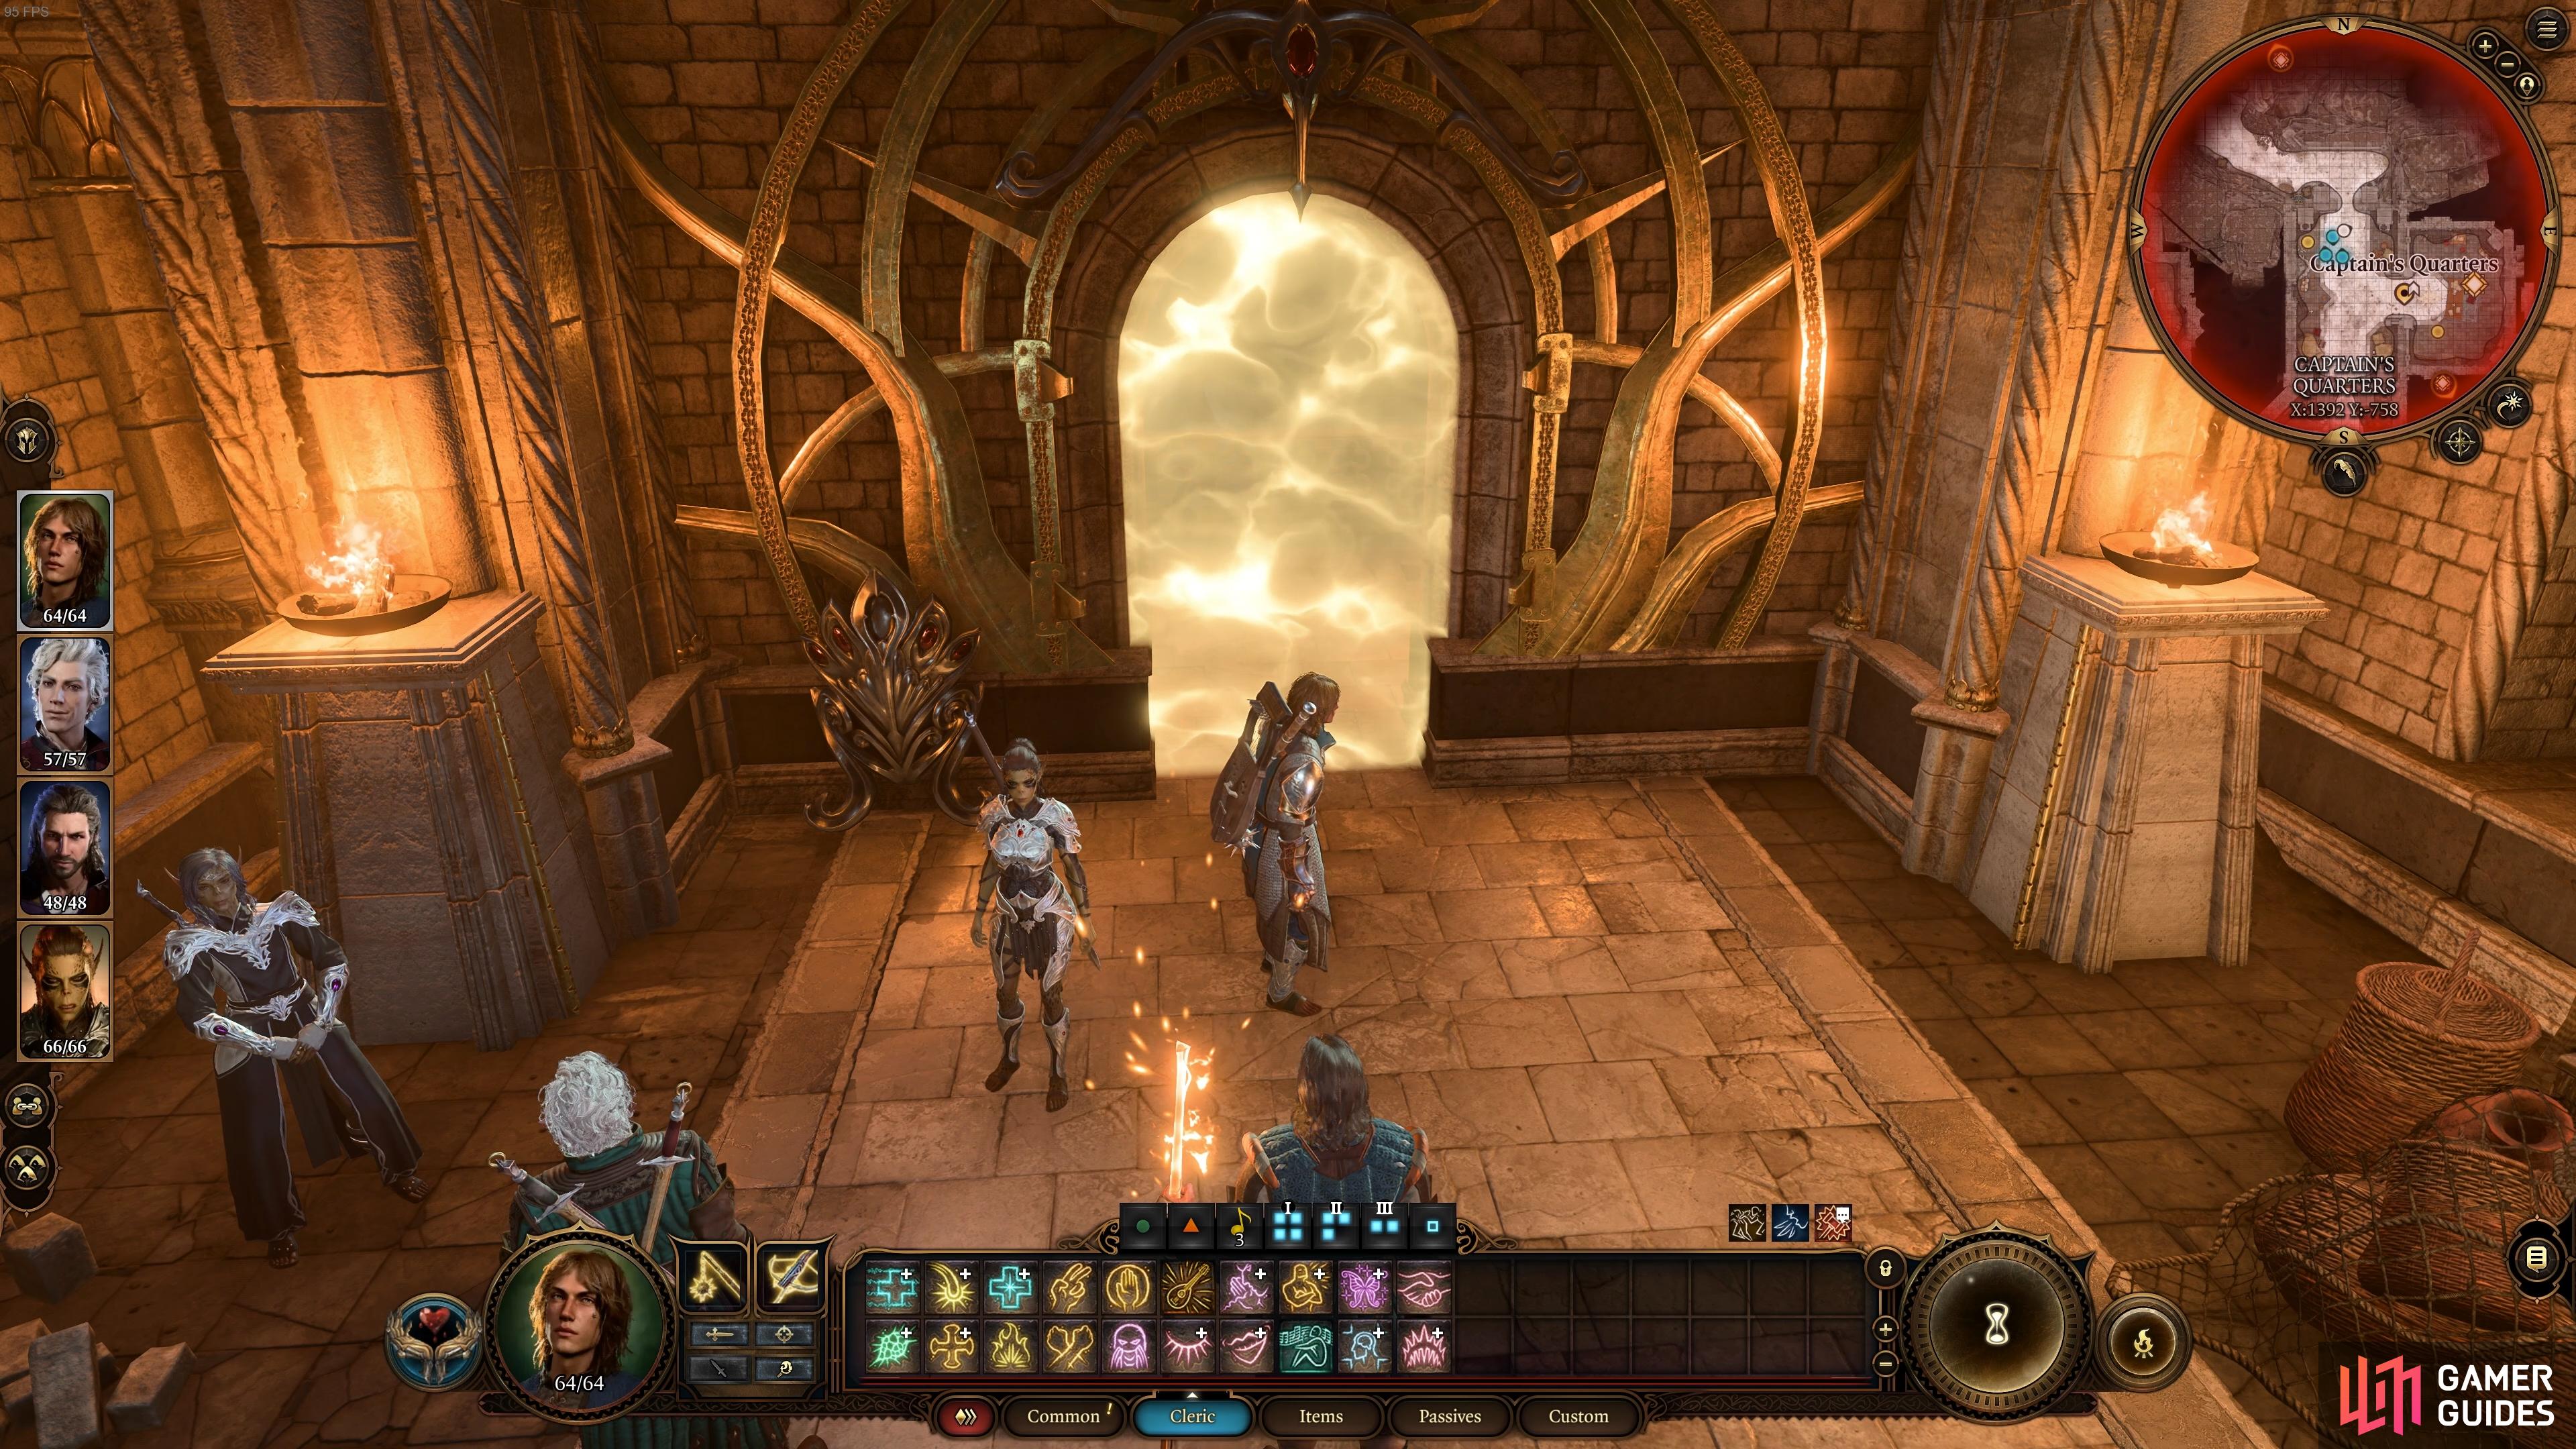
The way to the Inquisitor’s Chambers is blocked until you insert the Gith Shard into the Disruptor.
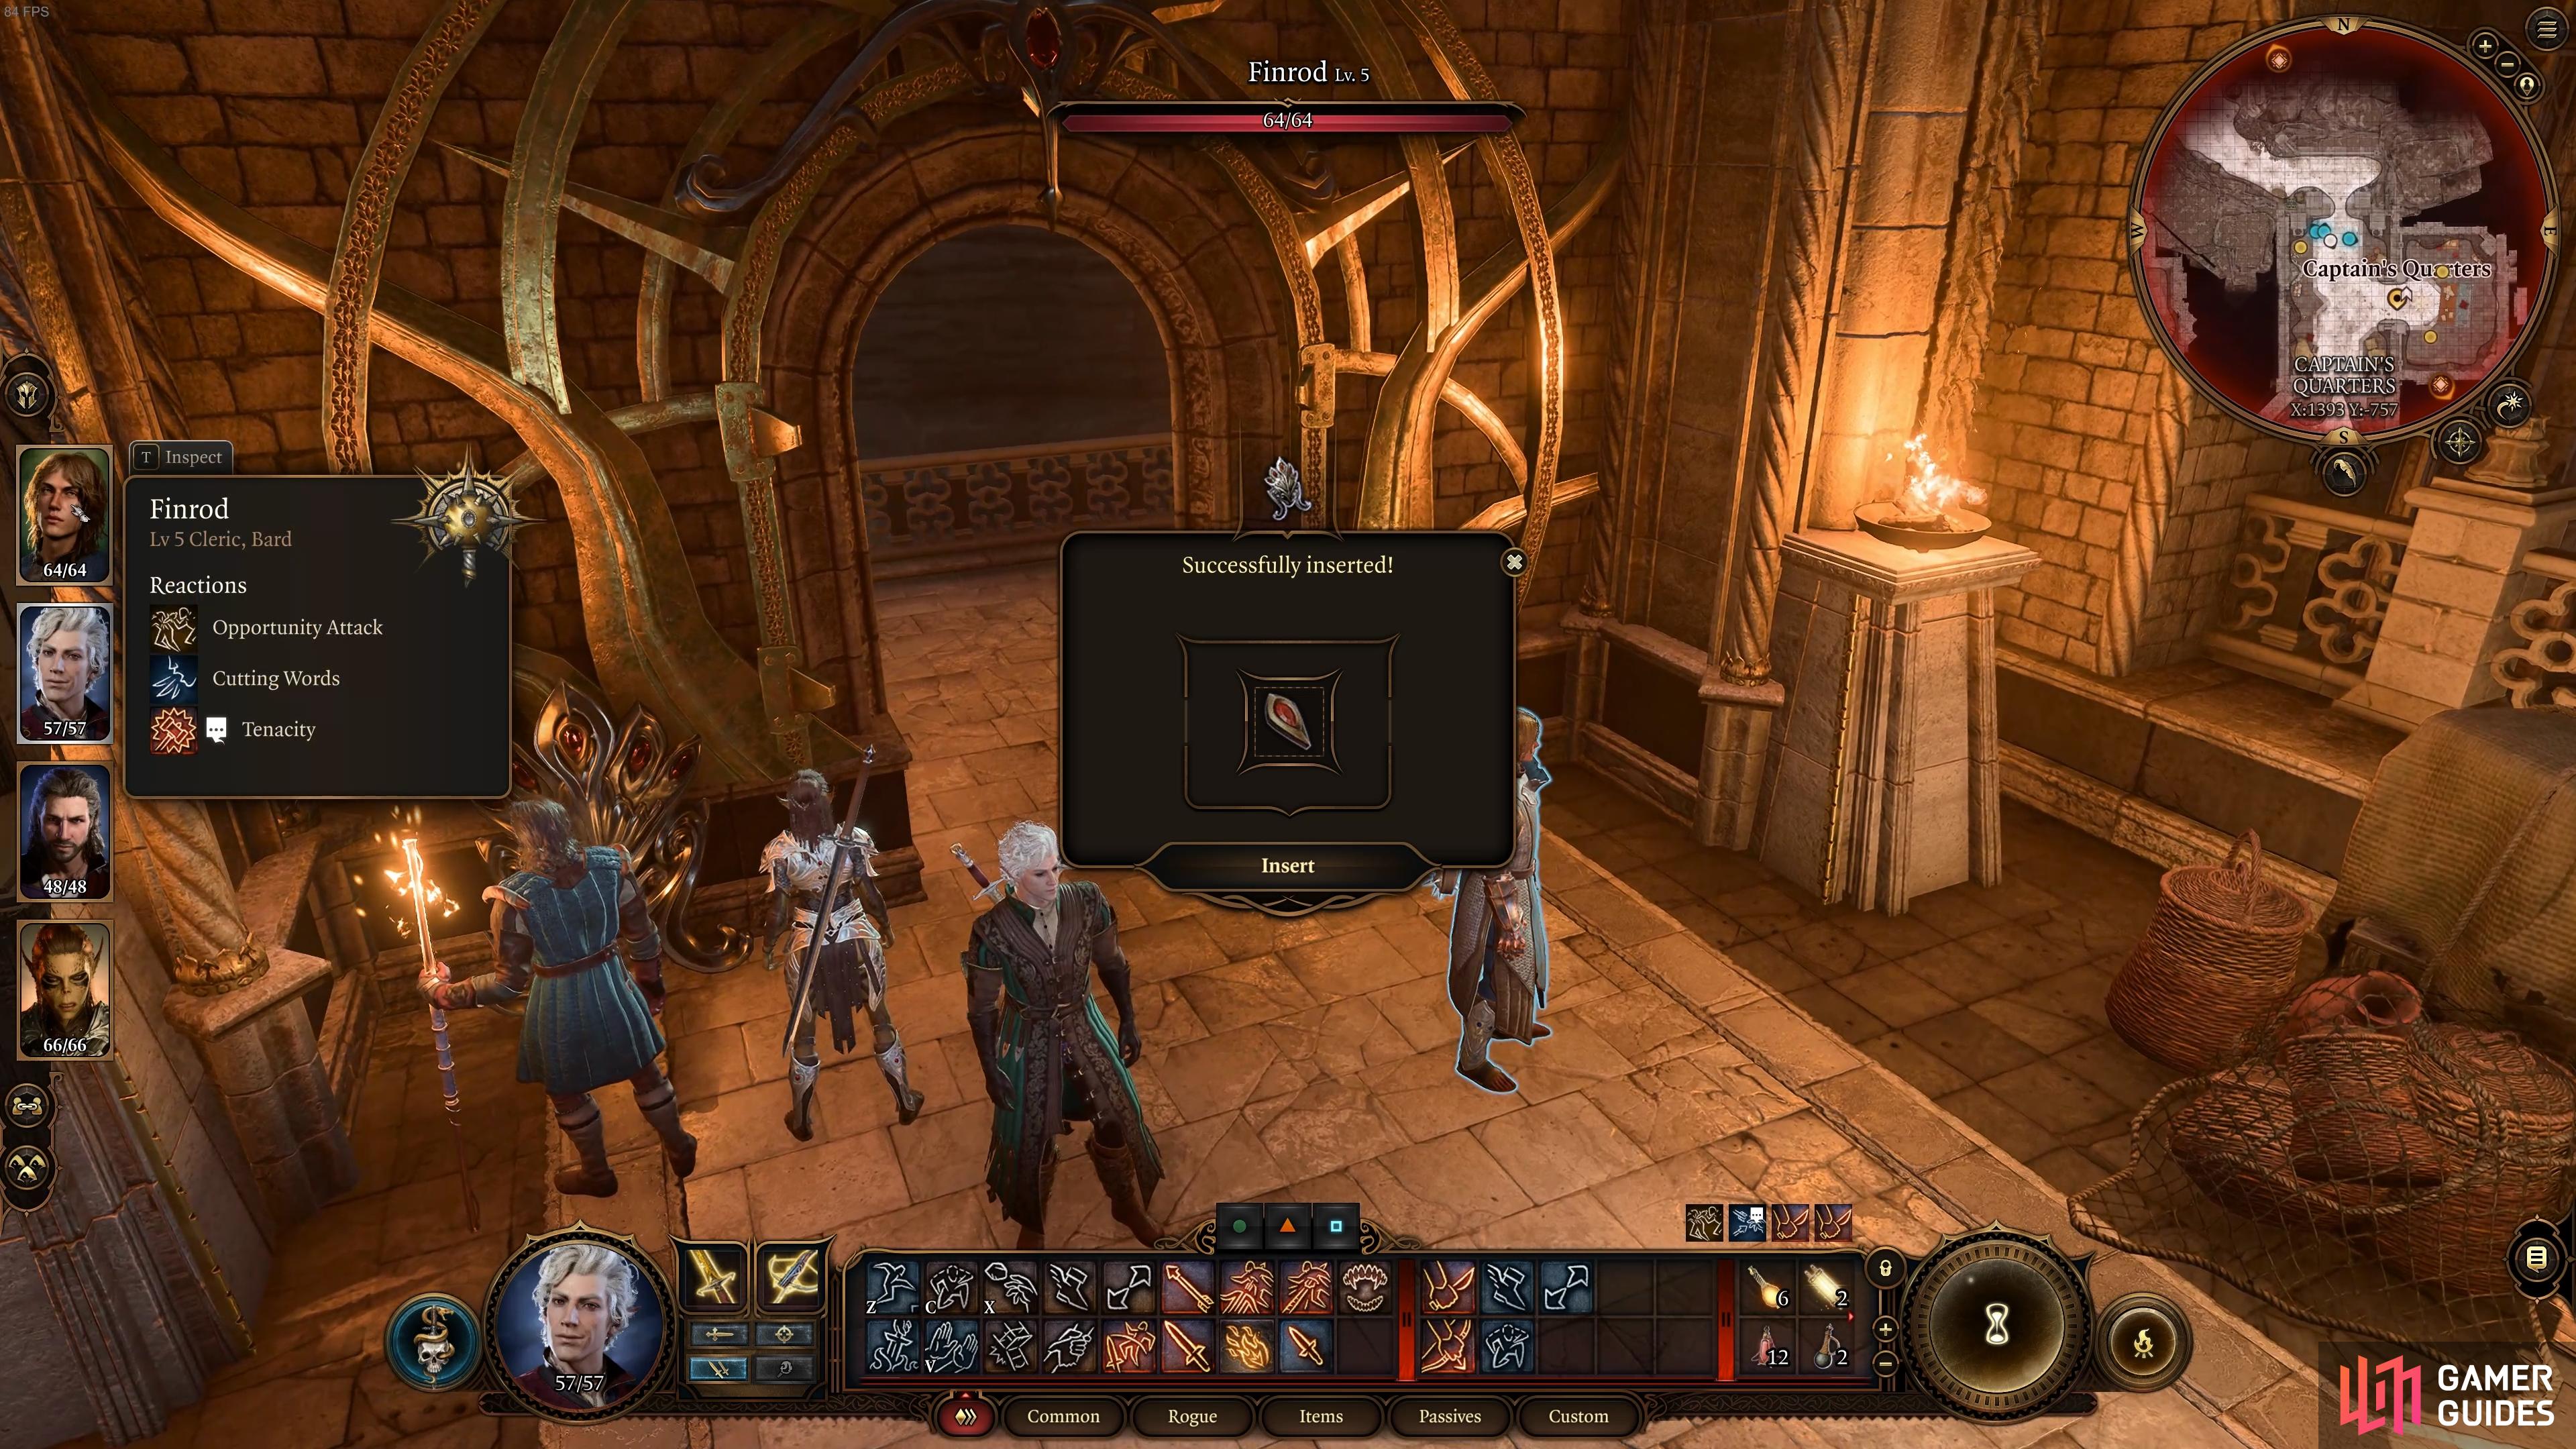
You can get the Gith Shard from the nearby Captain, then insert it into the Disruptor to dispel the energy shield.
Githyanki Creche - Inquisitor Dialogue Choices
Once you reach the Inquisitor and begin speaking with him, it will be difficult to deny that you have the artefact. He will find out one way or another, so you might as well choose the options which feel most relevant to your roleplaying preferences. It’s a good idea to let Lae’zel speak on your behalf at this point, especially if you want to keep her in your party. If you deny her too much during the scenes that follow, there’s a risk that she will leave you.
Fight the Inquisitor or Give Him the Artefact?
As the dialogue progresses you will learn more about why the Githyanki want to the artefact so desperately, but there’s more to this than meets the eye. If you refuse to produce the artefact for the Inquisitor, there are ways to convince Lae’zel that you’re doing the right thing, but you’ll need to choose the option which reminds her of what happened with the zaith’isk for it to work. If you don’t do this, she will permanently leave your party there and then. Either way, taking the path of refusing to give the artefact to the Inquisitor will result in you fighting him immediately, as will any dialogue which allows him to learn that you’re infected.
Should You Refuse Queen Vlaakith?
The only difference in what follows comes in terms of when you fight the Inquisitor, and when you speak with the Guardian / Dream Visitor that you’re asked to kill by Queen Vlaakith. She will make an appearance after you kill the Inquisitor, or she will make her appearance when you agree to hand over the artefact. In both cases, her request will be the same: enter the ![]() Astral Plane and kill the Guardian who you’ve met in your dreams when resting. Even if you don’t want to do this, you will have to accept at this point. If you refuse, Vlaakith will kill you instantly and it will be game over, so you’ll have to reload from your most recent save.
Astral Plane and kill the Guardian who you’ve met in your dreams when resting. Even if you don’t want to do this, you will have to accept at this point. If you refuse, Vlaakith will kill you instantly and it will be game over, so you’ll have to reload from your most recent save.
Should You Kill the Dream Visitor / Guardian?
There’s no need to worry if you don’t actually want to kill the Dream Visitor. You’ll have an opportunity to speak with them privately once you enter the Astral Plane, and you can either believe what she tells you, or try to kill her. The latter won’t work in any case, and you will be forced to speak with her afterwards, but she won’t be too pleased with you. We recommend not attacking her since you won’t actually be able to do any damage.
After the interaction with the Dream Visitor, you can return to Faerûn via the nearby portal. If you already killed the Inquisitor you can make your way back to the central part of the Creche. If not, you’ll need to do that first. You will also need to fight your way out of the Creche from this point, until you find a safe place to fast travel from. You should be able to fight only the Captain and her wolves, then leave the Captain’s Quarters to fast travel out of the creche if you wish. You won’t be able to fast travel until you’ve left the Captain’s Quarters.
More Baldur’s Gate 3 Guides
If you’re looking for more relevant BG3 guides, be sure to check the links below.
If the player is on the Blood of Lathander questline at the same time, going into the stairwell toward said quest will open up fast travel options. However, the player should finish the Blood of Lathander questline before leaving the area as the only way back would be to fast travel to the Creche Y'llek waypoint, where all of the hostile Githyanki are waiting.
If the player is on the Blood of Lathander questline at the same time, going into the stairwell toward said quest will open up fast travel options. However, the player should finish the Blood of Lathander questline before leaving the area as the only way back would be to fast travel to the Creche Y'llek waypoint, where all of the hostile Githyanki are waiting.