
For players who make it to Act 3, there’s plenty of really strong, niche items that will get you through some of the toughest moments in the game. There’s some really strong items, including some incredible build defining moments to come, allowing players to really complete their builds. If you want to know the best armor and weapons in Act 3 of Baldur’s Gate 3, then say no more!
Best Armor and Weapons in Act 3 of BG3
Before we continue, note that list is split into three categories (this serves as a ToC to auto scroll to FYI):
Act 3 Legendaries in Baldur’s Gate 3
Some of the BG3 Legendary Items are considered quest items or part of long quest chains.
| Legendary Item | Location | How To Get | Effects |
|---|---|---|---|
| Underneath Wyrmgate Prison | Find the secret base in the Wyrm Gate Prison or via Wyll’s storyline in the city. | 2D6 + 6 slashing weapon, with Giant slayer modifier, and Giant Form ability to gain temp hit points and an additional 1d6 on damage. | |
| Orin | Lower City Sewers (Undercity) | 1d4, 1d10 Necrotic with a crit lower effect of 1. Also grants |
|
| Orin | Lower City Sewers (Undercity) | 1d6 piercing and 1d4 Necrotic damage, with another 1D4 conditional piercing if the target is below 50% HP. When you attack with advantage, deal 7 piercing damage, and its off-hand modifier grants an ability modifier to the attack’s damage. | |
| Quest chain starts from the Barracks in the Lower City | 1d8 Piercing and 1d4 Necrotic. While offhand is empty, lower crit hits by 1. Gain an additional reaction per turn. Use a reaction to deal necrotic damage equal to your proficiency when you hit with the weapon. Comes with Challenging Dual (Taunt) and Dueller’s Enthusiasm, granting an extra attack with the weapon when not dual-wielding. | ||
| House of Hope | An item you can find in Raphael’s Palace you can visit. | Grants unarmed attack modifiers force damage and healing. Or trade healing for advantage on attacks and saving throws. Also grants +2 Constitution. BiS for Monk. | |
| Steel Watch Foundry (Lower City) | Defeat the boss inside the Foundry. | Legendary Crossbow with 1d8 piercing and 1d10 necrotic. Grants glowing in a 6m radius, weapon enchantment +3, |
|
| Raphael Boss Fight | You can enter his palace by either speaking to the lady in the building to the west of the Lower City Graveyard, or getting tips on entering via the Demon in the |
21 AC Heavy armor, with built-in Heavy armor proficiency if you want to use it. It also comes with fire resistance and saved throws return fire damage to the enemy caster. | |
| Underneath Wyrmgate Prison | Find the secret base in the Wyrm Gate Prison or via Wyll’s storyline in the city. | Health at the start of each turn, and gain +1 to AC and saving throws. You cannot be stunned or crit wearing this. | |
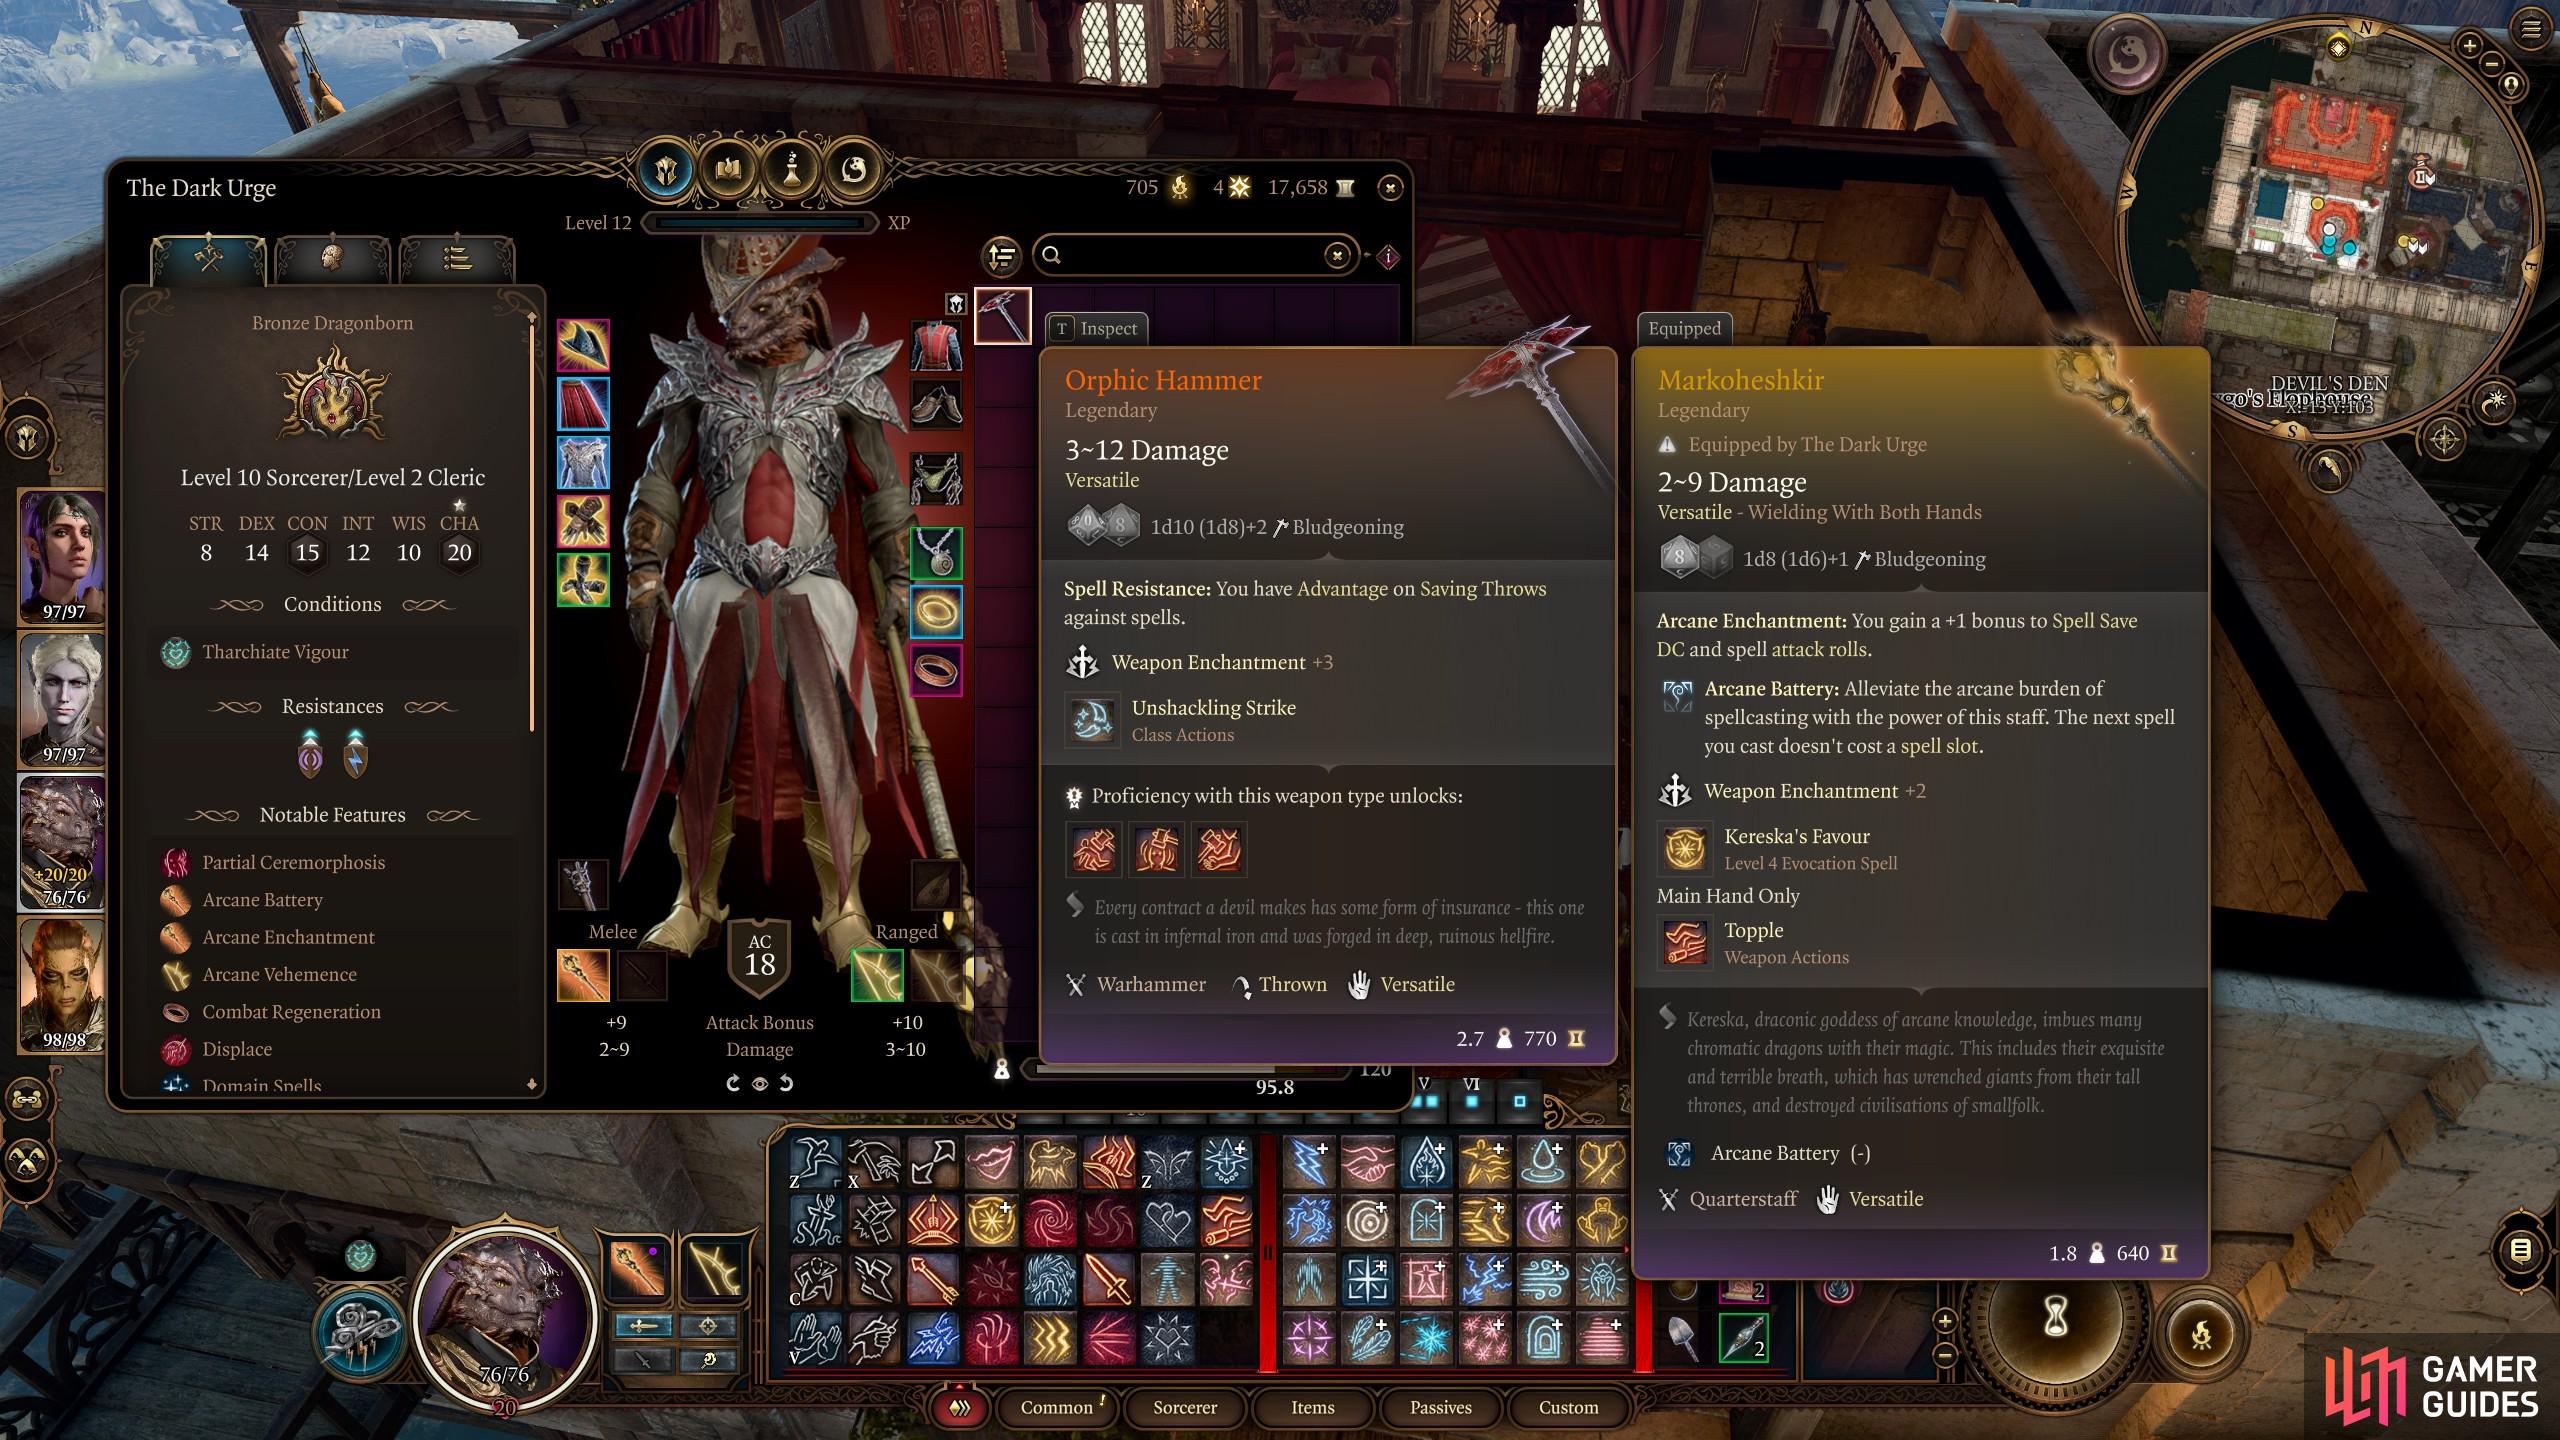
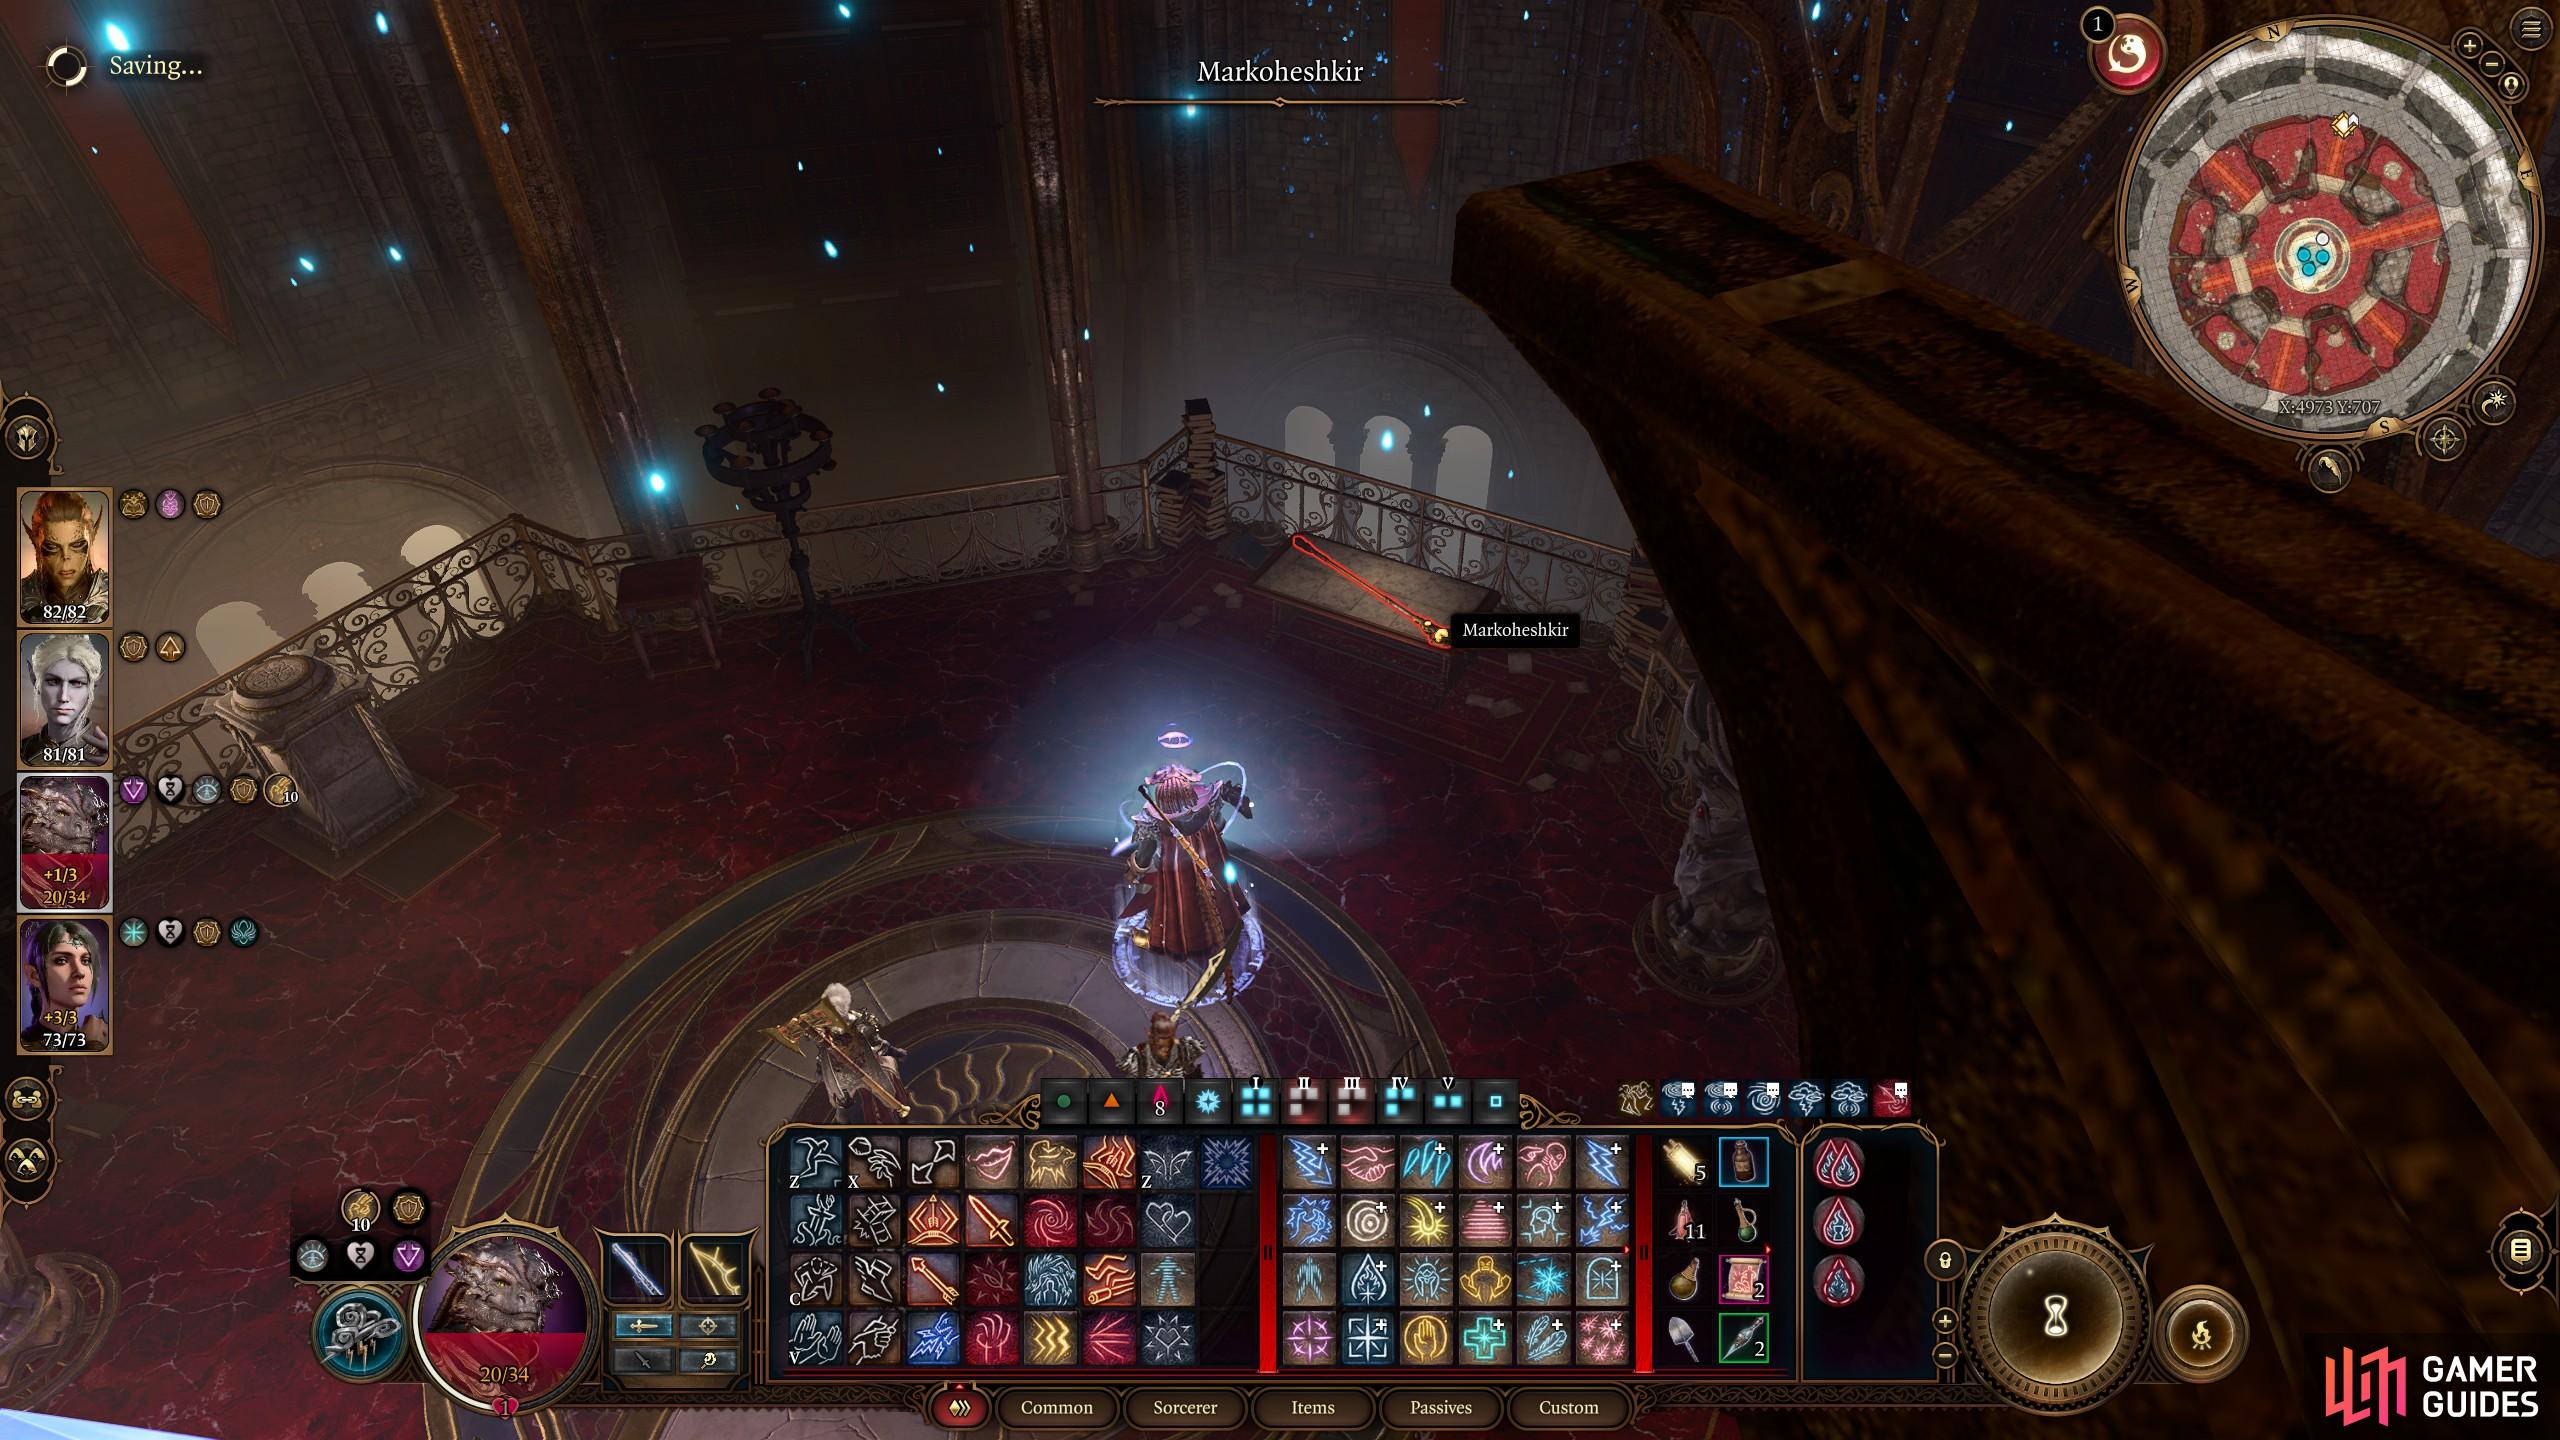
| Sorcerer’s Sundries Vaults | Acquired by solving an Arcane Barrier puzzle in the Ramazith’s Tower. | A staff that allows the user to use an ability that makes the next Spell cast not use a spell slot. | |
| Pickpocket the genie’s ring, then spin the wheel. Then follow the content on the screen to get it. | 1d8 or 1d6 piercing and 1d6 Thunder damage. Also grants a boomerang feature when thrown, and explodes for Thunder damage. Grants a bonus to movement speed, and it shines light. | ||
| Raphael’s Palace | Given as part of the deal with Raphael, or you can steal it from his palace. | Advantage on spell-saving throws. Mainly a quest item similar to the Spear of |
|
| Voss (Sewers) | Awarded as part of the Githyanki storyline with Voss, who you can find first in the Sharess Caress, and his final spot in the Sewers | A 2d6 weapon with 1d6 psychic damage rolls. Also grants buffs to Githyanki wielders. And grants an advantage on INT, CHA, and WIS rolls. Cannot be charmed, and resistant to psychic damage. | |
| House of Grief | Unlocked as part of the |
Best Act 3 Weapons
Many of the Legendaries and best weapons in Act 3 come from puzzles, quests or drops.
| Item | Class | Location | Notes |
|---|---|---|---|
| Casters | Inside a vault within the House of Hope Boudoir. Pass a wisdom and then Arcana check using the gems opposite the Boudoir and grab the staff inside. (can be a hard check). | Arcane Enchantment and Battery make this a great spellcaster staff to pick up, only slightly worse than |
|
| Necromancer Wizard, Spore Druid | Drops from the Carrion in Philgrave’s Mansion | Super strong staff for Necromancy-themed builds and spells. | |
| Warlock | Sold by Helsin in |
Restore 1 extra Warlock spell can be decent at times, presuming your warlock is without a better staff from elsewhere. | |
| Crit Rogue builds | Drops from Dolor, which you find in Facemaker’s Boutique as part of the |
If you’re taking the gear that grants better crit rolls, then this can be good for synergizing with spells like |
|
| Ranger | Fytz the Firecracker at the Armory near the Lower City Wall. | Arguably the best bow in the game for Rangers because of the Proficiency bonus | |
| Martial classes | Sold by Ferg Drogher in |
Decent bow for |
|
| Dwarf Martial classes | Ferg Drogher in |
Niche as it is, but if you have a Dwarf, the extra dice rolls make it one of the stronger weapons in the game, especially with all the Large, Huge and Garg-sized enemies to come throughout the act. | |
| Fighter, Barb, Paladin | Ferg Drogher, near |
A great Two-handed Great Axe for martial classes. It can get replaced by legendaries, but in some parties it can be used for the rest of the game. | |
| Martial classes | Stormshore Tabernacle basement in the Helm Box. | Niche weapon, but gets huge a power spike against Fiends and Undead, which means it can be very strong for Cazador, Raphael, and Philgrave Mansion stuff if you want to get it for those stages. Note it falls off after those fights, though. | |
| Paladin, Cleric, |
Vicar Humbletoes trader in the Stormshore Tarbanacle | The extra Radiant Orb works incredibly well for any players opting for Radiant gear from Act 1 and largely the late Act 2 items. Otherwise, it is not worth equipping it over a legendary. | |
| Fighter, Paladin, Barbarian | Sarverok in the Murder Tribunal area | Perhaps one of the strongest |
|
| Cleric, or other sword and shield melee | Viconia in the Shar temple, top left of the Lower City, as part of |
One of the stronger maces for its multiple dice rolls on damage and increases Strength to 18. One of the best One-Handed weapons in the game. |
Best Act 3 Armor
Plenty of the best pieces of gear can be purchased from vendors in Act 3.
| Item | Class | Location | Notes |
|---|---|---|---|
| Rogue, College of Swords, Pact of the Blade | You need to join the Bhaalist Cult in the Murder Tribunal, which will allow you to trade with a vendor that unlocks only if you join them. | Grants an aura that makes enemies Vulnerable to Piercing, turning Rogues into some serious damage contenders. | |
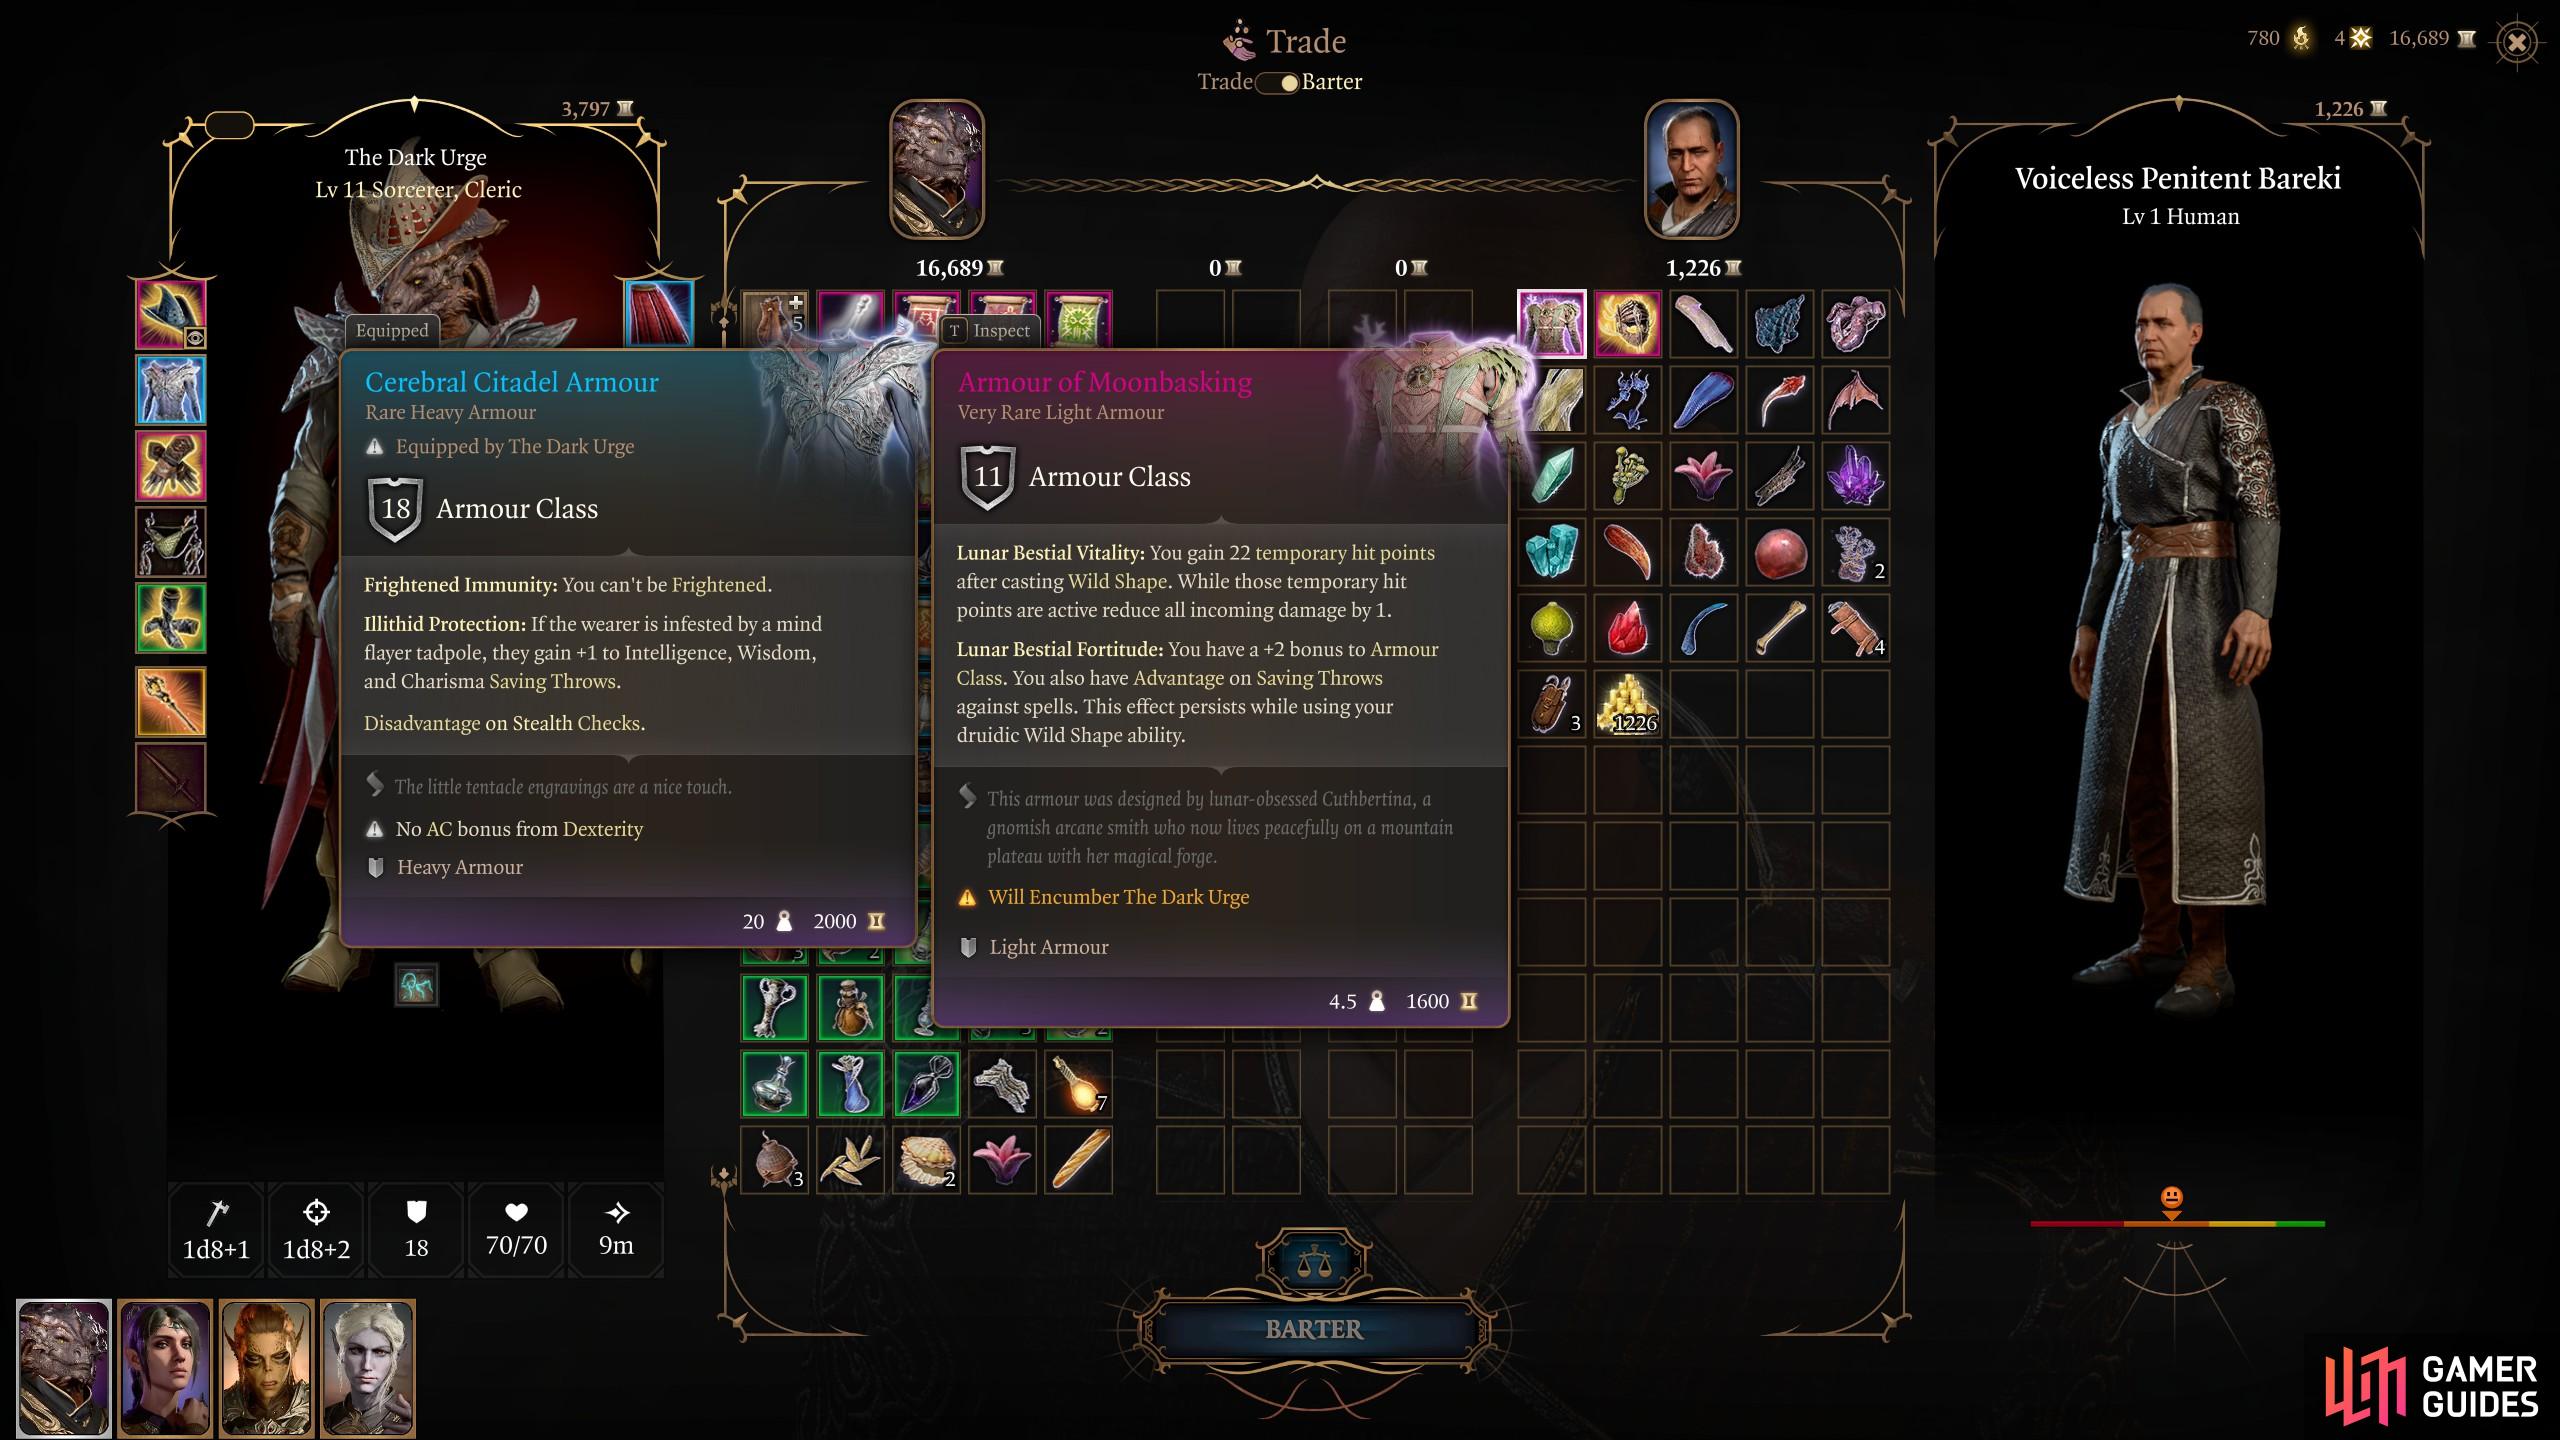
| Barbarian | Sold by Voiceless Penitent, slightly west of the Undercity Ruins Waypoint in the Sewers | Strong AOE for Barbarians when they rage. | |
| Warlock, Sorcerer, Bard | Sold in Sorcerer’s Sundries. | Huge for Charisma modifier in combat. Better for casters, since Bard’s get |
|
| Necromancer, Spore Druid, Summoner type builds | Defeating Carrion in Philgrave Mansion. | Free Level 6 |
|
| Necromancer, Spore Druid | Carrion in Philgrave Mansion | Solid Spore Druid synergy and general Necromancy damage improvements. | |
| Moon Druids | Purchased from Voiceless Penitent near the Undercity Ruins Waypoint in the Sewers. | Fantastic Temporary HP boost for Druids that use Shapeshifting a lot. | |
| Any | Inside a Gilded Chest on the |
Better Initiation and Attack roll modifier is really good for weapon-attacking characters. | |
| Sorcerer | Sold at the |
Nice gloves for adding on bonuses for Metamagic. | |
| Moon Druid | Sold by Helsik at the |
Increase charges of Wild Shape, offering more flexibility for Druids in how they use their wild shapes. Barb Druids may not need this in favor of |
|
| Any Caster | Sorcerer’s Vaults of the Sundries store | Great Spell DC and Spell Roll improvement for any Blaster Caster type build. | |
| Warlock, then any other caster | Sold by the Dwarf in |
Best used with |
|
| Any | Dolor at the end of |
Can’t knock a free Dimension door for party movement when needed. | |
| Casters | Sorcerers Sundries | Solid Robe with good AC boost, health restoration, and Spell cast improvements. | |
| Dex Builds | Sold by Gloomy Fentonson at the armory near the Lower City Wall. | Dex bonus is likely around 3, meaning you can get around 20 AC for a Dex class. It can even serve for other martial classes running Hill Giant gloves, then placing those points into Dex to get this. | |
| Monk | Sold at Sorcerer’s Sundries. | Good self-healing and reaction for more unarmed damage options. | |
| Druid | Strange Ox in |
An extra 1d4 to all Checks sounds good for Druids. | |
| Monk | Entharl Danthelon along the bridge to Wyrmgate. | Using Step of the Wind adds another 1d8 Force damage to attacks, which is an optional item to add even more damage to the already busted open hand monk damage potential, though it is not needed since there’s other great Monk armor available. | |
| Any | Sold by Entharl Danthelon along the Wyrmgate bridge. | Disadvantage on attack rolls for attackers targeting the wearer makes for a decent defensive cloak. | |
| Monk | Entharl Danthelon along the Wyrmgate Bridge | +2 to attack rolls and extra Necrotic damage when you don’t have full health works wonders. Slight downside to the helmet, but you will attack a lot to ignore it. | |
| Fighter | Entharl Danthelon along Wyrmgate Bridge | Disadvantage on Saving |
|
| Rogue | Exxvikyap near |
Extra 1d4 Force on Sneak Attacks is very nice. | |
| Barbarian | Exxvikyap in the |
Huge tanky and Temp HP item for Barbs. Combine with |
|
| Barbarian, then Anyone Else | In the House of Hope | Raising Constitution to 23 is huge for tankyness for Barbs, or other classes if you do not have one. | |
| Cleric | Stormshore Tabernacle basement Offering Box | BiS for all Clerics | |
| Fighter, Rogue, Ranger, Barbarian | Vicar Humbletoes in Stormshore Tarbanacle | A martial class with no concentration spell can use this for free weapons damage with their party. | |
| Cleric, Paladin, Druid | Vicar Humbletoes in Stormshore Tarbanacle | Great action economy usage and defensive buffs using these gloves for any support healer type build. | |
| Martial | Looted from the Archive in House of Hope. | Set the wearer’s Strength to 23, offering martial classes to respec into Dex or Con for better gameplay. | |
| Monk | From the Astral Plain Githyanki Monks at the start of Act 3. | Free damage modifier on all unarmed attacks. BiS boots for Monks. | |
| Found in an invisible chest within the Elminster Vault of Sorcerer Sundries. | Despite the self burning status, you get an extra bonus action, which can be good for blaster casters. | ||
| Wild Magic Sorcerer | Defeat The Hag in Act 3, as part of the Hag Survivors and Save Vanra stories. | BiS for that subclass of Sorcerer’s as its the only item that interacts with your subclass mechanic directly. | |
| Battle-Mage type builds | Looted from the bad Dwarf, Haarlep in the House of Hope fight. | Spell Save DC and Spell Hit Rolls alongside 1d6 |
|
| Casters | Sold at Sorcerer’s Sundries. | Another optional caster item, with its strong 13 AC for |
|
| Melee | Sold by Dammon in Act 3 at the Forge of the Nine. | Lots of free mobility improvements, great for any melee build presuming there’s no more build focused boots available for them. | |
| Wizard, Druid caster | Sold by Mystic Carrion, the mummy in Philgrave Mansion, who can sell it before you embark on finding Thumbro, or during the Free the Artist. | +2 AC for Spell Save and Attack Rolls. Great synergy for general spellcasting builds that don’t already need |
|
| Heavy Armor builds | Sold by Dammon in Act 3 of the Forge of the Nine. | Perhaps the best Heavy Armour because of its |
|
| Throwing Builds | Sold by the Kobold in the Circus nest to |
The item is a bit of a joke item, but it un-ironically is really good for throwing builds looking to get around fast and be a nuisance. |
This concludes the best Armor and Weapons in Act 3 of Baldur’s Gate 3. These items should be your bucket list, depending on your build and composition. If there’s another item you think deserves to be on the list, feel free to let us know in the comments below!
Read More:
No Comments