
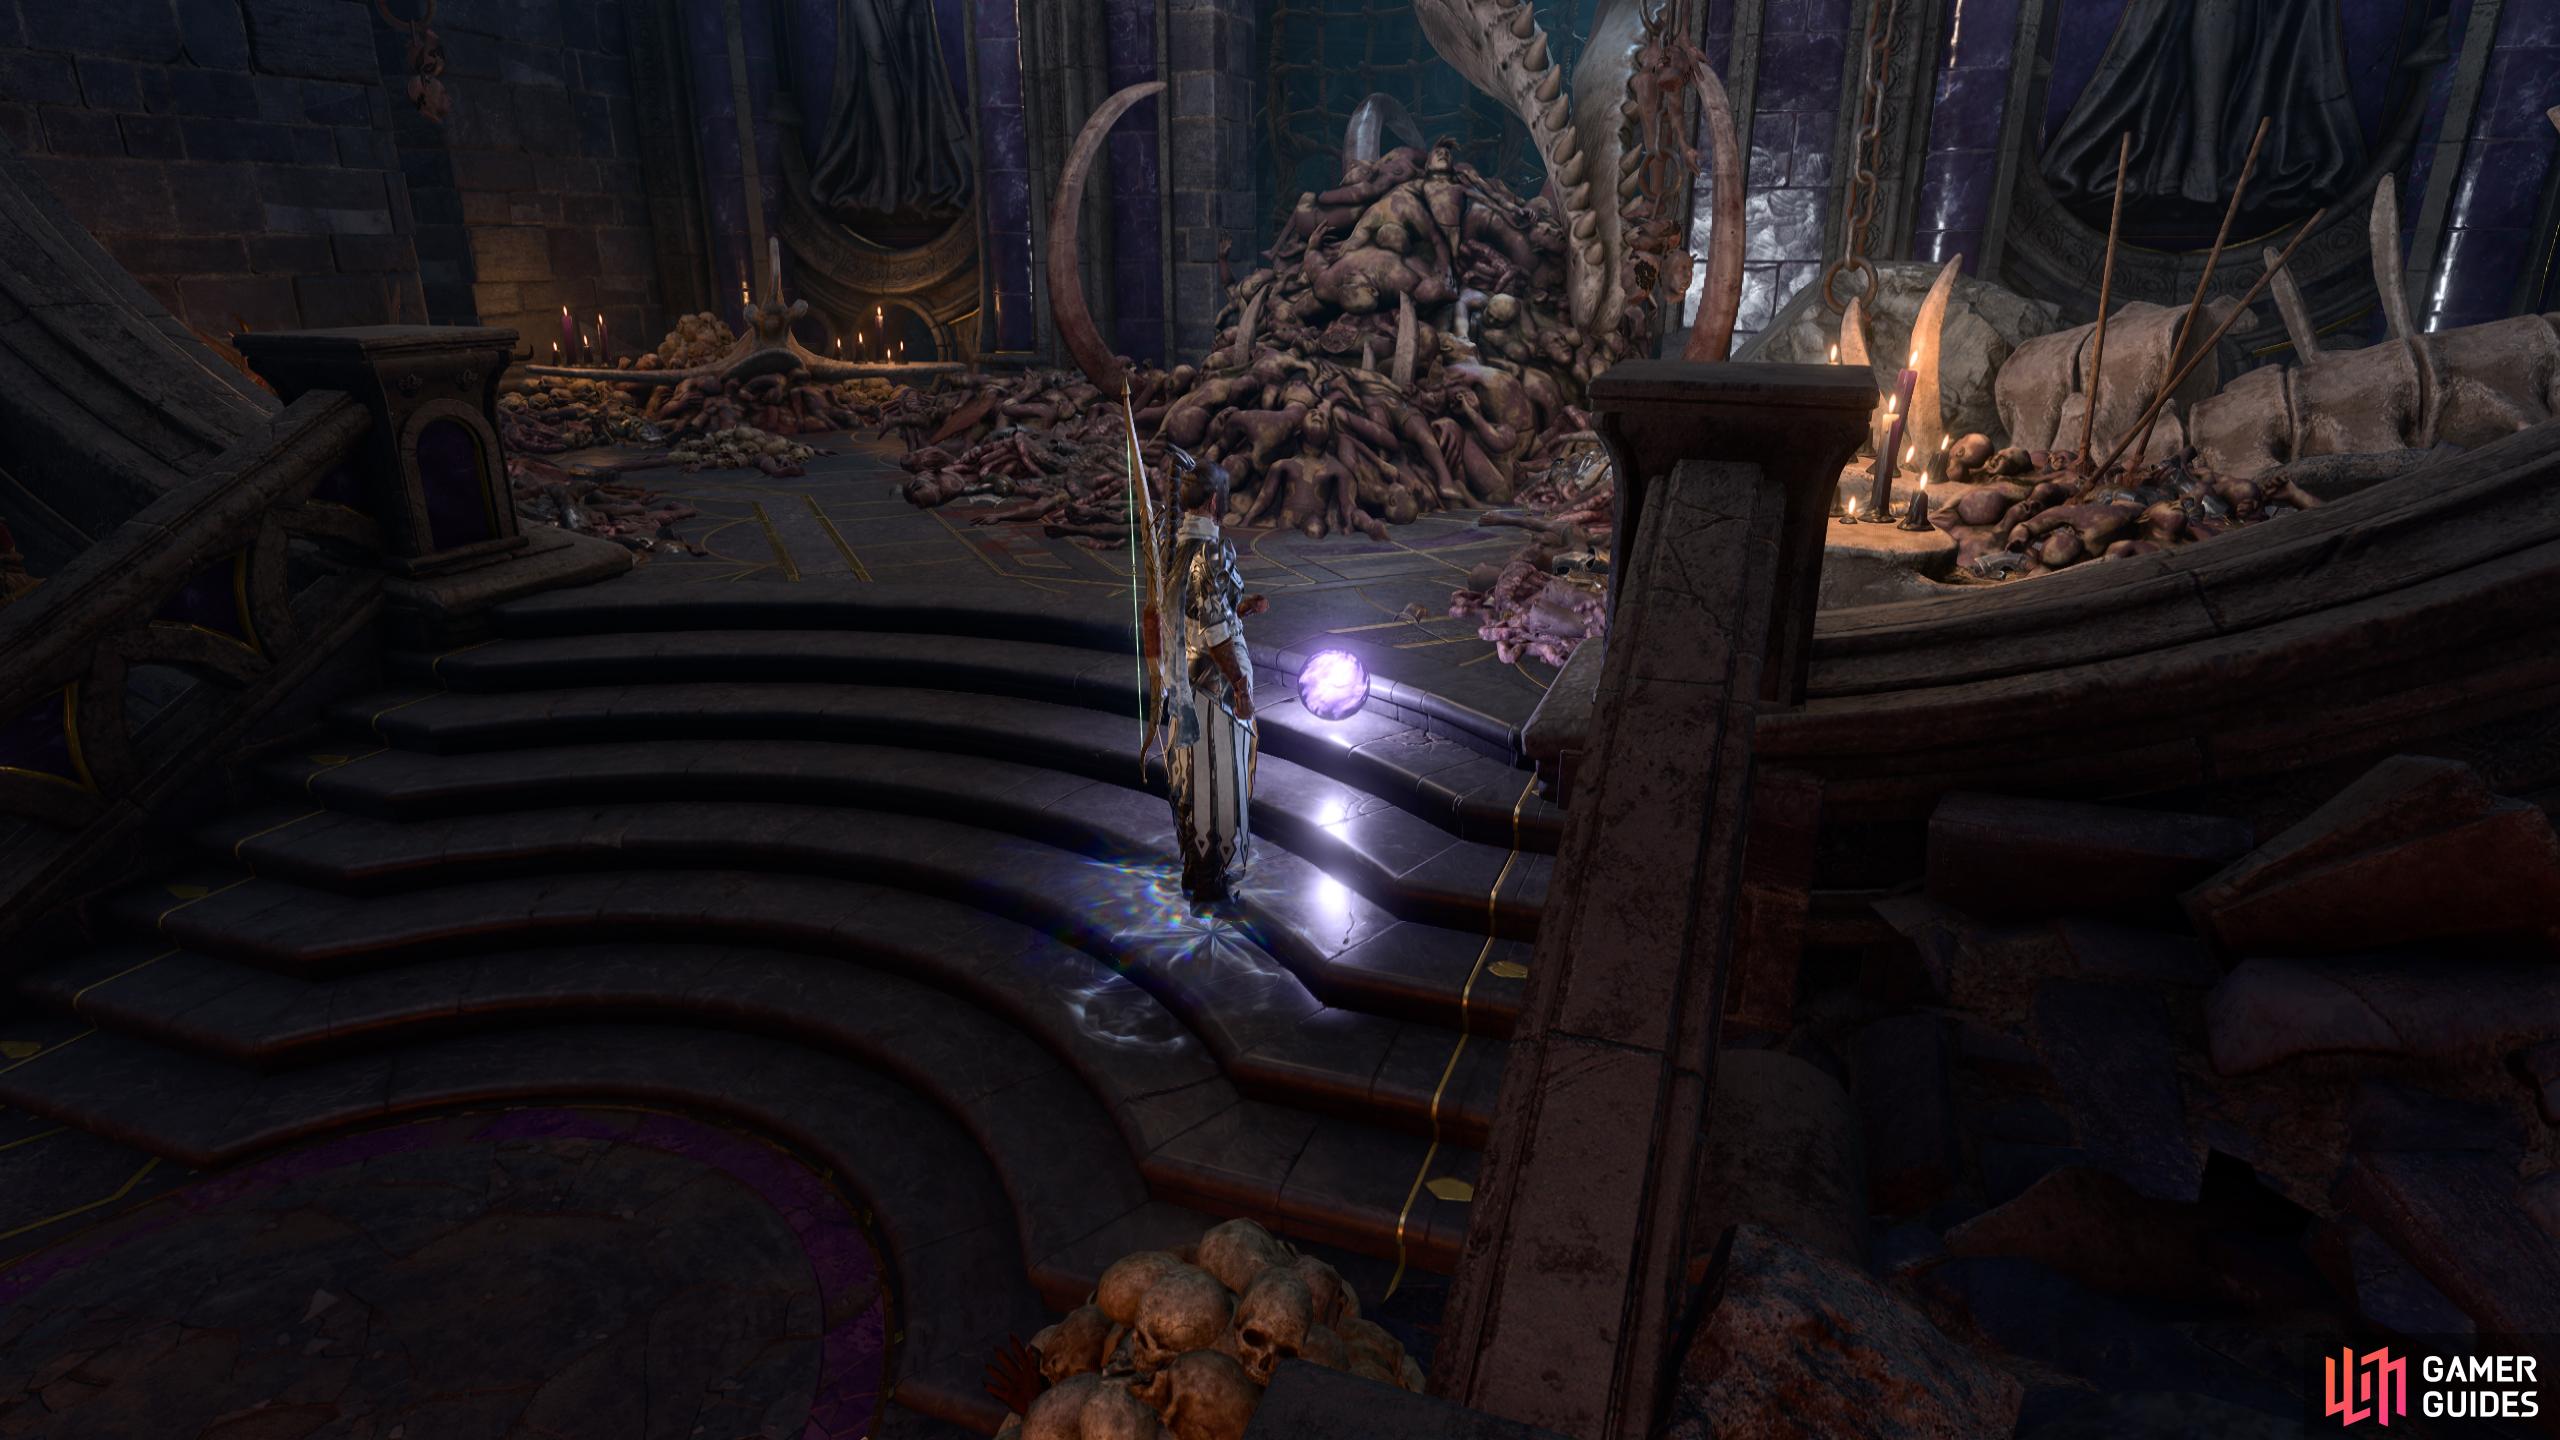
There are four Umbral Gems to find at the ![]() Gauntlet of Shar in Baldur’s Gate 3, all of which require you to either complete a trial or deal with the devil. Although you need these gems to progress through the Gauntlet, it’s also part of
Gauntlet of Shar in Baldur’s Gate 3, all of which require you to either complete a trial or deal with the devil. Although you need these gems to progress through the Gauntlet, it’s also part of ![]() Shadowheart’s personal quest to become a Dark Justiciar. Read below to find out where to find all four Umbral Gems, and what to do with them once you have the gems.
Shadowheart’s personal quest to become a Dark Justiciar. Read below to find out where to find all four Umbral Gems, and what to do with them once you have the gems.
You’ll need four Umbral Gems to get through the Gauntlet of Shar.
How to Get the Umbral Gems in BG3
The four Umbral Gems can be found in the following locations:
- Completing the Soft-Step Trial (Gauntlet of Shar waypoint)
- Completing the Self-Same Trial (Gauntlet of Shar waypoint)
- Completing the Faith-Step Trial (Gauntlet of Shar waypoint)
- Yurgir the Orthon’s Lair (East side of the map)
Soft-Step Trial Umbral Gem
You’ll encounter the Soft-Step Trial first unless you head east instead to the Orthon’s lair which is the opposite direction from the trials. From the entrance of the temple, head north until you reach the Verge of Shadows room. Here, you’ll need to complete a simple puzzle to progress further. There is a statue in the middle of the room that has an invisible wall around it, stopping you from getting the item you need to unlock the door behind it.
What you need to do here is to turn off all the Mystic Thuribles of which there are eight of them. Unfortunately, they are too high for you to reach, so you’ll need to lower them all. Around the room, there are four side rooms each containing a lever. Lower all the Mystic Thuribles, then turn them off one by one which will unveil the invisible wall. Go into Tactical View ( ) and slowly make your way around the maze-like wall to get the item then unlock the door behind it.
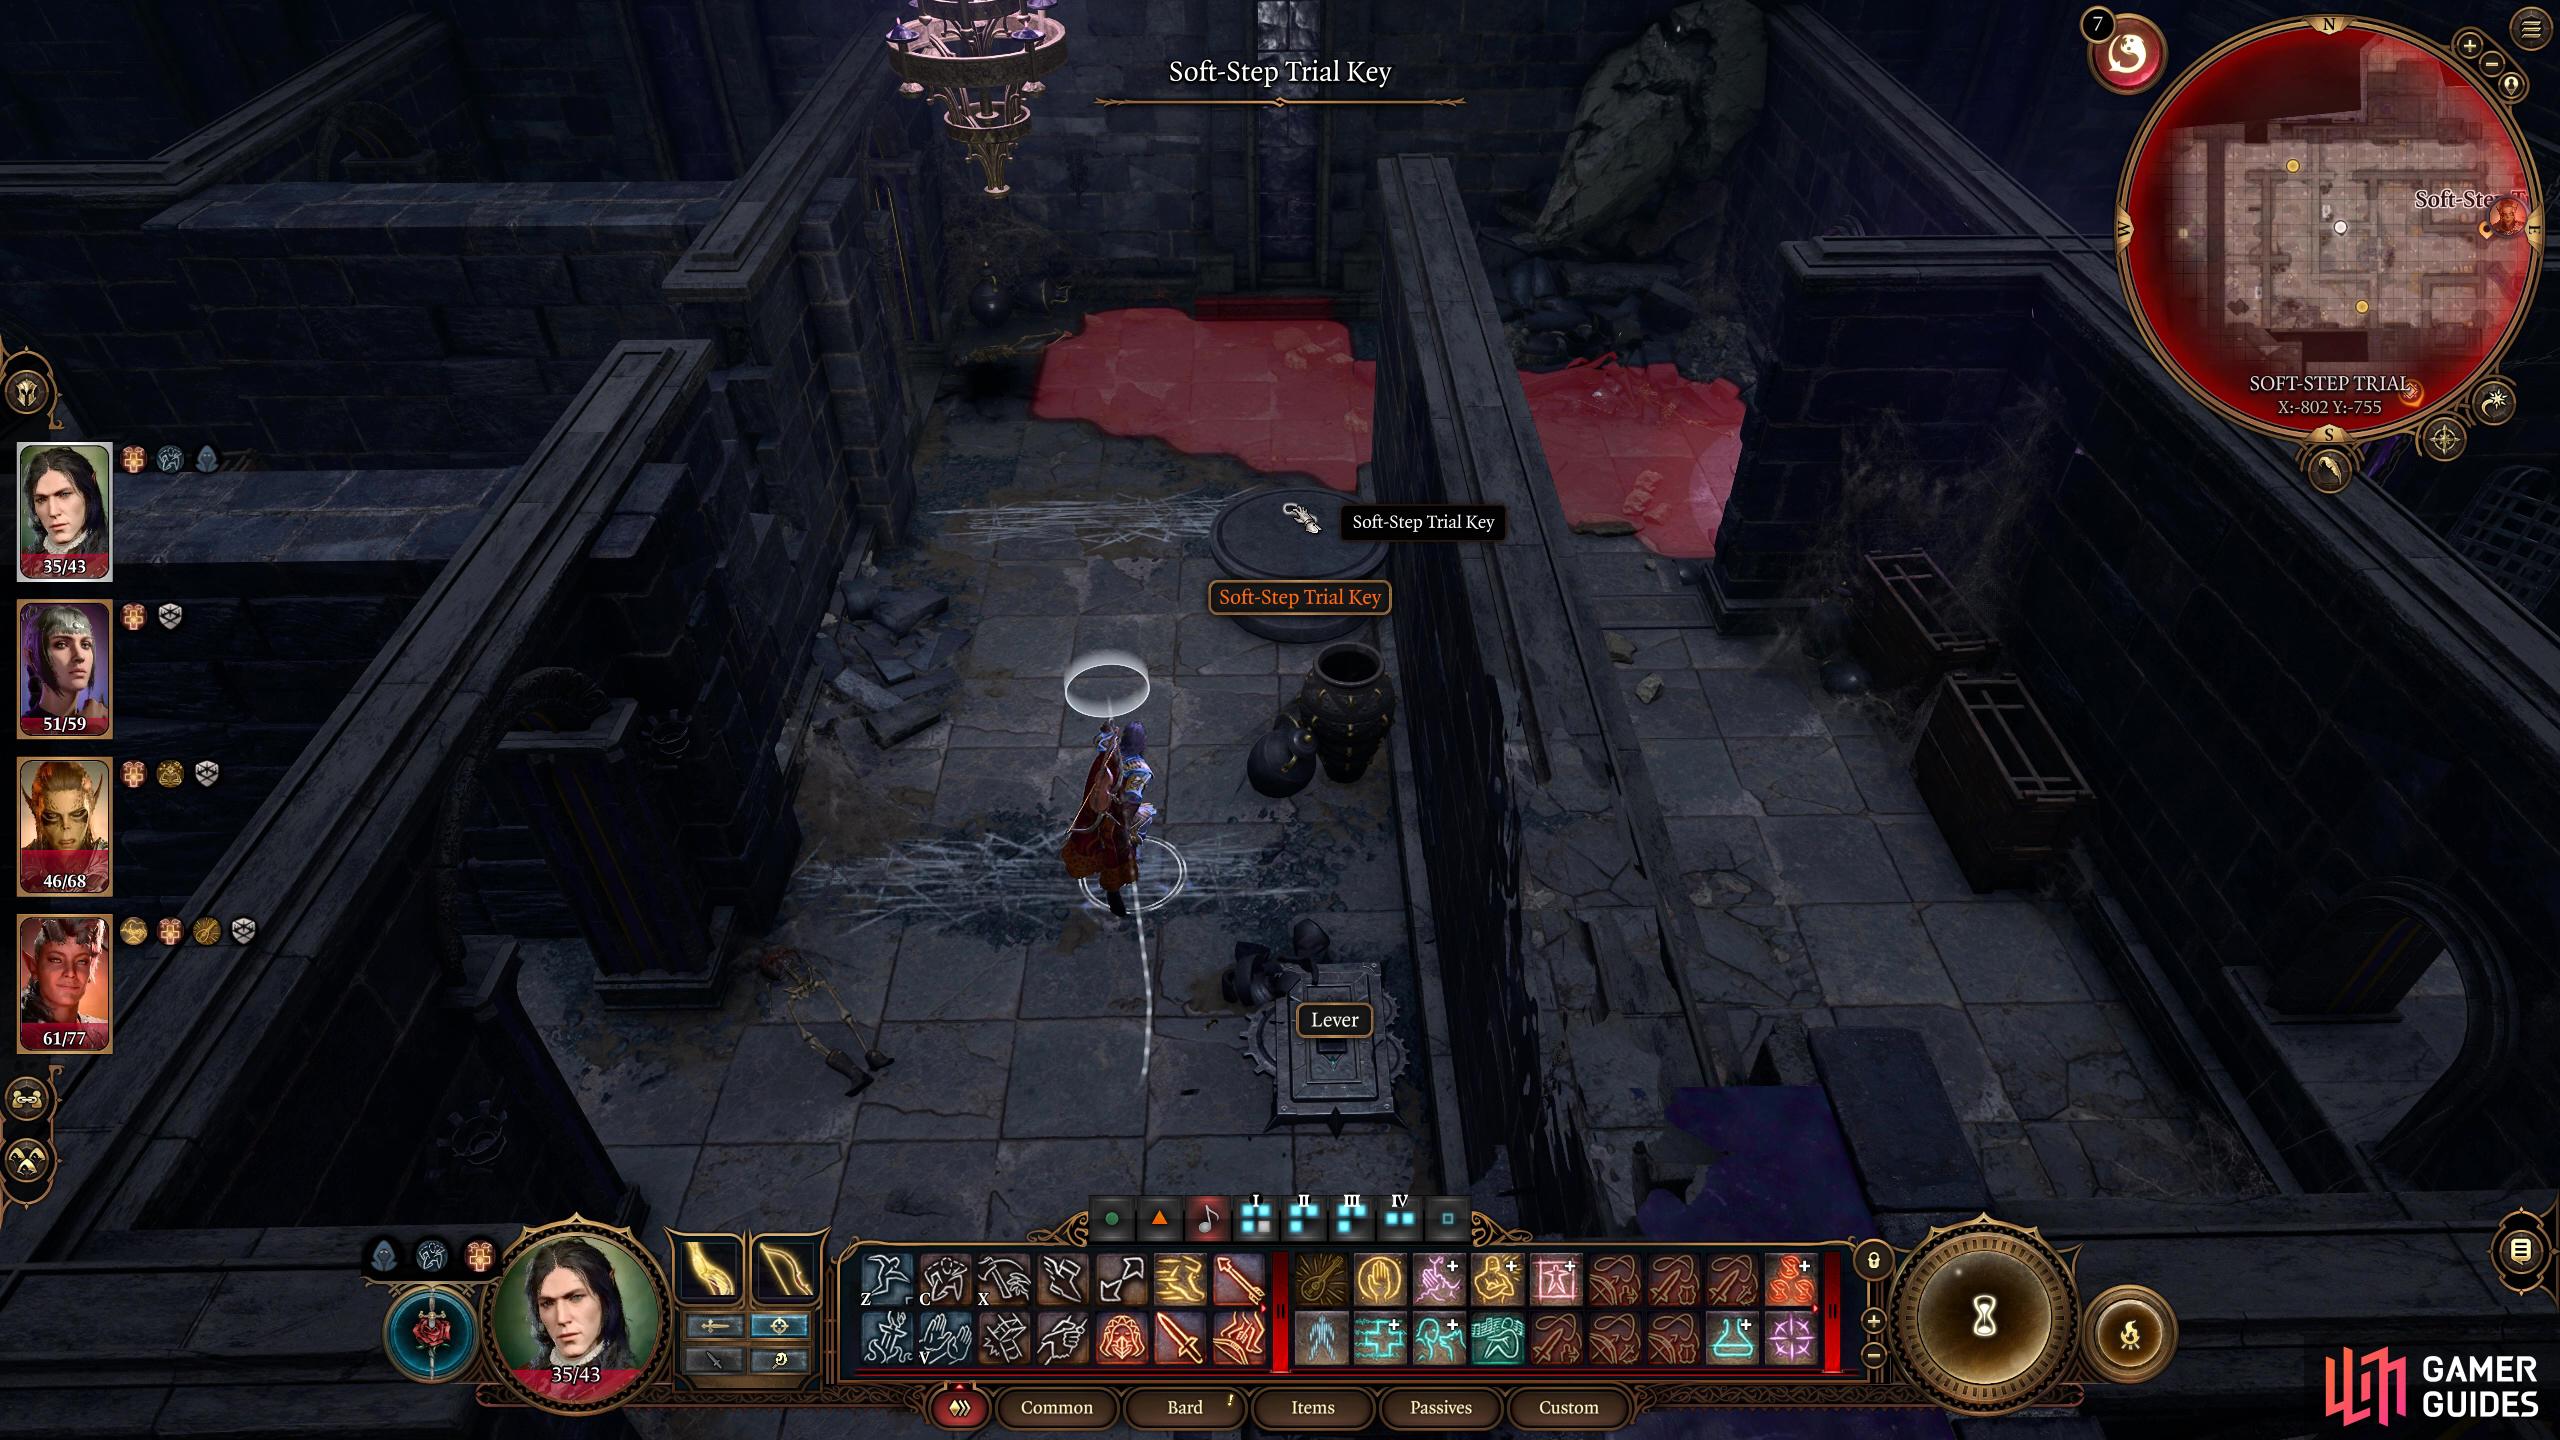
The Soft-Step Trial requires you to stealth through the room undetected; this Key will open the door at the end.
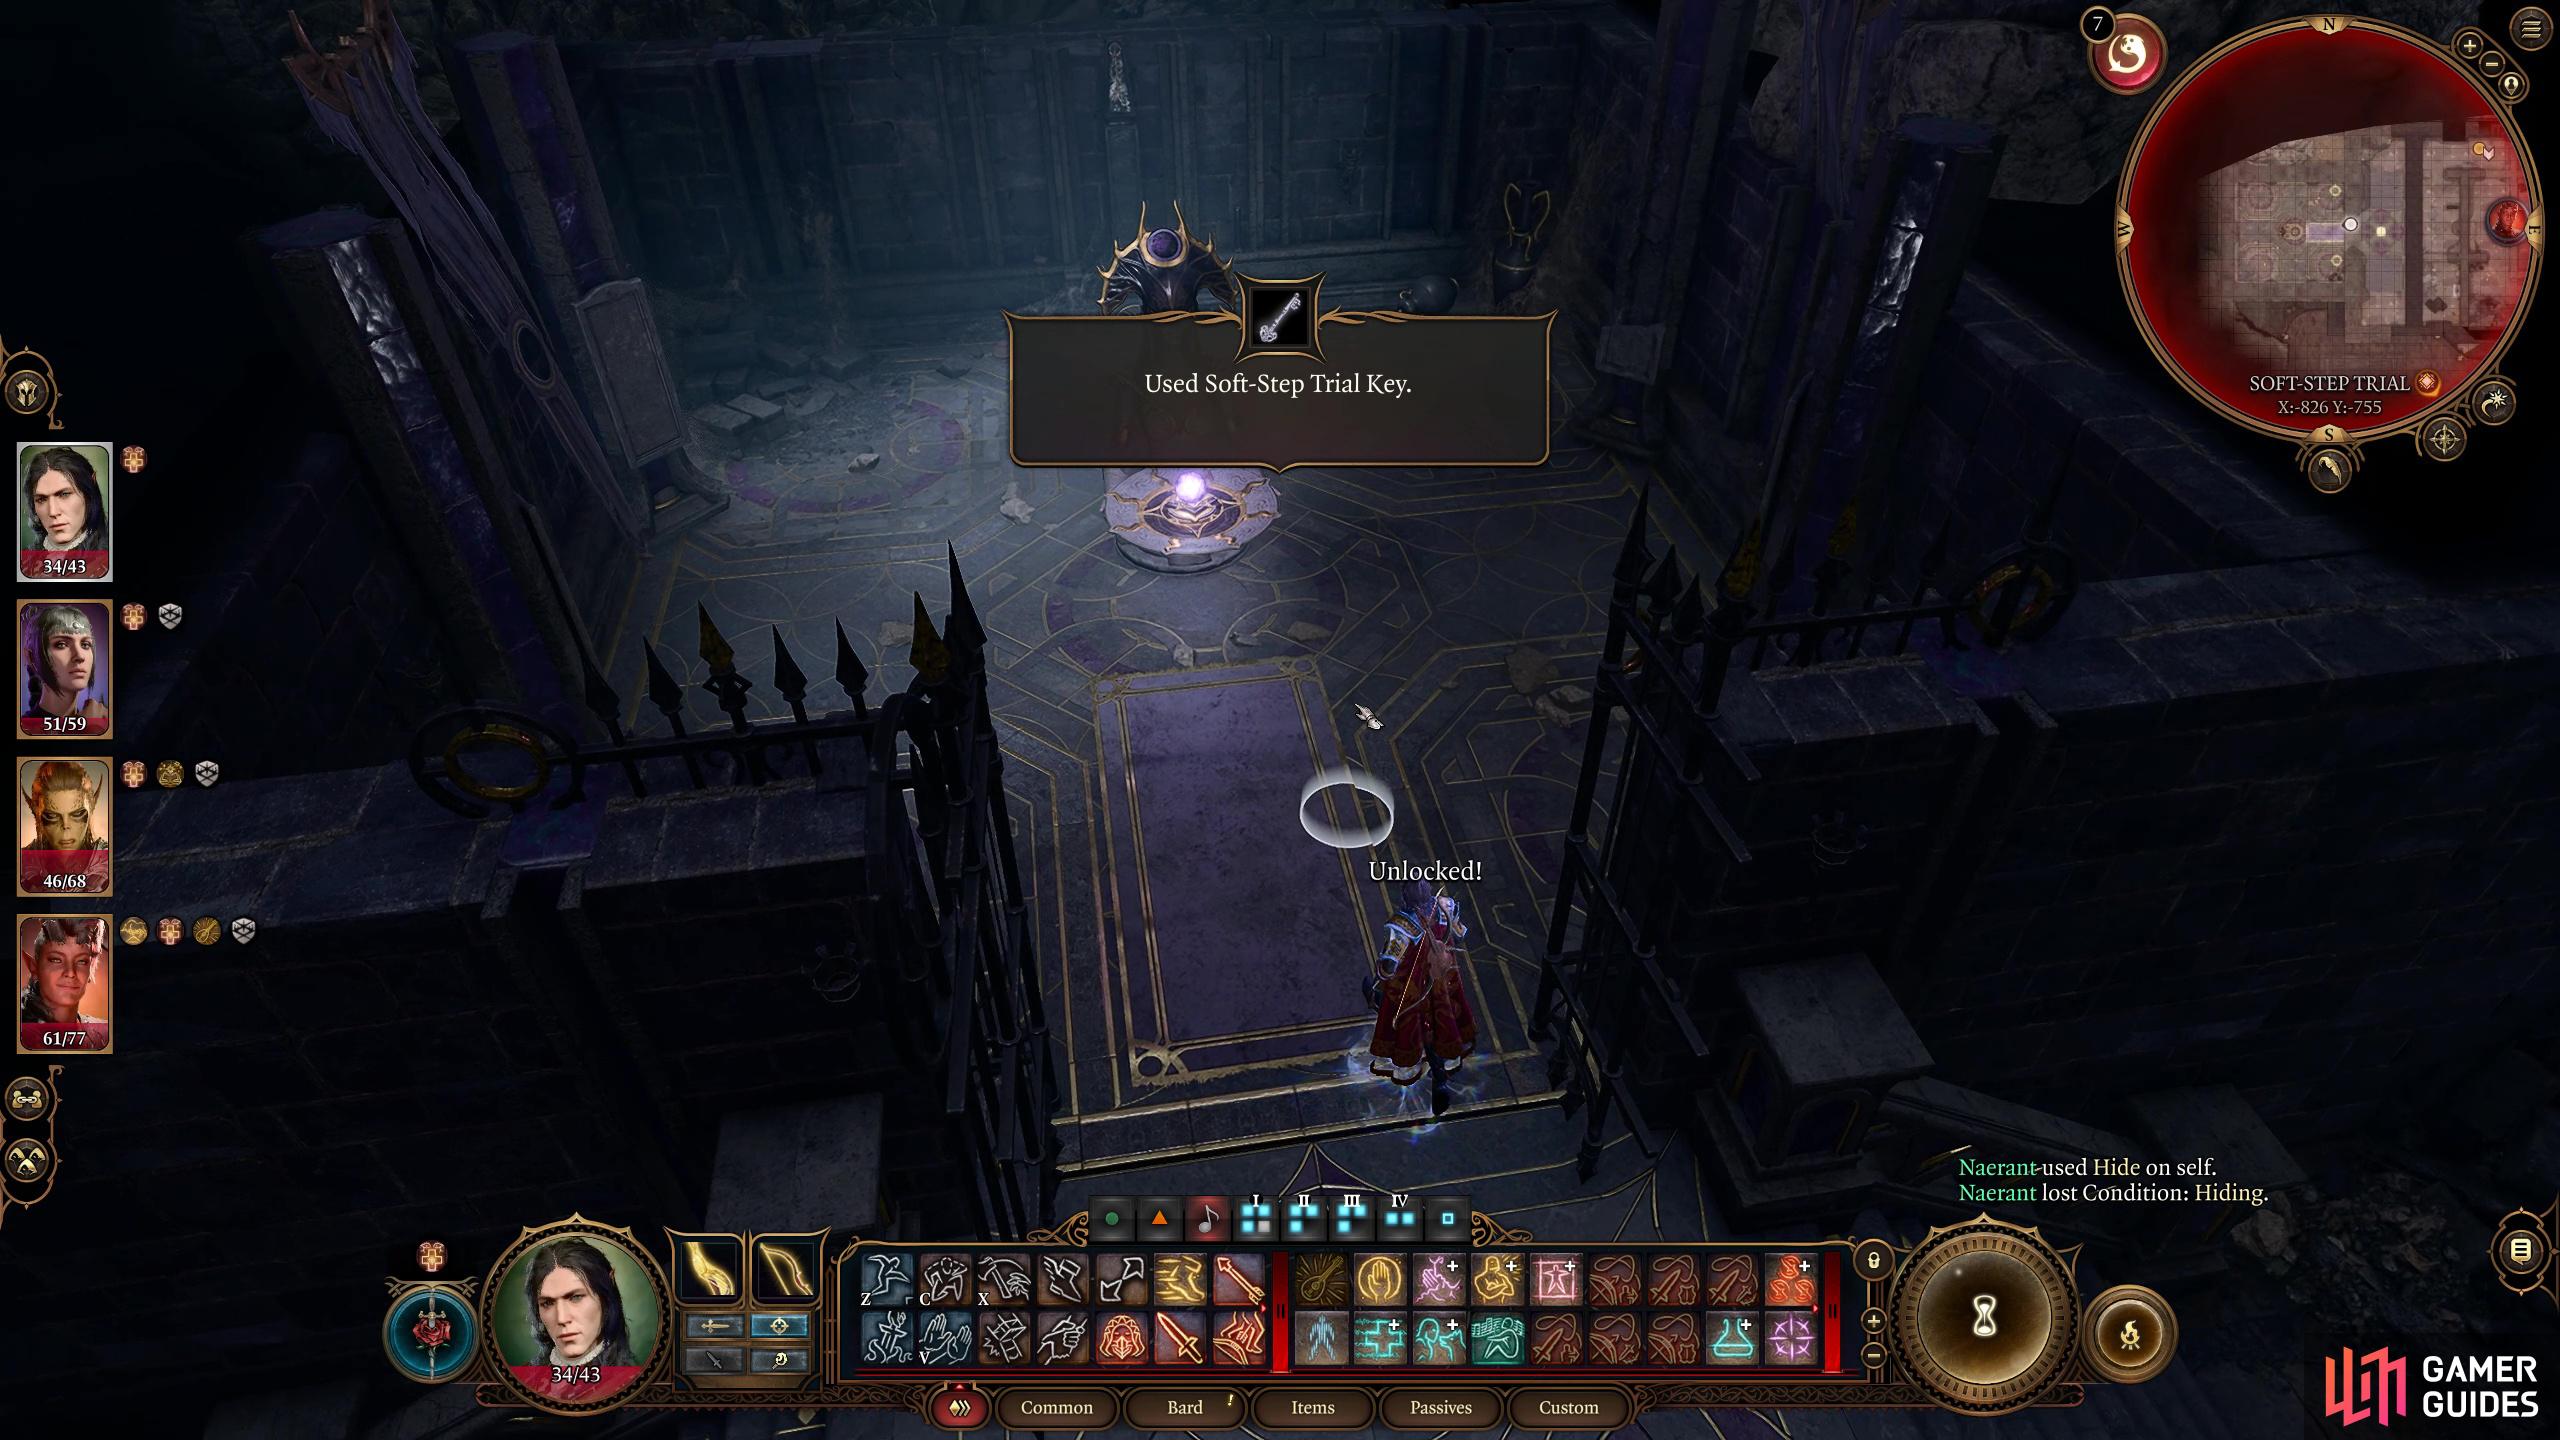
After you’ve unlocked the gate, pick up the Umbral Gem.
Continue north into the next room, and head west for the trials. As you head west, you’ll unlock the Gauntlet of Shar waypoint then follow the path north into the next room. Finally, head west again, and enter the first door you see to find the Soft-Step Trial. This is a stealth trial where you have to get to the end undetected to obtain the Umbral Gem. There are a few tricks to make this trial simple which you read about in our Soft-Step Trial guide. Once you get to the end, pick up the Umbral Gem from the altar, and use it to transport back to the beginning.
Self-Same Trial Umbral Gem
Arguably the most difficult trial to overcome as it is a combat trial against shadow versions of your party. The Self-Same Trial is next door down the corridor, next to the Soft-Step Trial. Open the door, use the Sacrificial Bowl to open the door at the other end, and head through.
Continue through the large open room until you initiate the battle, if you head toward the center, you can get the upper ground which is always nice to have. This battle is a mirror match where you’ll fight shadow versions of your current party. What makes things more difficult is you’re penalized for attacking anything other than your own shadow, for example, Shadowheart must attack the Shadowheart clone otherwise she will incur the Cheater’s Folly penalty which will reduce all of her ability scores by 1 up to a maximum of 3.

Use the Sacrificial Bowl to start the trial.
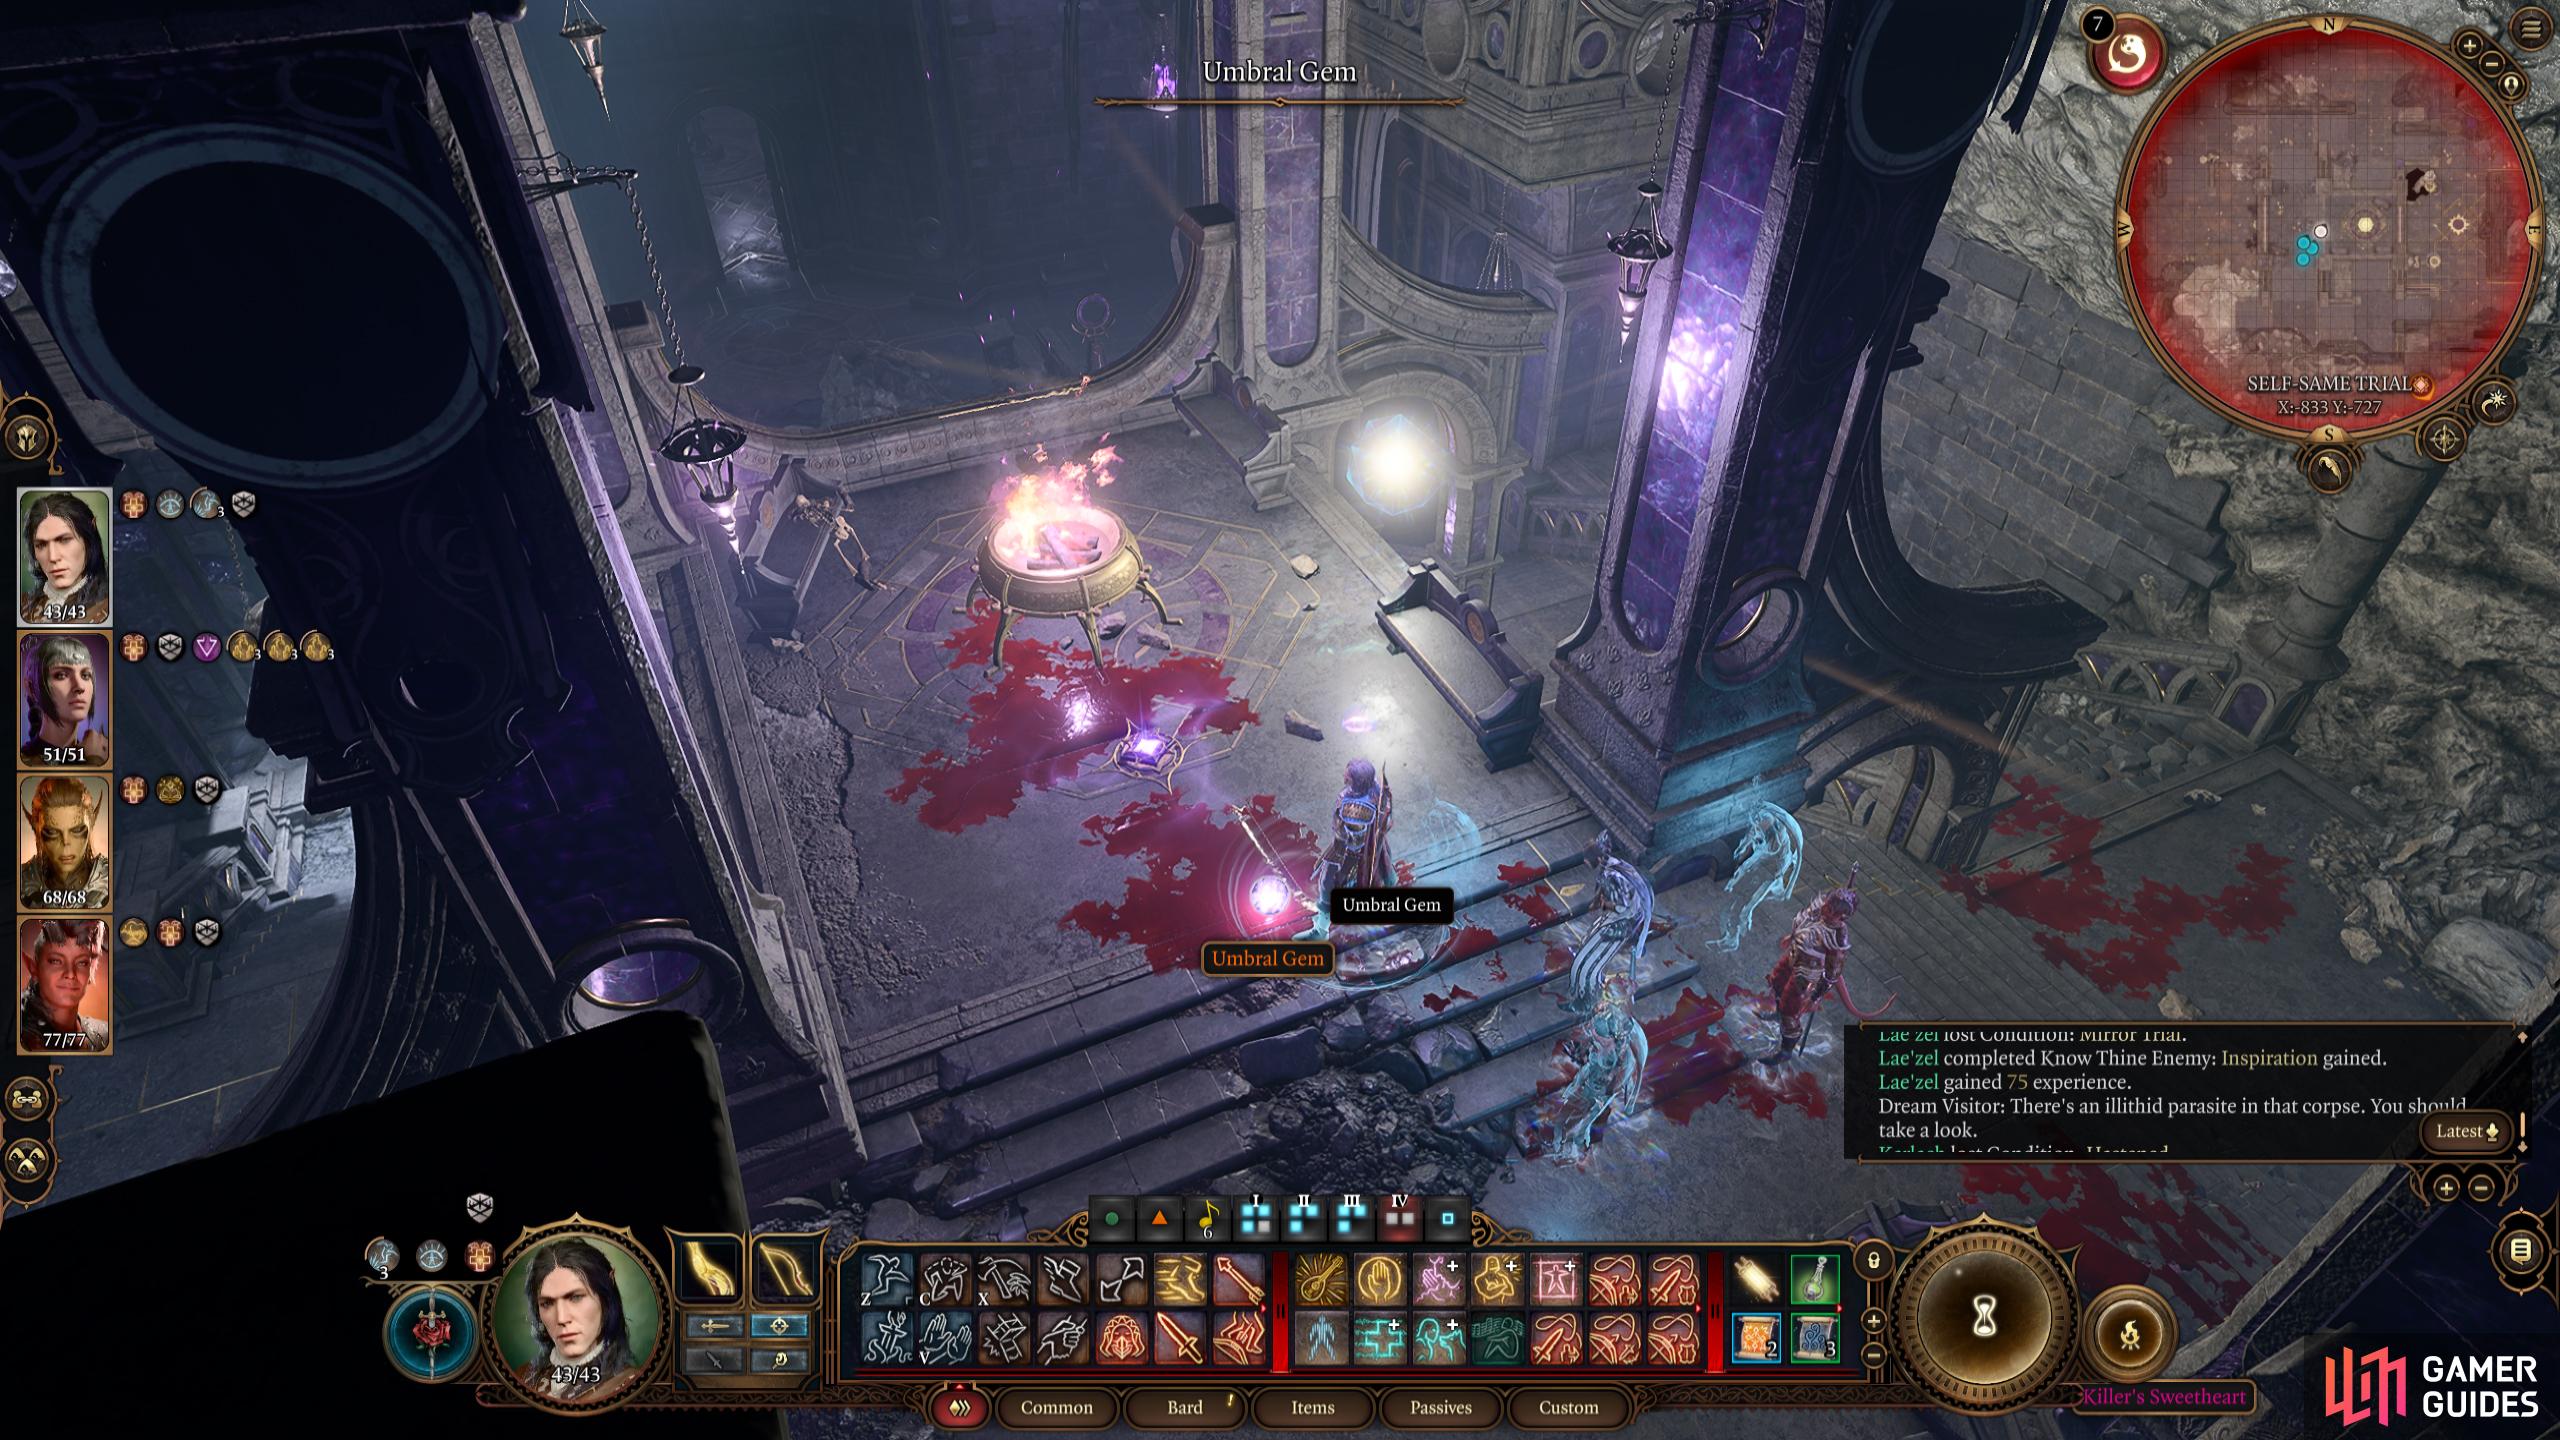
The Umbral Gem will drop off the last person you defeat.
Obviously, this battle will have a lot of variables depending on your party makeup, their level, the difficulty you’re playing on, and so on. For this reason, we can’t give you a definitive strategy for the battle, but we can give you some tips.
- Head to the highest part of the room in the center, if you control the high ground, you can control the battlefield.
- The Shadows regularly go in and out of invisibility, so make sure you have a way to see invisible whether that is through gear, scrolls, or potions.
- If you don’t have the above, use the Cleric spell
 Daylight, and place a sphere in the center of the arena, this will stop the shadows from hiding.
 - If you can finish someone off with a different character, it’s worth taking the Cheater’s Folly penalty to get them out of the battle.
- Use a Potion of Speed for every party member, these are really strong in general and allow you to perform a few attacks in one turn. These will give you an advantage over the shadows as they won’t use potions.
- Once a party member has defeated their shadow, use them to buff up the other party members with scrolls if you have them, this can speed up the battle.
Once you’ve defeated the shadows, pick up the Umbral Gem from the last person you defeated, then head back to the corridor outside the room.
Faith-Step Trial Umbral Gem
For the Faith-Step Trial, you’ll need to head to the floor below by taking the stairs down at the end of the corridor. What you need to do for this trial is follow a darkened path that will disappear as you go across the room, so you’ll need to remember where the path is before you traverse it.
As you enter the door, don’t go in just yet, instead, move your camera over the center of the room as this will show you the entire path that you need to take. As you head in, this will begin to disappear. When you’re ready, interact with the Sacrificial Bowl, and begin the trial. If your memory isn’t what it used to be, then follow the path in the images below. When you reach the other side, pick up the Umbral Gem, and use the altar to teleport to the front of the room.
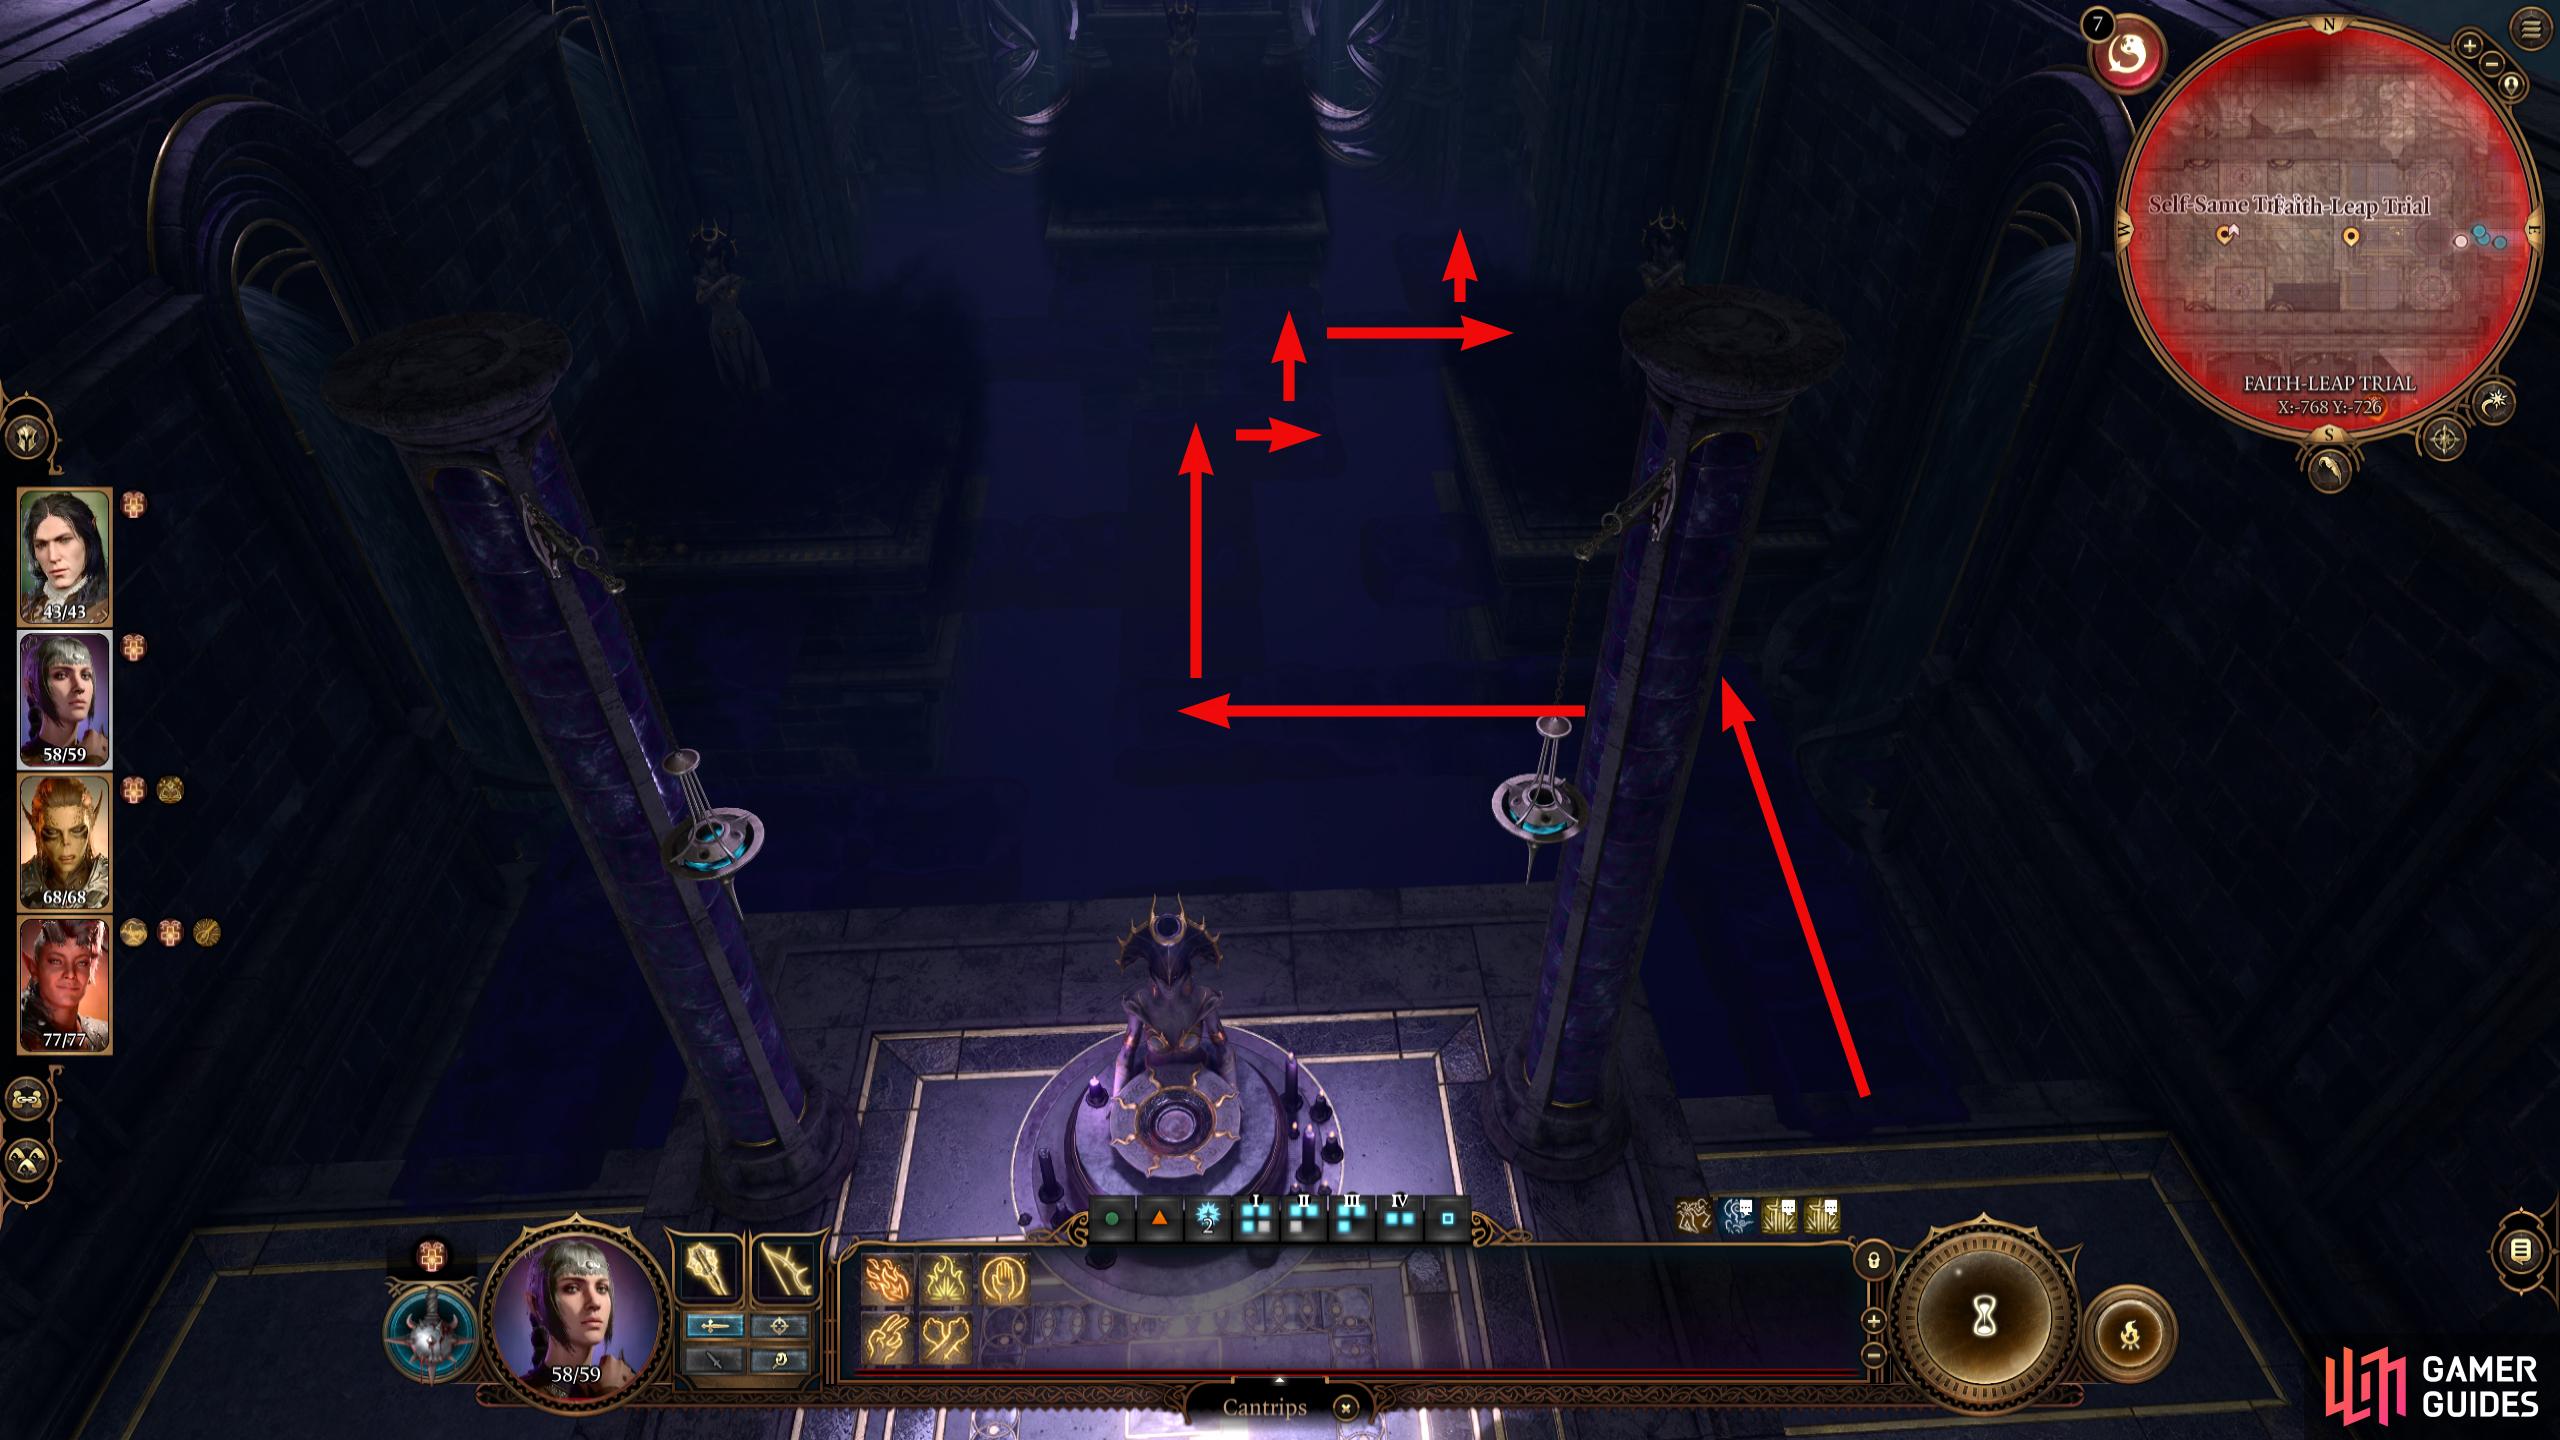
The Faith-Step Trial requires you to walk along a path that disappears which means you’ll have to remember where the path was.
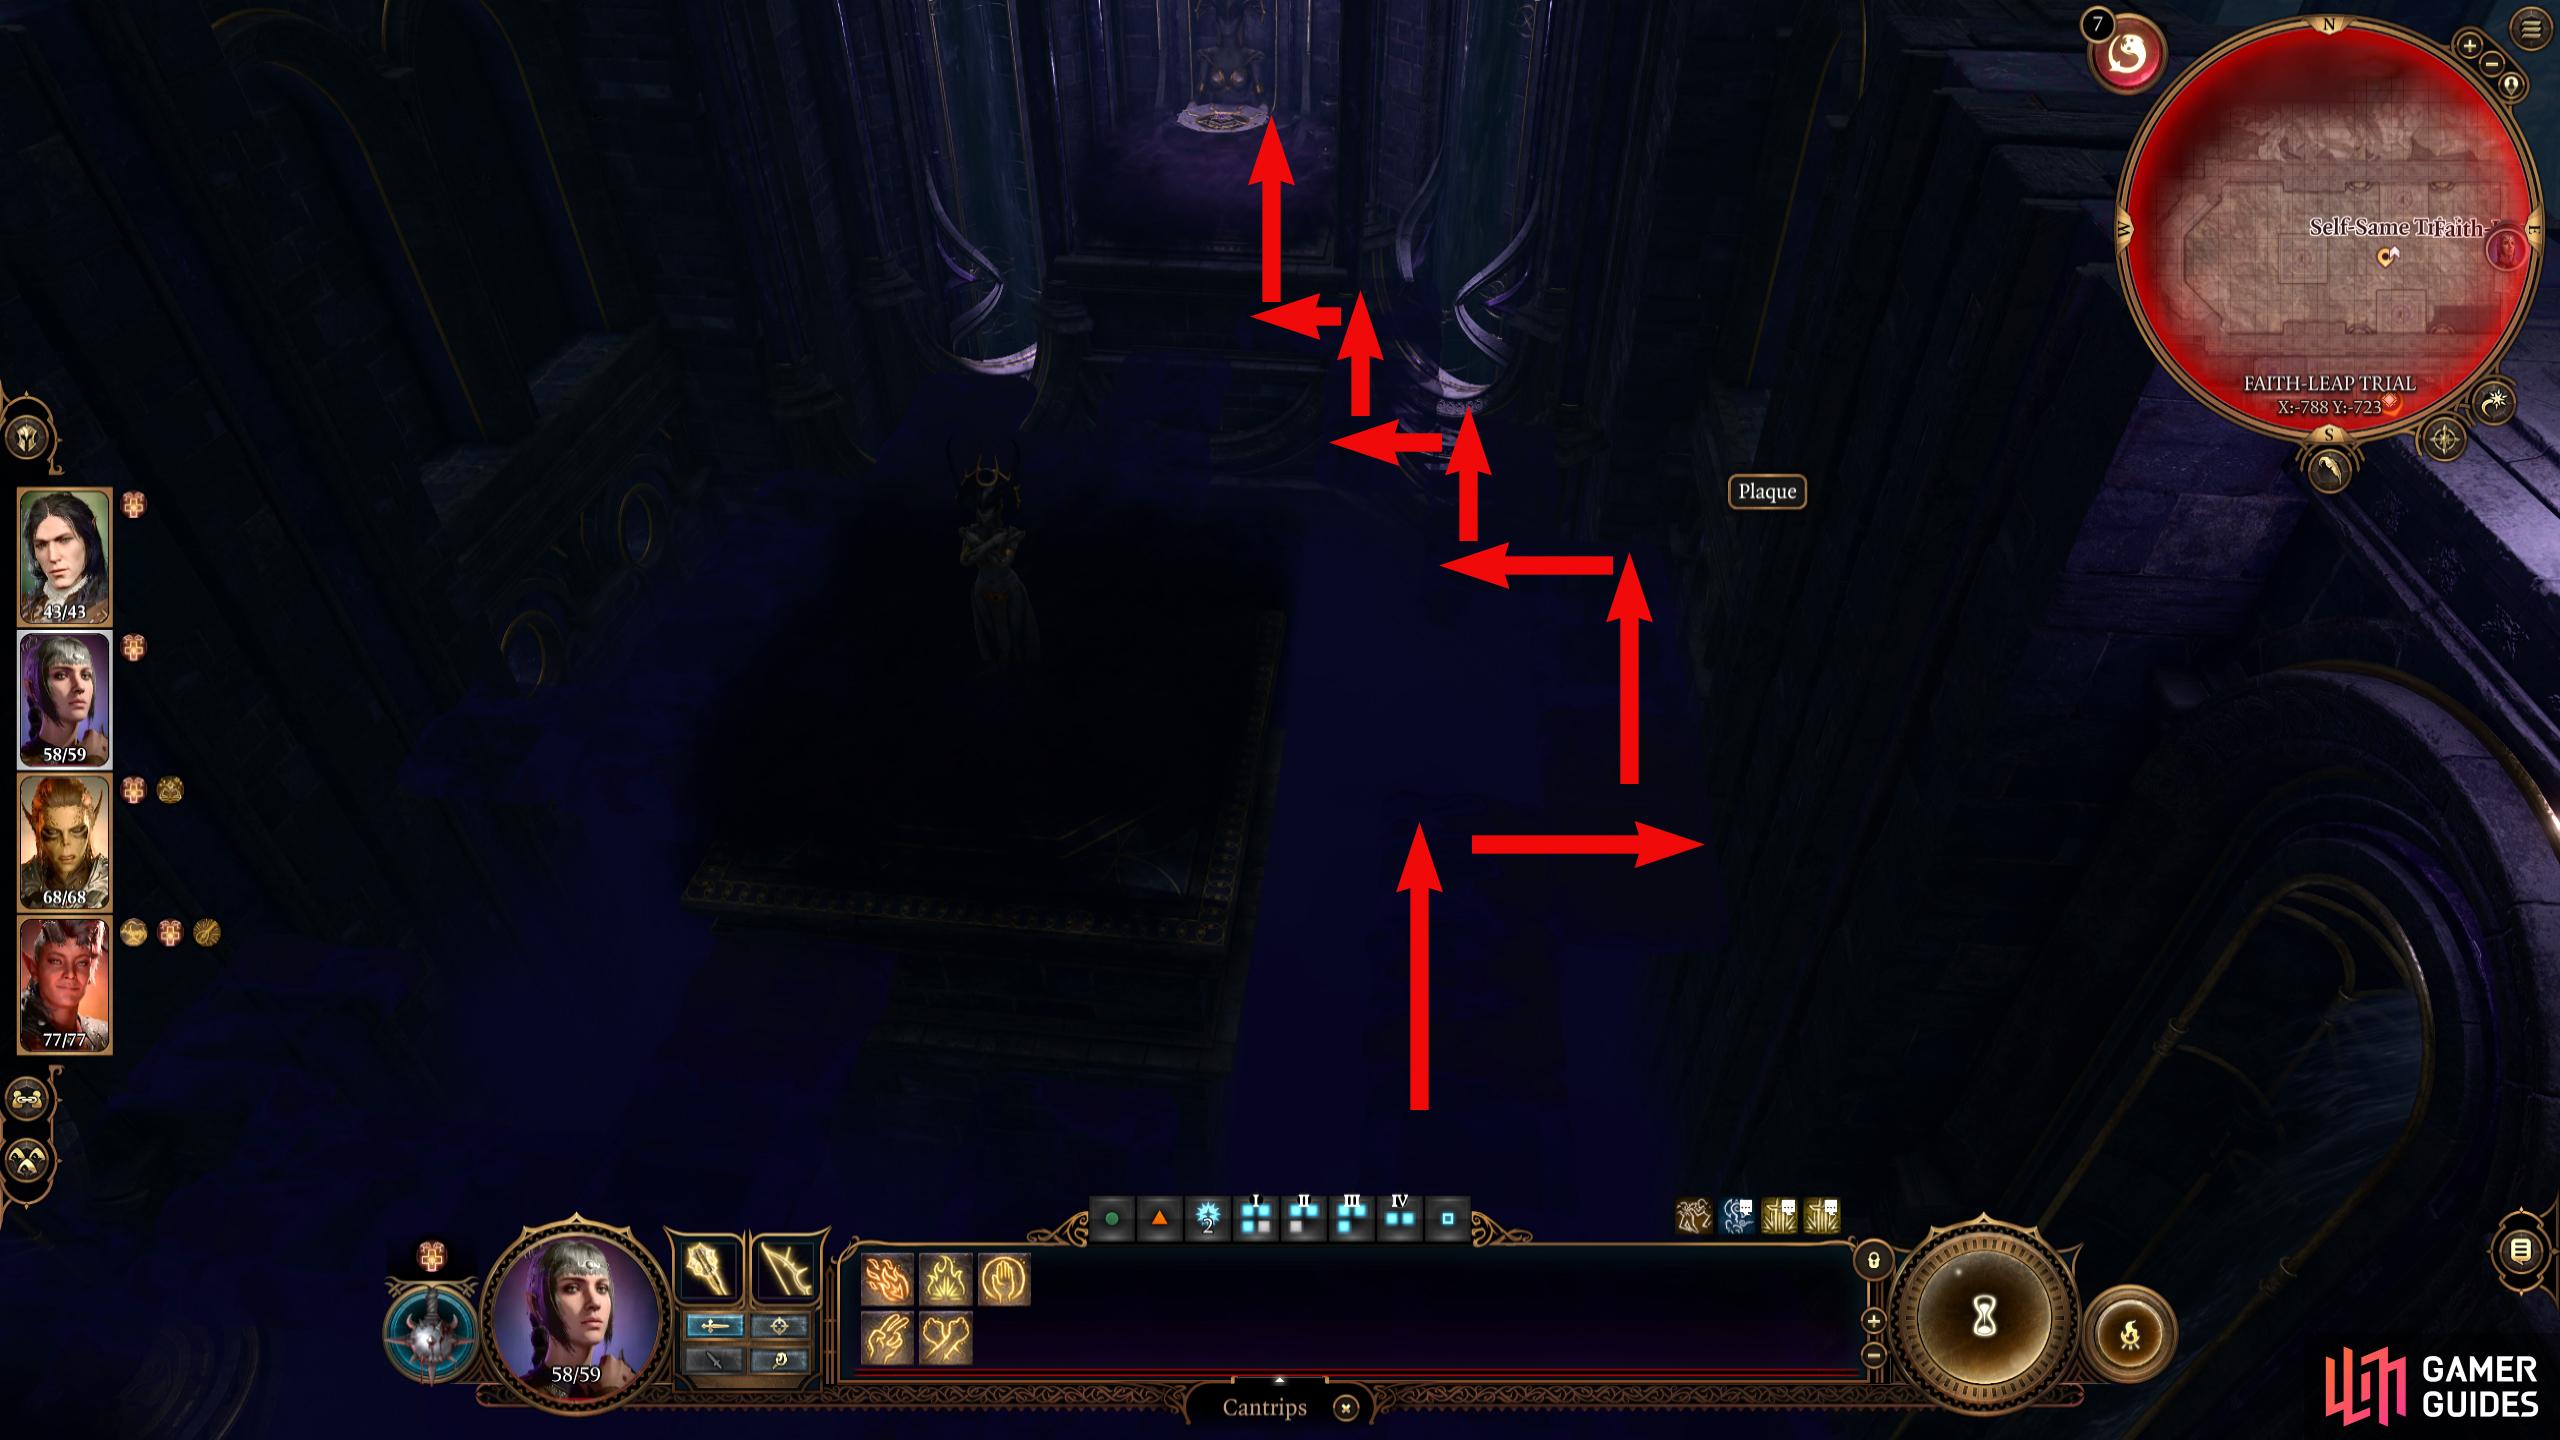
Or, you could just use our screenshots to remember the path for you!
Yurgir’s Lair Umbral Gem
Teleport back to the Gauntlet of Shar waypoint, but this time head east. As you follow the path east, you’ll see the Displacer Beast, don’t worry, it won’t attack you…yet. Follow the beast, and you’ll end up in Yurgir the Orthon’s Lair. This is the creature that Raphael wants you to kill, but both are terrible creatures, so pick whoever’s side you are on now as this will choose the way you handle this encounter. Regardless of how you end this encounter, you will still get the Umbral Gem as it is sitting on the stairs near his throne, so this is more for how you want your story to end up. You can side with Raphael by killing Yurgir, or you can side with Yurgir by freeing him. Both are bad choices, so pick your poison.
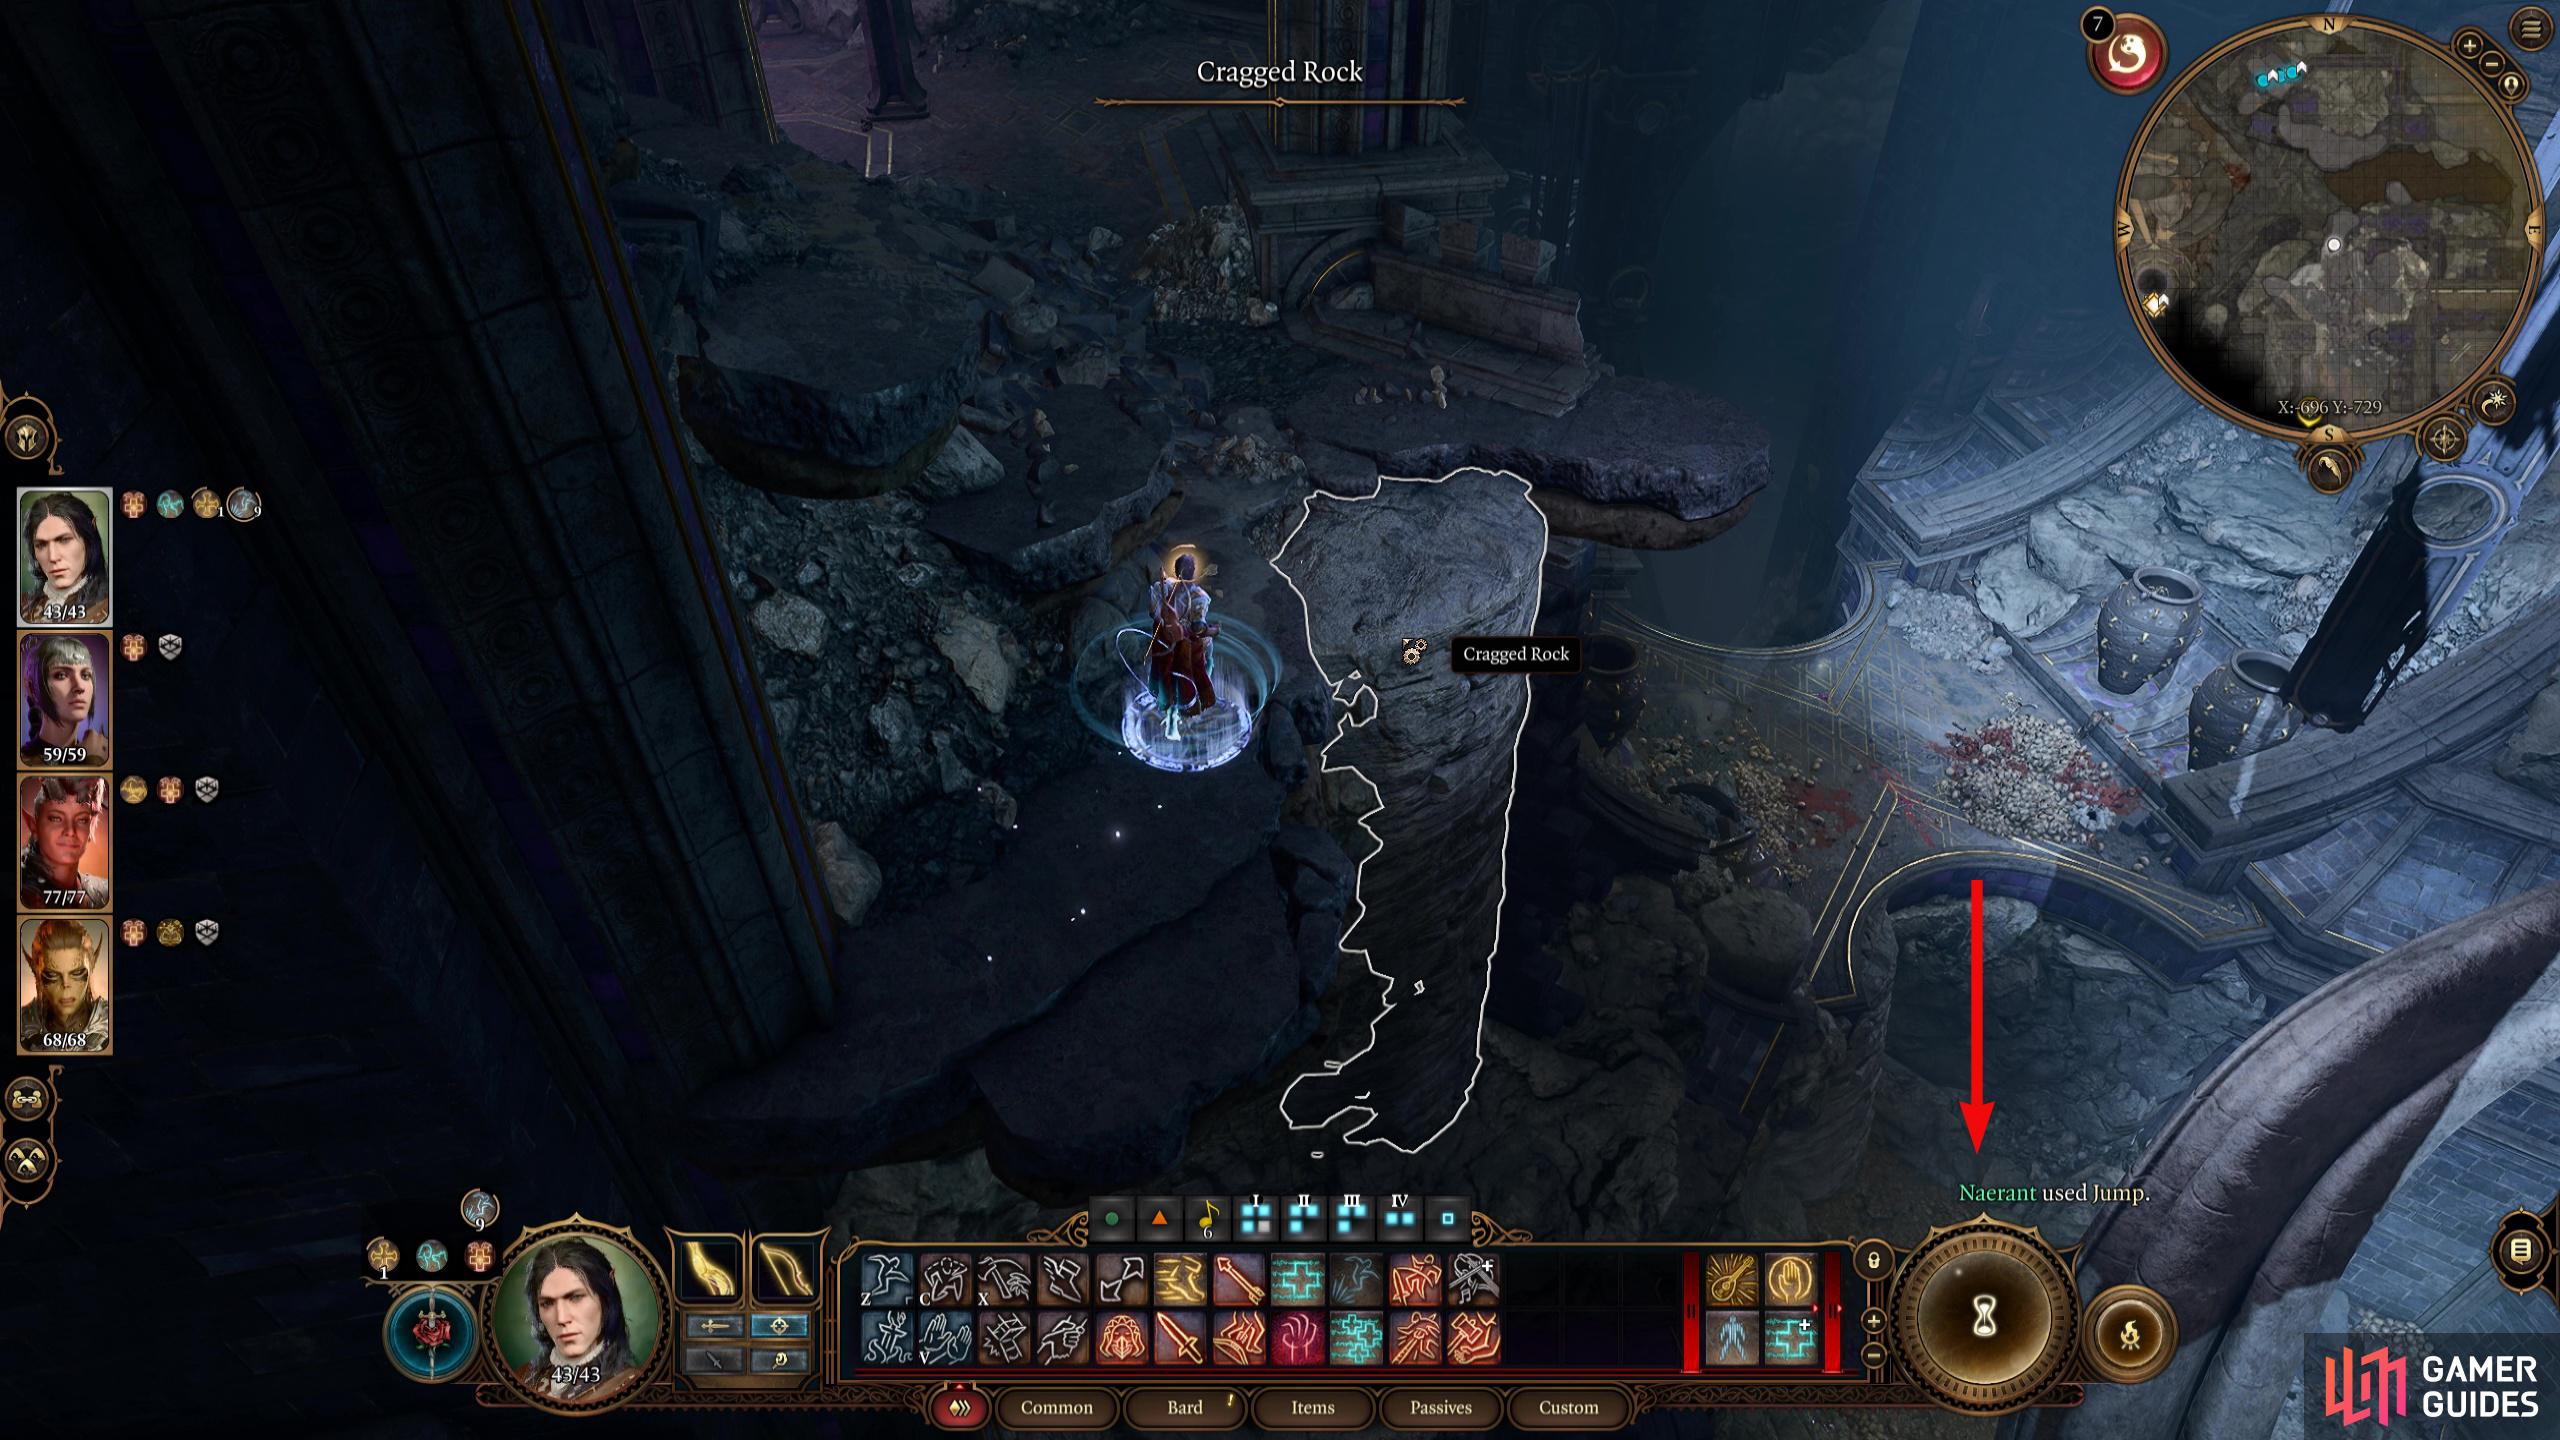
(1 of 5) In the west of Yurgir’s Lair is some ledges you can jump down, this will lead to a wall to climb.
If you side with Raphael, you’ll have a difficult battle with Yurgir, or you can persuade him to kill himself via the Persuasion and Bard choices. Still, if you side with Yurgir, you’ll have to break his contract which can be done by defeating the garrulous rats around the area. After defeating enough of them, head to the west of Yurgir’s lair, and jump the ledges to the area below where you’ll find a pit full of skulls. Here you’ll have to defeat hundreds of rats until Lythridor, the last Dark Justiciar spawns, then defeat him for some unique loot, as well as breaking Yurgir’s contract. Head back to him, and watch the scene play out before picking up the last Umbral Gem.
Where to Place the Umbral Gems
Now that you have all four Umbral Gems, head to the Ancient Altar in the center of the temple, east of the Gauntlet of Shar waypoint, and place an Umbra Gem in it to get the floating platform to work then jump on the platform, click on the Traversal Gem in the right corner of the platform to take you across the chasm. When you reach the other side, interact with the other altar and place the remaining Umbral Gem in it to open the door in front of it.
For the Faith-Step Trial gem, you don't have to remember the location. There is a map of the path on the floor in front of the sacrificial bowl.
For the Faith-Step Trial gem, you don't have to remember the location. There is a map of the path on the floor in front of the sacrificial bowl.