


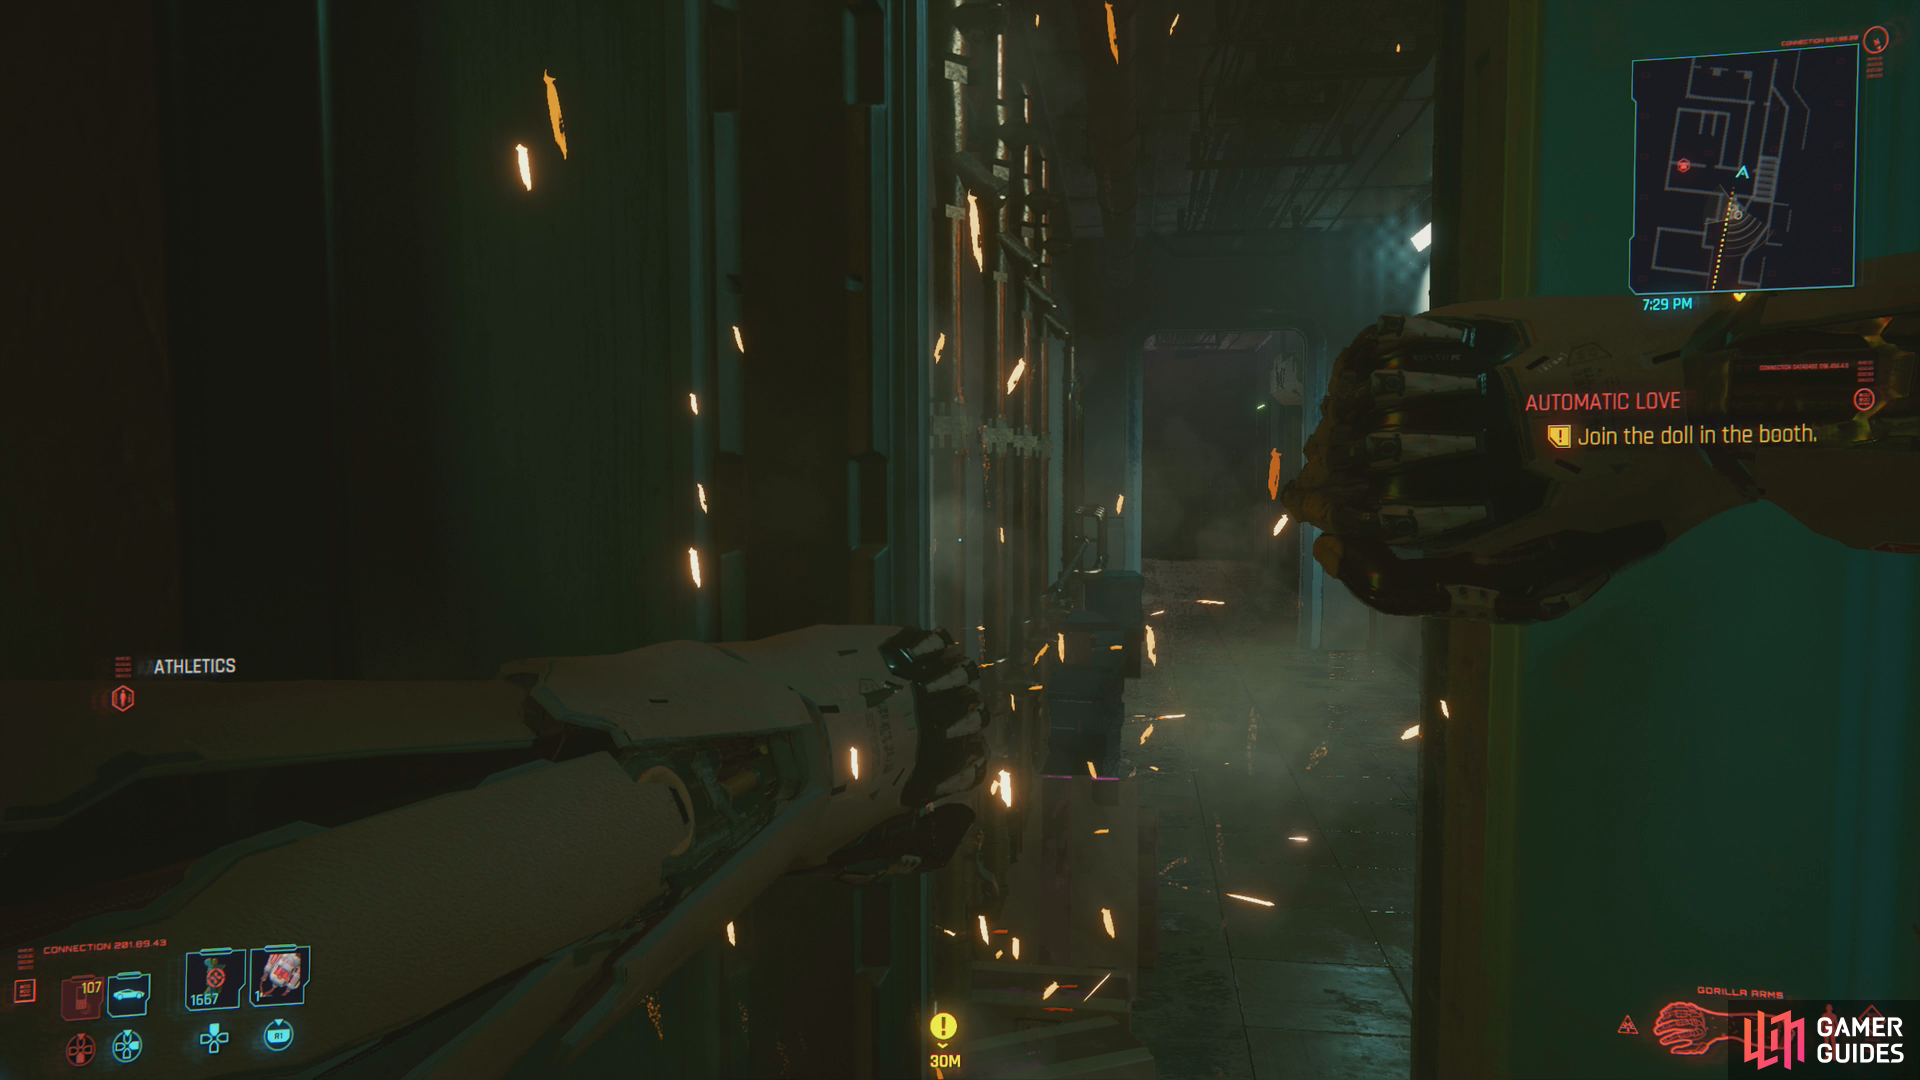
After completing Playing for Time you’ll find yourself spoiled for Main Jobs to advance. Of these, Automatic Love is our recommendation for the one you should pursue first, as you can finish this questline up sequentially (not something other Main Jobs can boast), and completing this questline will open up another questline, which can also be sequentially completed in its entirety. Plus, depending on your playstyle, you don’t even need to engage in combat during this job.

Meet Judy at Lizzie’s Bar to get a lead on Evelyn,
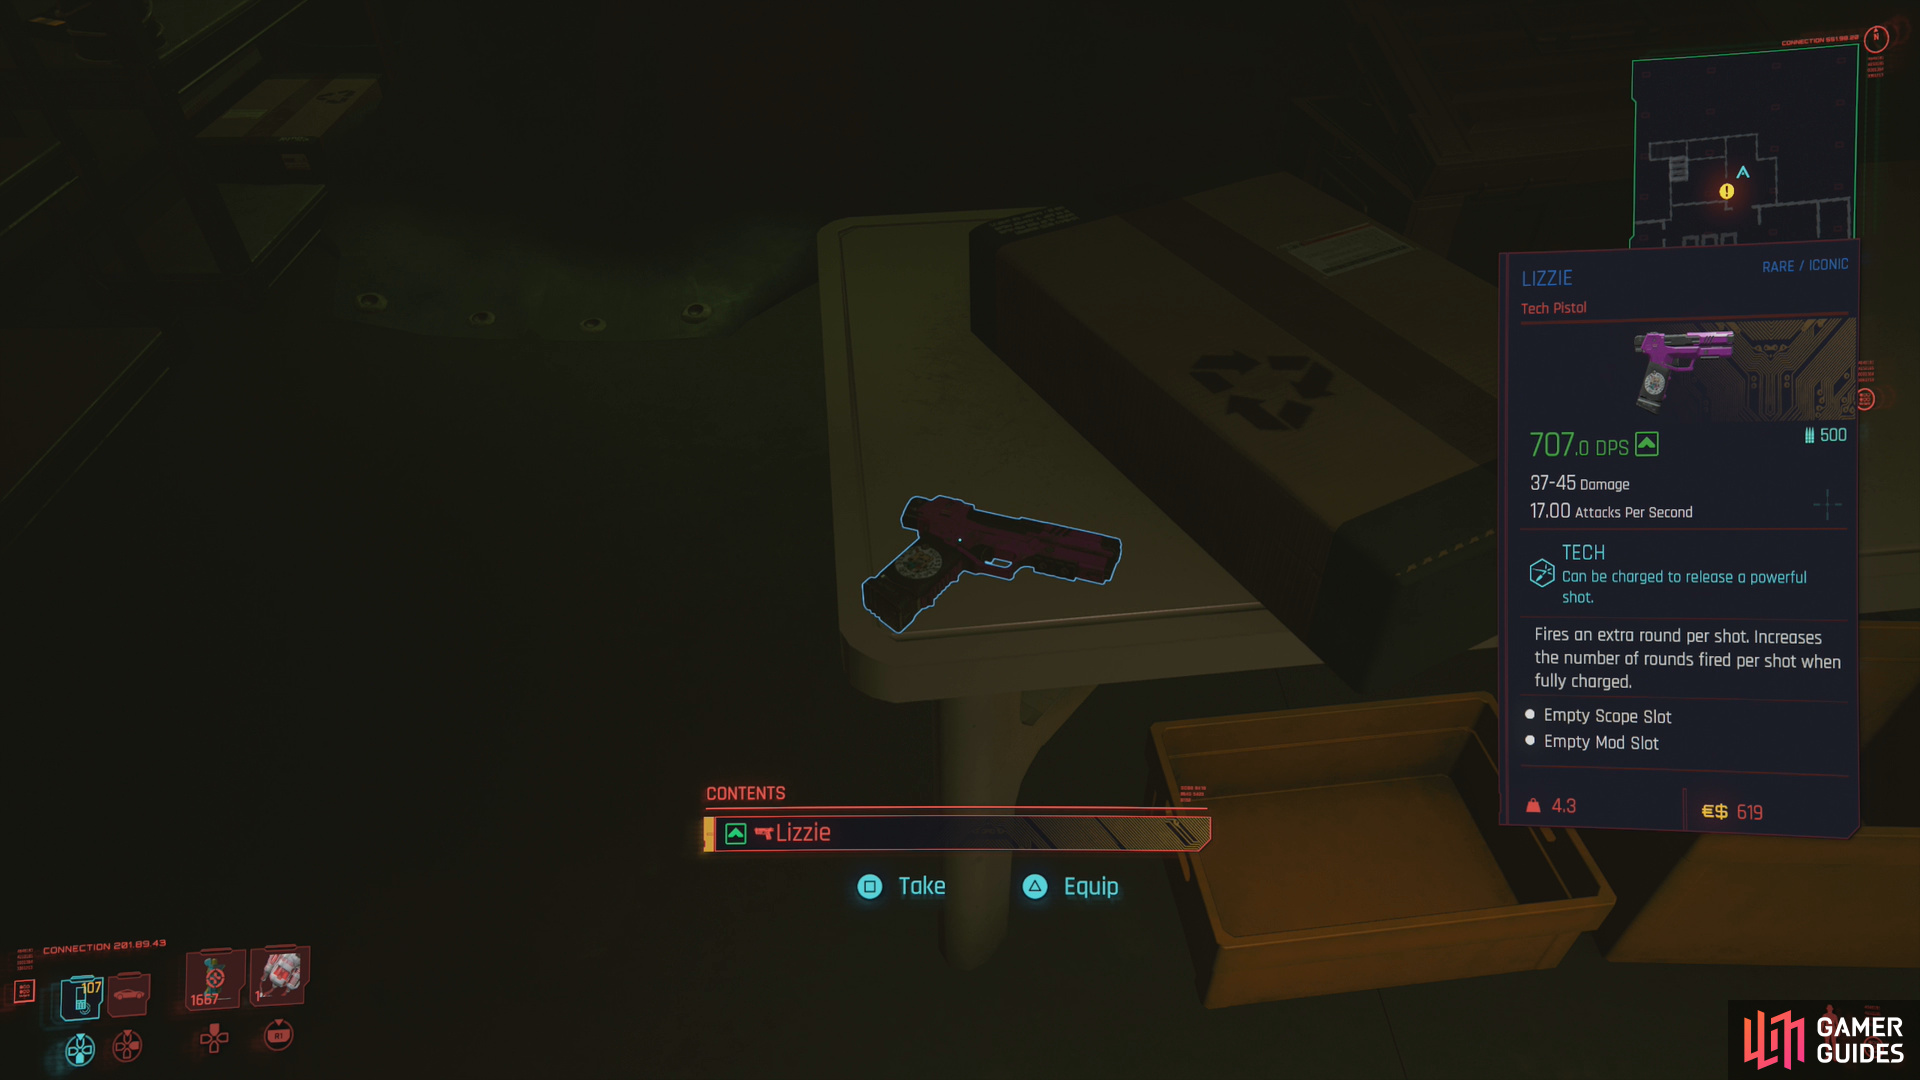
and grab the iconic gun “Lizzie” as you leave.
How to Complete Automatic Love in Cyberpunk
First up, you’ll need to meet with Judy, whom you can call ahead of time. Doing so doesn’t affect anything, so it’s really just a matter of choice. Wait until night (after 6:00 PM should do) and travel to Lizzie’s Bar, where again you’ll be bothered by the Mox bouncer before you’re allowed inside. Make your way down to Judy’s hideaway and talk to her. At length you’ll be given information about Evelyn’s day job, including an address courtesy of Evelyn’s Cigarette Case. Your responses here don’t matter, so say what you will, then leave Judy’s room. Turn right and search a table to find Lizzie, an iconic pistol. Not a bad way to start a job.
Clouds
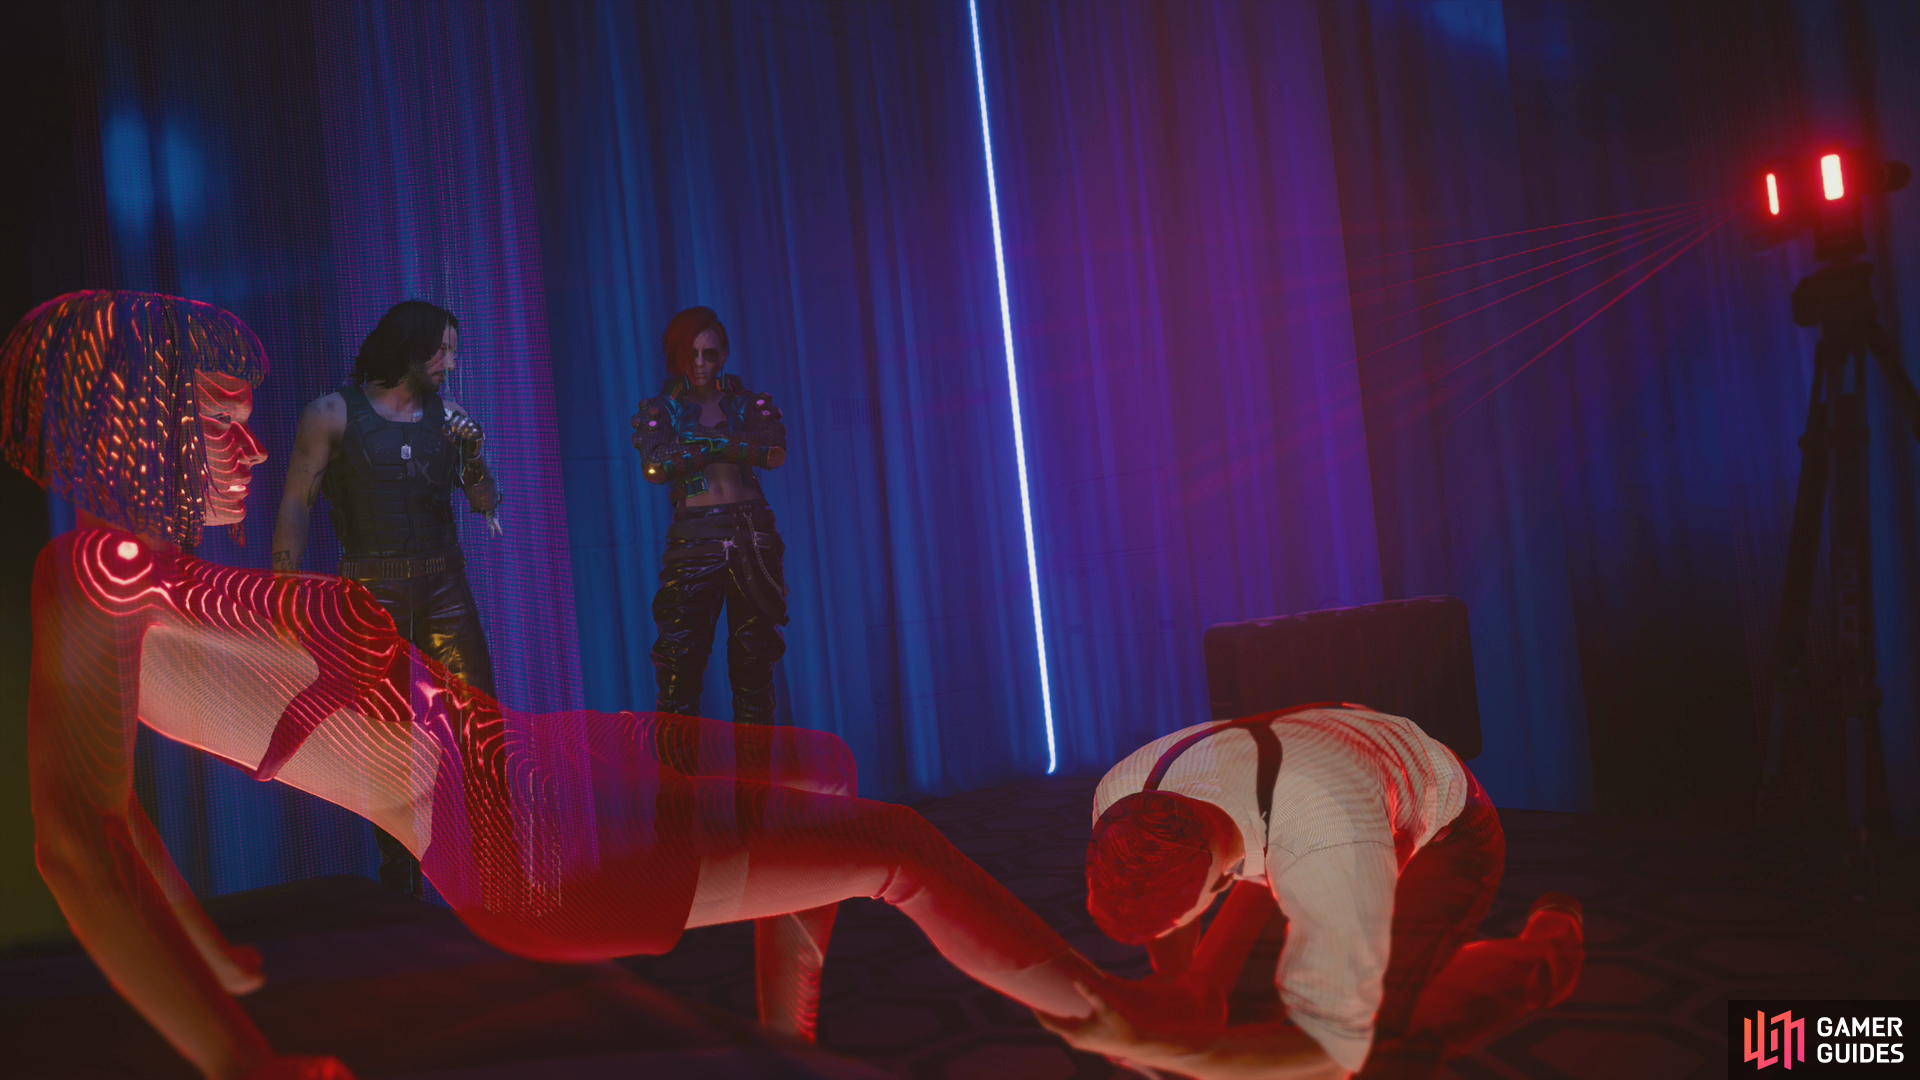
Leave Lizzie’s Bar and travel to Clouds, the brothel where Evelyn worked. If you’ve explored the district where it’s located - Japantown, Westbrook - you may have a fast travel terminal unlocked just outside of it. Travel to the Megabuillding H8 fast travel terminal if you can, drive there if you can’t.
Ride the elevator up and Johnny will serenade you with more fatalistic pessimism. When you reach your floor, enter Clouds and talk to the receptionist. At length you’ll need to pay €$500 to gain admission as a customer - there’s no getting around this. There’s also no getting around the weapons limitation that’ll force you to drop off your guns at a locker before entering. Yep, it’s another one of these jobs. Needless to say, combat is strongly discouraged.
You’ll be tasked with making your way to booth #9 to meet your doll, but there’s plenty of snooping worth doing before you bother with that. First things first, wander around the area and disable every camera you can find, making your way past booths #3, #4 and #5 until you find a Tyger Claw ganger standing in front of a hallway. He’s not guarding it, however, so head past him and continue forward until you find a patron whining about being denied access to the VIP area.
VIP area? If there’s information to be found, that’ll be where you find it.
Accessing the VIP Area
The doors to the VIP area are guarded by a burly thug, but his presence is largely ceremonial - if you had a VIP Token, you could get through the doors unbothered, but without one, they remain sealed. To your right, near the doors to the VIP area, are some shutters, which are more compromising - you can easily open them to get outside, just make sure the guard near the door to the VIP area walks away before you do so. The shutter will take you to a walkway outside, which will allow you to circle around to a storage room in the back, but you need not make this a first resort - especially if your Body has been leveled a bit.
Alternatively, you can continue through a door to the left of the doors to the VIP area, where you’ll find a small hallway with three doors. The gate to the left [Technical Ability 5] sequesters some loot and an Access Point [Intelligence 5] hidden behind a shelf, the middle door leads to a bathroom where you can take down a Tyger Claw ganger to snag a VIP Token. Kind of surprising how easy it was to get that…
The right-most door is the most interesting, however, although you’ll need to force it open [Body 7]. Beyond the door you’ll find a hallway that leads to a storage room where you’ll find another Tyger Claw you can ambush and loot for another VIP Token. You can also find another Access Point [Intelligence 5], a container which might yield a legendary item, an elevator, a door and some shutters leading out to a walkway outside (this connects to the shutter near the doors to the VIP area) and a locked door [Technical Ability 7]. There’s not much behind the locked door besides some loot, so don’t fret if you can’t get it open.
Choke out any one of the guards for a VIP Token, and stash the body in a storage container. These guards are all painfully easy to dispatch, their routes don’t overlap, and only one of them is even in a hostile area. The choice of which one to mug is more trouble than the guards themselves will be. Once you have a VIP Token, either go up the elevator in the storage room, or up the stairs to reach the VIP area. The only real difference is if you go up the elevator, you’ll be in a room where another Access Point [Intelligence 5] can be found behind a shelf.
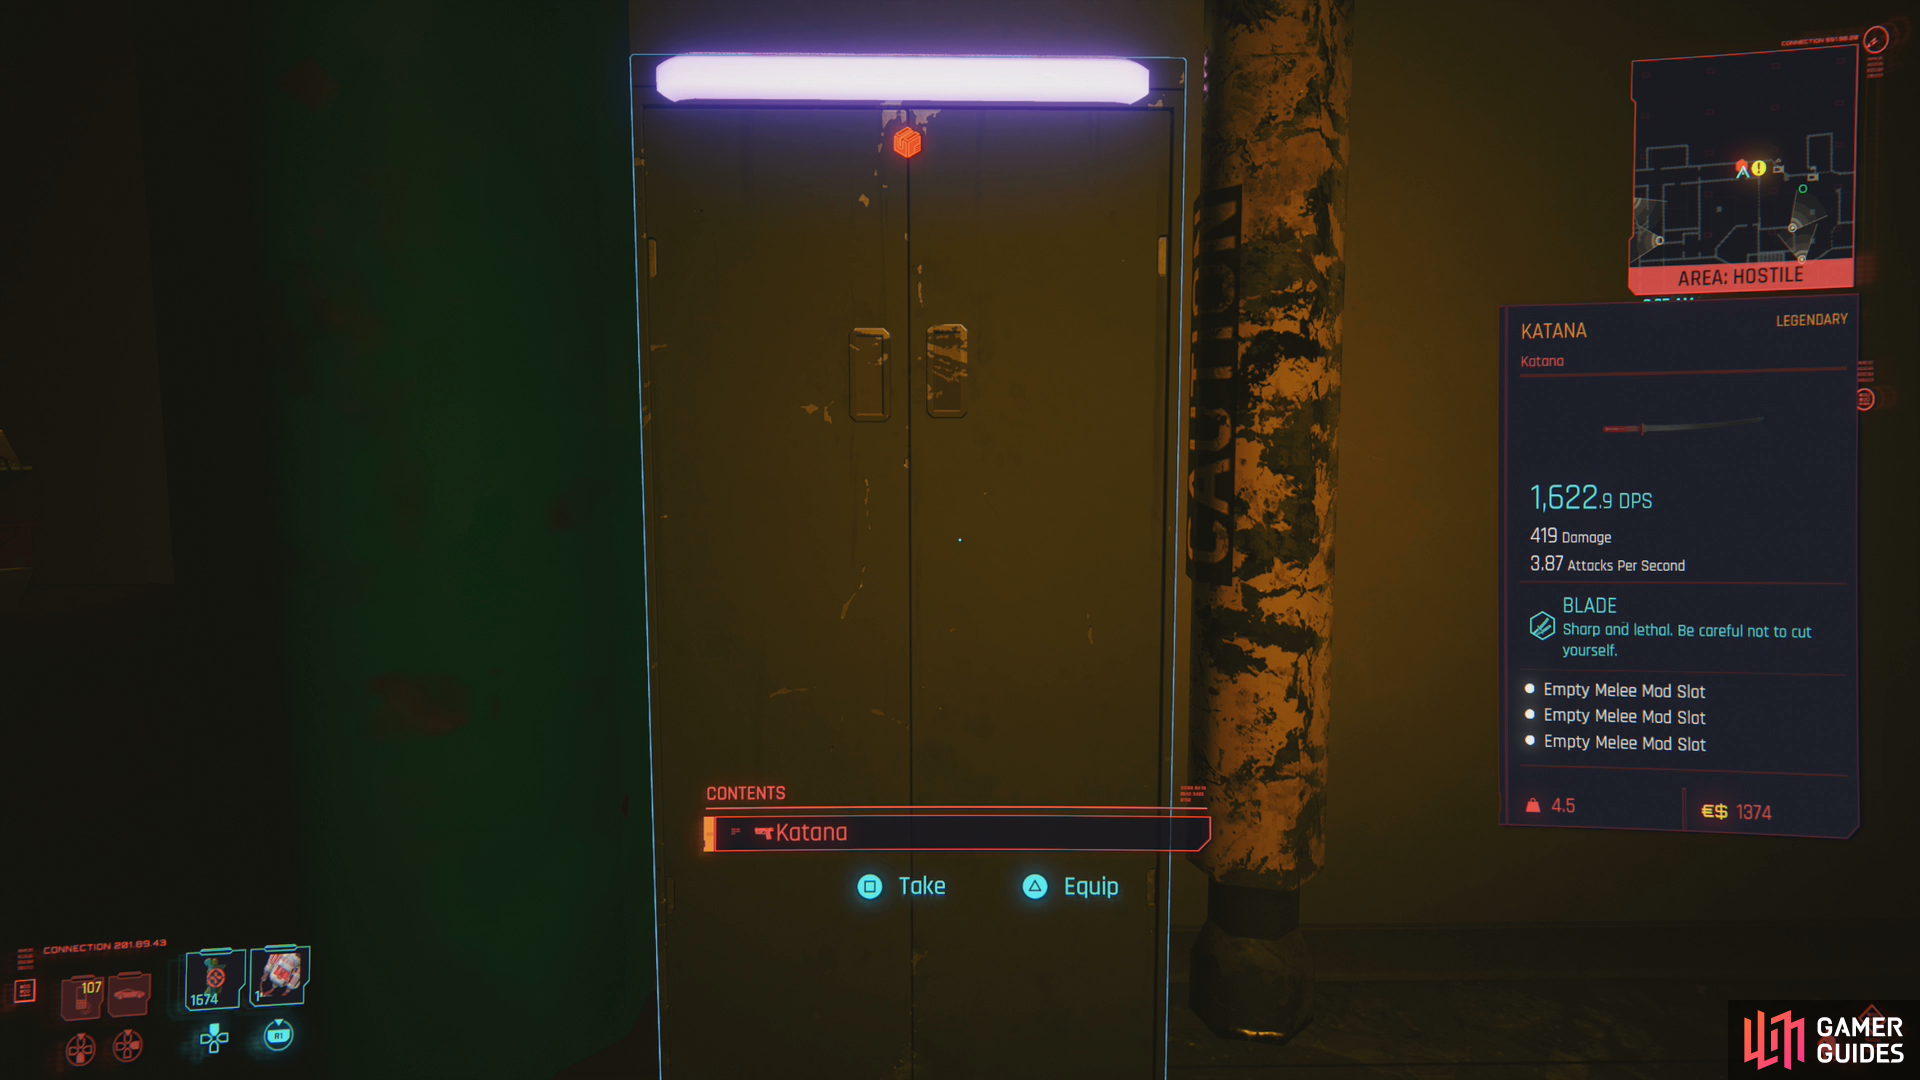
(1 of 4) Exit the VIP lounge and enter the restricted area beyond, where you may be lucky enough to score a legendary katana.
Searching the VIP Area
Stairs or elevator, you’ll soon find yourself in the VIP Lounge, complete with a bar. Tag the two guards in here, and note that one moves and the other doesn’t. There are three exits to this room - one that leads to the elevator, one to the stairs, and one to a third, unexplored area. Make sure no guards are looking at the third door, then slip on through.
Loot a container in the hallway you find yourself in to potentially score a legendary item (in our experience, you can usually find a legendary Katana here), then turn left to find a room where another Tyger Claw guard awaits. Wait for him to get done chatting, after which he’ll get up and walk across the room; Quickhack a vending machine to distract him, then sneak up and take him down. Once the room is clear, go through a door opposite the one you entered to find a dressing room for the dolls, wherein you’ll find Evelyn’s Jacket on the floor. Interact with it for some chatter, search the counter nearby to score the Cocktail Stick iconic weapon, then leave via a shutter on the opposite end of the room.
Loot the balcony you find yourself on, then go through another shutter to return to the room where you took out the last guard. Turn left to find a door, go through it, then turn right to find a hallway. Go down it and ignore the door to the left - you’ll get there soon enough - but to be sure to look through the window to the right to spot a guard in a control room. Continue to the end of the hallway and note the gate to the left, the room in front of you, and another hallway to the right.
You can get the gate to the left open by passing a [Body 5] or [Technical Ability 5] check, but it just leads to an office door you can’t open, and an elevator you can’t ride. Going into the room across the hall is more fruitful, as you’ll find a locker room with Evelyn’s Schedule on the floor and Evelyn’s Handbag in a locker. Whatever happened to her, she didn’t take her clothes out of the dressing room, and didn’t take essentials like her handbag and schedule with her, which suggests she either didn’t leave, she left in an awful hurry, or she left involuntarily.
You have all the intel you can gather about Evelyn… at least, all you can get from snooping. Looks like it’s time to start asking questions. Before you leave the VIP area, however, return to the hallway, turn left, then enter the door to the right to reach the control room. Dispatch the guard here and loot a container to score another potential legendary item, then return to the VIP lounge and head downstairs… just make sure neither of the guards in the lounge are near the door when you exit.
(1 of 3) After your session with your doll, ask about Evelyn to unlock her booth and to get referred to Tom.
Playing with Dolls
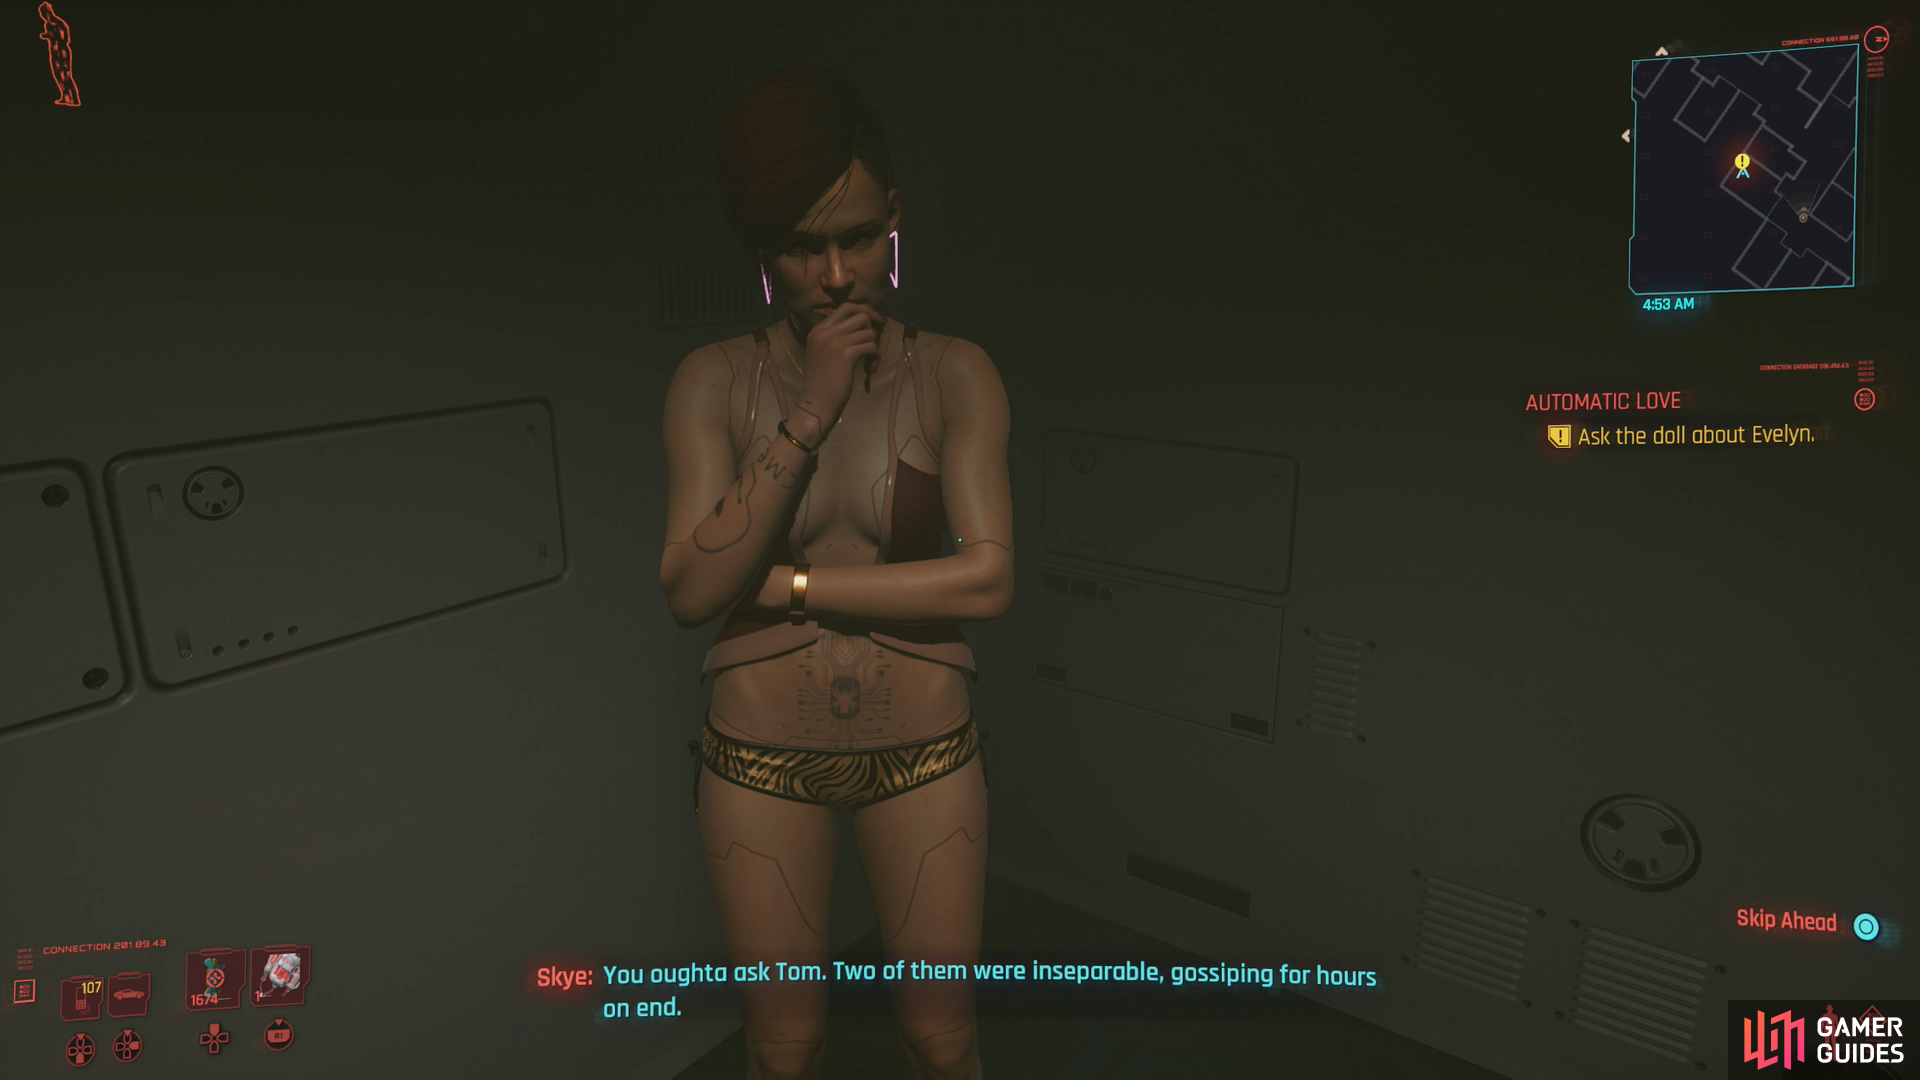
Make your way downstairs and head to booth #9 or #6 (depending on which doll you picked) and talk to your doll. Indulge your doll as long as you want, but you won’t get anything useful out of them until you say your safeword, after which you can ask about Evelyn. Whether you beg, threaten or bribe it doesn’t matter - you’ll eventually be referred to somebody named Tom. After she tells you about Tom, be sure to pick the dialogue options:
- ”A customer attacked her?”
- ”Where did it happen?”
- ”How do I get in?”
- ”Where did it happen?”
This step is actually optional, but doing it can get you some more options for resolving the quest. Head over to booth #11 and if you got your doll to unlock it, you’ll be able to go right in and explore. If not you’ll need to pass a [Technical Ability 5] check to gain access. Once you’re in the booth, scan the wall near the bed to find a port frame, then scan the opposite wall to find some bloodstains. Finally, interact with the suitcase on the floor to play a projection of Evelyn’s last performance.
Head back up to the VIP lounge and enter booth #2 to find Tom and he’ll mention one “Woodman”, who seems to be the boss around here. If anybody in this brothel knows what happened to Evelyn, it’ll be him.
Make your way back through the back rooms (the hostile areas - make sure the guards in the lounge aren’t watching!) to reach Woodman’s office - the room we purposefully didn’t explore when we were here earlier.

Interrogating Woodman
There are only two ways for your chat with Woodman to go: either you’ll get the information you want from Woodman directly and avoid conflict, or you’ll need to fight him, then search his terminal. In the latter case, look at his “Messages” folder and the message “Broken Doll” specifically. In the former case, you’ll need to successfully negotiate with him:
- ”Looking for Evelyn Parker.”
- ”You look like a reasonable man - let’s make a deal.”
- [Intelligence 20] ”Looks like you’ve got a netrunner problem. I can help.”
- ”Tit for tat - only if you help me.”
- ”Not telling you shit.”: Provokes Woodman into attacking.
- ”You have to isolate the chip’s core layers.”: Woodman tells you where Evelyn was taken. Avoids conflict.
- ”Tit for tat - only if you help me.”
- ”I’ll pay for info.”
- ”You look worse than that…”: Provokes Woodman into attacking.
- ”Just wanna make a donation.”: Results in the same dialogue options as ”You don’t understand what’s at stake.”.
- ”Sorry, done playing nice.”: Results in the same dialogue options as ”You don’t understand what’s at stake.”.
- [Intelligence 20] ”Looks like you’ve got a netrunner problem. I can help.”
- ”You don’t understand what’s at stake.”
- ”Wanna end up like Jotaro Shobo?”
- ”Shobo had an unlucky meeting.”: Woodman tells you where Evelyn was taken. Avoids conflict.
- ”I’ll tell the media everything.”
- ”Gonna take this to the news.”: Provokes Woodman into attacking.
- ”Your bosses should know how you treat customers.”
- ”I know you’ve been stealing.”
- ”Wonder what your Tyger Claws bosses would think.”: Provokes Woodman into attacking.
- ”Lemme tell you one more thing.”: Results in the same dialogue options as ”You don’t understand what’s at stake.”.
- ”You’re higher-up than I thought.”: Woodman tells you where Evelyn was taken. Avoids conflict.
- ”I know you’ve been stealing.”
- ”Could end you with my bare hands.”: Provokes Woodman into attacking.
- ”Wanna end up like Jotaro Shobo?”
- ”Let’s not make this harder than it has to be.”
- ”One way or another, I’ll find out…”: Woodman tells you where Evelyn was taken. Avoids conflict.
- ”You look like a reasonable man - let’s make a deal.”
- ”Tell me where Evelyn is.”
- ”I’m not leaving without info.”: Ultimately results in Woodman attacking.
As you can see, Woodman doesn’t respond well to direct threats. If at any point you say the following, you’ll provoke Woodman into attacking, either immediately or after the subsequent dialogue choices:
- ”You look worse than that…”
- ”Not telling you shit.”
- ”Gonna take this to the news.”
- ”Wonder what your Tyger Claws bosses would think.”
- ”I’m not leaving without info.”
If you want to navigate your conversation with Woodman peacefully, on the other hand, the following lines will get you the outcome you’re looking for:
- ”You have to isolate the chip’s core layers.”
- ”Shobo had an unlucky meeting.”
- ”You’re higher-up than I thought.”
- ”One way or another, I’ll find out…”
If you end up fighting Woodman, you’ll have to make do with whatever weapons you have at your disposal, which, to be fair, should include at least a rare katana, and at best a legendary katana/knife. Woodman should drop a legendary weapon of his own (we consistently gained a legendary Ajax assault rifle from him), which may sway your decision some. Once he’s down, turn on his computer, navigate to “Messages” and read “Broken Doll” to learn where Evelyn was taken. If you didn’t have to fight Woodman, he’ll surrender this information voluntarily, simplifying things significantly.
Now all you have to do is leave Clouds and listen to Johnny prattle. If you fought Woodman, the entire club will be on alert, and new thugs will have arrived to oppose you as you leave. If you were able to get through your meeting with Woodman peacefully, just go out the side door to his office and ride the elevator down. Either way, pick up your weapons before you leave, then ride another elevator down to exit Megabuilding H8.
This ends the job Automatic Love and begins The Space in Between.
No Comments