
Suggested Level: 1
Fighting the Hypatos (Combat Tutorial)
After the opening scenes you’ll get control of Bayek as he faces off against a Hypatos - the bodyguard - of Rudjek, the Heron, who just had an unfortunate mask accident. Although his master is now dead, that doesn’t dissuade the Hypatos from attempting to avenge him… which is just as well, as it provides a fine tutorial.
Start out by pressing [R3] (Xbox One/Playstation 4) to lock onto the Hypatos, then press [L1] (Playstation 4) or [LB] (Xbox One) to block, which serves the obvious useful function of reducing the damage of incoming attacks. Once you’ve started blocking, combat will actually begin, and this first phase of combat couldn’t be more basic; just hold down the block button and strafe around the Hypatos to avoid his attacks, and after he attacks, respond with a few light attacks [R1] (Playstation 4) or [RB] (Xbox One) of your own. After dealing enough damage the Hypatos will perform a massive desperation attack, which will send you both tumbling through the floor.
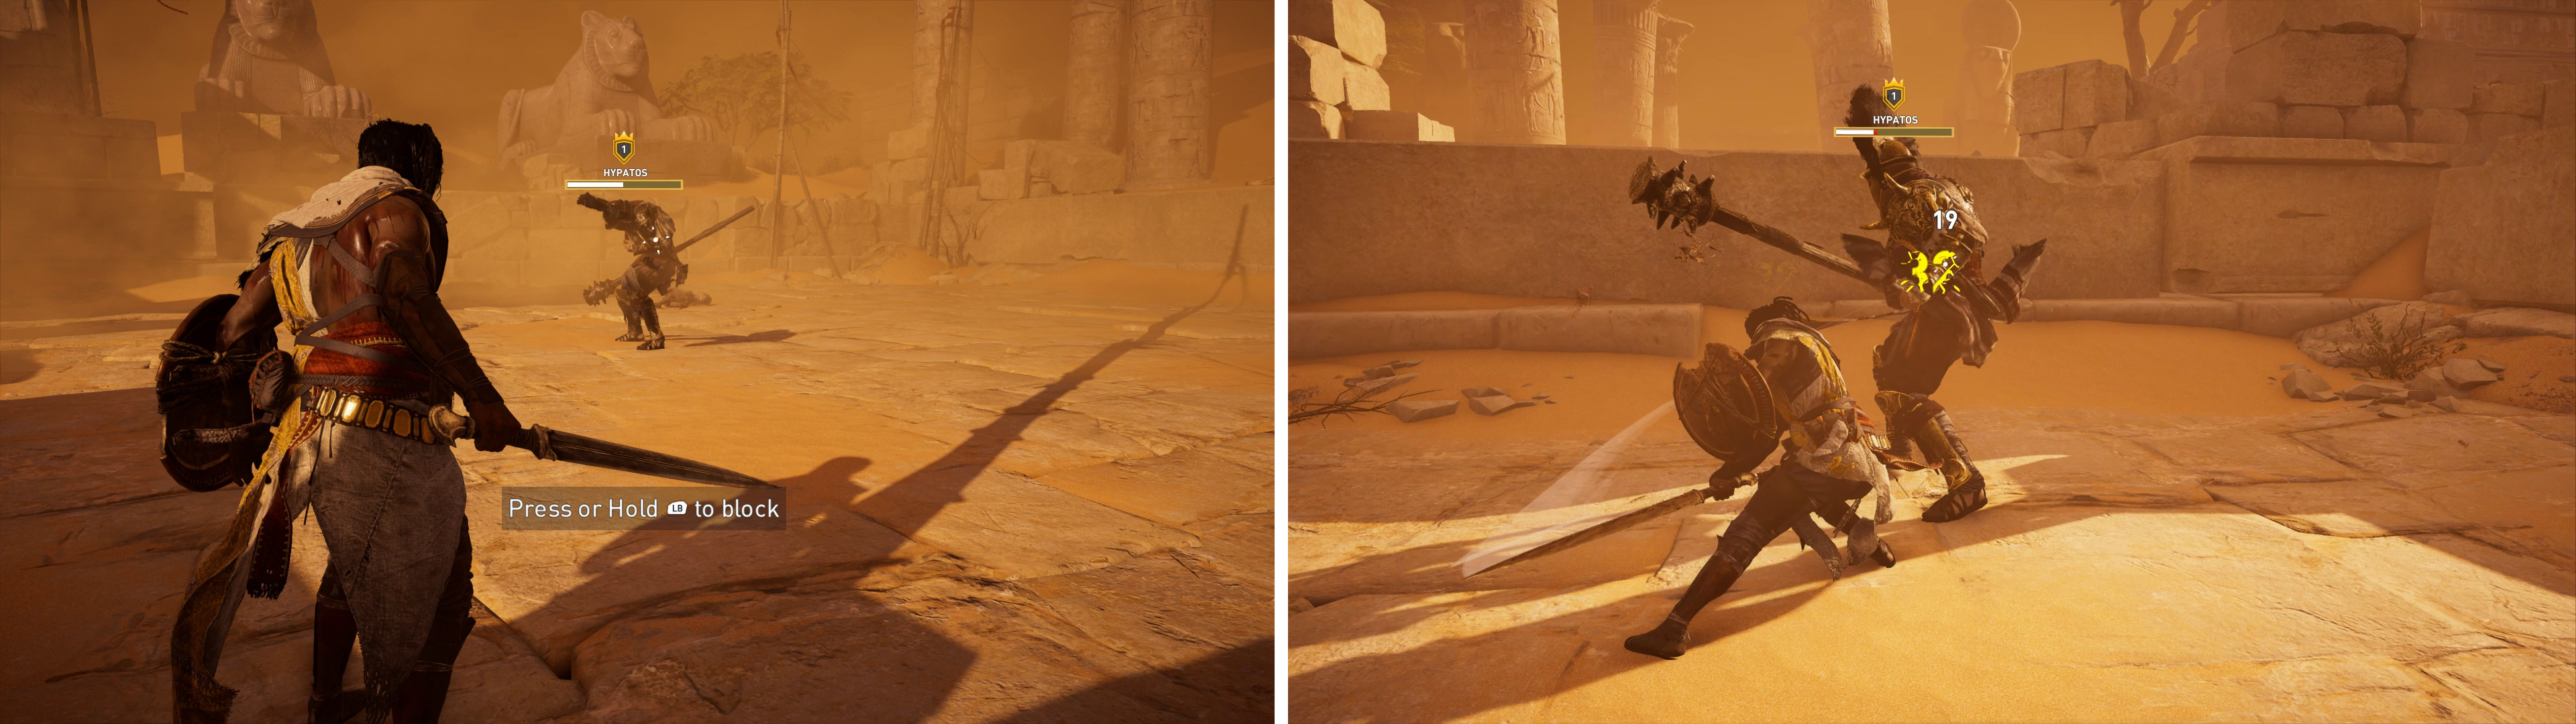
Block his slow attacks (left) and then proceed to counter with your own sword swings (right).
After somehow surviving such a great fall, both combatants will arm themselves and combat will begin again. Now the Hypatos has a shield, necessitating that you learn how to perform a heavy attack [R2] (Playstation 4) or [RT] (Xbox One), which will break his guard and allow you to follow up with a series of light attacks.
Don’t get too greedy, as after the Hypatos recomposes himself, he’ll start attack again. Dispense with the heavy attacks for this phase of the fight, and instead wait for the Hypatos to attack and press [Square] (Playstation 4) or [X] (Xbox One) to dodge, preferably circling around the Hypatos in the process. Once you’re behind the Hypatos following a successful dodge, counter with as many light attacks as you can get away with.
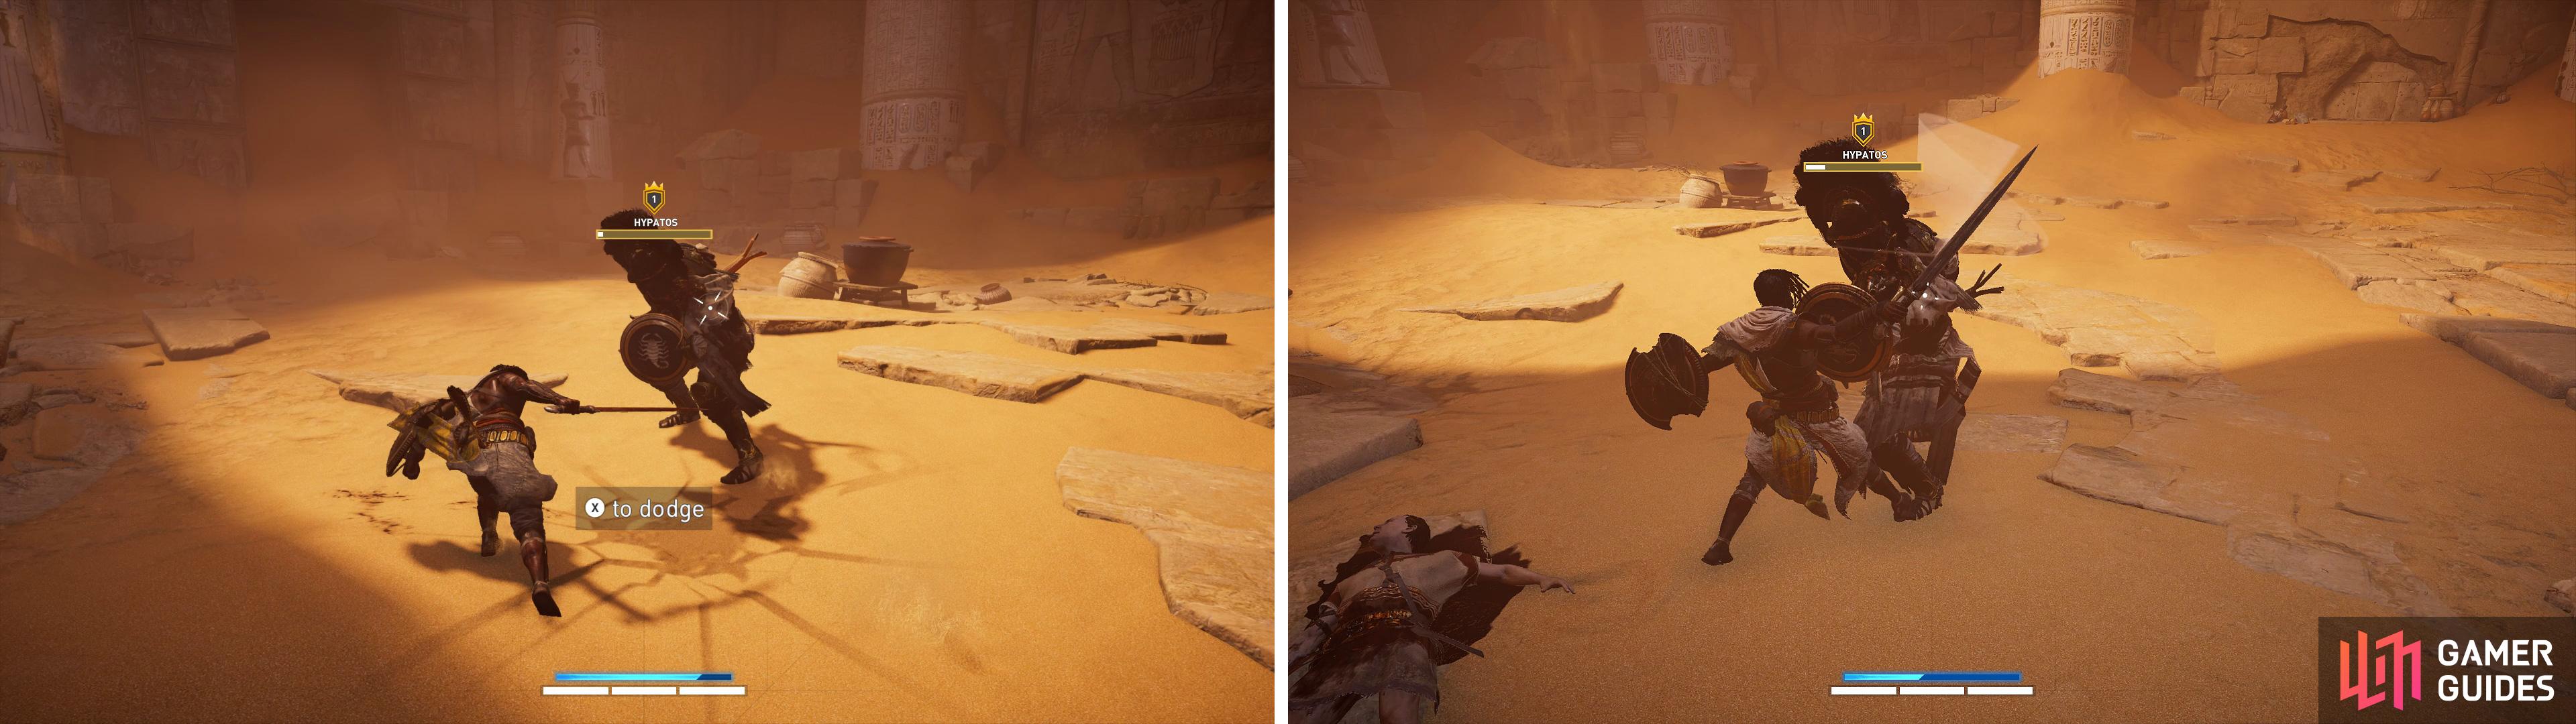
Press the dodge button as he takes a swing (left) and then beware of his shield (right). Your light attacks will bounce off.
As you perform attacks, keep an eye on the two bars at the bottom of the screen. The segmented white bar is your Health gauge, while the blue bar above it is your Adrenaline gauge. If your Adrenaline gauge fills during the fight, press [R1 + R2] (Playstation 4) or [RB + RT] (Xbox One) to perform a special Overpower attack, which should end the fight outright.
Escaping the Pyramid (Exploration Tutorial)
After you stand victorious over your vanquished foe, press [Triangle] (Playstation 4) or [Y] (Xbox One) to loot whatever he dropped - most likely his Mace weapon. To equip it (should you care to), press [Options] (Playstation 4) or [Menu] (Xbox One) to open the Character Menu. From here you can press [R1] or [L1] (Playstation 4) or [RB] or [LB] to toggle submenus. Go to the Gear menu, then move the cursor to the left-most “melee” square, which should be highlighted and occupied by your Bronze Sword. Simply press [X] (Playstation 4) or [A] (Xbox One) on this weapon slot to see all your available weapons, and press [X] or [A] on whichever one you wish to use. Exit the menu by pressing [Circle] (Playstation 4) or [B] (Xbox One) repeatedly, or by just pressing [Options] or [Menu] again.
Once done, it’s time to turn your attention to the next pressing matter: escape. You’re not climbing back up the way you came, clearly, so it looks like you’ll have to hope for another way out. Hold the [Up] button on the directional pad to use the Animus Pulse ability, which will tag interactable objects that happen to be nearby with a triangular symbol. In this case, it should highlight a block in the northern corner of the chamber. You don’t have a compass yet, but you can check your location and direction by looking at your map. Press [Touchpad] (Playstation 4) or [View] (Xbox One) to bring up your map and note the blue arrow, which indicates Bayek.
Tag the block, then head over to and interact with it by pressing [Triangle] (Playstation 4) or [Y] (Xbox One). When you make it into the chamber beyond, follow the on-screen prompt and hold [Right] on the directional pad to equip a torch. Handy, that. Fortunately it’s one of those fancy Hollywood prop torches that will never burn out, so you need not worry about it.
Once the way is lit, note the fancy door up some stairs to the north which beckons you forward. First, however, activate your Animus Pulse again and note the treasure triangles behind and above you. Turn right and head to the base of the first large, dark statue nearby and head to the right side of the statue (under the statue’s left arm) to spot a white, cracked pillar covered with hieroglyphs. Press [X] (Playstation 4) or [A] Xbox One to climb onto the white pillar, then ascend using the [Left Analog] stick. Once atop the pillar, walk forward, then turn right to find the treasure your Animus Pulse sniffed out, including a potentially generous satchel.

The Animus Pulse (left) is especially useful for hunting treasure (right) and hidden objects.
Grab the treasure, then turn around and head to the nearby ledge, at the edge of which press [Circle] (Playstation 4) or [B] (Xbox One) to drop down a ledge, and hold the aforementioned button to continually drop down until you reach the floor. [X]/[A] climbs, [Circle]/[B] drops down. Simple enough. If you take damage, never fear - you’ll regenerate as long as you’re not in combat. Once done, turn north again and head up the stairs you neglected earlier, pressing [X] or [A] to vault over some rubble in your way. When you reach some rubble you need to climb over, simply press [X] or [A] again and use the [Left Analog] stick to get Bayek over.
Continue forward until you reach a massive chamber with a large, collapsed, painted pillar conspicuously well-lit. That pillar is one way of getting to where you need to go, but instead of taking the boring, linear path, why not explore the tomb and get some treasure? Head to the base of the collapsed pillar, at which turn left and continue on until you hit a stone wall (there’s some loot to be had along the way, in the form of a chest and some urns near a still-standing pillar). When you reach the wall, turn right (north) and follow it until you find a hole in the wall you can climb through. Do so and continue through the small room beyond, turning right into a small chamber with two objects to loot, which opens up into a large, treasure-strewn chamber with much, much more loot.
Use your Animus Pulse to highlight the treasure, then plunder it all, after which scale the stone wall opposite of where you entered to reach another tiny room with more objects to loot. Fill your pockets with the treasure of the ancients, then continue forward to look down into another chamber, this one dominated by a massive sarcophagus. Drop down into the room and give it a good pillaging, then turn right from the sarcophagus to find a doorway, which leads down a small tunnel ultimately terminating at another mound of treasure. Snatch whatever your Animus Pulse tags, then follow the stone wall to the east to reach another corner with lootable objects.
At this last loot-filled corner, turn right once again and continue south along another wall until you find another hole in the wall to the left, between some painted pillars. Enter the treasure-filled rooms the hole leads to, first a smaller one with a modest amount of treasure, then a larger one heaped with a mountain of goodies. After plundering the larger chamber, climb up an enshrined bull statue to reach a stone ledge above it, where you’ll find even more loot.
With this last bit of treasure you should be just about done raiding this tomb. Go through a nearby door way to reach a ledge overlooking the massive chamber with the toppled pillar, then turn right, jump some gaps in the floor (just hold the [X] or [A] button as you move and Bayek will circumvent these obstacles automatically) until you find yourself standing in front of several more massive, dark statues - two sitting, two standing. From here you can grab the last bit of treasure here by turning around and leaping across some broken pillars and scaling a stone wall to find another, comparatively modest, heap of treasure to loot.
When you’re done, return to the aforementioned four statues and continue between them. Bayek will exclaim as he observes light, at which press [R2] or [RT] to drop the torch and continue on unimpeded. Climb up either of the standing statues, then leap from their heads onto a ledge below them, beyond which you’ll find a thin layer of wall crawling with beetles. Smack the vulnerable wall with your weapon (press [R1] or [RB]) to break out into daylight.
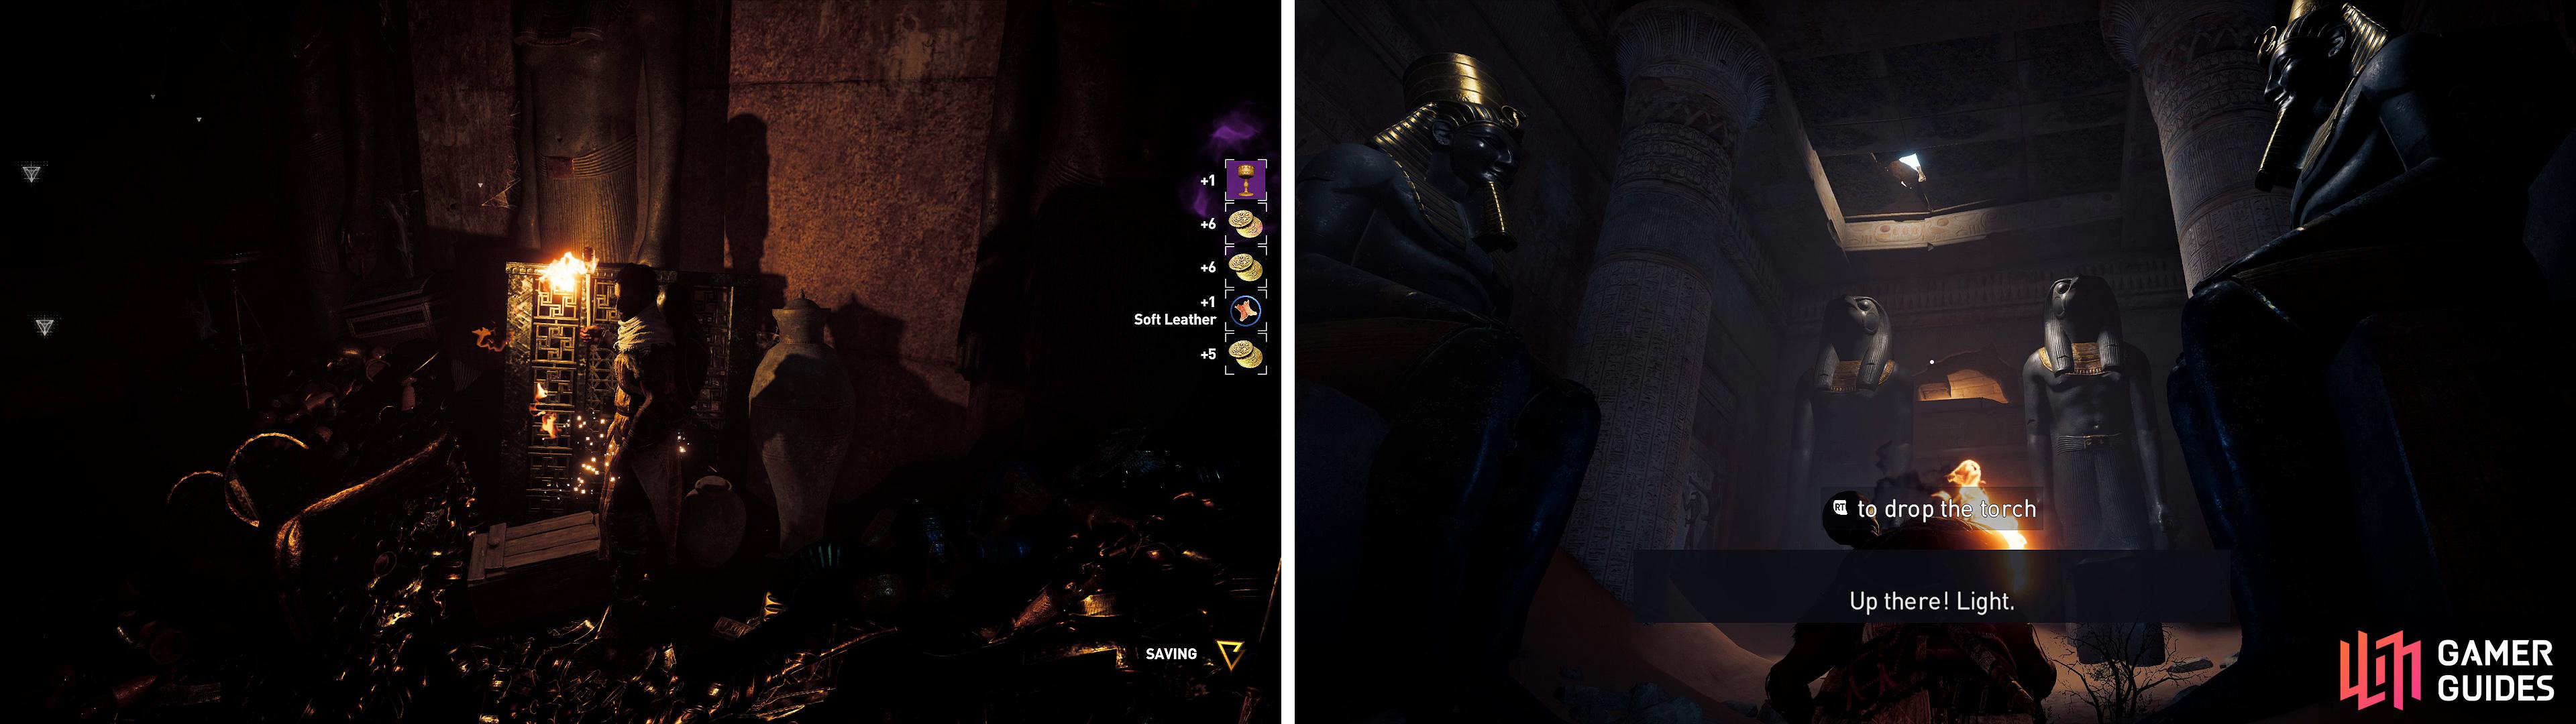
Trinkets are denoted by a purple border (left) and can be sold to merchants. To get out of the tomb, look for the light above the statues (right) then climb them.
Riding to Siwa
In the ditch ahead of and below you you should spot some people fighting. Slide down the sand and engage the two soldiers nearest you. While they’re relatively weak compared to the Hypatos, having two opponents may call for a somewhat different approach. Remember that you can lock on with [R3], and you can switch the lock-on target by moving the [Right Analog] stick towards the desired target. Also be wary that in larger fights, not using lock on at all may be preferable, as you can always lock your orientation by pressing the block button. Block and dodge their attacks as necessary, counter with light attacks when you have an opening, and be wary of their bows, as an unengaged soldier is not above shooting at you from afar. Kill these two, then move up and dispatch the other two, who should be easier as you’ll either fight one of them one-on-one, or their attention will be split between you and the other combatant.
When the soldiers are all dead, Bayek will greet the other man who was fighting your mutual foes - an old friend named Hepzefa. After some chatter, which includes Bayek recounting his most recent victory, Hepzefa will mention the Siwa oasis, which is your next destination. Once the cutscene ends, hold [Down] on the directional pad to call your mount, and once the beast arrives, mount it by getting near it and pressing [Triangle] (Playstation 4) or [Y] (Xbox One). Ride towards Hepzefa and hold down the [X] or [A] button to follow the road, which will automate the next bit and allow you to enjoy the scenery and listen to Hepzefa and Bayek chat as they ride through the desert… or you can
control your mount manually, if you prefer.
After passing through a ruined village - testament to the brutality of Pharaoh Ptolemy and his soldiers - you’ll crest a hill and spot Siwa. Hold down [X] or [A] to follow the road again and ride through the town, during which conversation will turn to another of Bayek’s targets, Medunamun, the Ibis. Be sure to follow Hepzefa manually when he veers off the road and follow him to his house. When he dismounts, follow suit by holding [Circle] (Playstation 4) or [B] (Xbox One), then follow him into the house he stands in front of, whereupon your schemes will be put on some hold as you earn some attention from a woman named Rabiah.
Securing Hepzefas Home (Archery and Stealth Tutorial)
When Bayek wakes up, you’ll shortly find yourself embroiled in a new tutorial - archery. Hepzefa will give you a Hunting Bow and instruct you to shoot down two dummies. Hold down [L2]/[LT] to aim, and hold [R2]/[RT] to draw the bow. The longer you draw, the more potent and truer your shot will be. Pop the heads off both dummies, after which a woman will arrive with a dire warning for Hepzefa.
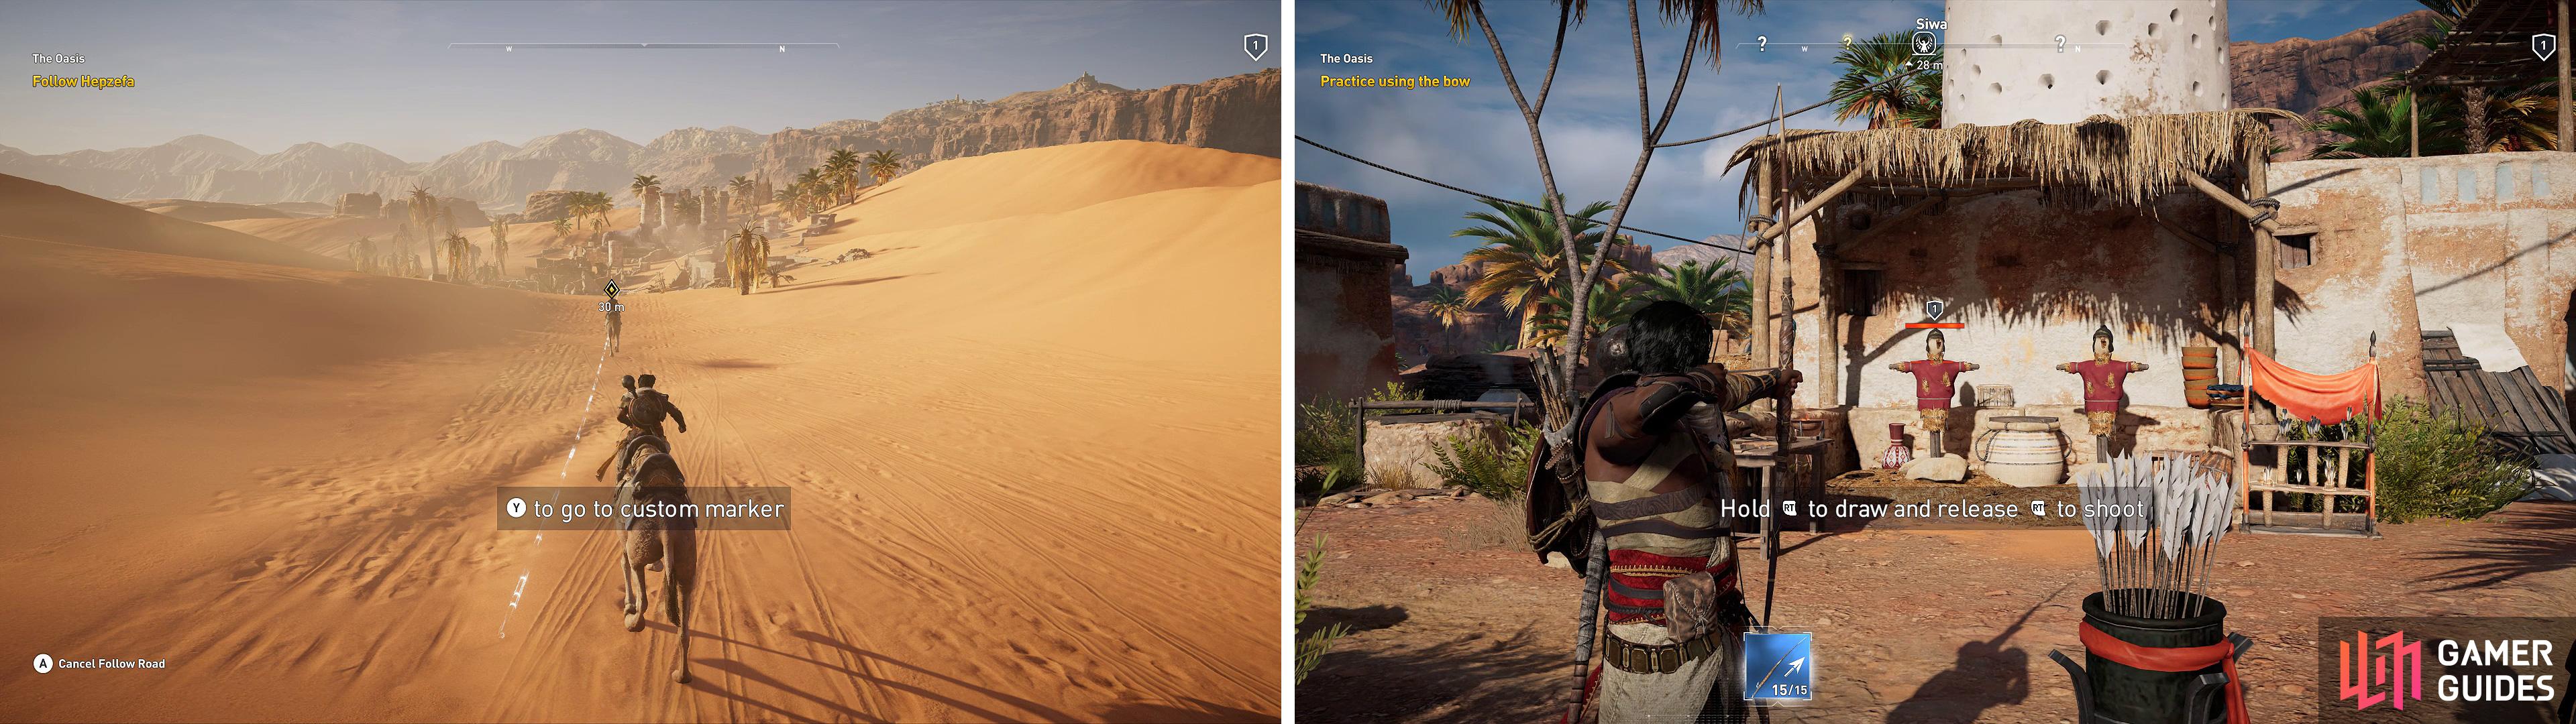
You can have your mount follow the road (left) for easy travel. Aim for the head of the dummies for maximum damage (right).
Next up - a stealth tutorial! Bayek and Hepzefa will be standing outside the house in some tall grass, and as one of the soldiers turns around he’ll detect Bayek. Follow the on-screen prompt and press [Circle] (Playstation 4) or [B] (Xbox One) to crouch. Note the white bar above the soldier’s head - this indicates an enemy’s level of awareness of you. As the enemy spots you, this bar will fill (the speed of detection relies on many factors, including distance, line of sight and how much cover you’re in), and once the bar begins to fill the enemy may start to actively seek you out - they are aware of you in as much as they know something is amiss, but have not directly identified you enough to turn hostile and attack outright. Once the bar has filled entirely, it will turn yellow - they have detected you and are about to turn hostile, and you have a short “surprise” period in which you can still stealthily take them out, after which the bar will turn red and they’ll attack. After you’ve been detected, to hide successfully again you’ll need to flee, break line of sight, and stay hidden long enough for your enemies to give up the search.
All of that may come into play shortly. For now, wait as the soldier approaches, and when he gets close he’ll spot you - and the game will prompt you to perform a takedown by pressing [Triangle] (Playstation 4) or [Y] (Xbox One). That one was a freebie, but the other soldiers will have be be dealt with on your own… or at least without the game guaranteeing your success.
When you’re back in control, Hepzefa will slink off towards that house, but never fear - if you get into trouble, he’ll show up and help out. Let’s not let it come to that, eh? There’s one soldier standing right in front of the house, but ignore him for now. Instead, make your way straight ahead into the tall grass along the left side of the house (west, southwest) and stay in the grass as you circle around behind the house, where you’ll find another soldier. There are actually two back here, one behind some wheat to the west, northwest of the first one, so head deep into the grass, look at the nearby soldier, and press [Down] on the directional pad to whistle and lure him to you. When he gets near enough, perform a takedown, then continue through the grass to the northwest and circle behind the sedentary guard near the wheat and dispatch him as well.
Two down, three to go. Return back to where the first of these two soldiers was and loot at the house, where you should spot a wooden wagon leaning against the wall. Climb up the wall here to find another soldier guarding the back door, whom you can easily sneak behind and disable. Turn east, northeast and go through the house to reach the balcony on the front, then turn northwest and climb atop the balcony railing to spot another soldier standing near an awning below you. Aim at him and press [Triangle]/[Y] to perform a leaping takedown, turn turn northeast and circle around behind the soldier standing in front of the house and eliminate him as well. Easy-peasy.
After you secure Hepzefa’s security - at least for the time being - he’ll introduce you to the busy-work around Siwa that’ll occupy a fair amount of your time in the immediate future, tell you about your target, Medunamun, the Ibis, reintroduce you to Senu, your winged friend, and give you some advice as to how to proceed. This ends the quest “The Oasis” and begins “The False Oracle” and “Gear Up” .
| Reward (For completeing the quest “The Oasis”) |
|---|
| 1,000 XP |
Leveling Up
Speaking of which, now that you’ve completed the quest “The Oasis” you’ll earn enough experience to level up. You earn XP from doing nearly everything in Assassin’s Creed Origins; killing animals or enemies, discovering map locations, completing map locations, completing sidequests and main quests, etc. When you earn enough XP you’ll level up, which will increase your base stats (Health and damage) as well as earn you an Ability Point.
Ability Points can be invested into your ability trees, which you can find under the “Abilities” page of the character menu. Here you’ll find three trees - Hunter, Warrior and Seer - each of which contain a variety of abilities (both active and passive) which you can buy by investing Ability Points into them. Different abilities may cost a different number of Ability Points (typically ranging from one to three), and the penultimate ability in each tree can be constantly invested in for ever-increasing rewards.
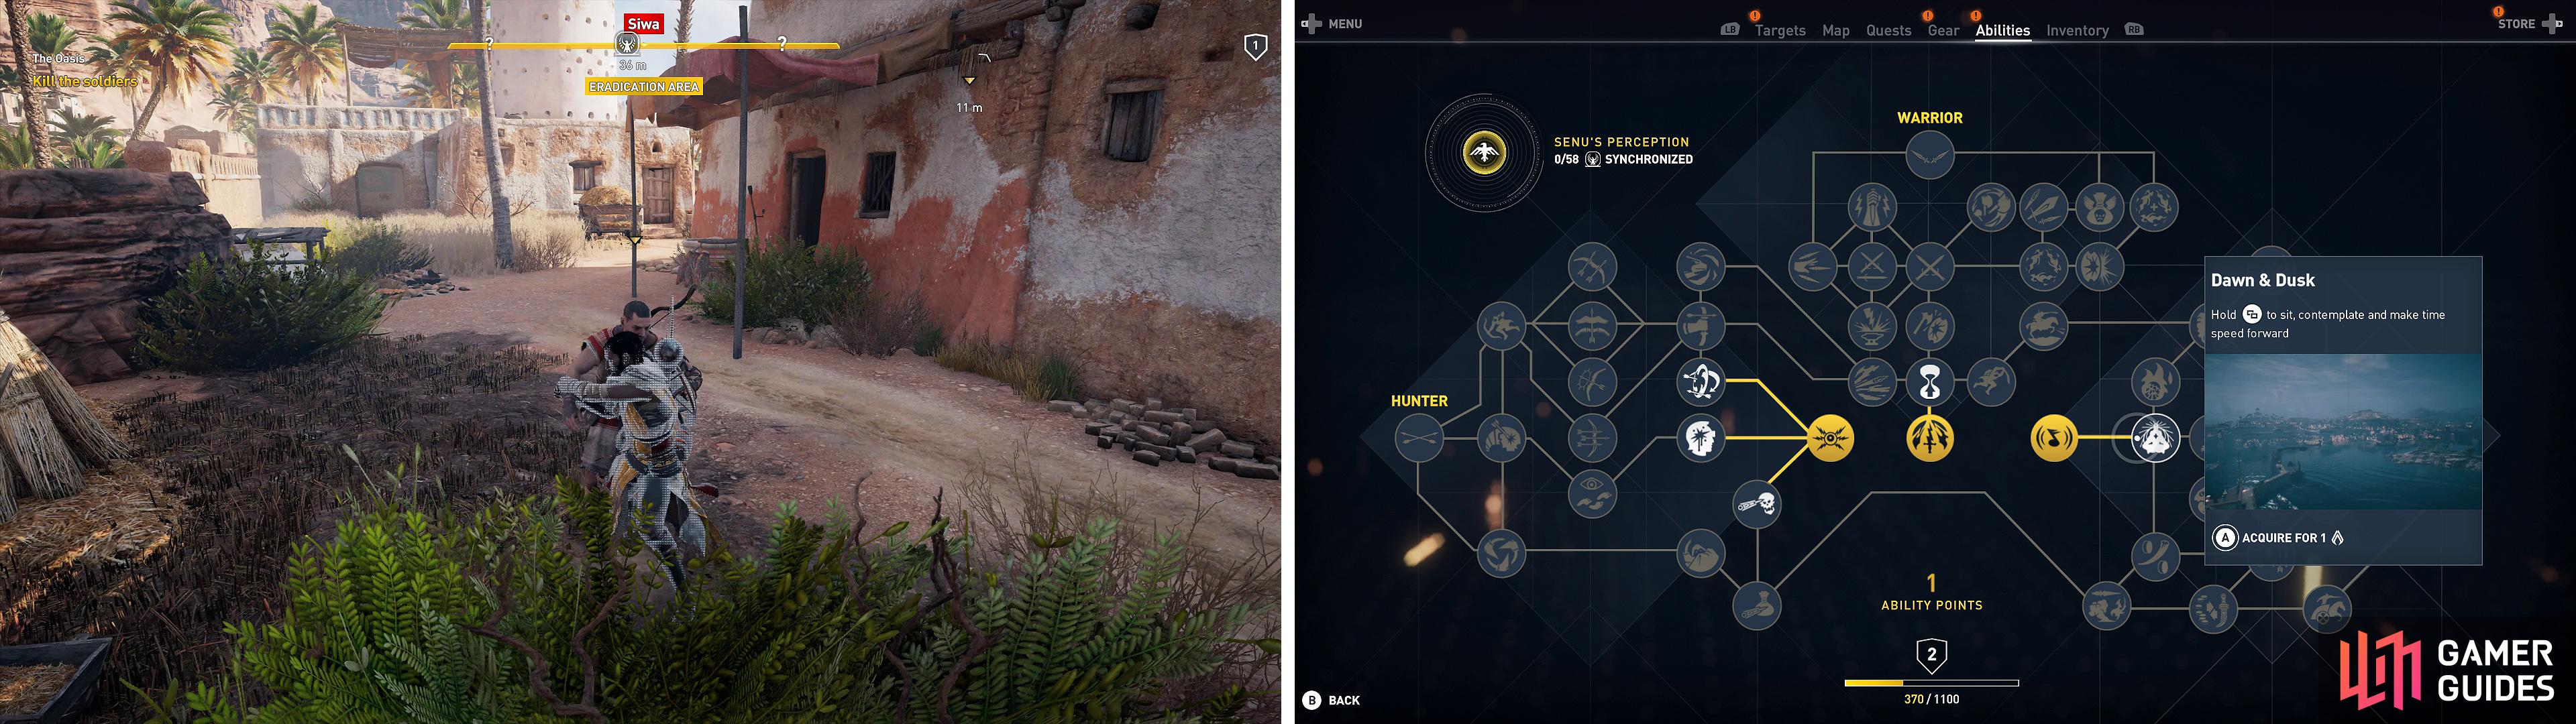
You can stealth kill an enemy (left) right before they spot you. Every time you level up, you can ability points (right) to spend on new skills.
Next Steps
Like in many open world RPGs, you’re free to advance or neglect the main story as you please, but progression in Assassin’s Creed Origins is significantly regulated by a quest’s suggested level - which is an indicator of the level of the enemies you’ll encounter during said quest. In Assassin’s Creed Origins, like in other RPGs such as The Witcher 3 and Kingdoms of Amalur: Reckoning, enemies that are more than a few levels higher than you are prohibitively powerful, obliging you to take breaks from the main story from time to time to see to side content, level up, gain better weapons, and all that fun stuff. You know… the meat of an RPG.
Case in point, the next main quest “The False Oracle” has a suggested level of five, but fortunately there are other tasks you can attend to in and around Siwa that’ll prepare you for your ultimate goal. Namely the quest “Gear Up” (Suggested Level: 2), which will be covered next in the walkthrough. Given the structure of quests in Assassin’s Creed Origins, then, segregating main quest content and side quest content makes little sense, as you’ll constantly need to switch between the two in order to keep your level on par with the suggested level of main quests.
Instead, this guide will use an “Ideal Chronological Order” approach, largely based on a quest’s level and convenience (geography), and the walkthrough is intended to be played through sequentially, in order. Skipping sidequests is, of course, possible, but not advised… at least, not on a large scale.
Before you get started with any new task, press [Options] or [Menu] to open the character menu, then scroll to the “Quests” submenu, select the “All” icon to view all current quests and press [X] or [A] over whichever quest you want to pursue next to track that quest.
Once done, continue southeast to the table Hepzefa is standing in front of and press [Triangle] or [Y] to interact with it. This is the Informant Table, where you can pick up new quests from people in the nearby area. You can also start quests by simply finding them as you explore (available quests are marked on your map as exclamation points contained in white diamonds on your map). The current quests you can pick up from the Informant Table include “Family Reunion” (Suggested Level: 2) and “Water Rats” (Suggested Level: 3), which are both fine ways to sharpen your claws before going after Medunamun.
Fast Travel
Before running off anywhere, however, open your map and note the hawk symbol near Hepzefa’s home (not actually marked - but the Informant Table is). This indicates a fast travel point, albeit one that hasn’t been claimed. To claim it, simply travel to the location - in this case a large white tower near Hepzefa’s house - scale to the top and locate the marked perch, at the end of which you’ll be prompted to “synchronize”. This will reveal nearby map markers (although it won’t discover the locations themselves) and more importantly, create a new fast travel point. Be sure to do this every time you find yourself near a fast travel point. The object you’ll end up climbing may be different each time, but the general principle is the same.
No Comments