
The Chronolith Trials offer some of the greatest challenges in FF16, and you’ll find one for each of the seven Eikons. The Hand of Rhea, Shiva’s Chronolith Trial, will require you to master Cold Snap and other like-minded abilities. This page will go over how to complete this Trial and obtain your reward.
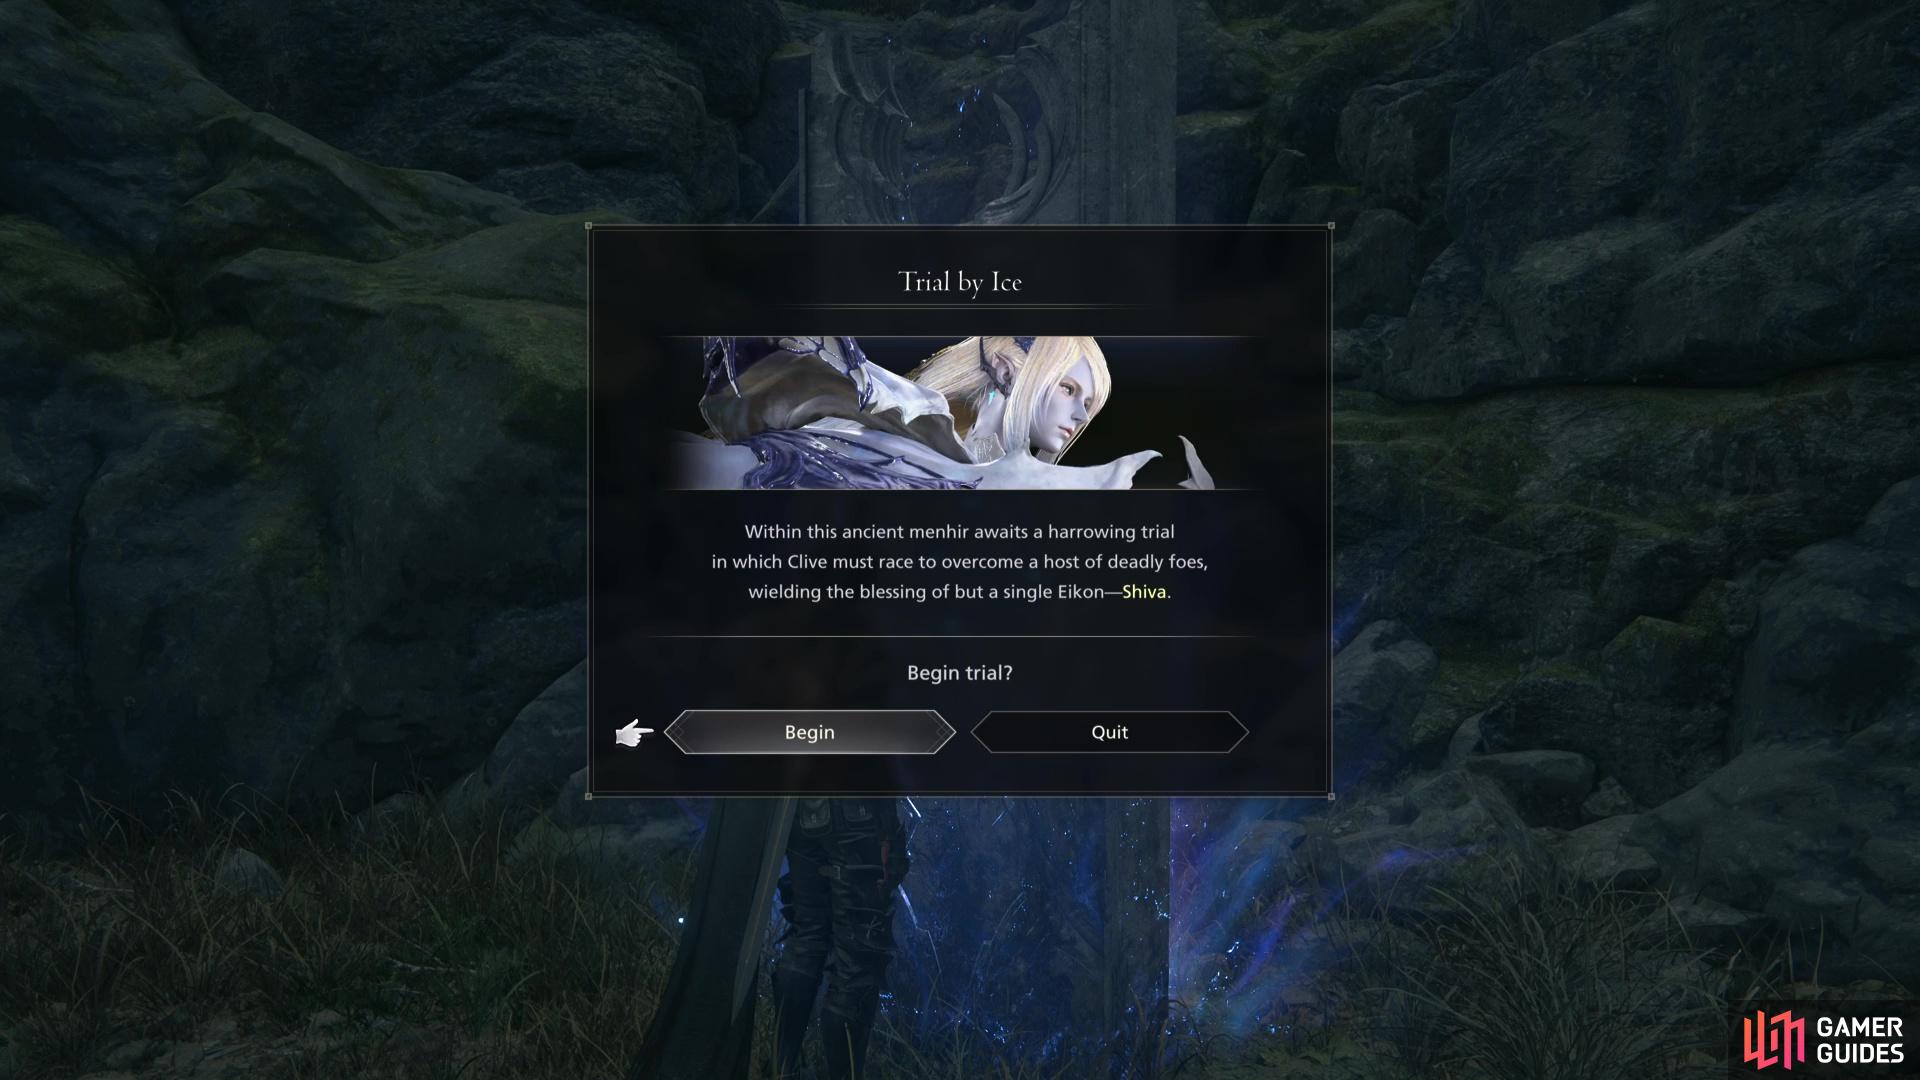
Trial by Ice is !Shiva’s Chronolith Trial in Final Fantasy 16.
Where to Find The Hand of Rhea Chronolith in FF16
The Chronolith you’re looking to find for the ![]() Shiva trial is The Hand of Rhea. Make your way to the Kingdom of Waloed and head to The Angry Gap. There are two parts to this large open area, so head south in the left of the two areas and you’ll find a path leading to the Chronolith.
Shiva trial is The Hand of Rhea. Make your way to the Kingdom of Waloed and head to The Angry Gap. There are two parts to this large open area, so head south in the left of the two areas and you’ll find a path leading to the Chronolith.
As always, be sure to make sure you save your game and prepare fully before accessing the trial, you won’t be able to learn/unlearn any abilities once the trial begins but you will be able to change your equipment.
Shiva Chronolith Trial Preparation
As with all of the Chronolith Trials, you’ll want to make sure you’re fully prepared before entering, and there are a few common preparations across all of the trials. To begin with, you’ll have a much easier time if you progress the Main Quest to the final one where all of the final Side Quests open up.
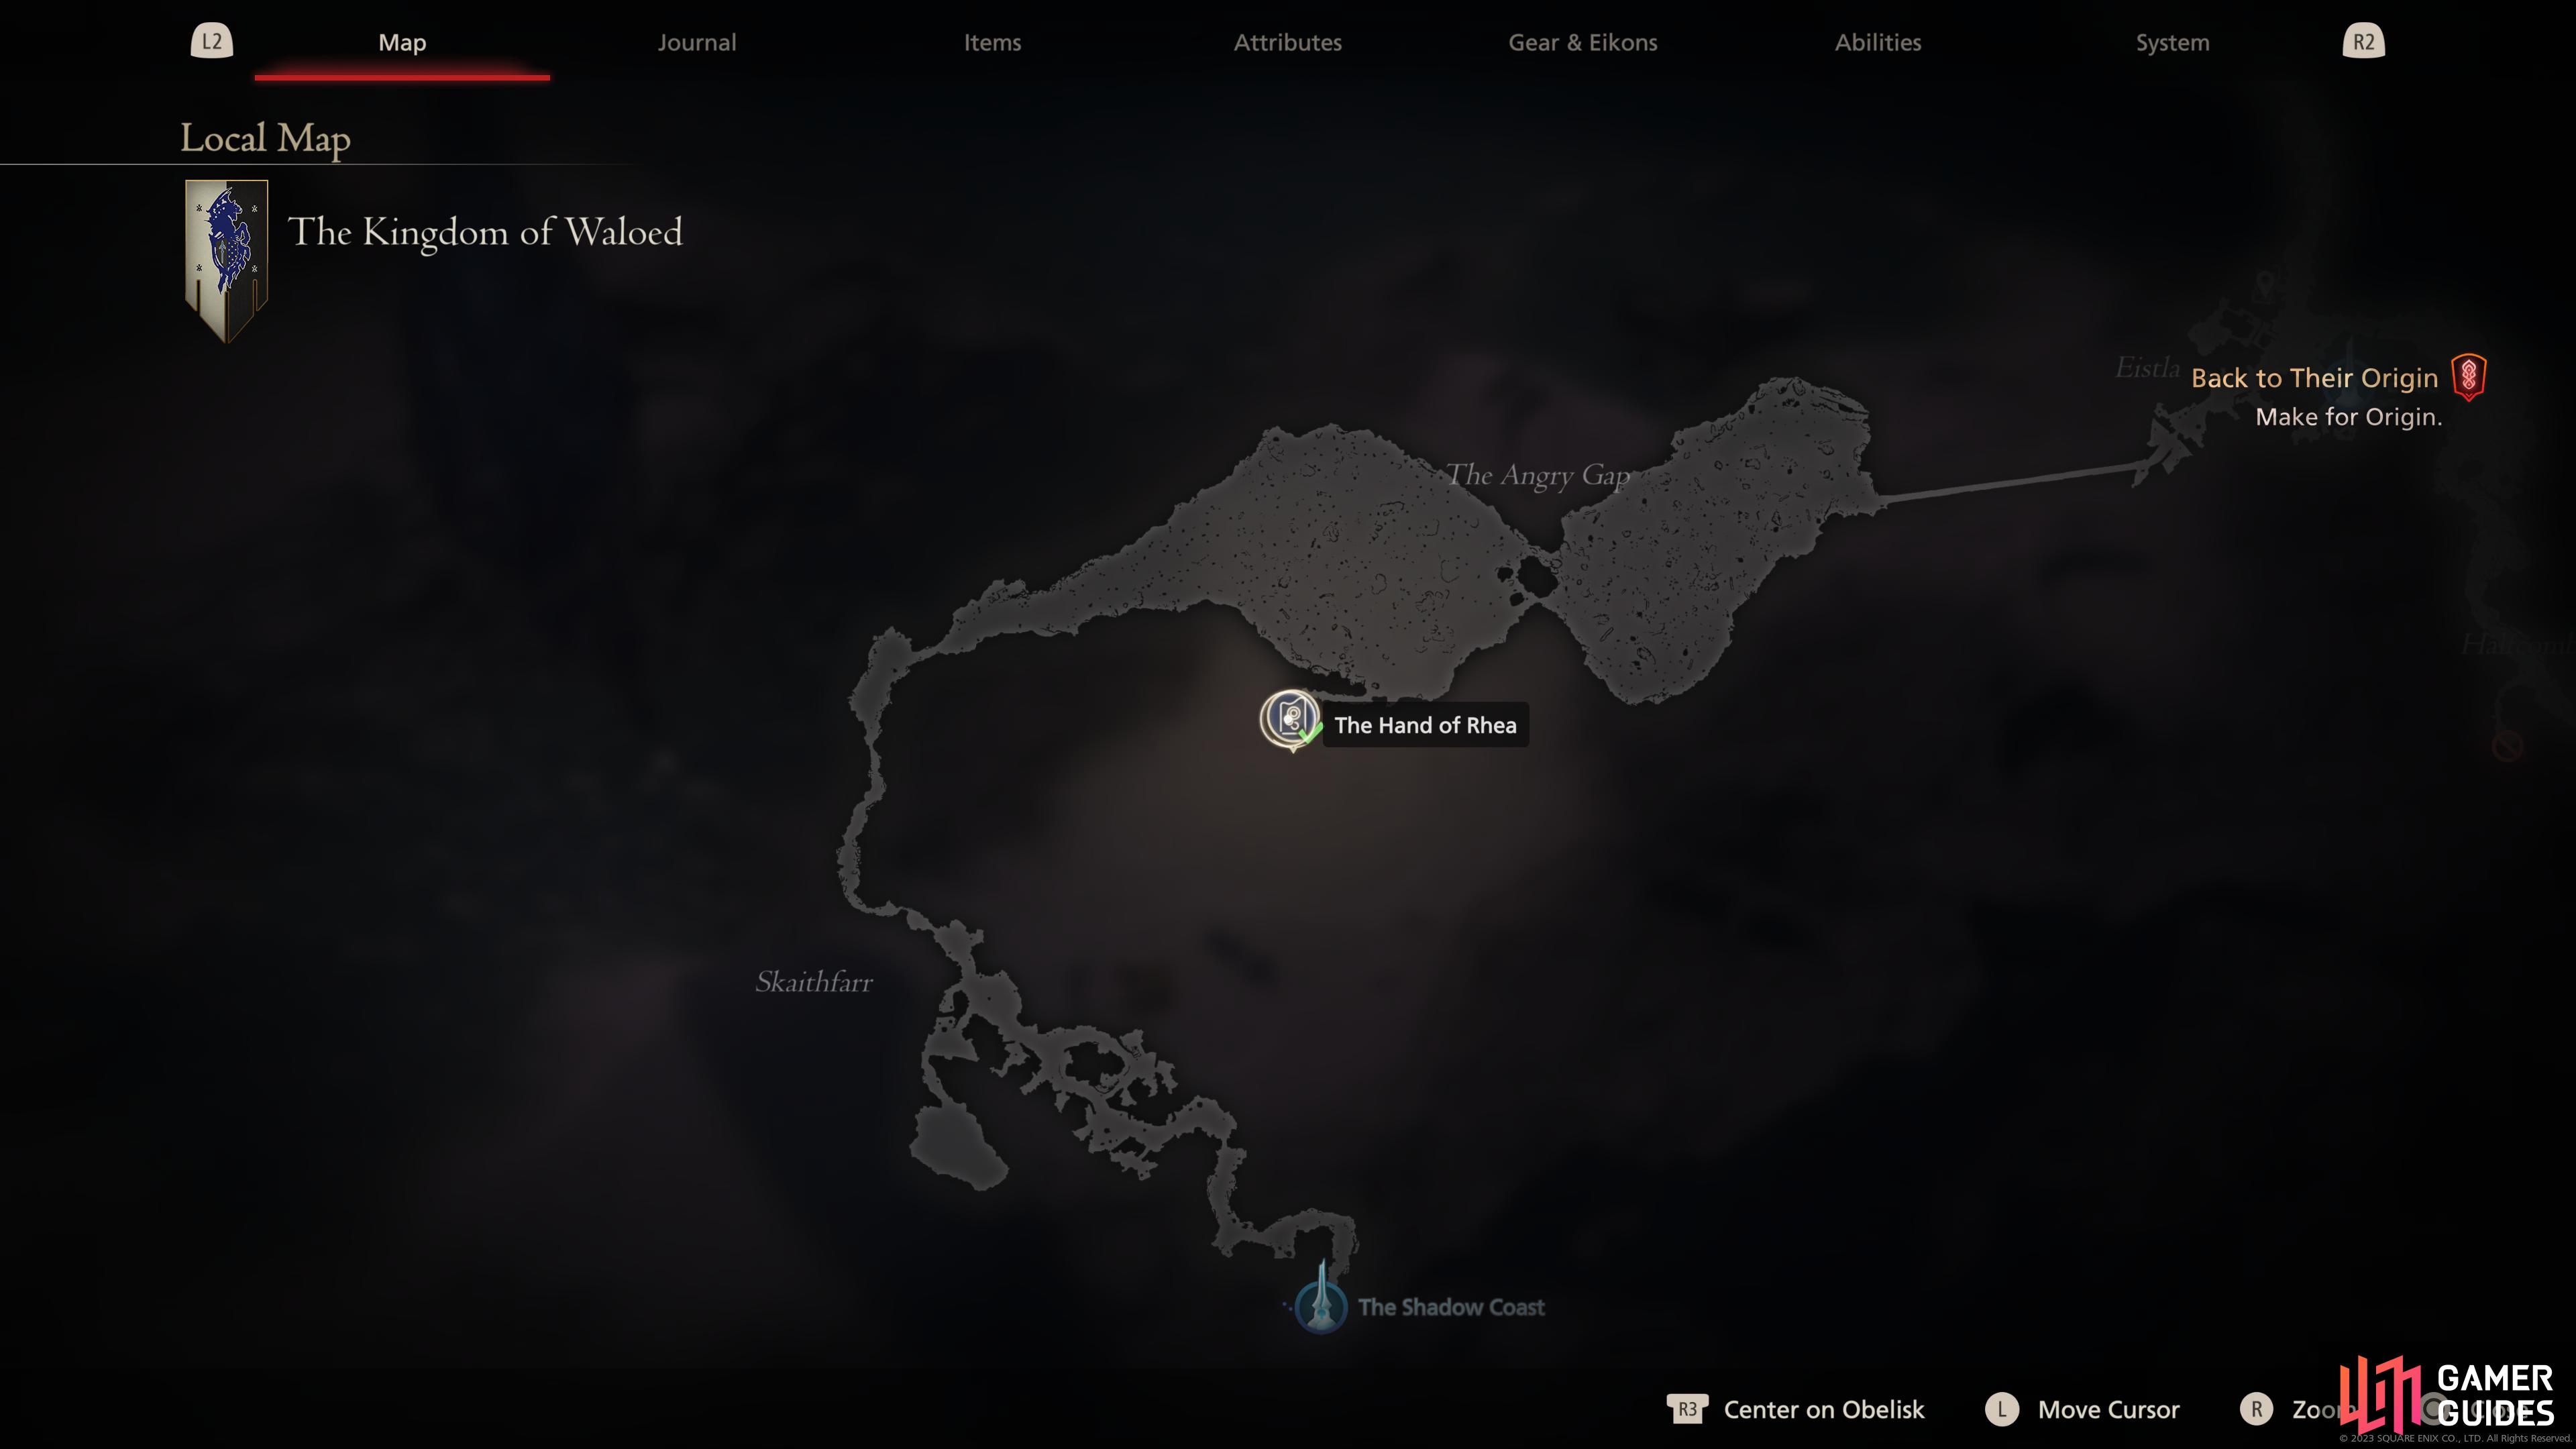
Head to the southwest of The Angry Gap in Waloed to find the Chronolith
you will obtain a powerful accessory should you complete the trial.
Equipment
With this step done, you’ll be able to complete Blacksmith’s Blues IV and obtain the recipe for the Gotterdammerung, the most powerful weapon in Final Fantasy XVI. You’ll also be able to get your hand on all of the accessories that you should equip for each of these trials. With that in mind, we suggest the following equipment loadout:
| Name | Slot | Description | Location |
|---|---|---|---|
| Weapon | +375 Attack + Stagger | Complete the Blacksmith’s Blues IV Side Quest to obtain the recipe and then craft it. | |
| Belt | +95 Defense, +32 HP | Crafted from the recipe obtained from the Blacksmith’s Blues III Side Quest. | |
| Vambraces | +94 Defense, +50 HP | Reward for completing the Where There’s a Will Side Quest. | |
| Accessory 1 | Increases attack and alters |
Reward for 85 Renown at the Patron of Whispers. | |
| Stage Ability Accessory | Accessory 2 | – | Multiple |
| Stage Ability Accessory | Accessory 3 | – | Multiple |
As mentioned above, having the Gotterdammerung will make life a lot easier, as will having the best armor. For your Vambraces, you can opt for ![]() The Sons of Ouroboros instead, the difference is slightly more Defense at the expense of more HP.
The Sons of Ouroboros instead, the difference is slightly more Defense at the expense of more HP.
The ![]() Berserker Ring is a fantastic Accessory that alters and powers up your Precision Dodge, but if you don’t like the animation, opt for the Genji Gloves instead as they offer a flat 5% damage increase to all damage Clive outputs.
Berserker Ring is a fantastic Accessory that alters and powers up your Precision Dodge, but if you don’t like the animation, opt for the Genji Gloves instead as they offer a flat 5% damage increase to all damage Clive outputs.
The final two Accessories should be rotated around to the abilities you have access to for each stage, as this will make life a lot easier to complete some of the Battle Techniques and increase your time. You can find a list of Shiva accessories in the table below:
| Name | Description | Location |
|---|---|---|
| The Breath of Ice ( |
Reduces |
Reward from the Duty Undying Side Quest |
| The Breath of Ice ( |
Reduces |
Buy at |
| The Favor of Ice ( |
Increase |
In a Chest during The Last King Main Quest |
| The Will of Ice ( |
Increases |
In a Chest during The Last King Main Quest |
| The Will of Ice ( |
Increases |
In a Chest during the Streets of Madness Main Quest |
| The Breath of Ice ( |
Reduces |
Reward for the Litany of Errors Side Quest |
| Shiva’s Kiss | Reduces |
Reward from the Priceless Side Quest |
Abilities
The second piece of preparation you should make is to ensure that you have upgraded all of Shiva’s abilities. You’ll be forced to use all of them throughout the Chronolith Trial and having them at their best will make your life a lot easier. Don’t be afraid to refund some of your Ability Points from other Eikons as you will only have access to Shiva’s for this trial.
Stage 1 Walkthrough

You will have Rime and Mesmerize available for Stage 1.
Stage 1 should be where you look to get the majority of your time bonuses as it’s the easiest of the three, as you may expect. Be sure to equip the two accessories above before you begin the stage.
Out of all the possible Battle Technique Bonuses, Snap Shatter is the toughest as it can be tricky to time your ![]() Cold Snap (
Cold Snap ( ) just before an enemy is defeated. The other bonuses are much easier to achieve, and some of the easiest out of all of the Chronolith Trials.
Collateral Rime wants you to hit three enemies with one of your Rimes, simply hold off on using it until enemies are grouped up to achieve that bonus. You should be looking to pull of Permafrost whenever possible anyway, which is done by using Cold Snap at the last moment (like a Precision Dodge), this will also freeze your target for a while. Collateral Mesmerize is the easiest of the bunch, simply have Mesmerize hit two enemies which is easily doable provided there’s enough enemies close by.
Beyond that, you’ll have the typical bonuses you see everywhere, perform a Punish (when an enemy is downed), finish an enemy with an ability, pull off a Precision Dodge, and of course at least 10 ![]() Magic Bursts. Hitting all of these bonuses throughout the stage will see you score another 20 seconds.
Magic Bursts. Hitting all of these bonuses throughout the stage will see you score another 20 seconds.
Stage 1-1
The stage begins with a group of Icebound Wraiths, these don’t have much in the way of HP but they can easily surround you. Make use of both Rime and Mesmerize on these groups here. There should be little to cause problems here and you should look to finish this step without losing any HP.

Stage 1-2
The second step sees you take on a group of Fallen Icebound Bugs alongside some Icebound Hornets. The bugs should cause little issue, they’re more fodder for you to score some of the bonuses on, but the Hornets can be tricky if you’re normally used to other Eikons or ![]() Torgal when dealing with flying enemies. Luckily, Rime works great here, dash into the center of the enemies, the Hornets will follow and then you can unleash Rime to catch them in it (and score another bonus in the process).
Torgal when dealing with flying enemies. Luckily, Rime works great here, dash into the center of the enemies, the Hornets will follow and then you can unleash Rime to catch them in it (and score another bonus in the process).
Stage 1-3
The final part of Stage 1 sees you up against an Icebound Jelly, which is an Elite enemy that has a Stagger bar. There are no other foes here for you to contend with, so you can pay more attention to its abilities.
If you’ve fought the Flan Prince then you’ll know what to expect in terms of attacks the Jelly will use against you. Look for when it brings its arms in close, it will follow up by shooting them back out and this is an easy time to pull off a Permafrost if you’ve yet to do so.
Save your ![]() Limit Break and Eikonic Abilities for when you Stagger the Icebound Jelly, this will allow you to deal as much damage as possible during the Stagger phase and save on time. With your abilities upgraded, the best weapon equipped and your abilities available, you should be looking to defeat it within one Stagger phase.
Limit Break and Eikonic Abilities for when you Stagger the Icebound Jelly, this will allow you to deal as much damage as possible during the Stagger phase and save on time. With your abilities upgraded, the best weapon equipped and your abilities available, you should be looking to defeat it within one Stagger phase.
Stage 2 Walkthrough

Stage 2 will lose Rime but add Ice Age to your arsenal.
| Ability | Suggested Accessory |
|---|---|
| The Favor of Ice ( |
|
| The Will of Ice ( |
Stage 2 increases the difficulty a little, adding in tougher enemies and more Elite enemies for you to deal with. You’ll lose Rime for this Stage but gain Ice Age, a powerful ability that is at its strongest if you hit the sweet point when charging.
As for Battle Technique Bonuses, there’s only one new one, Perfect Ice taking the place of Collateral Rime. To hit this bonus, you’ll need to use Ice Age and make sure you hit your target with a fully charged strike (hitting that sweet point). This is more difficult to achieve than the Mesmerize and Rime bonuses due to the fact you have to charge it, wait until an enemy is stationary before pulling it off.
Stage 2-1
Right from the start, you’re up against an Elite in the form of an Icebound Adamantoise and accompanied by some ![]() Goblins. The start is the perfect time to charge up an Ice Age and score that bonus, so be sure to start with it. Focus on dealing with all of the Goblins first and then you can turn your focus to just the Adamantoise.
Goblins. The start is the perfect time to charge up an Ice Age and score that bonus, so be sure to start with it. Focus on dealing with all of the Goblins first and then you can turn your focus to just the Adamantoise.
As you may expect, the Adamantoise isn’t the fastest customer, but it can perform a spin dash that may catch you out if you’re not careful. Also, remember that striking the side or back of the Adamantoise (the shell) will cause you to deal significantly less damage, so keep that focus on the head.
When you’re up close, the Adamantoise will attempt to melee you, this is a slow attack and perfect for a Permafrost, leaving it frozen for a while and allow you to whittle down that Will gauge. Once Staggered, you should find you can pump out more damage with the addition of Ice Age, when used in Limit Break and fully charged, it will deal heavy damage to the Adamantoise. As with the previous stage, look to defeat the Adamantoise in one Stagger phase.
Stage 2-2
The second part of Stage 2 is up against ![]() Bombs and
Bombs and ![]() Chocobos, a lethal combination if you’re not careful. Keep an eye on the birds, but your main focus is to defeat the Bombs quick enough to prevent them from using Self-Destruct and completely wreck your run by decimating your HP. Outside of that, this should be the easiest part of Stage 2.
Chocobos, a lethal combination if you’re not careful. Keep an eye on the birds, but your main focus is to defeat the Bombs quick enough to prevent them from using Self-Destruct and completely wreck your run by decimating your HP. Outside of that, this should be the easiest part of Stage 2.

Stage 2-3
The final part of Stage 2 sees you once again up against an Elite, an Icebound Fanatic which are your typical large humanoids from the Iron Islands that you encountered in the Fire and Ice Main Quest. As always, begin by taking out the group of Icebound Thorns that accompany this brute, enemies that should take little to go down.
Like with most of the enemies in this Stage, the Icebound Fanatic will use slow melee attacks which are perfect for Permafrost and Precision Dodges, this should allow you to Stagger him fairly easy and follow that up with your usual routine. The only difference with the Fanatic and the Adamantoise in Stage 2-1 is that you may not defeat it during the first Stagger phase.
Stage 3 Walkthrough

Stage 3 adds the powerful Diamond Dust to your available abilities.
| Ability | Suggested Accessory |
|---|---|
| The Favor of Ice ( |
|
| Shiva’s Kiss |
Hopefully you’re around 5 minutes of time remaining come Stage 3 and you’ll lose Mesmerize but gain the incredibly useful Diamond Dust in the process. This is a large Area-of-Effect (AoE), especially if you upgrade it, and will deal significant Stagger damage. If you have the accessory equipped to shorten the cooldown too, it should make this next Stage a lot easier.
Once again, only one new Battle Technique Bonus, with Collateral Diamond replacing Collateral Mesmermize and to achieve it, you need to hit at least two enemies with it, something that will almost certainly happen unless there’s only one enemy remaining, so be sure to use it for the first time early in the battles.
Stage 3-1
Another part that begins with an Elite from the beginning, this time an Icebound Wivre accompanied by two spell slinging Icebound Mesmermizers. Begin the battle by dashing in and using Diamond Dust, then finish off the Mesmermizers if needed. Once left alone with the Wivre, look to bait a Permafrost by going up close and waiting for a melee attack, just bear in mind the Wivre is a lot quicker than the other Elite enemies you’ve faced so far.
Stage 3-2
Like Stage 2-2, this is another part against a group of enemies, rather than an Elite. You’ll be facing off against Icebound Commanders and ![]() Scorpions and you can easily line up a large group of them from the start with an Ice Age or Diamond Dust should they be available. If you see yourself surrounded, use Cold Snap to get out of there and freeze them in the process, an easy part that should allow you to gain some Limit Break and preserve your HP.
Scorpions and you can easily line up a large group of them from the start with an Ice Age or Diamond Dust should they be available. If you see yourself surrounded, use Cold Snap to get out of there and freeze them in the process, an easy part that should allow you to gain some Limit Break and preserve your HP.

(1 of 3) Don’t be afraid to use Limit Break to restore your HP outside of Stagger if it’s low
Stage 3-3
The final part of Stage 3 is the toughest, pitting you against an Icebound Bighorn and and Icebound Lich, two Elites at once! The Bighorn will deal more damage but is far slower where the Lich looks to attack you from blindspots and can teleport in and out of range.
With that in mind, turn your attention to the Lich to begin with and use Diamond Dust when it is available to drive down that Stagger gauge. If you’re low on HP at the start of this Stage but have Limit Break available, you may wish to use it at the start to try and take the Lich down quicker. Once Staggered, you should be able to finish off the Lich in a single phase.
This will leave you with just the Bighorn to contend with, and it’s here where you’ll want to think ahead to the final battle of this Trial. If you have plenty of time remaining (4:30+) then take it slow and easy to ensure you’re finishing this battle with as much HP as possible. The only real attack to watch out for from the Bighorn is its charges, and this is easy to use Permafrost against.
Final Stage - Icebound Necrophobe Strategy

The Final Stage is a boss battle without any time bonuses against the Icebound Necrophobe.
| Ability | Suggested Accessory |
|---|---|
| The Will of Ice ( |
|
| Shiva’s Kiss |
The Final Stage is a single boss battle, and the time you’ve earned to this point is what you’ve got, no more Battle Technique Bonuses. You’ll keep the incredibly useful and powerful Diamond Dust, but Rime returns in place of Ice Age, so you’re going to lose a bit of damage at the expense for utility. Your time remaining will affect how aggressive you need to be, the first time we undertook this Trial we had over 5:30 meaning that we had time to take it a bit slower.
The Icebound Necrophobe is no joke, and you may remember fighting a regular version of it during the Fire in the Sky Main Quest. If you cast your mind back to it, you’ll remember that it attacks at speed with many spells that you’ll need to dodge. Despite being “Icebound”, the Necrophobe still retains attacks such as Enfiraga.
Speaking of Enfiraga, this is an attack perfect for Permafrost or a Precision Dodge, wait for it the sweep of the blade to get close and use it to create an opening for yourself. Just be weary that Enblizzaga usually follows, which is an AoE around the Necrophobe so be sure to back away after a few hits. The final of the elemental En attacks is Enthundaga, this will cause multiple lightning strikes before the Necrophobe dashes in electrically charged.
Dualcast: Blizzaga will see it fire off too beams in quick succession, if you’re close to the Necrophobe, this is easier to dodge to the side of, from range, a lot less so. Dualcast: Firaga will shoot multiple balls of fire out from close range that then rotate, this is one you’ll want to be at range for and then work your way inside.

When it comes to dealing with the Icebound Necrophobe, look to save Diamond Dust to drive that Stagger gauge down, when upgraded, it should bring it close to half of the gauge. This will ensure that you won’t have to spend as much time trying to hit the Stagger phase. If you’re playing optimally, you should be able to defeat the Necrophobe in two Stagger Phases, just don’t be worried to use Limit Break if your HP gets dangerously low before a Stagger Phase, survival is more important.
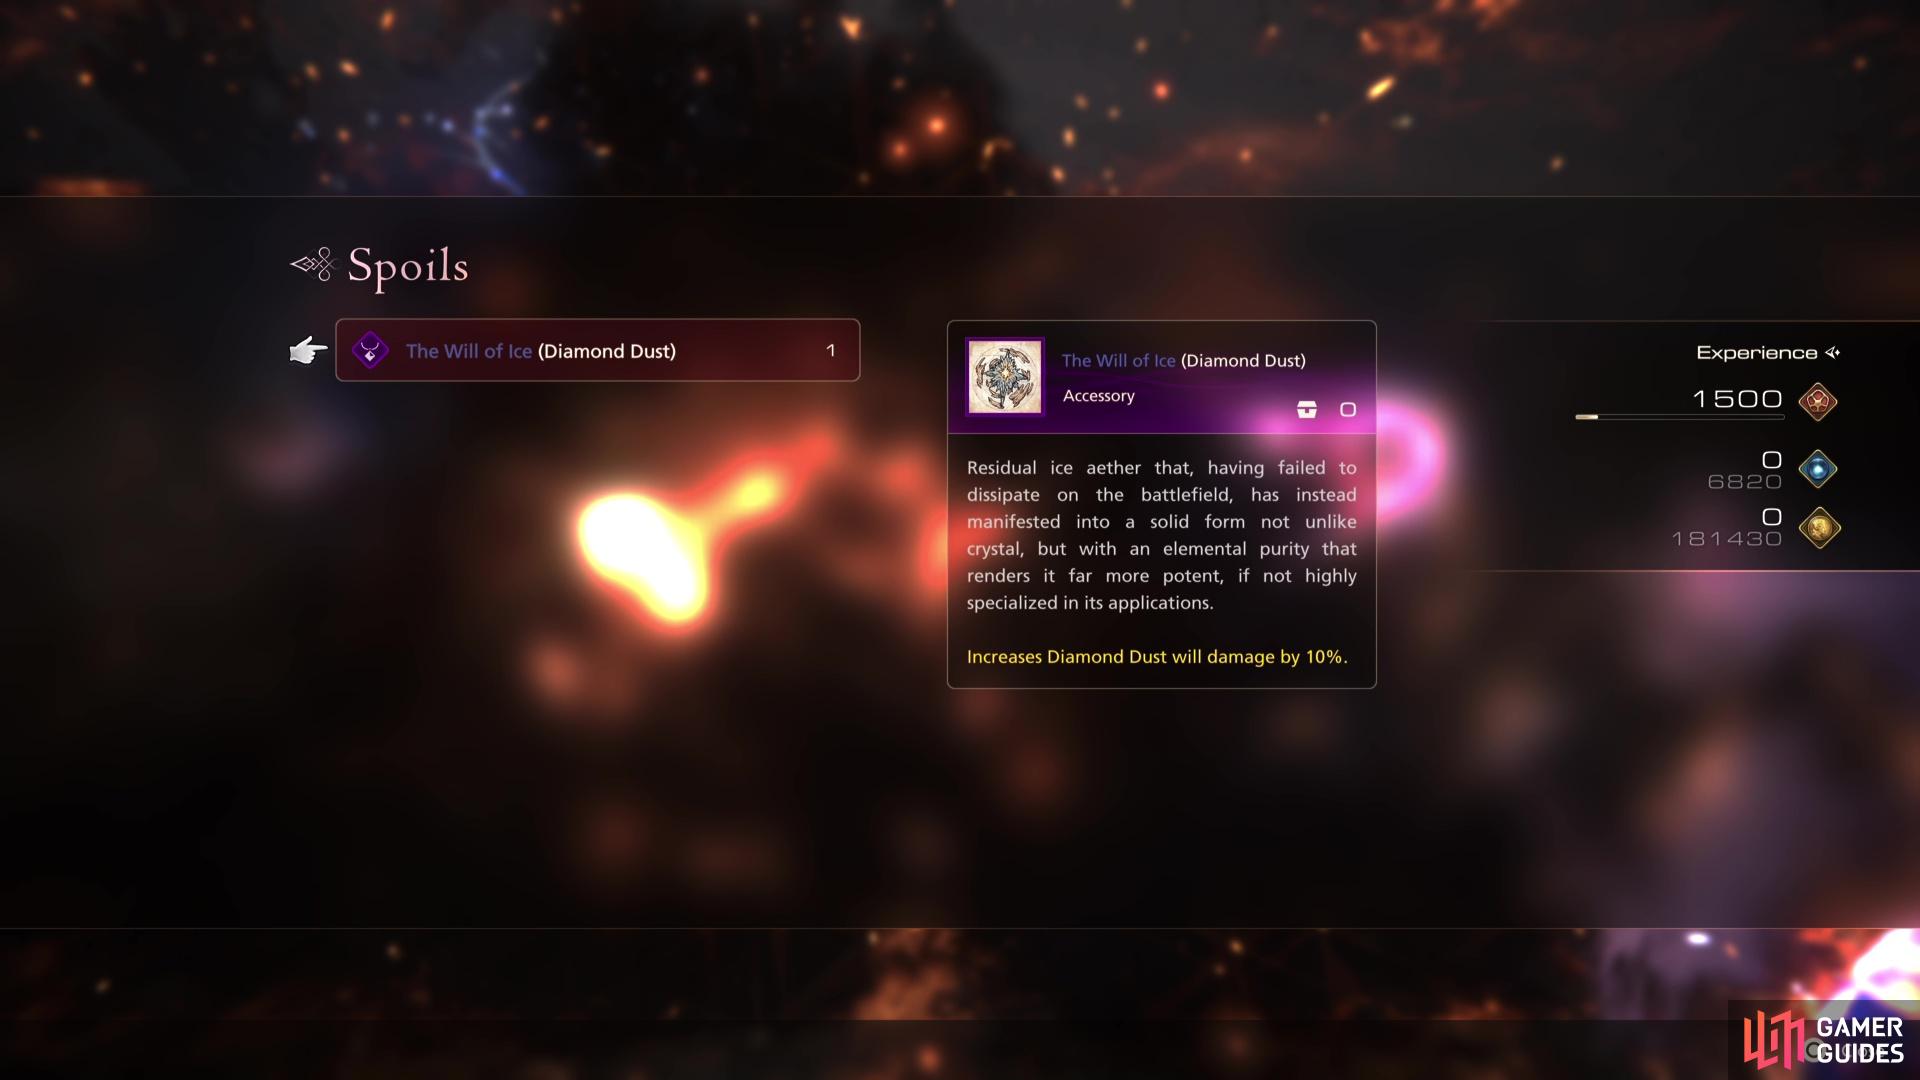
Once you finally defeat the Icebound Necrophobe, give yourself a pat, you’ll have completed the Trial and will obtain the The Will of Ice (![]() Diamond Dust), a powerful Accessory that increases the damage of it by 10%. You’ll also unlock The Final Trial by Ice at the
Diamond Dust), a powerful Accessory that increases the damage of it by 10%. You’ll also unlock The Final Trial by Ice at the ![]() Arete Stone in
Arete Stone in ![]() The Hideaway, a more challenging version of the trial you just completed (with no real rewards)!
The Hideaway, a more challenging version of the trial you just completed (with no real rewards)!
More Final Fantasy 16 Chronolith Trials
If you’re looking for help on any of the other Chronolith Trials, check out our pages below:
- Where to Find All Chronolith Trials
- How to Complete the Phoenix Trial by Fire Chronolith Trial
- How to Complete the Garuda Trial by Wind Chronolith Trial
- How to Complete the Titan Trial by Earth Chronolith Trial
- How to Complete the Ramuh: Trial by Thunder - Chronolith Trial in FF16
- How to Complete the Bahamut Trial by Light Chronolith Trial
- How to Complete the Odin Trial by Darkness Chronolith Trial
No Comments