
While progressing through the main story of Final Fantasy 16, you’ll begin to unlock more Hunts. At the moment, you’ve most likely only fought a C Rank or two, and Belphegor will be the first proper test for you as it’s a the first B-Rank you’ll fight unless you fight the Griffin first. Read below to find the exact location of Belphegor, recommended abilities, equipment, items as well as our detailed hunt strategy.
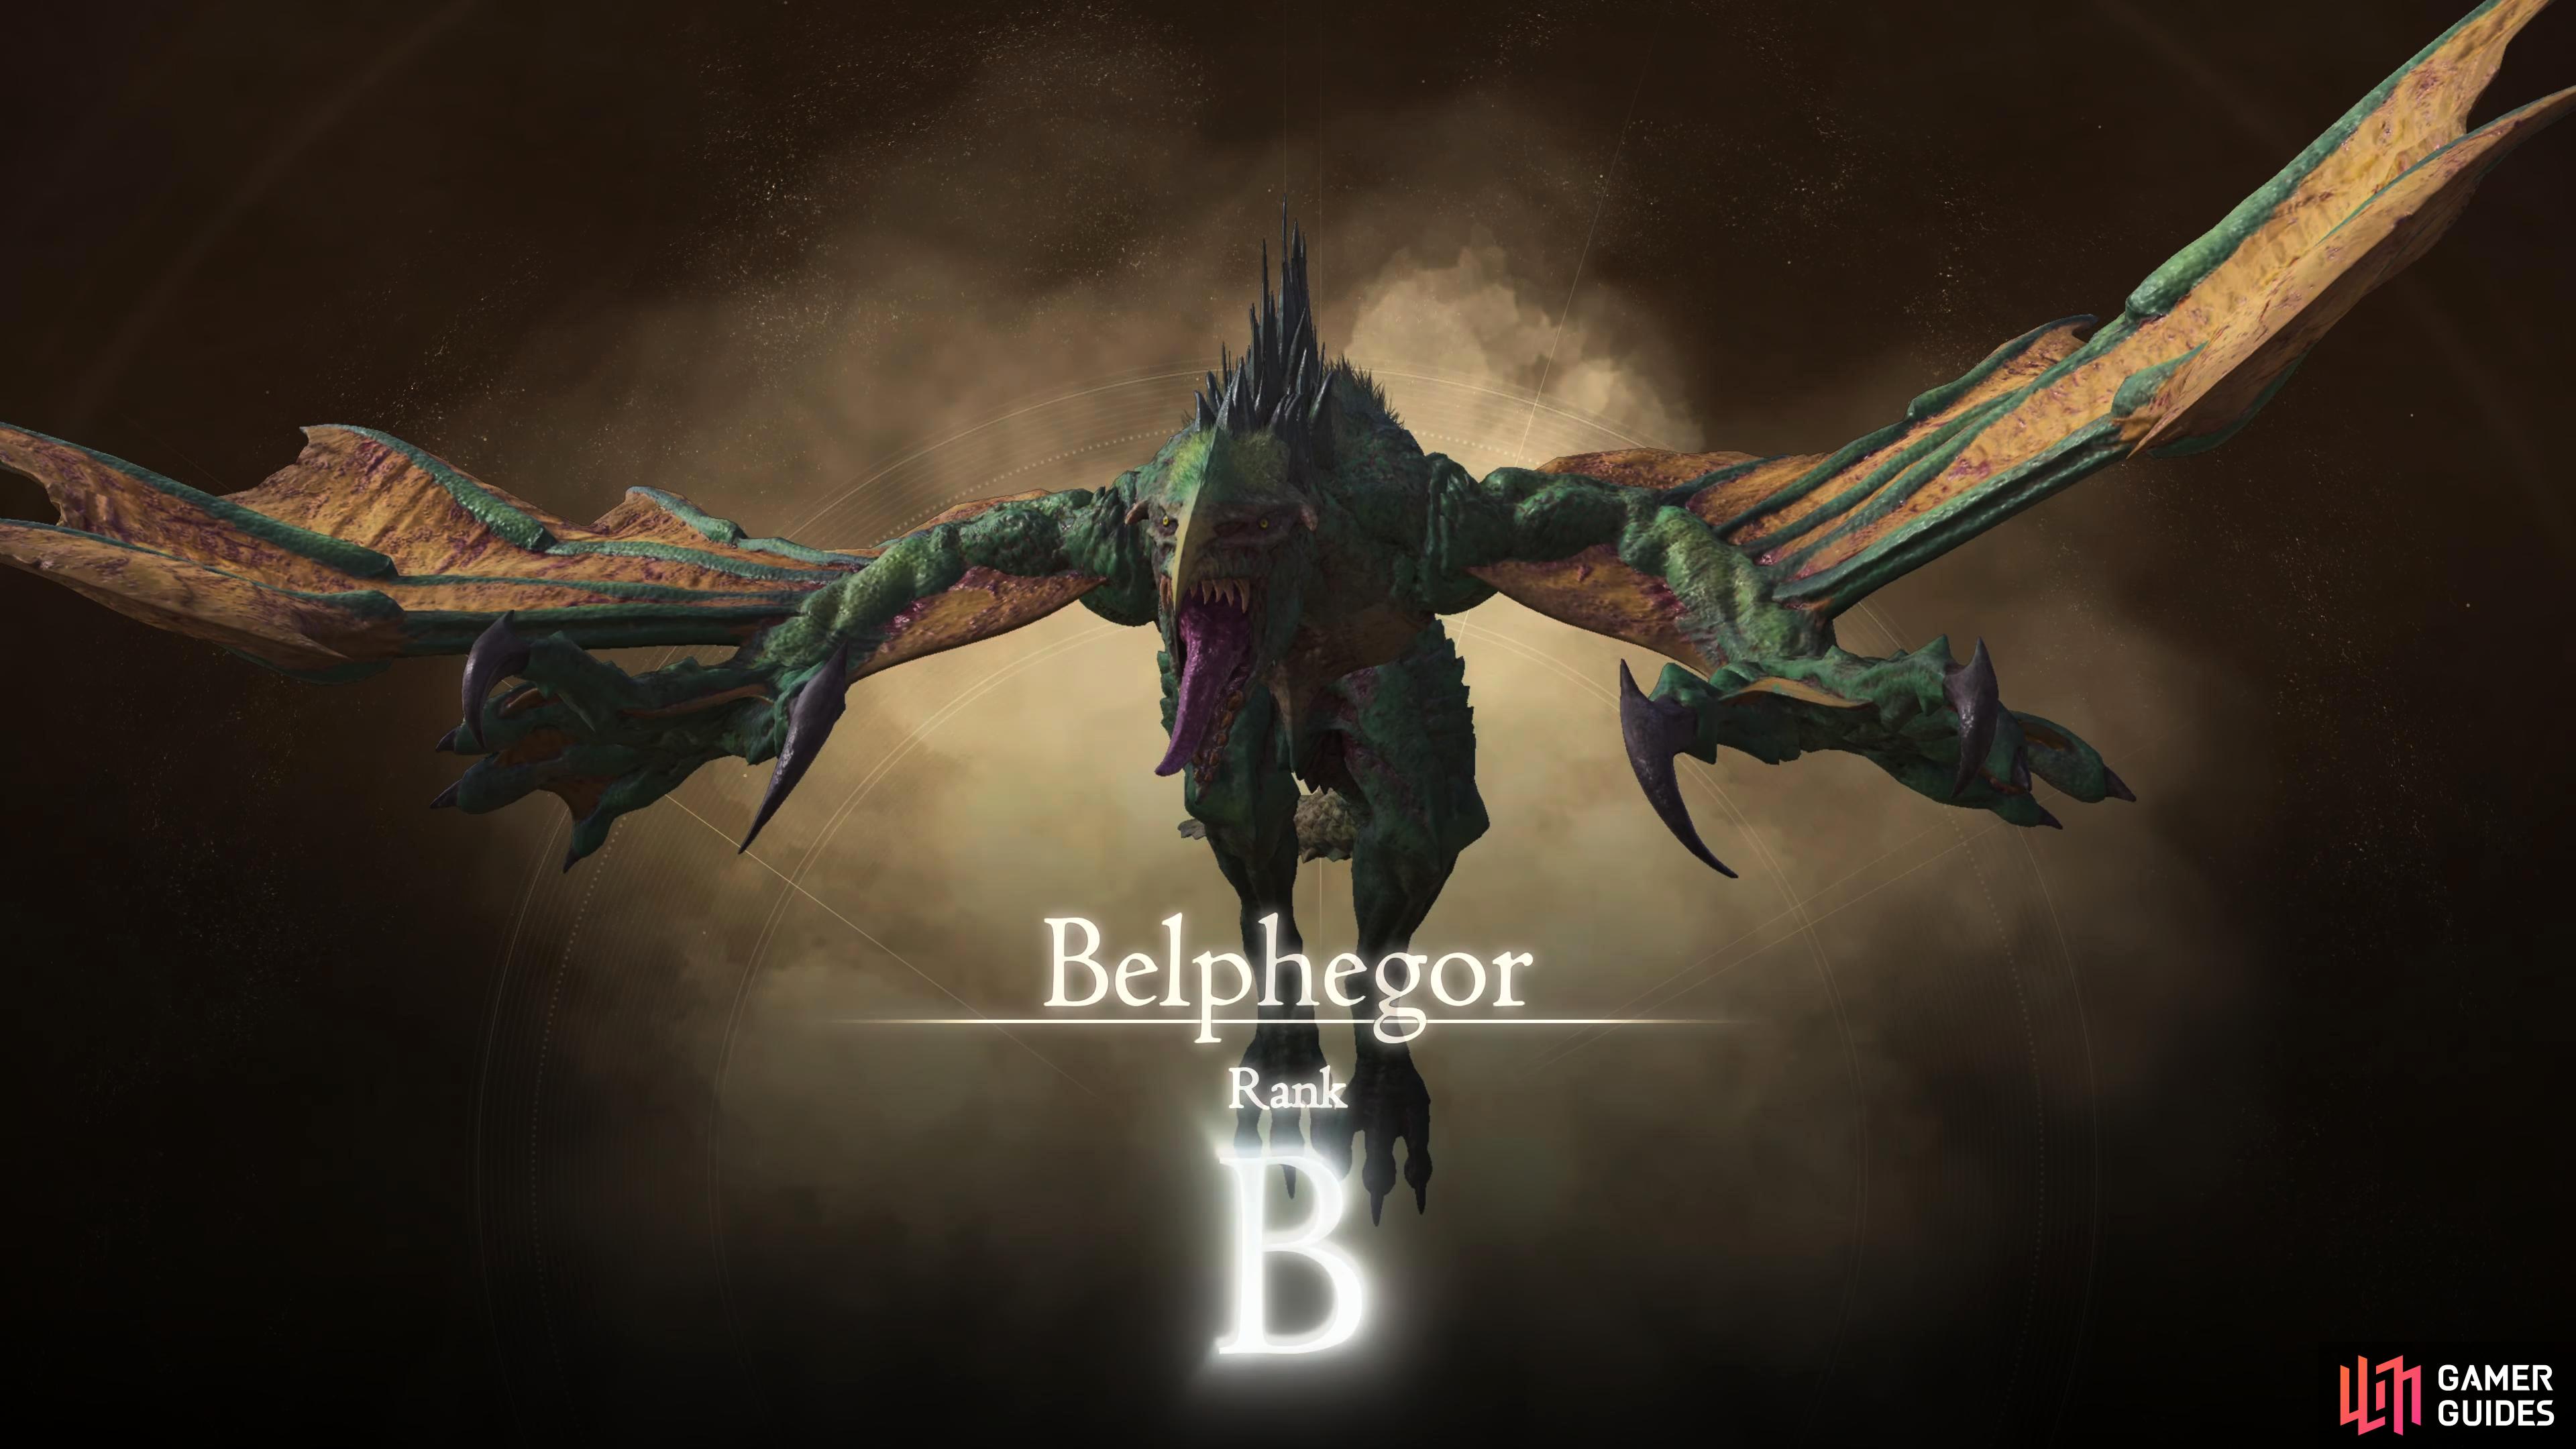
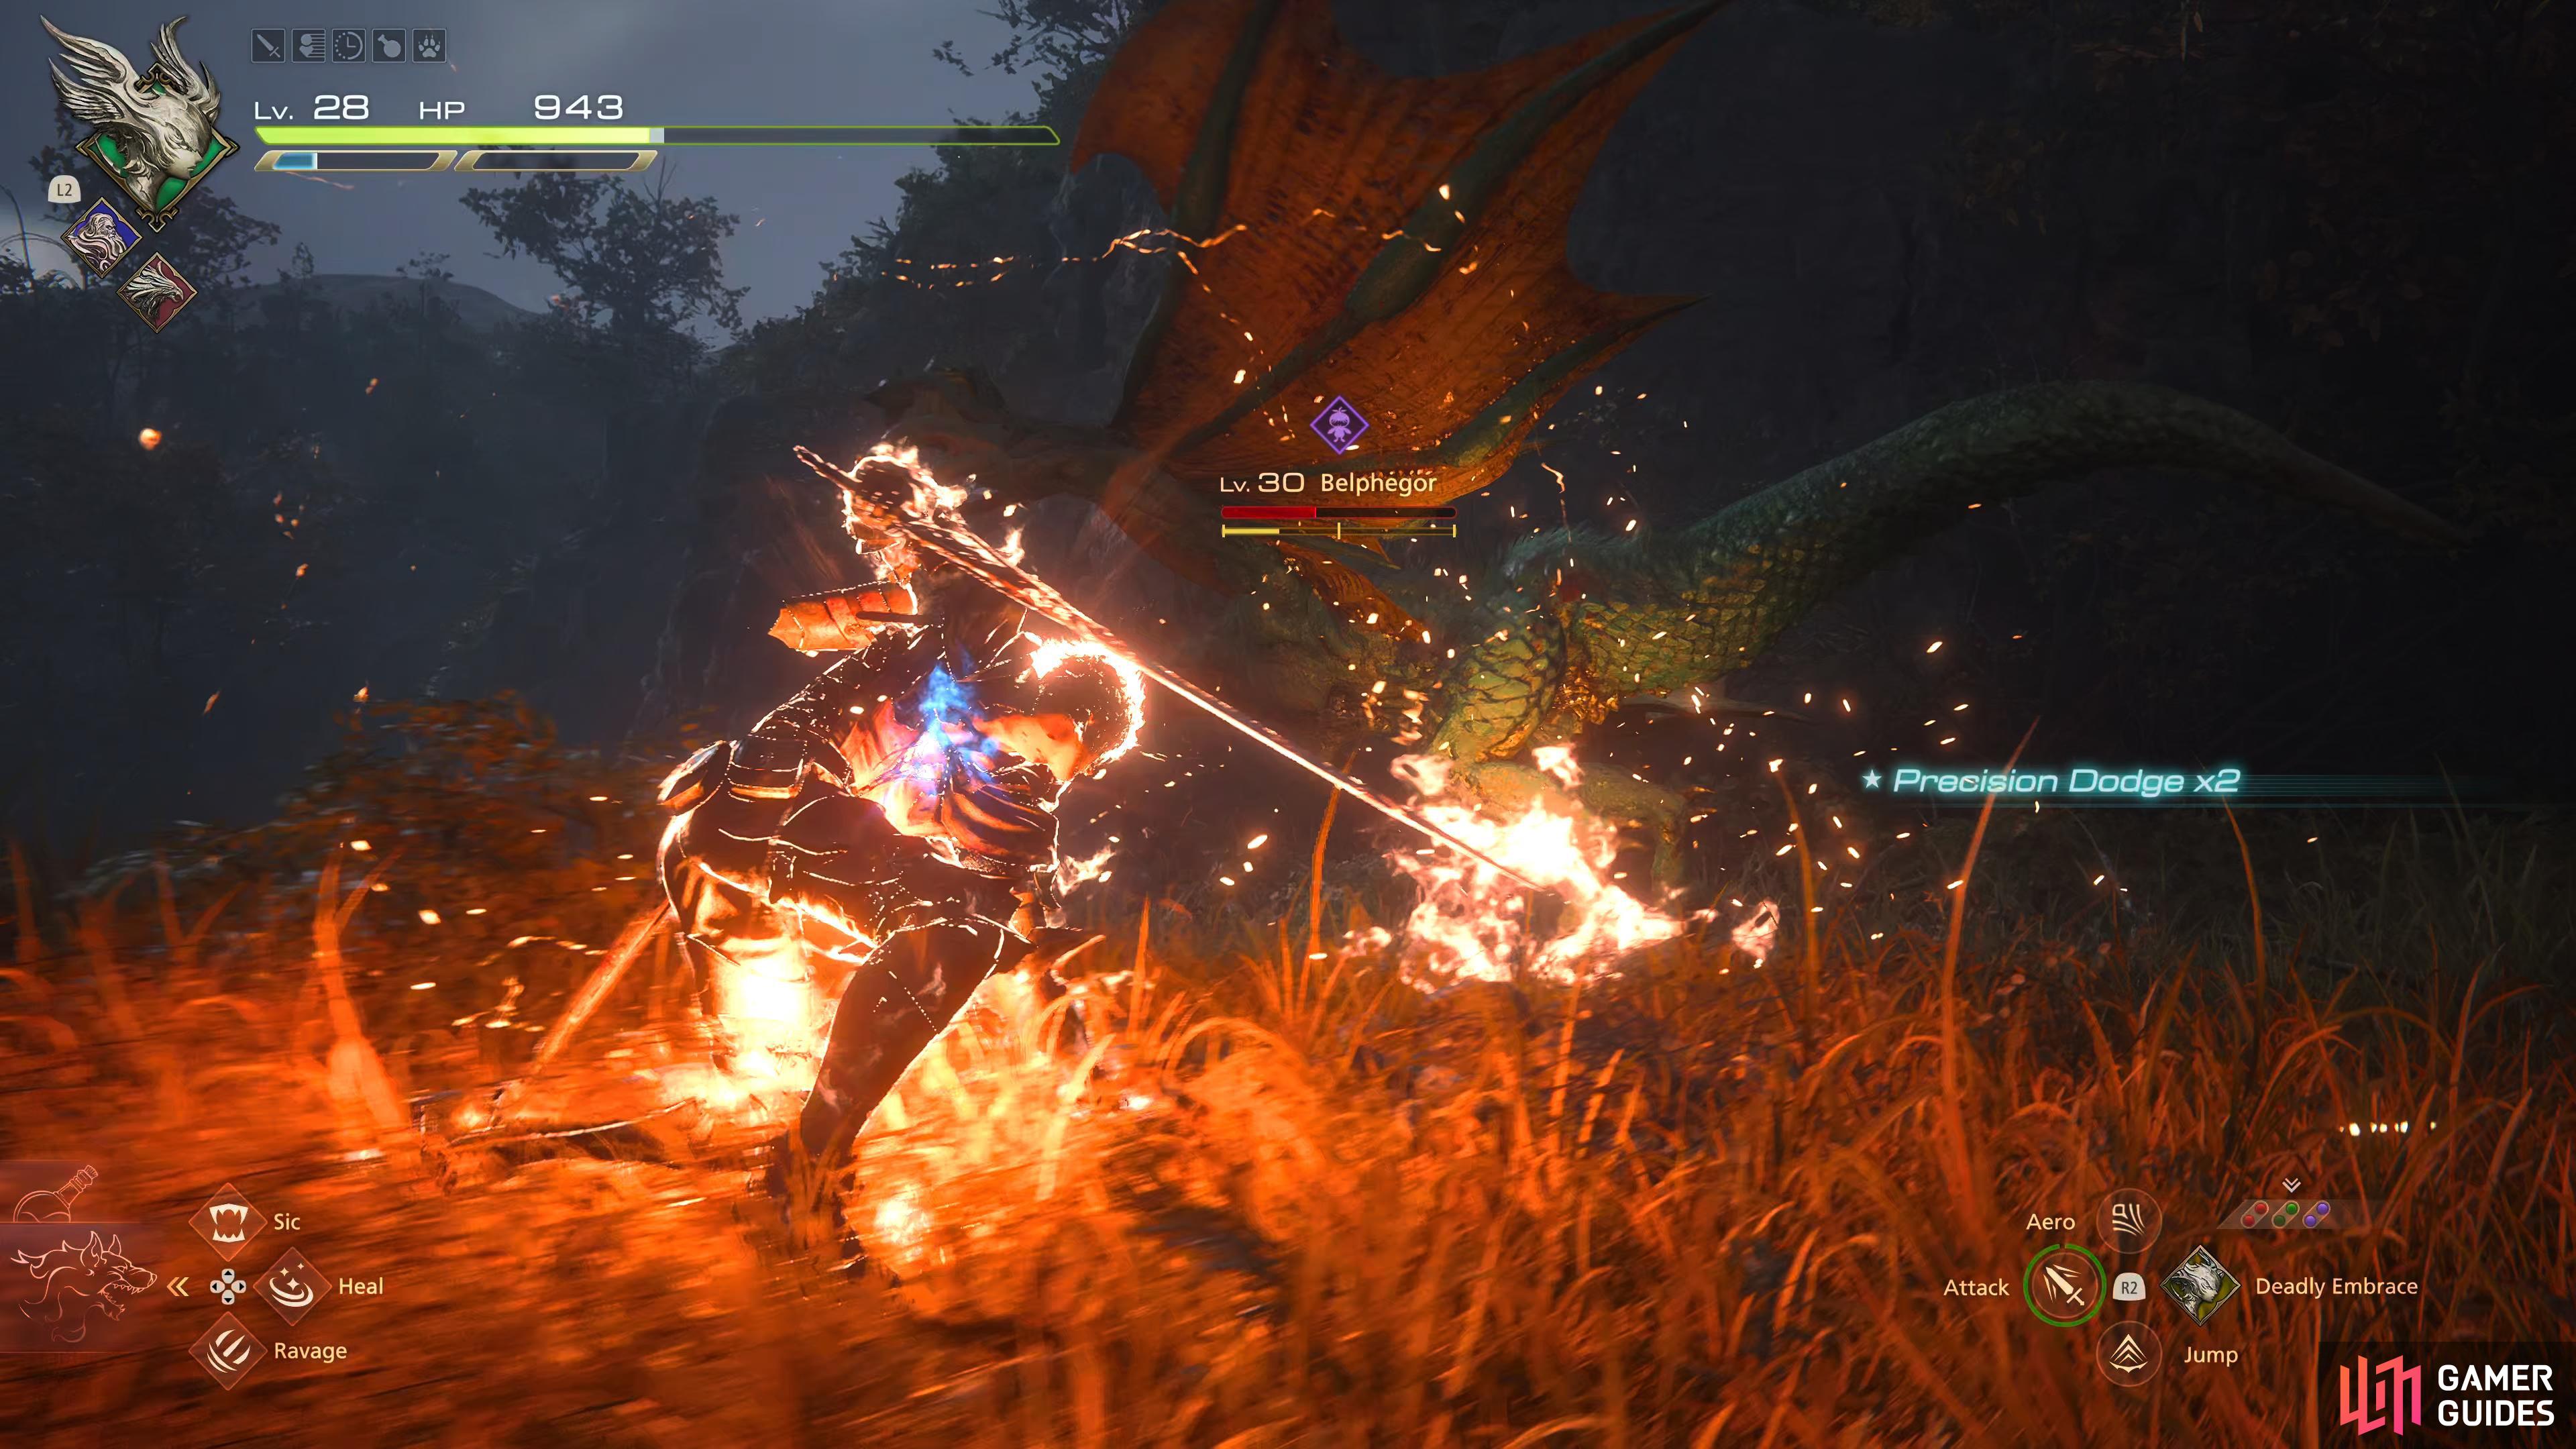
!Belphegor is one of the first B Rank Hunts you’ll encounter.
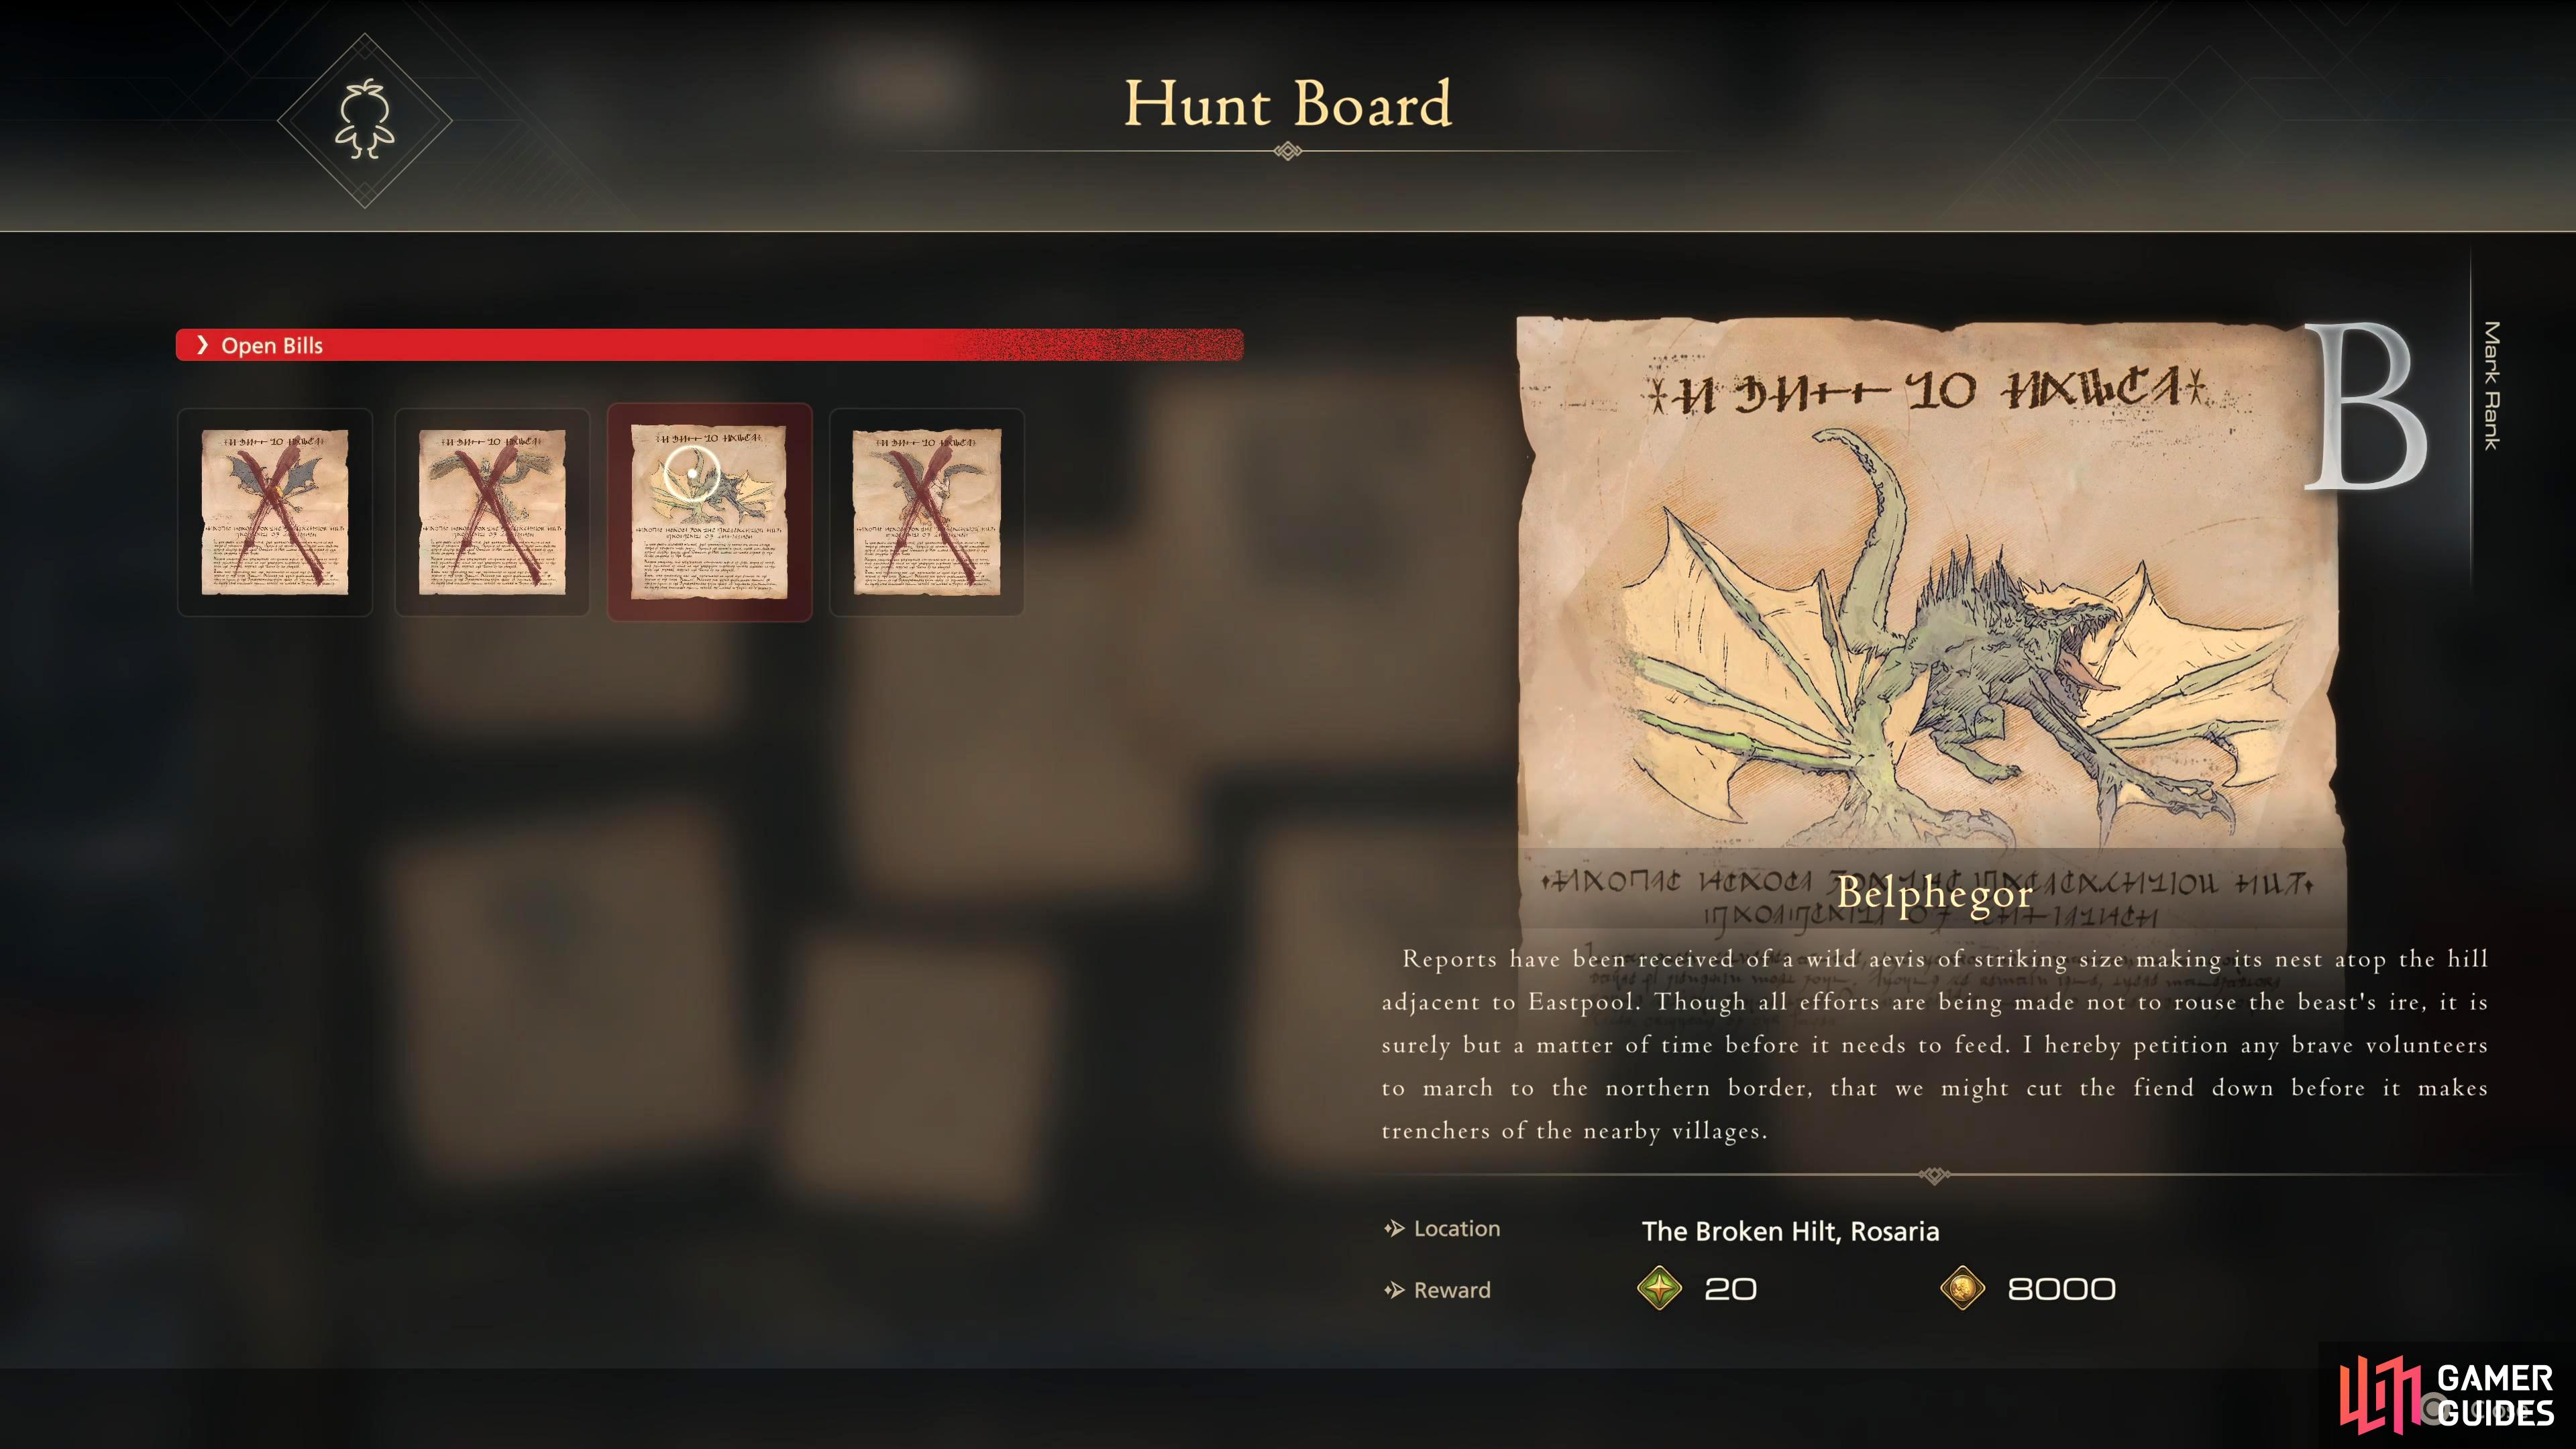
Where is the Belphegor Mark Location?
| Location | Level | Bounty |
|---|---|---|
| South of Eastpool | 30 | 8,000 Gil, 20 Renown |
First things first, you’ll need to find ![]() Belphegor, and by reading the Hunt Bill you’ll find out it can be found “atop the hill adjacent to Eastpool”. Open up the World Map, and travel to
Belphegor, and by reading the Hunt Bill you’ll find out it can be found “atop the hill adjacent to Eastpool”. Open up the World Map, and travel to ![]() Eastpool. Now, head out of the southeastern exit, go across the bridge into The Broken Hilt where you’ll find a field with scarecrows in it. Proceed across the field to find a narrow path next to the windmill, and follow it all the way south until you reach a clearing where you’ll find Belphegor.
Eastpool. Now, head out of the southeastern exit, go across the bridge into The Broken Hilt where you’ll find a field with scarecrows in it. Proceed across the field to find a narrow path next to the windmill, and follow it all the way south until you reach a clearing where you’ll find Belphegor.
By reading the hunt description, and the location.
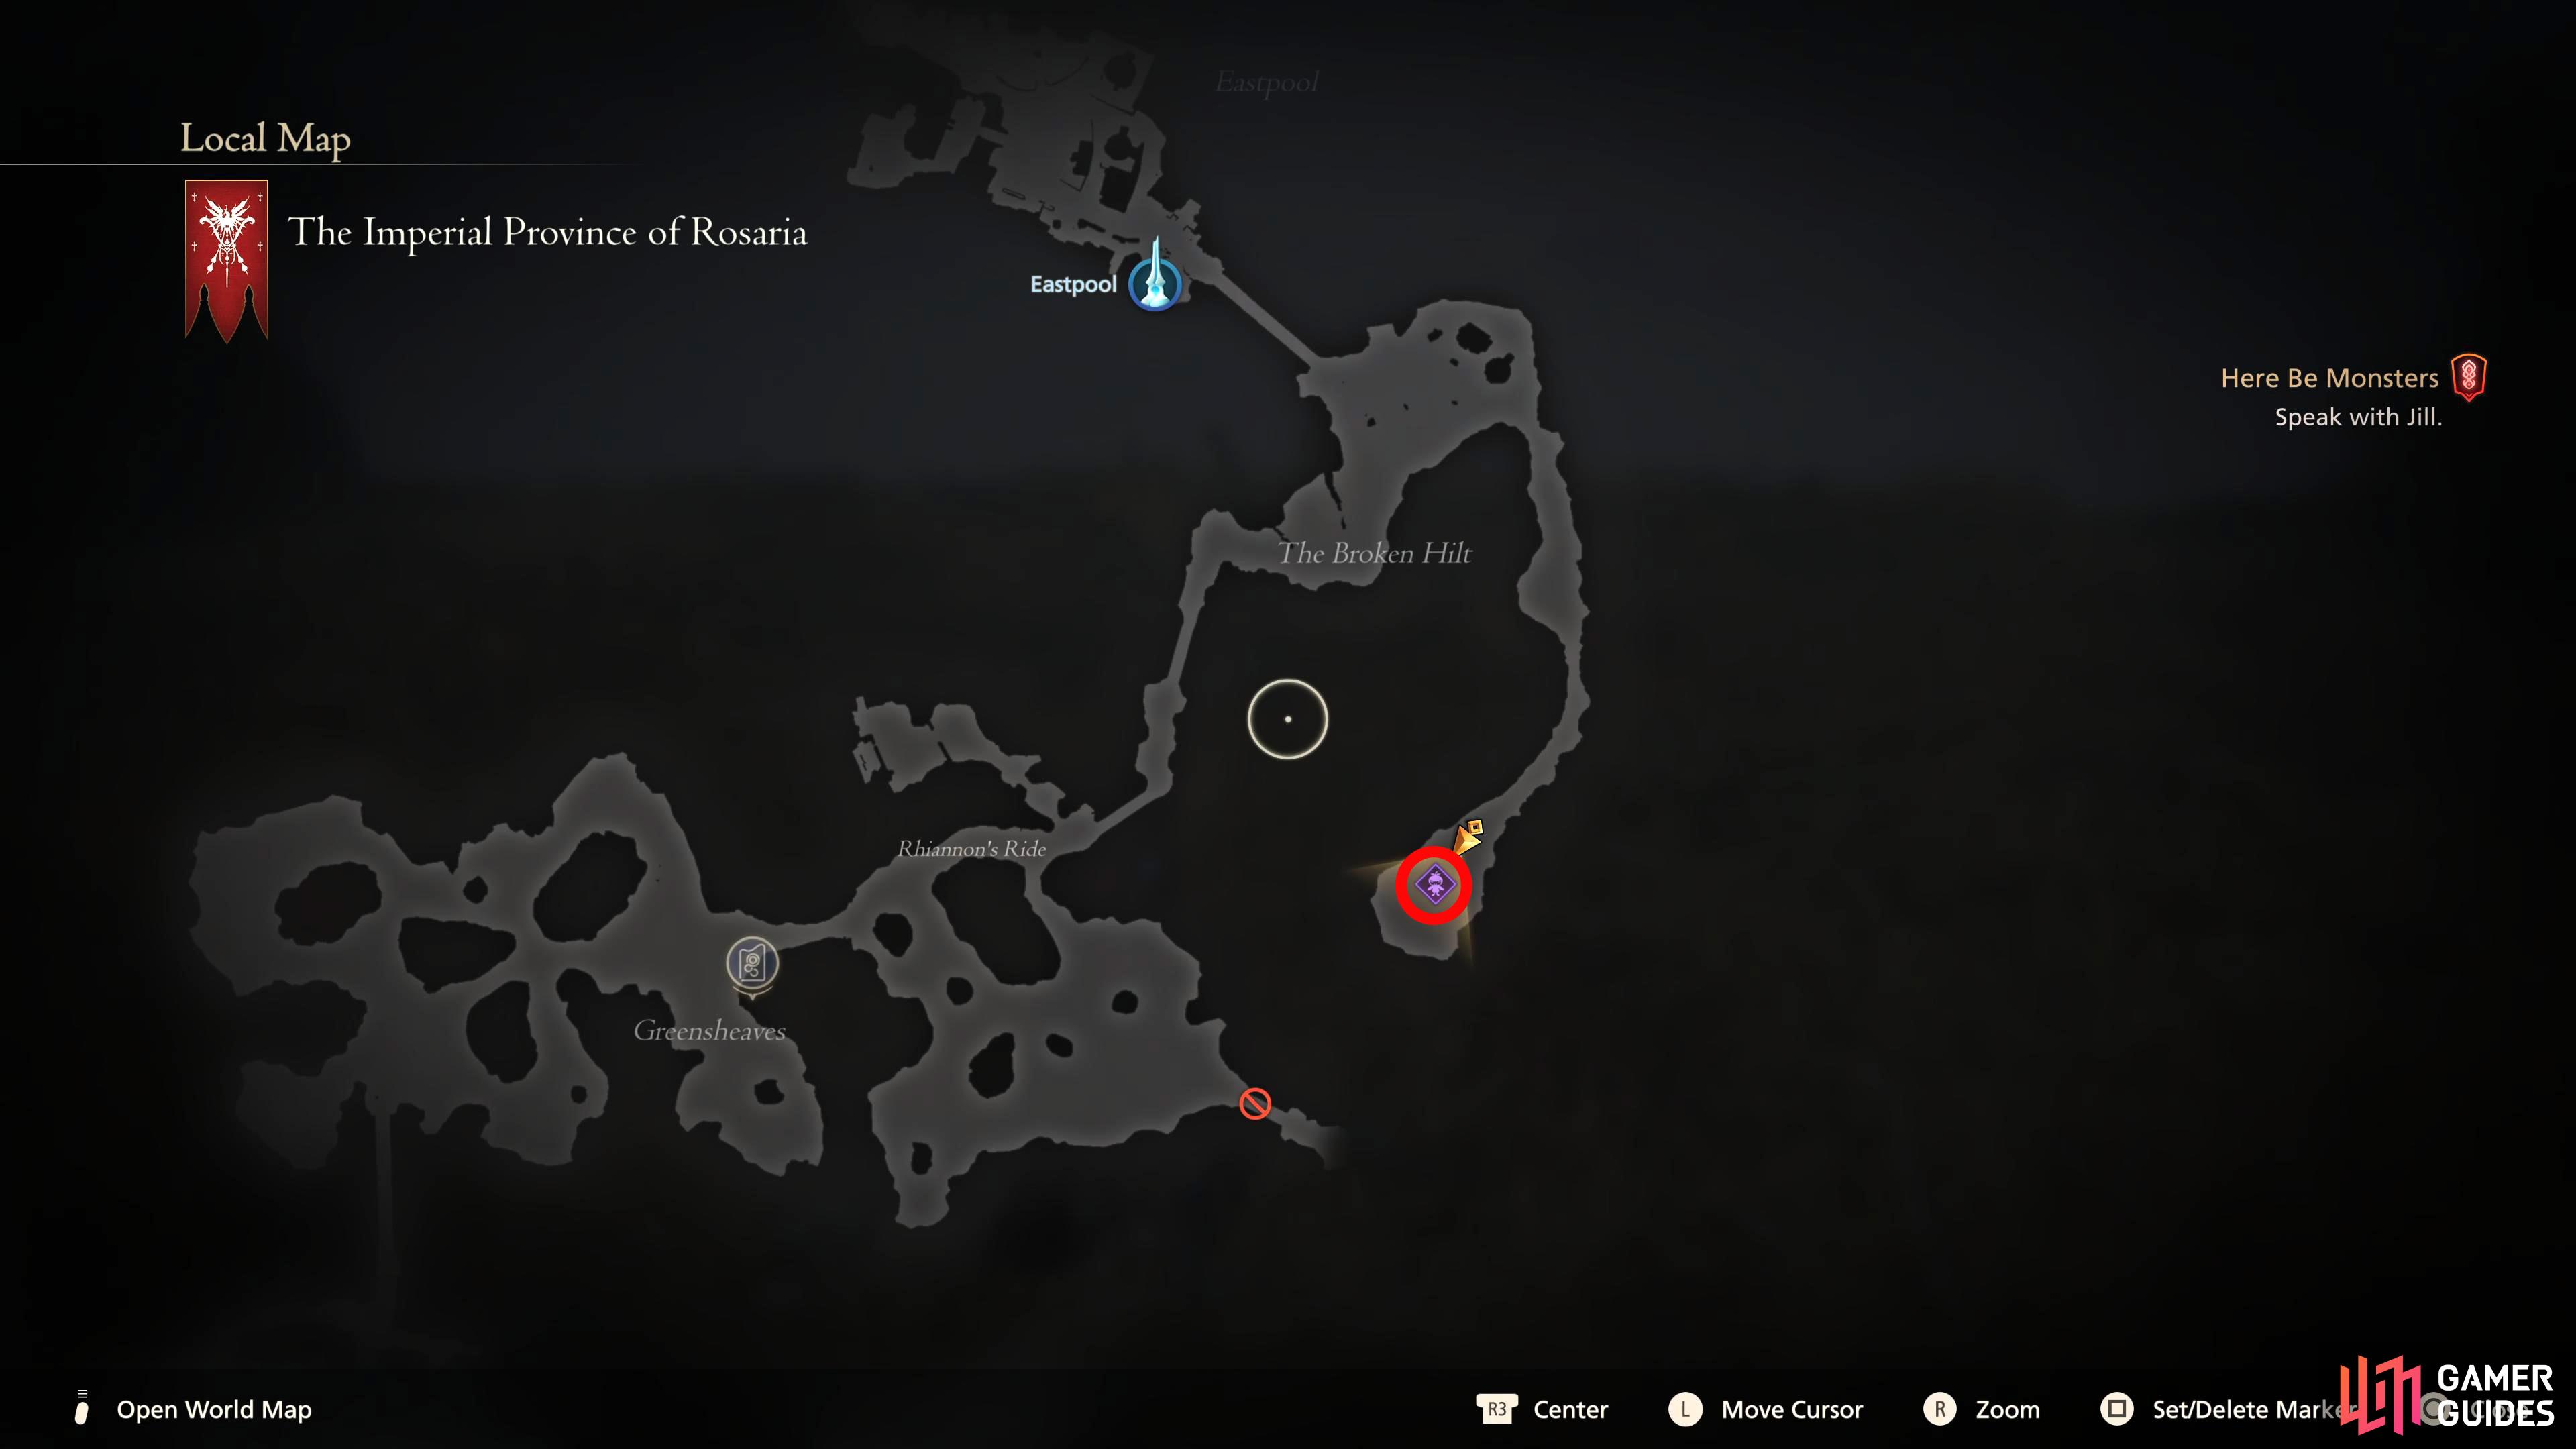
You’ll find out that !Belphegor can be found south of !Eastpool.
Belphegor Attacks
Below you’ll find all the attacks that Belphegor has in its arsenal:
| Attack | Description | Counter |
|---|---|---|
| Tail Flip Combo | Belphegor will perform a three-hit combo. It’ll start off with a claw attack which it’ll lunge into, then it’ll follow it up with the same attack on its opposite claw before unleashing an attack with its tail while performing a backflip. | This combo can deal a substantial amount of damage, so focus on avoiding the attack by Precision Dodges on each attack, or evading it entirely. |
| Tri-Fire | Belphegor will unleash three balls of fire in quick succession toward you. | Either keep moving left to right to avoid them, or wait for the fireball to reach you, and dodge at the last second to get a Precision Dodge. If you choose the latter option, Precision Dodge all three projectiles first before countering. |
| Tail Stab | Belphegor quickly turns to its side to hit you with its tail in a stabbing motion. | This normally occurs when you are in the melee range of the monster. It comes quickly, so you’ll need to have quick reflexes to dodge the attack. Getting hit by it will knock you back as well as deal moderate damage to you. |
| Leaping Tail Spin | Belphegor will leap towards you while spinning to hit you with its tail. | It won’t use this attack much unless you’re in medium range of the monster. You can simply move backwards to avoid this attack, or use dodge just as the tail is about to make contact for a Precision Dodge. |
| Flame Breath | Belphegor will unleash a breath of fire in a cone in front of itself which will deal continuous damage to you. | This attack has the potential to deal massive amounts of damage, especially if you stay in the fire. Perform a Precision Dodge to either side to avoid, and punish the monster. |
| Wing Blast | Belphegor will hover into the air and attack you with a Wing Blast. This will temporarily stun you, and it’ll perform a follow-up attack, Dive Bomb. | You can avoid the Wing Blast if you’re quick, but if you do get hit by it, you’ll have a short window to dodge the Dive Bomb just before the monster gets to you. This is the same attack that the Wivre, and Dragon Aevis use. |
| Dive Bomb | As mentioned before, Belphegor will normally use this after a Wing Blast, although it can use it without it. | The best way to counter the attack is to perform a Precision Dodge just as Belphegor is going to hit you as you can get a nice few counterattacks of your own. If it does the attack after you get hit by Wing Blast, you’ll have approximately one second to dodge the incoming blow. |

Recommended Abilities for Belphegor
Here we will list our recommended ability set up to do this effectively:
| Eikon | Ability | Damage Type |
|---|---|---|
| Damage and Will (2 Stars) | ||
| Will (4 Stars) | ||
| Will (2 Stars) | ||
| Phoenix | Damage and Will (3 Stars) | |
| Damage (4 Stars), Will (3 Stars) | ||
| Damage and Will (3 Stars) |
The reason behind the chosen abilities above is mainly due to the battle as Belphegor doesn’t give you a lot of openings, so using ![]() Will-o’-the-Wykes to negate a lot of its damage is pivotal to making the battle easier as it will absorb up to four attacks when upgraded. Rook’s Gambit is taken to counter a lot of Belphegor’s attacks as it can perform them pretty quickly, and Rook’s Gambit allows you to counter them with ease while still providing a decent amount of Stagger to the monster.
Will-o’-the-Wykes to negate a lot of its damage is pivotal to making the battle easier as it will absorb up to four attacks when upgraded. Rook’s Gambit is taken to counter a lot of Belphegor’s attacks as it can perform them pretty quickly, and Rook’s Gambit allows you to counter them with ease while still providing a decent amount of Stagger to the monster.
Gouge is a fantastic ability to use after you’ve pulled down Belphegor with Deadly Embrace during the halfway stagger with an upgraded version almost being enough to put it in full stagger. Pile Drive is brought along to provide a bit more Will/Damage. It’s taken over Thunderstorm as it’s quicker to perform and doesn’t leave you open. Finally, Flames of Rebirth is excellent to use after you’ve accumulated the x1.50 damage multiplier when the boss is staggered then follow it up with a Judgment Bolt to finish off the stagger phase.
Recommended Items and Equipment for Belphegor
Gear
For your Weapon, Belt, and Vambraces, you should have the following:
| Weapon | Belt | Vambraces |
|---|---|---|
If you don’t have what’s listed above, use the highest Attack for Weapon, and highest Defense and Health for the Belt and Vambraces.
Accessories
For your Accessories, this is more subjective, so here is what we used:
| Accessory 1 | Accessory 2 | Accessory 3 |
|---|---|---|
Items
Finally, we have items. This is more of a preference thing, but we chose the following items:
| Shortcut 1 | Shortcut 2 | Shortcut 3 |
|---|---|---|
More Healing is always a good thing which is why we went with Elixir for the third slot. These are costly, so if you don’t want to waste your Gil, take either a ![]() Strength Tonic to use when you knock Belphegor into the Stagger phase to maximize damage, or a
Strength Tonic to use when you knock Belphegor into the Stagger phase to maximize damage, or a ![]() Stoneskin Tonic to reduce damage by 30%.
Stoneskin Tonic to reduce damage by 30%.
Belphegor Boss Strategy
Belphegor is definitely a step-up in difficulty from what you’re used to outside some bosses. It’s pretty quick on its feet, and it doesn’t give you many openings. When you attack it in melee range, it has a couple of attacks that it will use such as Tail Stab to knock you back, or Flame Breath if you’re in front of it. Not only that, but it will regularly use its Tail Flip Combo which starts off with two lunging claw attacks followed up by a tail flip. Each of these attacks can do 100-300 damage per hit, and if you’re caught by all the attacks, you can lose around half of your health bar.
So, when do you attack the boss then? Well, you need to wait for openings. Although there aren’t many, there are some. You can Precision Dodge the three fireballs from Tri-Fire to close the distance and get some nice counterattacks on the boss. Flame Breath leaves the boss open for a while as it channels the attack, simply Precision Dodge either side of it, and hack away on the helpless monster. Finally, if you can time the dodge of Dive Bomb, you can get some hits in that way.
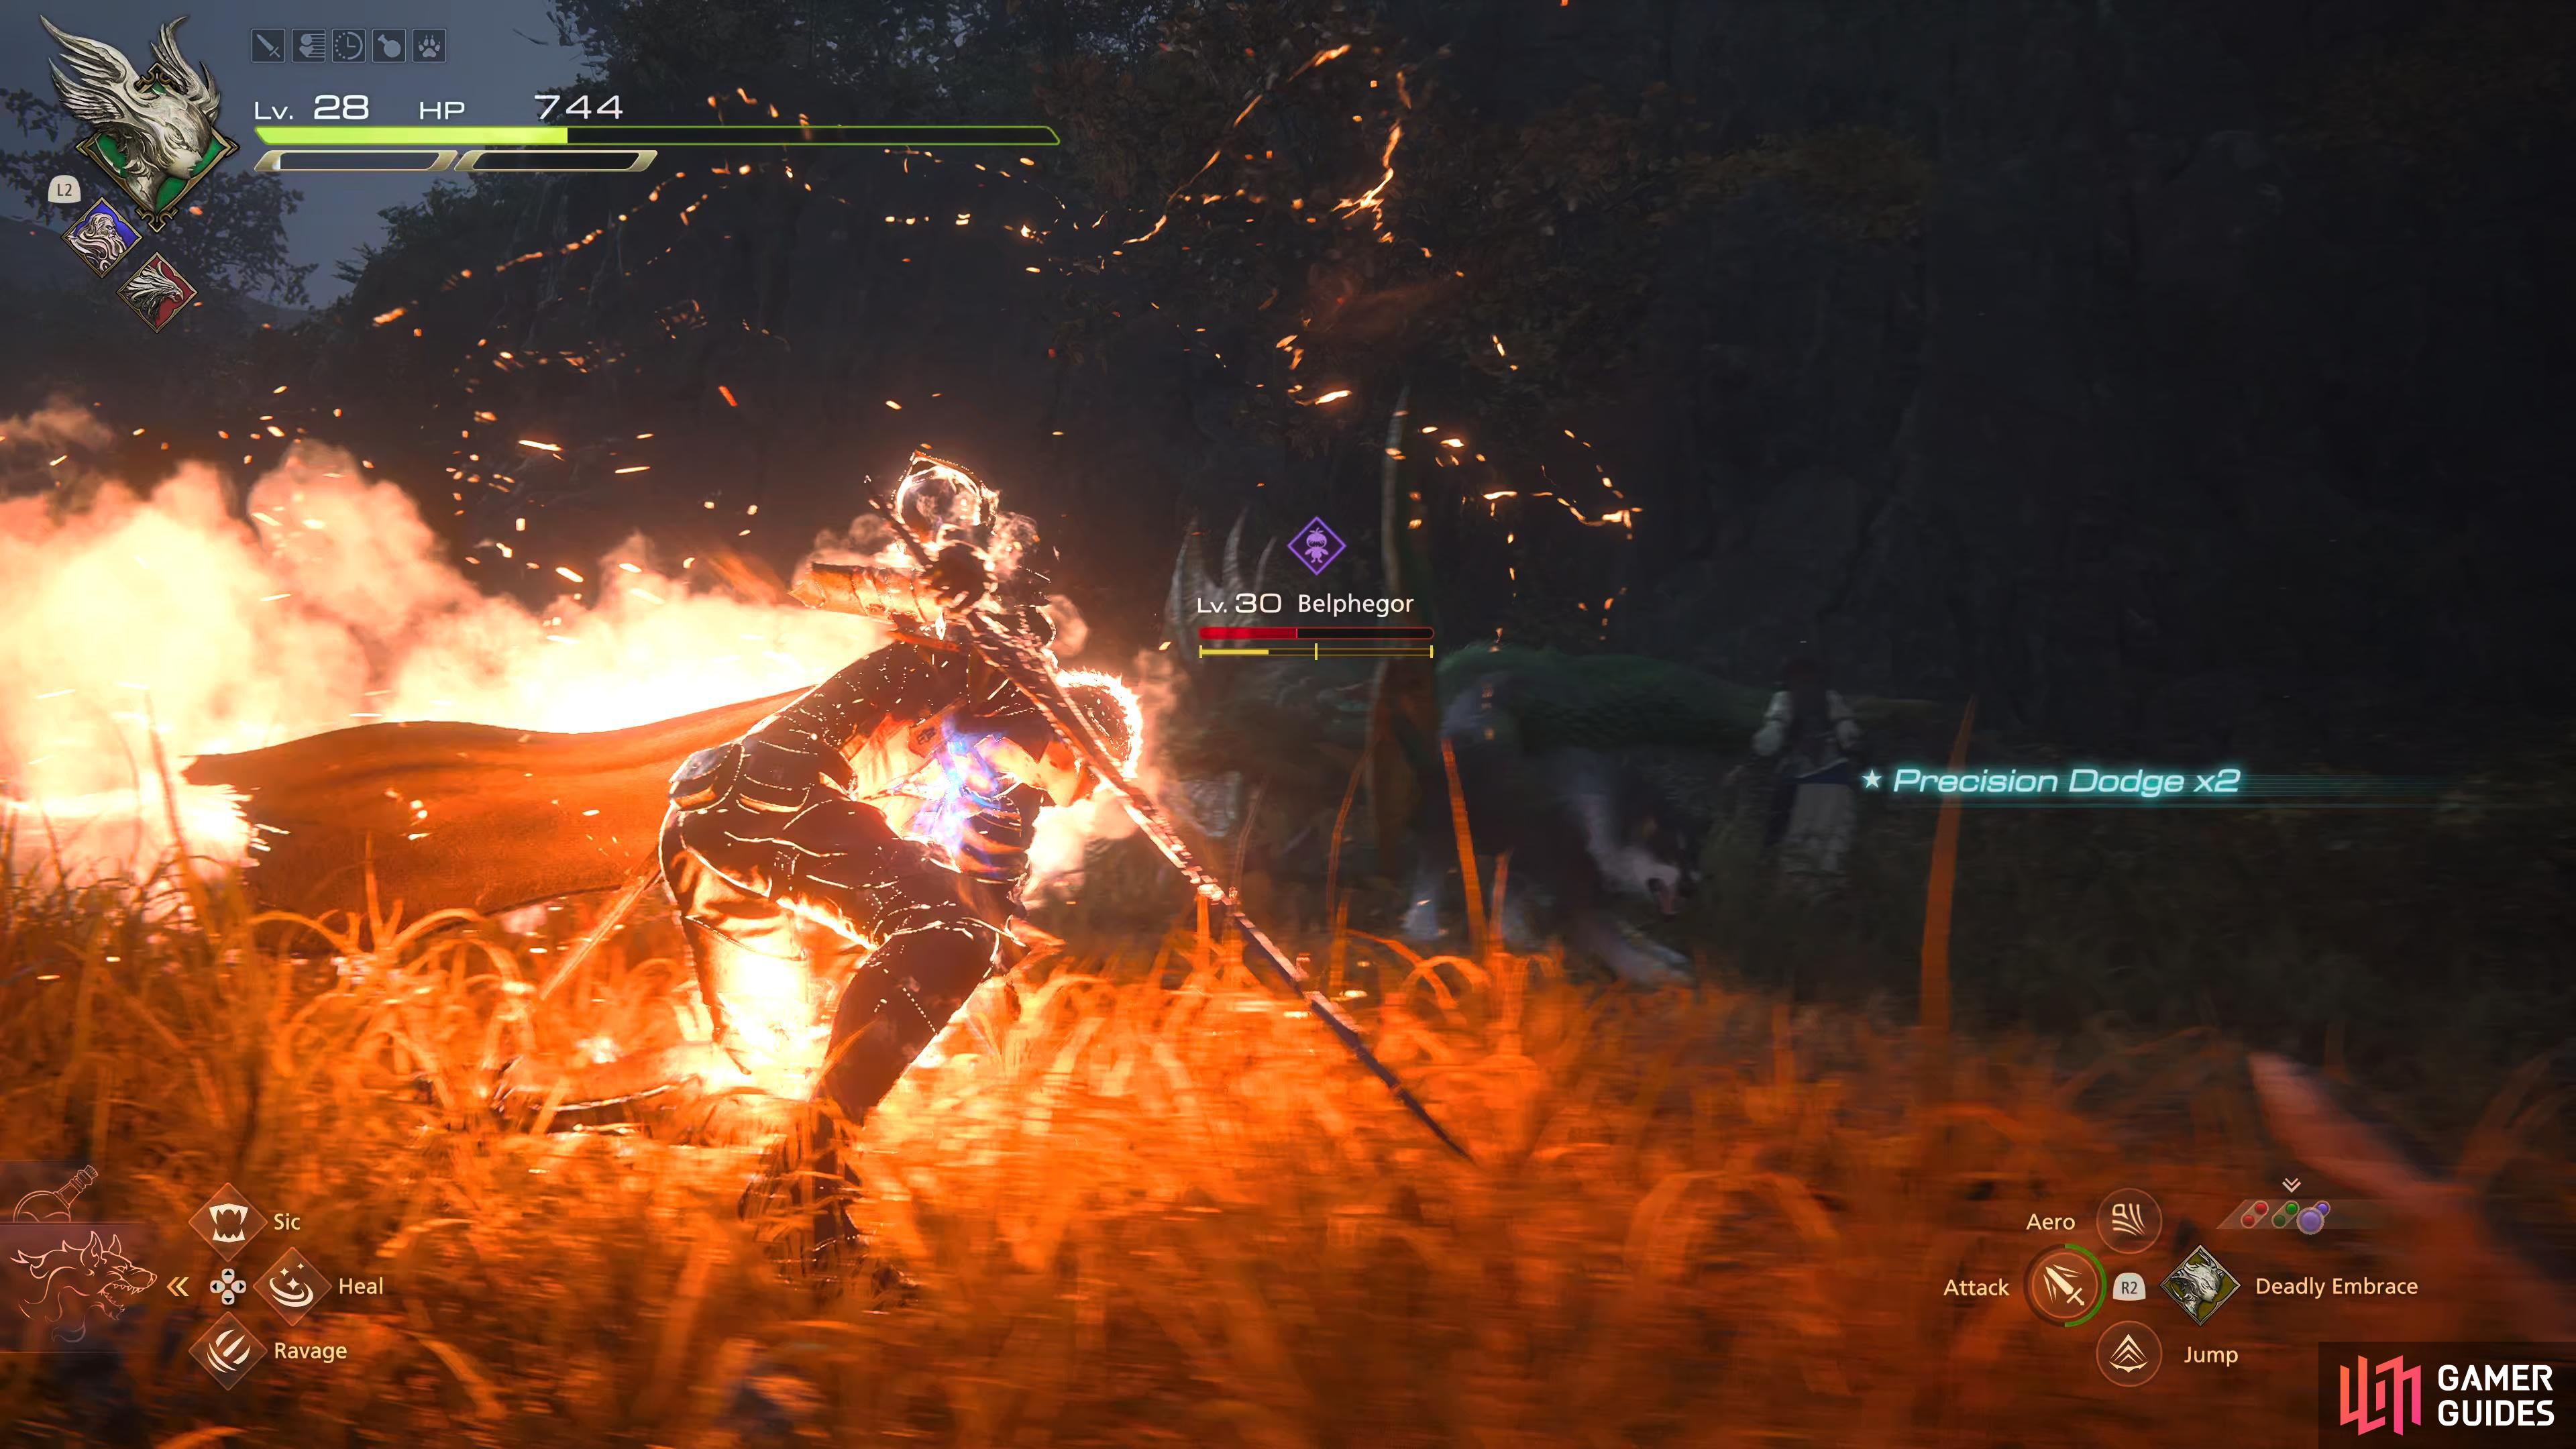
Performing a !Precision Dodge to the side against the Flame Breath attack will give you ample time to unleash some combos of your own.
You can use the same technique with the Dive Bomb attack as well.
As with all bosses, elite enemies, you’ll want to break the Will-Gauge down to half, use Deadly Embrace to pull them down, then use high Will-Damage abilities like Gouge to shred the rest of the gauge to put them in Stagger phase where you can use your Limit Break, Strength Tonics, and high-damage abilities to maximize your damage.
The most difficult part of this fight is the initial half of the Will-Gauge as you won’t have the openings to get much Will-Damage done, so you’ll have to bide your time chipping away at it while avoiding its attacks. Once it’s down to half, and you’ve pulled it to the floor with Deadly Embrace, you can use an upgraded Gouge to take it down quickly. This is why we brought along Rook’s Gambit. You can use this ability off cooldown to counter a lot, if not all of Belphegor’s melee attacks, and punish them with Will-Damage which makes it easier to take down the first half of the Will-Gauge. Throw in some !Pile Drivers whenever you get the chance for a little more Will damage, and you’ll have it down in no time.
When Belphegor goes into the full Stagger phase, unleash multiple-hit combos and abilities such as Gouge to bring up the damage multiplier to x1.50 then use your Limit Break, and potions before using Flames of Rebirth and Judgment Bolt. This should do significant damage to Belphegor before it gets back up. Rinse and repeat the above strategy until you defeat it.
As the battle prolongs, and Belphegor gets low on health, it will use its attacks quicker while sometimes using some attacks multiple times in quick succession. For example, we saw Flame Breath get used four times in a row during this stage of the battle. Keep up with the above strategy, and punish Belphegor when it uses Flame Breath. Finally, keep Will-o’-the-Wykes up to negate any damage you get if you mistime a dodge. When you defeat Belphegor, you’ll be rewarded with 8,000 Gil and 20 Renown along with some materials.
More Final Fantasy 16 Hunts
For information on some of the other ![]() Notorious Marks you can take on in Final Fantasy XVI, check out these pages below:
Notorious Marks you can take on in Final Fantasy XVI, check out these pages below:
No Comments