
While progressing through the main story of Final Fantasy 16, you’ll begin to unlock more Hunts, and the Angel of Death, Aruna, is one of them. Read below to find out recommended abilities, equipment and even items as well as where to find the Angel of Death, and how to defeat them with our detailed hunt strategy.

Aruna will be the second C Rank Hunt you’ll face.
Where is the Angel of Death, Aruna Mark Location?
| Location | Level | Bounty |
|---|---|---|
| Southwest of Northreach | 27 | 6,200 |
Teleport to ![]() Northreach which is in
Northreach which is in ![]() The Holy Empire of Sanbreque region, and head southwest into the fields of Claireview. You should see Aruna who looks like a Wind Elemental hovering in the air. Head towards them to initiate the battle.
The Holy Empire of Sanbreque region, and head southwest into the fields of Claireview. You should see Aruna who looks like a Wind Elemental hovering in the air. Head towards them to initiate the battle.
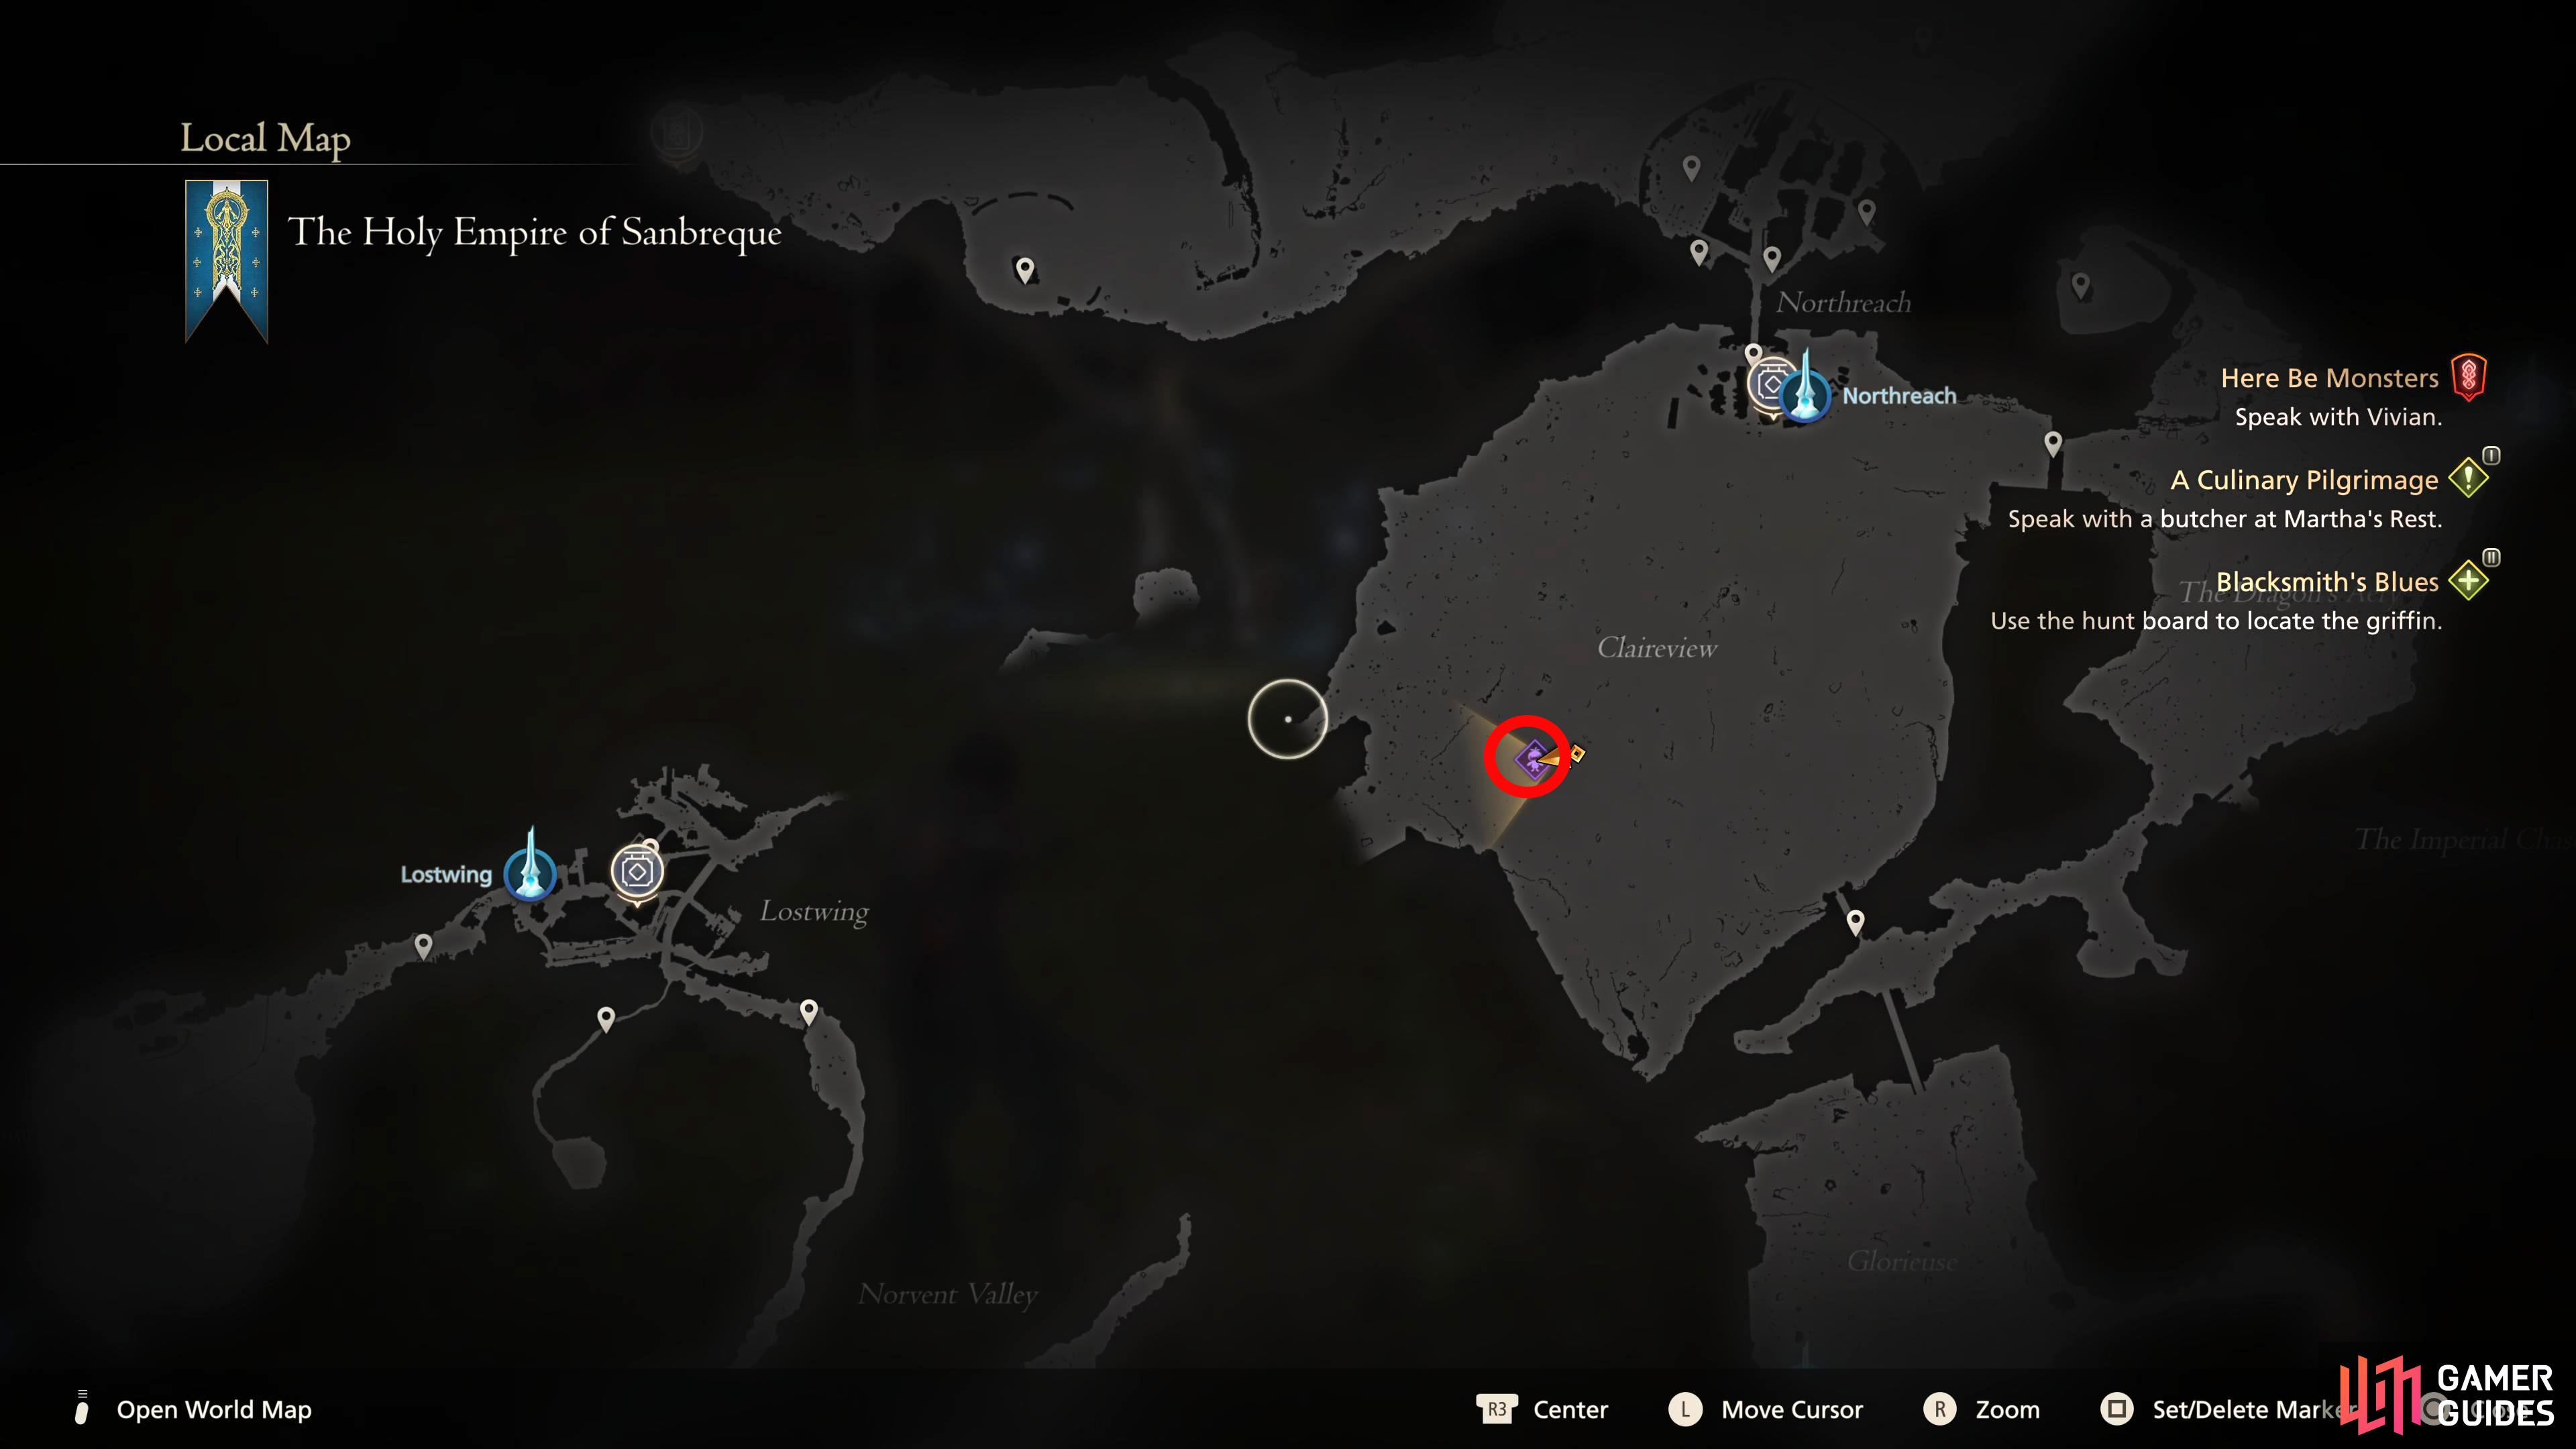
Aruna can be found southwest from !Northreach.

It’ll look like a Wind Elemental from a distance.
Angel of Death, Aruna Attacks
Below you’ll find all the attacks that Aruna has in its arsenal:
| Attack | Description | Counter |
|---|---|---|
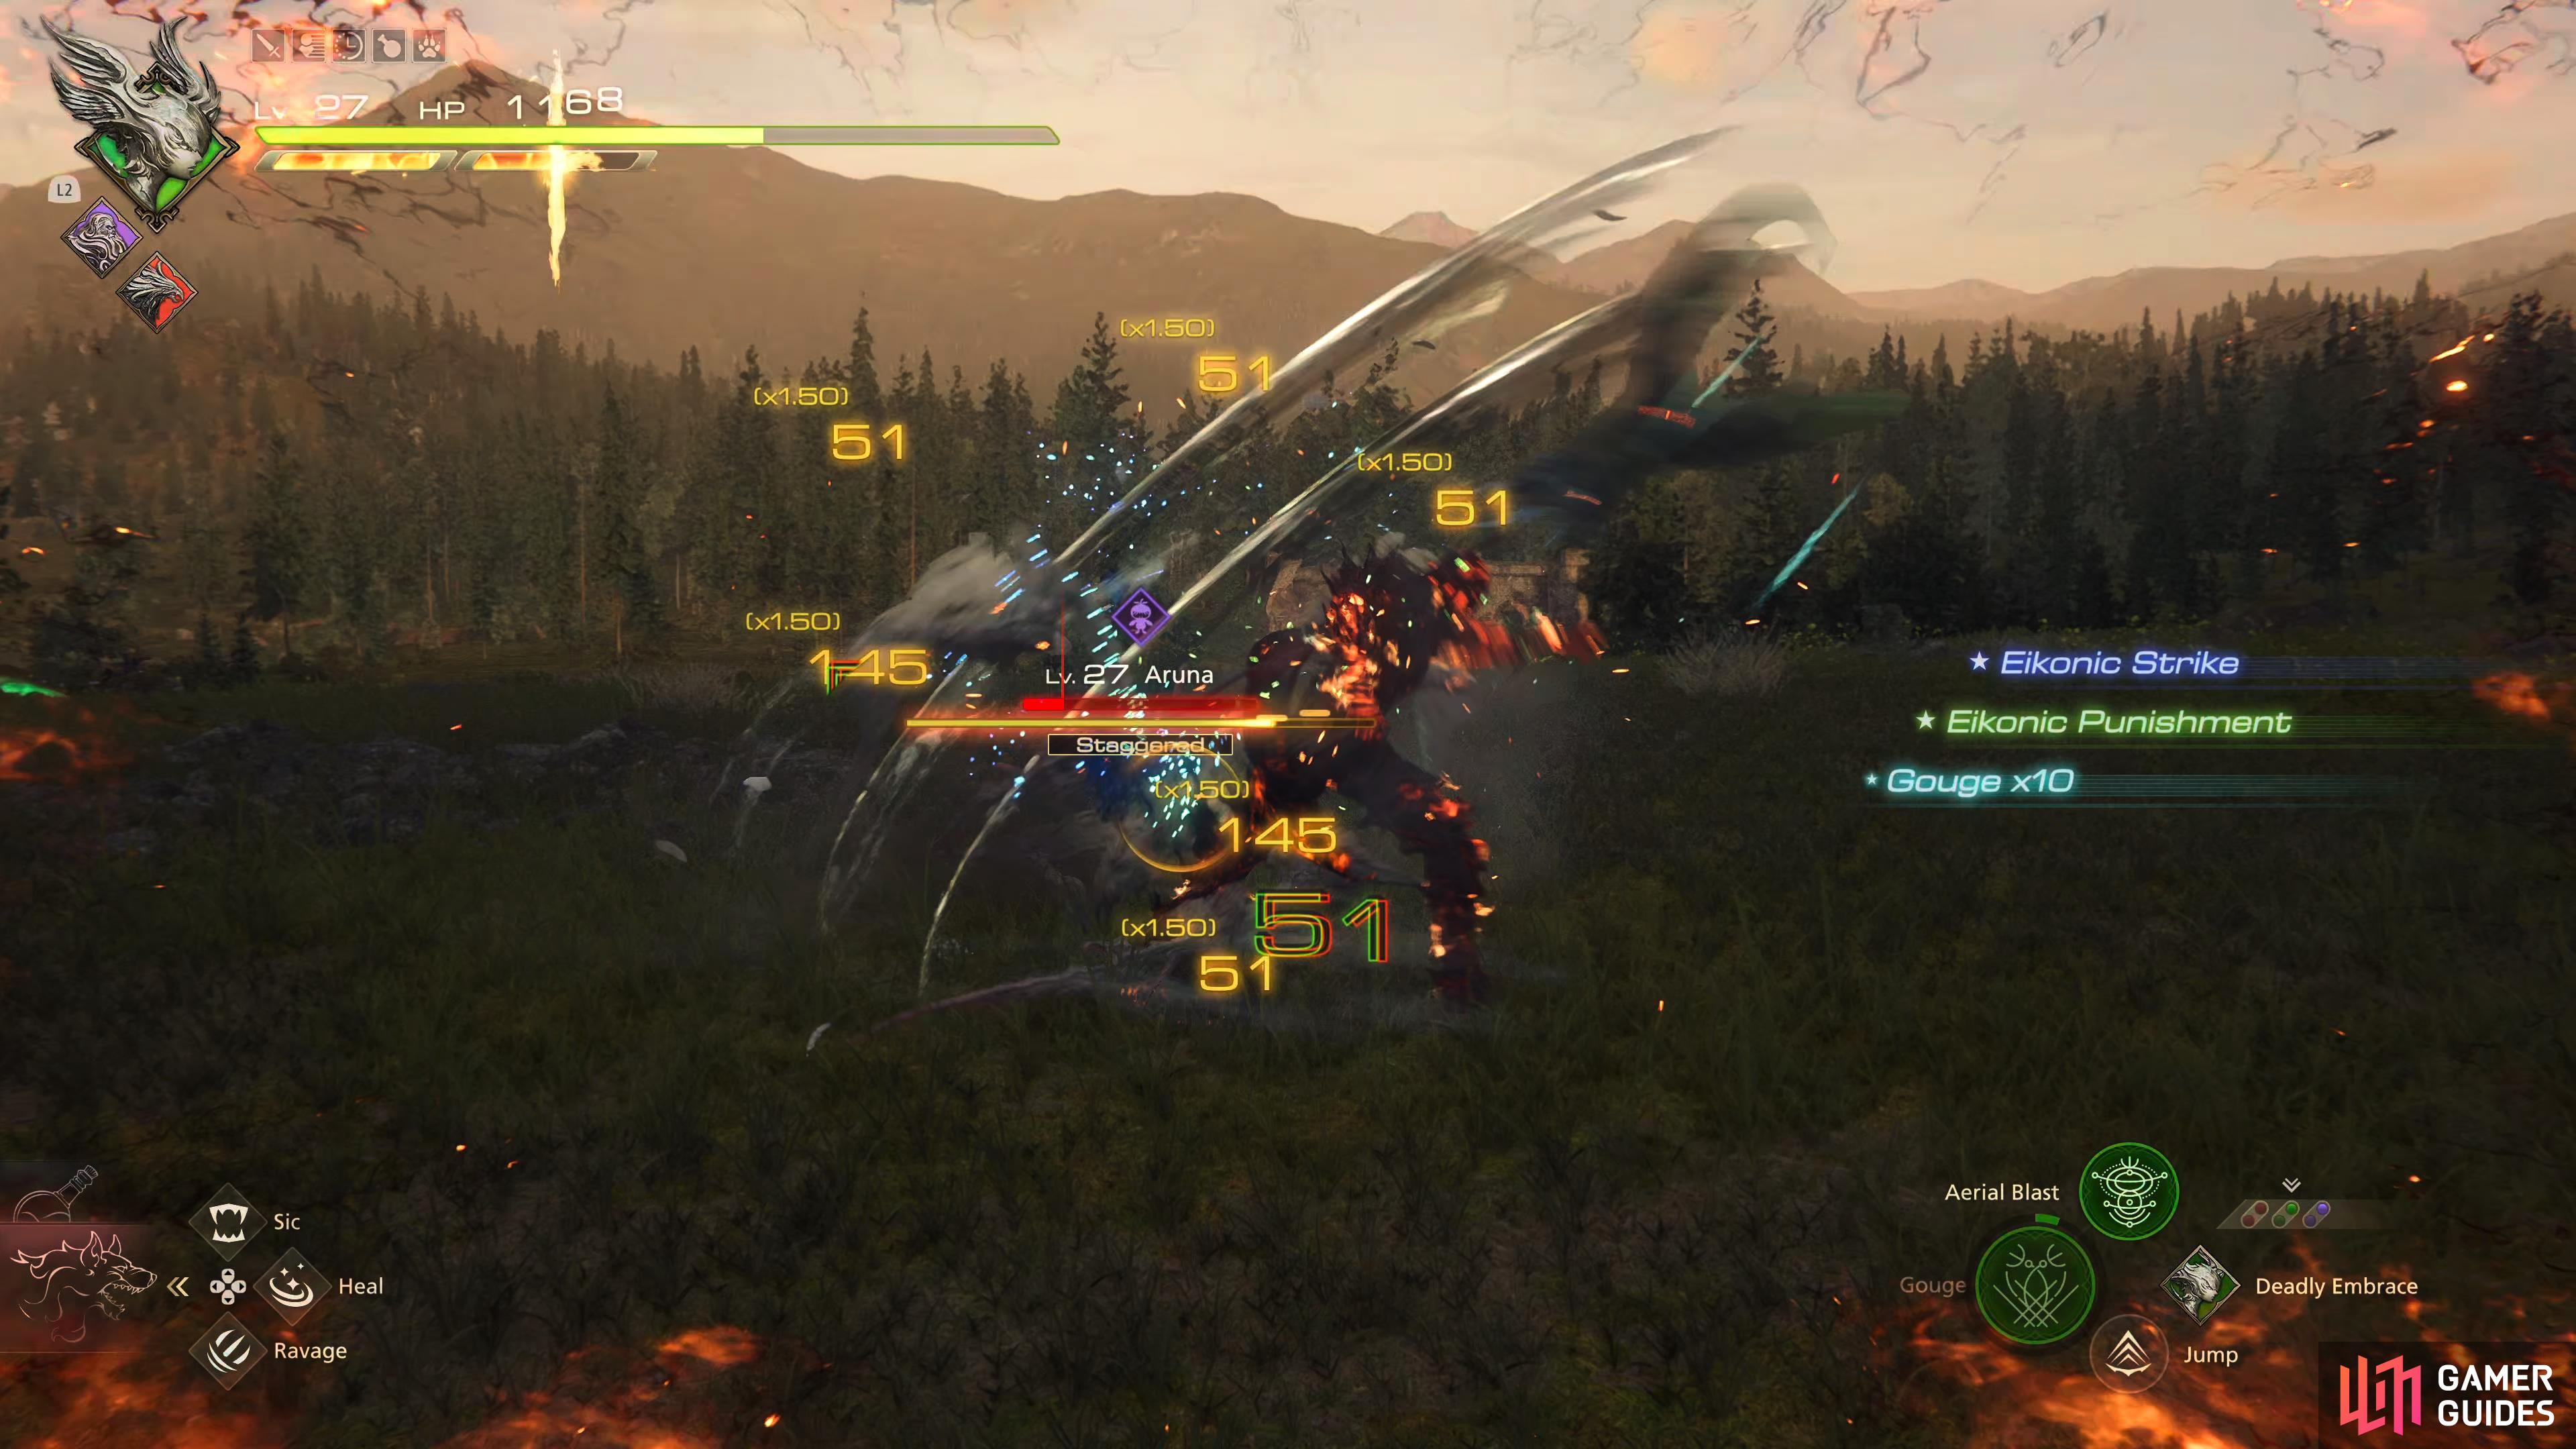
| Wind Blast | Aruna will charge up an attack which is displayed by a green line on the floor before it unleashes a large ball of wind in the direction of the line. | This attack is worthless, and incredibly easy to avoid, just don’t stand in the line. It takes Aruna a good few seconds before the attack happens which gives you plenty of time to avoid it. |
| Dive Bomb | A lot of Hunts enjoy this attack. Aruna will dive across the arena to attack you. | You can move early and avoid it entirely, or you can wait until Aruna is about to hit you then dodge to get a Precision Dodge. |
| Wind Trap | Aruna will place numerous green traps on the floor before they explode into a windy mist consecutively. | Unless Aruna does this straight on top of you, you most likely won’t get hit by it. It takes a few seconds for the traps to explode, so you have ample time to get away from them. |
| Wind Slash | Aruna will twist around before slashing you with its claw/arm. This can be used with either arm. | This attack comes at you pretty quickly when you’re in melee range, so always be ready to dodge whenever this happens. If your reactions are quick enough this will normally result in a Precision Dodge. |
| Foot Slam | Aruna will lift its foot before slamming it down at your location. | Another attack that comes fairly quickly. Good thing it only has a short range though. Whenever you see their foot raise, simply walk/dodge backward to avoid it. |
| Wing Spin | Aruna will wrap its body with its wings before spreading them, and spinning on the spot. | As soon as you see Aruna’s wings envelop their body, get out of melee range to avoid the attack. If you’re mid-combo, press dodge as soon as they begin their spin to Precision Dodge out of it. |

(1 of 6) Wind Blast will display a faint green line on the floor which is where Aruna will fire the ball of wind.
Recommended Abilities for Aruna
Here we will list our recommended ability set up to do this effectively:
| Eikon | Ability | Damage Type |
|---|---|---|
| Damage and Will (2 Stars) | ||
| Will (4 Stars) | ||
| Will (2 Stars) | ||
| Phoenix | Damage and Will (3 Stars) | |
| Damage (4 Stars),Will (3 Stars) | ||
| Damage and Will (3 Stars) |
The reason behind the chosen abilities above is mainly due to Aruna having a couple of melee attacks which they will use during your combos, so using Will-o’-the-Wykes to negate the odd attack while you continue on with your onslaught. This can absorb up to four attacks when upgraded. Rook’s Gambit is also taken to counter a lot of Aruna’s melee attacks because when timed correctly, it can deal a fair bit of !will-damage while also avoiding the attack.
Gouge is a fantastic ability to use after you’ve pulled down Aruna during the halfway stagger with Deadly Embrace with an upgraded version almost being enough to put it in full stagger. Pile Drive is brought along to provide a bit more Will/Damage while also being quick to use. Finally, Flames of Rebirth is excellent to use after you’ve accumulated the x1.50 damage multiplier when the boss is staggered then follow it up with a Judgment Bolt to finish off the stagger phase.
Recommended Items and Equipment for Aruna
Gear
For your Weapon, Belt, and Vambraces, you should have the following:
| Weapon | Belt | Vambraces |
|---|---|---|
If you don’t have what’s listed above, use the highest Attack for Weapons, and the highest Defense and Health for the Belt and Vambraces.
Accessories
For your Accessories, this is more subjective, so here is what we used:
| Accessory 1 | Accessory 2 | Accessory 3 |
|---|---|---|
Items
Finally, we have items. This is more of a preference thing, but we chose the following items:
| Shortcut 1 | Shortcut 2 | Shortcut 3 |
|---|---|---|
![]() Potion and
Potion and ![]() High Potion are always a mainstay, and for the third slot, we went with a
High Potion are always a mainstay, and for the third slot, we went with a ![]() Strength Tonic to use during the Stagger phase to maximize damage. When used with
Strength Tonic to use during the Stagger phase to maximize damage. When used with ![]() Limit Break, you can do massive amounts of damage to Aruna.
Limit Break, you can do massive amounts of damage to Aruna.
Angel of Death, Aruna Boss Strategy
If we’re being honest, Aruna is a bit of a wimp. Their attacks are telegraphed, and you have plenty of time to avoid them. The only real problem you may face is if you’re too aggressive which leads to you getting hit by the plethora of melee attacks it has. Throughout the battle, Aruna will use Wind Blast, and normally follow it up with a Dive Bomb, both of which are easy to avoid. When you’re in melee range, it’ll use the Wind Slash, and Foot Slam attacks with the odd Wing Spin thrown in. This is where Will-o’-the-Wykes and Rook’s Gambit come in. Use Will-o’-the-Wykes if you want to just absorb the attack while you continue to attack, or Rook’s Gambit if you want to punish Aruna.
When Aruna is in the Stagger phase, start off with !Gouge to raise the damage multiplier.
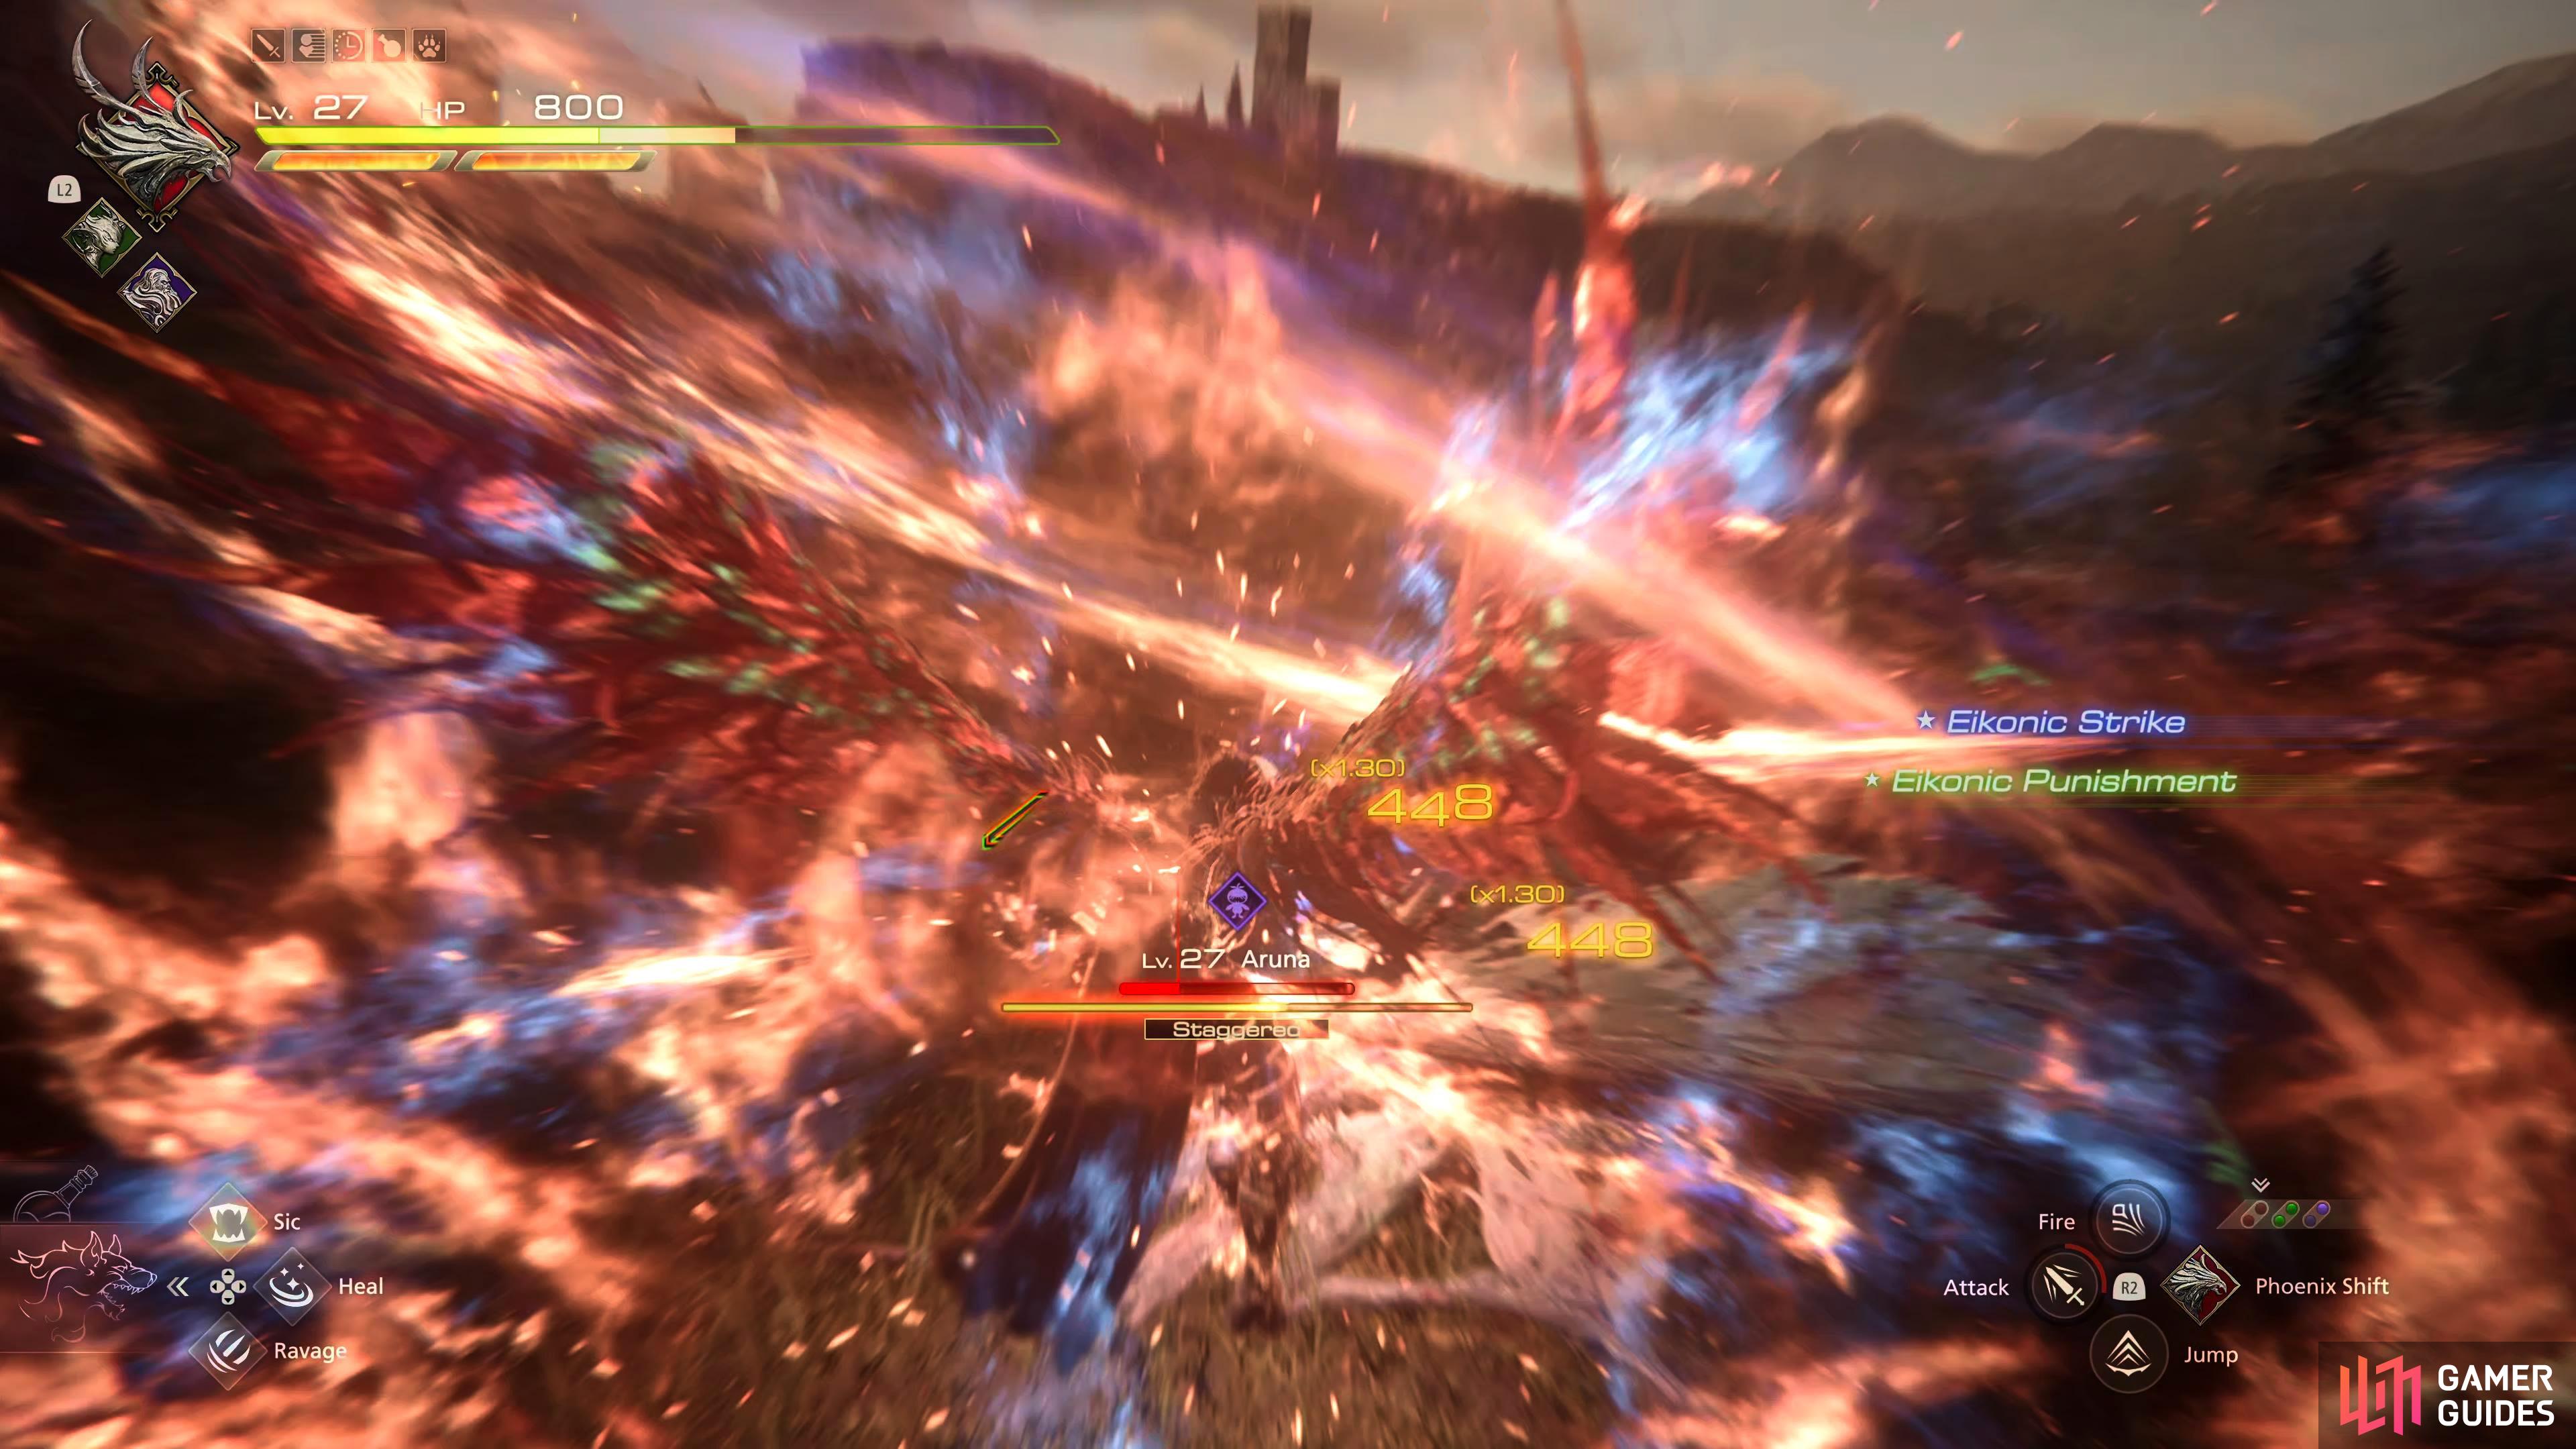
Then finish it off with a !Flames of Rebirth or !Judgment Bolt. If you do this while using !Limit Break and a !Strength Tonic, the numbers can get pretty high.
Her Wind Traps are almost pointless unless you purposefully stand on them and wait for them to explode. These appear more to be a deterrence than an actual attack so that you won’t stand in front of them the whole battle slashing away. As with all bosses and elite enemies, you’ll want to break the Will-Gauge down to half, use Deadly Embrace to pull them down, then use high ![]() Will damage abilities like Gouge to shred the rest of the Will-Gauge to put them in the Stagger phase where you can use your Limit Break, Strength Tonics, and high-damage abilities to deplete their health as quickly as possible. As stated earlier, Aruna won’t give you much trouble, and the Hunt plays out very similar to the Wind Elemental battles you fought earlier when heading to Benedikta. Once you defeat Aruna, you’ll receive 6,200
Will damage abilities like Gouge to shred the rest of the Will-Gauge to put them in the Stagger phase where you can use your Limit Break, Strength Tonics, and high-damage abilities to deplete their health as quickly as possible. As stated earlier, Aruna won’t give you much trouble, and the Hunt plays out very similar to the Wind Elemental battles you fought earlier when heading to Benedikta. Once you defeat Aruna, you’ll receive 6,200 ![]() Gil, and 10 Renown.
Gil, and 10 Renown.
More Final Fantasy 16 Hunts
For information on some of the other ![]() Notorious Marks you can take on in Final Fantasy XVI, check out these pages below:
Notorious Marks you can take on in Final Fantasy XVI, check out these pages below:
No Comments