
The greatest challenges in Final Fantasy 16 come from the Chronolith Trials that unlock as you reach the closing stages of the game. These trials force you to use only the designated ![]() Eikon and selected abilities, all while under a time limit.
Eikon and selected abilities, all while under a time limit. ![]() Garuda’s trial, The Hand of Dione, will of course focus on Garuda and you’ll need to make full use of
Garuda’s trial, The Hand of Dione, will of course focus on Garuda and you’ll need to make full use of ![]() Deadly Embrace to overcome it. This page will give you all the knowledge you need to overcome this trial.
Deadly Embrace to overcome it. This page will give you all the knowledge you need to overcome this trial.
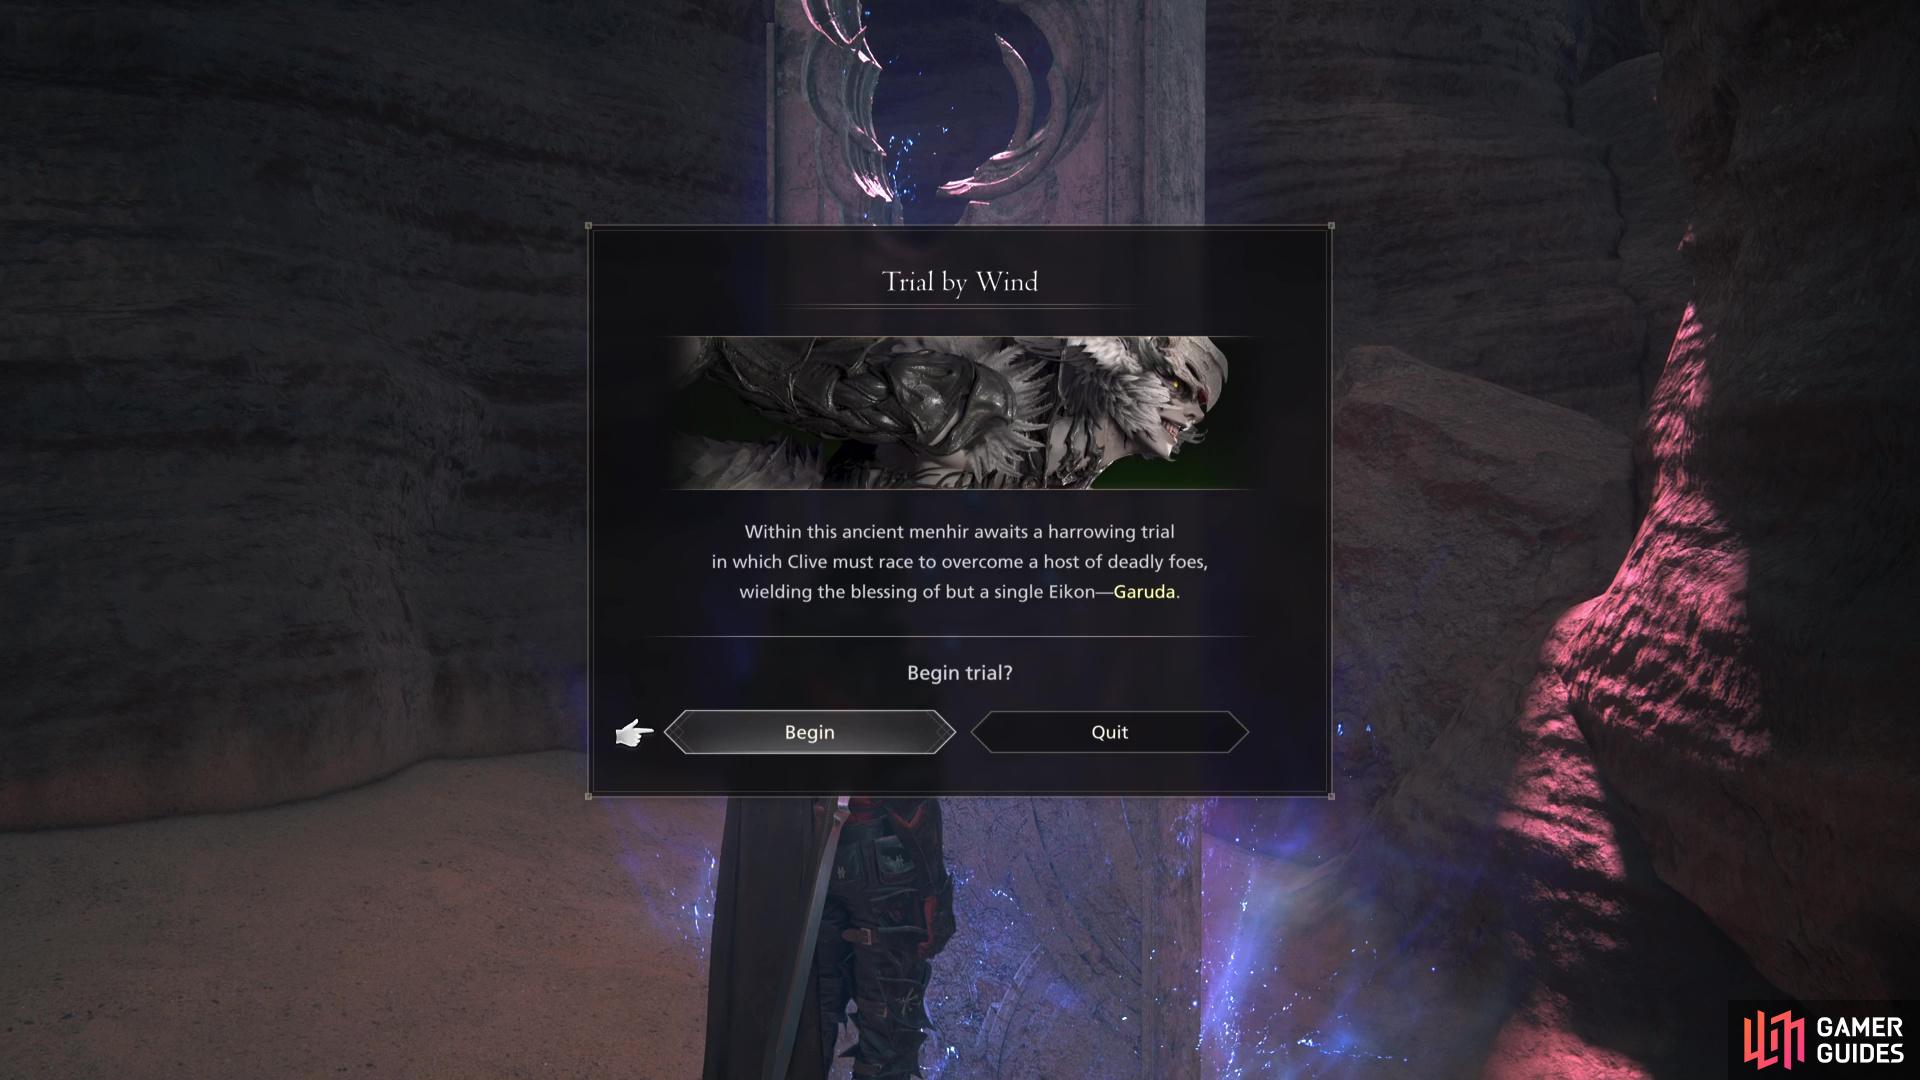
Trial by Wind is the !Garuda Chronolith Trial in Final Fantasy 16.
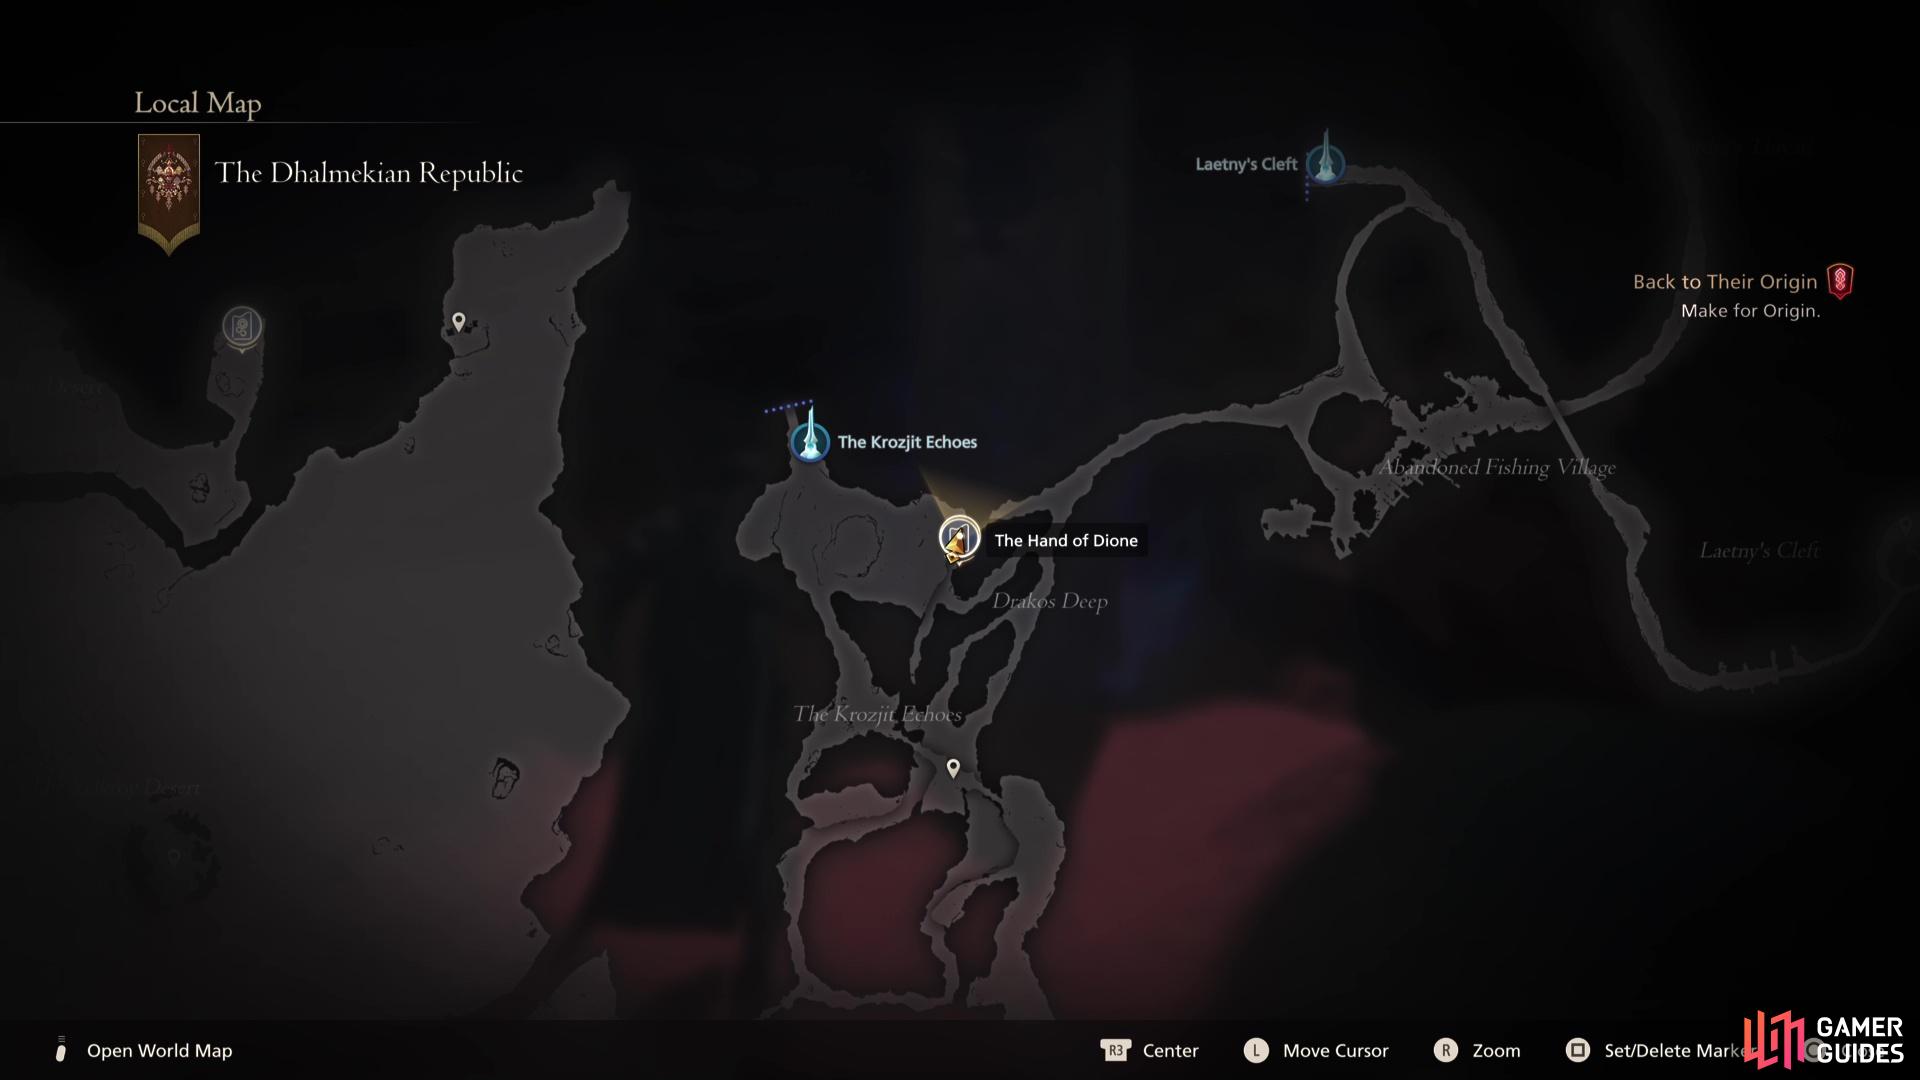
Where to Find The Hand of Dione Chronolith in FF16
The Chronolith that you need to access for the Garuda trial is The Hand of Dione, and you’ll find it in ![]() The Dhalmekian Republic. Once there, head to the
The Dhalmekian Republic. Once there, head to the ![]() Velkroy Desert
Velkroy Desert ![]() Obelisk and follow the northern wall through the ruins and then through the sandstorm to the far northeast corner. You may have to deal with some bandits along the way in the ruins, as it’s easy for
Obelisk and follow the northern wall through the ruins and then through the sandstorm to the far northeast corner. You may have to deal with some bandits along the way in the ruins, as it’s easy for ![]() Ambrosia to become spooked.
Ambrosia to become spooked.
Be sure to make sure you save your game and prepare fully before accessing the trial; you won’t be able to learn/unlearn any abilities (although these will come upgraded anyway) once the trial begins but you will (and should) be able to change your equipment between stages.
Garuda Chronolith Trial Preparation
As with all of the Chronolith Trials, you’ll want to make sure you’re fully prepared before entering, and there are a few common preparations across all of the trials. To begin with, you’ll have a much easier time if you progress the Main Quest to the final one, Back to Their Origin where all of the final Side Quests open up.
You will find the Chronolith in Dhalmekia
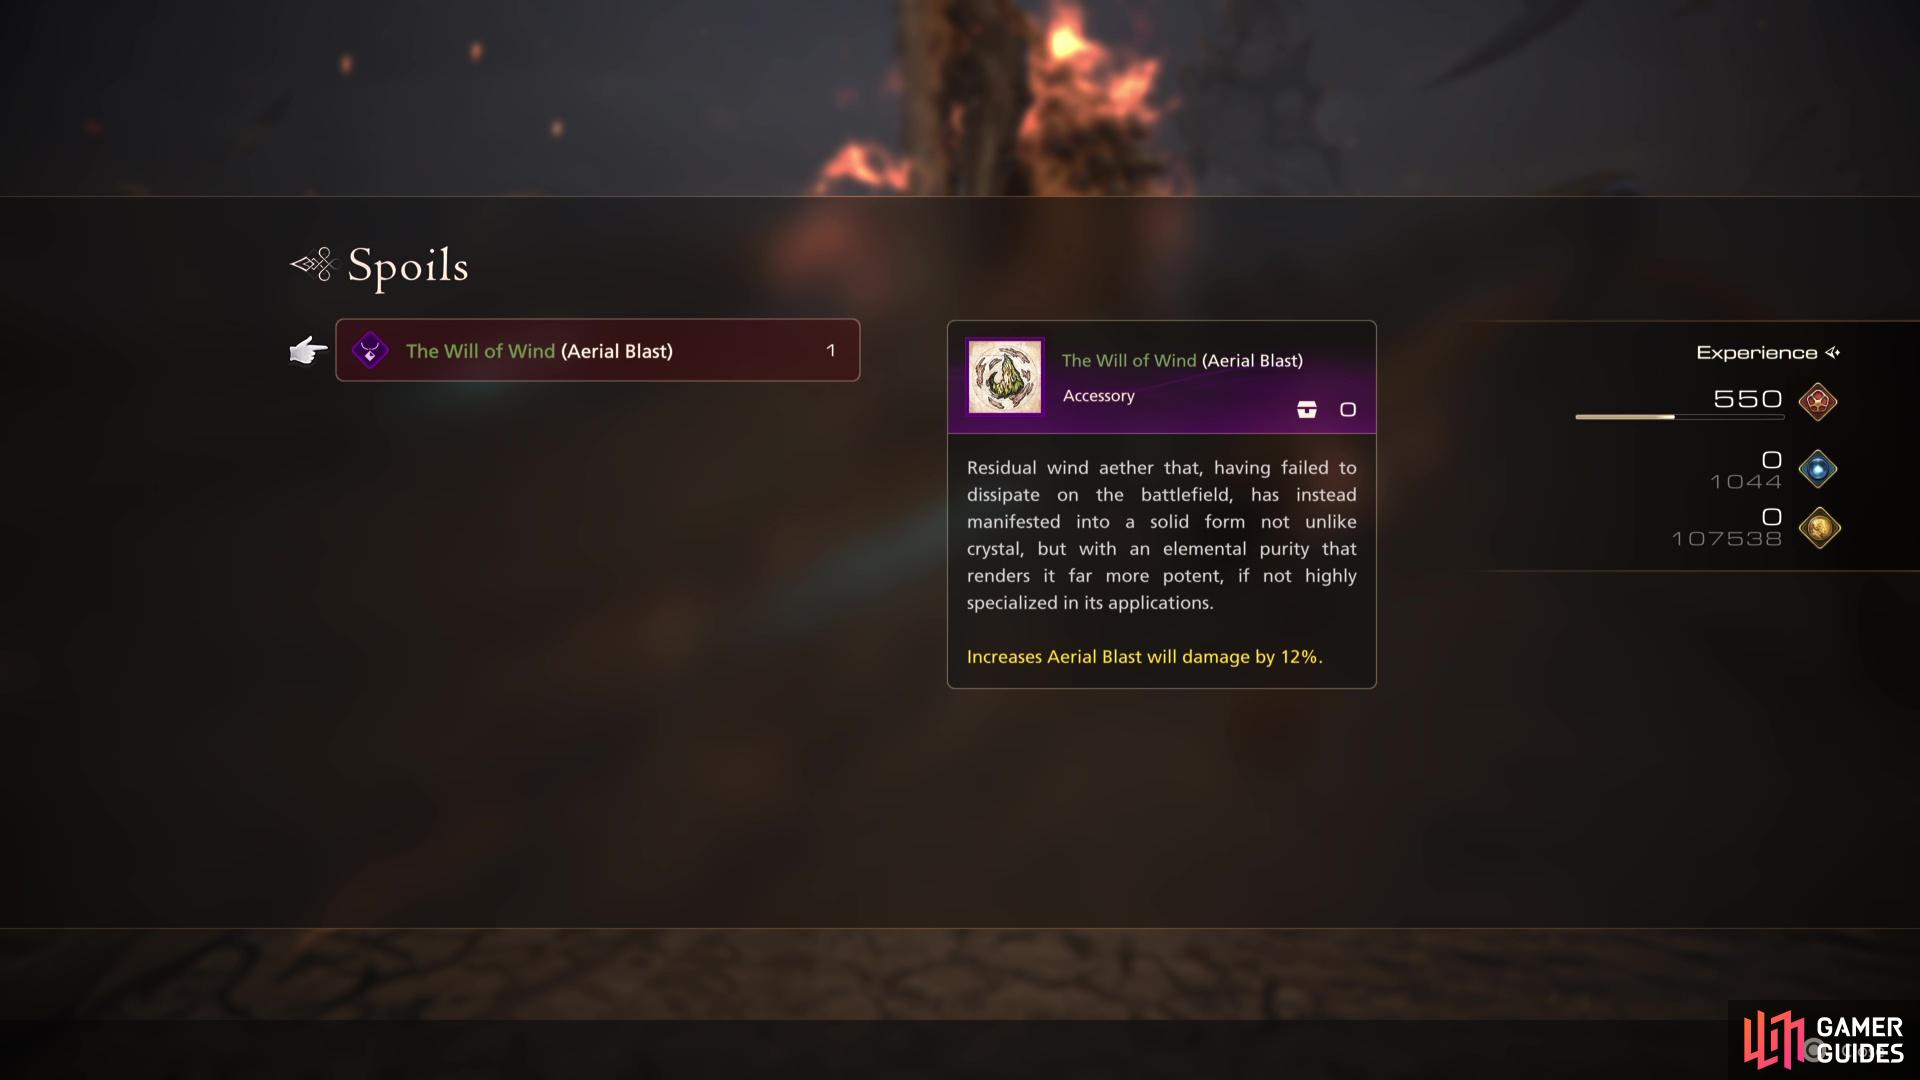
and obtain a powerful accessory upon completion of the trial.
Equipment
Having access to everything in FF16, you’ll be able to complete Blacksmith’s Blues IV and obtain the recipe for the Gotterdammerung, the most powerful weapon in Final Fantasy XVI (at least for your first playthrough). You’ll also be able to get your hands on all of the accessories that you should equip for each of these trials. With that in mind, we suggest the following equipment loadout:
| Name | Slot | Description | Location |
|---|---|---|---|
| Weapon | +375 Attack + Stagger | Complete the Blacksmith’s Blues IV Side Quest to obtain the recipe and then craft it. | |
| Belt | +95 Defense, +32 HP | Crafted from the recipe obtained from the Blacksmith’s Blues III Side Quest. | |
| Vambraces | +94 Defense, +50 HP | Reward for completing the Where There’s a Will Side Quest. | |
| Accessory 1 | Increases attack and alters |
Reward for 85 Renown at the Patron of Whispers. | |
| Stage Ability Accessory | Accessory 2 | – | Multiple |
| Stage Ability Accessory | Accessory 3 | – | Multiple |
As mentioned above, having the Gotterdammerung will make life a lot easier, as will having the best armor. When it comes to the Vambraces, you can go for ![]() The Sons of Ouroboros instead; the difference is slightly more Defense at the expense of more HP.
The Sons of Ouroboros instead; the difference is slightly more Defense at the expense of more HP.
The ![]() Berserker Ring is an excellent accessory that alters and powers up Precision Dodge, but if you find it difficult to deal with the animation, opt for the Genji Gloves instead as they offer a flat 5% damage increase to all damage Clive outputs.
Berserker Ring is an excellent accessory that alters and powers up Precision Dodge, but if you find it difficult to deal with the animation, opt for the Genji Gloves instead as they offer a flat 5% damage increase to all damage Clive outputs.
Your final two Accessories should be rotated around to the abilities you have access to for each stage, this will make life a lot easier to complete the Battle Techniques which crucially increases the available time you have remaining to complete the trial. You can find a list of Garuda accessories in the table below:
Garuda Accessories List
| Name | Description | Location |
|---|---|---|
| Reduces cooldown of Aerial Blast by -11 seconds | Found in a chest during the Fire and Ice main quest | |
| The Will of Wind (Aerial Blast) | Increases |
Acquired as a reward after completing the Garuda Chronolith |
| Reduces cooldown of Rook’s Gambit by -2.7 seconds | Purchased from Charon’s Toll shop at |
|
| The Will of Wind ( |
Increases Rook’s Gambit damage by +10% | Found in a chest during the Buried Memories main quest, after the Fallen Guardian |
| Increases Wicked Wheel damage by +10% | Found in a chest during the Buried Memories main quest, after the Iron Giant | |
| The Break of Wind (Wicked Wheel) | Reduces cooldown of |
Acquired as a reward from the For Great Justice II side quest |
| Increases Gouge damage by +15% | Found in a chest during the Buried Memories main quest, after the Fallen Guardian | |
| Reduces Gouge cooldown by -2.7 seconds | Acquired as a reward for completing the Dark Clouds Gather main quest | |
Stage 1 Walkthrough
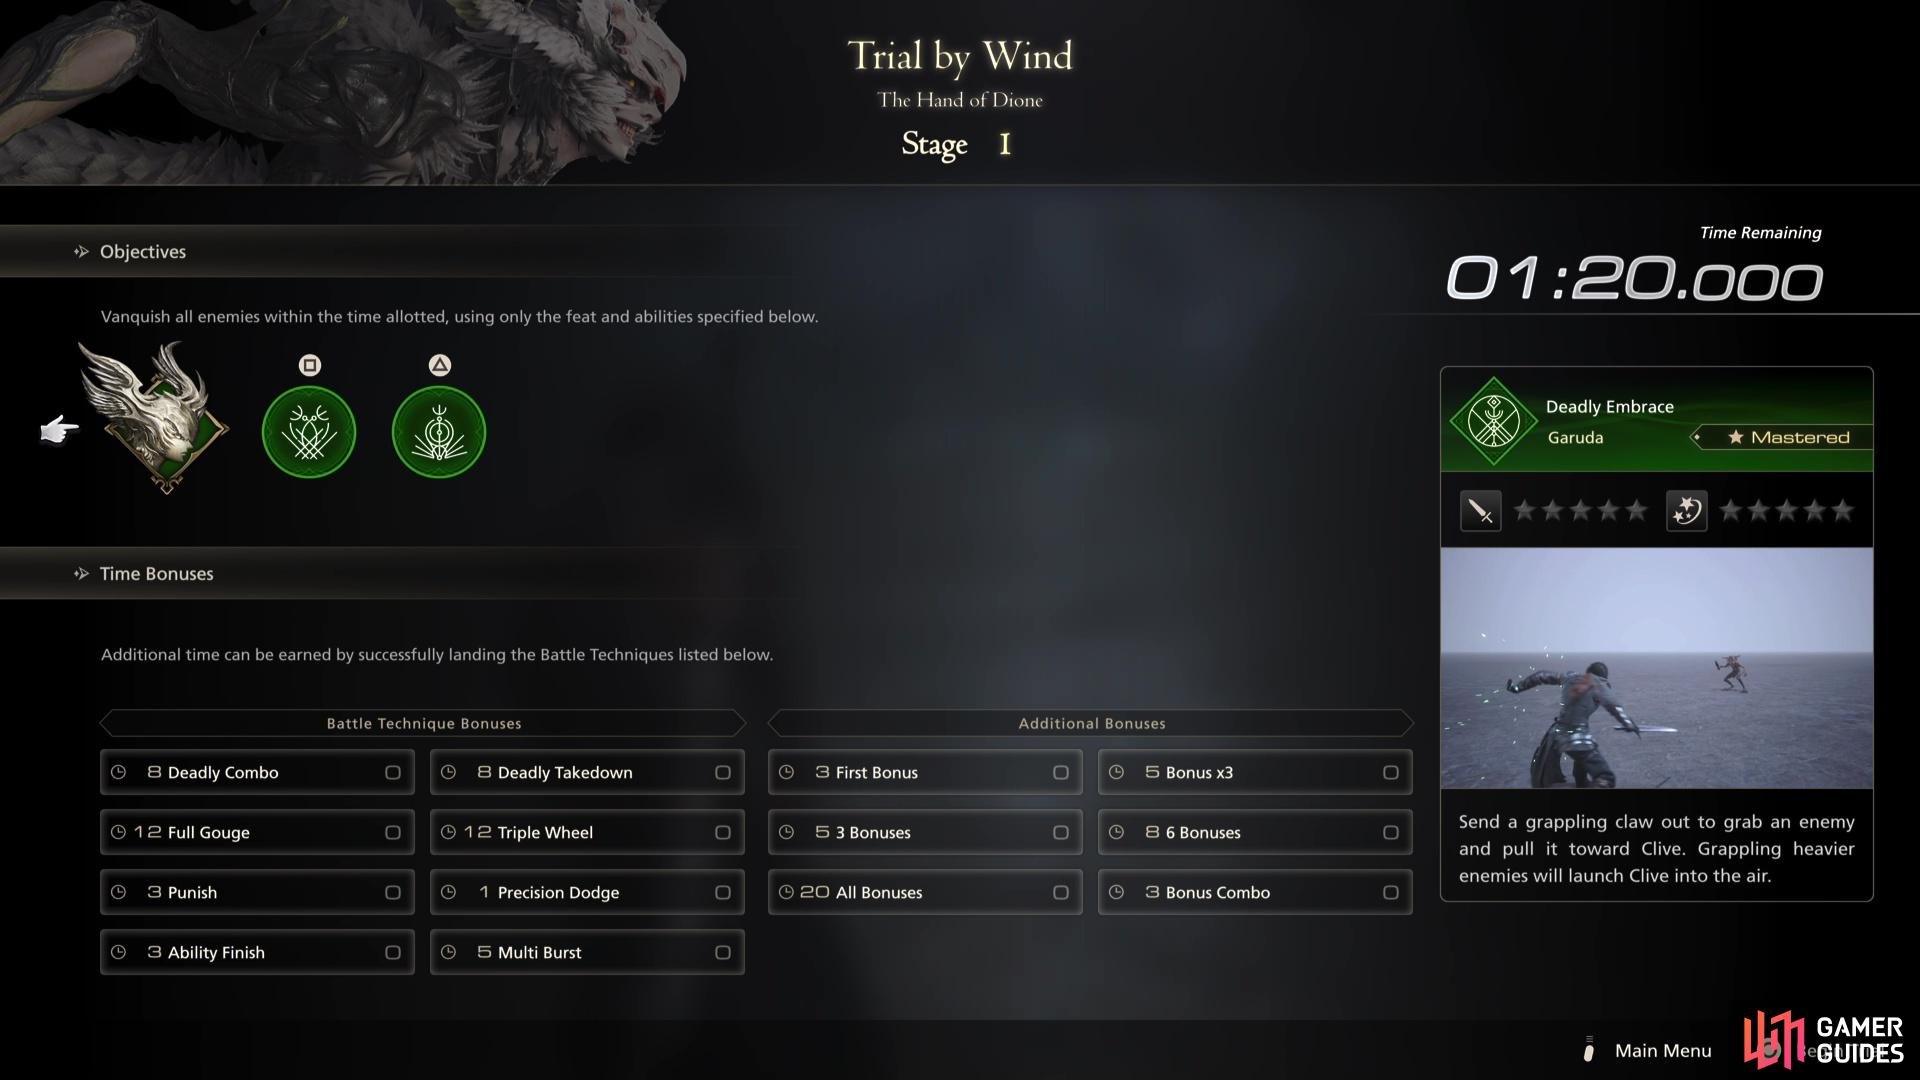
Stage 1 will give you the !Gouge and !Wicked Wheel abilities.
| Ability | Suggested Accessory |
|---|---|
As with any Chronolith Trial, Stage 1 is where you should be looking to build up the majority of your time bonuses, this is because you’ll be facing the easiest enemies that you’ll encounter in the challenge. Be sure you equip the two suggested accessories above before you begin.
When it comes to the Battle Technique Bonuses for Garuda, Deadly Combo is a simple one as all it requires is for you to land a four-hit melee combo once you draw an enemy in with Deadly Embrace, something you can cross off early in a stage by pulling in one of the smaller enemies.
Deadly Takedown is another simple one, and one you should be looking to use as it is so effective. When you use Deadly Embrace on a larger enemy and they’re half Staggered, this will yank them to the ground. Ability Finish and Multi Burst are as they say, simply finish an enemy off with an Eikonic Ability and use 10 ![]() Magic Bursts respectively.
Magic Bursts respectively.
Full Gouge can be a tricky Battle Technique Bonus to pull off if you don’t time it right, you must use Gouge to score the maximum number of hits. Triple Wheel, on the other hand, arguably the toughest Battle Technique to pull off here, you need to launch an enemy into the air with Wicked Wheel (so target smaller enemies) and then score three aerial attacks while they are airborne.
Stage 1-1
The first stage begins with a group of Windbound Worgens accompanied by two Windbound Mesmerizers. The Worgens are simple wolf enemies you should have little trouble with, but the Mesmerizers can cause issues if you leave them be, so focus on them first (they may great targets for the Triple Wheel Battle Technique). Alternatively, you can pull them to you with Deadly Embrace and follow-up with a full combo to score the Deadly Combo Technique.

Focus on the Mesmerizers in the first stage

the Windbound Minotaur has many attacks that are easy to !Precision Dodge.
Stage 1-2
Another stage that is similar to the last where you’ll be up against more limited enemies. This time, it’s a group of Windbound Thorns and two Windbound Muggers, ![]() Goblins that should pose little threat. As always, focus on the two slightly stronger enemies (the Muggers) and they’re easy to bait into nailing some Precision Dodges against. You should be looking to complete both 1-1 and 1-2 without losing much HP.
Goblins that should pose little threat. As always, focus on the two slightly stronger enemies (the Muggers) and they’re easy to bait into nailing some Precision Dodges against. You should be looking to complete both 1-1 and 1-2 without losing much HP.
Stage 1-3
The final part to Stage 1 is a battle against a Windbound Minotaur, these are Elite enemies that can deal heavy damage if you’re not careful around their attacks. Triple Wheel is off the menu here, you won’t be launching this beast into the air, and Deadly Combo is also risky as you need to be ready to dodge out of the way of the wide-sweeping attacks the Minotaur uses.
The goal, then, is to get the Windbound Minotaur to half stagger and then use Deadly Embrace to pull it down to the ground and finish up with a full Gouge, this should Stagger it. Not only will you deal heavy damage with this, but you’ll also score two Battle Techniques in the process.
Stage 2 Walkthrough

You will gain the !Rook’s Gambit ability for Stage 2.
| Ability | Suggested Accessory |
|---|---|
| The Will of Wind ( |
|
The difficulty ramps up a little in Stage 2 as you start coming across more Elite enemies. For this stage, you lose access to the useful Gouge but gain Rook’s Gambit in its place, this is an ability that is focused on countering your foes and delivering a powerful follow-up. It will also grant you many invincibility frames and can be used to cancel your other attacks.
When it comes to the Battle Techniques, the only new on to consider is Precision Gambit. This is simple in nature, but you must pick your targets correctly as you’ll need to successfully block an attack and then hit them with the counter, the main purpose of Rook’s Gambit.
Stage 2-1
This is a tough opening act, you’ll be immediately up against a Windbound Aevis and three Windbound ![]() Hornets. The Aevis is your main target, being the biggest threat, but focus on taking out those Hornets first as they will chip away and cause you a lot of hassle otherwise. These are also ideal for hitting that Triple Wheel Battle Technique.
Hornets. The Aevis is your main target, being the biggest threat, but focus on taking out those Hornets first as they will chip away and cause you a lot of hassle otherwise. These are also ideal for hitting that Triple Wheel Battle Technique.
The Aevis itself is a difficult beast as its attacks are fast so you’ll need to be on your game to avoid a lot of the attacks it throws your way. This is also perfect, though, to work on that Precision Gambit Battle Technique as it presents you with a lot of openings to use it on, just be careful not to get too focused on it that you use up all of your time.

The !Aevis is an agile creature
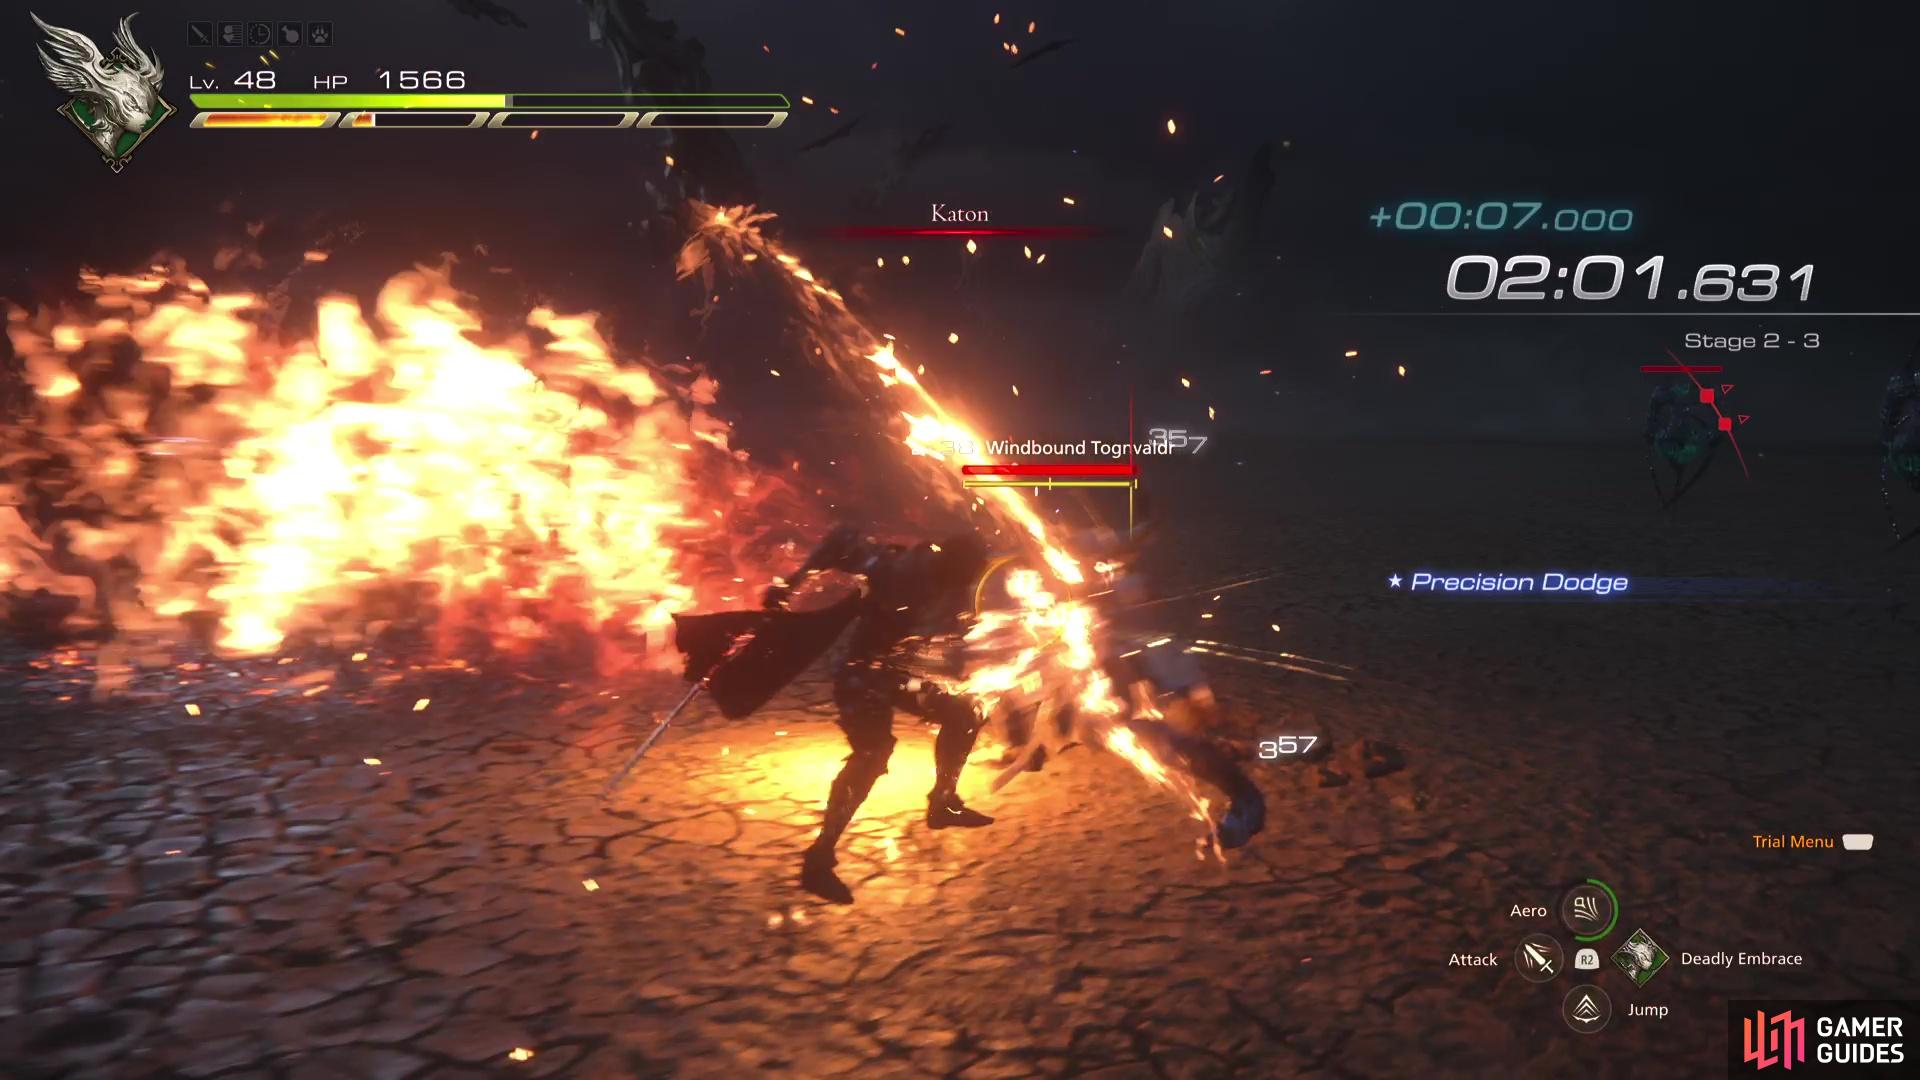
dodge to the side of the Tognvaldr when it uses Katon.
Stage 2-2
![]() Orcs and Goblins are your targets for the next stage, and this is a nice break after a difficult first part to Stage 2. The Goblins are Windbound Weavers and are casters, so as always, focus on dealing with them first so that they’re not slinging spells at you while you focus on the Orcs. Use this stage to build your Limit gauge and attempt to preserve as much HP as possible for the last part of this Stage.
Orcs and Goblins are your targets for the next stage, and this is a nice break after a difficult first part to Stage 2. The Goblins are Windbound Weavers and are casters, so as always, focus on dealing with them first so that they’re not slinging spells at you while you focus on the Orcs. Use this stage to build your Limit gauge and attempt to preserve as much HP as possible for the last part of this Stage.
Stage 2-3
This final part to Stage 2 can be tricky and catch a lot of people out. You’ll be up against a Windbound Tognvaldr accompanied by three Windbound Specters. The Specters should be your immediate focus as they will continue to shoot out orbs at you and it can be difficult to focus on the Tognvaldr while this is happening.
The Tognvaldr is a tougher version of the Midnight Raven you fought near the start of the adventure and shares the majority of the same attacks. This means you can expect a fast flurry of attacks, followed by deadly Ninjutsu when using Katon and Raiton. If you get caught by Katon, it can deal heavy damage to you, but this is also your best time to attack the Tognvaldr as you can get to the side or behind it and deal enough damage to force it to half Stagger and follow it up with a Deadly Takedown.
Stage 3 Walkthrough

You will have access to !Aerial Blast in Stage 3.
| Ability | Suggested Accessory |
|---|---|
| The Will of Wind ( |
|
This is the final stage in which you can earn time bonuses, so be sure to keep an eye out for opportunities while trying not to lose too much HP ahead of the Final Stage. As for abilities, you’ll lose Wicked Wheel but gain access to the incredibly useful Aerial Blast ability. This has a longer cooldown than the other abilities (but shortened with the accessory above) but will deal massive Stagger damage over a large area.
With a new ability comes a new Battle Technique, and Collateral Blast is an incredibly easy one to nail when there is a group of enemies. All you need to do is hit at least three enemies with the ability, something you’re guaranteed to do so long as there are three enemies to actually hit.
Stage 3-1
Right from the start of Stage 3, you’ll be up against a Windbound Bighorn along with two Windbound Weavers. Start the battle by lunging into the Bighorn and dropping an Aerial Blast, this will grant you the Battle Technique Bonus and begin draining its Stagger gauge. While this is going on, turn your attention to the Weavers as it’ll be difficult to see and avoid the Bighorn’s attacks.
The deadliest of these attacks is the Bucking Bull attack, this will deal heavy damage if it hits you and can be difficult to see through the effects of Aerial Blast. Once you bring it to half Stagger, pull it down with Deadly Embrace and drive it to a full Stagger where you can finish it off.
Stage 3-2
An easier stage is up next, no Elite enemies as you’re up against a group of Windbound Osfreyr and two Windbound ![]() Vultures. If you have Aerial Blast available again, lunge in and drop it in the middle and it will do most of the work for you. If it’s not available yet, save it for the start of 3-3 and instead focus on taking out the Vultures before dealing with the Osfreyr.
Vultures. If you have Aerial Blast available again, lunge in and drop it in the middle and it will do most of the work for you. If it’s not available yet, save it for the start of 3-3 and instead focus on taking out the Vultures before dealing with the Osfreyr.

Drop an !Aerial Blast on the Bighorn at the start of 3-1

and the same during the start of 3-3 before focusing on the Elemental.
Stage 3-3
Every Stage 3-3 is always one of the toughest parts of the Chronolith Trials, but this 3-3 is one of the easiest due to the two enemies you’re up against (but don’t take this for granted). You’re fighting against a Windbound Elemental and a Windbound ![]() Gigas, and you’ll want to focus on one at a time where possible.
Gigas, and you’ll want to focus on one at a time where possible.
If you saved your Aerial Blast, go ahead and lunge into the Gigas and drop it there, then turn your focus to the Elemental. This is because it has many ranged attacks to use against you, where as the Gigas is much easier to avoid if you keep an eye on it. It’s a good idea to pop a ![]() Limit Break at the start of this battle to hopefully take the Elemental down and allow you to focus on just the Gigas.
Limit Break at the start of this battle to hopefully take the Elemental down and allow you to focus on just the Gigas.
Final Stage - Windbound Coeurl Strategy

You will fight against a Windbound Coeurl for the Final Stage.
| Ability | Suggested Accessory |
|---|---|
If you’ve done any other Chronolith Trials, you’ll understand that the Final Stage is against just the boss, and you’ll have no opportunities for extending your time so what you have is what you have to work with. You’ll lose the defensive-minded Rook’s Gambit for this final stage, but gain Gouge, this makes it even easier than ever to Stagger the boss.
The Windbound Couerl, despite being an agile creature, isn’t too tough to handle provided you have enough time going into the battle. You will have fought a few ![]() Coeurls, such as during the Capital Punishment main quest and the abilities are the same here. As time is of the essence here, dart in and begin the battle with Aerial Blast, the cooldown should be up by the time you Stagger the Coeurl provided you have the accessory equipped.
Coeurls, such as during the Capital Punishment main quest and the abilities are the same here. As time is of the essence here, dart in and begin the battle with Aerial Blast, the cooldown should be up by the time you Stagger the Coeurl provided you have the accessory equipped.
The signature attack of the Windbound Coeurl is Whipcrack, which will see it electrically charge its antennae and then sweep them at you. If you’re confident and see the attack coming, you can easily Precision Dodge this, but otherwise, get behind the Coeurl as you see the attack name and it will miss you, this is because it hits an arc in front of it.
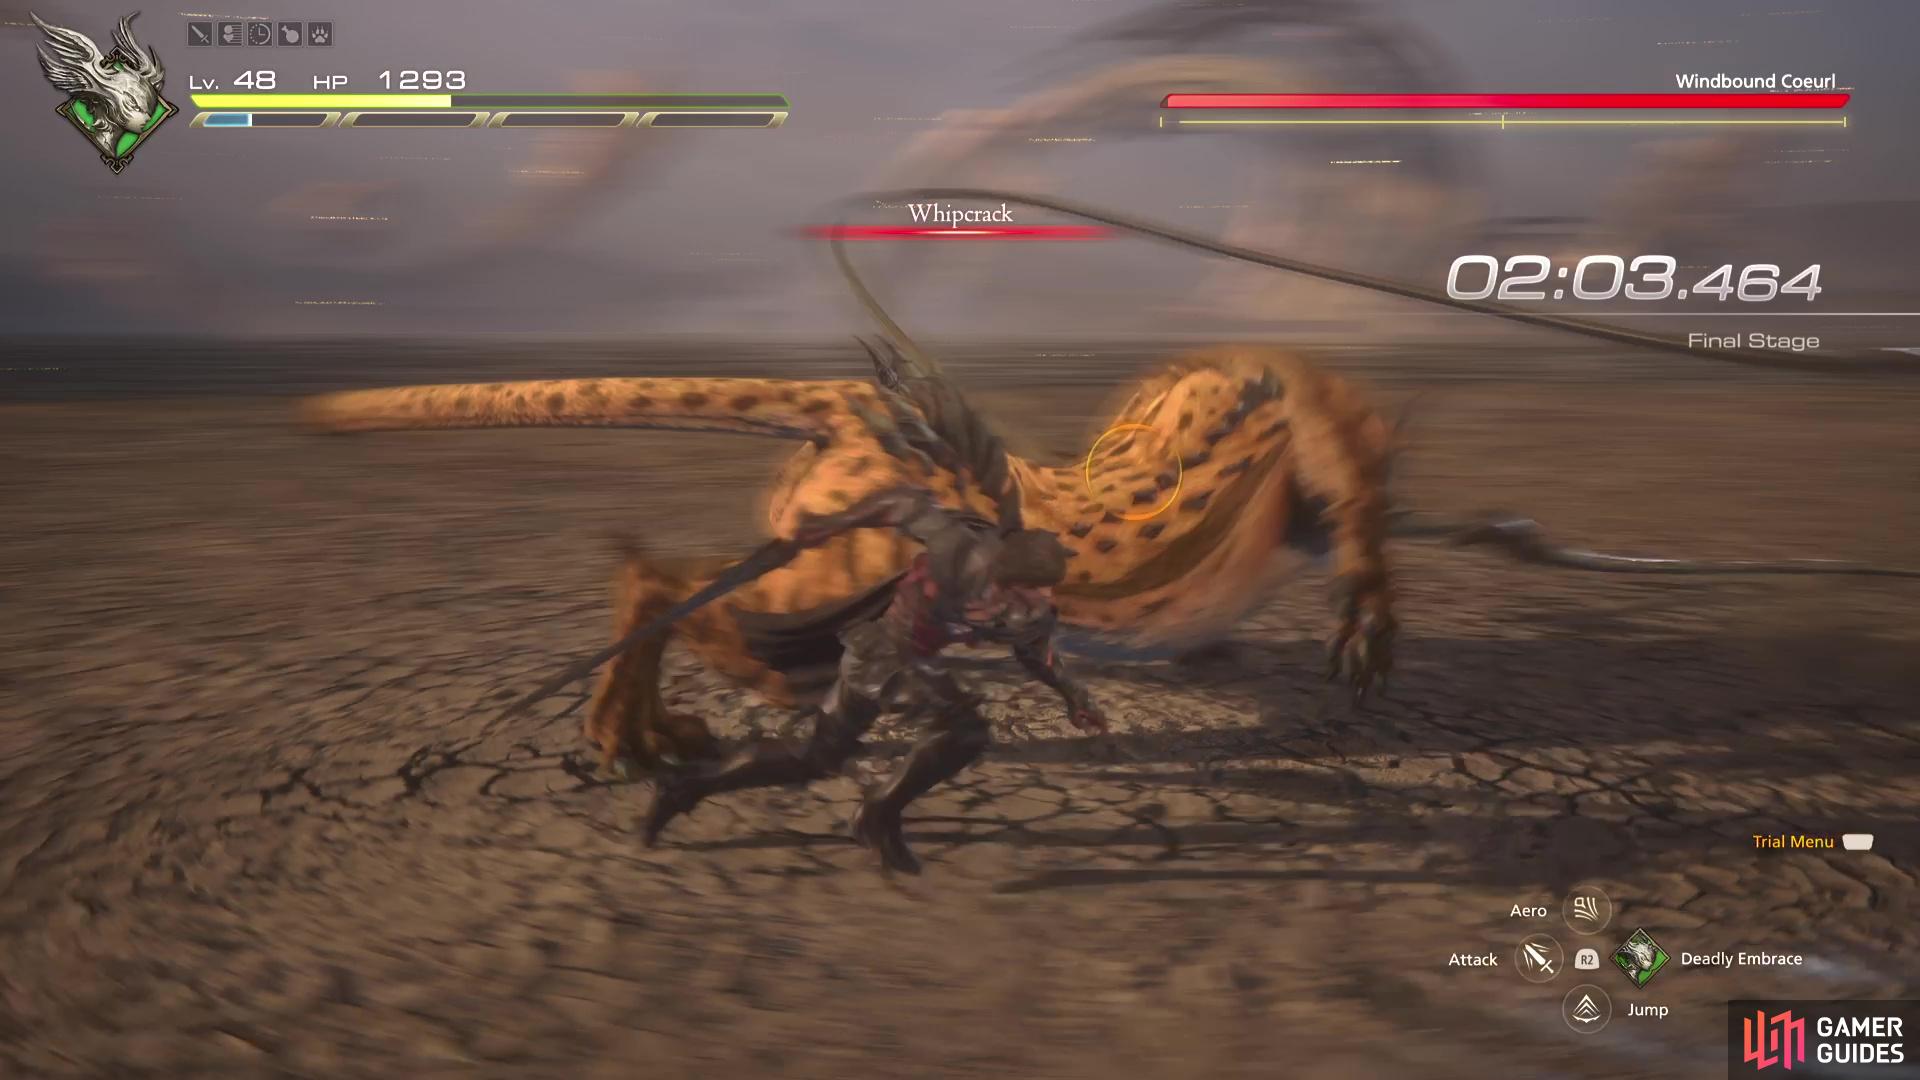
With Aerial Blast continuing to deal damage, and attacking with Magic Burst combos yourself, you’ll soon Stagger the Coeurl and can pop Limit Break to deal plenty of damage. If you’re proficient with your combos, you should be looking to defeat the Windbound Coeurl in just over two Staggers (quicker if you don’t need to use Gouge to Stagger and instead use it during Limit Break).
Once the Windbound Coeurl has been dealt with, you’ll complete the trial and obtain the The Will of Wind (Aerial Blast), a powerful accessory that increases the Will damage of it by 12%. You’ll also unlock The Final Trial by Wind at the ![]() Arete Stone in
Arete Stone in ![]() The Hideaway, a more challenging version of the trial you just completed (with no real rewards)!
The Hideaway, a more challenging version of the trial you just completed (with no real rewards)!
More Final Fantasy 16 Chronolith Trials
If you’re looking for help on any of the other Chronolith Trials, check out our pages below:
No Comments