
By the time you unlock the Chronolith Trials in Final Fantasy 16, you should be well accustomed to the battle system. As such, these should provide a suitable challenge for those of you looking to complete everything the game offers. Bahamut’s trial, The Hand of Mimas, will of course focus on the abilities of Bahamut and you’ll need to master Wings of Light to overcome it. This page will provide everything you need to know about this trial.

Trial by Light is the !Bahamut Chronolith Trial in Final Fantasy 16.
Where to Find The Hand of Mimas Chronolith in FF16
If you wish to undergo the ![]() Bahamut trial, The Hand of Mimas, you’ll need to head to the Holy Empire of Sanbreque and go to the
Bahamut trial, The Hand of Mimas, you’ll need to head to the Holy Empire of Sanbreque and go to the ![]() Northreach
Northreach ![]() Obelisk. Leave Northreach to the north and head as far west as you can to find the Chronolith, you should be able to avoid any enemies along the way if you’re riding on a Chocobo.
Obelisk. Leave Northreach to the north and head as far west as you can to find the Chronolith, you should be able to avoid any enemies along the way if you’re riding on a Chocobo.
Be sure to make sure you save your game and prepare fully before accessing the trial; you won’t be able to learn/unlearn any abilities (although these will come upgraded anyway) once the trial begins but you will (and should) be able to change your equipment between stages.
Bahamut Chronolith Trial Preparation
When it comes to taking on any Chronolith Trial, you’ll want to make sure you’re fully prepared before entering, and this advice will ring true for each and every one of them. To begin with, you’ll have a much easier time if you progress the Main Quest to the final one, Back to Their Origin where all of the final Side Quests open up.
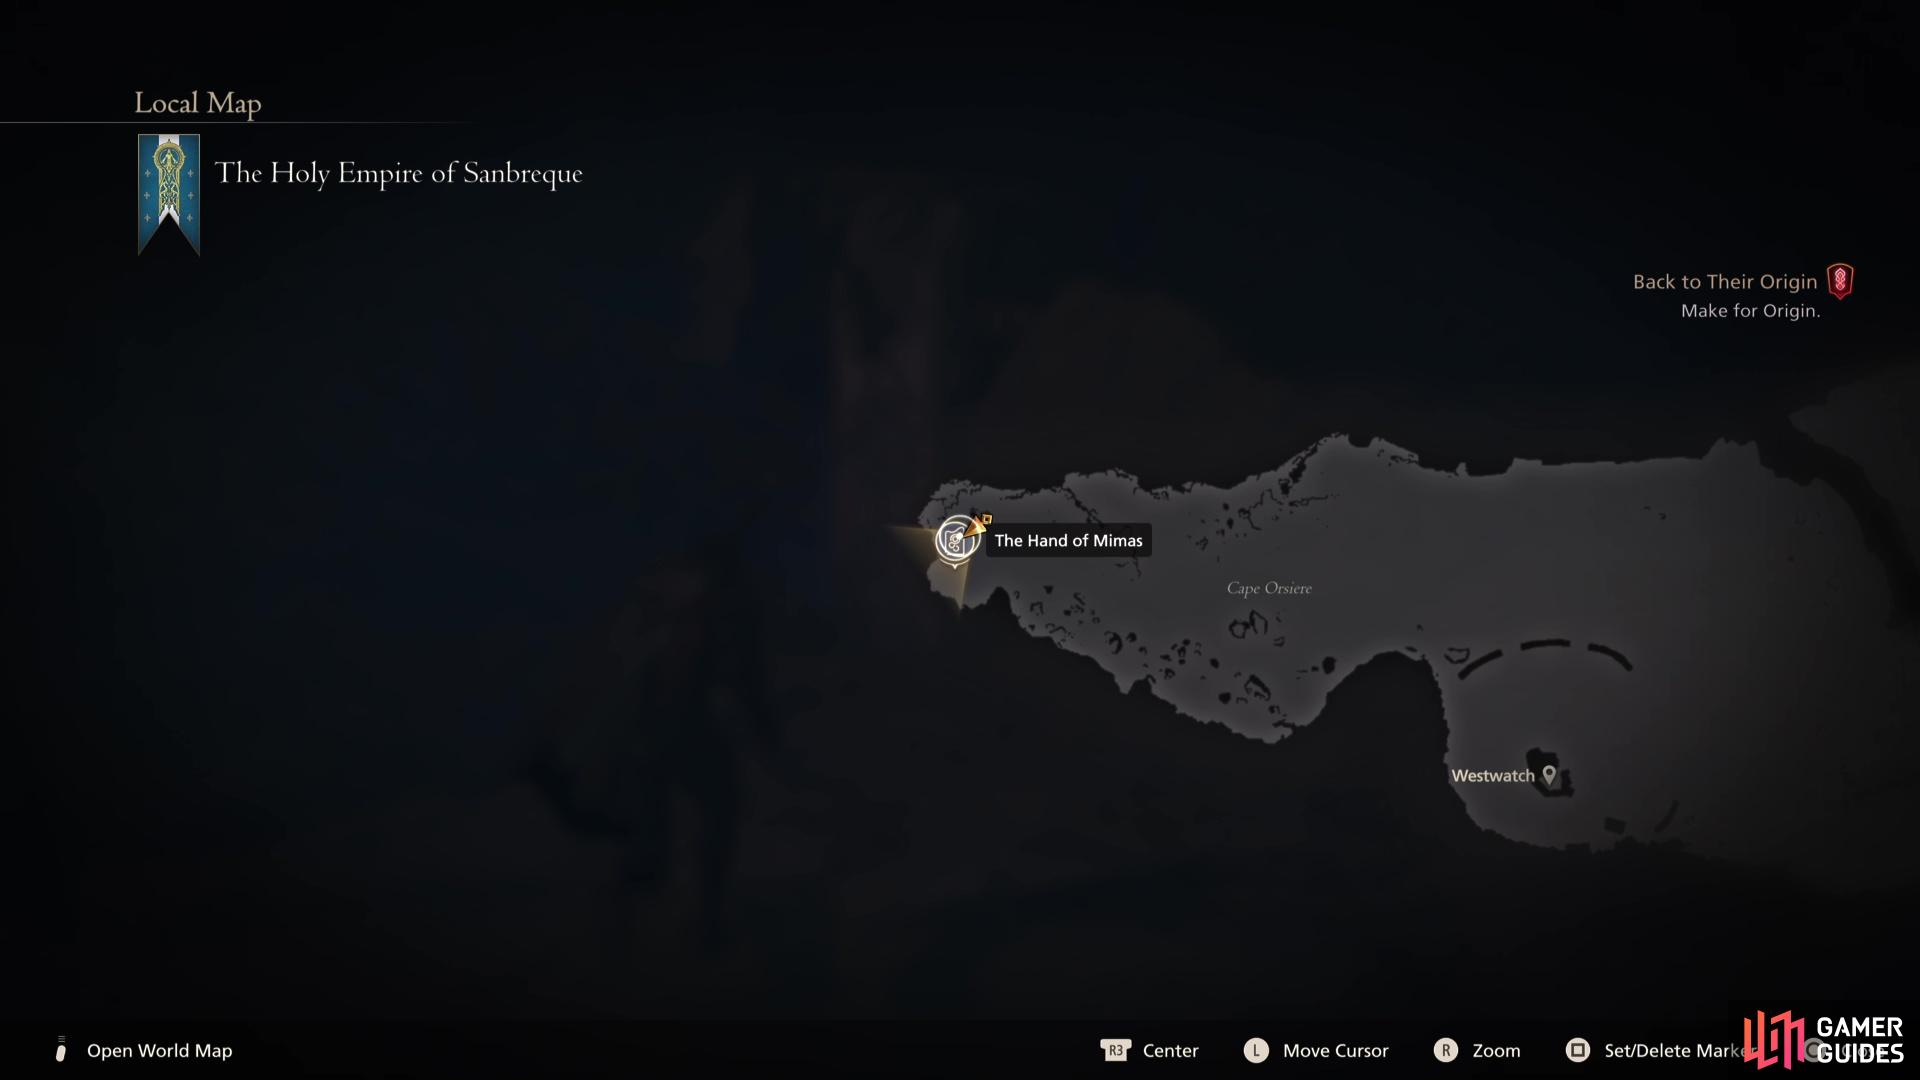
Head to the northwest edge out of !Northreach to find the Chronolith

you will obtain a powerful accessory as a reward for clearing this trial.
Equipment
Now that you have access to everything you can do in FF16 (outside of NG+), you’ll be able to complete Blacksmith’s Blues IV and obtain the recipe for the Gotterdammerung, the most powerful weapon in Final Fantasy XVI (at least for your first playthrough). You will also have access to all of the accessories that you should equip for each of these trials. With that in mind, you should consider the following equipment loadout:
| Name | Slot | Description | Location |
|---|---|---|---|
| Weapon | +375 Attack + Stagger | Complete the Blacksmith’s Blues IV Side Quest to obtain the recipe and then craft it. | |
| Belt | +95 Defense, +32 HP | Crafted from the recipe obtained from the Blacksmith’s Blues III Side Quest. | |
| Vambraces | +94 Defense, +50 HP | Reward for completing the Where There’s a Will Side Quest. | |
| Accessory 1 | Increases attack and alters |
Reward for 85 Renown at the Patron of Whispers. | |
| Stage Ability Accessory | Accessory 2 | – | Multiple |
| Stage Ability Accessory | Accessory 3 | – | Multiple |
As you can see from the above table, equipping the Gotterdammerung will make life a lot easier, as will having the best armor. When it comes to the Vambraces, you can change to ![]() The Sons of Ouroboros instead; the difference is slightly more Defense at the expense of more HP.
The Sons of Ouroboros instead; the difference is slightly more Defense at the expense of more HP.
The ![]() Berserker Ring is something you should certainly consider, as it is an excellent accessory that alters and powers up Precision Dodge, but if you find it difficult to deal with the animation, opt for the Genji Gloves instead as they offer a flat 5% damage increase to all damage Clive outputs.
Berserker Ring is something you should certainly consider, as it is an excellent accessory that alters and powers up Precision Dodge, but if you find it difficult to deal with the animation, opt for the Genji Gloves instead as they offer a flat 5% damage increase to all damage Clive outputs.
When it comes to the final two Accessories, consider rotating these around to the abilities you have access to for each stage, this will make life a lot easier to complete the Battle Techniques and crucially increase the available time you have remaining to complete the trial. You can find a list of Bahamut accessories in the table below:
| Name | Description | Location |
|---|---|---|
| The Breath of Light (Flare Breath) | Reduces Flare Breath cooldown time by 2.7 seconds | Reward from the Smooth Like Butler Side Quest |
| The Favor of Light (Flare Breath) | Increases Flare Breath damage by 12% | Chest during the Evenfall Main Quest |
| The Will of Light (Impulse) | Increases Impulse will damage by 10% | Dropped by the boss in the Through the Maelstrom Main Quest |
| The Breath of Light (Satellite) | Reduces Satellite cooldown time by 4.0 seconds | Buy at the shop in |
| The Will of Light (Satellite) | Increases Satellite will damage by 10% | In a Chest during the Streets of Madness Main Quest |
| Bahamut’s Mercy | Reduces !Gigalare cooldown time by 6.0 seconds | Reward for A Tail to Tell Side Quest |
| The Breath of Light (Impulse) | Reduces Impulse cooldown by 2.0 seconds | Reward from the Lines in the Sand Side Quest |
| The Favor of Light (Gigaflare) | Increases Gigaflare damage by 5% | Reward for completing the Bahamut Chronolith Trial |
Stage 1 Walkthrough

Stage 1 will give you the !Flare Breath and !Satellite abilities.
| Ability | Suggested Accessory |
|---|---|
| The Favor of Light (Flare Breath) | |
| The Will of Light (Satellite) |
If this is not the first Chronolith Trial you’ve attempted, Stage 1 is where you should be looking to build up the majority of your time bonuses. This is because you’ll be facing the simplest enemies that you’ll encounter in the challenge, so be sure you equip the two suggested accessories above before you begin.
When you take a look at the Battle Technique Bonuses for Bahamut, Megacharge can be a tough one to trigger if you attempt to charge ![]() Wings of Light against the lesser enemies, instead, only do this when you’re fighting against the tougher enemies and can raise it quicker with Precision Dodges. Also, remember that should you get hit by an enemy, it will knock you out of it and begin to lower.
Wings of Light against the lesser enemies, instead, only do this when you’re fighting against the tougher enemies and can raise it quicker with Precision Dodges. Also, remember that should you get hit by an enemy, it will knock you out of it and begin to lower.
Multiflare, then, is basically an extension of the Megacharge bonus, as you’ll need to have Megaflare strike 50 targets, something you will certainly achieve if you’re using a max charge Megaflare against a group of enemies. Ability Finish and Multi Burst are as they say, simply finish an enemy off with an Eikonic Ability and use 10 ![]() Magic Bursts respectively.
Magic Bursts respectively.
Full Flare is a simple one, you just simply need to hit an enemy 120 times with it and seeing as it’s a persistent ability, you’ll easily get this one. Satellite, on the other hand, can be tricky to obtain as you need to make use of the Satellite ability effectively, this means keeping it up and using magic related attacks to trigger it.
Stage 1-1
The first stage of this trial sees you up against a group of Lightbound Revenants, this is the perfect opportunity to trigger Satellite and then use Flare Breath to group them all up and nail the two Battle Technique Bonuses. Stay away from Wings of Light here, it will take too long to try and charge it here as the enemies are not aggressive enough.

Keep !Satellite active at all times

charge a Lv 4 Megaflare for Stage 1-3.
Stage 1-2
For this next encounter, you’ll be fighting against Lightbound Bugs and Lightbound Nodes, of which the latter should be your main target. Once again, refrain from using Wings of Light, you’ll waste too much time trying to charge it. Instead, look to use Flare Breath to group them up and finish them off with Magic Burst combos.
Stage 1-3
The final encounter for Stage 1 is against a Lightbound Bavarois, this is a reskin of the Flan Prince hunt without all of the different spells that it had available to it. Seeing as you’ll be facing just the one target, and that it’s far more aggressive than the lesser enemies, this is a great time to use Wings of Light.
Keep close to the Bavarois and when it attempts to use its various melee attacks against you, perform a Precision Dodge to charge up that Megaflare gauge. Aim for Level 4 for the bonuses, and then unleash it, dealing heavy damage to the Bavarois and leaving you with little work to finish it off and end the stage.
Stage 2 Walkthrough
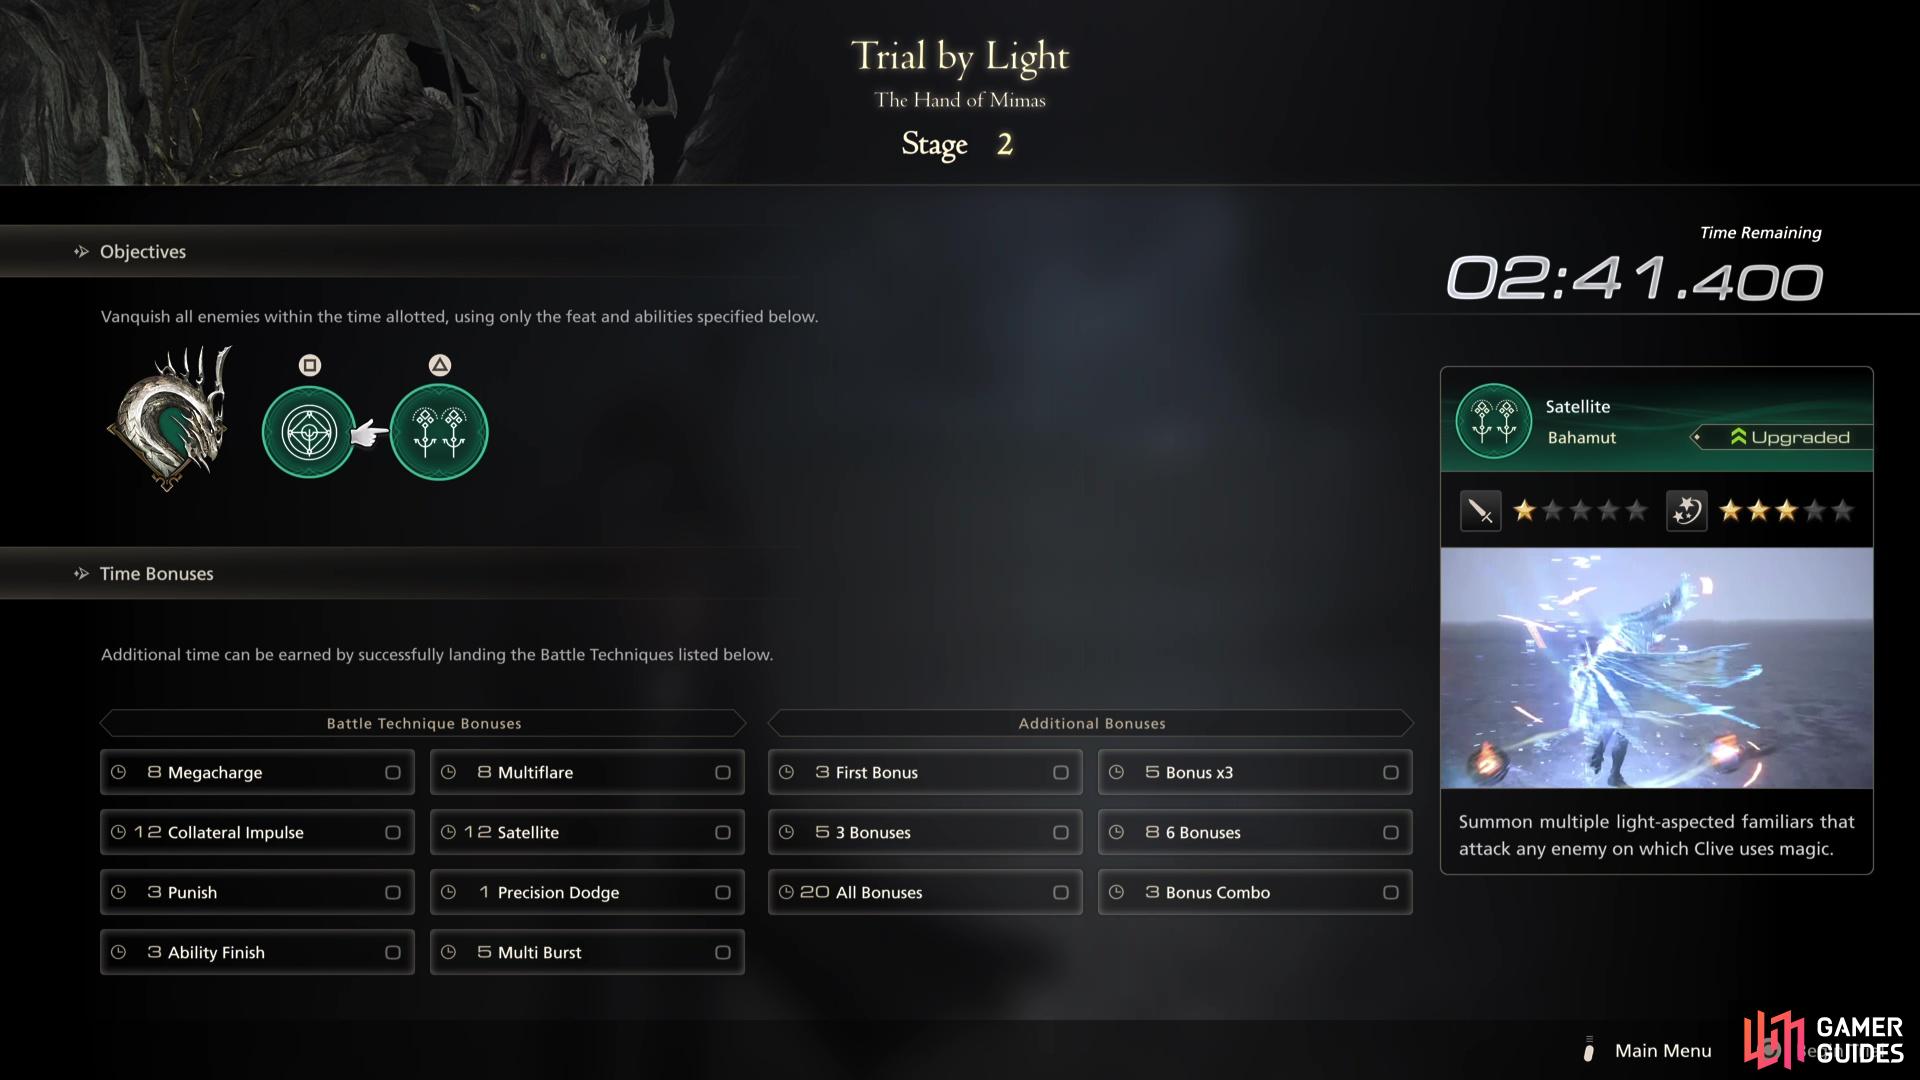
Stage 2 will give you the !Impulse and !Satellite abilities.
| Ability | Suggested Accessory |
|---|---|
| The Will of Light (Impulse) | |
| The Will of Light (Satellite) |
You’ll know what to expect for the Bahamut trial now, and you can expect the difficulty to ramp up a little for Stage 2. You’ll lose access to Flare Breath for this stage, but you’ll get the useful Impulse in its place. Once you let off the spheres of light, wait for them to turn a bright orange before triggering it again to manually explode, this deals heavy Will damage.
As for new Battle Techniques, there’s only one new one to consider, Collateral Impulse. To achieve this bonus, you need to have your Impulse spheres strike at least two enemies, a task easily achievable at the start of any encounter with a group of enemies so be sure to trigger it as soon as you can and grab that time bonus.
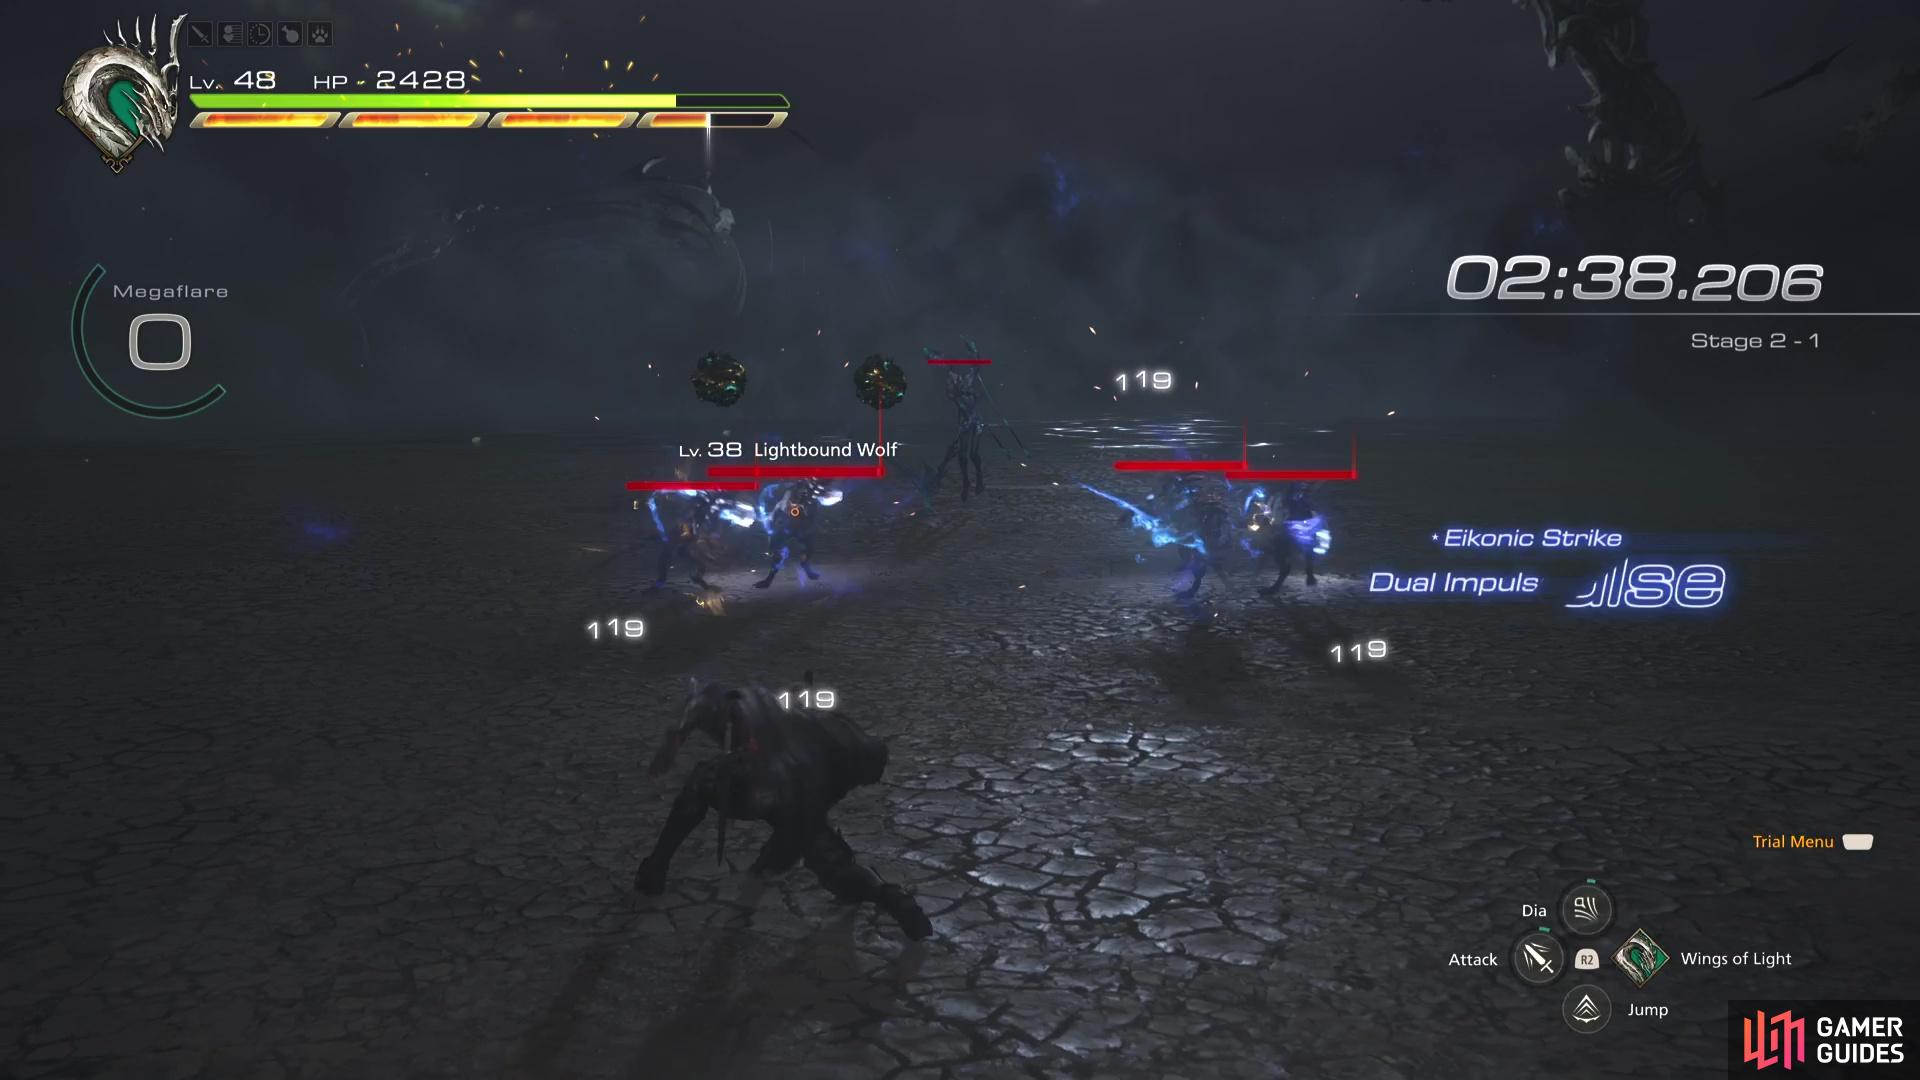
Stage 2-1
This stage begins with an encounter against a group of Lightbound ![]() Wolves and a deadly Lightbound Lichs. Start by triggering Satellite, then toss out an Impulse before lunging in, the Wolves may be weak, but you need to keep an eye on that Lich who will attack from range so look to get them down as quickly as possible.
Wolves and a deadly Lightbound Lichs. Start by triggering Satellite, then toss out an Impulse before lunging in, the Wolves may be weak, but you need to keep an eye on that Lich who will attack from range so look to get them down as quickly as possible.
Once you’re left alone with just the Lich, you can take this opportunity to use Wings of Light and let off a Lv 4 Megaflare, this will deal heavy damage to the Lich and if you just so happen to defeat it while it’s still raining down, it will carry over to the next encounter of Stage 2, making it slightly easier.
Look to clear the other enemies first before focusing on the Lich in 2-1

prepare a Lv 4 Megaflare against the Champion in 2-3.
Stage 2-2
The next encounter is a simple one, a battle against a group of Lightbound ![]() Raptors and two Lightbound Weavers. If you have Megaflare still going off, you’ll find it will do most of the work for you, but do trigger Satellite again if it’s available and then focus Magic Burst combos on the Weavers. This is also a good stage to build up some !Limit gauge as it’s one of the easier encounters you’ll come across in the Bahamut trial.
Raptors and two Lightbound Weavers. If you have Megaflare still going off, you’ll find it will do most of the work for you, but do trigger Satellite again if it’s available and then focus Magic Burst combos on the Weavers. This is also a good stage to build up some !Limit gauge as it’s one of the easier encounters you’ll come across in the Bahamut trial.
Stage 2-3
The final encounter for Stage 2 can be tricky, you’re facing a group of Lightbound ![]() Vultures and a Lightbound Champion. The Vultures should be your initial focus, there’s four of them and they will harass you while you try to take out the Champion, so let off Impulse and trigger it at its strongest before finishing them off with
Vultures and a Lightbound Champion. The Vultures should be your initial focus, there’s four of them and they will harass you while you try to take out the Champion, so let off Impulse and trigger it at its strongest before finishing them off with ![]() Charged Magic. When left alone with the Champion, use Wings of Light, charge to Lv 4 and execute, this along with Satellite still triggering should push it into Stagger where you can finish it off.
Charged Magic. When left alone with the Champion, use Wings of Light, charge to Lv 4 and execute, this along with Satellite still triggering should push it into Stagger where you can finish it off.
Stage 3 Walkthrough

Stage 3 will give you the !Impulse and !Gigaflare abilities.
Stage 3 is the last stage you can use to accrue time bonuses (which seems to be an easier task in this trial) and as such, you’ll want to ensure you nail as much as possible while the difficulty takes another step up. To make life so much easier, though, is the addition of the devastating Gigaflare in place of Satellite. This is one of the most powerful abilities in Clive’s arsenal and will make the final two stages a lot easier.
With the final ability now available, you’ll also have the final Battle Technique Bonus available, Collateral Gigaflare. This is another simple one, like all of the other Eikon ultimates, that only requires you to hit two targets with a single Gigaflare, something you’ll almost certainly achieve so long as there are two targets to hit.
Stage 3-1
The first encounter of Stage 3 is against a group of Lightbound Specters and a Lightbound Guardian. Jump straight into Gigaflare and sweep across the group of Specters to grab that time bonus and clear them off the field. This will leave you with just the Guardian, and although a tricky foe, it has a lot of attacks you can bait to easily charge Megaflare to Lv 4. By the time you Stagger the Guardian, Gigaflare should be available again (especially if you equipped the accessory) and you can finish it off.

Use !Gigaflare at the start of 3-1 to deal with the lesser enemies

try to line up both of your foes in 3-3 for !Gigaflare.
Stage 3-2
The calm before the storm, the next encounter for Stage 3 is against a group of Lightbound ![]() Scorpions and two Lightbound Astrologers. There’s a possibility that Megaflare will still be firing if you took down the Guardian in the previous stage easily, but still focus on the Astrologers first as not only will they use magic from a distance, but they have the ability to Cure their allies.
Scorpions and two Lightbound Astrologers. There’s a possibility that Megaflare will still be firing if you took down the Guardian in the previous stage easily, but still focus on the Astrologers first as not only will they use magic from a distance, but they have the ability to Cure their allies.
Stage 3-3
The final encounter of Stage 3 is perhaps tougher than even the Final Stage, you’ll need to take down a Lightbound Lancer and a Lightbound Cannonier and both of these are fearsome foes. You first action should be to use Wings of Light and begin charging for a Lv 4 Megaflare, both of your targets are very aggressive, so they should give you ample opportunity to Precision Dodge and charge it quicker.
Once Megaflare is firing, focus on the Lancer and bring it to Stagger (which shouldn’t require too much work at this point), then unleash Limit Break and use Gigaflare which should easily take out the Lancer. If you’re able to, try and line up both the Lancer and Cannonier so that Gigaflare strikes them both at the same time and hopefully take them out in one fell swoop.
Final Stage - Lightbound Warlord Strategy

The Final Stage is against a Lightbound Warlord.
| Ability | Suggested Accessory |
|---|---|
| The Favor of Light (Flare Breath) | |
| Bahamut’s Mercy |
If you’ve completed any other Chronolith Trial, you’ll understand how the Final Stage works. You’re up against a boss with just the time you’ve earned, there is no way to earn any more time bonuses during this period. Thankfully, if you’ve been paying attention to Bahamut’s Battle Technique Bonuses, it’s one of the easier to accumulate a lot of time so you can take it slower if you need to. You’ll lose access to Impulse, which is a shame, and gain Flare Breath in its place. Ultimately, it matters little though as Gigaflare is so powerful that it can do most of the work for you.
The Warlord is an enemy you would’ve come across a few times in Final Fantasy XVI and you would have taken out a tougher version in the form of the Pandemonium S Rank Hunt. Begin the battle by using an initial Gigaflare to get the ball rolling, and then switch to Wings of Light to begin charging a Lv 4 Megaflare. The Warlord uses a lot of attack thats makes it easy to Precision Dodge and charge it up quickly.
Unless you have a lot of HP, try to stay away from Flare Breath as it causes more trouble than its worth by locking you into the animation; the Warlord will almost certainly get an attack in while you’re channeling it. Instead, use this time to use regular Precision Dodges against the Warlord’s attacks and counter while Megaflare is striking and build your !Limit gauge.

Once you Stagger the Lightbound Warlord, enter Limit Break and use Gigaflare, this will deal devastating damage to the Warlord. Even without Stagger, three Gigaflares (with a Lv 4 Megaflare) will pretty much kill it, so it’s a good idea to use it whenever it’s available. The only real attack to watch out for from the Warlord is Rictus of Horror, this will fire a massive beam in front of it but you can also use this as an opening by dodging to the side.
Once the Lightbound Warlord has been dealt with, you’ll complete the trial and obtain the The Favor of Light (Gigaflare), this makes the already absurdly powerful even stronger by 5%. You’ll also unlock The Final Trial by Light at the ![]() Arete Stone in
Arete Stone in ![]() The Hideaway, a more challenging version of the trial you just completed (with no real rewards)!
The Hideaway, a more challenging version of the trial you just completed (with no real rewards)!
More Final Fantasy 16 Chronolith Trials
If you’re looking for help on any of the other Chronolith Trials, check out our pages below:
- Where to Find All Chronolith Trials
- How to Complete the Phoenix Trial by Fire Chronolith Trial
- How to Complete the Shiva Trial by Ice Chronolith Trial
- How to Complete the Garuda Trial by Wind Chronolith Trial
- How to Complete the Ramuh Trial by Thunder Chronolith Trial
- How to Complete the Titan Trial by Earth Chronolith Trial
- How to Complete the Odin Trial by Darkness Chronolith Trial
No Comments