
One of the last A-Rank ![]() Notorious Marks in Final Fantasy 16 is the Grim Reaper, Prince of Death. This one has a couple of requirements before you can access them. The first is to be on the last main scenario quest in the game, and the second is to complete the side quest Under New Management II. Read below to find out the exact location of the Grim Reaper, and how you can defeat them.
Notorious Marks in Final Fantasy 16 is the Grim Reaper, Prince of Death. This one has a couple of requirements before you can access them. The first is to be on the last main scenario quest in the game, and the second is to complete the side quest Under New Management II. Read below to find out the exact location of the Grim Reaper, and how you can defeat them.
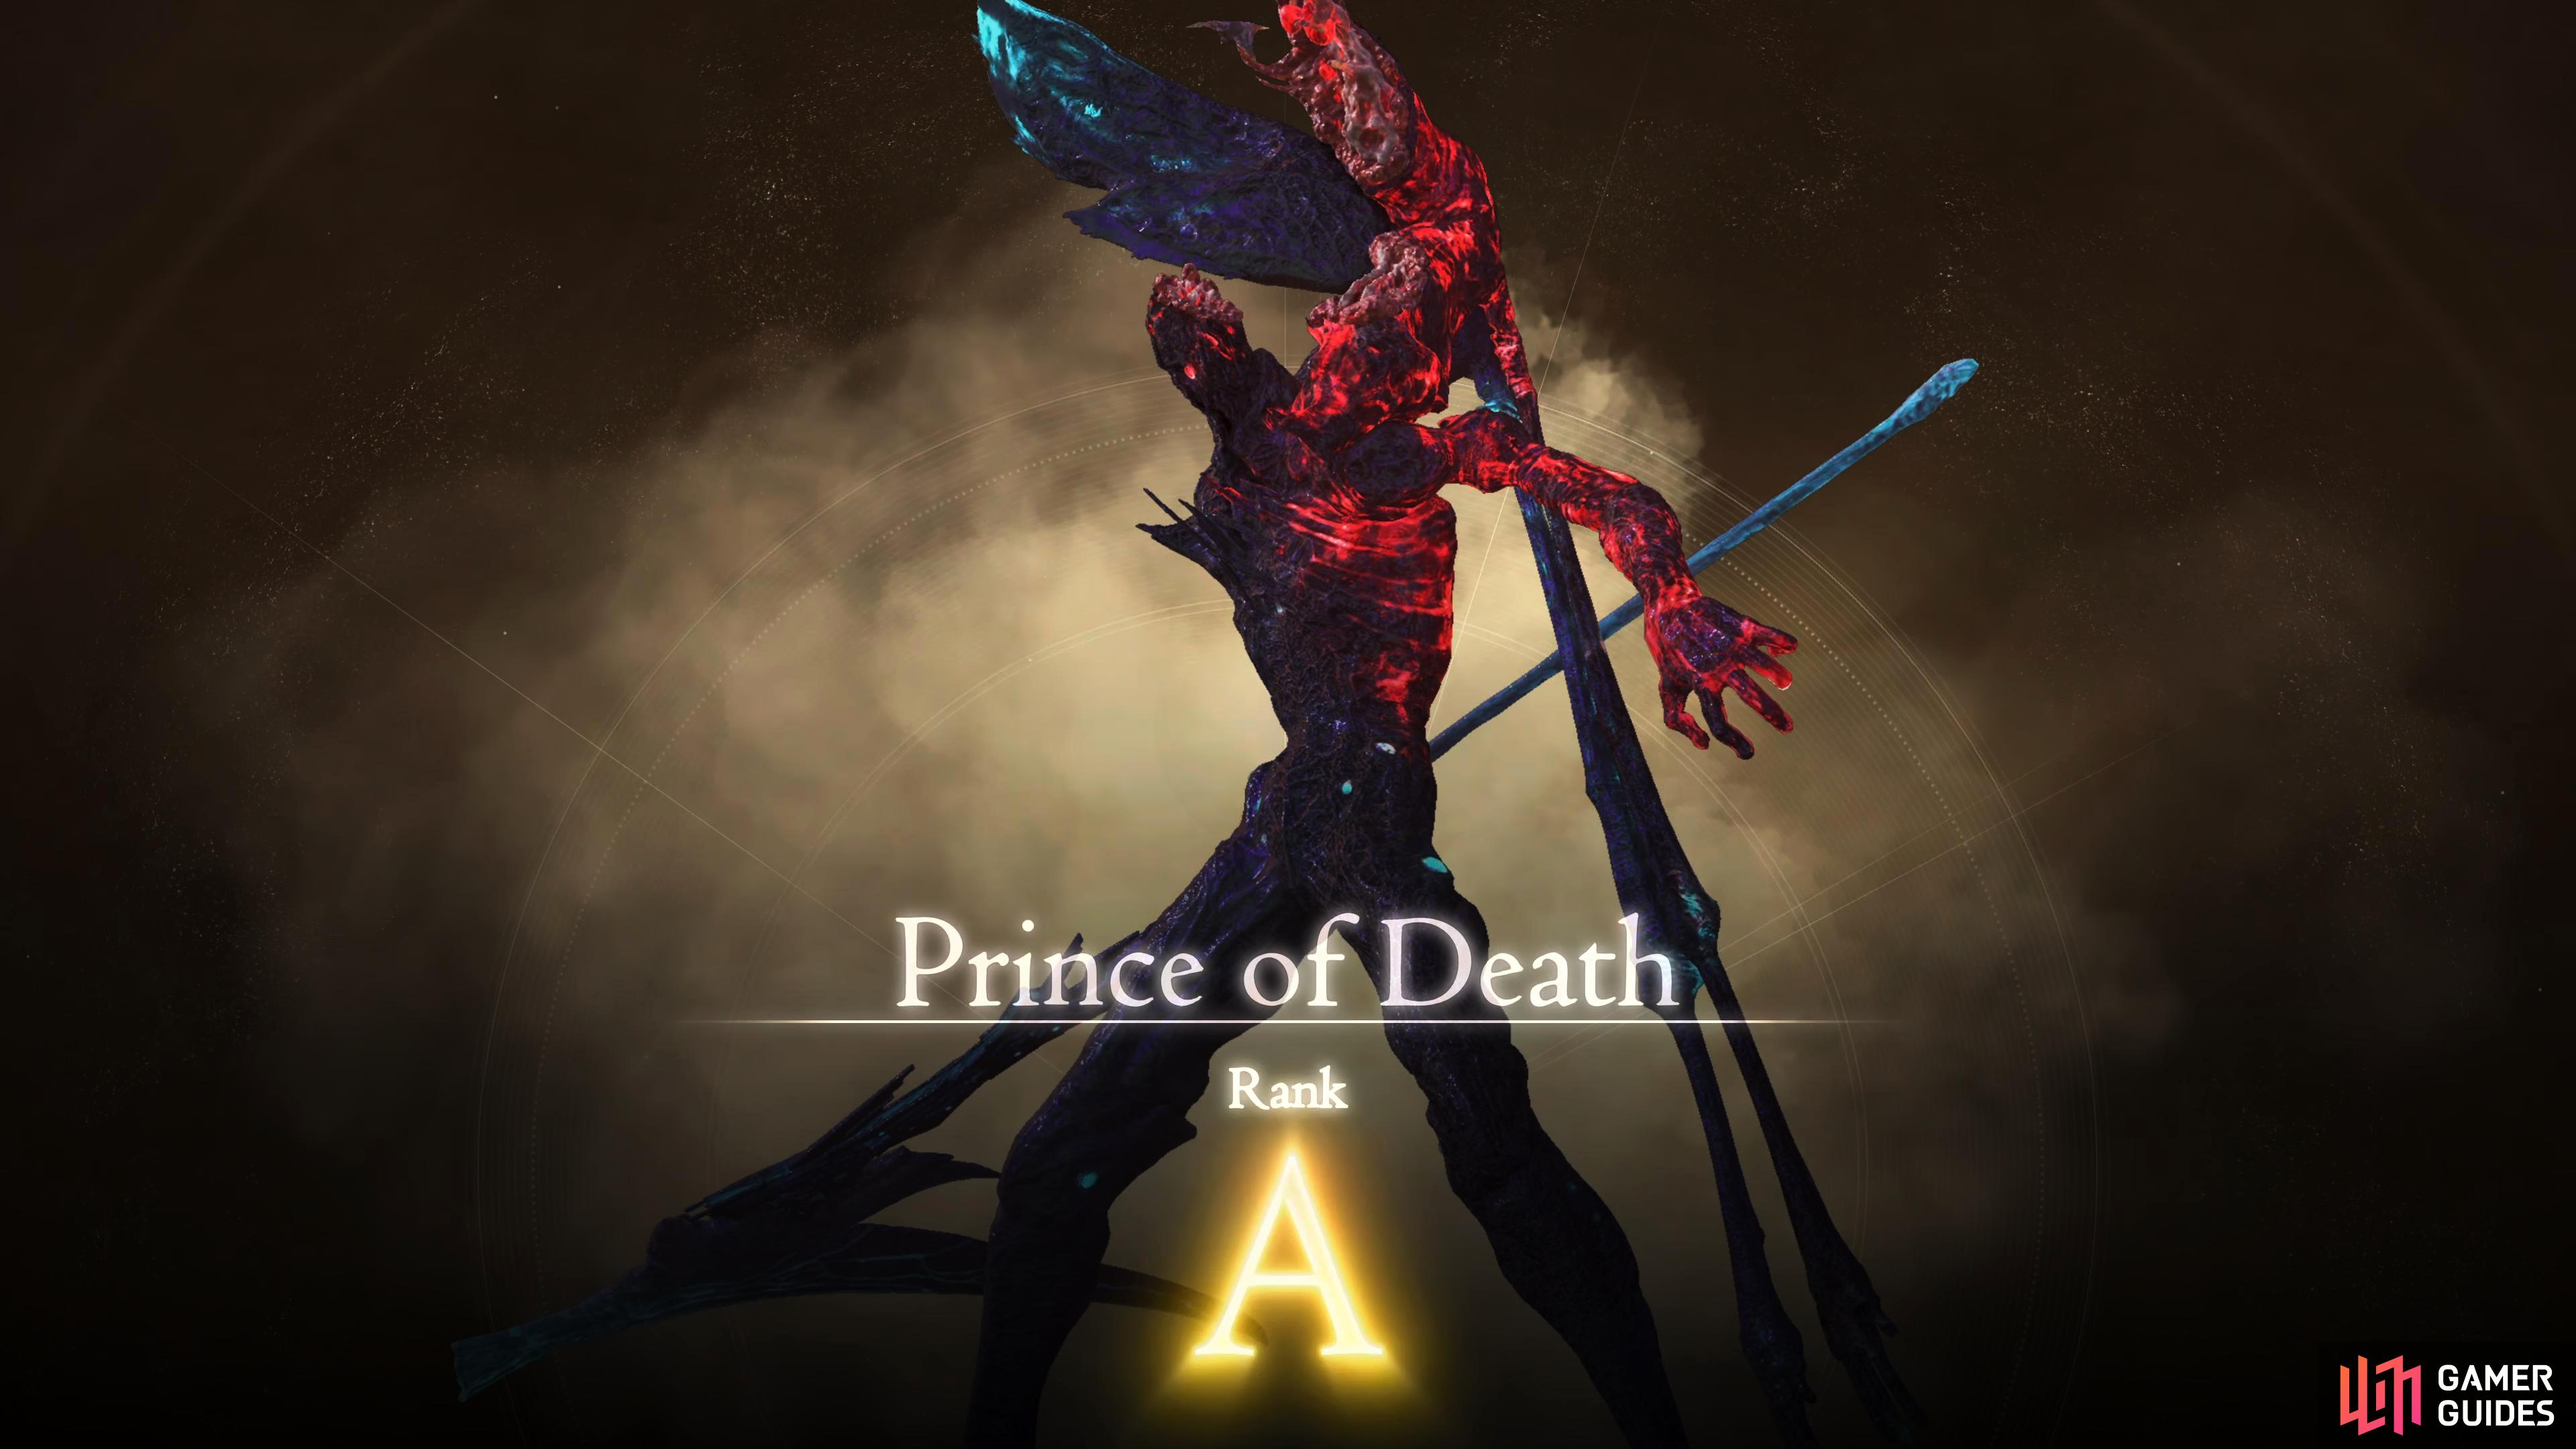
Prince of Death becomes available during the last main scenario quest.
Where to Find Grim Reaper, Prince of Death
| Location | Level | Bounty |
|---|---|---|
| West Royal Meadows, Sanbreque | 40 | 15,000 |
As stated above, you’ll need to be on the last story quest “Back to Their Origin”, and have completed the side quest Under New Management II which can be accepted in ![]() Northreach before you can gain access to the Hunt Bill. Once you’ve met these requirements, teleport to Northreach and leave via the northern exit. Traverse west across the Royal Meadows until you can see the stone tower in the distance, then take a north up the grassy bank where you’ll see the Prince of Death.
Northreach before you can gain access to the Hunt Bill. Once you’ve met these requirements, teleport to Northreach and leave via the northern exit. Traverse west across the Royal Meadows until you can see the stone tower in the distance, then take a north up the grassy bank where you’ll see the Prince of Death.
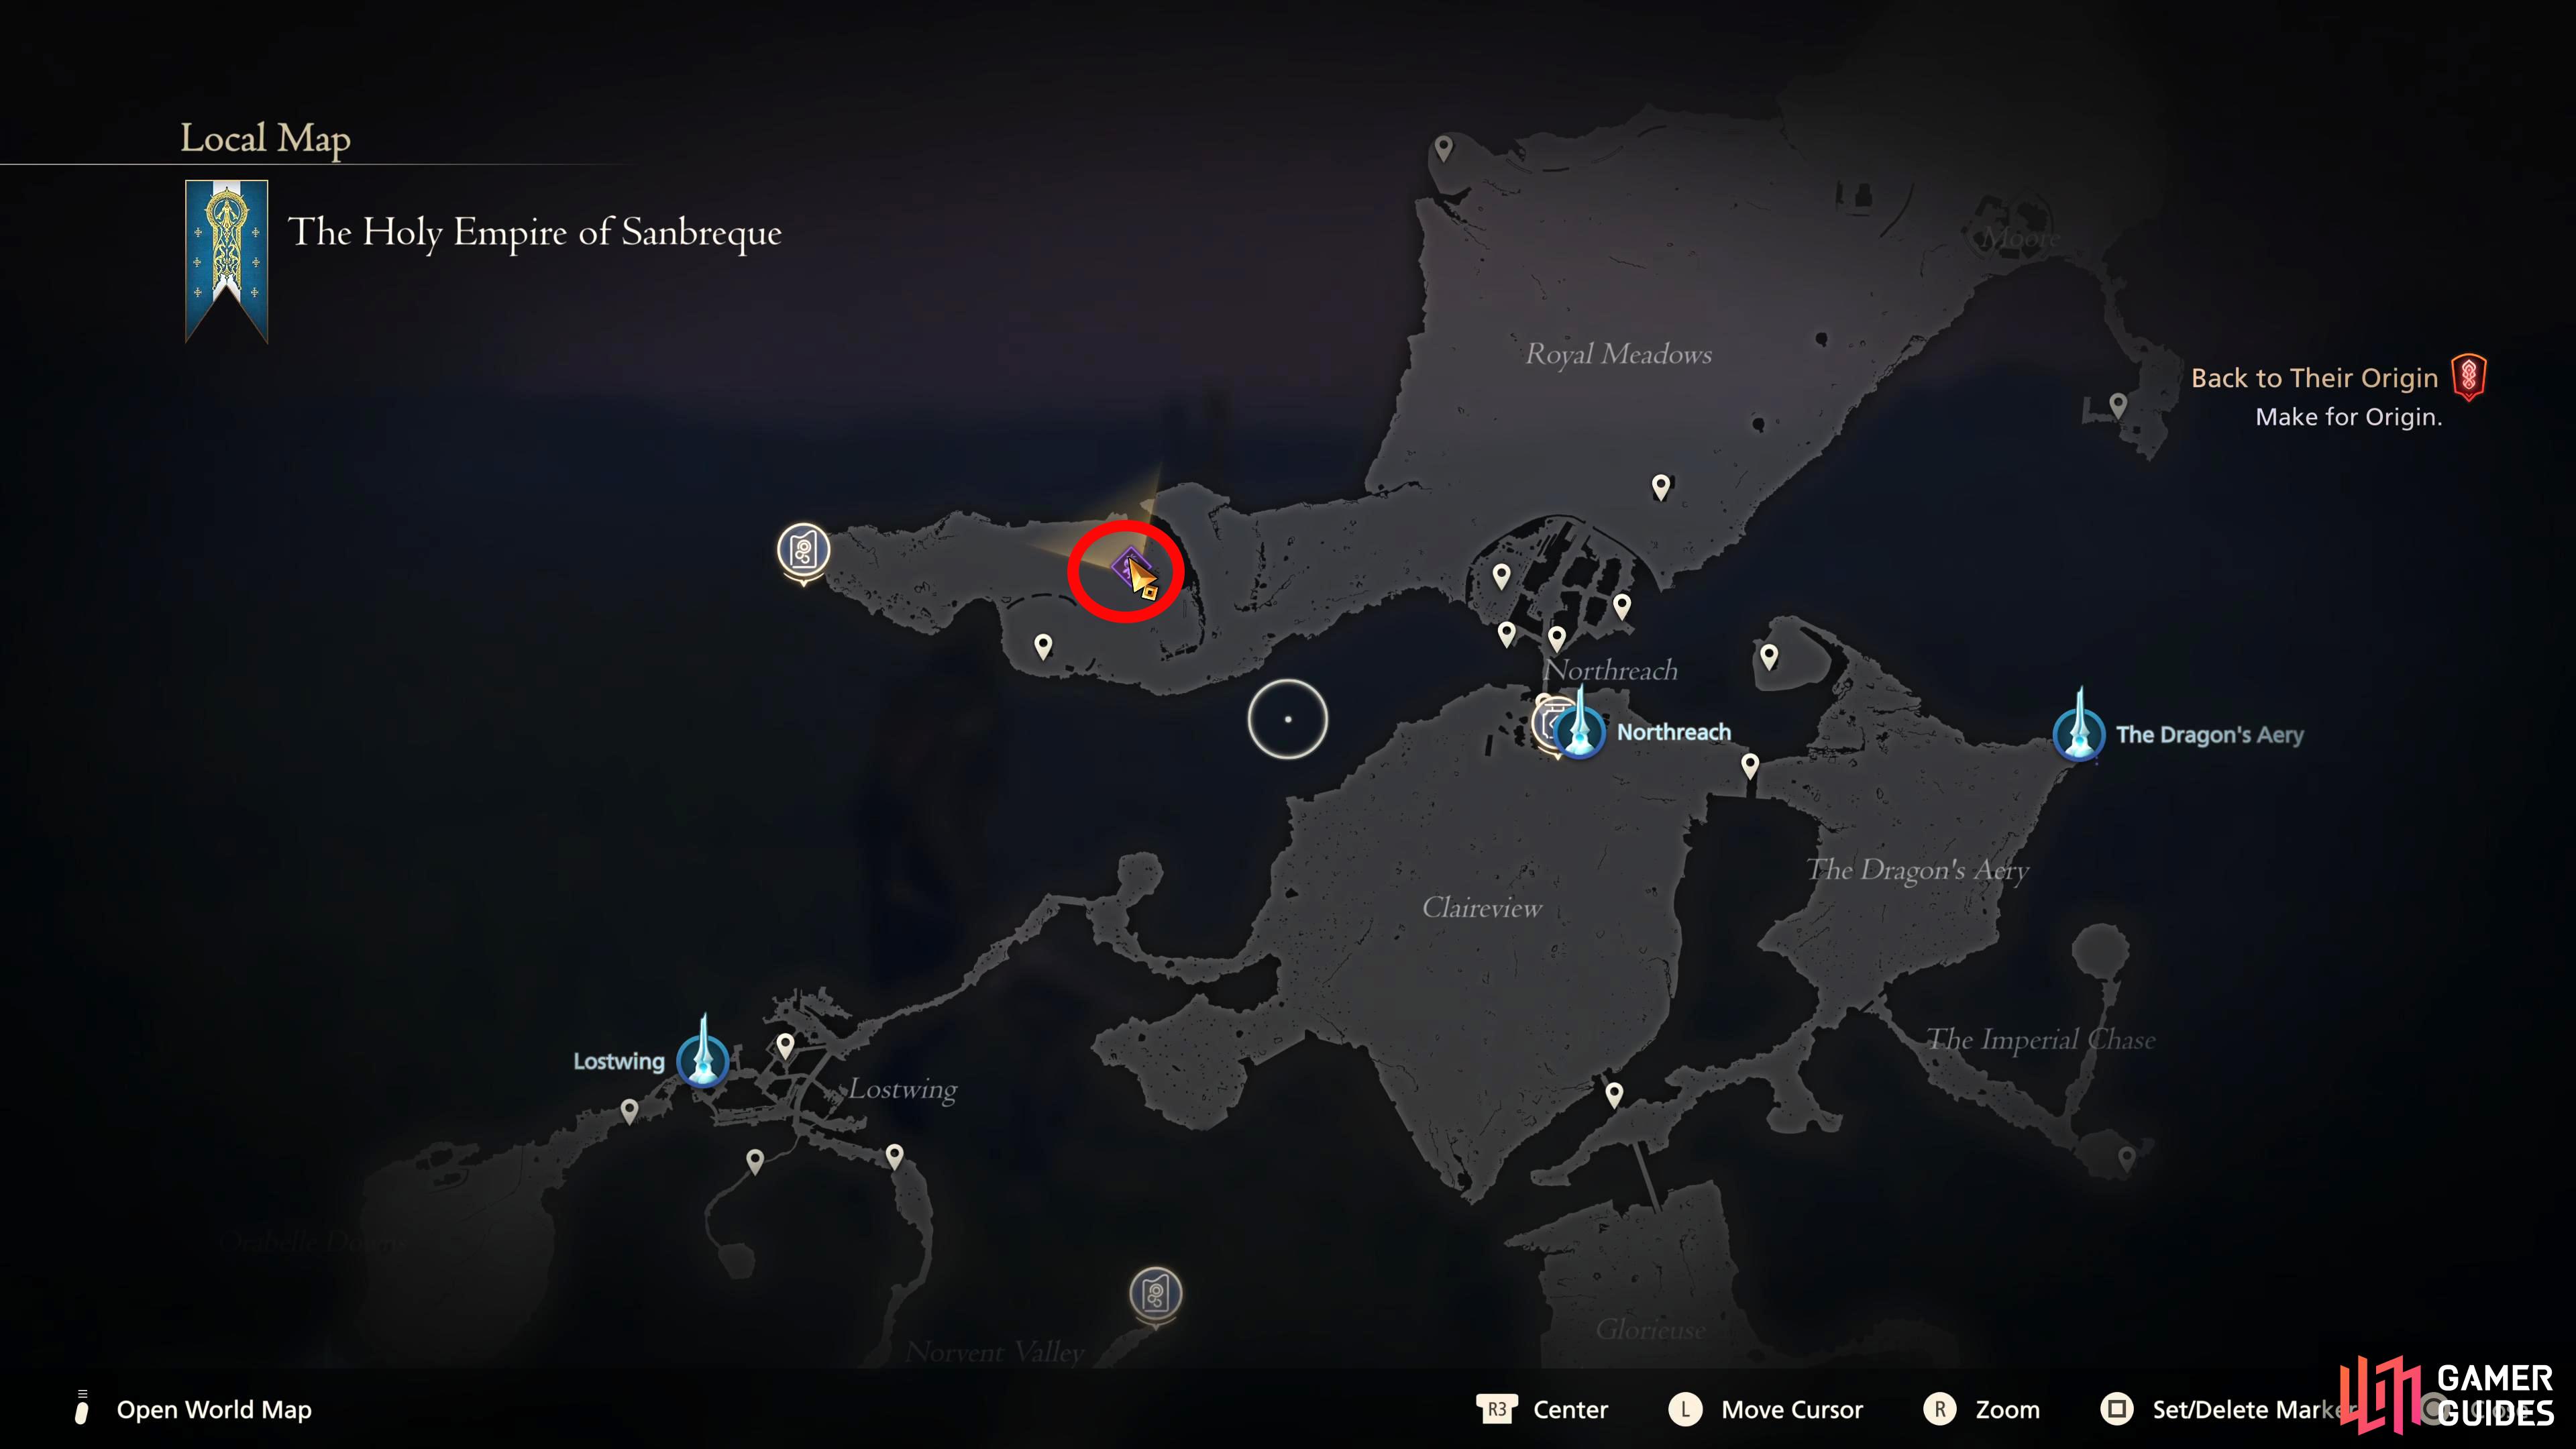
Exit Northreach via the north, and head west across the meadows.
Turn north when you see a tower in the distance to find the Grim Reaper.
Grim Reaper, Prince of Death Abilities
Below you’ll find all the attacks that the Prince of Death has in its arsenal:
| Attack | Description | Counter |
|---|---|---|
| Melee Attacks | The Prince of Death will periodically perform a two-hit sweeping scythe attack. | These attacks are slow enough that you can simply dodge them. Just be careful of their deceptive range. |
| Spin to Win | The Prince of Death will perform three spinning attacks with its scythe. | Either dodge each attack as the scythe is about to reach you, or back away from the Prince. Will-o’-the-Wykes will negate all the attacks. |
| Scythe Throw | The Prince of Death will perform a backflip while hurling their scythe at you. | This attack comes at you pretty quickly, and your only real action should be to dodge. Time the dodge just as the scythe reaches you to enact a Precision Dodge. If you’re quick enough, you can sidestep the attack too. |
| Sweeping Slash | The Prince of Death will teleport to get some range before unleashing a sweeping slash that will release a wide projectile at your location. They will repeat this one more time for a total of two hits. | This is another attack that will come at you quickly. Wait for the projectile to get close to you then dodge through it. If the timing is right, you’ll perform a precision dodge. |
| Soul Harvest | This is the Prince of Death’s signature attack. They will perform a combo that has up to ten attacks. During the combo, they’ll teleport to change the direction the attack is coming from. | Fortunately, these attacks are fairly slow and easy to avoid provided you don’t get caught out by the teleport. You could even run away to avoid the attack if you prefer to play it safe as the majority of its attacks will whiff anyway. |

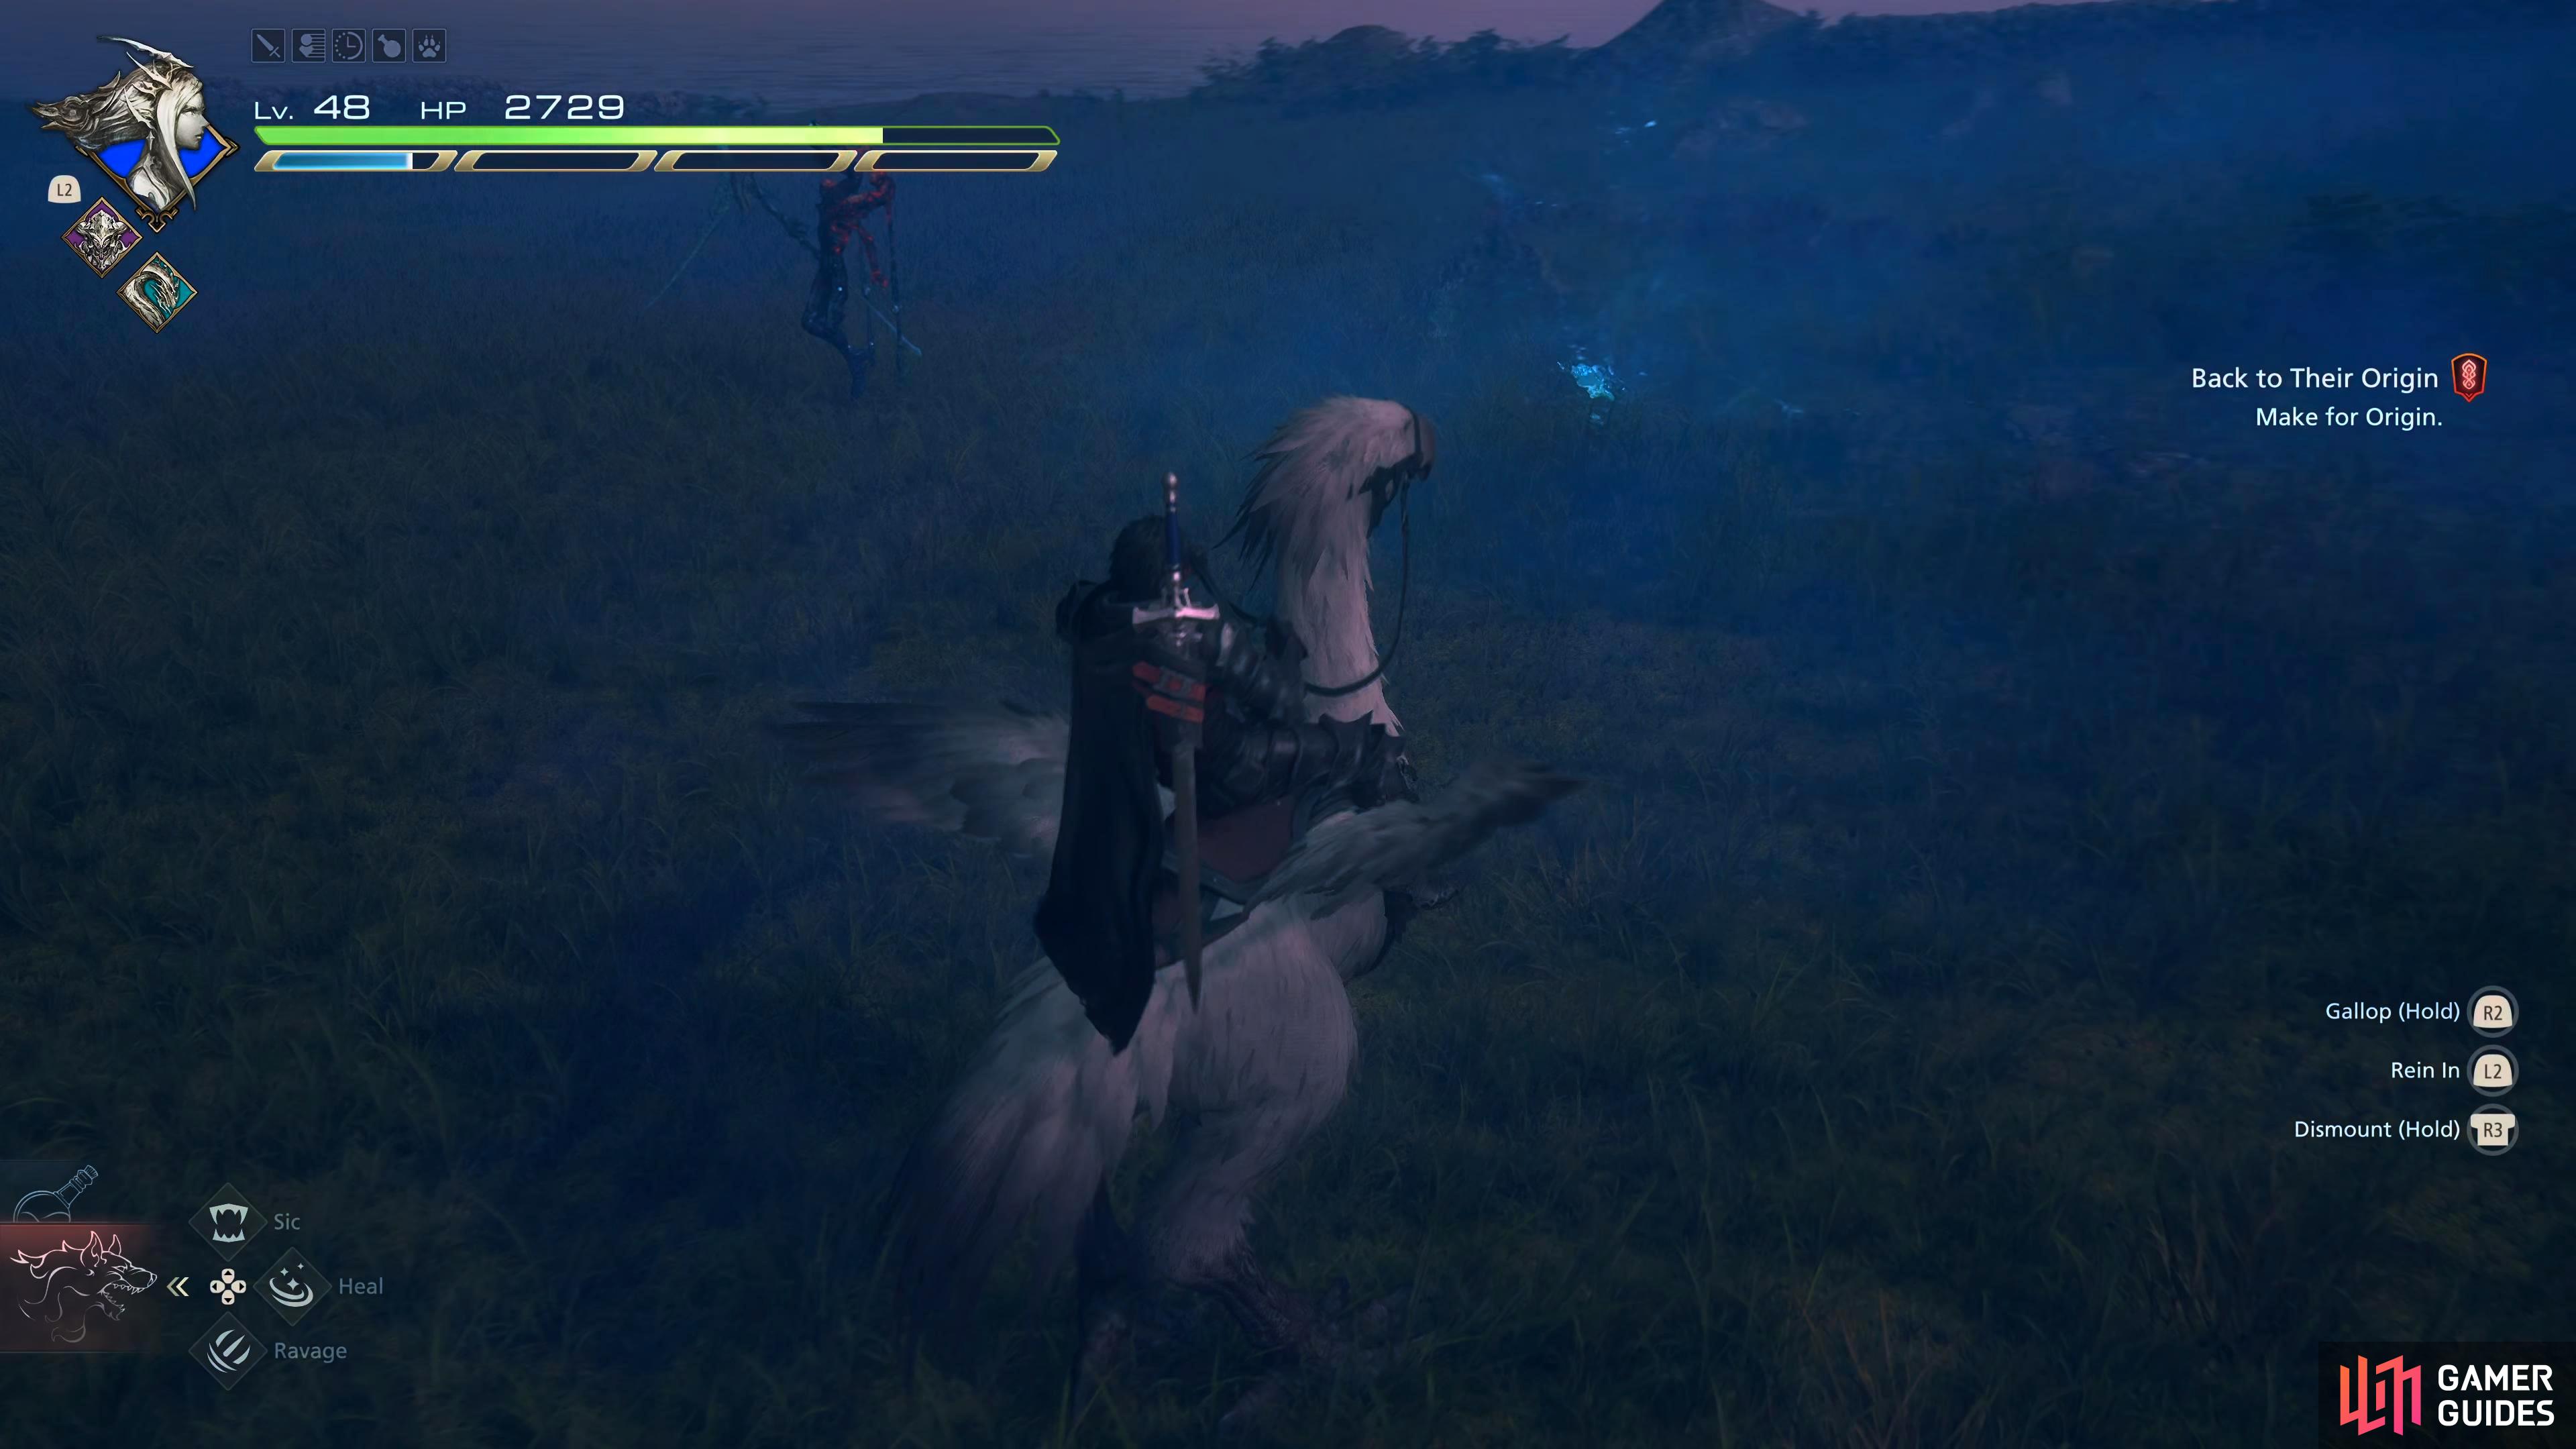
(1 of 4) Spin to Win has the Prince of Death close the distance and spin three times with its scythe.
Recommended Abilities for Prince of Death
Here we will list our recommended ability set up to do this effectively:
| Eikon | Ability | Damage Type |
|---|---|---|
| Damage (5 Stars) | ||
| Will (2 Stars) - Master this and place it as the second Bahamut ability. | ||
| Will (5 Stars) | ||
| Damage (2 Stars), Will (3 Stars) - Master this and place it as the second Shiva ability. | ||
| Damage (1 Star) Will (2 Stars) | ||
| No damage – Use to recover immediately from any ability or action. |
The reason behind the chosen abilities is as follows. Odin’s Zantetsuken when used at level 5 is powerful, to say the least, and can be used quite frequently especially when combined with Dancing Steel which can give you 3–4 levels of Zantetsuken in one attack. Rift Slip allows you to immediately cancel an action should you need to while also allowing you to slow down time briefly when followed up after a combo to give you more time to get Dancing Steel off as it takes a while to execute.
Shiva’s Cold Snap can Permafrost enemies whenever you perform a successful Precision Dodge which makes her invaluable to have while also providing Diamond Dust which is the strongest Will-Damage attack in the game. Then we take Lightning Rod from Ramuh to place in front of the Prince of Death when it is staggered to amplify any multiple-hit attacks you do.
Finally, take Bahamut for Gigaflare which is one of the most powerful attacks in the game. This is fantastic to use at any time, but especially at the end of a stagger phase when combined with Lightning Rod. You could switch out Bahamut with Titan for added defense with Titanic Block, but Bahamut’s Wings of Light can be really strong, especially when you get to level 5 Megaflare just before the stagger phase.
Recommended Items and Equipment for the Prince of Death
Gear
For your Weapon, Belt, and Vambraces, you should have the following:
| Weapon | Belt | Vambraces |
|---|---|---|
If you don’t have what’s listed above, use the highest Attack for the Weapon, and the highest Defense and Health for the Belt and Vambraces. The Founder’s Grasp is from the side quest “Where There’s a Will” which can be completed around the same time as this Hunt.
Accessories
For your Accessories, this is more subjective, so here is what we used:
| Accessory 1 | Accessory 2 | Accessory 3 |
|---|---|---|
| Shiva’s Kiss (Reduces Diamond Dust cooldown by 7.5 seconds) |
Shiva’s Kiss is a reward for completing the side quest “Priceless” unlocked during the final stretch of the game.
Items
Finally, we have items. This is more of a preference thing, but we chose the following items:
| Shortcut 1 | Shortcut 2 | Shortcut 3 |
|---|---|---|
Although Prince of Death is fairly difficult for an A-Rank, at this point of the game, it shouldn’t cause you too many problems. That is why we suggest bringing Strength Tonics as they will increase your damage by 30% which will end the battle quicker.
Grim Reaper, Prince of Death Boss Strategy
Firstly, complete the side quests “Priceless”, and “Where There’s a Will” as this will add both Joshua and Jill to the party. This battle isn’t too difficult as at this stage, you’ll have access to the strongest equipment and abilities the game has to offer. When you begin the battle with the boss, you’ll notice it’s quick. It uses teleports to maneuver around the battlefield while trying to strike you when you least expect it.
Most of the damage you’ll suffer will be either from Spin to Win, a three-hit spin attack with its scythe when it gets close to you, or its projectile attacks from Scythe Throw and Sweeping Slash as these come at you quickly. Technically, Soul Harvest is its most damaging attack, but it’s slow, and it will miss most of the attacks, but, if you do somehow get hit by every attack, it can be devastating.

As with all boss-like enemies in this game, you’ll want to focus on taking down their Will-Gauge first, and there aren’t many better ways than using Lightning Rod > Diamond Dust. This will take half of its Will-Gauge in one attack. Throw in a Dancing Steel to not only chip away at its health further, but also raise your Zantetsuken meter to level 4. You’ll want this at level 5 for the stagger phase. Either continue chipping away at the remainder of the gauge or wait for !Diamond Dust to come off the cooldown to send it into the stagger phase.
During this phase, place another Lightning Rod next to the boss, use a level 5 Zantetsuken and finish with a Gigaflare. If you have any time left of the phase, either perform some melee combos or use Diamond Dust / Dancing Steel if they’re available. If you avoid the attacks before this phase as Bahamut, you can use a level 5 Megaflare just before the stagger phase begins which will tremendously increase your overall stagger damage. Repeat all of this one more time, and the Prince will go back to their grave. Defeating the Prince of Death will reward you with 8,000 XP, 100 AP, 15,000 Gil, and 45 Renown. On top of all that, you’ll receive the invaluable ![]() Darksteel material from its spoils which are used in the creation of the
Darksteel material from its spoils which are used in the creation of the ![]() Gotterdammerung.
Gotterdammerung.
Darksteel Crafting Use
Check out the page below to find out where you can use Darksteel.
How to Craft the Gotterdammerung
If you want to know exactly what’s needed to craft the best weapon in the game, Gotterdammerung, check out the page below.
More Final Fantasy 16 Hunts
For information on some of the other Notorious Marks you can take on in Final Fantasy XVI, check out these pages below:
No Comments