
The last available S-Rank Hunt in Final Fantasy 16 is the notorious Behemoth King. Known for their incredible size, and their penchant for astrology these hulking monsters often play a part in a Final Fantasy game. Read below to find out Behemoth King’s exact location as well as our detailed in-depth Hunt strategy.
Behemoth King is the last S-Rank Hunt you will unlock in Final Fantasy 16.
Where to Find the Notorious Mark, Behemoth King
| Location | Level | Bounty |
|---|---|---|
| North Vidargraes, Waloed | 47 | 20,000 Gil, 55 Renown |
This Hunt can only be accepted during the last main scenario quest of the game, Back to Their Origin, and you must have completed the Nobody’s Tool side quest with ![]() Dorys before the Hunt will appear. When you first look at this hunt, it’ll be known as the “Masterless Marauder” and it’ll have a ??? as its location. By reading the bill, you’ll see that it was captured by Waloeder’s which lets you know that it’s somewhere in the region of
Dorys before the Hunt will appear. When you first look at this hunt, it’ll be known as the “Masterless Marauder” and it’ll have a ??? as its location. By reading the bill, you’ll see that it was captured by Waloeder’s which lets you know that it’s somewhere in the region of ![]() Ash.
Ash.
Well Ash is a pretty big place, and that doesn’t really narrow it down, does it? Fortunately, we can tell you where to find it. Teleport to the Vidargraes obelisk and make your way southwest where you should see the Behemoth King lumbering about in the distance. Head over to them to initiate the battle.
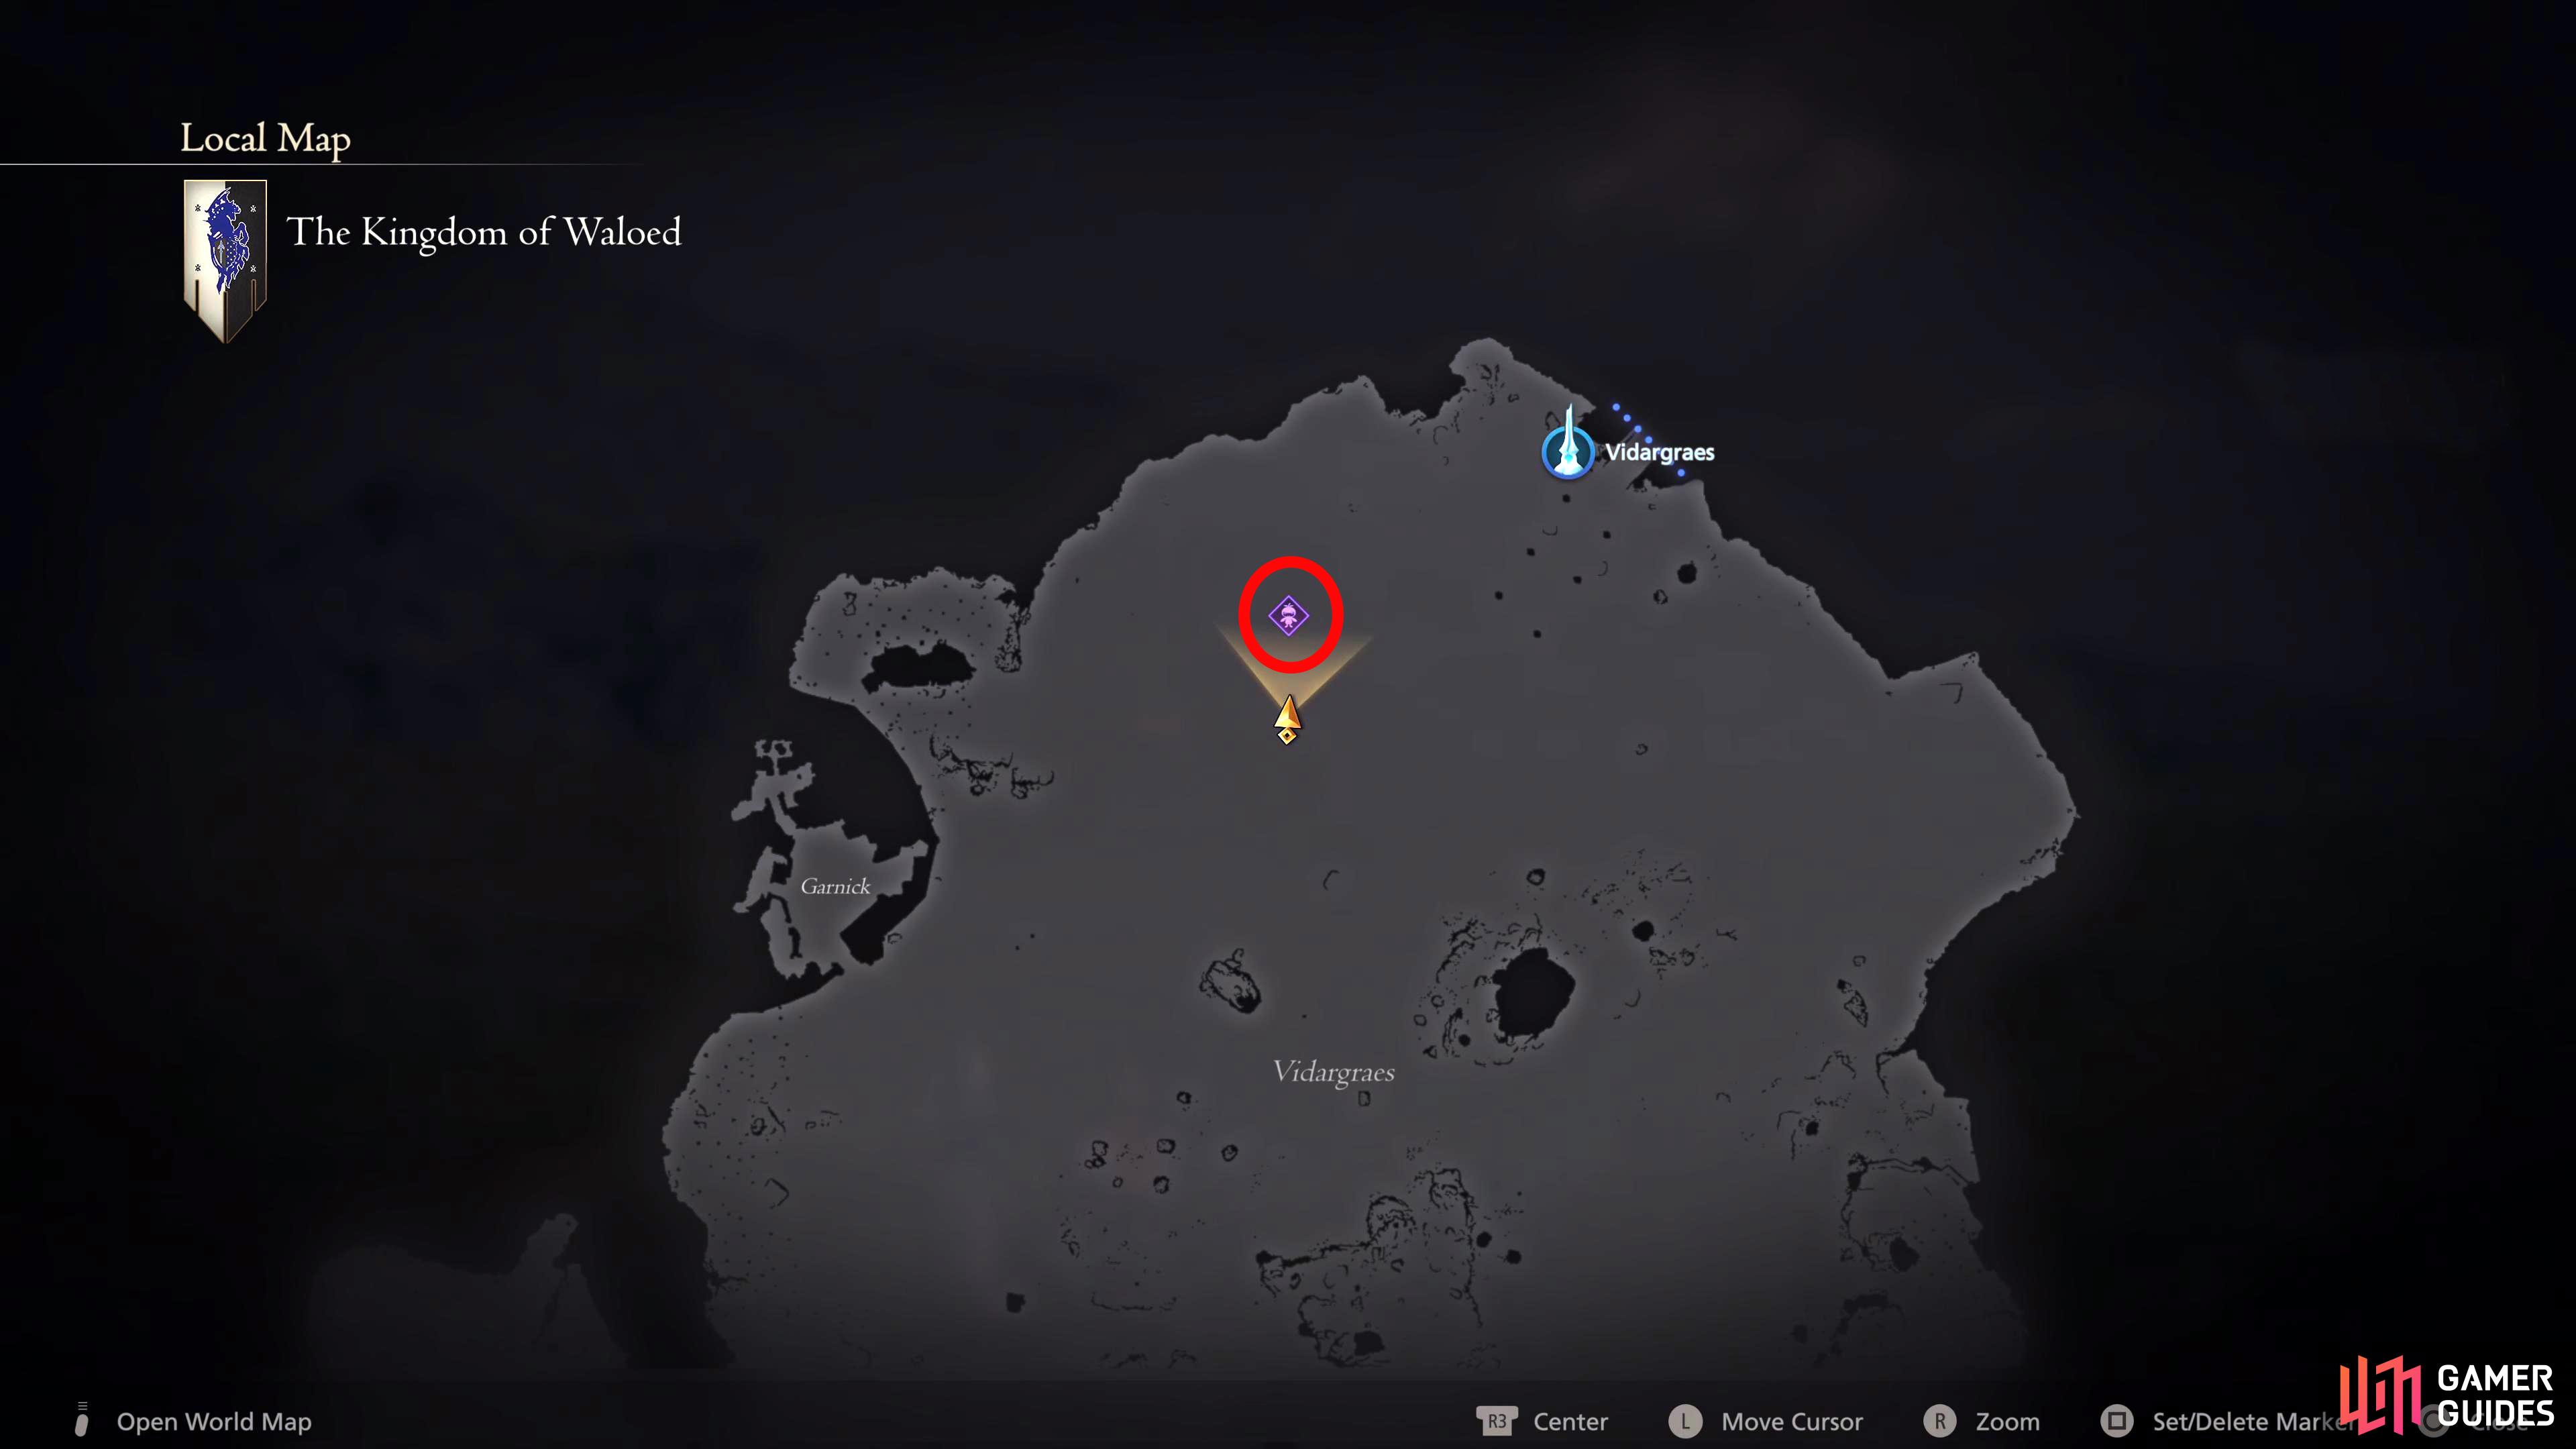
You’ll find the Behemoth King southwest from the Vidargraes obelisk in Waloed.

Approach them to initiate the battle.
Behemoth King, Masterless Marauder Attacks
Below you’ll find all the attacks that the Behemoth King has in its arsenal:
| Attack | Description | Counter |
|---|---|---|
| Arm Swipe | Behemoth will swipe its arm from one side to the other. | This is your simple melee attack which is easily avoided by dodging when the arm meets you. Even if you’re hit by it, it won’t deal much damage. |
| Melee Combo (2-Hit) | Behemoth will raise its arm to perform an elbow drop before immediately spinning around to hit you with its tail | The elbow drop is pretty slow, so use that to get a Precision Dodge where you can use that to avoid the tail altogether or wait to dodge the tail too. |
| Melee Combo (4-Hit) | This is a four-hit attack where Behemoth will raise its arm before swiping it at you twice, then it’ll switch to the other arm to perform an elbow drop before spinning around to attack you with its tail. | If you have Will-o’-the-Wykes up, you can safely ignore this combo. If not, back away from Behemoth until the combo is finished. Every attack can be dodged, but it’s safer to back away. |
| Shoulder Charge | Behemoth will charge at you with a lowered shoulder as if it’s trying to hit you with its shoulder | As with any charge attack, move either side of the charge, or wait until they get close, then hit dodge. |
| Pounce | Behemoth will charge from a distance before pouncing at you with its front claws. | Run to either side to avoid the attack, or wait until the pounce reaches you before dodging. |
| Lightning Storm | Behemoth will charge electricity in its horns before placing numerous blue marks in its immediate vicinity before raining down bolts of lightning. | Move away from the small blue marks scattered on the arena to avoid the bolts. You can stand on them, and dodge at the last second to get a Precision Dodge. |
| Four Horsemen | You won’t see four horsemen, but you will see four meteors crashing down. Behemoth will place four meteor markers in each corner of a small square (NW, SW, NE, SE) before unleashing four meteors at the same time. Each of these meteors will shoot out a shockwave on impact. After the meteors have landed, a few portals above Behemoth will open up firing small comets in your direction. | The worst part of this attack is the shockwaves as the meteors are easy enough to avoid. Either run away from them as quickly as possible and jump any shockwaves coming your way, or stand in the center of all four meteors, and either dodge/jump when the shockwaves fly out. You can ignore the comets for the most part, just make sure you’re not stationary. |
| Maelstrom | Behemoth will briefly lean on its hind legs before slamming down, and creating a large tornado in front of itself. This is almost always followed up with a Lightning Storm. | This attack is more of a deterrence, although it can still damage you. This will stop you from attacking Behemoth from the front for a short while. Head to its rear to continue your onslaught, but be careful when you dodge, so you don’t end up in the tornado. |
| Reign of Fire | What’s worse than four meteors? How about 20ish? Behemoth will retreat back, and numerous meteor markers will appear on the floor. After a short while, it’ll unleash a barrage of meteors that will crash down upon the floor. Behemoth will do this twice. | Fortunately, these don’t have shockwaves. Instead, each meteor will leave behind a pool of molten fire that expands on the floor. Stand in between the meteors while they’re going off, then keep agile while moving away from the molten pools. It may look like you’re about to run out of space to avoid them, but they will dissipate before it gets to that. |
| Apocalypse | This attack combines multiple attacks in one. It will start off with Reign of Fire followed by two, Four Horsemen before unleashing one final giant meteor in the center of the arena. | Reign of Fire and the two Four Horsemen can be avoided the same way you normally would, but for the giant meteor at the end, you’ll need to get out of the large orange circle before it crashes down. The circle can be hard to see at first as it’s not a solid line, but a fragmented line instead. |
(1 of 7) Behemoth has two melee combos, one consisting of two attacks, the other being four attacks.
Recommended Abilities for Behemoth King
Here we will list our recommended ability set up to do this effectively:
| Eikon | Ability | Damage Type |
|---|---|---|
| Damage (5 Stars) | ||
| Will (2 Stars) - Master this and place it as the second Bahamut ability. | ||
| Will (5 Stars) | ||
| Damage (2 Stars), Will (3 Stars) - Master this and place it as the second Shiva ability. | ||
| Damage (1 Star) Will (2 Stars) | ||
| No damage – Use to recover immediately from any ability or action. |
The reason behind the chosen abilities is as follows. Odin’s Zantetsuken when used at level 5 is powerful, to say the least, and can be used quite frequently especially when combined with Dancing Steel which can give you 3–4 levels of Zantetsuken in one attack. Rift Slip allows you to immediately cancel an action should you need to while also allowing you to slow down time briefly when followed up after a combo to give you more time to get Dancing Steel off as it takes a while to execute.
Shiva’s ![]() Cold Snap can Permafrost enemies whenever you perform a successful Precision Dodge which makes her invaluable to have while also having access to Diamond Dust which is the strongest Will-Damage attack in the game. Then we take Lightning Rod from
Cold Snap can Permafrost enemies whenever you perform a successful Precision Dodge which makes her invaluable to have while also having access to Diamond Dust which is the strongest Will-Damage attack in the game. Then we take Lightning Rod from ![]() Ramuh to place in front of Behemoth when it is staggered to amplify any multiple-hit attacks we do.
Ramuh to place in front of Behemoth when it is staggered to amplify any multiple-hit attacks we do.
Finally, we take Bahamut mainly for ![]() Gigaflare which is one of the most powerful attacks in the game. This is fantastic at any time, but especially at the end of a stagger phase when combined with Lightning Rod. You could switch out Bahamut with Titan for added defense with
Gigaflare which is one of the most powerful attacks in the game. This is fantastic at any time, but especially at the end of a stagger phase when combined with Lightning Rod. You could switch out Bahamut with Titan for added defense with ![]() Titanic Block, but Bahamut’s
Titanic Block, but Bahamut’s ![]() Wings of Light can be really strong, especially when you get to level 5 Megaflare just before the stagger phase.
Wings of Light can be really strong, especially when you get to level 5 Megaflare just before the stagger phase.
Recommended Items and Equipment for Behemoth King
Gear
For your Weapon, Belt, and Vambraces, you should have the following:
| Weapon | Belt | Vambraces |
|---|---|---|
If you don’t have what’s listed above, use the highest Attack for Weapon, and the highest Defense and Health for the Belt and Vambraces. Depending on what you choose to spend your ![]() Orichalcum on, you can have
Orichalcum on, you can have ![]() Gotterdammerung at this point, but that will be at the cost of the
Gotterdammerung at this point, but that will be at the cost of the ![]() Ouroboros accessories. The Founder’s Grasp is from the Where There’s a Will side quest which can be completed around the same time as this Hunt.
Ouroboros accessories. The Founder’s Grasp is from the Where There’s a Will side quest which can be completed around the same time as this Hunt.
Accessories
For your Accessories, this is more subjective, so here is what we used:
| Accessory 1 | Accessory 2 | Accessory 3 |
|---|---|---|
| Shiva’s Kiss (Reduces Diamond Dust cooldown by 7.5 seconds) |
Shiva’s Kiss is a reward for completing the Priceless side quest unlocked during the final stretch of the game.
Items
Finally, we have items. This is more of a preference thing, but we chose the following items:
| Shortcut 1 | Shortcut 2 | Shortcut 3 |
|---|---|---|
If you’re careless, Behemoth King can deal a lot of damage in a short amount of time while also having a boatload of attacks to deal said damage, so more healing items are always a good thing. For the other slot, bring along ![]() Stoneskin Tonics to reduce damage by 30%. You could bring
Stoneskin Tonics to reduce damage by 30%. You could bring ![]() Elixirs instead, but it’s not worth the 10,000 Gil per potion. If you’re having a lot of trouble, you could always bring a
Elixirs instead, but it’s not worth the 10,000 Gil per potion. If you’re having a lot of trouble, you could always bring a ![]() Last Elixir.
Last Elixir.
Behemoth King, Masterless Marauder Boss Strategy
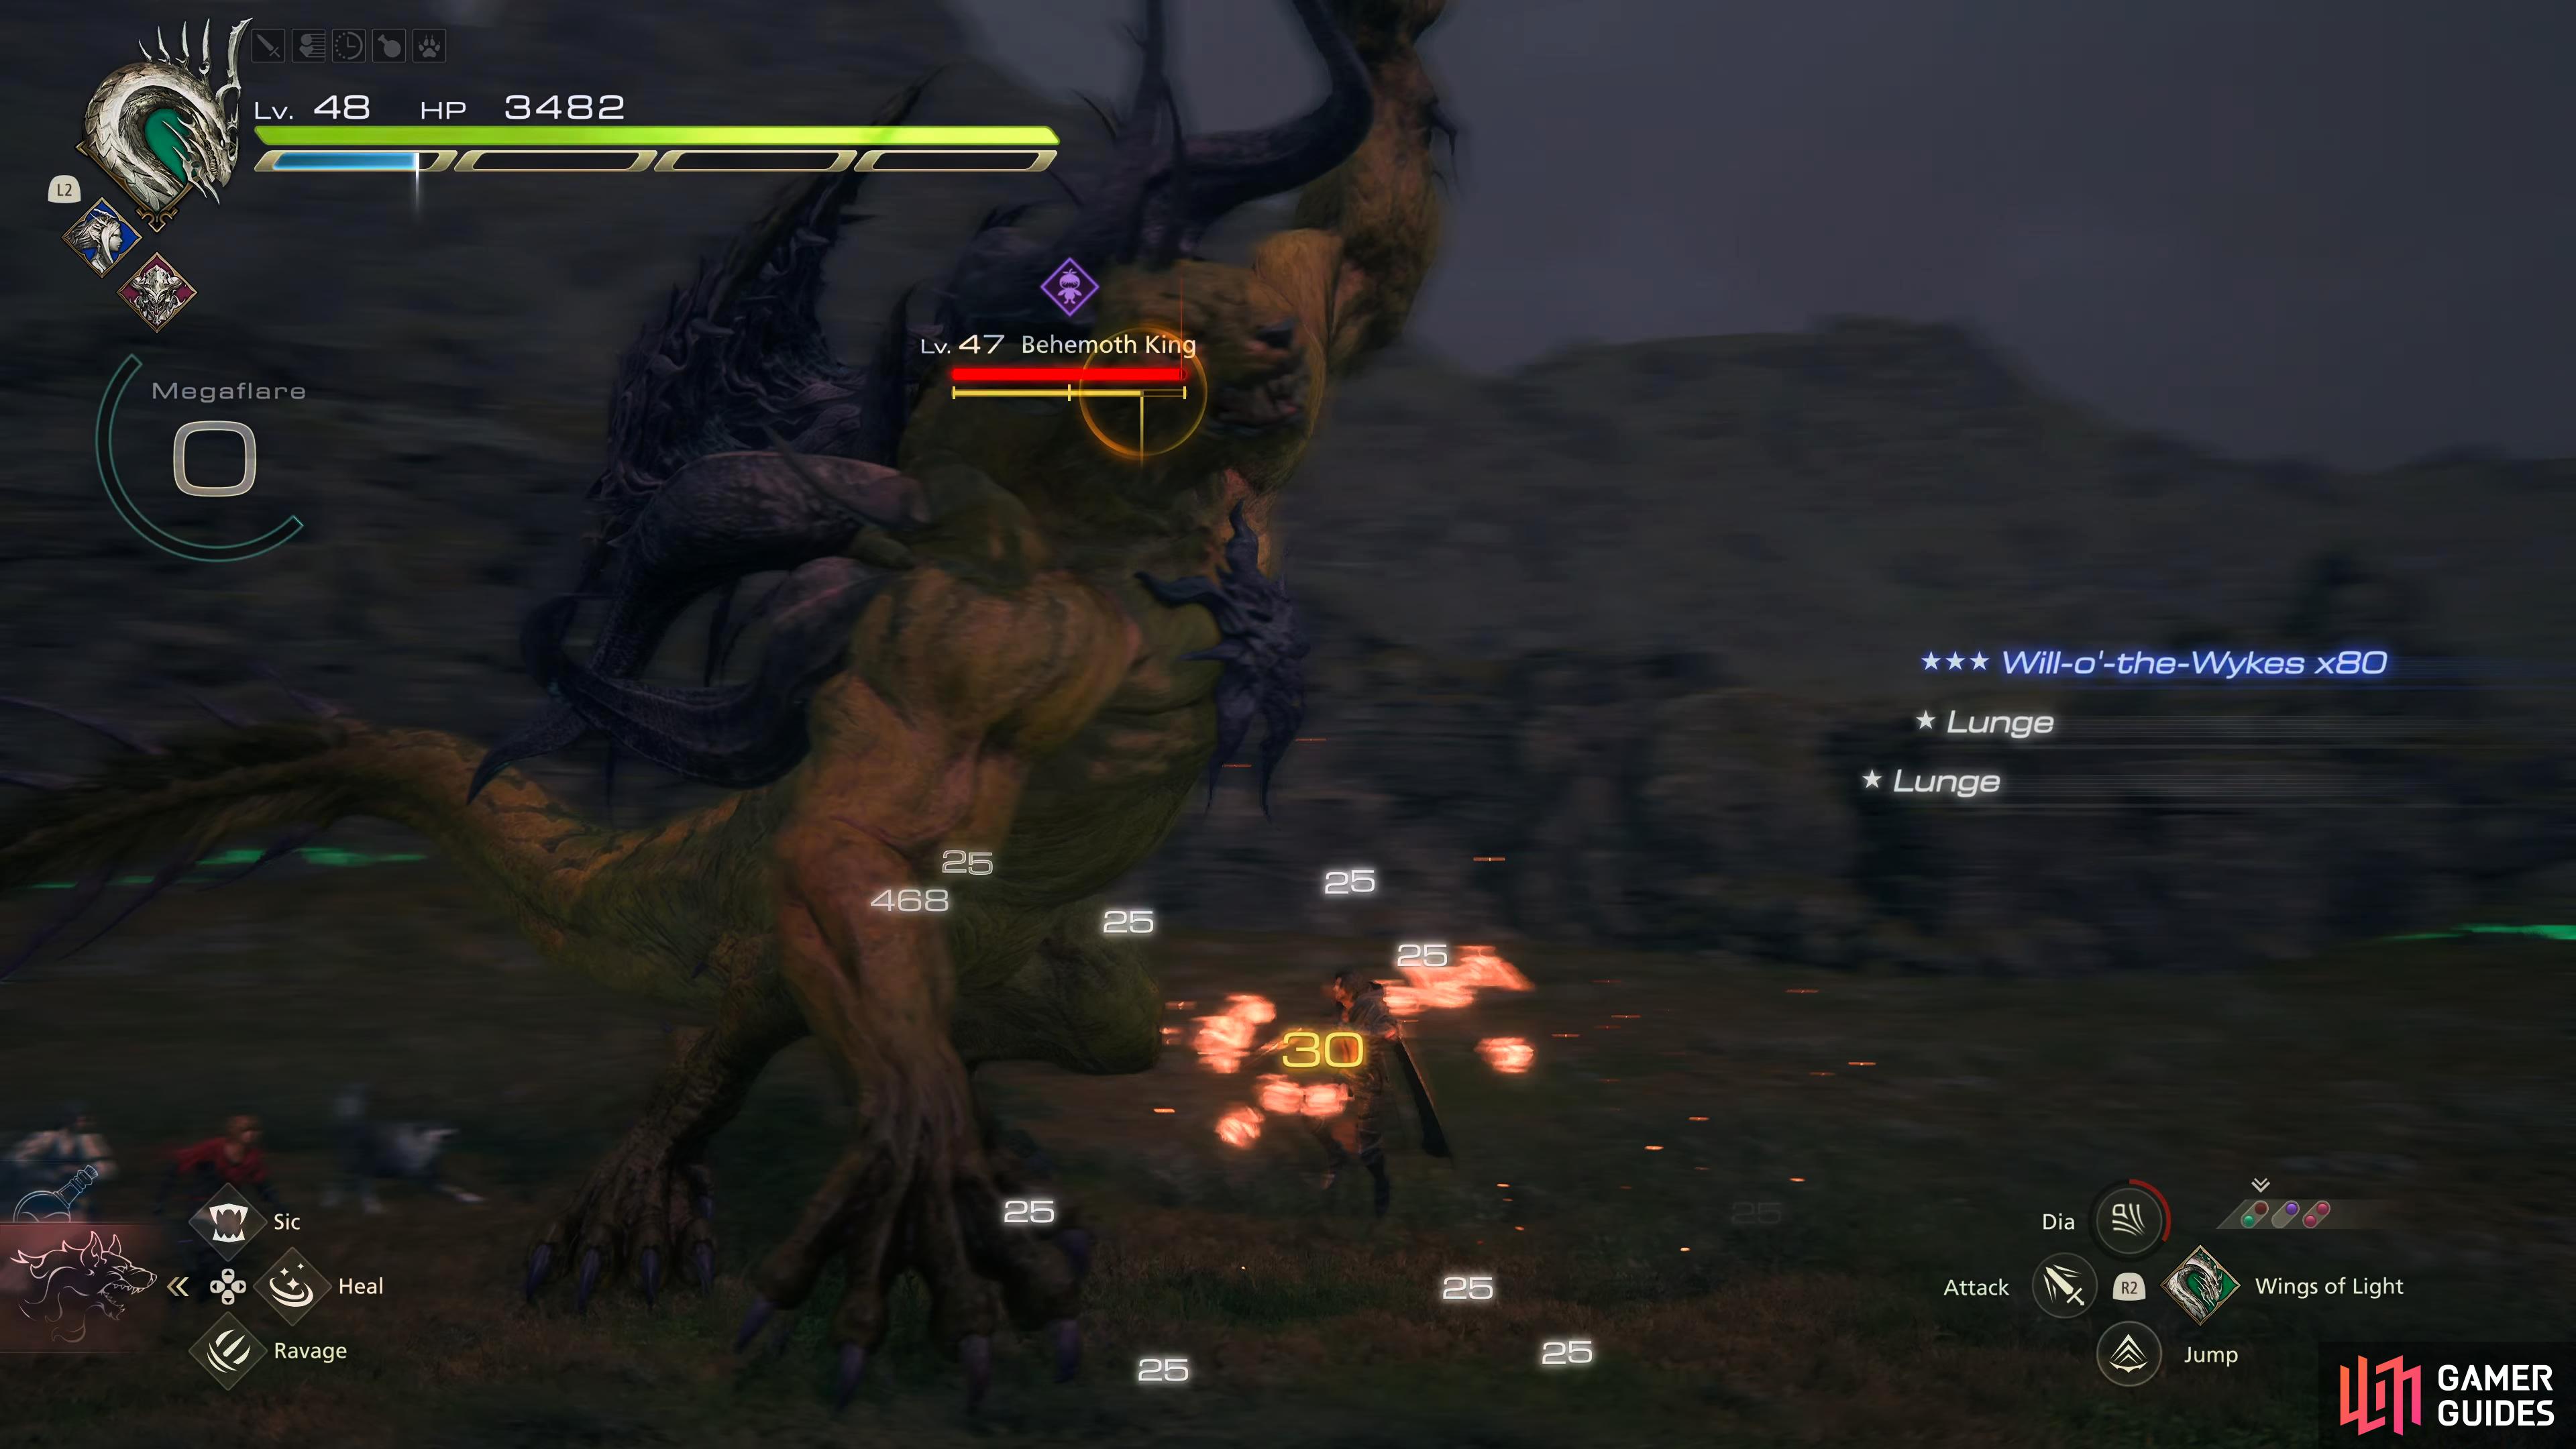
This is a fun battle that looks a lot tougher than it actually is. Although Behemoth’s attacks are flashy and menacing, they are relatively easy to avoid. Most of the damage you’ll take is from its melee attacks, or follow-up attacks as they can catch you off guard. Start the battle by using Will-o’-the-Wykes, and keep it up throughout the battle as this will negate up to four attacks while dealing minor damage.
As stated above, Behemoth’s attacks are easy to avoid on their own, but once it starts chaining them together, it becomes a bit more difficult due to so much happening at the same time, so always be ready to dodge while dealing with a different mechanic. Behemoth tends to use Shoulder Charge or Pounce a lot while you’re managing its other attacks, so keep an eye on Behemoth at all times.
When fighting all bosses/hunts, you’re first call of action is to focus down their Will-Gauge first, and that’s no different here. Well, there is not much better than a Lightning Rod > Diamond Dust combo. Place a Lightning Rod as near to Behemoth as you can, then cast Diamond Dust when Behemoth is near the rod to deplete its Will-Gauge. Two of these at most should be enough to break the gauge and stagger Behemoth. During the stagger phase, use the following combo: Limit Break > Lunge ( +
+  ) > Lightning Rod > Gigaflare > Lv 5 Zantetsuken. After that use any ability of cooldown like Diamond Dust, Dancing Steel, or even some regular combos. To maximize damage, you should be getting Zantetsuken to Lv 5 during the before the stagger phase, so it’s ready to be used during it, and if you can, use a Lv 5 Megaflare from Wings of Light just before you break the Will-Gauge as this will go off during the stagger phase as well, thus increasing your damage.
Keep using Dancing Steel throughout the battle to get to Lv 5 Zantetsuken as quickly as possible and use that whenever you can, although, make sure you save one for the stagger phase. The best way to use Dancing Steel is to go into Arm of Darkness (Odin  ), perform a Lunge attack with and which changes to a multi-hit attack then use Rift Slip at the end of it to slow time before using Dancing Steel. This gives you just enough time to execute the ability without taking damage.

For Behemoth’s attacks, Reign of Fire, Four Horsemen, and Apocalypse are the main attacks to watch out for. Reign of Fire will place approximately 15-20 meteor markers on the ground which will leave behind an ever-expanding puddle of lava behind on each marker. Thankfully, these stop expanding after a certain point, so keep moving away from the molten puddles, maneuvering in between them until the attack is finished. Just when you think you survived it, it happens again! Continue avoiding the puddles, and you’ll be fine.
Four Horsemen on the other hand goes for quality over quantity. This time, Behemoth will only place four markers, but these leave behind a shockwave that is harder to avoid. Each marker will be placed in a corner of an imaginary square, and the idea is to run into the center, and dodge or jump over the shockwaves as they converge, but you can run away from them by getting as far away to one side as possible and jumping just the one/two shockwaves instead.
Apocalypse is Behemoth’s ultimate attack, it will do Reign of Fire, followed immediately by two consecutive Four Horsemen attacks before finishing it off with Extinction, which is a humongous meteor in the center of the arena which slowly crashes to the floor. Below the meteor is a large fragmented orange circle which you will need to get out of immediately, or you will take significant damage if not death.
Other than that, Shoulder Charge and Pounce can cause you some problems as can its melee combos, but good timing and Will-o’-the-Wykes can take care of that. Despite the fact that Behemoth has a lot of deadly attacks, you can deal so much damage at this point, that you can take it out pretty quickly with a couple of stagger phase combos. Once you’ve defeated the Behemoth King, you’ll be rewarded with 20,000 XP, 200 AP, 20,000 Gil, and 55 Renown. On top of that, you’ll get an Orichalcum, and a ![]() Behemoth Shackle from the spoils.
Behemoth Shackle from the spoils.
Masterless Marauder, Behemoth King Location and Attack Video Guide
Check out the video below to better help visualize the battle, and how to counter Behemoth Kings attacks.
More Final Fantasy 16 Hunts
For information on some of the other ![]() Notorious Marks you can take on in Final Fantasy XVI, check out these pages below:
Notorious Marks you can take on in Final Fantasy XVI, check out these pages below:
No Comments