

| Trophy/Achievement Overview | . |
|---|---|
| Missable Trophies/Achievements: | None - You’ll unlock Chapter Select after beating the game, allowing you to replay the game for anything you missed earlier. |
| Online Trophies/Achievements: | None |
| Difficulty Trophies/Achievements: | Game must be completed on Hard difficulty |
| Number of Playthroughs: | 2+ (Easy/Normal difficulty and Hard difficulty, plus some cleanup) |
The trophy list for Final Fantasy VII Remake is structurally quite forgiving: while you can “miss” numerous trophies on your first playthrough (typically for side quests and minigames), after you beat the game once on any difficulty you’ll unlock Chapter Select, which will allow you to replay any chapter in any order at any time on any difficulty to get what you missed previously. Don’t want to fuss with a particular minigame? Skip it! You can always come back via Chapter Select. Miss a weapon? Go back and get it with Chapter Select! Just didn’t feel like grinding everything up? No worries! You’ll earn x3 XP and AP when you repeat chapters via Chapter Select.
Not only do you not have to worry about nuisances on your first playthrough thanks to Chapter Select, it’s actually mandatory to play through the game more than once, as you’ll have to beat the game on Hard difficulty, which in turn is only unlocked after beating the game once on any other difficulty. There’s no real problem with playing on Easy/Classic, as every side quest, minigame and progression trophy can be earned in these modes, but it may leave you somewhat under-prepared for Hard difficulty in terms of gameplay mechanics.
Not only do you have to beat the game twice on various difficulties, but there are some trophies you can earn based on decisions you make throughout a playthrough, typically involving how many side quests you choose to complete in various chapters. You don’t have to play through the entire game again to lock these decisions, but you do need to complete the entire chapter where the decisions are made. For example, various choices made earlier in the game affect certain things in Chapter 9, so if you need to lock a decision from Chapter 3 you’ll need to play through Chapter 3, after which you can skip ahead to Chapter 9. Hence you’ll need to play through every chapter at least twice, and some chapters perhaps as many as three times.
Master of Fate
Earn every other trophy.
Onetime Gig
Complete Chapter 1. Story-related, cannot be missed.
Escape Artist
Complete Chapter 2. Story-related, cannot be missed.
Mercenary Endeavors
Complete Chapter 3. Story-related, cannot be missed.
Night on the Town
Complete Chapter 4. Story-related, cannot be missed.
Plan E
Complete Chapter 5. Story-related, cannot be missed.
Lights Out
Complete Chapter 6. Story-related, cannot be missed.
Trapped like Sewer Rats
Complete Chapter 7. Story-related, cannot be missed.
Reunited
Complete Chapter 8. Story-related, cannot be missed.
Never the Bride
Complete Chapter 9. Story-related, cannot be missed.
Sewer Survivor
Complete Chapter 10. Story-related, cannot be missed.
Paranormal Investigator
Complete Chapter 11. Story-related, cannot be missed.
The Collapse
Complete Chapter 12. Story-related, cannot be missed.
Broken Dreams
Complete Chapter 13. Story-related, cannot be missed.
Picking Up the Pieces
Complete Chapter 14. Story-related, cannot be missed.
The Pizza in the Sky
Complete Chapter 15. Story-related, cannot be missed.
No Appointment Needed
Complete Chapter 16. Story-related, cannot be missed.
Emerging from Chaos
Complete Chapter 17. Story-related, cannot be missed.
Destiny’s Crossroads
Complete Chapter 18. Story-related, cannot be missed.
Warming Up
You’ll earn this trophy after you defeat the two Security Officers at the beginning of Chapter 1. Cannot be missed.
Weakened Resolve
You’ll earn this trophy by hitting an enemy with an element they’re weak to. In Chapter 1, most of your foes (including Security Officers and Guard Dogs are weak to fire (which Cloud possesses) and the Sentry Rays, Sweepers and Scorpion Sentinel are all weak to lightning. We’re going to call this one unmissable as well, as you’re probably not beating certain foes without targeting their elemental weaknesses.
Bonds of Friendship
Some enemy attacks can inflict the “Bound” status, which prevents the character from moving or acting. Defeating an enemy that has a character “Bound” will free them, as will hitting said enemy with a powerful attack like “Braver” or “Omnistrike”. You can get this as early as Chapter 1, as Sweepers have a stomp attack that can inflict “Bound”, but it’s easier to obtain from the Gorgers in Chapter 3. Once Tifa joins your party, just run around Scrap Boulevard until a Gorger hits somebody with “Feast”, a leaping attack that inflict “Bound”. It should be a simple matter to kill the offending Gorger and earn this trophy.
Staggering Start
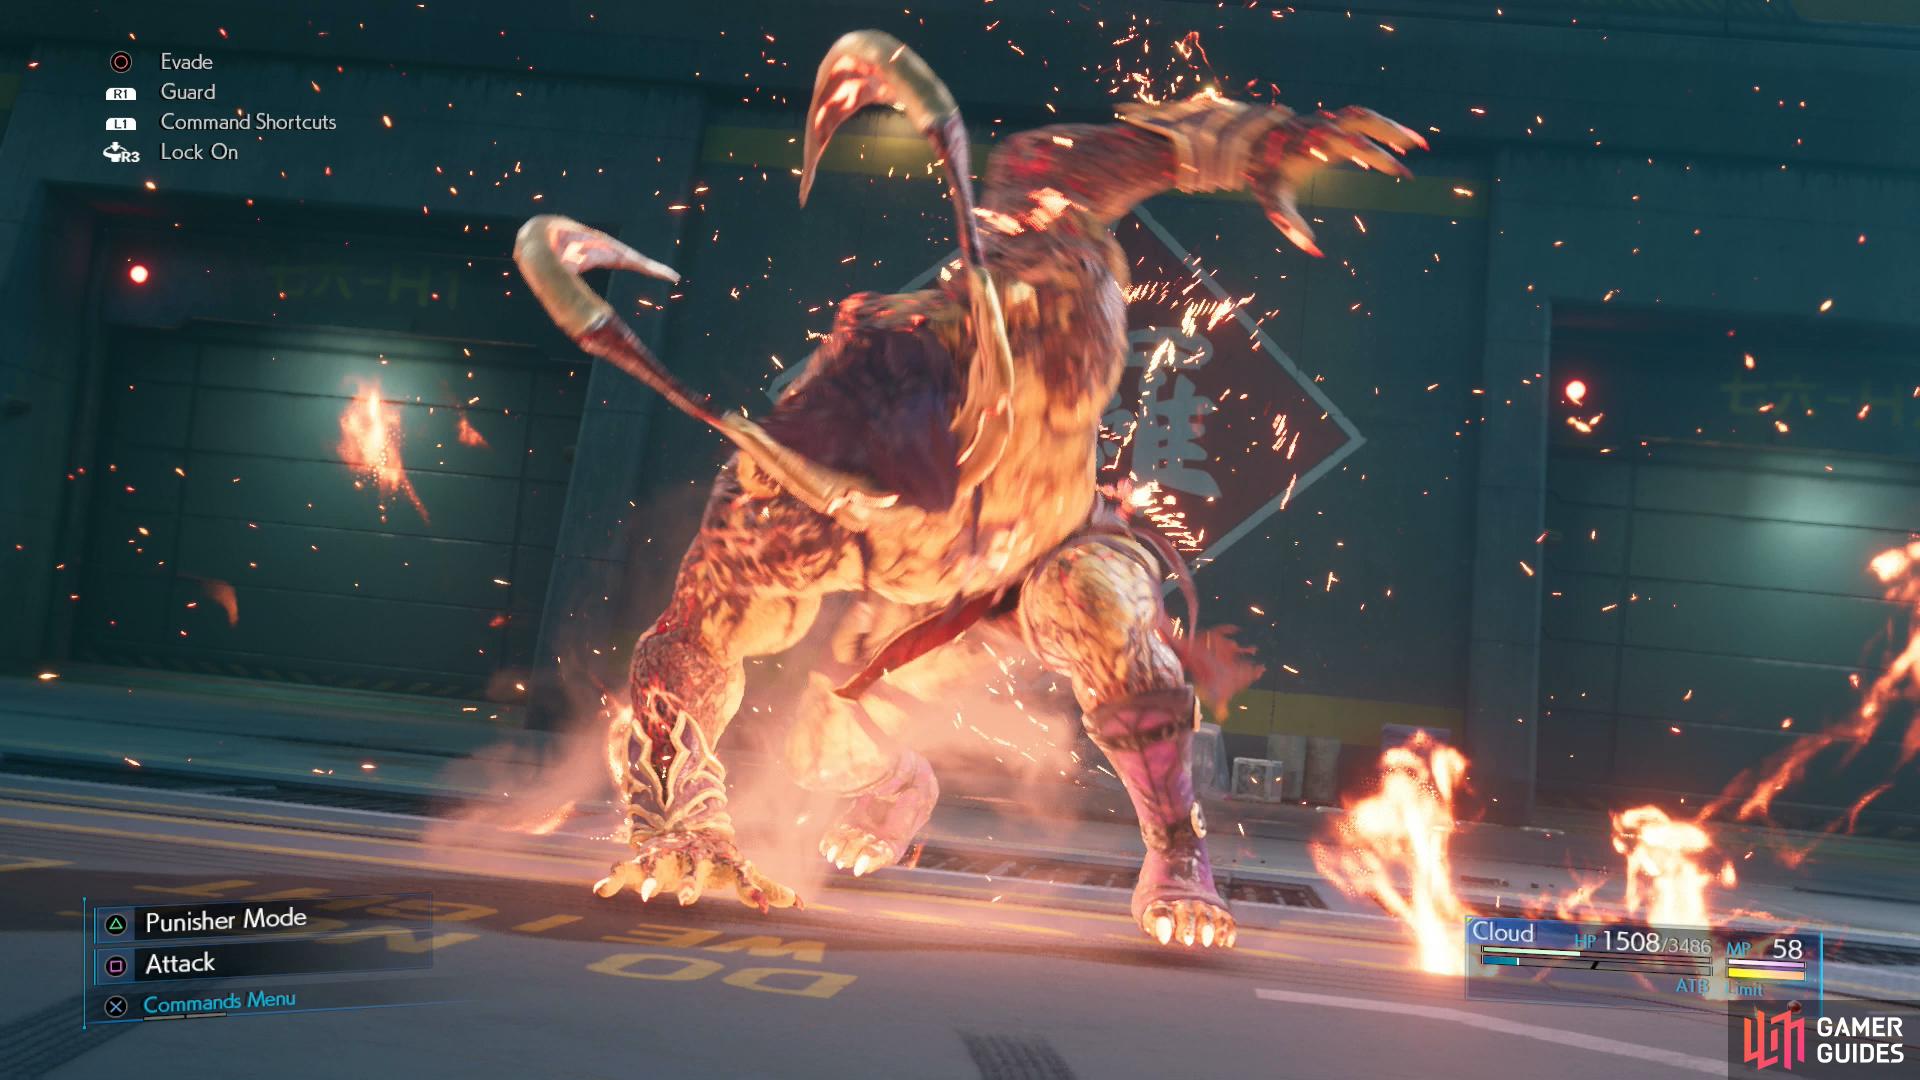
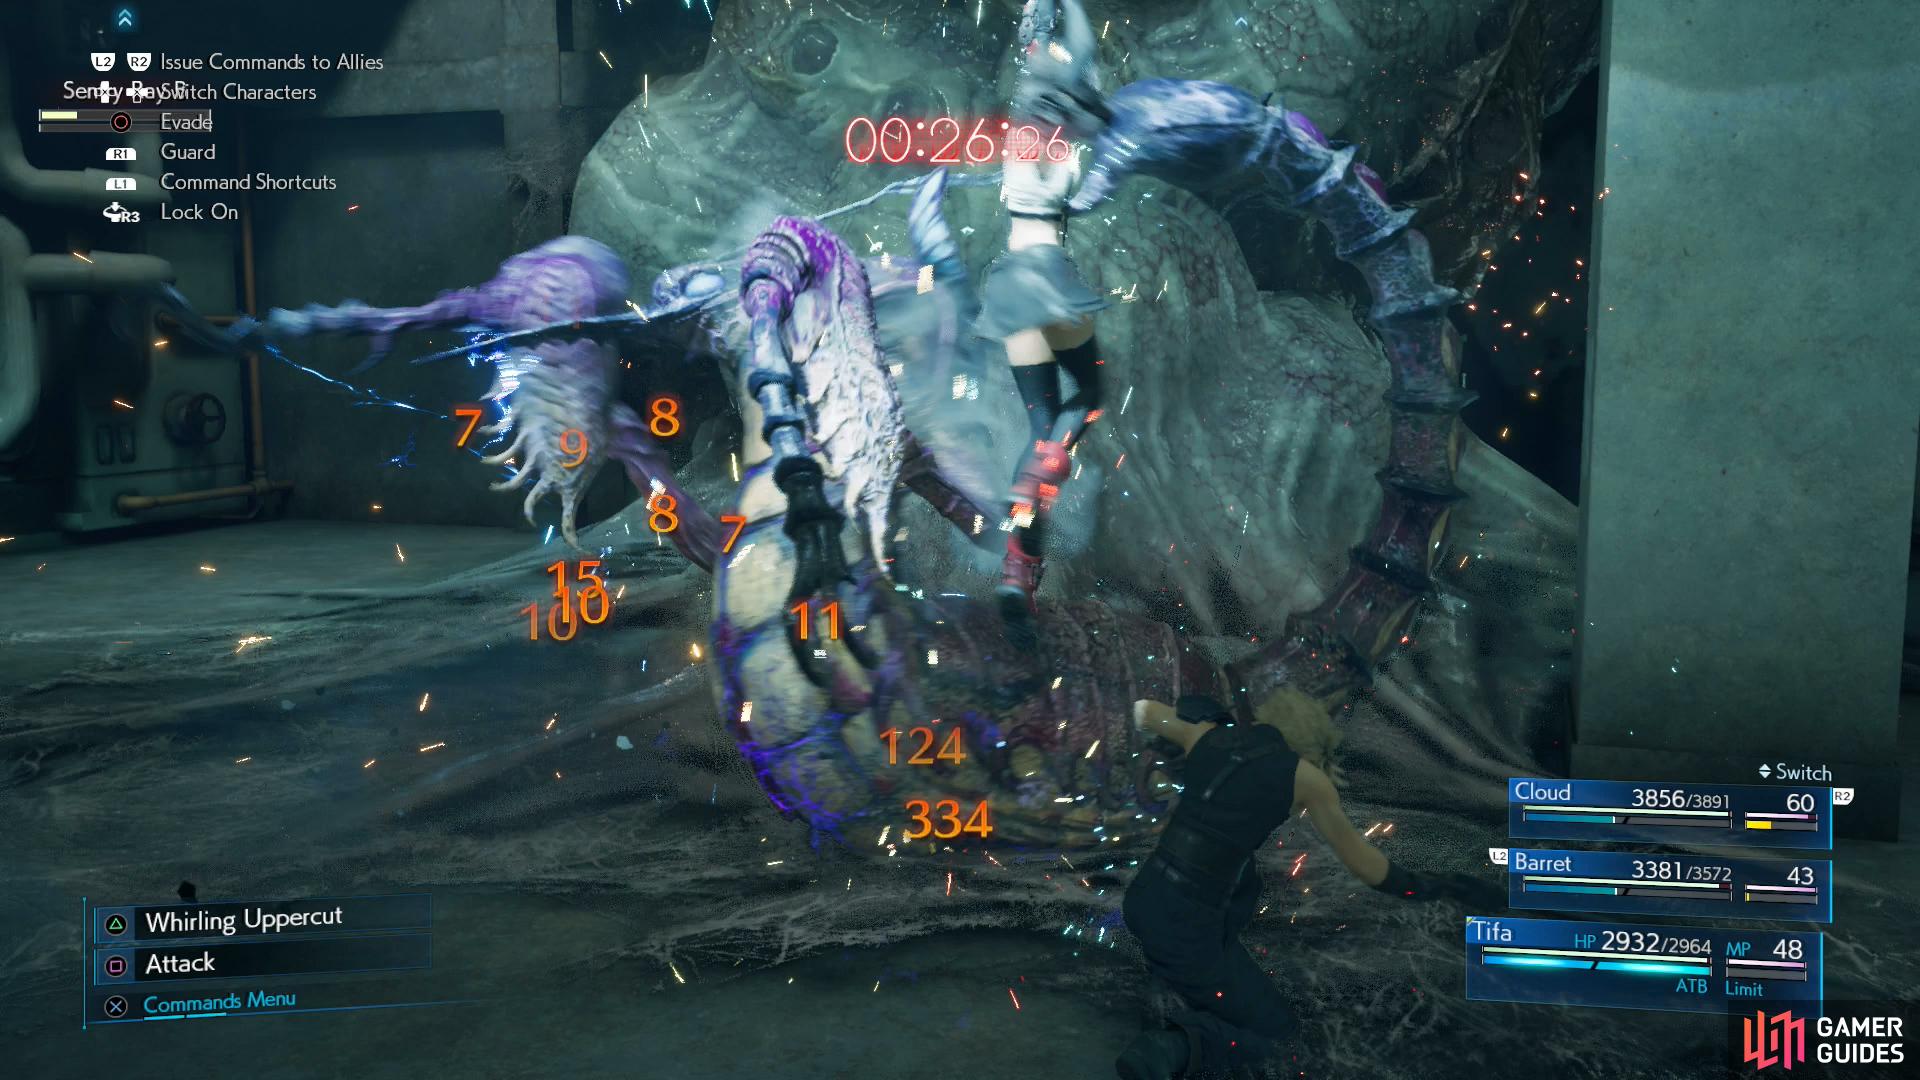
You’ll earn this trophy the first time you Stagger an enemy. When you meet various conditions in battle - usually targeting an enemy’s elemental weakness, dodging certain attacks, counterattacking, or just dealing enough damage - the enemy will become “Pressured”. At this point you’ll be able to increase their Stagger gauge faster than usual, something attacks like “Focused Thrust” and “Focused Strike” excel at. Once you fill an enemy’s Stagger gauge they’ll become Staggered. Using Punisher mode to counterattack Guard Dogs will go a long way towards Staggering them, and if that fails, Sweepers and the Scorpion Sentinel are all likely to be Staggered in Chapter 1. It’s inconceivable that you’ll somehow beat the game without Staggering some enemy at some point.
Music Collector
You’ll earn this trophy when you collect three Music Discs. See Disc Jockey (below) for more information.
Gotta Start Somewhere
After clearing the Scrap Boulevard in Chapter 3, you’ll be told to talk to Wymer and Chadley to pick up your first side quests. Simply complete any one side quest at any point in the game to earn this trophy - the easiest is probably Chadley’s first quest, Chadley’s Report, which requires you to scan two foes. Trivially easy, just equip the provided Assess Materia and use it on any two different enemies (like the Gorgers and Wererats the infest Scrap Boulevard) then return to Chadley to complete this quest, earn a trophy, and start the first few Battle Intel Reports.
My First Ability
Each weapon in the game has an ability you can use while said weapon is equipped. Under certain conditions (usually by using the ability a weapon grants you) you’ll gain proficiency with that weapon, and if you max out your proficiency with a weapon, the character will permanently learn that weapon’s ability, being able to use it even without the weapon equipped. For example, the Iron Blade imparts the “Triple Slash” ability, and you’ll gain proficiency by using “Triple Slash”. Learn any one weapon ability to earn this trophy. Check out Weapons Expert (below) for more details.
Materia for Beginners
When you defeat enemies you’ll earn XP and AP. Gaining XP will level up your characters, while AP will be earned by any equipped materia, potentially leveling it up. There’s no need to fret about AP early on - the first two chapters are fairly linear and you’re limited in what you can do, but in Chapter 3 you’ll be able to explore various locations (like Scrap Boulevard) with constantly respawning enemies. If you want, just run around there and grind for AP to level up an orb of materia and pop this trophy… or just play the game, it’s inconceivable that you won’t level up some materia at some point.
During certain fights the summon meter will start to charge.
Once full, you can call an equipped summon.
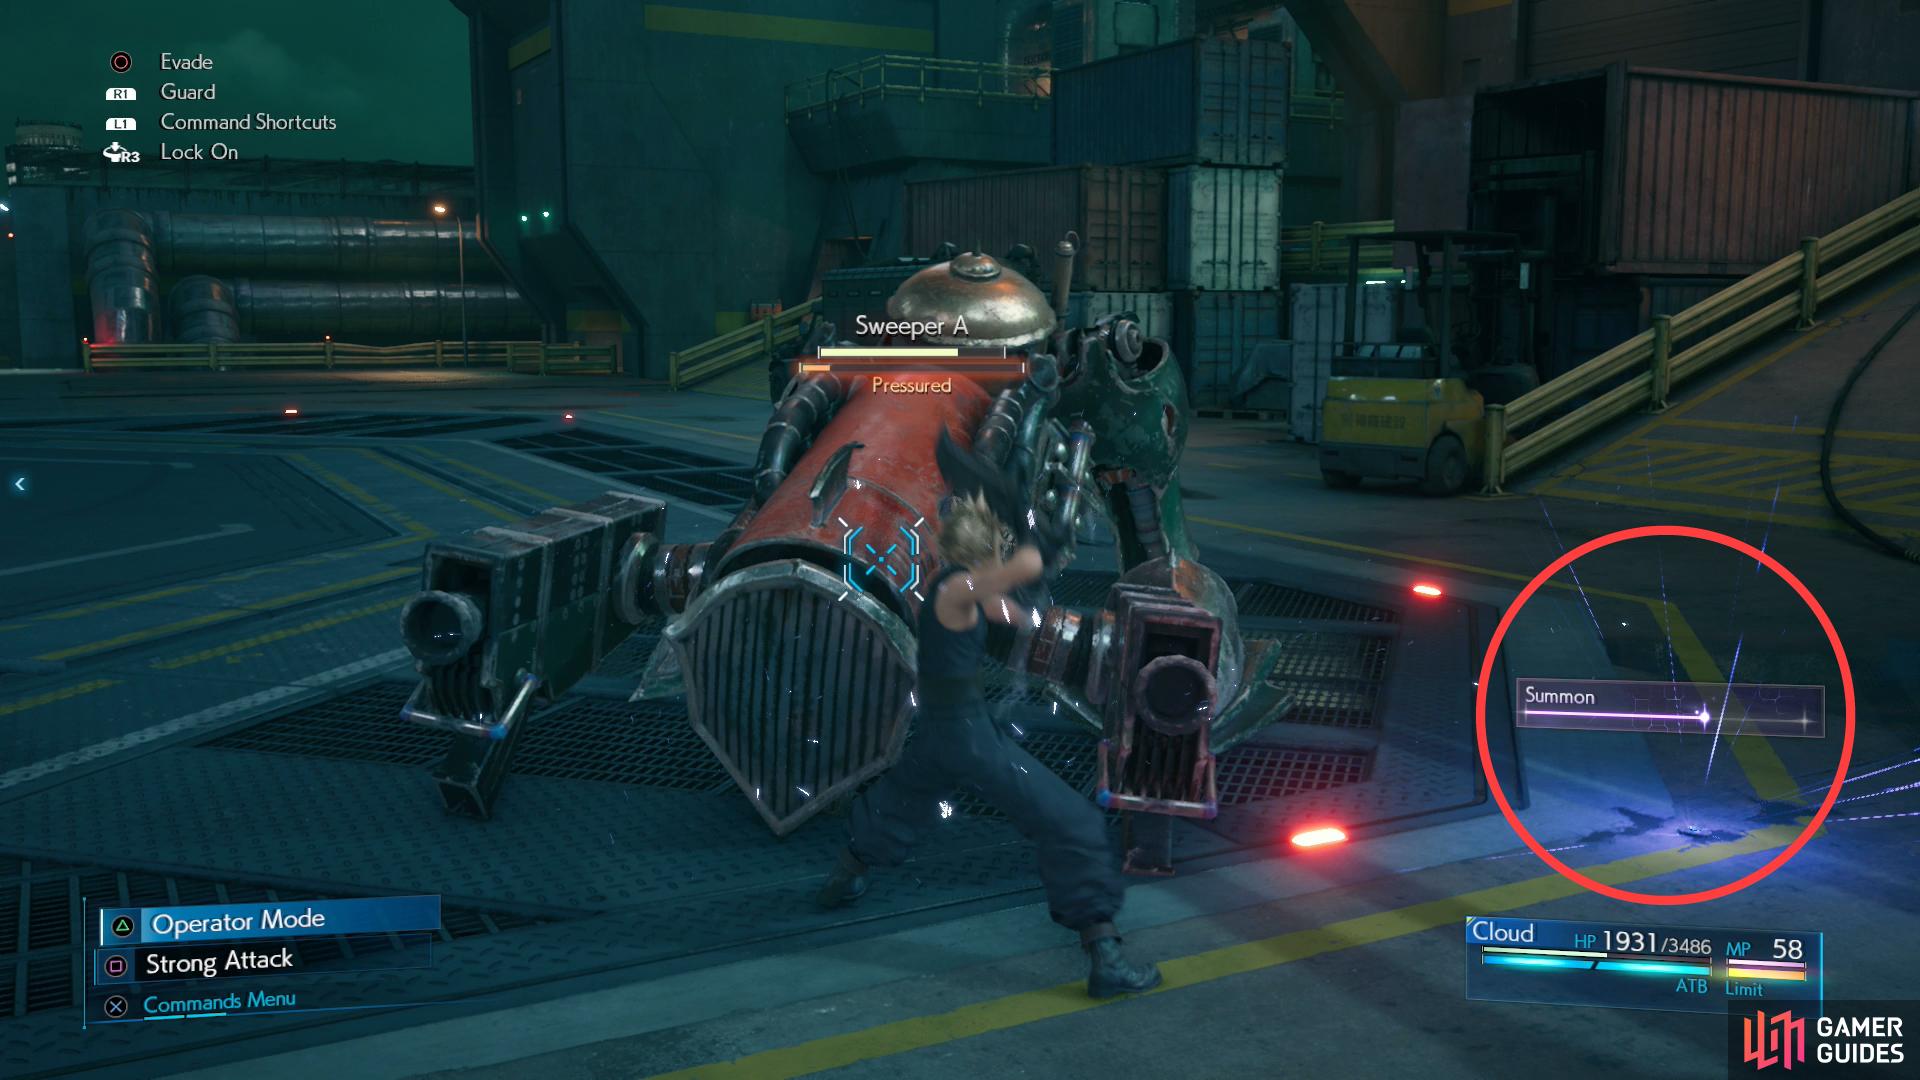
My First Summon
Invoke a summon at any point in the game to earn this trophy. When you can do this can vary - if you obtained some of the preorder summons (say, Cactuar), you could potentially use this as early as the fight with The Huntsman at the end of Chapter 2. Normally, however, you’ll be given an orb of Ifrit Materia at the end of Chapter 3. Equip it, and in Chapter 4 during the fight with the waves of enemies in the Sector 7-6 Annex your Summon gauge should start filling. Just summon Ifrit when it’s full to earn this trophy.
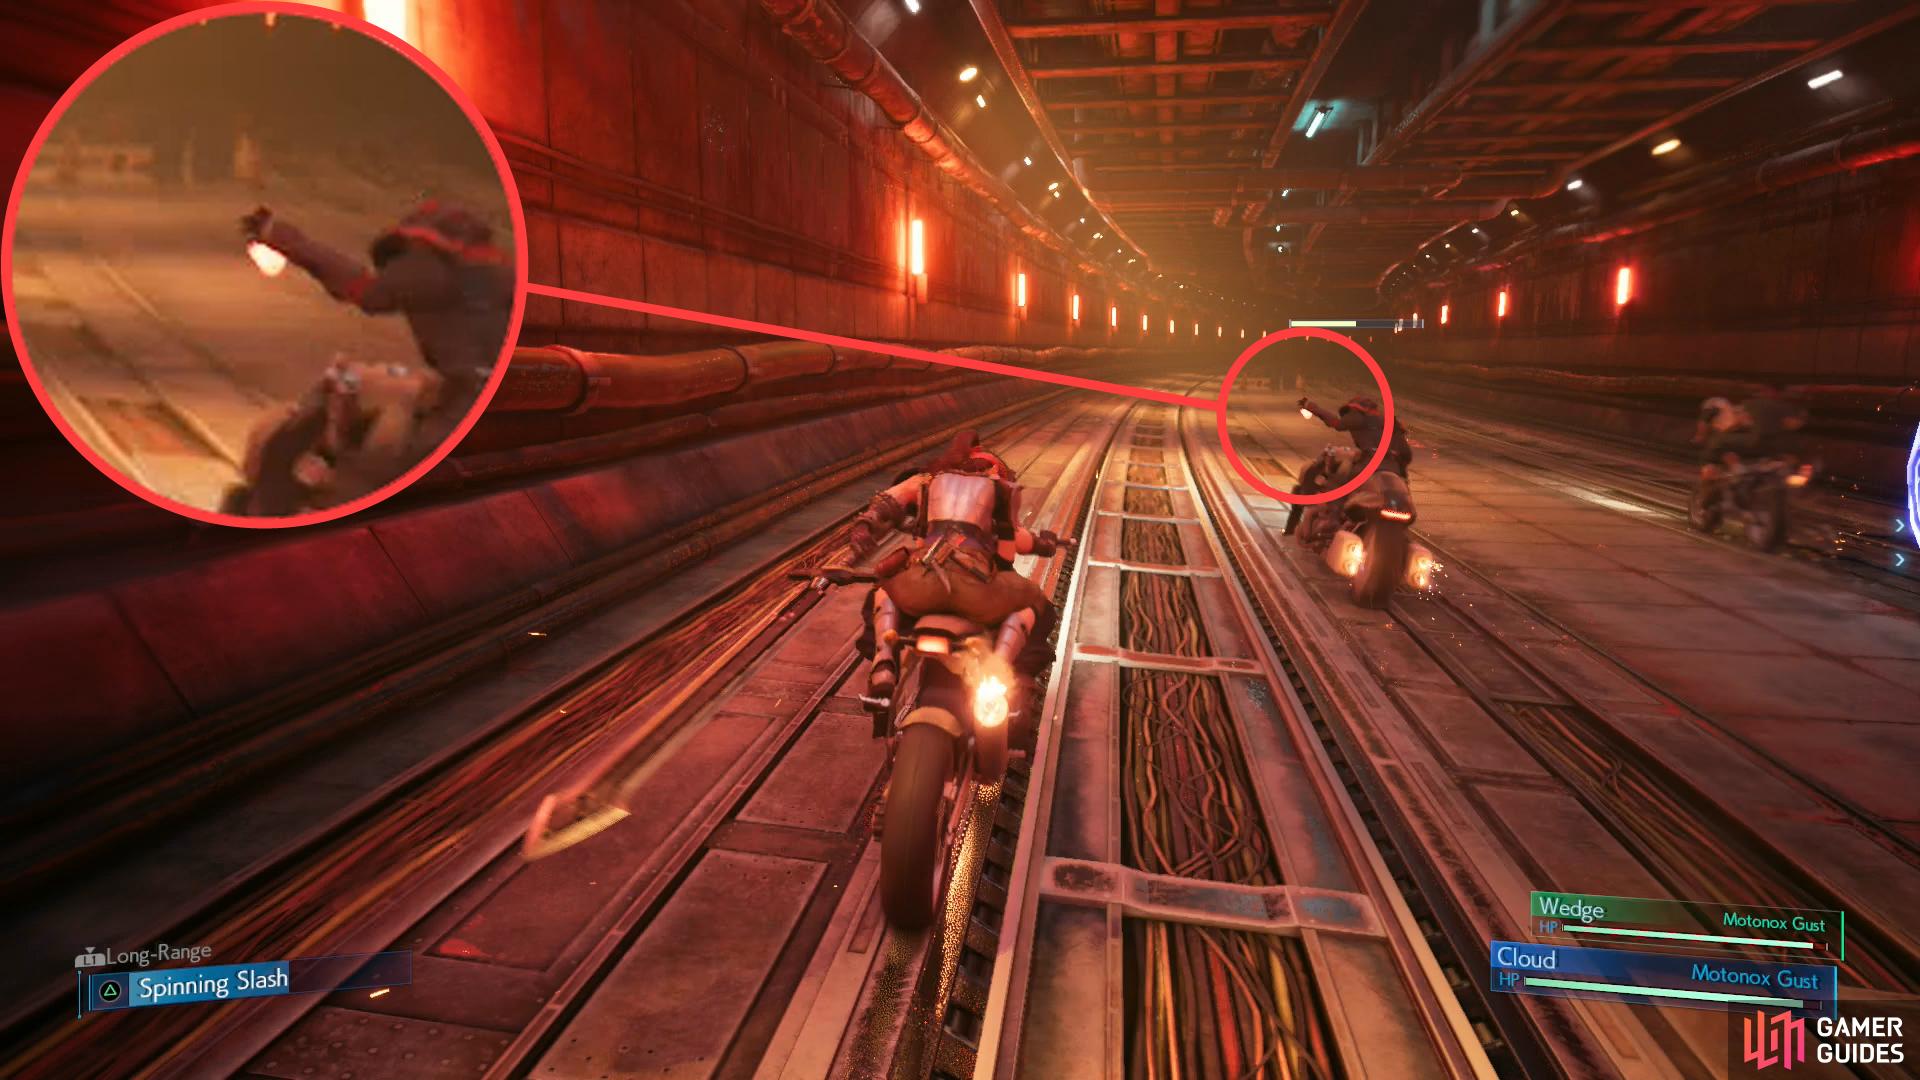
(1 of 3) Be wary of the direction Mobile Units Officers will hold their firebombs, as that’s the direction they’re limited to throwing them.
Biker Boy
At the start of Chapter 4 you’ll have to complete a motorcycle minigame segment. To earn Jessie’s affection - and this trophy - you’ll need to demonstrate your skill by clearing the segment without taking too much damage. At the bottom right of the screen you’ll see the life bar for your bike - as long as your life bar is roughly around the “N” in the word “Motonox Gust” (around 75% full) you’ll succeed. You cannot use retries to continue from checkpoints - you need to make the run all in one go. Fortunately with a little practice this isn’t too bad, just be sure to use your “Spinning Slash” attack ([Triangle]) whenever you can, watch out for the explosives thrown by Mobile Unit Officers and most importantly, play on Easy difficulty, and you’ll be fine.
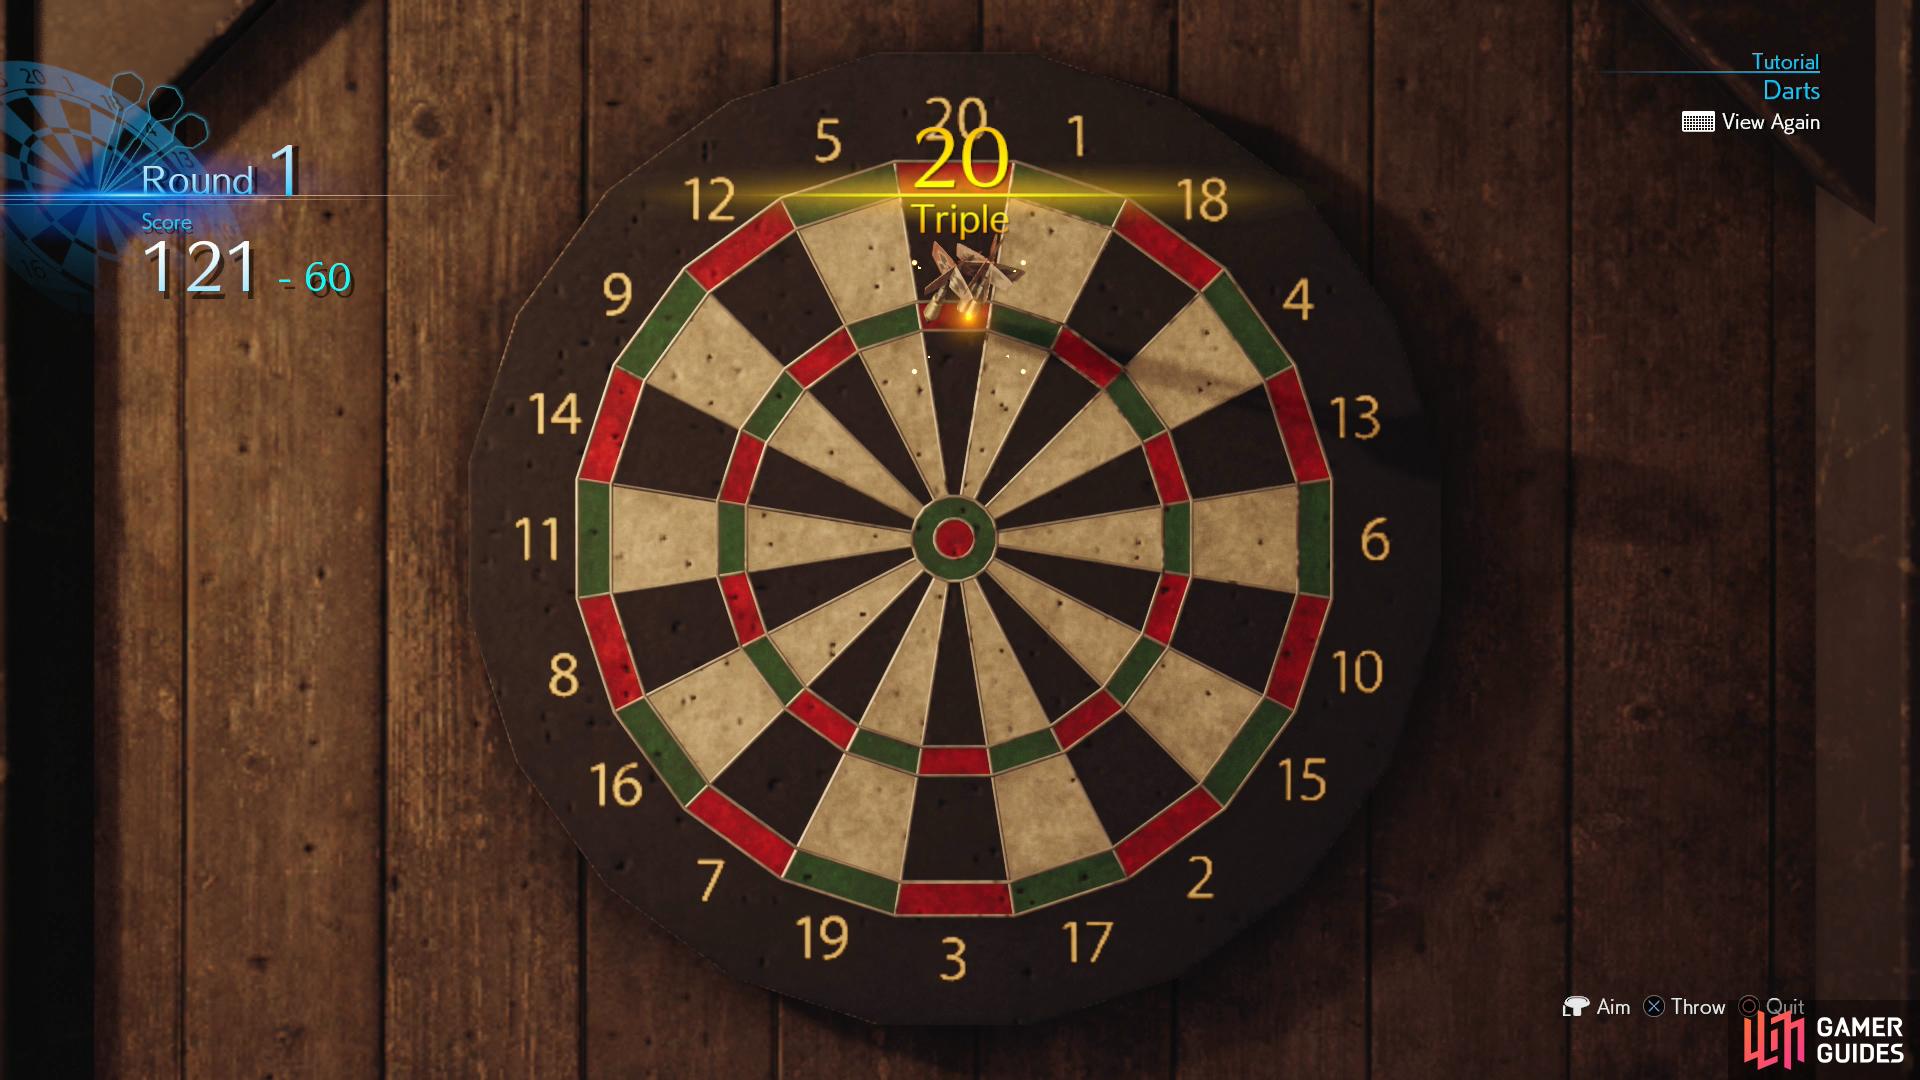
Your goal is to knock away as many points as possible with as few throws as possible - landing four darts in the 20x3 zone will do much to secure the score you need
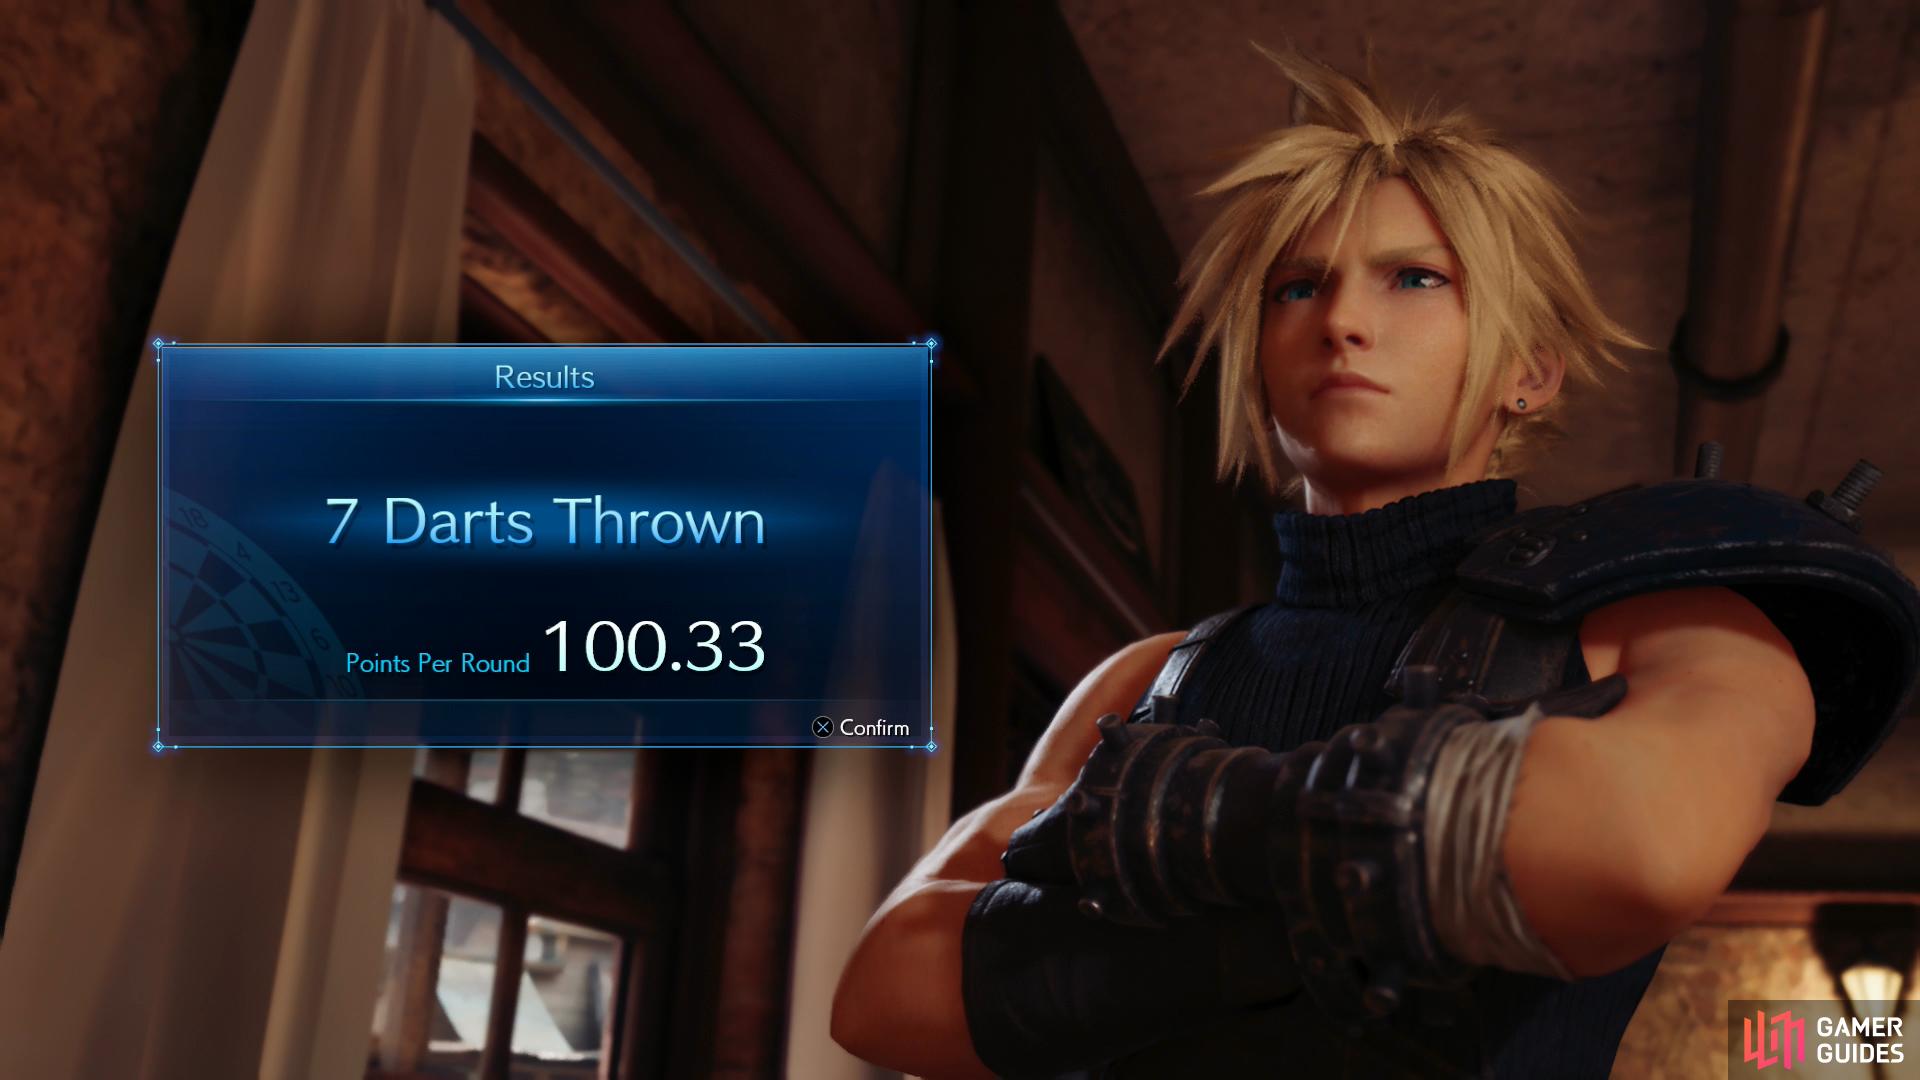
keep practicing until you manage to knock off 301 points in seven darts or less, you’ll earn the trophy “Heavenly Dart Player”
Heavenly Dart Player
After you rescue Johnny in Chapter 3, return to Seventh Heaven and you’ll be able to play darts. To earn this trophy you’ll need to beat Wedge’s high score of eight darts - so score 301 points in darts using seven darts or fewer. There’s not much margin for error here, as the absolute best you can do is six darts. Set the controller down and use your thumb and index finger to more accurately control the reticle, aim for either the bullseye (50 points) or the 20x3 target (60 points), wait for the reticle to shrink to refine your aim and try to knock off points. If you mess up, you can exit and try again as much as you wish. Score exactly 301 points in seven or fewer dart throws and you’ll earn this trophy, not to mention an orb of Luck Up Materia from Wedge later on. Check out the dedicated Darts page for more details.
Cleanup Crew
In Chapter 6, turn off all the Sun Lamps, then travel back to where the cargo lift is - the “H01” platform. Use a smaller lift (not the cargo lift) to travel west, climb into a room and activate a console to the west to turn off the fans and activate a timer. You’ll need to head into the nearby room, kill a Queen Grashtrike and two Sentry Rays before time expires, then activate another console to complete the maintenance routine and open the way to get behind the fans. If you fail, don’t fret - return to the room to the south and activate the terminal there to get another minute, and this time around you’ll have to defeat three Grashtrikes. However you manage it, you’ll be able to grab the Chocobo & Moogle Materia from behind the fan, earning the Cleanup Crew trophy in the process.
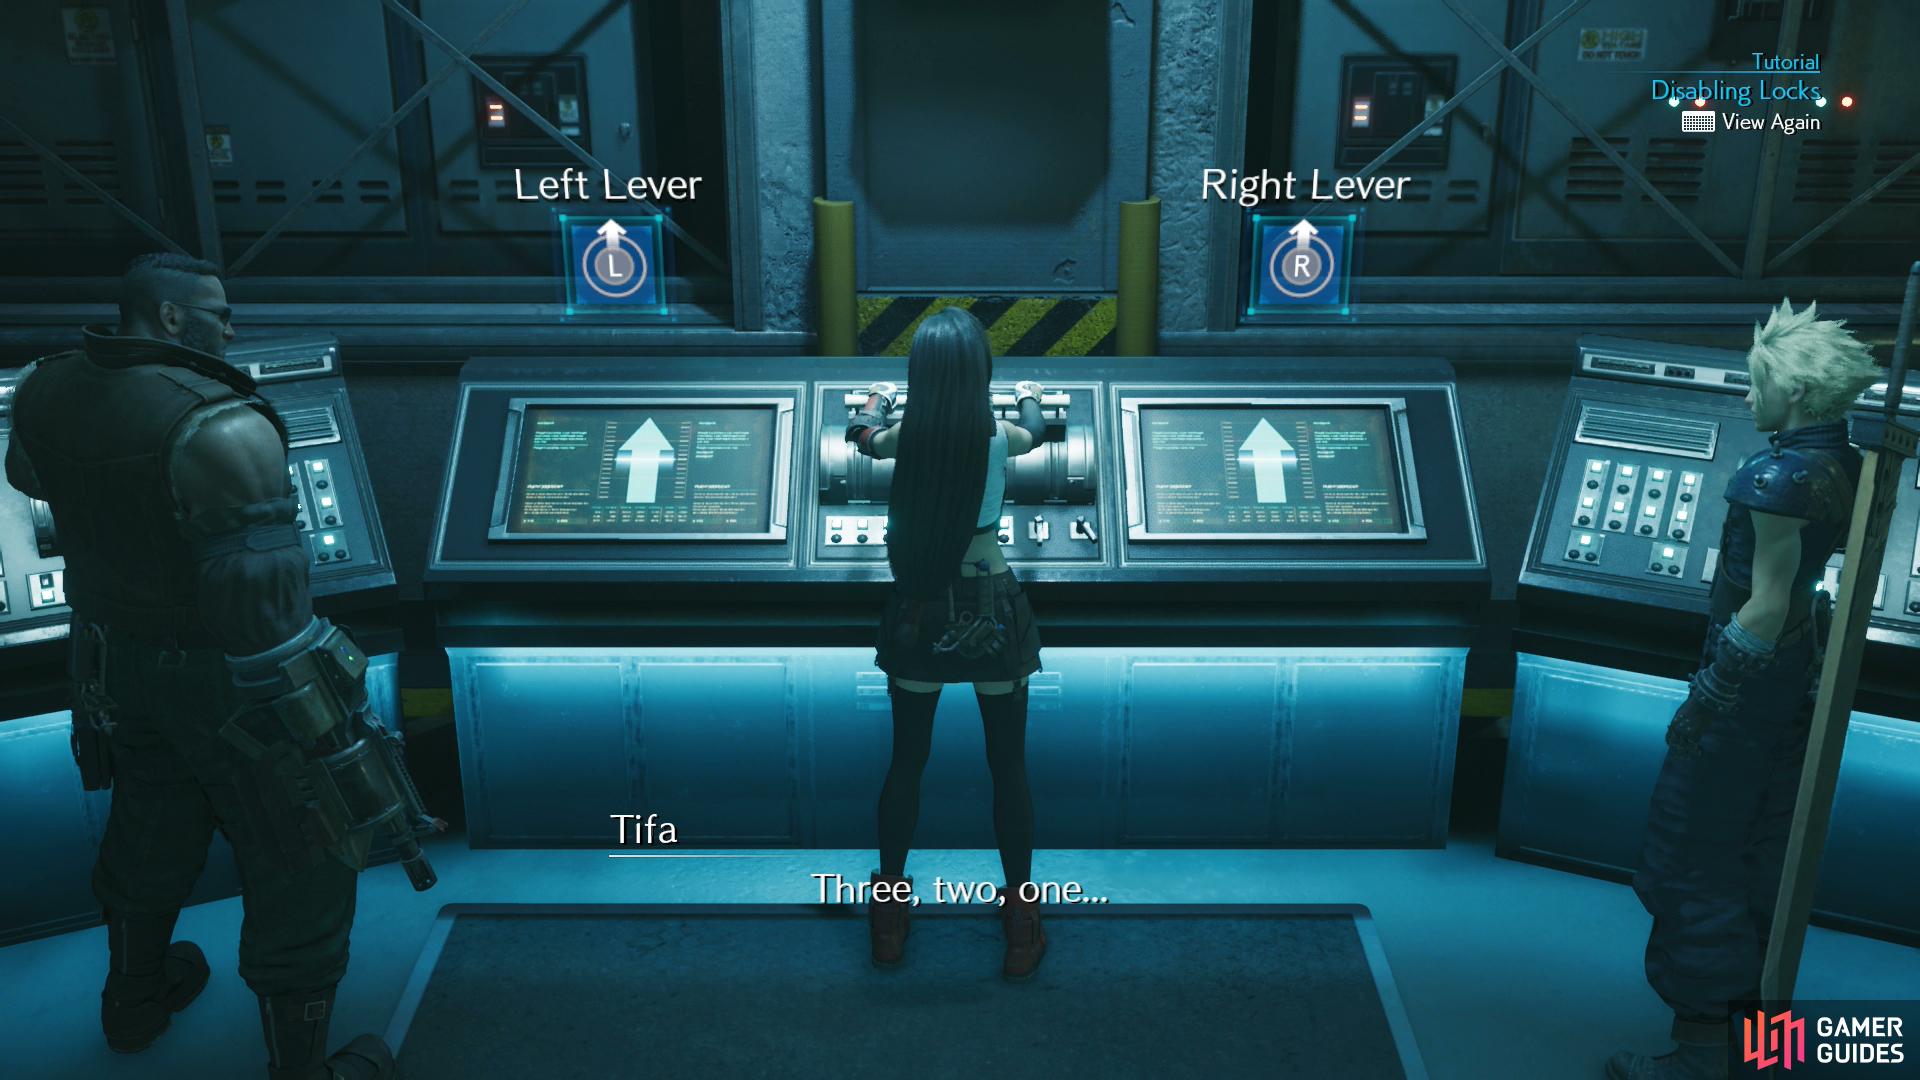
Pull some levers synchronously to open the way forward - and perhaps to some treasure.
In Lockstep
Near the end of Chapter 7 you’ll find a door you have to bypass by synchronously pulling levers. Once such pull is enough to allow you to continue on, but if you want access to the vault (and this trophy) you’ll need to do this several times. Tifa will count down (and automatically pull) the levers she’s standing in front of, leaving you to move the analog sticks up or down (as indicated on-screen) to cause Barret and Cloud to move their levers in the right direction and in time with Tifa. There’s no penalty for failure, so you don’t really need to be competent here, just persistent. We had more luck putting the controller down on a table to move the analogs, as the game seems pretty picky about the direction as much as the timing. Manage to get into the vault and you’ll get this trophy, not to mention some Magic Up Materia and other goodies depending on choices you made earlier in the chapter.
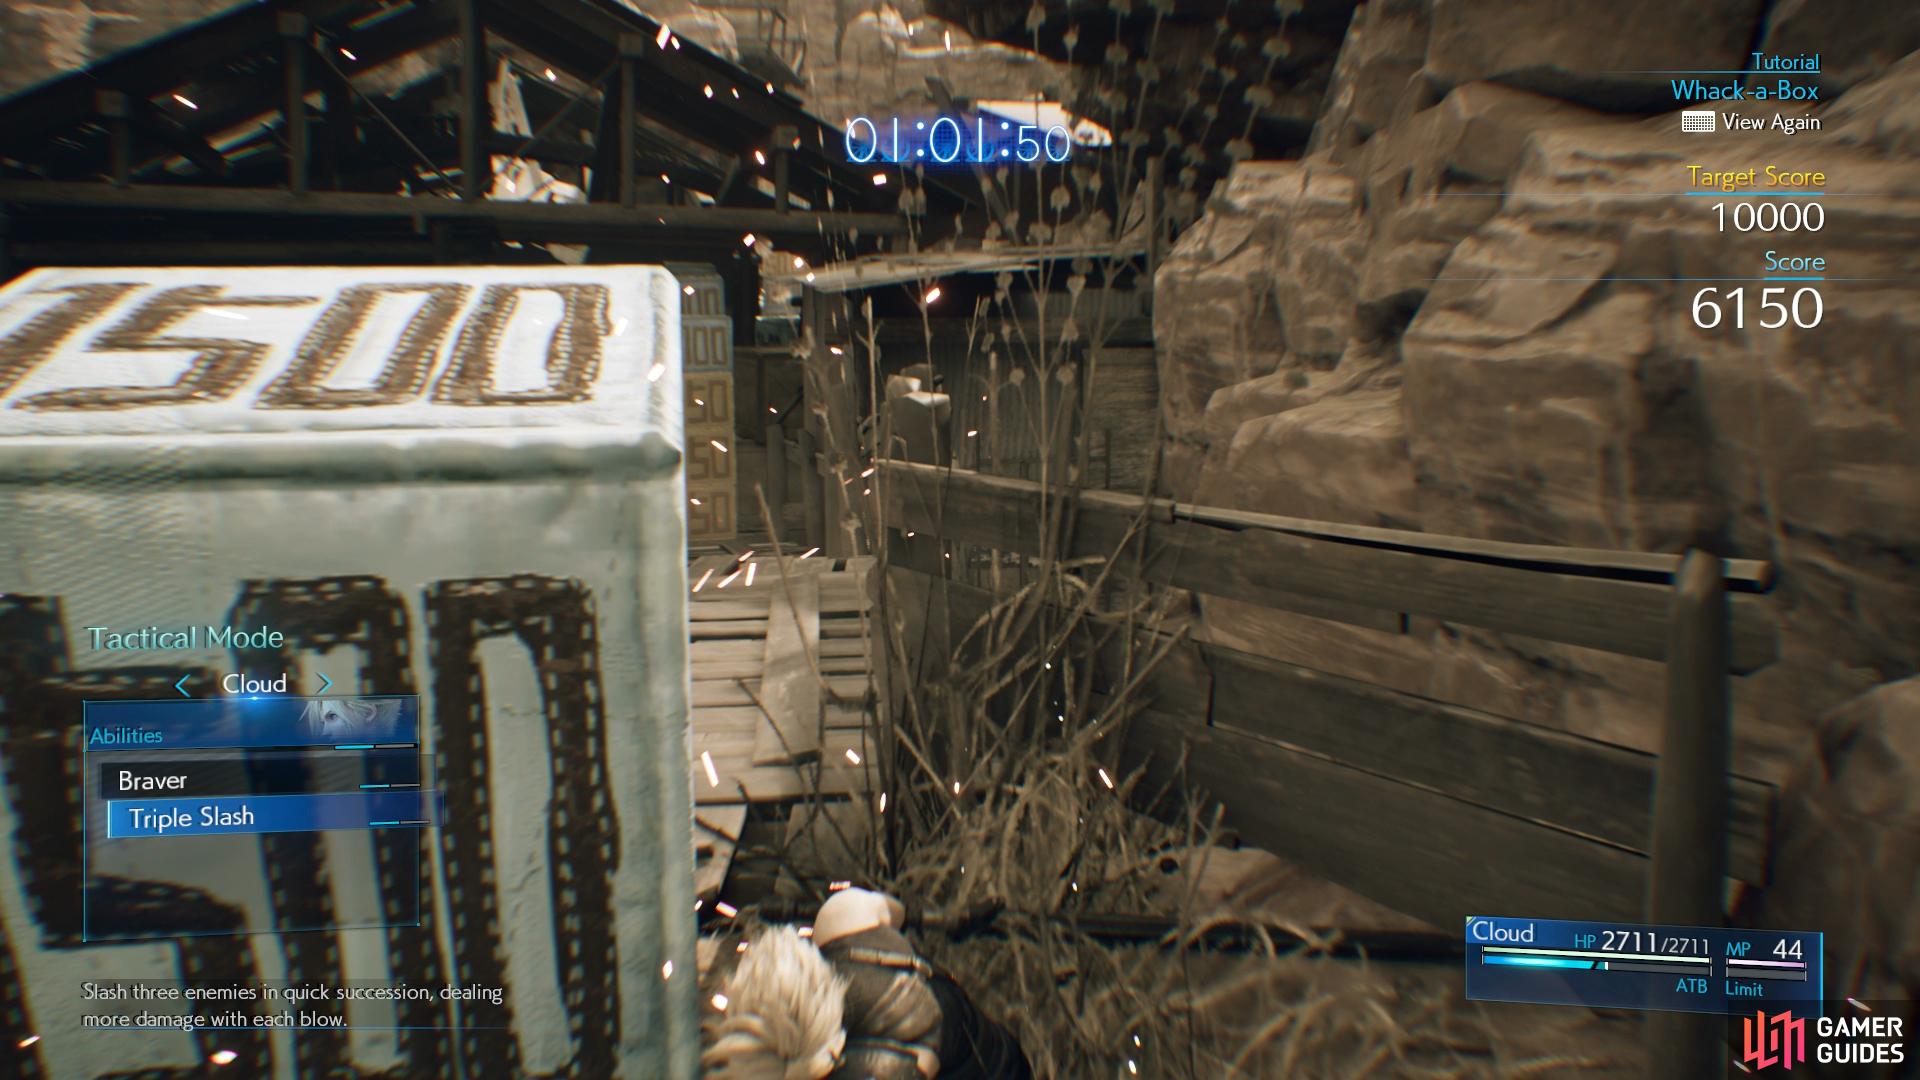
Make use of the Iron Blade’s Triple Slash
focus on hitting all of the Time Boxes first.
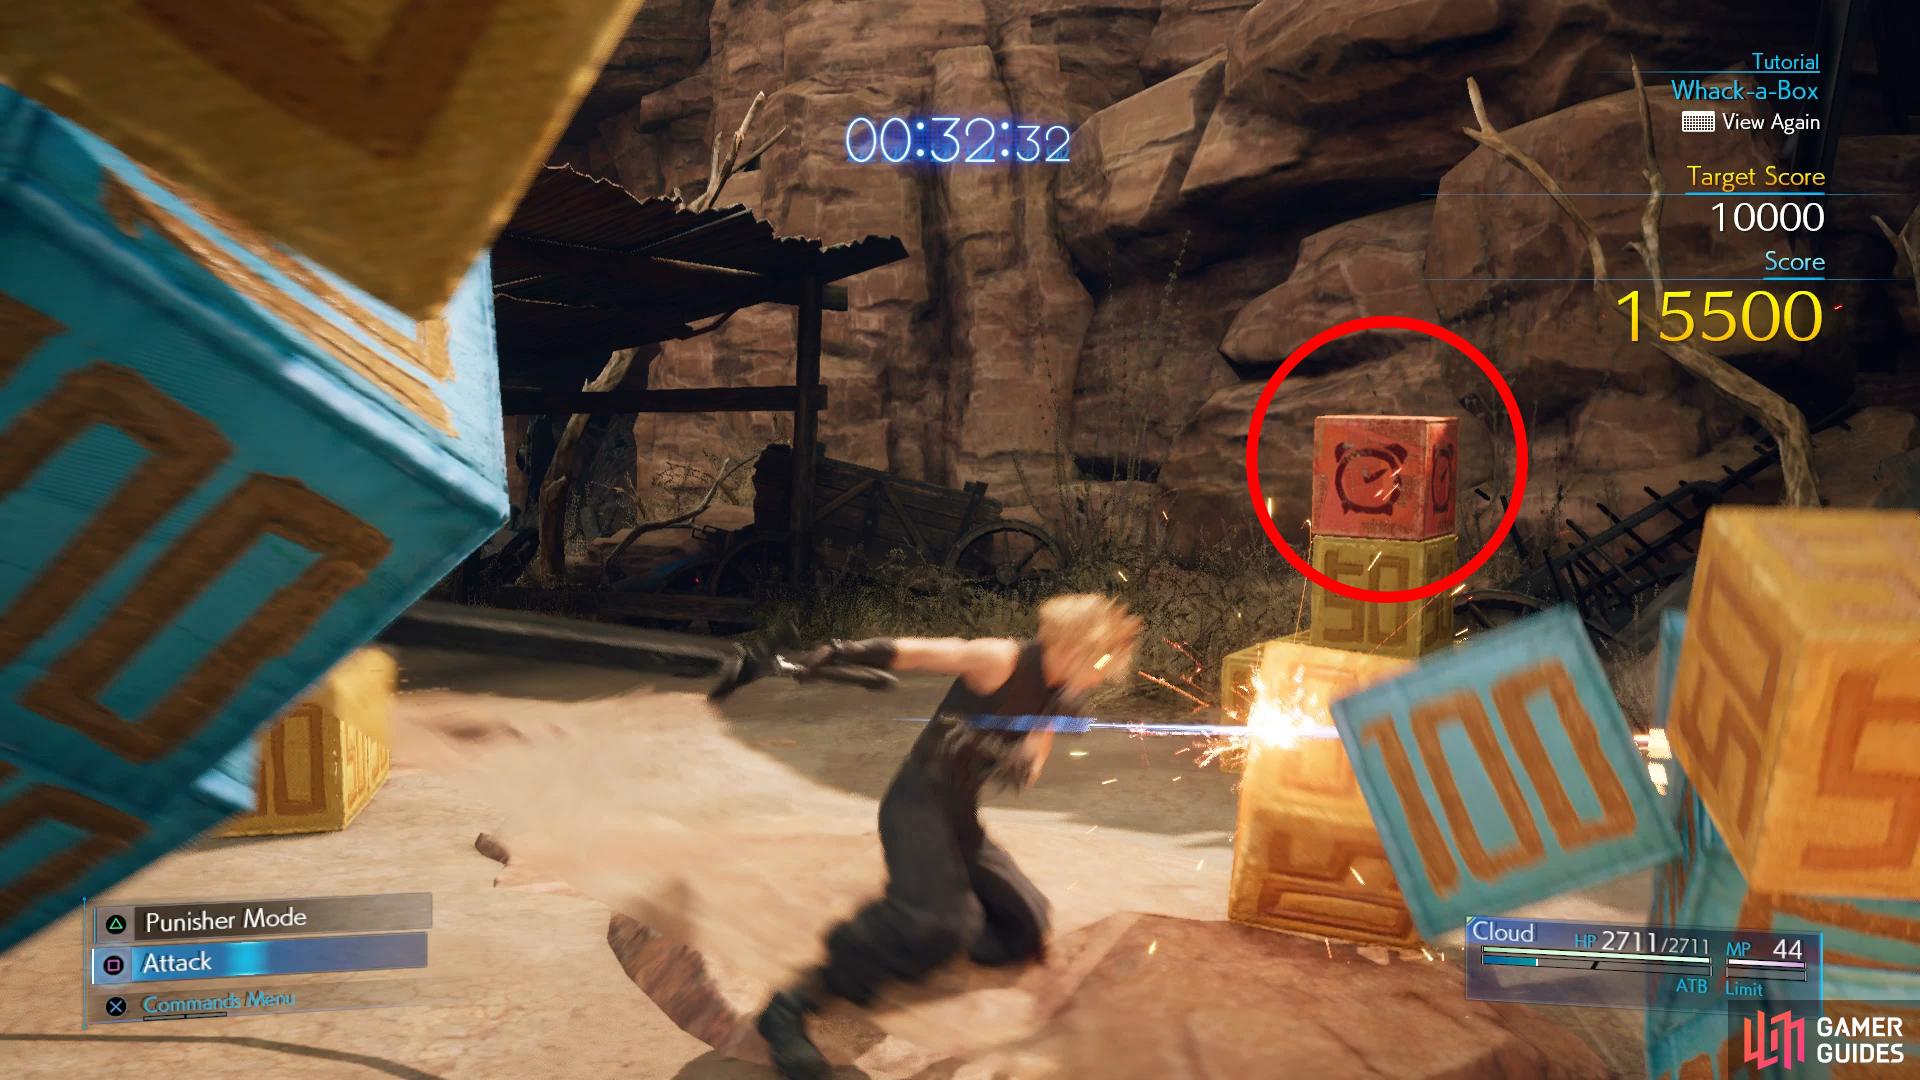
Crate Annihilator
After you return to the Sector 5 Slums from Aerith’s House during Chapter 8 (after picking flowers) you’ll have to rescue some kids. Do so and you’ll be able to start some side quests. Complete Kids on Patrol to unlock A Verified Hero, the object of which is to compete in their newly-devised “Whack-a-Box” game, the goal of which is to destroy a variety of boxes as quickly as possible. The boxes you’ll find stacked about have different point values, and your goal is to score as many points as possible within the time limit.
With a little practice, it should be easy to hit the 30,000 point mark - your goal for this trophy. Equip the Iron Blade and use “Triple Slash” every time you have the ATB to do so. Aim for the Time Boxes to extend your time, and focus on stacks of smaller boxes, as they’ll ultimately get you more points faster than the large boxes will, which are rather sturdy. Check out the page for Whack-a-Box for more details.
Say It with Flowers
After reaching Aerith’s house in Chapter 8 she’ll force you to pick three types of flowers. Pick whatever you want three times (even if you pick the same flower multiple times) and take the flowers to Leaf House. Advance the story (and optionally complete some side quests) and when you’re heading back to Aerith’s house you’ll be shown what has been made with the flowers you picked. The arrangement varies based on the flowers you selected earlier, but for this trophy the outcome doesn’t matter. Cannot be missed.
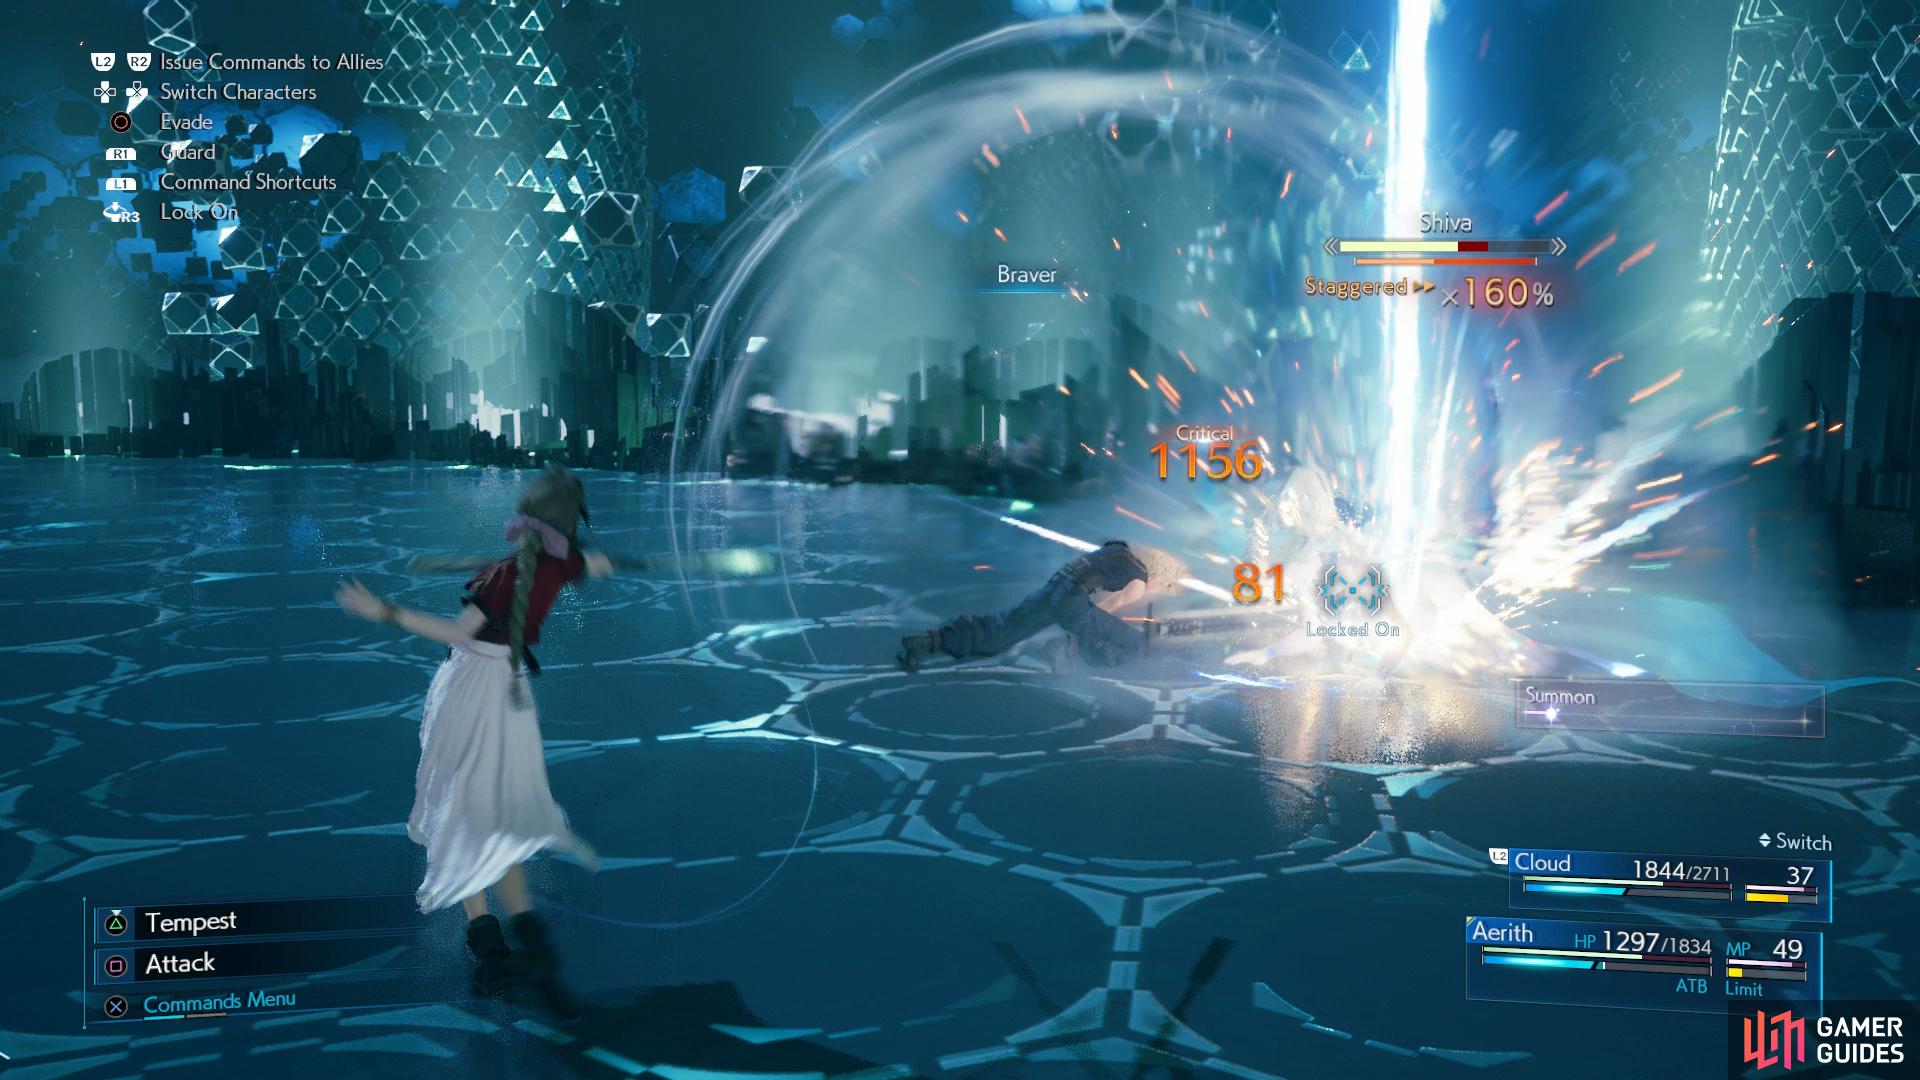
Defeat any summon to earn the “Summon Slayer” trophy.
Summon Slayer
Over the course of the game Chadley will give you Battle Intel Reports, more of which will unlock as you clear the ones assigned. Provided you’ve cleared enough of these Battle Intel Reports, in Chapter 8 you’ll unlock your first VR Mission by talking to Chadley, where you’ll be tasked with fighting a simulated battle against a powerful entity - a summon. Defeat any one of these summons: Shiva in Chapter 8 (complete Battle Intel Reports 01-04), Fat Chocobo in Chapter 9 (complete Battle Intel Reports 05-09), Leviathan in Chapter 13 (complete Battle Intel Reports 10-14) or Bahamut in Chapter 14 (complete all other Battle Intel Reports) to earn this trophy. Shiva is arguably the easiest to defeat, and there’s no difficulty requirement for any of these fights. Check out their linked pages for combat strategies.
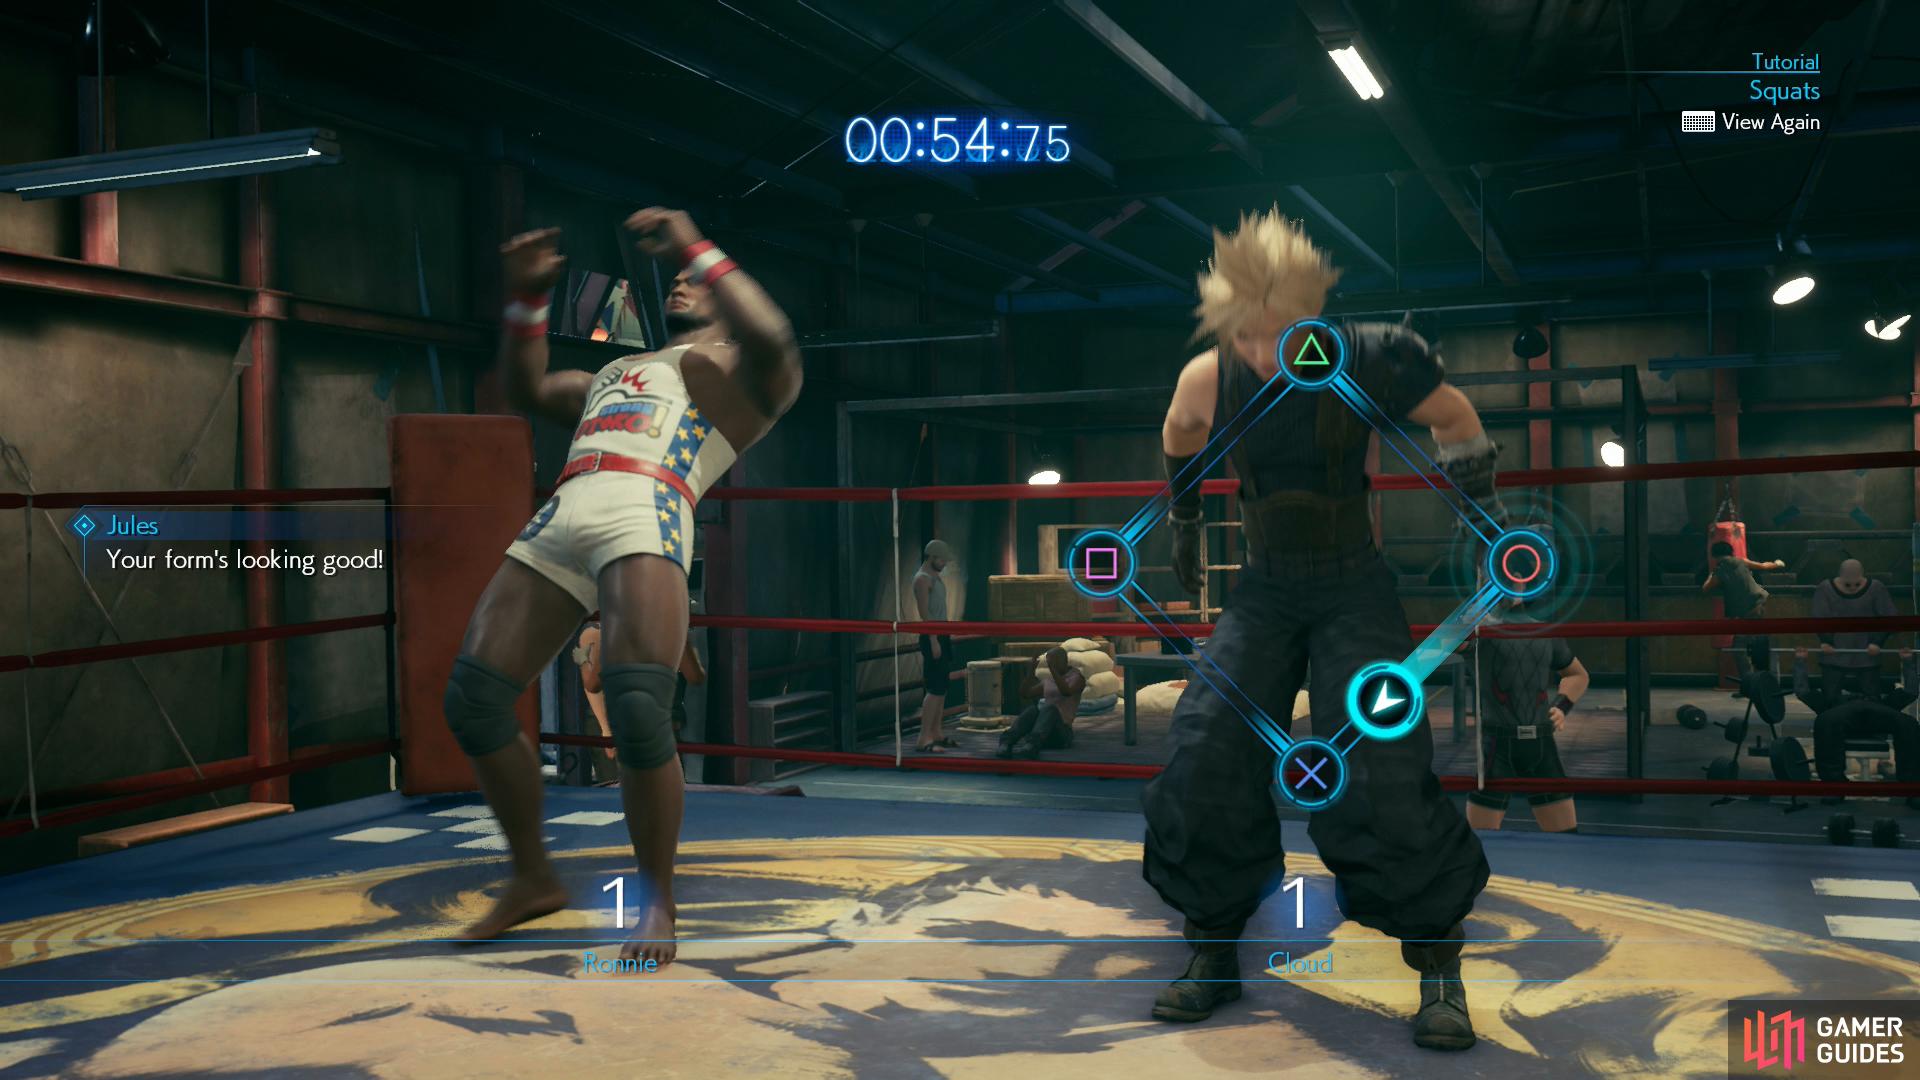
Sultan of Squat
After competing in the Underground Colosseum in Chapter 9 you’ll be assigned some side quests, one of which is always Burning Thighs. This quest will introduce you to the magical world of squats! To earn this trophy you’ll need to defeat Ronnie, Jay and finally Jules by performing more squats than your opponent in a set amount of time. To perform squats you’ll need to press the [Triangle], [Circle], [Cross] and [Square] buttons in order and in time with Cloud’s movements. The timing is fairly generous, and it’s often safer to wait until you know it’s safe to continue the sequence before pressing the next button. The more squats you perform in succession the faster Cloud will move, allowing you to increase the tempo, and at some point you’ll be able to mash off combos as fast as you can sequentially press the buttons. Once you get the timing down, the only snag is that occasionally you’ll have to stop to mash a button during your combo. Squats honestly aren’t that difficult, and with a little practice you should score this trophy - for more tips, check out the guide’s Squats page.
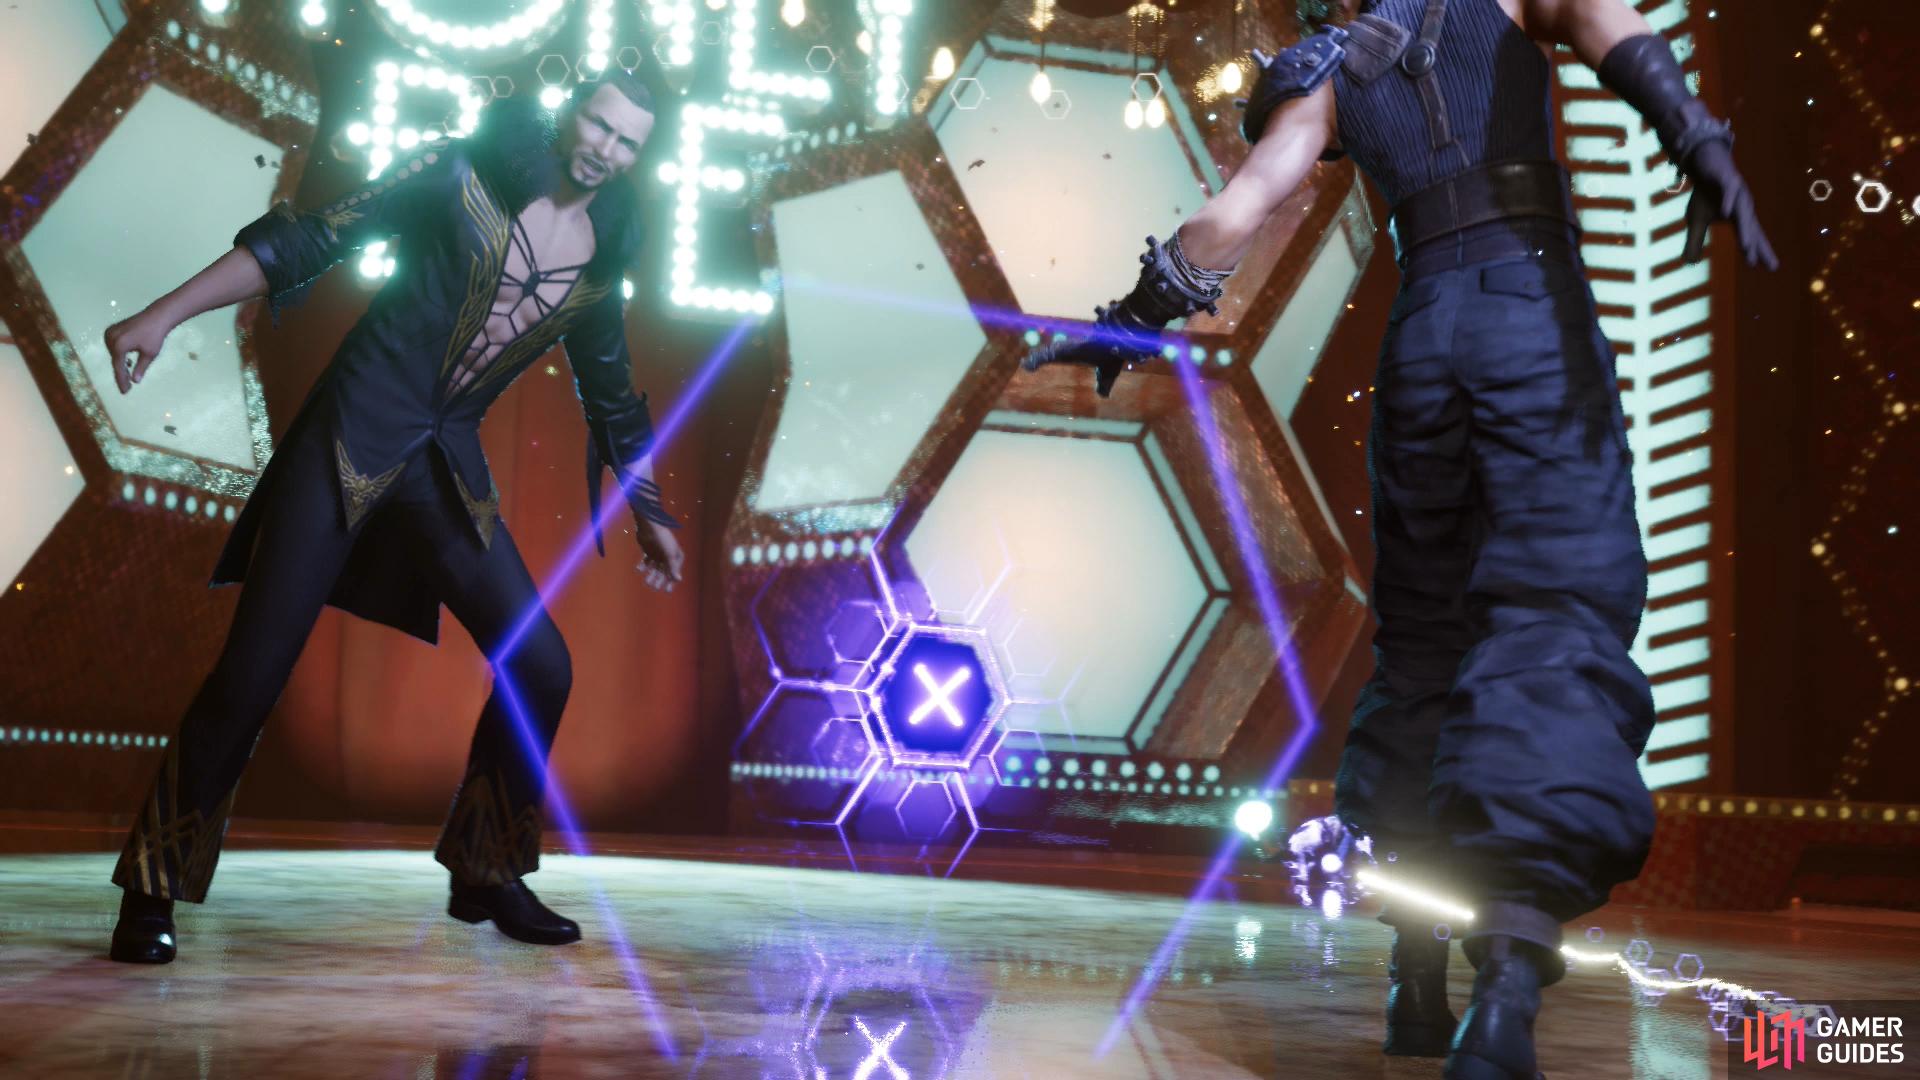
Dancing Queen
After competing in the Underground Colosseum in Chapter 9, you’ll be able to continue on to Corneo’s Mansion (after completing or skipping some side quests), which ultimately leads you to the Honeybee Inn. Here you’ll have to engage in a dancing minigame, which requires you to hit specific buttons ([Triangle], [Circle], [Cross] or [Square]) at the correct time. You’ll get a chance to practice this before starting the actual dance with Andrea, which itself is comprised of three phases over which you’ll need to hit a total of 28 notes. Depending on your timing you’ll be scored “Great”, “Good” or “Bad” on each press, and the game’s pretty generous - you can earn Andrea’s reward (and this trophy) with a score of 22 Greats, 4 Goods and 2 Bads. You don’t need to be perfect, just decent.
Returning Champion
In Chapter 9 you’ll have to participate in a series of four arena battles in the Underground Colosseum as part of the main story. After defeating the boss of the arena you’ll be invited to partake in more exhibition matches. Win any one of these matches and you’ll earn this trophy. You can also return to the Underground Colosseum in Chapter 14.
Snappy Dresser
There are nine dresses in the game (see Dressed to the Nines, below), three of which you’ll inevitably obtain over the course of the game. Which three you get doesn’t matter, and since you’re guaranteed to get three whatever you do, this trophy isn’t missable. You’ll earn this trophy as soon as Cloud gets his dress in Chapter 9.
Dressed to the Nines
This trophy will single-handedly force you to do at least three partial playthroughs of the game, as Cloud, Tifa and Aerith each have three possible dresses they can wear in Chapter 9, and what dress each character ends up wearing depends on what side quests they do in Chapter 3 (Tifa), Chapter 8 (Aerith) and Chapter 9 (Cloud).
For Tifa, you’ll need to complete all the side quests in Chapter 3, after which you’ll unlock the Alone at Last Discovery Event. Complete this event and you’ll get to choose between three hypothetical outfits: “Something mature”, “Something… sporty?” and “Something exotic?”. What you say will determine what Tifa wears in Chapter 9, and if you fail to complete all the side quests and/or this Discovery Event, Tifa will default to the “Mature” dress.
Aerith’s dress choice is fairly straight-forward as well, as it’s determined by how many side quests you complete in Chapter 8. If you do every side quest in chapter in chapter 8 she’ll end up wearing an elegant red dress, if you do some of the side quests in Chapter 8 (say, 3/6) she’ll end up wearing a dark pink dress, and if you do none of the side quests in Chapter 8 she’ll end up wearing a… rather ugly light pink dress.
Cloud’s dress is where things get complicated. There are five side quests in Chapter 9, and depending on some choices you make throughout that chapter you’ll get different quests from different characters (see Best in the Business for more details on how to unlock these quests). One quest, Burning Thighs is universal, but The Party Never Stops and A Dynamite Body are exclusive to Chocobo Sam, while The Price of Thievery and Shears’ Counterattack are exclusive to Madam M. The dress Cloud ends up wearing is determined by whether you do all of Chocobo Sam’s quests, all of Madam M’s quests, or none of the possible quests.
Make whatever choices you wish on your first playthrough (we suggest doing all the quests possible for the Divine Gratitude trophy, and Chocobo Sam’s quests for The Johnny Experience trophy), after which you’ll need to replay Chapters 3, 8 and 9 to get the other three. This trophy should pop late in Chapter 9, when you unlock Cloud’s third dress.

Complete the hard difficulty version of Whack-a-Box to earn the “Whack-a-Box Wunderkind” trophy.
Whack-a-Box Wunderkind
In Chapter 14 you’ll be able to return to the children’s hideout in the Sector 5 Slums to participate in the new and improved hard difficulty Whack-a-Box challenge. Almost everything you learned from the Normal difficulty run still applies, the boxes are just in different locations, typically in smaller stacks. Equip the Iron Blade Weapon and use Triple Slash whenever your ATB gauge is charged enough to do so. Seek out the Time Boxes first, and prioritize stacks of small boxes over the large ones, as the amount of time it takes to destroy them versus their point value is rarely favorable. Check out the page for Whack-a-Box for more details.
Peeress of Pull-Ups
In Chapter 14 you’ll be able to visit the gym to start - and finish - the quest Wavering Heart, which is all well and good, but it’s only the tip of the iceberg when it comes to the subject of this trophy: the pull-ups minigame. To earn this trophy you’ll need to defeat Andrea, after which you can challenge the regulars - Ronnie, Jay and Jules.
To earn this trophy you’ll need to defeat Jules, the other contests with Andrea, Ronnie and Jay are just warmups. Fundamentally the pullups minigame is very similar to squats in that you’ll have to rhythmically press the [Triangle], [Circle], [Cross] and [Square] buttons, although this time the order in which you’ll have to press them is randomly determined at the start of each round. Each match spans two rounds - another innovation that differs pullups from squats - which really just gives them an opportunity to switch up the button sequence.
Otherwise, it’s largely the same; you’ll need to start out slow, rhythmically pressing the aforementioned randomly ordered buttons, picking up speed as your combo count increases. Once in a while you’ll have to mash one of the buttons (always the first button in the combo), and this is honestly the trickiest part of the minigame, as it can be easy to lose focus and press the flashing button on the screen out of order. As with squats you can take a moment to collect your bearings - useful before and after you have to mash a button to continue your combo and the timing is fairly generous.
Do yourself a favor and mute everything in the game save the sound effects to limit distractions. Jules will almost always fall off the bar near the beginning of round one (around 6-7 pullups in) and will regularly fall off near the end of the second round (when he hits his maximum of around 42-44 pullups). Don’t pay attention to Jules’ score, you can’t do anything to change that, and he almost always ends up around the same 42-44. Fretting about it will only distract you, and it’s largely your performance that will determine the outcome, not Jules’. If you fall off the bar at any point, you might as well just quit and try again, but if you end the first round with 18-24 pullups, you’re probably in a position to try to win in round two, whatever Jules’ score is. The final fifteen seconds are usually where your heart will be broken, as you’ll almost invariably have to mash the first button of your combo twice in that time, and the faster you’re moving, the easier it is to get tripped up.
Keep practicing and put up more pullups than Jules to claim victory - a tie will not suffice. When you do, you’ll score a Champion Belt and this trophy.
For completing all the quests possible in a single playthrough you’ll get a letter from the Angel of the Slums.
Divine Gratitude
To earn this trophy you’ll have to complete every possible quest in a single playthrough. There are twenty-six side quests in the game, and you can complete twenty-four in a single playthrough. In Chapter 9 you’ll be able to complete three of five quests. One quest, Burning Thighs is universal, but The Party Never Stops and A Dynamite Body are exclusive to Chocobo Sam, while The Price of Thievery and Shears’ Counterattack are exclusive to Madam M. Choices you make throughout Chapter 9 will determine which of the latter two quests you receive. It doesn’t matter which two you unlock, as long as you complete them.
Should you complete all twenty-four possible quests, when you head to the “Urban Development District” en route to the end of the chapter you’ll find a letter on the ground. Pick it up to score an orb of Elemental Materia and this trophy.
The Johnny Experience
The goal of this trophy “Witness all Johnny-related incidents” is somewhat ambiguous, but it mostly revolves around completing a “Discovery Event” and two side quests. This can be completed in one playthrough, but the Vagabond Johnny Discover Event in Chapter 9 is missable, as is the side quest The Party Never Stops in the same chapter as well as Tomboy Bandit in Chapter 14.
The actions you’ll need to take to unlock this trophy are as follows:
| Event | Description |
|---|---|
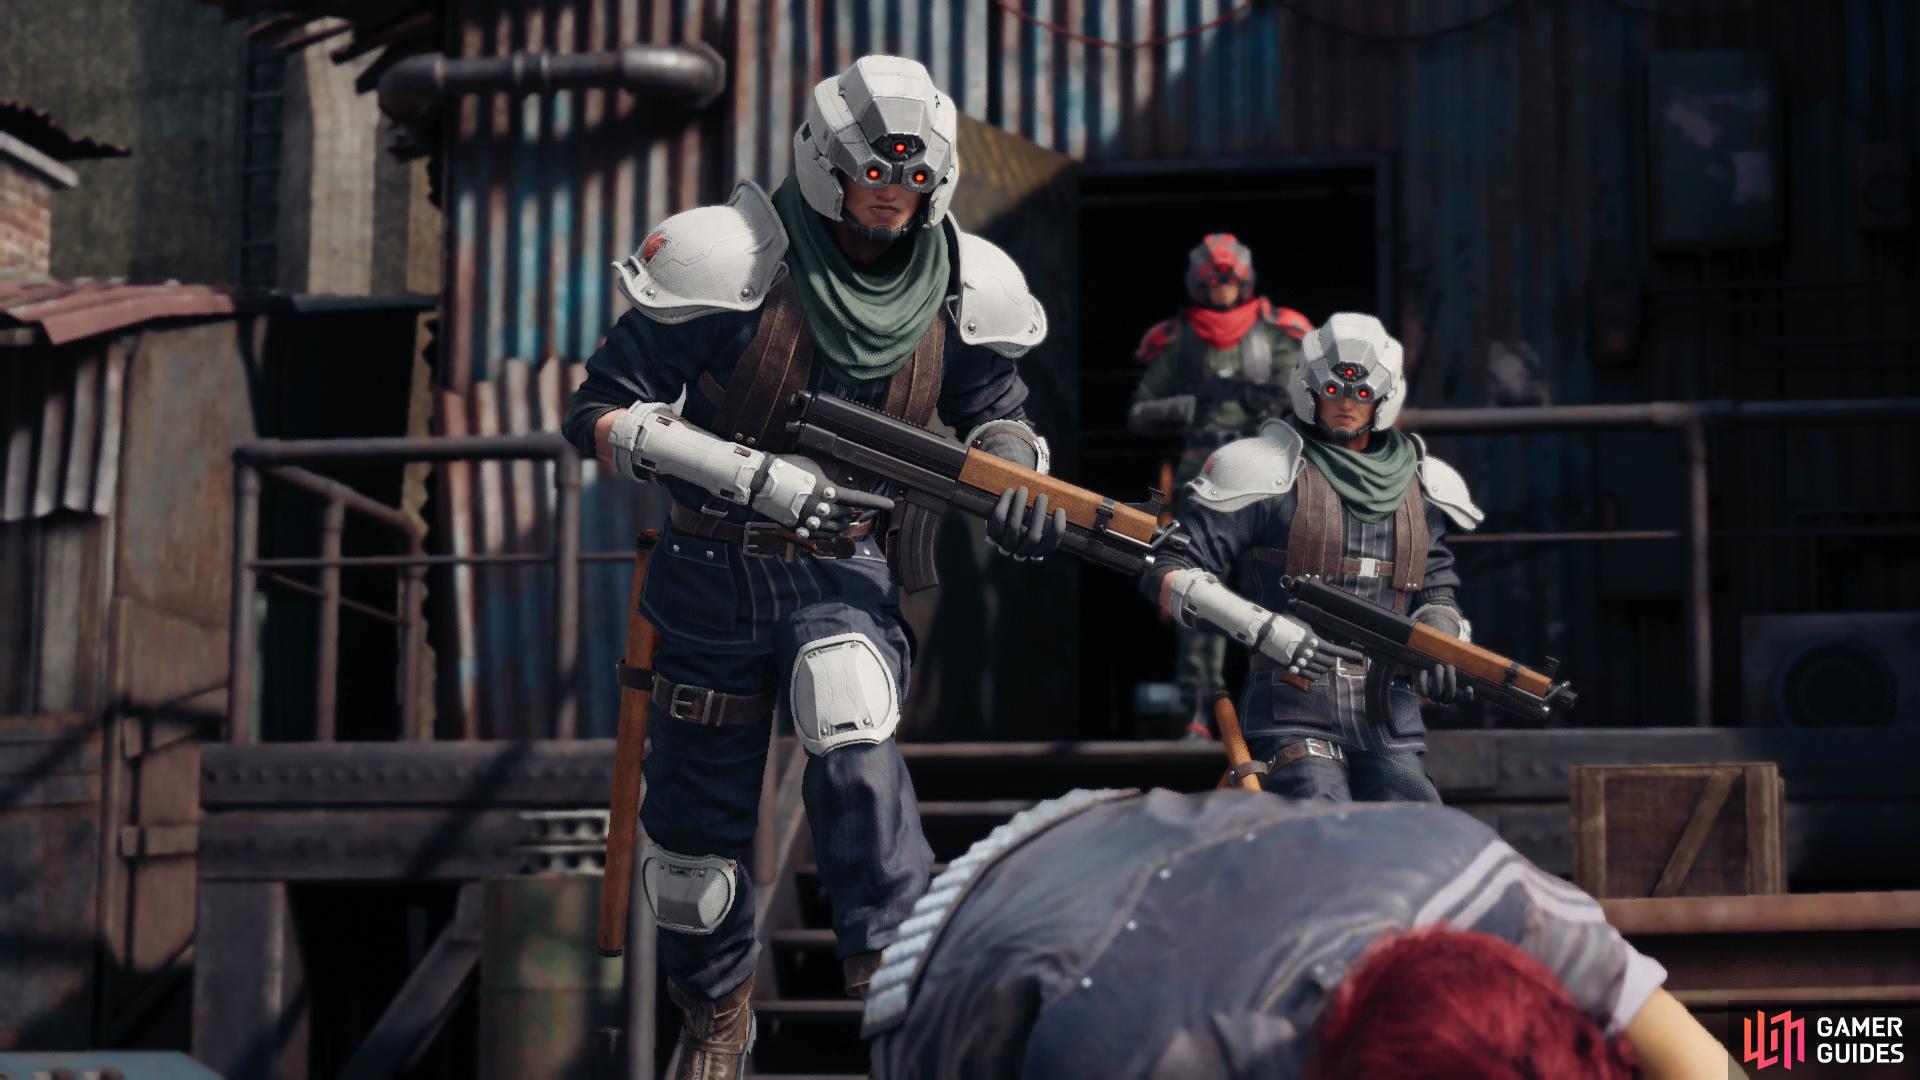
| Chapter 3 - Shinra Interrogation | After completing at least one side quest, head over to the crowd near Seventh Heaven to witness a scene involving Johnny. Follow him and defeat the Shinra Troopers. This is part of the main story and can’t be missed. |
| Chapter 9 - Vagabond Johnny | Immediately after entering Wall Market, head towards Corneo’s Mansion and Johnny should run past you. Follow him to the Honeybee Inn and say whatever you wish to him. |
| Chapter 9 - The Party Never Stops | Complete the quest The Party Never Stops. |
| Chapter 14 - Tomboy Bandit | Complete the quest Tomboy Bandit. Be sure to give Johnny his wallet back after the quest. |
Best in the Business
There are twenty-six side quests in the game (listed as “Odd Jobs” in your “Play Log”), and to earn this trophy you’ll need to complete them all.
On its own, this is pretty straight-forward: There are side quests in Chapter 3, Chapter 8, Chapter 9 and Chapter 14, and for the most part, completing them is just a matter of… well, not skipping ahead to the next chapter when they’re available. In every case, the game will warn you when you’re about to cross the point of no return and advance the story.
Whether you want to complete every side quest in a given playthrough is another matter, as the trophy Dressed to the Nines will require you to purposefully skip some side quests, but for this trophy the only tricky bit is in Chapter 9. There are five side quests in Chapter 9, and depending on some choices you make throughout that chapter you’ll get different quests from different characters. One quest, Burning Thighs is universal, but The Party Never Stops and A Dynamite Body are exclusive to Chocobo Sam, while The Price of Thievery and Shears’ Counterattack are exclusive to Madam M. You can only do three of these five quests in a single playthrough, so you’ll need to come back to Chapter 9 after beating the game via Chapter Select to complete the other two.
Below you’ll find a list of the events in Wall Market (Chapter 9) that influence what quests you’ll get, and what you need to say or do to get them:
| Event | Chocobo Sam Response | Madam M Response |
|---|---|---|
| First talk with Chocobo Sam: “The girl we’re looking for…” | She’s in great shape. | She’s a great fighter. |
| She’s great at handling the books. | ||
| Talk to the guy outside the hotel: “Stay the night?” | …No, thanks. | How much? |
| Vagabond Johnny (talk to Johnny near the Honeybee Inn) | Yeah. | No. |
| Second talk with Chocobo Sam: “Heads or tails?” | Heads. | |
| Tails. | No deal. | |
| Talking to Madam M: “Choose which course?” | Poor Man’s Course - 100 G | Luxury Course - 3000 G |
| Standard Course - 1000 G | ||
| Talking to Madam M: “How is Aerith’s outfit?” | It’s alright. | Looks comfortable. |
| It matter what I think? |
A list of quests and the chapters in which they are found follows:
Disc Jockey
To earn this trophy you’ll need to collect every Music Disc in the game. You can typically buy them from shops and vending machines, acquire them from jukeboxes, or by talking to characters. When one is nearby you’ll get a pop-up on the top left of your screen telling you what song is playing nearby… or displaying ??? if you don’t yet possess the Music Disc. If you miss a Music Disc, you can go back and get it after unlocking Chapter Select. A list of all the Music Discs in the game can be found below.
| Music Disc | Chapter | Location |
|---|---|---|
| 1. The Prelude | Chapter 3 | Buy from the Item Shop in the Sector 7 Residential Area. |
| 2. Bombing Mission | Chapter 7 | Vending machine before the fight with Airbuster . |
| 3. Tifa’s Theme | Chapter 3 | Search the jukebox in Seventh Heaven. |
| 4. Barret’s Theme | Chapter 3 | Buy from the Sector 7 Undercity Station Item Shop. |
| 5. Lurking in Darkness | Chapter 15 | Buy from the vending machine in the 65M Above Ground Level area, just outside the Central Tower building. |
| 6. Let the Battles Begin! | Chapter 11 | Buy from the vending machine in the Maintenance Facility 2F area. |
| 7. Turk’s Theme | Chapter 14 | Speak to the woman north of Madam M’s massage parlor, near the pond, during the quest The Power of Music. |
| 8. Under the Rotting Pizza | Chapter 9 | Search the jukebox near the hotel in Wall Market. |
| 9. The Oppressed | Chapter 10 | Buy from the vending machine in the Sector 6 Sewers - Aqueduct 1 area. |
| 10. Honeybee Inn | Chapter 9 | Buy from the Wall Market Item Shop. |
| 11. Don of the Slums | Chapter 9 | Buy from the vending machine in the Corneo’s Mansion - Basement - Forbidden Room area. |
| 12. Fight On! | Chapter 14 | Buy from the Colosseum Shop in Wall Market during the side quest The Power of Music. |
| 13. The Chase | Chapter 14 | Buy from a vending machine in the Sector 6 Restricted Area - Aqueduct 4 area. |
| 14. Main Theme of FFVII | Chapter 13 | Buy from the vending machine in the Underground Lab, just before the fight with the Failed Experiment. |
| 15. On Our Way | Chapter 13 | Buy from the Item Shop in Evergreen Park. |
| 16. Good Night, Until Tomorrow | Chapter 14 | Talk to a man in the lobby of the hotel in Wall Market during the side quest The Power of Music. |
| 17. Farm Boy | Chapter 9 | Talk to a cowgirl on a roof southeast of the Honeybee Inn. |
| 18. Electric de Chocobo | Chapter 6 | Buy from the vending machine near the fan controls (not the one near the cargo lift) in the Section H Utility Access area. |
| 19. Costa del Sol | Chapter 8 | Buy from the Materia Shop in the Sector 5 Slums. |
| 20. Gold Saucer | Chapter 8 | Buy from the Moogle Emporium. |
| 21. Cait Sith’s Theme | Chapter 7 | Buy from a vending machine in the Sector 5 Slums Station area. |
| 22. Cosmo Canyon | Chapter 9 | Buy from a vending machine in the Collapsed Expressway area. |
| 23. Descendant of Shinobi | Chapter 8 | Talk to a man at the northern end of Station Way, near the Sector 5 Undercity Station. |
| 24. Wutai | Chapter 14 | Talk to a man in the Urban Development District in Wall Market, during the quest The Power of Music. |
| 25. Tango of Tears | Chapter 8 | Search a jukebox in the Sector 5 Slums community center. |
| 26. Let the Battles Begin! -REMAKE- | Chapter 9 | Attain a perfect score on the dance practice before the dance minigame with Andrea. |
| 27. Hip Hop de Chocobo | Chapter 3 | Speak to the DJ northeast of Seventh Heaven. |
| 28. Stamp | Chapter 5 | Buy from a vending machine in the a Section E - Former Rail Yard area. |
| 29. The Midgar Blues | Chapter 9 | Talk to the singer in the bar across the street from the gym in Wall Market. |
| 30. Stand Up | Chapter 14 | Speak to the woman in the alley southwest of the entrance to the Honeybee Inn in Wall Market, during the quest The Power of Music. |
| 31. Scarlet’s Theme | Chapter 16 | Search the jukebox on the 63rd floor. |
Building Character
You’ll get this trophy when any character reaches level 50. You probably won’t attain this during your first playthrough, nor is there any real need to try - play through the game normally, then use Chapter Select to grind out whatever levels you still need, as enemies fought in Chapter Select yield x3 XP.
Staggering Feat
Getting an enemy’s Stagger damage to 300% is no easy feat, as it takes an enemy that remains Staggered for an incredible amount of time and has the HP to endure the attacks necessary to boost Stagger damage that high. Fat Chocobo is the ideal target for this, and Tifa is the character you’ll want to carry it out. After you beat the game and unlock Chapter Select, start Chapter 13 in Hard difficulty and talk to Chadley, where you’ll be able to start the Fat Chocobo VR Mission. Make sure somebody has Haste Materia equipped and start the fight as normal, Haste Tifa, and when Fat Chocobo becomes Staggered, have Tifa spam “Rise and Fall” and “Omnistrike”, as each attack will increase Fat Chocobo’s Stagger damage %. Aerith’s “Ray of Judgment” will also drive up Stagger damage %, but to be able to use her you’ll have to use Chapter Select to go to Chapter 17, instead. With any luck you’ll reach the target 300% Stagger damage, and pop this trophy.
Intelligence Agent
You’ll meet Chadley in Chapter 3, where he’ll give you the side quest Chadley’s Report, which also happens to be the objective for the first Battle Intel Report. After this, you’ll be able to take on new Battle Intel Reports as you advance the story, meeting Chadley in Chapter 8, Chapter 9 and Chapter 13. The Battle Intel Reports and their objectives are listed below, while more details on their completion can be found by following the provided links to pages dedicated to each Battle Intel Report:
| Battle Intel Report | Condition | Chapter | Reward |
|---|---|---|---|
| Report 01 - Monster Bio Pt. 1 | Assess 2 enemy types | Chapter 3 | Auto-Cure Materia |
| Report 02 - Magic Elements Pt. 1 | Hit enemies vulnerable to fire, ice, or lightning using the appropriate magic | Chapter 3 | Wind Materia |
| Report 03 - The Stagger Effect Pt. 1 | Use unique abilities on staggered enemies and charge the ATB gauge 10 times. | Chapter 3 |
gooe
gooe