
With two crystals awakened (or is that six?), only two more remain. Poor Agnes got more than she bargained for, when she first promised to awaken the crystals… Like in round one, our next destination is the Altar of Fire, deep beyond the Mythril Mines of Eisenberg.
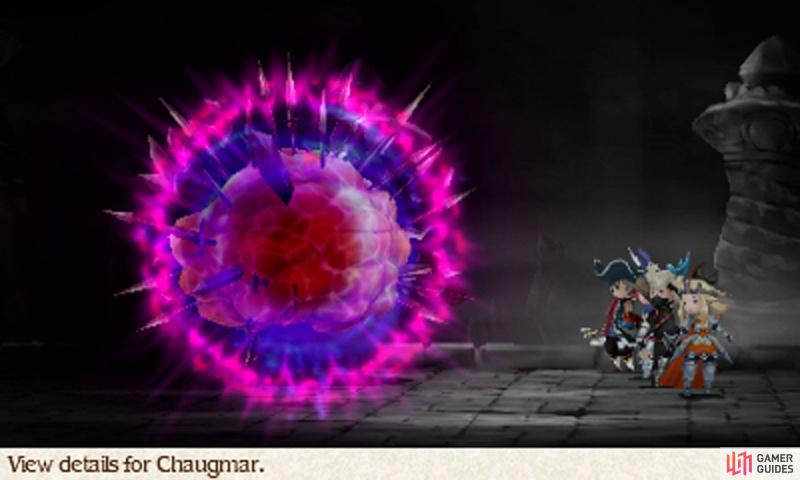
At the altar, Chaugmar, the Mark of Doom, shows itself once again.
Boss: Chaugmar
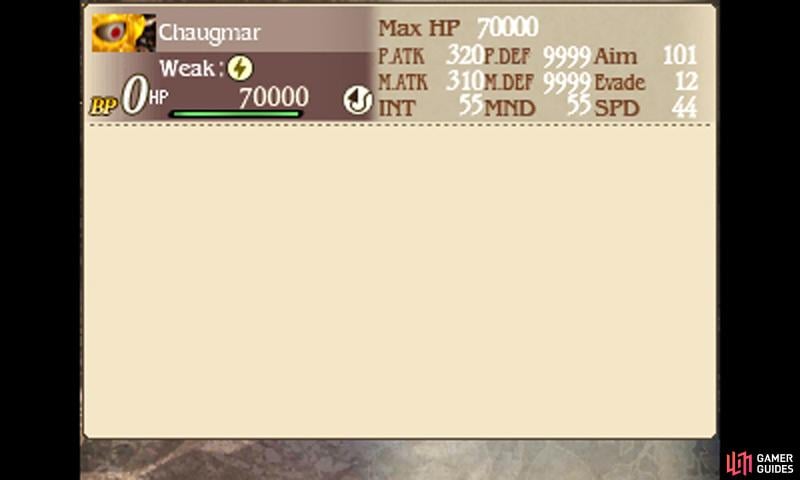
| Level | HP | Weak to |
|---|---|---|
| 48 | 70,000 | Lightning, Demon |
The Mark of Doom follows the same pattern of putting up its barrier for the first three turns, protecting it from normal attacks. You can have somebody with the Salve-maker‘s Attack Item Amp throw attack items, such as the Pantheon’s Wrath to cause fixed damage.
Alternatively, you can use defense-penetrating moves, such as the Vampire’s Fireball or put on the Black Mage’s Pierce Magic Defense (Level 12) and open fire with your strongest thunder spells. On the fourth turn, Chaugmar will use Transform to drop its barrier and then Energy Burst for massive physical damage on the fifth turn.
As before, Default to weather the blast (paired with the Templar‘s Default Guard for greater efficiency) or use Utsusemi or Rampart to block the damage altogether. On the sixth turn, utterly blast Chaugmar with all the BP you’ve been saving up. Then on turn seven, Chaugmar will use Transform to raise its barrier and the cycle repeats.
Upon scrubbing out the Mark of Doom, you’re free to awaken the Fire Crystal. Afterwards, make for the final crystal–the Earth Crystal at the top of Eternia’s Everlast Tower. By now, it should come as no surprise that another creature born of the darkness has returned from the dead to stop you.
Boss: Gigas Lich

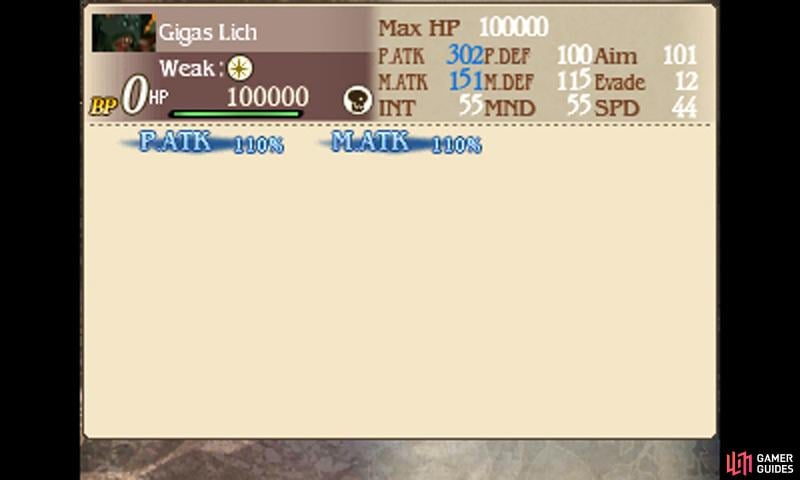
| Level | HP | Weak to | Absorbs |
|---|---|---|---|
| 48 | 100,000 | Light, Undead | Earth |
It hasn’t been too long since you last confronted the Propagator of Doom. Like previously, it will use Negative Power each turn to slowly raises its physical and magic attack. At the same time, it will punish your party with Slam, causing heavy physical damage, as well as Quaga for earth damage.
Utsusemi or Rampart–all-too familiar abilities by now, hopefully–are useful for blocking Slam, while Abate Earth or Earth Charms will help to defend against Quaga. Negative Power should be combated with Dispel or abilities that drop physical or magic attack.
This time, Gigas Lich will cast Death, which causes instant-death to one, near the beginning of the battle and not just the end. So ensure your party is kitted with Safety Rings and you have a reliable way of resurrecting fast (such as somebody with the Salve-maker’s Job Command or the White Magic Arise).
Also watch out for Fear, which inflicts Dread on a character–cast Esuna or Esunaga to bring confidence back to your party and re-enable the Brave and Default commands! Again, if you want an effortless fight, activate Bravely Second and forcefully make Gigas Lich drink an Elixir or Megalixir to drain its HP in one go.
Exorcize the undead giant… again (clearly, this is one vengeful ghoul) and the way will be open to awaken the Earth Crystal. Once all four crystals have been awakened, the Holy Pillar will reappear in the south-eastern seas; send a signal to Grandship and navigate it into the Holy Pillar.
No Comments