
If you haven’t slain Jabberwock yet, these extra Courage Rings will come in handy.
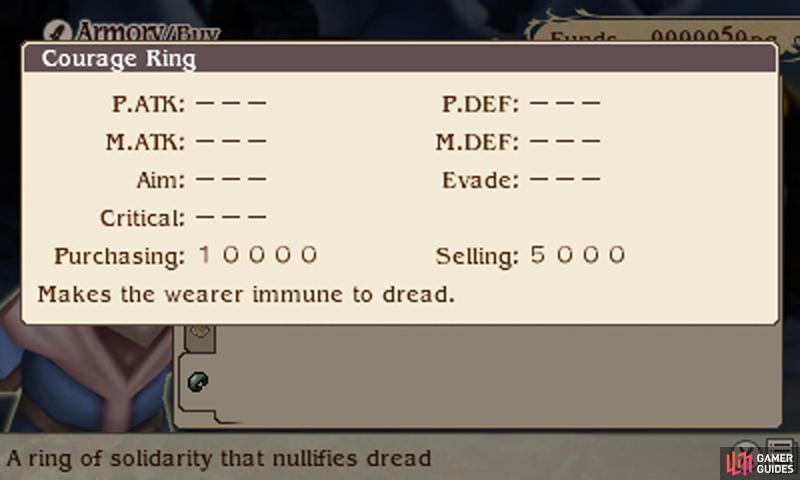
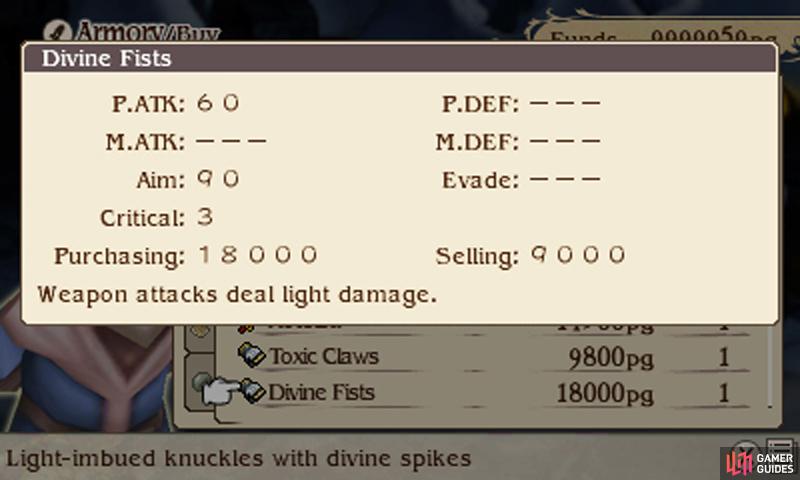
Finally we come full circle and return to Eternia–the stronghold of those who stand opposed to Agnes and company. Inside Eternia city, have a gander at the armory to find a pair of Divine Fists selling for 18,000 pg and Courage Rings that could be yours for just(!) 10,000 pg.
To make your presence known, begin by waltzing straight through the front door of Eternian Central Command. As predicted, Victor and Victoria appear out of nowhere to make our heroes’ lives a living nightmare, before hastily retreating back into Central Command.
After chasing the duo into the first floor right-hand room, Victor will discuss Victoria’s past once more, but with details not discussed previously. One thing hasn’t changed though–and that’s the fact that Victor and Victoria won’t leave without a bloody battle!
Boss: Victor and Victoria
| Level | HP | Weak to |
|---|---|---|
| 48 | 80,000 (Victor), 70,000 (Victoria) | Dark (Victor), Light (Victoria) |
Victor, the Doctor, uses Holy to cause heavy damage to one, Curada to heal himself or Victoria and Fairy’s Aid to boost his or Victoria’s elemental damage. Meanwhile, the Witch Victoria uses Dark for major damage to one, Corpse to inflict Doom, Poison to poison your party and Exterminate to damage anyone poisoned.
Being magic-based foes, there are many ways to alleviate your stress. Give everybody a Star Pendant to prevent Victoria’s poison-based attacks and have your healer hold onto a Dark Shield to negate her Dark spell. It would also help if you put on Abate Dark (Dark Knight) and Abate Light (Templar) onto as many characters as possible.
Victoria is the most annoying foe still, because of her ability to cause Doom–this can be prevented by having a Spiritmaster cast Fairy Ward (Level 11) beforehand. Alternatively, have a Time Mage cast Reraise to instantly revive a character who suffers a K.O. As Victoria’s HP drops, she will start to Brave, unleashing two lots of Dark in one go.
When the going gets tough, use the Spiritmaster’s Adaptation to convert the Dark and Holy damage into HP. For offense, you have plenty of light moves to punish Victoria with, such as the Templar’s Radiant Blast or the Excalibur and Holy Lance. For Victor, the Dark Knight’s Black Bane or the Black Mage’s Dark spell are good.
If you’re feeling sneaky and your characters are quick, you can forgo the Star Pendants and use Esunaga to rid your party of poison on the fly. Then inflict Poison (you’ll likely need the Arcanist’s Status Ailment Amp for a decent success rate) on Victor and Victoria and let Victoria hurt her own party with Exterminate.
Put the witchdoctor duo out of their misery and it’s high time you confronted the head honcho himself–Grand Marshal Braev Lee, aka the Templar.
Make your way up Central Command and Braev will be waiting inside the council room at the top floor. This time, Edea actually manages to make her father explain his actions, which is a huge step in resolving their dispute. However, despite their mutual understanding, Braev isn’t ready to drop his ideals–at least not without a good fight.
Boss: Braev Lee
| Level | HP | Weak to |
|---|---|---|
| 48 | 112,500 | Dark |
The big question you’re probably asking: does Braev recover all of his HP after you defeat him like last time? Well, fortunately enough, he doesn’t, which makes this battle more straightforward. Aside from this change, this battle progresses in a very similar manner.
Braev will frequently Default to build up his BP to 2 or 3 points, before expending BP for a variety of moves. Initially he’ll use Radiant Blast (pierce Default) followed by Heart Strike (guaranteed critical). Later, he’ll Brave twice, for a combination of Giant Strike (hurts higher HP foes), Heart Strike and Radiant Blast.
When Braev Defaults, that’s a good opportunity if any to pound him if you have Default-piercing moves such as Qigong Wave (Monk), Targeting (Ranger), Spray (Vampire) or your own Radiant Blast. Once Braev starts Braving twice, he’ll easily go into negative BP, leaving you with ample opportunity to get some free hits in.
We can see the fire in your eyes… You’re not about to stop, even after crushing the highest in the chain of command. Nope, you’re about to charge straight into the dreaded Vampire Castle, to dethrone Lord DeRosso of his title of strongest man (or woman) in Luxendarc.
We’re assuming you gathered all six keystones required to enter Vampire Castle in the previous chapter. If you collected them, rejoice as you don’t have to fight the six dragons again (you CAN if you want, but their stats are unchanged so we won’t bother). If this is your first time taking on the Vampire, please refer to Chapter 4 of this guide.
Boss: Lord DeRosso
| Level | HP | Weak to |
|---|---|---|
| 60 | 150,000 | Light |
We won’t lie; the Vampire can be bested using the same strategy as his first fight–for full details, please refer to the Vampire sub-scenario. To refresh your memory, DeRosso uses Battle Thirst to drain 1 BP from a character, then on the next turn he’ll use Energy Burst to cause massive physical damage to your party.
As before, Rampart (Templar) or Utsusemi (Ninja) can be used to block Energy Burst (and Utsusemi can evade Battle Thirst too, stopping DeRosso from following with Energy Burst). DeRosso will also use Bone Crush when your party sustains damage, dealing damage to each character equal to their lost HP–fatal if they have less than half HP.
As Bone Crush is physical, you can avoid it with Rampart or Utsusemi, but it’s probably best if you just heal your party. Finally, DeRosso may surprise you with Graviga, which chops off 3/4 of your party’s health, with a chance of missing. As before, be vigilant with your healing and Graviga will only be a nuisance and not a total wipe out.
If you’ve been levelling the Spiritmaster job, you can use Stillness (Level 8) in place of Rampart. However note that the strategy changes, as Stillness prevents all damage to both parties for two turns. Ideally you want two or three characters build up BP, then unleash their attacks and finish the turn with the slowest character using Stillness.
Just make sure the slowest character can still outrun DeRosso! For consistent results–so your attackers don’t move after the Stillness user, thus wasting their turn(s)–use the Ninja’s Shippujinrai to snipe DeRosso before Stillness kicks in and chuck all your speed-enhancing equipment and abilities on your Stillness user.
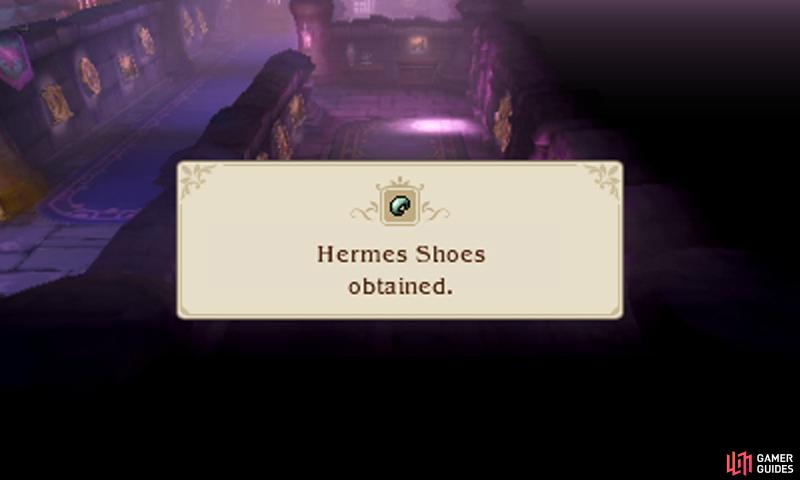
Remember the Hermes Shoes you found here? Use those and other Agility-boosting gear or abilities to control the turn order.

No Comments