

Did you expect to find a dungeon inside Grandship of all places? After exiting the elevator, you’ll be thrust into the 27th level of the basement–this place sure is massive! From the entrance, follow the path right to find another elevator, but like the one in the Grand Mill Works it’s out of operation right now.
Elevator Lever Number 1
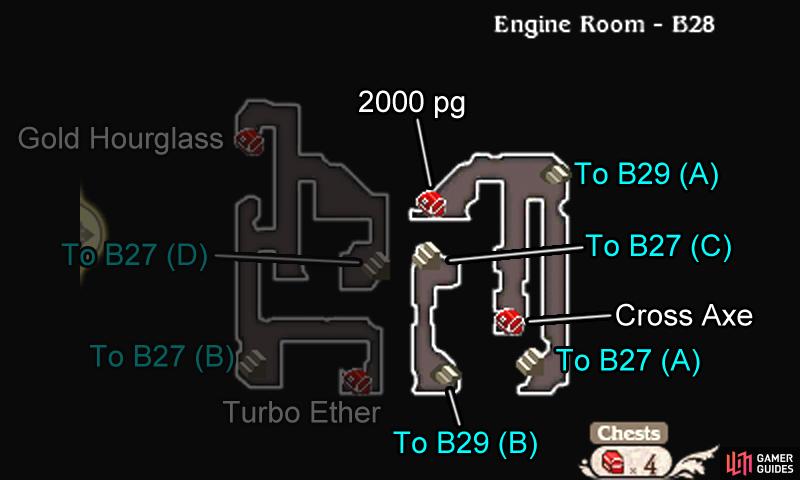
Continue along the path to find a flight of stairs in the bottom-right corner, leading further down. Downstairs, on level 28, follow the corridor up until you reach the stairs in the top-right corner, which lead even further down. Before going down, head left to find chests containing 2000 pg and a Cross Axe.
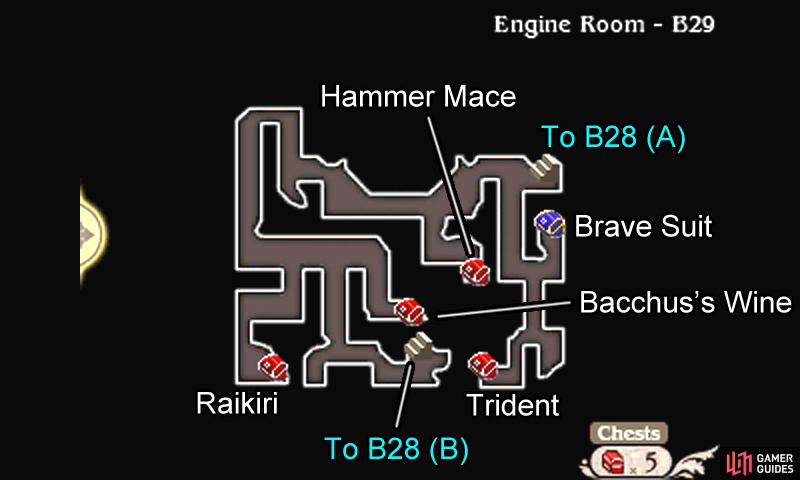
On level 29, follow the path down at the initial junction for a blue locked chest and a chest with a Trident inside. Next, head left from the junction. Nearby to the south, there’s a chest with a Hammer Mace. Continue following the corridors to find chests containing a Raikiri (bottom-left corner) and Bacchus’s Wine (near center), plus stairs going up near the south.
Back on level 28, head up the one-way corridor to find stairs going up ahead. Upstairs, on level 27, flip the lever in the corner to deactivate part of the barrier around the elevator.
Elevator Lever Number 2

Return to the first part of level 27 using a Teleport Stone or otherwise. From the bottom-right corner, continue left to find a chest containing 1000 pg near the south and stairs going down in the bottom-left corner. Before descending the stairs, head up to find the last chest, which contains an Antarctic Wind.
Downstairs, on level 28, head right to nab yourself a Turbo Ether from a chest. Then return to the stairs in the corner and follow the path upwards to find a chest with a Gold Hourglass in the top-left corner and stairs leading up near the center.
Up on level 27, flick the lever in the corner to deactivate the other part of the barrier–now the second elevator will become operational. Return to the elevator in the top-right corner of level 27 and ride it down. Step outside the elevator to emerge in the final area–the Engine Room Core.
Engine Room Core

At the first junction, take the left path to find a chest with an Arctic Wind.
After feeling clever about your hidden loot, continue following the visible corridor and you’ll find the Adventurer by the bottom-left corner–how he got here before you we’ll never know. Continue up from the bottom-left corner to find the final chest, which hides a Barrier Shroud inside.
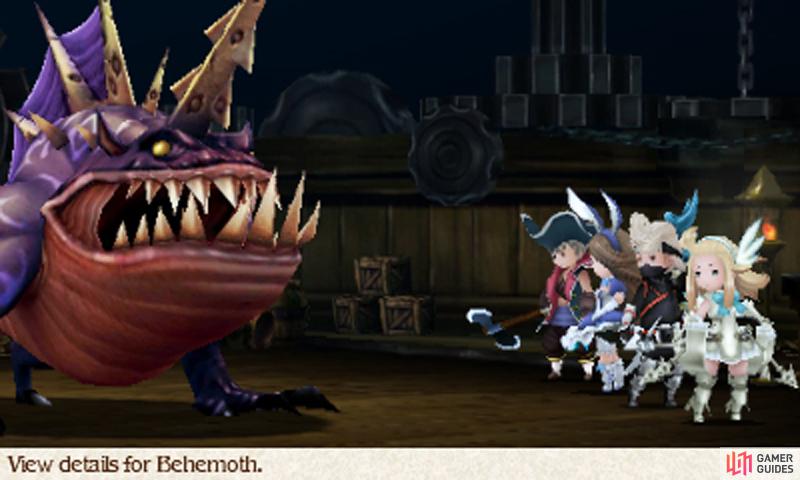
Speak to the Adventurer to save your game and purchase wares if necessary. Either way, once you’re ready, follow the path right from the Adventurer and you’ll reach a large, open room. Inspect the fiery cauldron at the far end and a nasty boss will give you the jump.
Boss: Behemoth
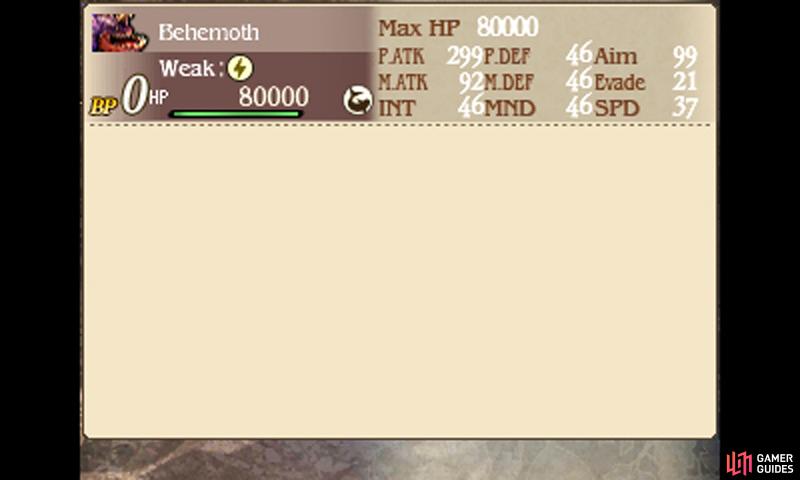
| Level | HP | Weak to |
|---|---|---|
| 41 | 80,000 | Lightning, Aquatic |
This grotesque sea creature has a bunch of strong attacks to put the wind out of you. Its Toothy Rend does major damage to a single target and it also likes to use Venomous Fangs to inject poison onto one unlucky sap. Its nastiest trick is Roar, which hits your whole party and causes Silence to all.
You’d better equip your healers and magic users with the appropriate Silence-warding equipment or abilities (Silence Immunity learned by Black Mages or the White Cape), so they don’t become totally useless. Otherwise, besides its hefty fire-power, this boss isn’t really that smart.
A Performer casting Got Your Back every now and then to bolster the party’s defense can go a long ways to improving your survival odds. You can also use the Ninja‘s Utsusemi to avoid the boss’s all-physical attacks and counter with the Ninja’s Transience after the inevitable dodge.
For general offense, smack the boss with lightning-element attacks (the Raikiri and Trident weapons you just got are good) or anti-aquatic attacks (for example, the Viking Axe).
Once you’ve diced up the sea monster, Tiz and company will chuck the orichalcum into the cauldron, before returning to the bridge. Awaiting them there are Datz, Zatz and the Proprietress–apparently everyone else has evacuated. As they chat, Ringabel notices a glowing button by the wheel and, after being egged on by Edea, he presses it…
From Sea to Skies
Now you can pilot Grandship in the air and reach new heights–including the continent of Eternia to the north-west. Unlike the Eschalot–when it was airborne–you can land almost anywhere, provided there aren’t trees or mountains in the way.
For now, you may wish to head to the new orange exclamation mark, which will take you to Eternia; upon arrival, land to the left of the closed gateway and this chapter will end.
No Comments