
Shrines are one of the core gameplay elements in The Legend of Zelda: Tears of the Kingdom. Scattered throughout Hyrule, shrines typically require you to solve some sort of puzzle or combat trial, upon the completion of which you’ll be rewarded with a ![]() Light of Blessing and potentially equipment. Shrines can also serve as fast travel points - all you have to do is interact with them. Since completing shrines will make your character stronger and provide exploration footholds, it’s essential that you conquer them whenever possible. This page will provide a walkthrough for
Light of Blessing and potentially equipment. Shrines can also serve as fast travel points - all you have to do is interact with them. Since completing shrines will make your character stronger and provide exploration footholds, it’s essential that you conquer them whenever possible. This page will provide a walkthrough for ![]() Jiukoum Shrine.
Jiukoum Shrine.
Where to find Jiukoum Shrine in Tears of the Kingdom
Jiukoum Shrine can be found in north-central ![]() Faron, which is a region along the southern end of Hyrule. It’s just southeast of Popla Foothills Skyview Tower.
Faron, which is a region along the southern end of Hyrule. It’s just southeast of Popla Foothills Skyview Tower.
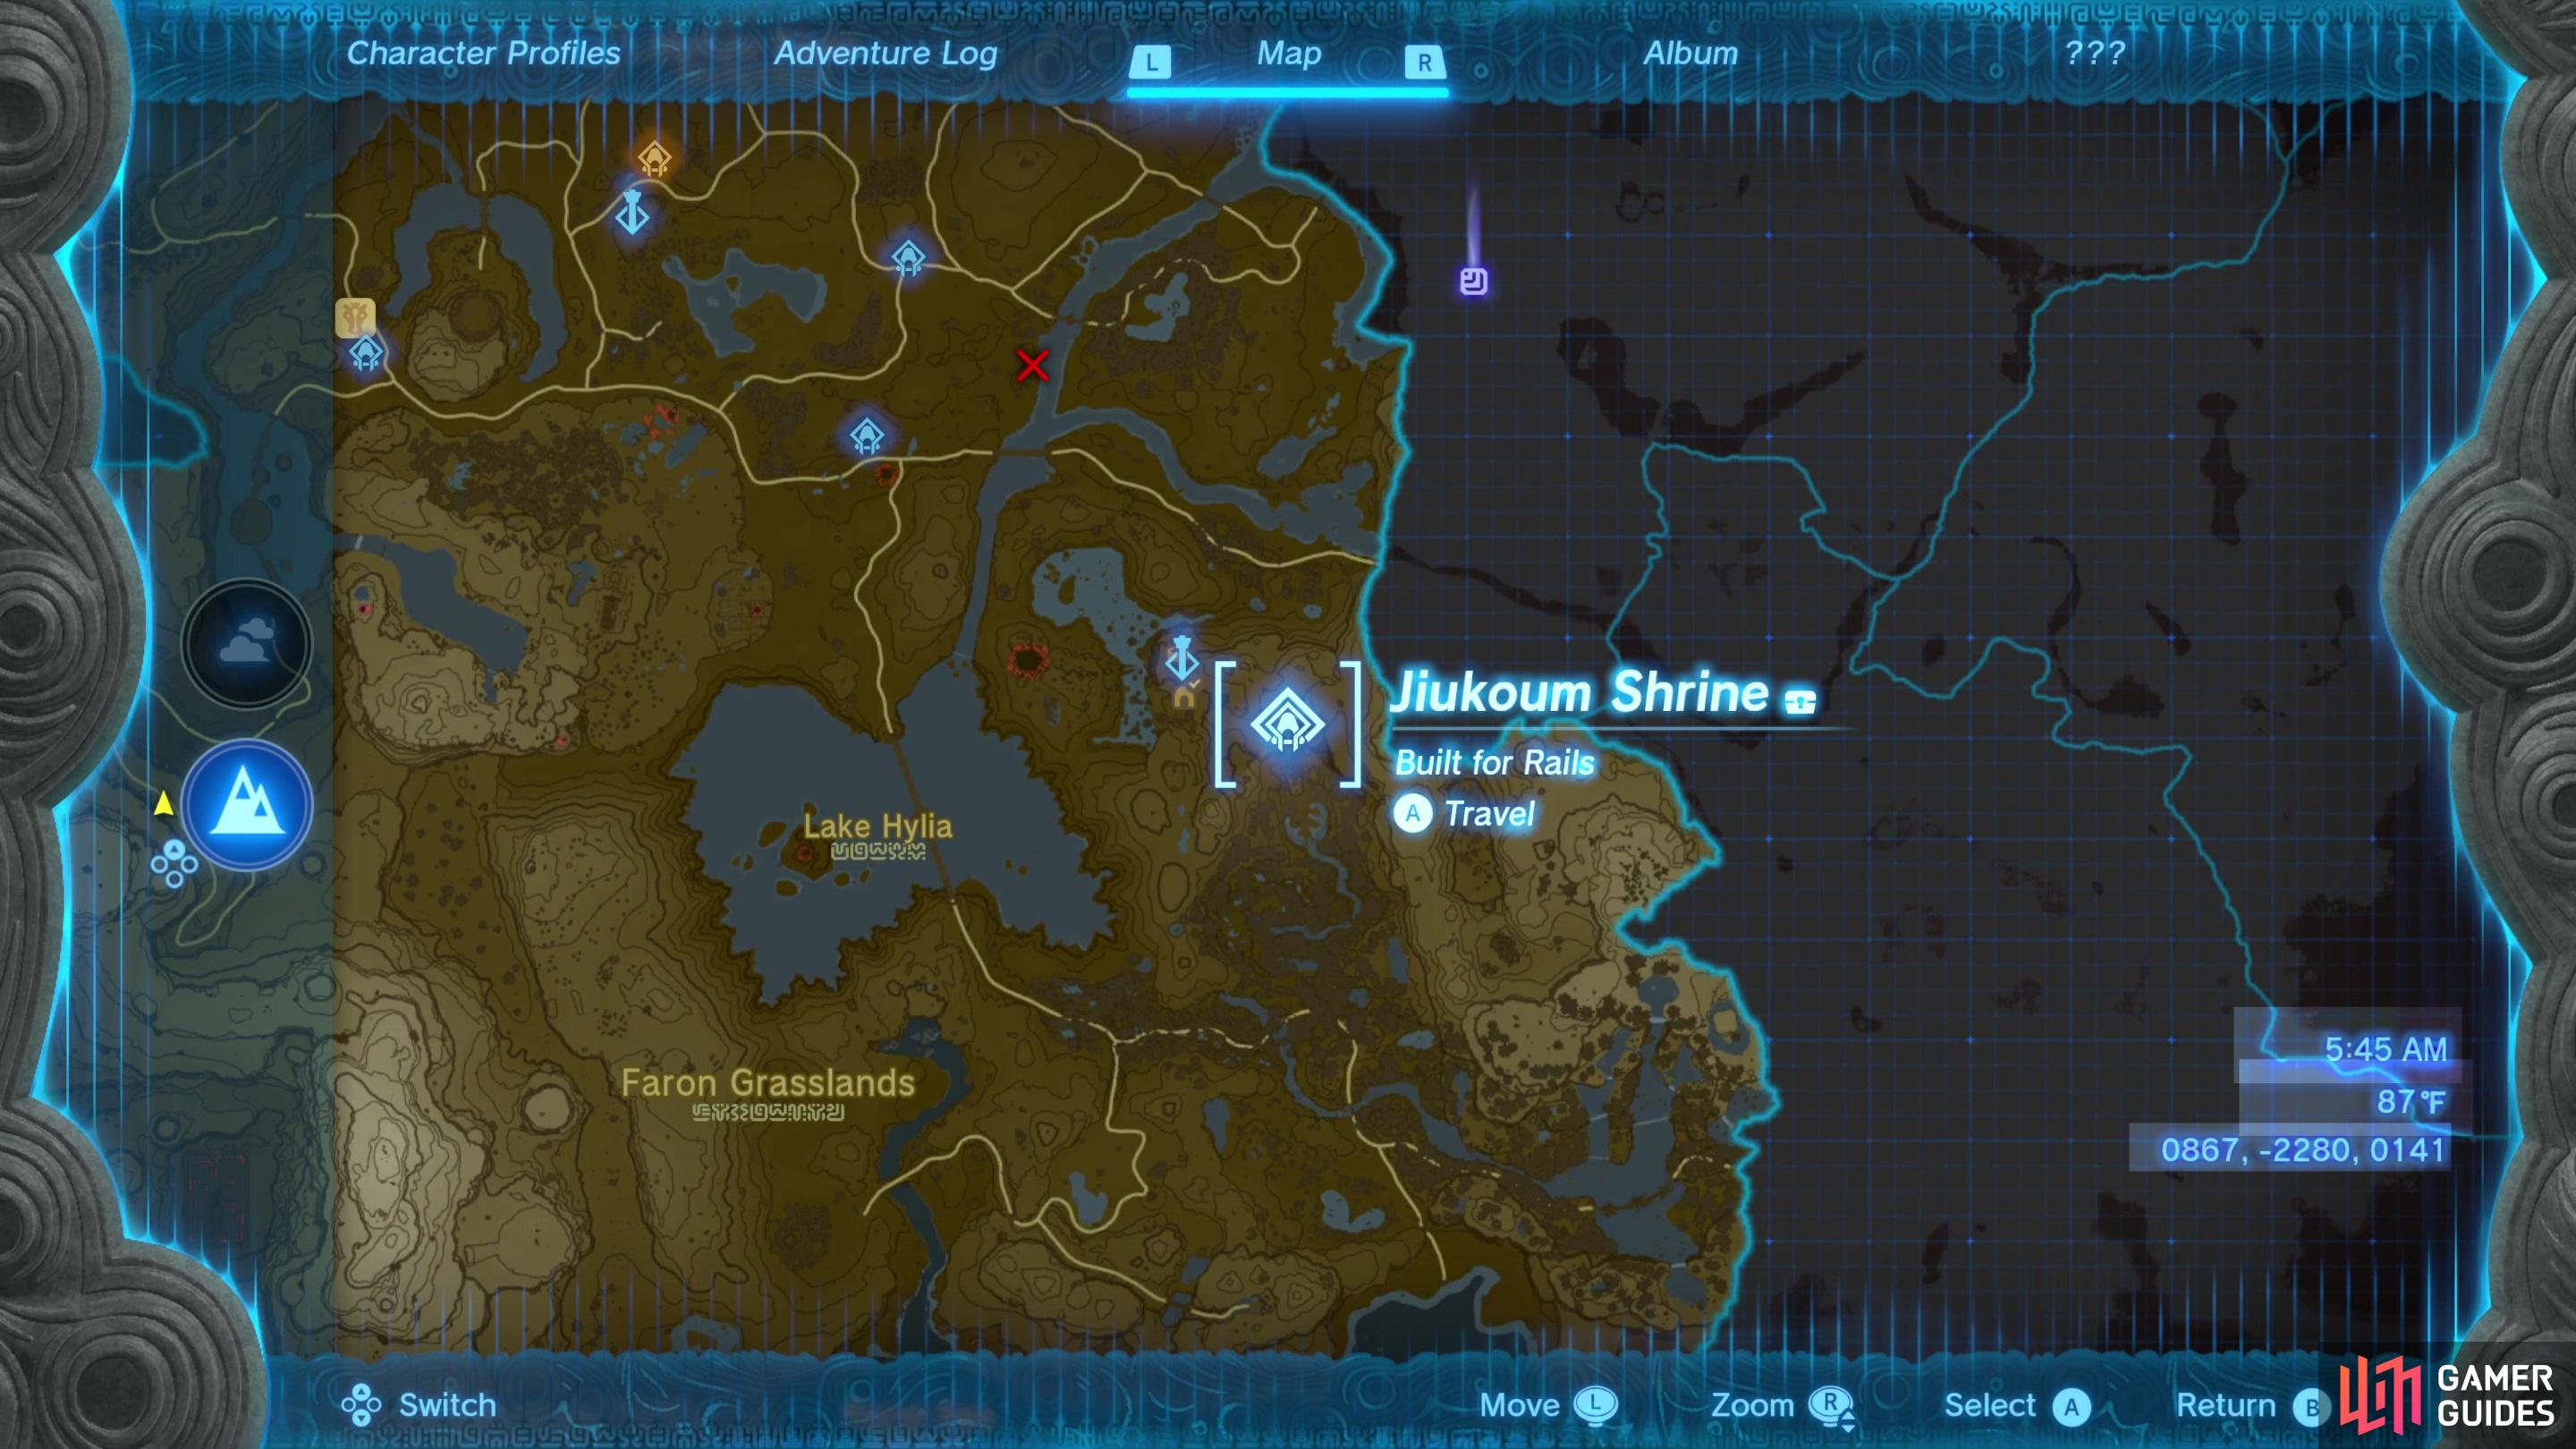
You can find Jiukoum Shrine in north-central Faron.
How to Complete the Jiukoum Shrine in Tears of the Kingdom
When you enter Jiukoum Shrine you’ll notice it’s titled ”Built for Rails”, which is both a hint and a summary of this shrine’s content, which will put your knowledge of rails and building with ![]() Ultrahand to the test. There are three puzzles you’ll have to solve, all of which involve assembling some vehicle with Ultrahand and riding down some rails to the next puzzle, and the first of these three trials doesn’t prepare you for the next two.
Ultrahand to the test. There are three puzzles you’ll have to solve, all of which involve assembling some vehicle with Ultrahand and riding down some rails to the next puzzle, and the first of these three trials doesn’t prepare you for the next two.
If you need an Ultrahand refresher, the first puzzle provides - fuse two squares,
then ride them to the second puzzle.
How to Solve the First Rail Puzzle in Jiukoum Shrine
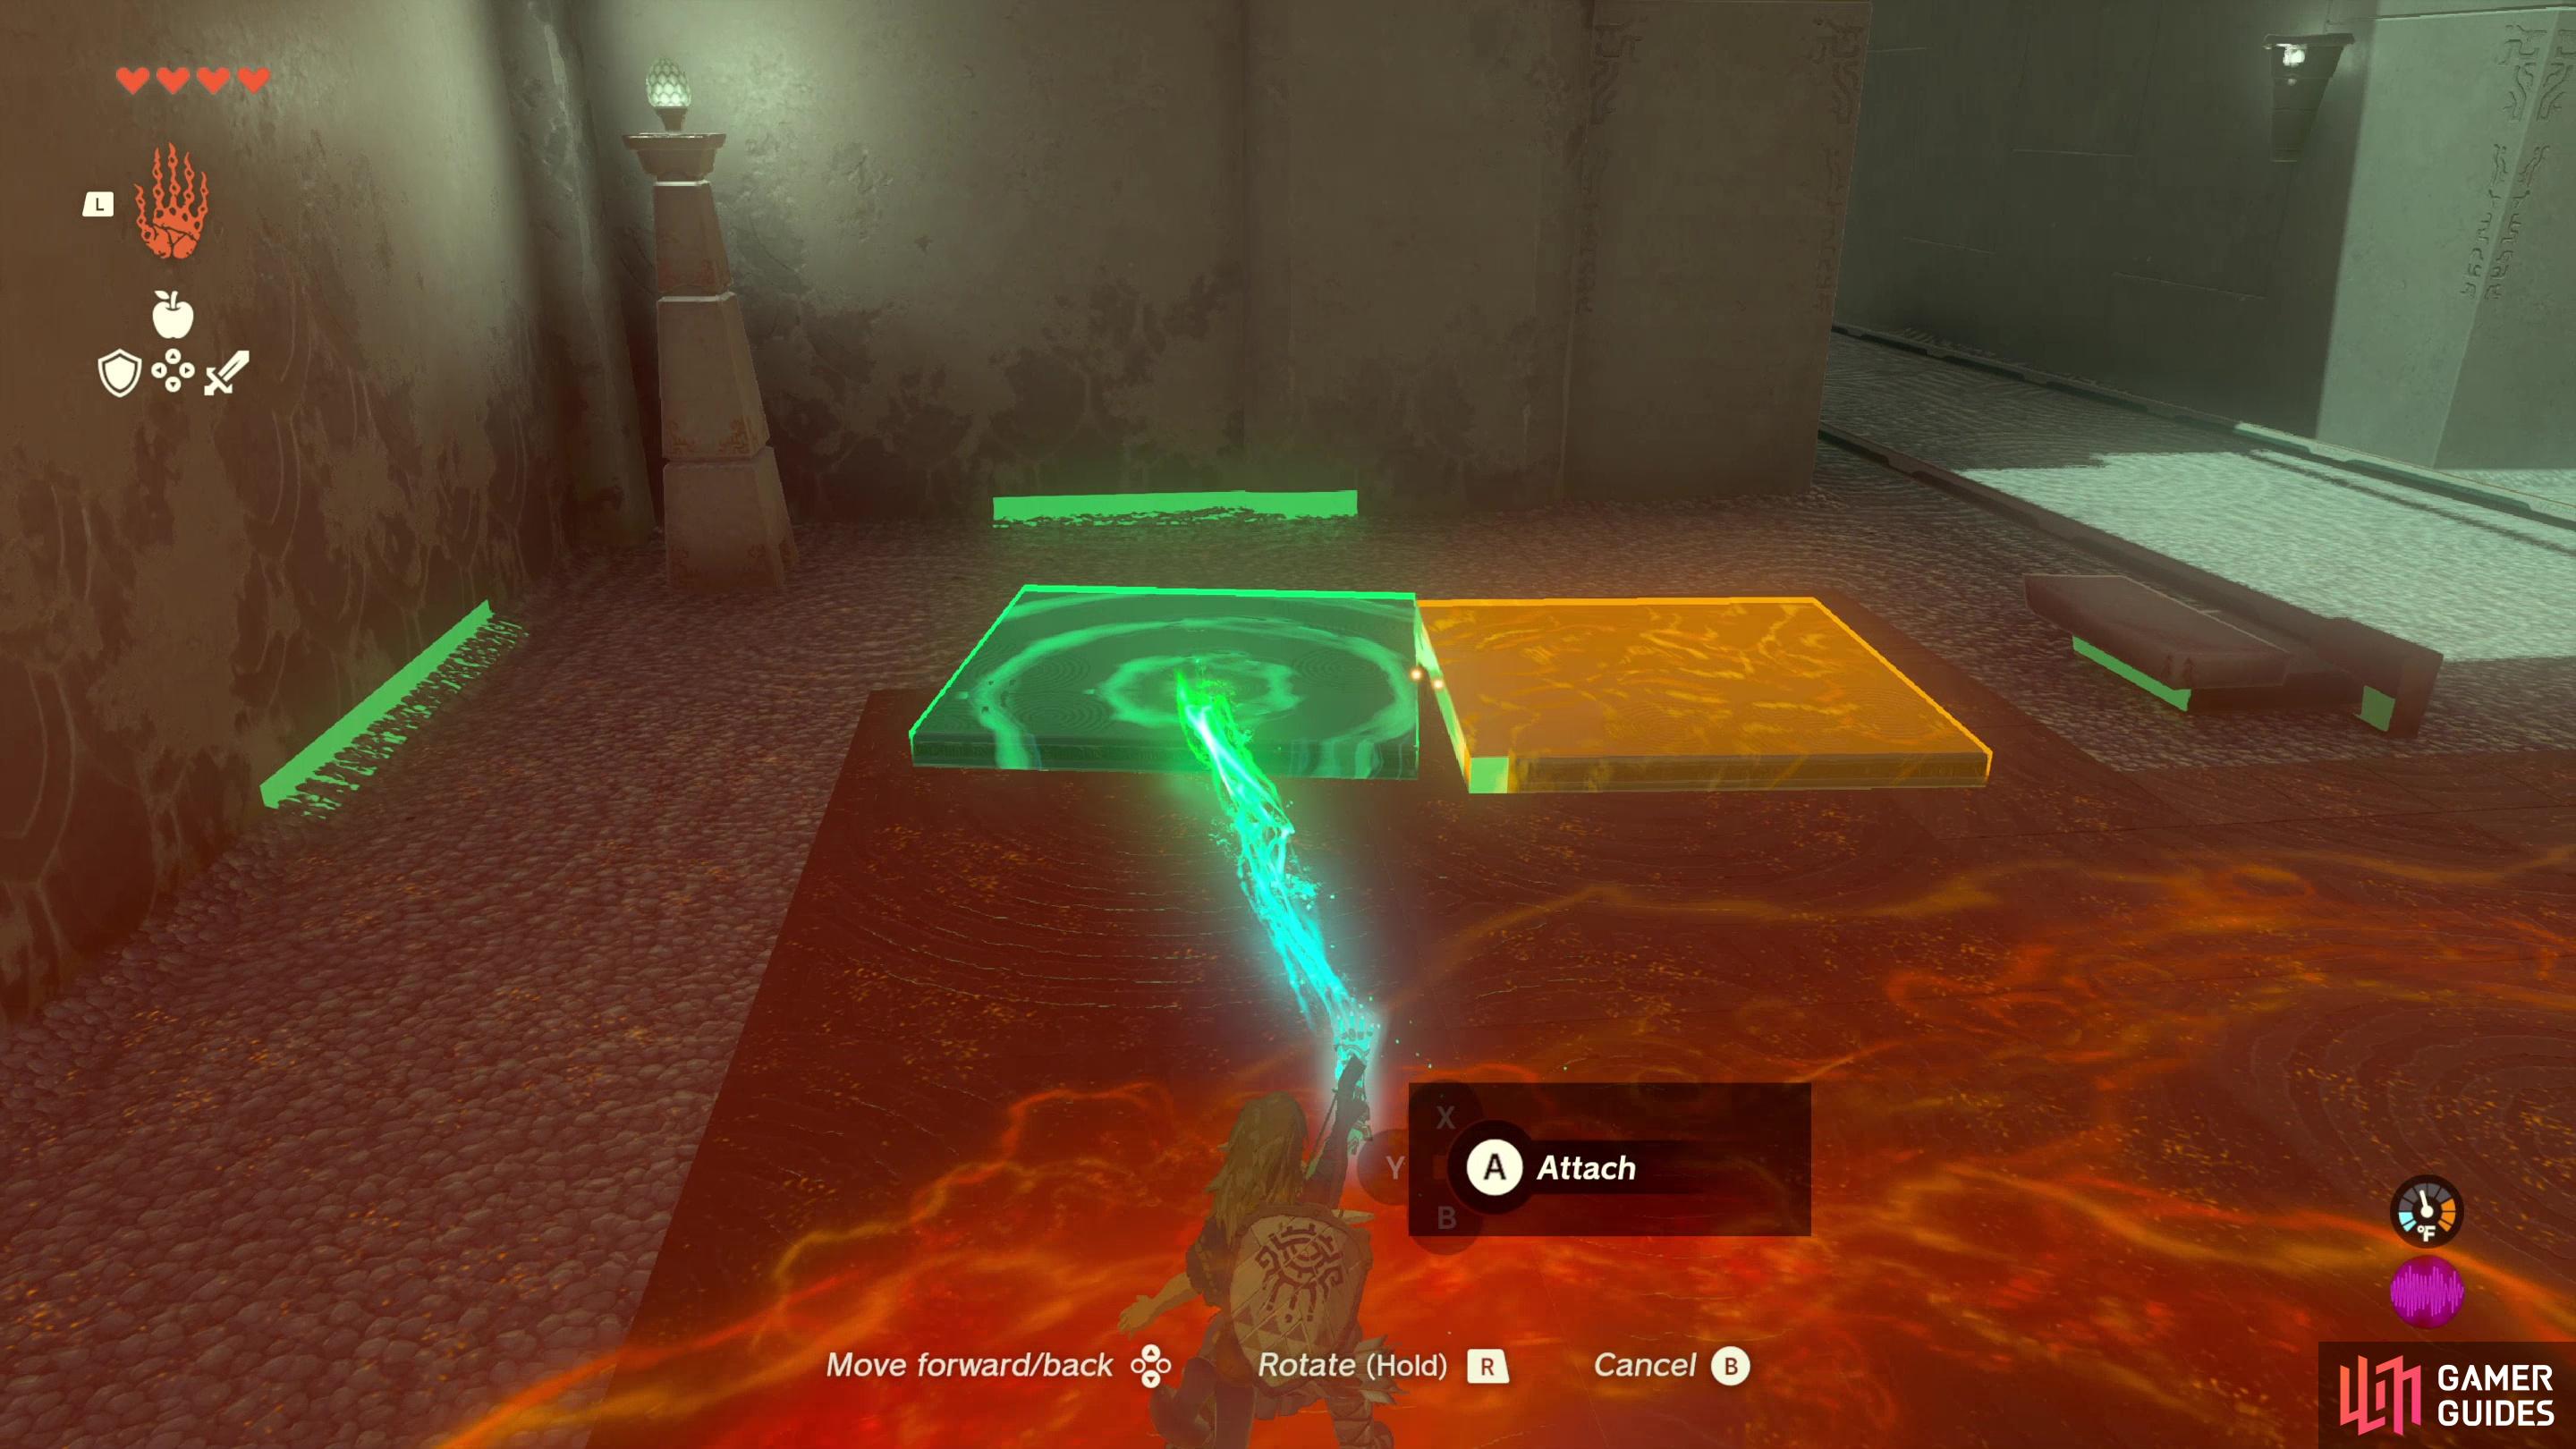
This one is simple, almost more of a refresher for Ultrahand and rails in general than a legitimate puzzle. Ahead of you are two rails crossing a gap, and to the left of these rails are two square platforms. ![]() Fuse them together with Ultrahand to create a rectangular platform, place it on the rails, and jump on before gravity steals your tools from you. This makeshift rail vehicle should glide you to the next puzzle with little fuss.
Fuse them together with Ultrahand to create a rectangular platform, place it on the rails, and jump on before gravity steals your tools from you. This makeshift rail vehicle should glide you to the next puzzle with little fuss.
To get a chest, create a ramp on a short rail,
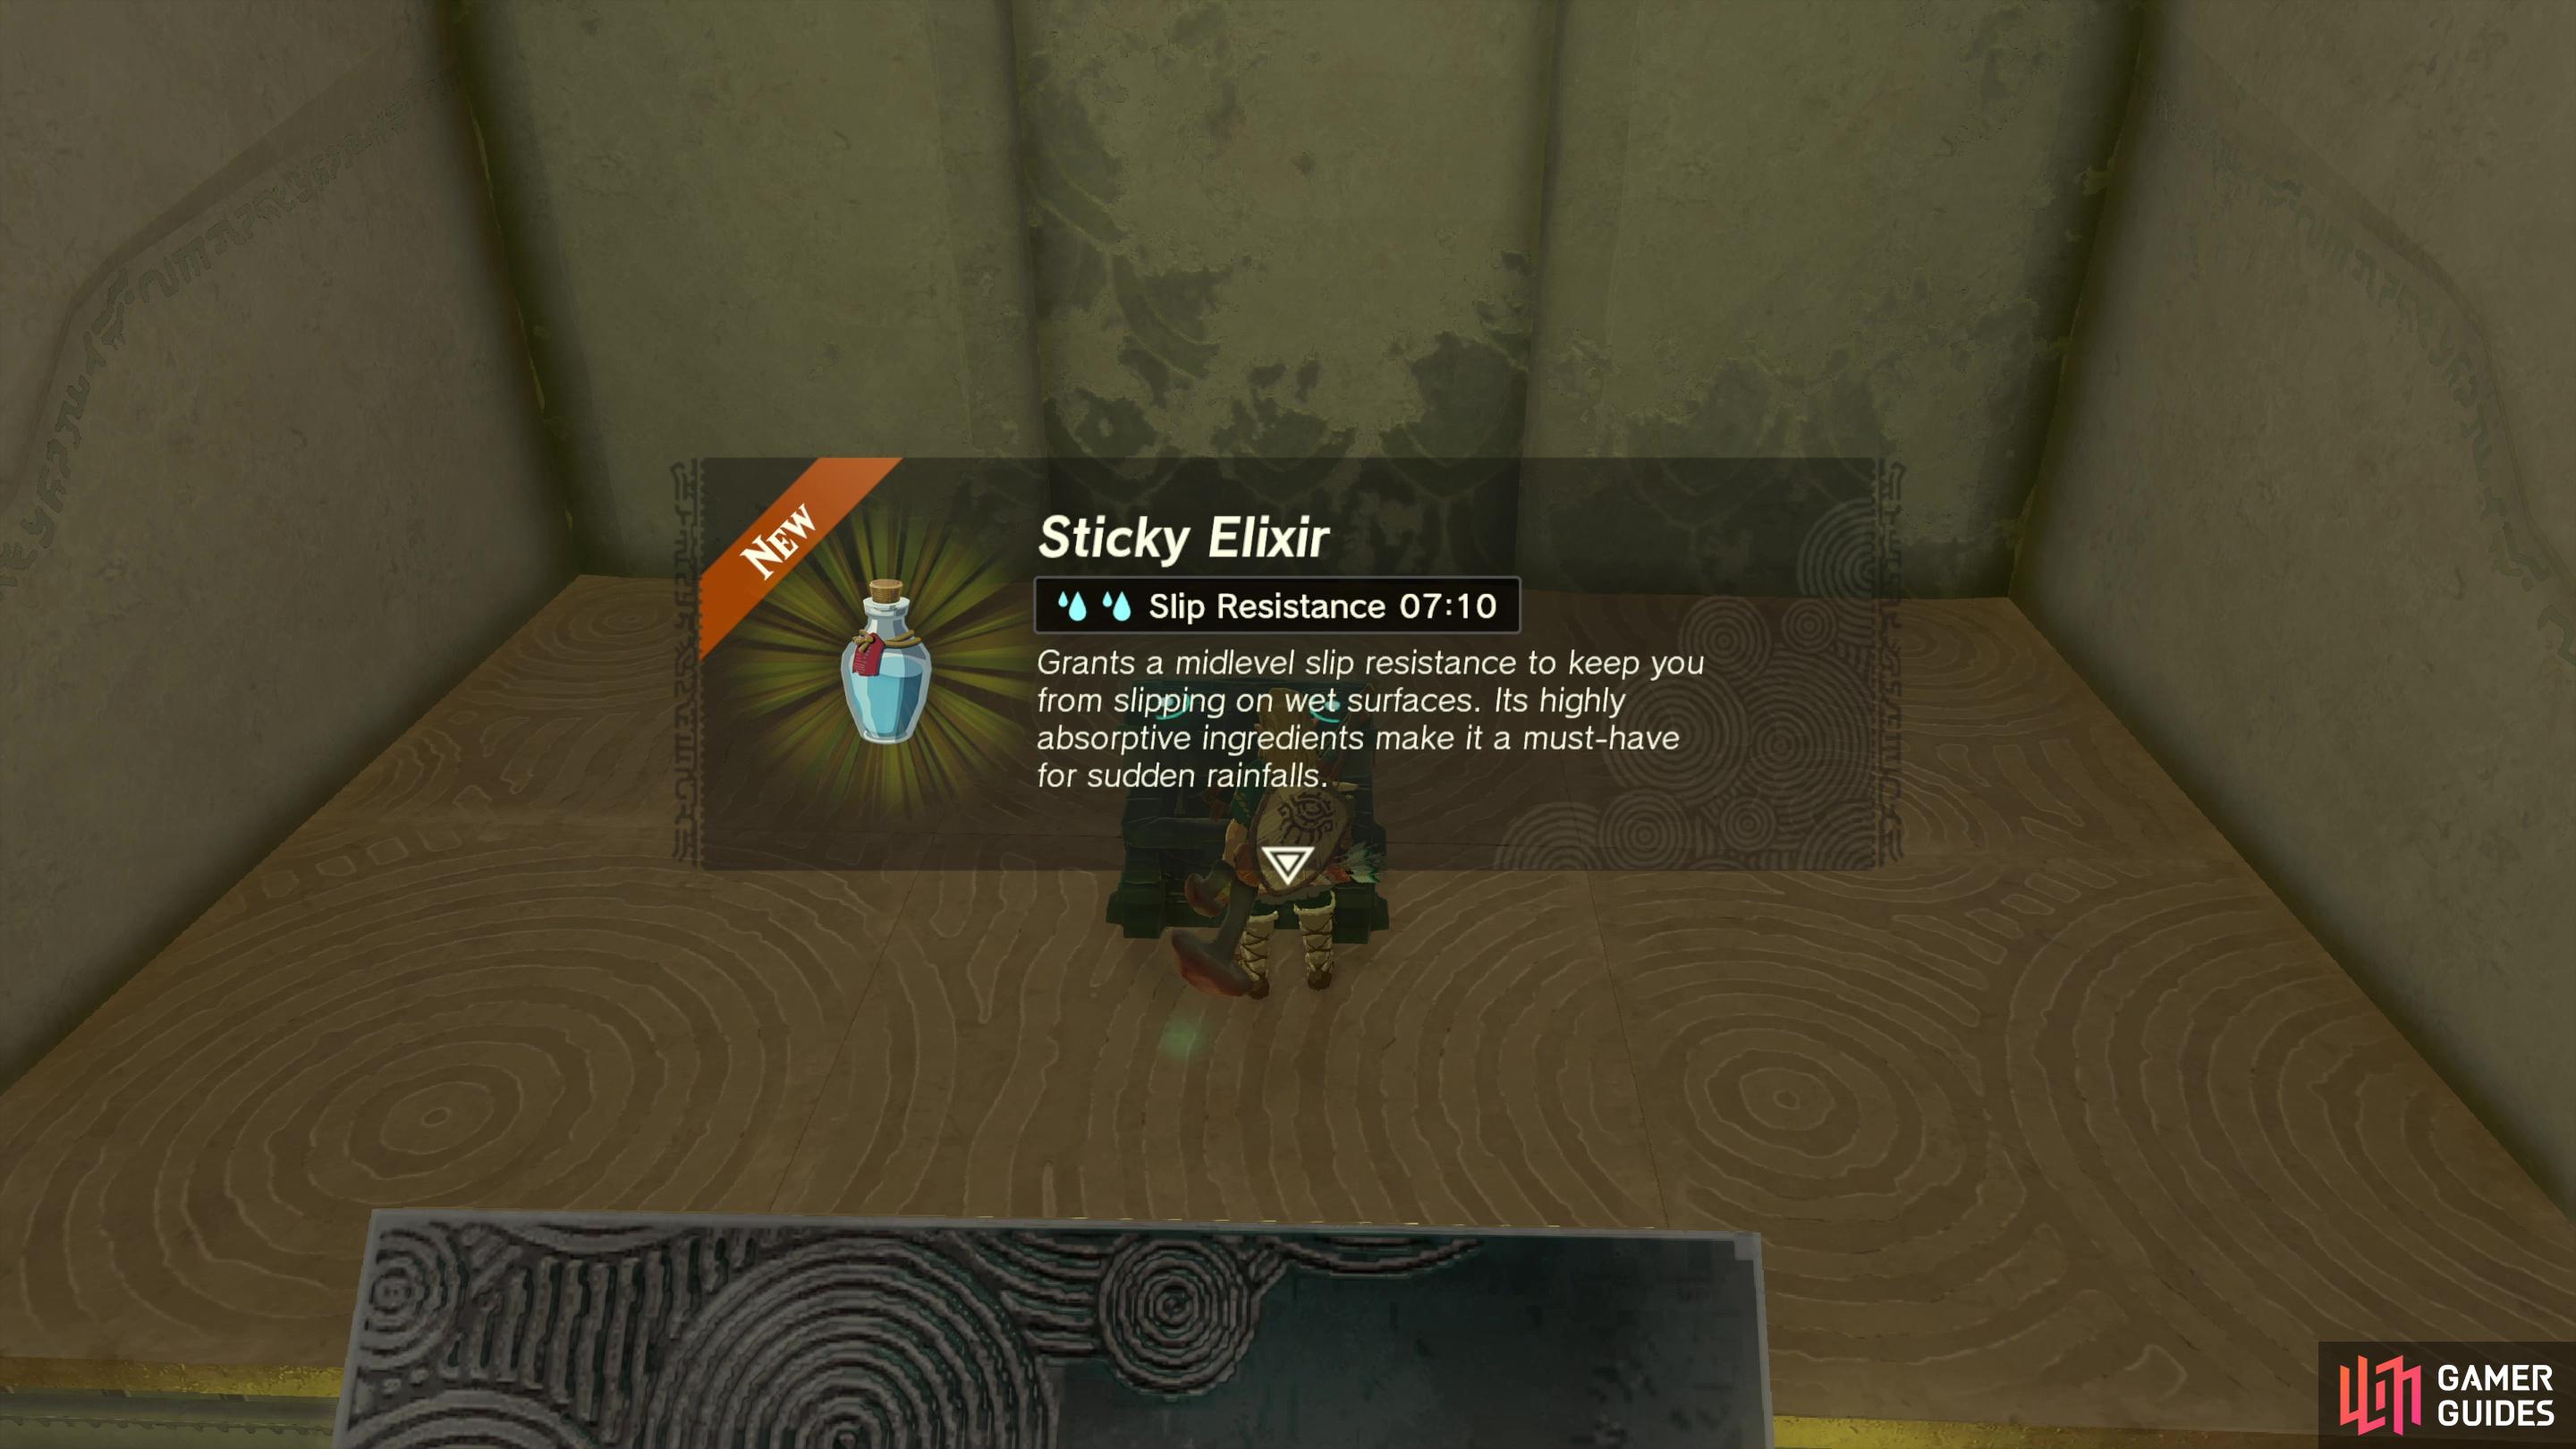
then run up and snag a Sticky Elixir.
How to Solve the Second Rail Puzzle in Jiukoum Shrine
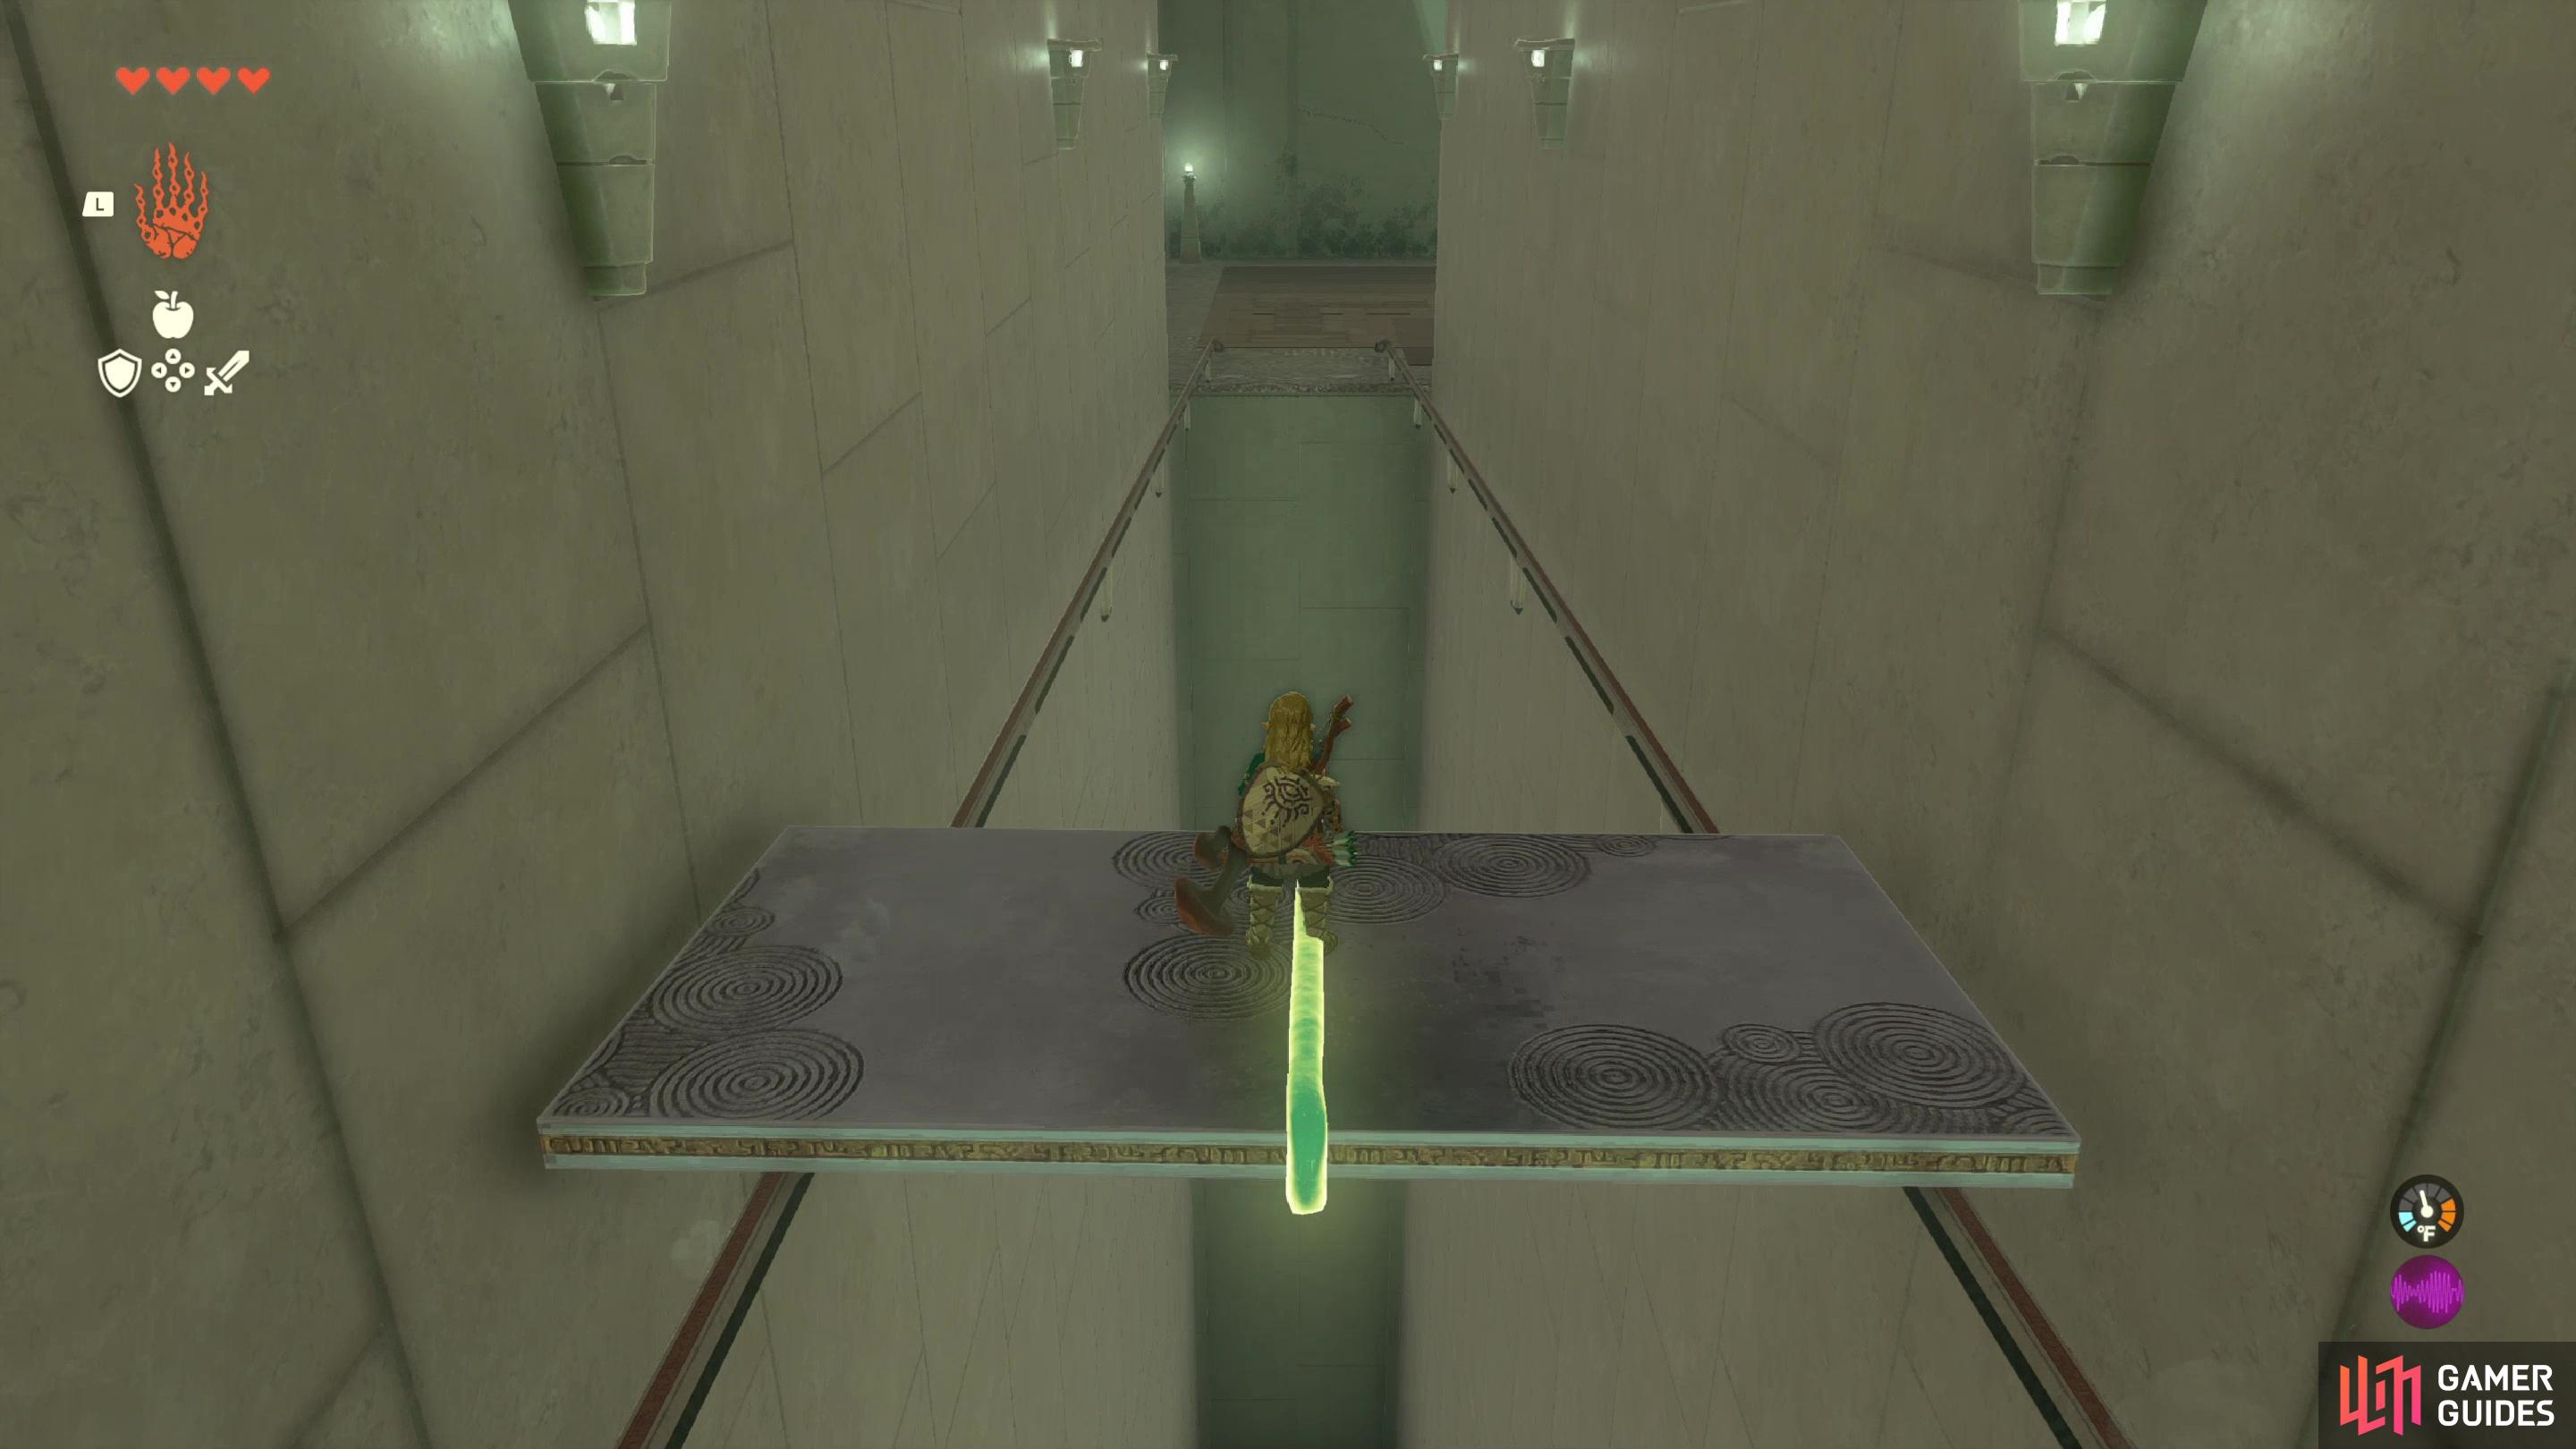
This is where things get tricky. When you land, turn right and you’ll see some rails, where a rectangular platform will show you the complication presented by this puzzle - it’ll roll down the rails, hit a turn, and promptly fall off into the void. Not ideal.
Before you bother with this new puzzle, look left (opposite the rail) and you’ll find another short rail leading to an elevated ledge upon which sits a smug chest. No harm in a little self-enrichment before finishing the puzzle, right? Near this short rail are three square platforms. Fuse two of them into a rectangle and place them lengthwise on the short rail leading up to the chest-ledge, then take the unfused square, walk onto the fused rectangle, rotate the square platform so it’s at a 45-degree angle, and fuse it to the rectangular platform to create a ramp up to the chest. Done properly, you should be able to just run up the ramp and loot the chest to obtain a ![]() Sticky Elixir. We won’t be using it in this shrine.
Sticky Elixir. We won’t be using it in this shrine.
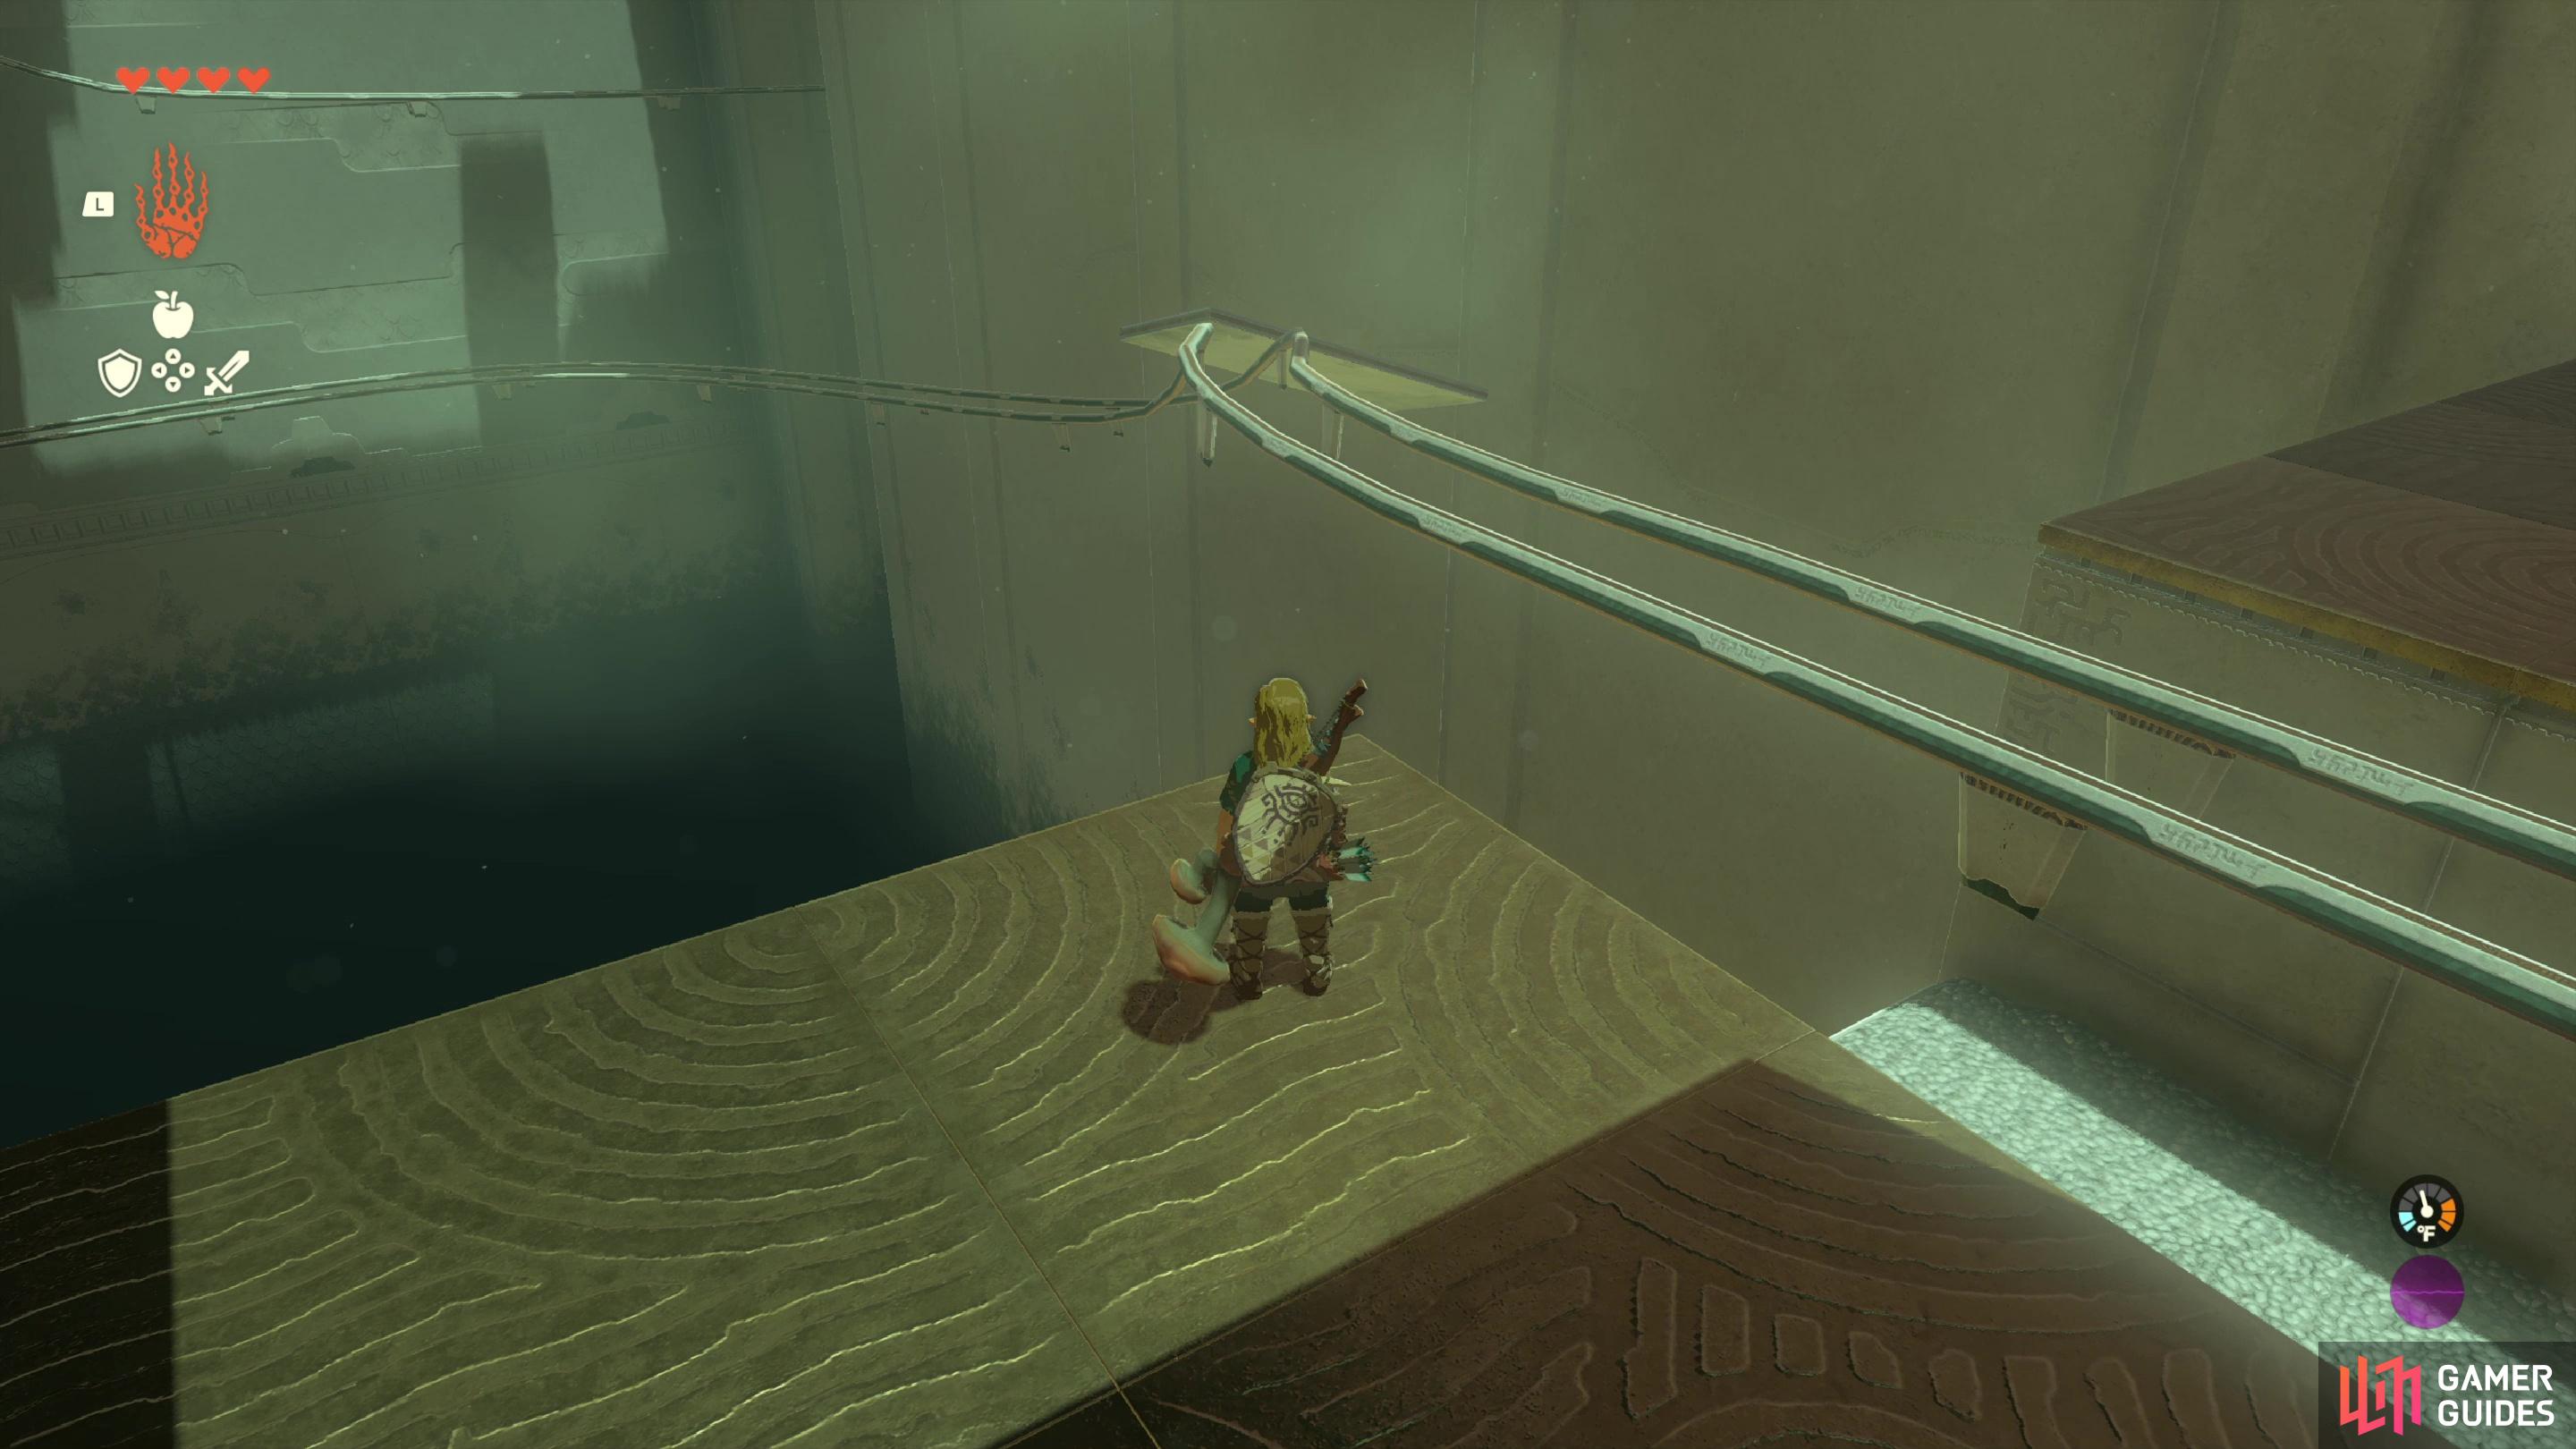
(1 of 3) Riding railtop doesn’t work on the second puzzle, as evidenced by a rectangular platform falling into the abyss eternally.
Now, return to the puzzle at hand. Glide back, knock the fused squares into a pit to get them to respawn, or drag them out and shake them loose. Once done, grab the rectangle that keeps spawning on the rails - it’s doing no good in its Sisyphian cycle of failure.
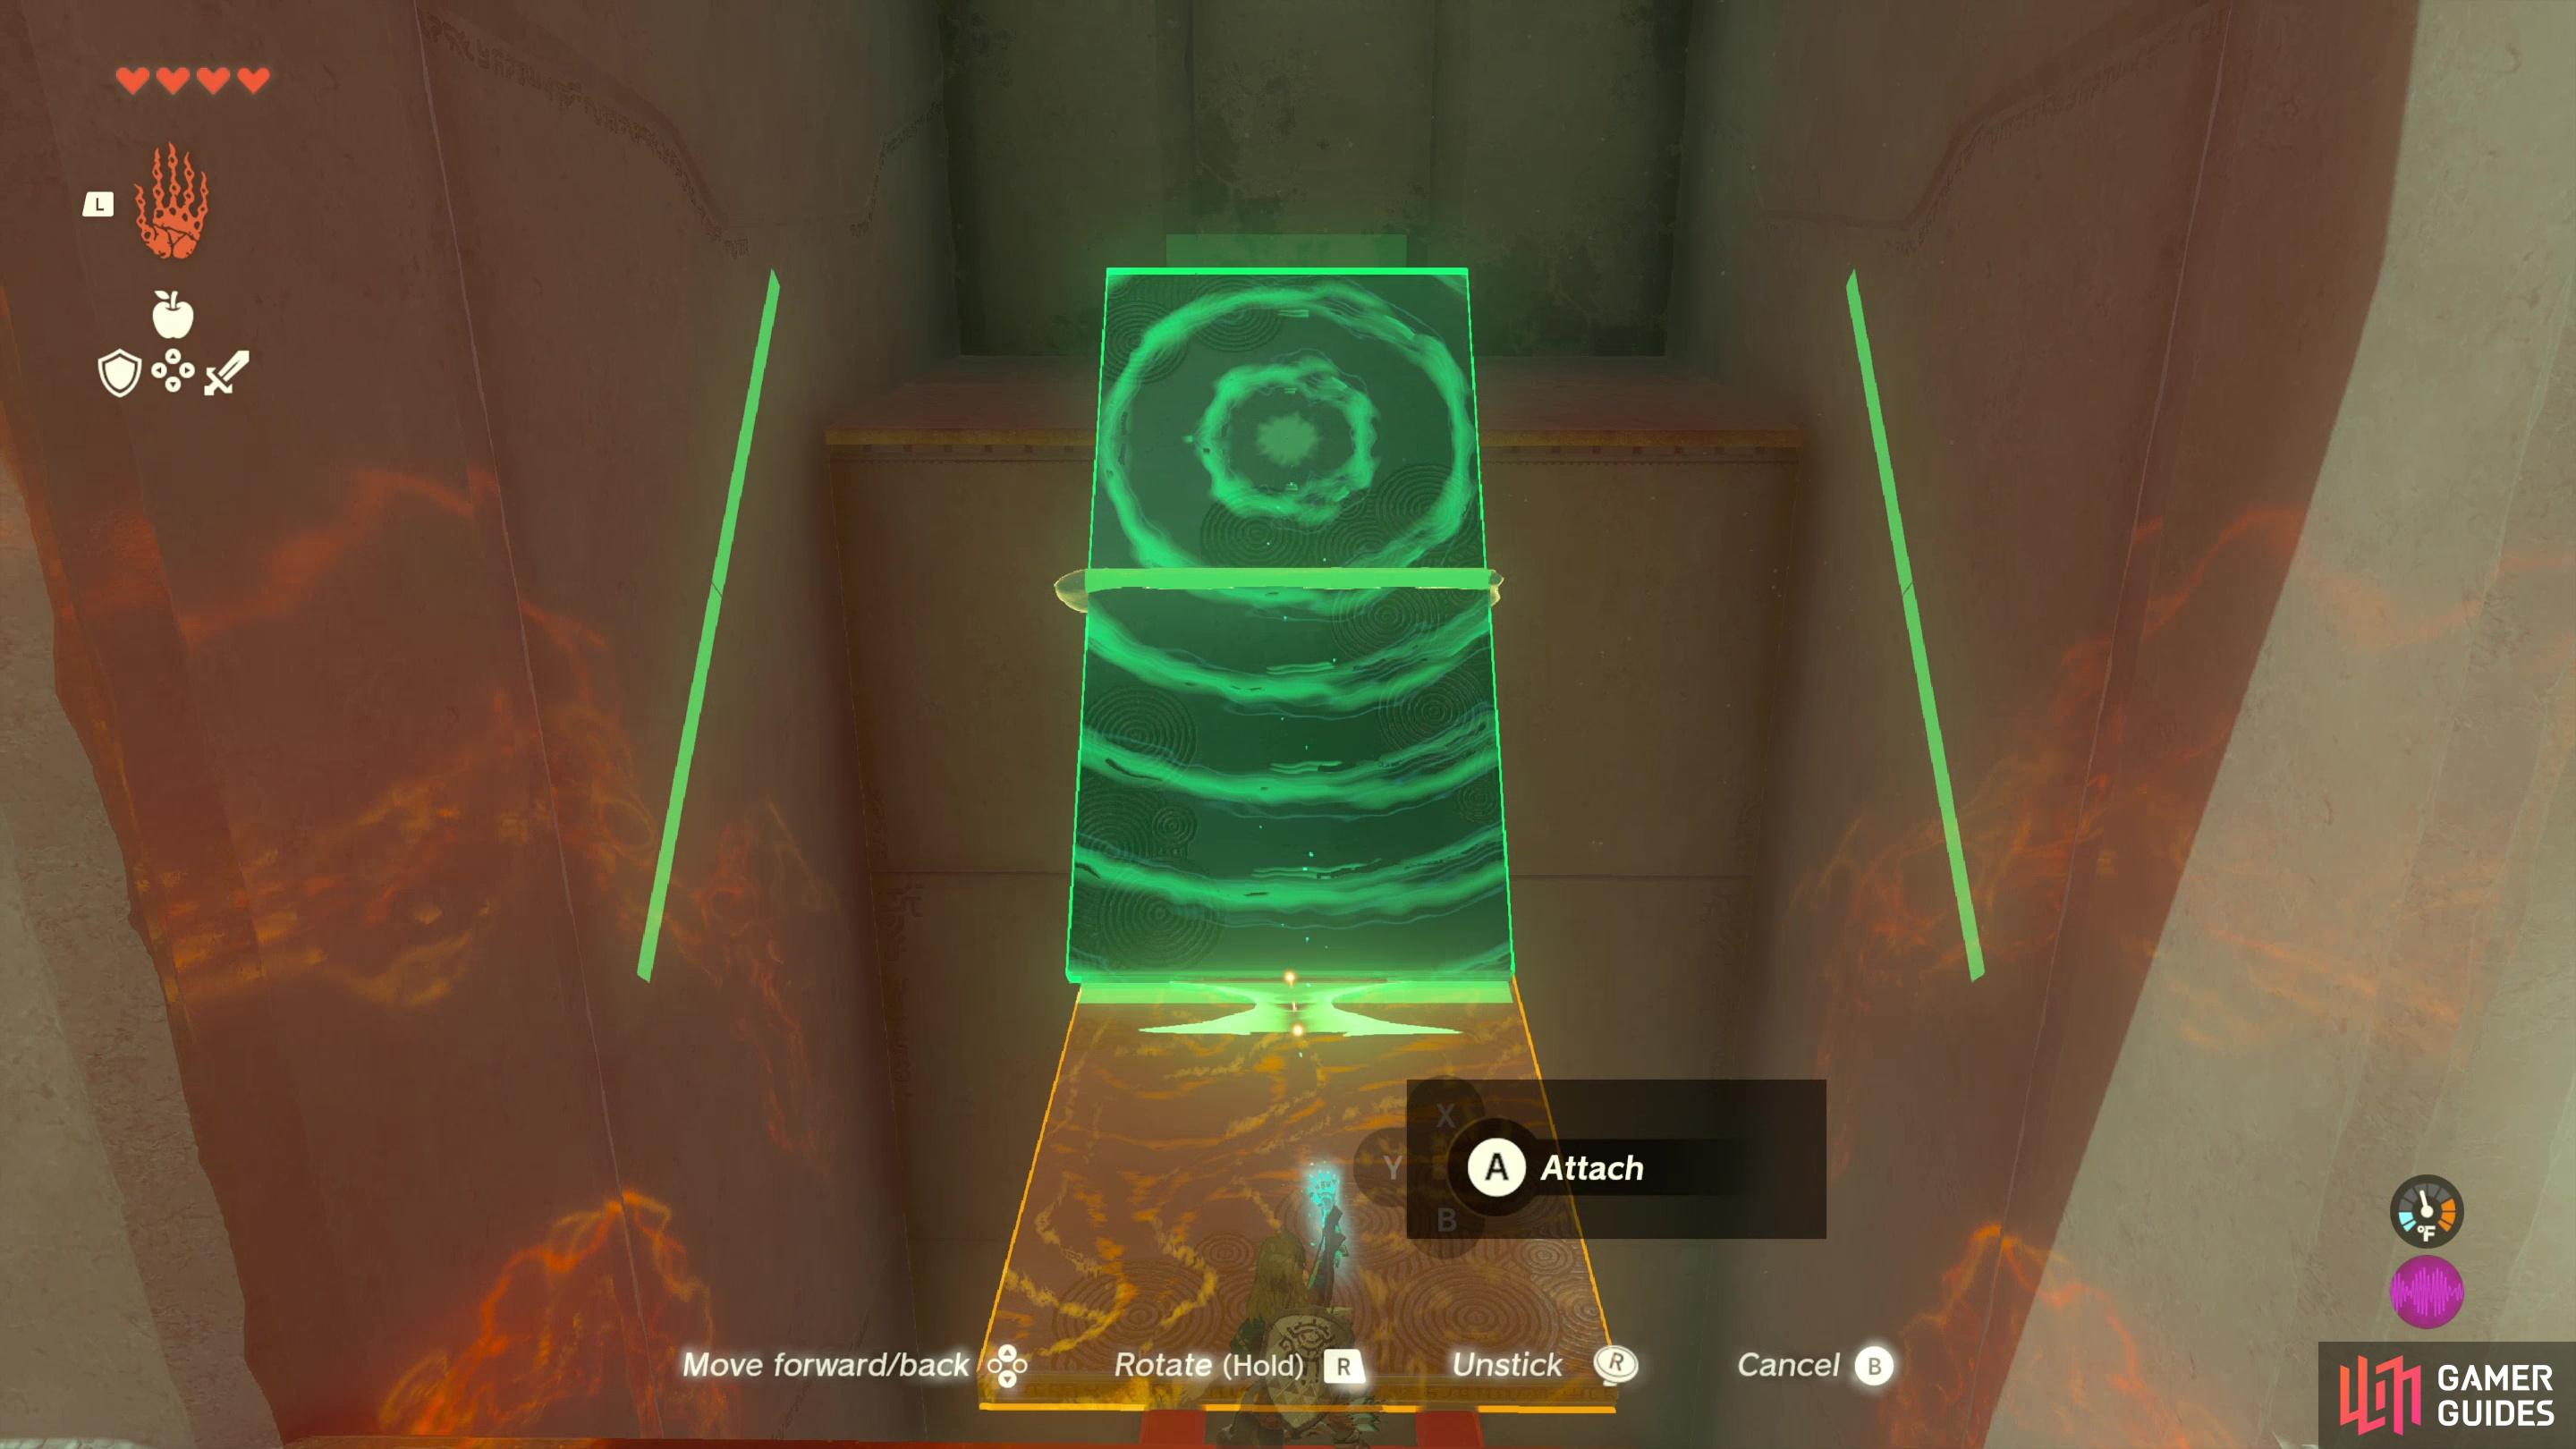
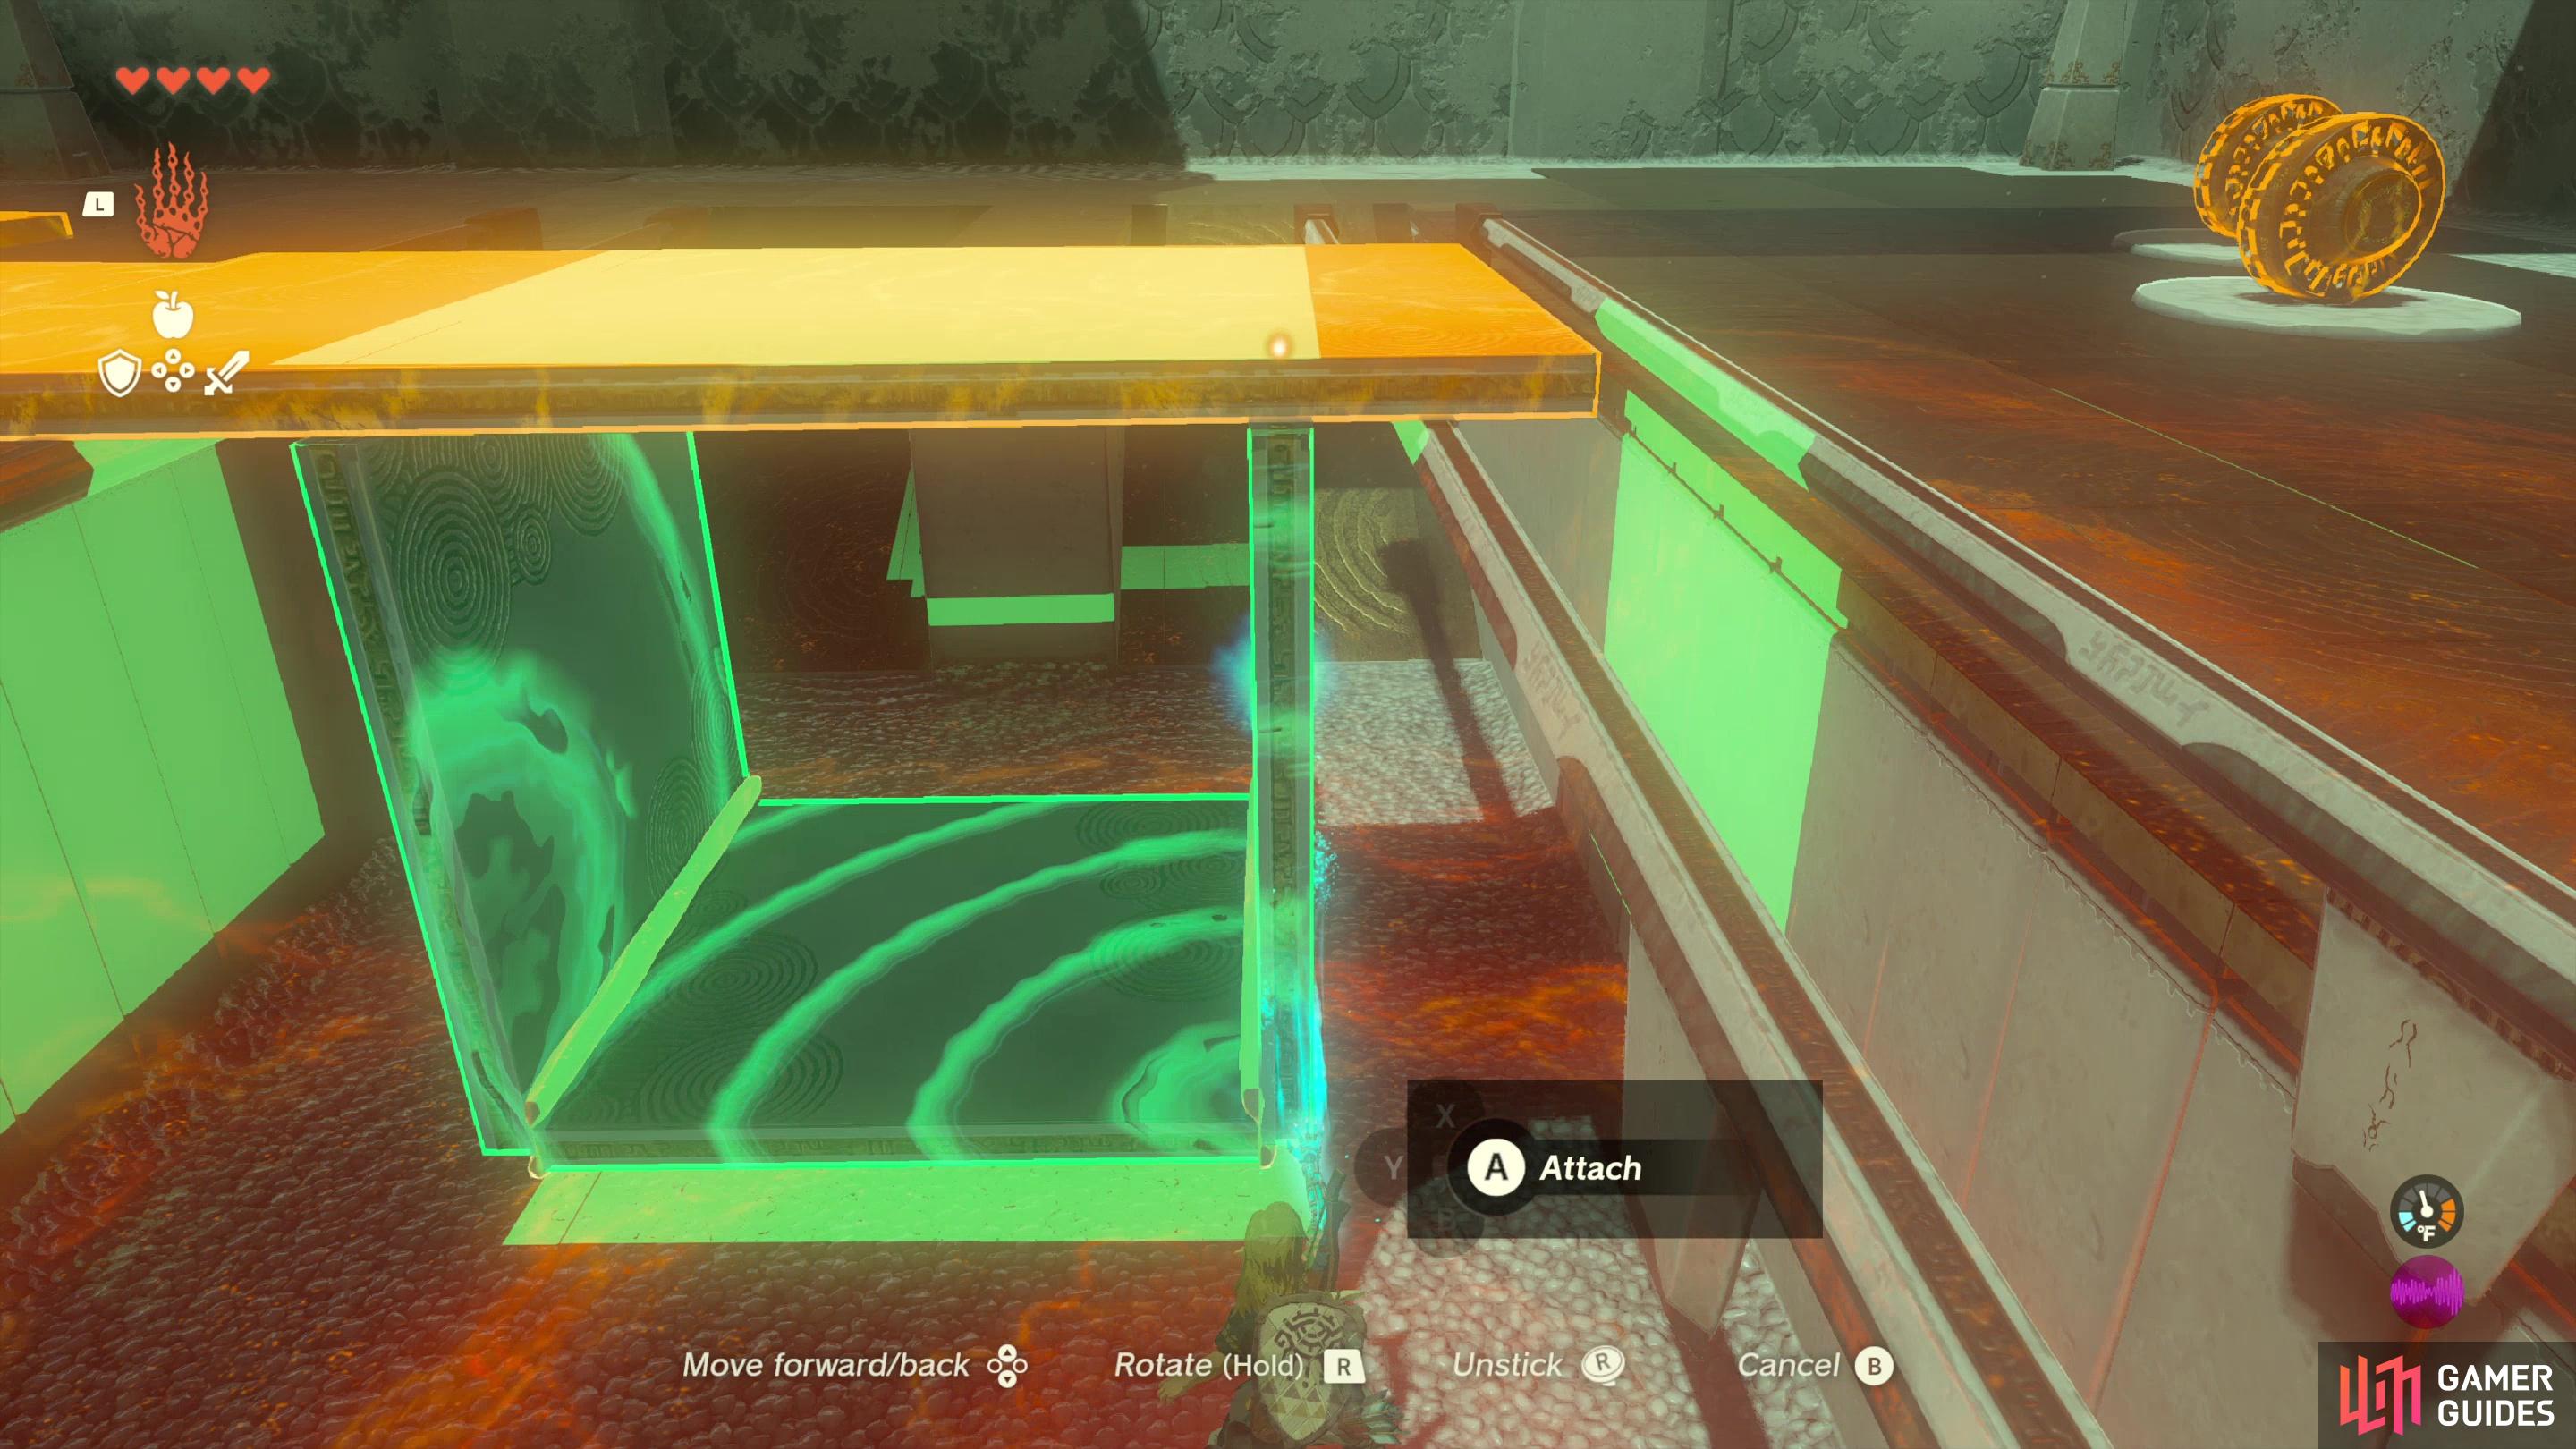
As usual, there are probably many ways to solve these puzzles, but the solution we found - which largely works for the next two puzzles - is to create a box, more or less. There are two problems we need to solve; first, keeping our vehicle on the rails, and second, keeping Link on the vehicle. Making a box solves both those problems handily, as if our vehicle encloses the rails it cannot fall off, and if Link is surrounded on all four sides, he can’t either.
Place the rectangle on the ground, then take two squares and fuse them perpendicular to the rectangle, far enough apart to enclose the rails, close enough together so the third square can be put between them to serve as a floor. It doesn’t have to be pretty or perfect or lined up or anything fancy like that, as long as you end up with a fully enclosed box you should be fine. Once done, pick up your contraption and thread it onto the rails, rotating it so the rectangular edge (which will be longer than the box formed by the three squares) is on top. Be very careful before you dismiss Ultrahand and set the vehicle on the rails, as it will start to move. Slowly, perhaps, but you have to jump onto the floor of the box hanging under the rectangle before it gets too far away, and you cannot climb onto the puzzle pieces. Keep this in mind and plan to mount the vehicle before you let it loose, lest you end up having to rebuild it.
As unwieldy as it seems, your long-topped box should slide down the rails, and make its ways to the third puzzle. If it rolls over in transit… well, your build wasn’t perfect, but it should stay on the rails and Link should stay in the box, even if you may have to glide to safety when you reach the end of the rails. This isn’t a beauty contest, as long as you make it to where you need to go, right?
How to Solve the Third Rail Puzzle in Jiukoum Shrine
(1 of 4) For the third puzzle, rebuild the vehicle from the second - centering is a bit more important this time to avoid snags.
Remember when we said you needed to solve two problems to complete these puzzles? Well, the third puzzle introduces a third problem - the rails you start out on end and, after a gap, a single rail continues on. You need a vehicle that can make the transition from two trails to one, cross the gap, and survive some ensuing turns to reach the end of the rail. Oh, and this time, the rails start out going uphill, so that’s four problems.
Fortunately, our long-topped box vehicle that got past the second puzzle will work for this one, too! Head upstairs and you’ll find your tools for this puzzle: a long rectangular platform, three square platforms, and three Zonai fans. Follow these steps:
-
Place the rectangular platform on the rails so that it’s more or less centered between the two rail lines. It should only be touching the inner of each pair of rails. Centering is important here, as a lopsided vehicle may not make the transition from two rail lines to one.
-
Build a box under the rectangular platform, just like you did during the second puzzle. You can’t thread the completed vehicle onto the rails this time, but this just means you’ll have to fuss more moving and rotating pieces, the end goal is more or less the same. Centering is more important this time. Doesn’t have to be perfect… but the tolerances for this one can be annoying.
-
Once your vehicle is created, attach all three Zonai fans together in a line, then move all three and stick them on top of the long rectangular top of your box. Centered as much as possible. Every time we tried putting them in the box with us, we got stuck on the rails, so top it is.
-
Center your vehicle on the rails and fuss over details. When you’re happy, get in front of the vehicle beneath the rails and shoot the fans with an arrow to turn them on. They don’t consume energy here, so you don’t need to worry about that. Now you just need to jump inside the vehicle box as it moves towards you and hope for the best.
There are lots of ways this can go wrong, but when the design works, it can do so surprisingly well. If your vehicle box is sealed, it shouldn’t be possible for it to derail. If it’s somewhat centered and the fans are on top, it shouldn’t get stuck. It may roll, but the box should keep Link from falling into the void. Hopefully you’ll slam into the wall near the end of the shrine a few seconds after taking off - use ![]() Ascend to jump through the roof of your masterpiece and walk forward to find the glowing green disc marking the end of the shrine. Interact with it to score a very well-earned Light of Blessing.
Ascend to jump through the roof of your masterpiece and walk forward to find the glowing green disc marking the end of the shrine. Interact with it to score a very well-earned Light of Blessing.
No Comments