
This quest begins immediately after The Rescue. Having awoken from a troubling dream and spoken to Valka. Eivor now finds himself embodying Havi (Odin) once more, who has been rescued by two dwarves: Sigrun and Halstein.
Follow Sigrun and Halstein
After the initial cutscene, you’ll need to follow Sigrun and Halstein through the dwarven halls. You’ll eventually encounter a single Muspel who is looking for treasure intended for Havi. You’ll need to take this enemy out to trigger another cutscene, during which Havi is presented with the treasure: a magical bracer which allows Havi to draw out the essence of fallen foes, thereby stealing some aspect of their powers. You can try this ability out immediately after the scene, by drawing the power from the nearby fallen Muspel. A brief tutorial will then follow, allowing you to slot this specific power to a button of your choice.
Power of Muspelheim
The above Power of Muspelheim is the first of numerous others that you will find throughout Svartalfheim. You’ll soon have the opportunity to put this power to good use, as Sigrun and Halstein are unable to proceed through a locked door. You’ll need to activate the power so that you can walk over the lava pool, then go around the back of the door to open it from behind. However, be sure to defeat the Muspel scouts to refill the power bar if necessary. It will need to be full before you can activate the power and walk over the lava.
Shrines of Yggdrasil and Hugr Blooms
As you make your way through the crack in the wall to the right of the locked door, you’ll find an Yggdrasil Shrine and some Hugr Blooms, both of which are capable of replenishing your power bar. However, the shrines will require a sacrifice in the form of a portion of your health.
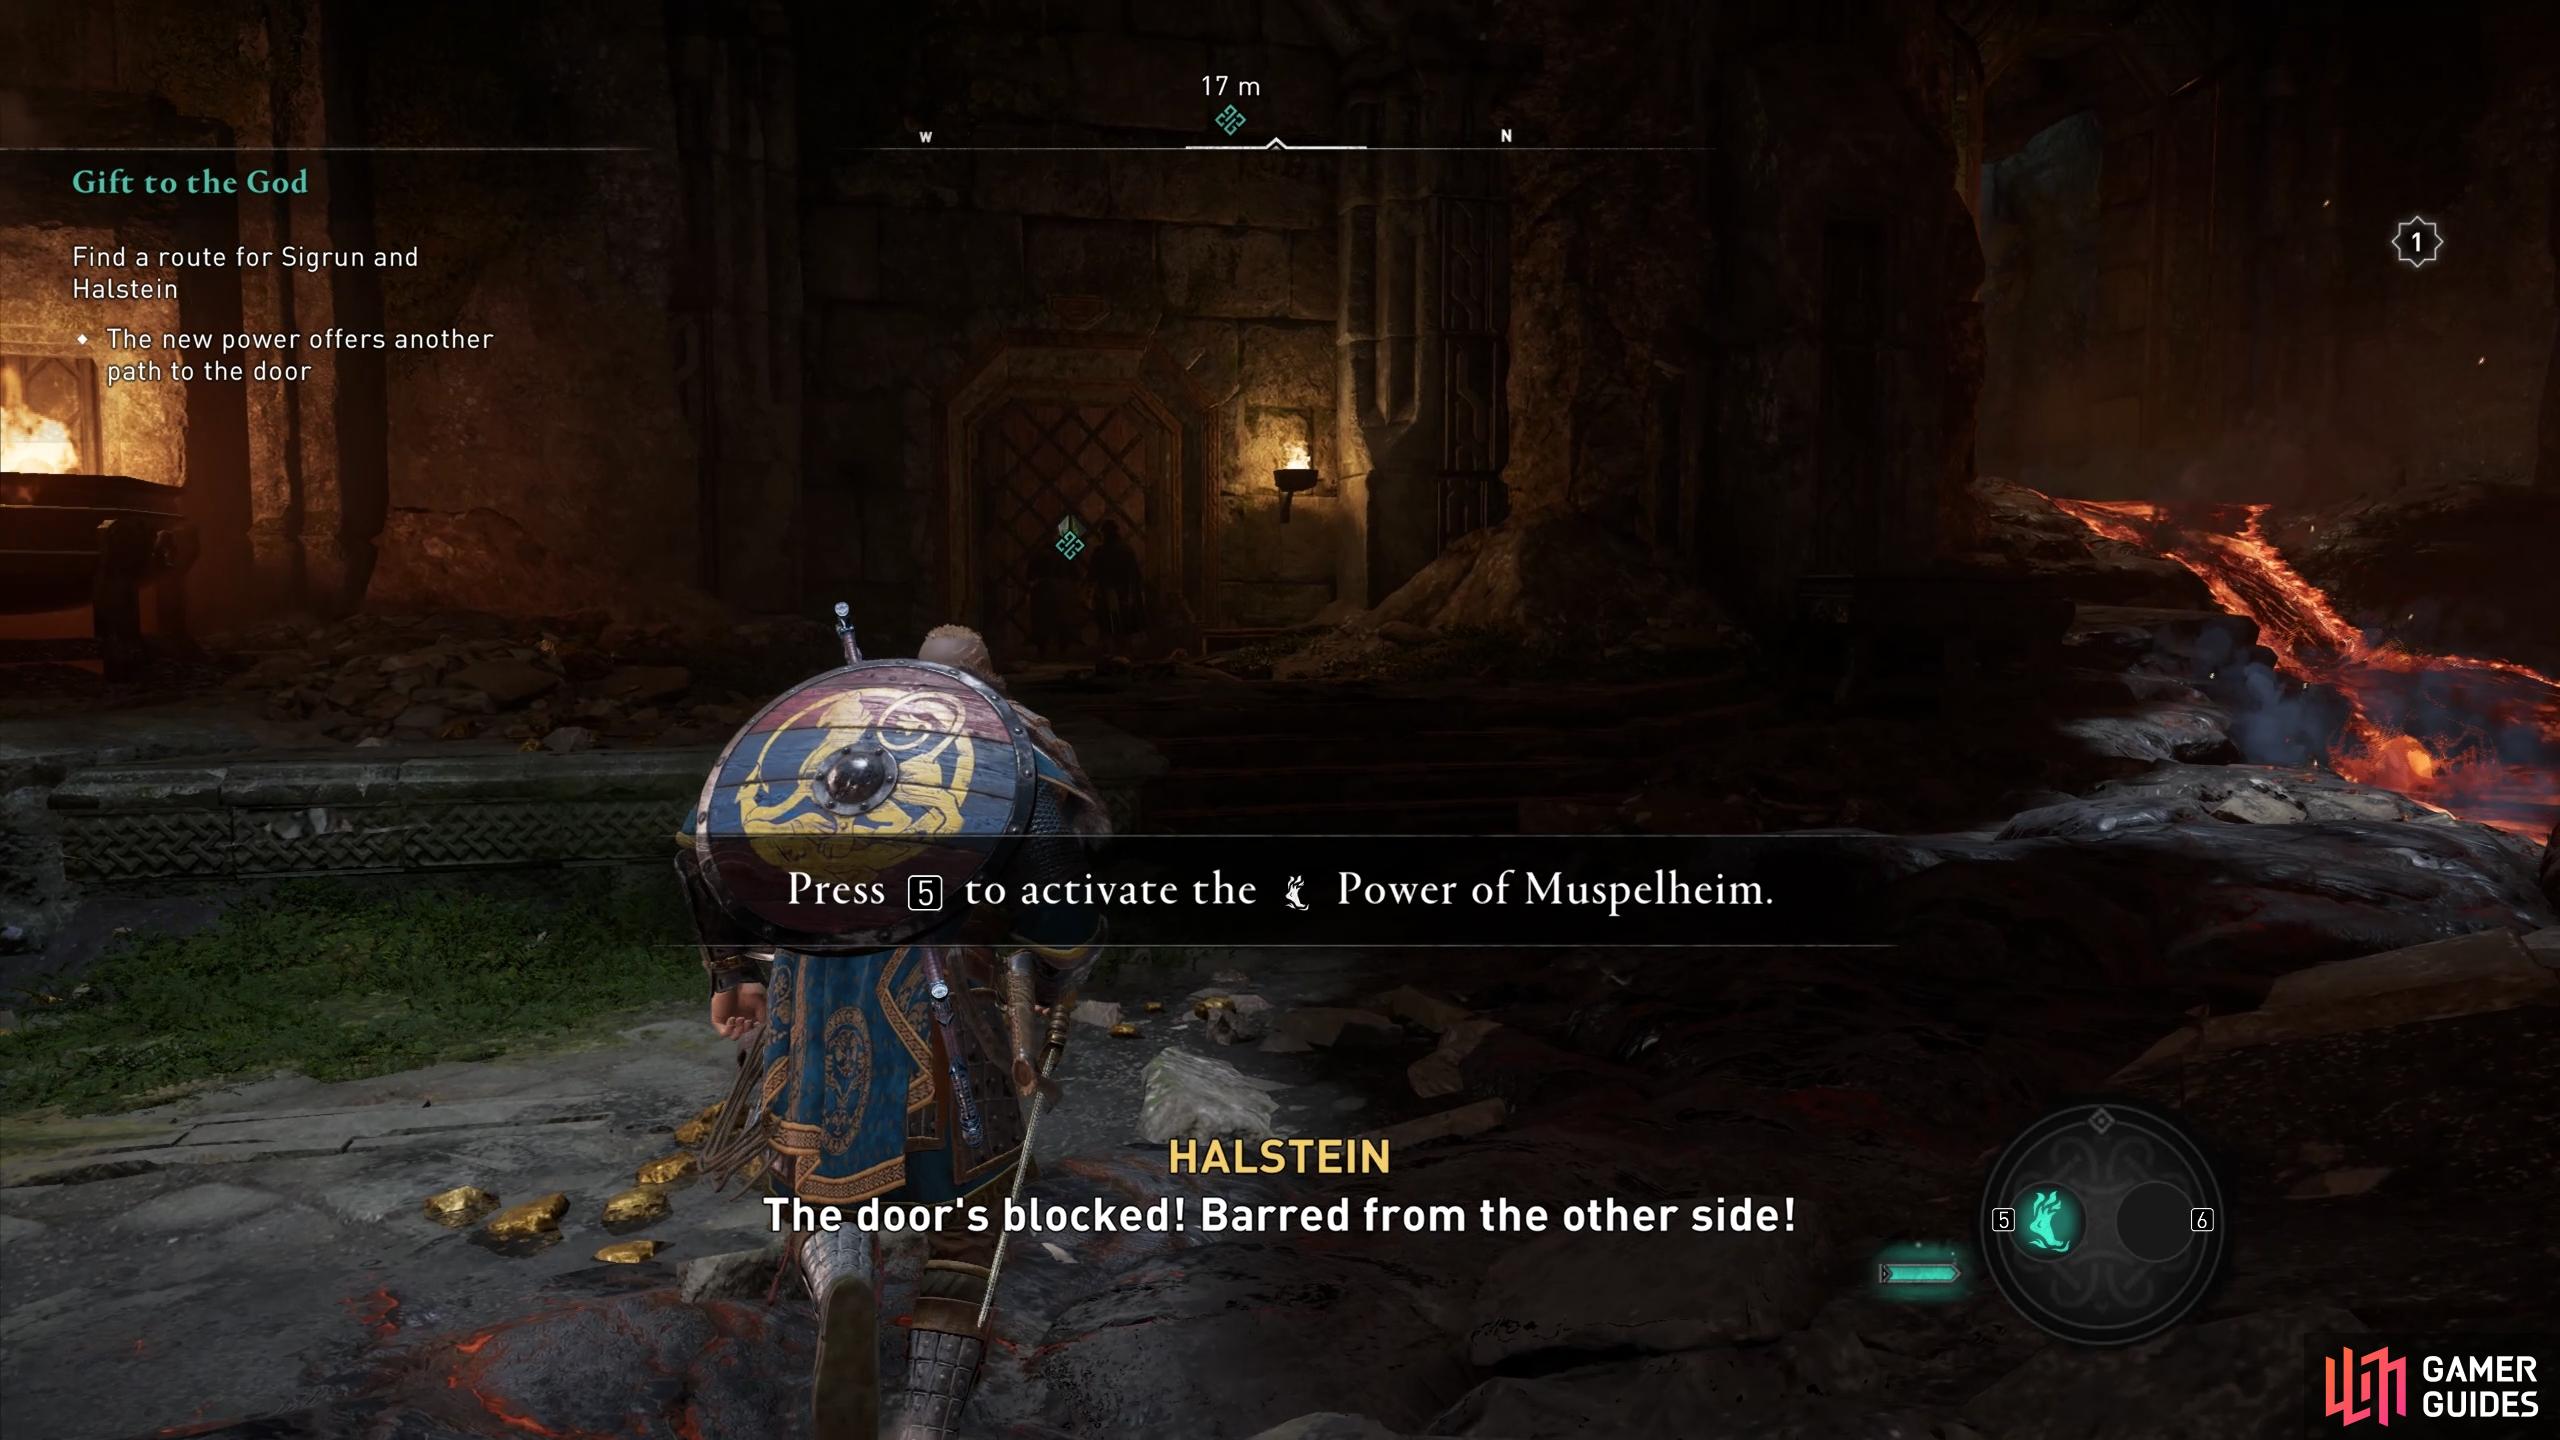
(1 of 4) Use the Power of Muspelheim to walk over the lava pool unharmed and unlock the door from the other side.
As you move along the path from the door that you opened for Sigrun and Halstein, you’ll encounter a gap in the floor. You’ll need to use your Power of Muspelheim here to jump down and move the block of stone closer to the other side, allowing both of the dwarves to jump across. Try to do this as quickly as possible to ensure that the power doesn’t run out while you’re exposed to lava. Once you’re over the gap, you’ll soon encounter more Muspel enemies, who you can assassinate using the power if you wish. The power essentially allows you to approach any Muspel from the front and assassinate them before they can recognise you as an enemy.
Mini Boss Fight: Sinmara
Once you step outside of the cave a cutscene will begin, during which Sinmara, Surtr’s companion, shows up. This leads to another boss fight, but not really a proper one since Sinmara will flee once you take around 25% of her health. Sinmara’s attacks are generally less powerful than Surtr’s, but she’s more agile. She has weak points in the same places where Surtr’s were - her elbows and her foot. Her weapon attacks are fairly swift and more difficult to predict than Surtr’s, but you can still dodge around her with enough efficiency to avoid most of them, or parry / block those which aren’t indicated by a red rune aura.
Sinmara has a similar fire wall attack to Surtr’s, but she essentially casts it from the end of her weapon on the ground, as shown in the gif below.
Other than this special attack, there isn’t really anything that can catch you off guard in this fight. You should avoid the centre of the arena where the lava pool is unless you’re using the Power of Muspelheim. The fight will be over as soon as you deplete Sinmara’s health by 25%, and you can continue following Sigrun and Halstein to a nearby Shelter.
Find the Jordber Shelter with Sigrun and Halstein
After the fight with Sinmara, you’ll be introduced to the Svartalfheim map. This introduces a number of new icons including Shelters, Valkyrie Arenas, Mylna Raid locations, and more (see the below image for a full list). The main focus here is the nearby Shelter, which you’ll need to find by looking for Shelter Signs: objects with dwarven signs on them, painted with yellow paint. You’ll be finding more Shelters like these, and you can use Odin’s Sight to highlight the signs wherever you’re having trouble. Once you’ve identified the Shelter Signs in this area, you’ll eventually find the Jordber Shelter entrance. Here you’ll meet the dwarven chieftain Brudd, who will take you to the blacksmith. You’ll want to visit blacksmiths whenever you find more Silica, since this can be used to upgrade the Hugr-Rip bracer.
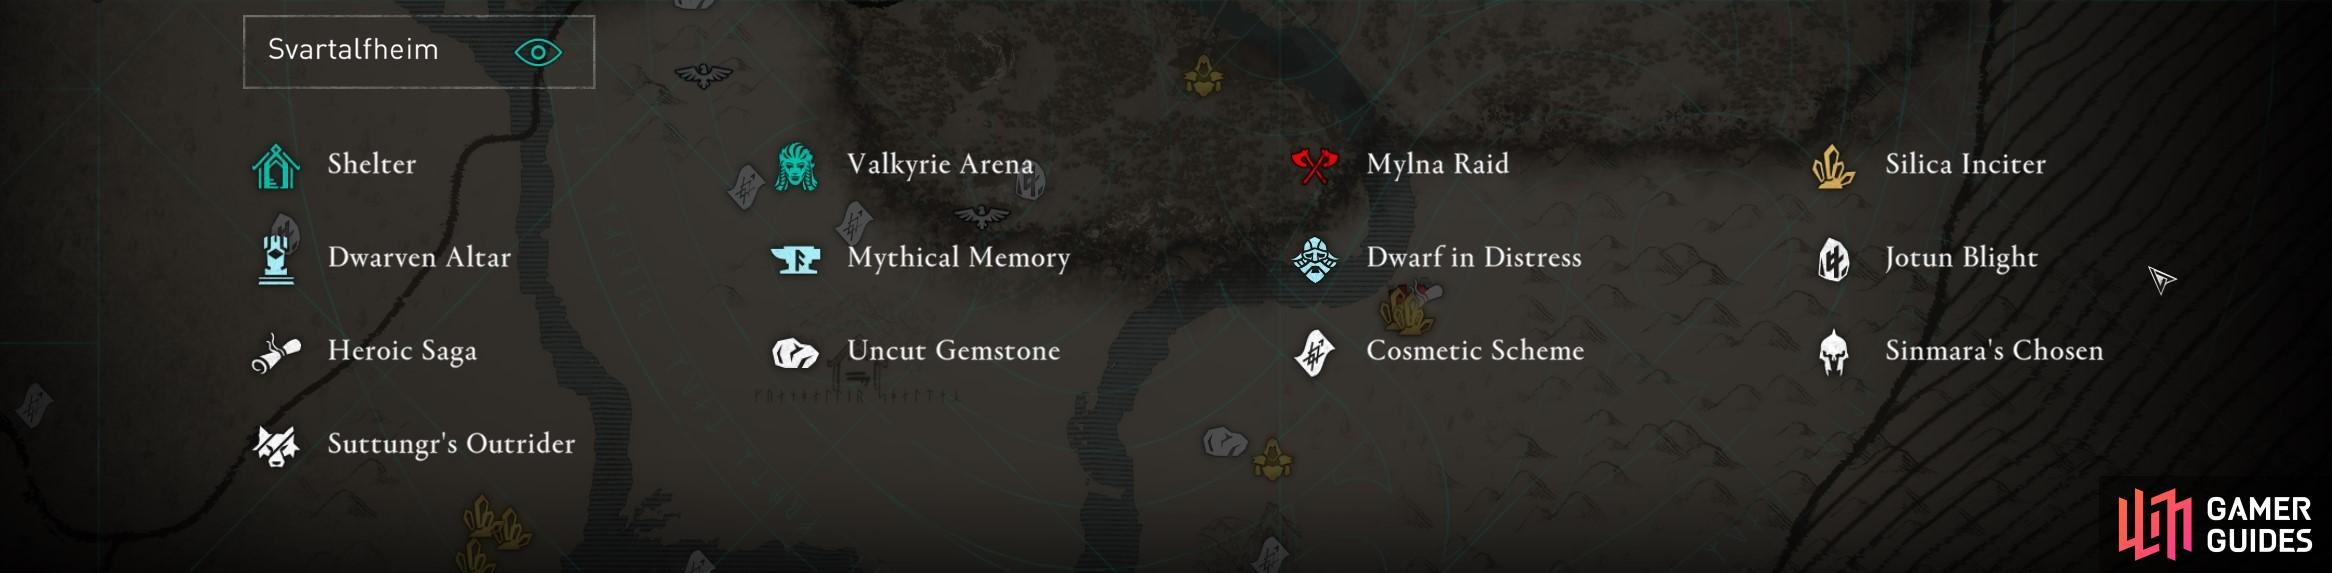
The new list of map legends for the Svartalfheim region.
You can now take your time to explore the Jordber Shelter as much as you want, but when you’re ready you should return to Brudd by the entrance. He’ll walk with you and tell you a bit about the land, and his plight in it, before the quest ends as you reach the edge of a cliff which overlooks much of the region.
No Comments